Archives for July 2011

peanut butter and jelly muffins

pb jelly muffins 5

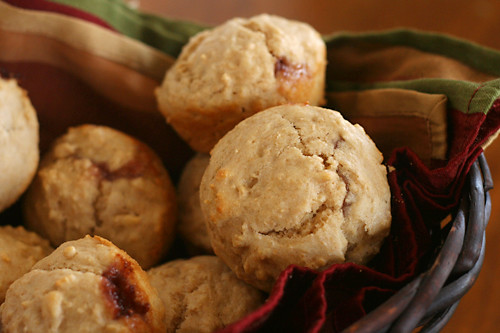
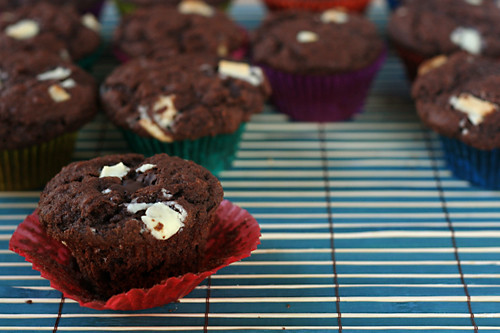
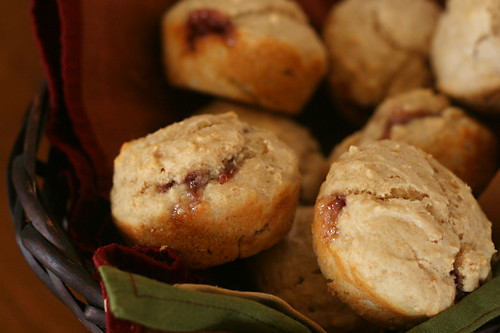
I used to make a recipe similar to this – but without the peanut butter – and I loved it. Something about a dollop of jam baked inside of a muffin tastes so much better than a spoonful of jam spread over it once it’s baked. My old recipe also had a warm overtone of nutmeg I enjoyed.

pb jelly muffins 1

The only thing that wasn’t perfect about it was that it seemed too cakey, too dessert-like. These days, I like a heartier muffin. I also like to squeeze protein in wherever I can, and besides, everyone knows that peanut butter is a perfect partner for jelly.

pb jelly muffins 2

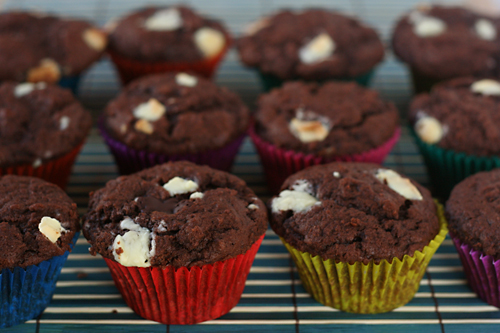
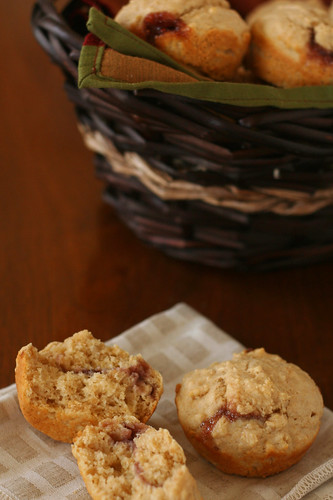
These peanut butter muffins are mixed a little differently than a standard muffin, in that the peanut butter is cut into the dry ingredients before the remaining liquids are added. Maybe this contributed to how light and soft the muffins were once baked, or maybe it was just the fat content of the peanut butter. Either way, with a good proportion of whole wheat flour and a layer of fruity jam in the middle, these are even better than my old favorite.

pb jelly muffins 6

One year ago: Lemon Curd Tart
Two years ago: Puff Pastry Dough
Three years ago: Pain a l’Ancienne

Printer Friendly Recipe
Peanut Butter Jelly Muffins (adapted from Real Simple and Jeanne Lemlin’s Vegetarian Classics)

I used half whole wheat pastry flour.

Update 5/5/2014 : I made these again and think they needed more sugar, so I’ve doubled it from the original ¼ cup.

1 cup whole milk
1 egg, beaten
3 tablespoons unsalted butter, melted
1 teaspoon vanilla
2 cups (9.6 ounces) all-purpose flour
½ cup (3.5 ounces) sugar
2 teaspoons baking powder
½ teaspoon salt
Pinch nutmeg
⅓ cup (3 ounces) peanut butter (crunchy or smooth)
About ¼ cup jam

1. Adjust a rack to the middle position and heat the oven to 375 degrees. Spray the bottoms of a 12-cup muffin pan with nonstick spray or line with paper liners. In a large measuring cup, whisk together the milk, egg, butter, and vanilla.

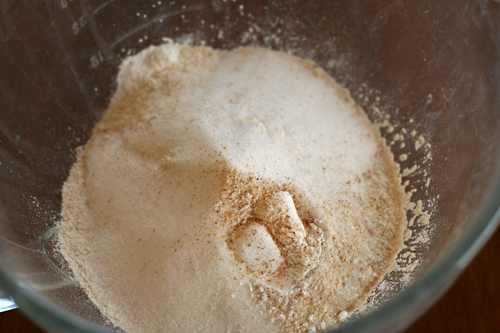
2. In the bowl of a stand mixer (or in a large mixing bowl with a hand mixer), combine the flour, sugar, baking powder, salt, and nutmeg. Add the peanut butter; mix until evenly combined. Turn the mixer off, add all of the milk mixture at once, and mix on low speed just until combined (small lumps are fine).

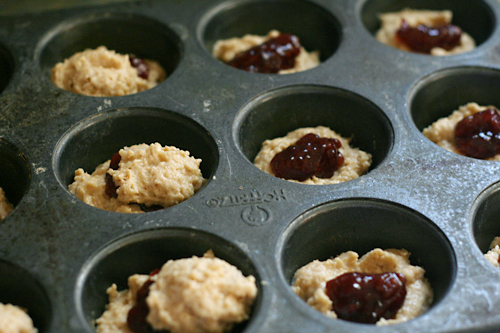
3. Place one heaping tablespoon of batter into each muffin cup. Spoon about a teaspoon of jam over the batter in the cups. Divide the remaining batter evenly between the cups.

4. Bake until a toothpick inserted into a muffin comes out clean, 15-20 minutes. Set the pan on a rack to cool slightly, about 5 minutes, then use a thin-bladed knife to remove the muffins from the pan.

pb jelly muffins 7

bruschetta with chickpea puree

chickpea bruschetta 5

I wouldn’t say I have a black thumb, but I certainly don’t have a green thumb. Every spring I get really excited about gardening. Besides the quality and convenience of produce from the backyard, I love to watch things grow. I especially enjoy watching seeds sprout, as the green shoot springs up and then slowly uncurls, stands tall, and spreads its first two leaves. I like creating something so impressive from almost nothing at all.

chickpea bruschetta 4

Gardening in southern New Mexico is relatively easy. Our growing season, from last frost to first frost, extends from March all the way to November. Overwatering and mold certainly aren’t problems, since it almost never rains here. Our soil is hardpacked clay, but it wasn’t difficult or expensive to build a small raised bed. A layer of mulch and the lack of rain keep most weeds at bay. With a timed sprinkler system, there’s little effort involved with keeping a garden beyond the initial planting.

chickpea bruschetta 3

Except for the bugs. Squash bugs always get my zucchini plants eventually. And last year I think grasshoppers ate more tomatoes than I did. This year, even worse, I bought a diseased tomato plant and it spread its fungus to the rest of the bunch. They’ll have to be pulled, I’m afraid.

chickpea bruschetta 2

So my hopes for panzanella, slow-roasted tomatoes, BLTs, pasta with tomatoes and fresh mozzarella, big pots of sauce to freeze, and a whole long list of other tomato recipes I love – this isn’t the year for that. Instead of topping grilled garlic-rubbed slices of Tartine’s country bread with fragrant tomatoes from my garden, I’ll have to find other ideas.

chickpea bruschetta 1

While nothing is going to live up to perfectly ripe summer tomatoes, I won’t complain about this chickpea spread. Something that could so easily be bland – a bowl of mashed beans – is kicked up with all sorts of good things, like tangy bits of red onion, spicy red pepper flakes, sweet balsamic vinegar, and tart lemon juice. Then it’s topped with crunchy toasted nuts and fresh herbs. It’s not garden-fresh tomatoes, but it’ll do in a pinch.

chickpea bruschetta 7

One year ago: Stuffed Squash Flowers
Two years ago: Dried Fruit Compote
Three years ago: Sautéed Shredded Zucchini

Printer Friendly Recipe
Bruschetta with Spicy Chickpea Purée (adapted from Rick Tramonto’s Fantastico via epicurious)

8 slices rustic bread
4 garlic cloves, peeled and halved lengthwise
½ teaspoon kosher salt
1 (16-ounce can) chickpeas, drained and rinsed
½ small red onion, minced
2 tablespoons extra virgin olive oil, plus more for drizzling
2 tablespoons fresh lemon juice
1 tablespoon balsamic vinegar
1 teaspoon crushed red pepper flakes (use more or less to taste)
½ teaspoons honey
Kosher salt and freshly ground black pepper
2 tablespoons pine nuts, toasted
1 tablespoon chopped fresh tarragon (optional)
1 tablespoon chopped fresh flat-leaf parsley
8 lemon wedges

1. In the bowl of a food processor fitted with the metal blade, pulse the chickpeas, onion, 2 tablespoons of oil, lemon juice, vinegar, red pepper, and honey. Scrape down the sides of the bowl several times and pulse until the mixture is smooth. Season to taste with salt and black pepper. The texture of the paste should be that of spreadable peanut butter; if necessary, thin it with water and pulse again.

2. Prepare gas or charcoal grill or preheat the broiler or a panini press. The heating elements or coals should be medium-hot. Cut the slices in half and brush both sides with a generous amount of olive oil. Season both sides with salt and pepper. Grill or broil the bread, turning once, until lightly browned on both sides. Rub 1 side of the toasts with garlic.

3. Spread the bean paste on the bruschetta. Sprinkle with pine nuts, tarragon (if using), and parsley. Drizzle with olive oil, and serve garnished with lemon wedges for squeezing over the bruschetta.

chickpea bruschetta 6

chocolate sorbet

chocolate sorbet 3

My feelings toward cookie dough are well documented. In short, I like it a lot. It isn’t just cookie dough either; it’s anything made in the mixer and not in its final form, which means that also includes frosting and all manner of batters.

chocolate sorbet 1

But somehow, on Saturday, I made muffins, snickerdoodle dough, frosting, and chocolate sorbet without overeating even a little. I was some kind of self-control expert!  So I was extra surprised on Sunday when I ate enough chocolate sorbet to put me over that edge of too much. Chocolate sorbet? Who knew?

It snuck up on me, I think, because chocolate sorbet seems like it should be so rich and indulgent, but it’s also refreshing and light. It’s easy to justify one more little scoop, because there’s no butter or cream. It’s just sugar and milk, and heck, chocolate – everyone knows chocolate is good for you. There’s no need for self-control!  Except for all the sugar, of course, not to mention the fat in the chocolate.  Healthwise, though, it could be a lot worse – it could be cookie dough.

chocolate sorbet 5

Steph chose this for Tuesdays with Dorie; she has the recipe posted. Other than adding a pinch of salt and a dribble of vanilla, I followed it as written, but my sorbet is definitely grainy. Maybe I should have whisked more or even given it a whirr in the blender.

One year ago: Chewy Chunky Brownies
Two years ago: Vanilla Ice Cream
Three years ago: Summer Fruit Galette

chocolate sorbet 4

tapioca pudding comparison

tapioca pudding 11

Everyone knows there’s science in cooking – reactions occur when heat is applied to ingredients or even just mixed together, like the bubbles that form when baking powder is stirred into batter. But rarely when I cook do I feel like a scientist. I understand some of what’s happening on a molecular level, but following the steps in a recipe, or even hashing out my own path on the stovetop, does not feel like doing science.

tapioca pudding 2

Recipe comparisons are when I get to be an experimentalist and a cook/baker all at once, and that’s why I love them, despite all the work they entail. I thought a tapioca pudding comparison would be easier, and so I wouldn’t mind sharing it with Jen as part of her Friday Favorites series. And besides, Jen’s an engineer – that’s just a scientist with a purpose. It wasn’t until later that I found out that Jen doesn’t like pudding.

tapioca pudding 9

I would have loved for my first shared comparison to be one of those rarities in which there’s a clear favorite, but there wasn’t even one recipe that we loved. Cooks Illustrated’s had a weird gritty texture, Kraft’s was lacking flavor, and I completely messed up Mark Bittman’s recipe – although that one ended up being Dave’s favorite. Clearly more experimentation is in order, and that is absolutely fine with me. Check out Jen’s blog to get the full analysis, more photos, and the recipes – the very first pudding recipes in her blog, and perhaps the only ones she’ll ever post!

One year ago: Tacos al Pastor
Two years ago: Crockpot Chicken Broth
Three years ago: Chicken with Forty Cloves of Garlic

tapioca pudding 10

coconut scones

coconut scones 4

The first half of this year was downright lazy for me. Of course I went to work, exercised, did laundry, cooked, and kept my house from turning into a cesspool, but I managed to do all that while spending the majority of the weekend, every weekend, outside in the backyard reading books and drinking margaritas. I love reading books and drinking margaritas, but I admit that I was starting to get the slightest bit bored.

coconut scones 1

And just in time, because the pace is picking up. The second half of the year is packed with vacations, from a weekend in Colorado over 4th of July, a week on the beach later in the summer, Italy in the fall, Thanksgiving with Dave’s family, and then finally Christmas. It’s getting busy, and I’m still adjusting.

That’s my excuse for not being on top of things and making these scones for breakfast a few weekends ago, since we spent this weekend in Albuquerque. On the other hand, I knew I wouldn’t be able to find chestnut flour in my little town, but I was pretty convinced I could get it at Whole Foods in the “big” city. I was wrong; they didn’t have it.

coconut scones 2

So no chestnut flour and no breakfast opportunities. Then I remembered that scones are really dessert disguised as breakfast, so there was no reason not to eat them after dinner. And while grinding almonds would have been a better substitute for chestnut flour than coconut flour was, I chose the easier option: coconut flour is already ground. I doubt coconut flour and chestnut flour result in a similar scone, but I can assure you that coconut flour, at least, makes a light scone with a texture somewhat reminiscent of a sable. One little scone made a nice dessert.

coconut scones 5

Andrea had some chestnut flour in her kitchen that she bought a while ago, so she chose this recipe for Tuesdays with Dorie. I simply substituted coconut flour for the chestnut flour in the original recipe. I also doubled the salt, added ¼ cup of unsweetened flaked coconut, and topped the scones with shredded sweetened coconut right before baking.

One year ago: Lots of Ways Banana Cake
Two years ago: Blancmanger
Three years ago: Cherry Rhubarb Cobbler

coconut scones 3

slow cooker spinach mushroom lasagna

crockpot lasagna 12

Lasagna cooked in the slow cooker is not that different from lasagna cooked in the oven. It has the same ingredients, the same layers, the same browned cheesy top – and the same amount of effort required to make it. Really the only thing that’s different is the amount of time it takes to cook.

crockpot lasagna 4

This was good news in a way. I was surprised that the lasagna wasn’t watery and that the top looked almost exactly the same as a baked lasagna. The problem, of course, was that it wasn’t any easier to put together.

crockpot lasagna 2

Another problem is apparently that béchamel sauces curdle in the slow cooker. This recipe was originally based on a cream sauce instead of tomato sauce. Since béchamel didn’t work, the recipe called for a jar of Alfredo sauce.

crockpot lasagna 8

I’m not usually one for dumping jars of prepared foods into my recipes, but after a scan of the jar label revealed no unrecognizable ingredients, I had just about acquiesced to buying it – until I looked at the fat content. Jarred Alfredo sauce (like homemade Alfredo sauce) is almost pure cream, and I just couldn’t stomach the idea of adding all that fat to what I intended to be a weeknight meal.

crockpot lasagna 7

Replacing the cream sauce with tomatoes made this recipe very similar to my favorite vegetarian lasagna, but that’s okay, because they’re flavors I like. In fact, the lasagna had a lot of qualities I love, with its meaty flavor without any meat, plenty of cheese, and plenty of vegetables to even out the cheese.  While it wasn’t any better than oven-baked lasagna, it wasn’t any worse, and it can’t hurt to have the option for a longer cooking time.

crockpot lasagna 14

One year ago: Basic Pancakes
Two years ago: Brioche
Three years ago: Salad with Herbed Baked Goat Cheese

Printer Friendly Recipe
Slow Cooker Spinach Mushroom Lasagna (adapted from Cook’s Illustrated’s Slow Cooker Revolution)

Serves 6 to 8

I have a 4-quart slow cooker, but I don’t see any reason this wouldn’t work in a 5- or even 6-quart cooker.  The lasagna just won’t be as tall.

I did not line the slow cooker with foil, because it seems so wasteful. Individual slices of lasagna were still surprisingly easy to serve intact, although the first one was messy.

I used half this amount of cheese. I’m sure the full amount is great, but I was trying to lighten it up a bit.

nonstick spray
8 curly-edged lasagna noodles (7 ounces), broken in half
1 tablespoon olive oil
1 onion, chopped fine
1½ pounds white mushrooms, trimmed and sliced thin
2 garlic cloves, minced
16 ounces fresh baby spinach
1 (28-ounce) can crushed tomatoes
1 (15-ounce) container ricotta cheese
1¼ cups (2½ ounces) grated Parmesan cheese
½ cup minced fresh basil
1 large egg
4 cups (1 pound) shredded mozzarella cheese

1. Line the slow cooker with an aluminum foil collar: Layer and fold sheets of heavy-duty foil until you have a six-layered rectangle that measures 16 by 4 inches. Press the collar into the back side of the slow cooker insert. Fit two more large sheets of foil into the slow cooker, perpendicular to each other, with the extra hanging over the edges of the cooker for a sling to help remove the lasagna later.

2. Bring 4 quarts water to a boil in a large pot. Add the broken lasagna noodles and 1 tablespoon salt and cook, stirring often, until the noodles are al dente. Drain the noodles, rinse them under cold water until cool, then spread them out in single layer over clean kitchen towels and let dry. (Do not use paper towels; they will stick to the noodles.)

3. Heat the oil in the same pot over medium-high heat until shimmering. Add the mushrooms, garlic, and ¼ teaspoon salt, cover, and cook until the mushrooms are softened, about 5 minutes. Uncover, add the onions, and continue to cook until the mushrooms are dry and browned, 5 to 10 minutes longer. Stir in the spinach, cover, and cook until wilted, about 2 minutes. Stir in the crushed tomatoes and ½ teaspoon salt.

4. In a bowl, mix the ricotta, 1 cup (2 ounces) Parmesan, basil, egg, ½ teaspoon salt, and ½ teaspoon pepper together. Spread ½ cup of the mushroom-spinach sauce into the prepared slow cooker.

5. Arrange 4 lasagna noodle pieces in the slow cooker, overlapping if necessary, then dollop 9 rounded tablespoons of ricotta mixture over noodles. Sprinkle with 1 cup mozzarella, then spoon 1 cup more mushroom-spinach sauce over top. Repeat the layering of lasagna noodles, ricotta mixture, mozzarella and mushroom-spinach sauce twice more. For the final layer, arrange the remaining 4 noodles in the slow cooker, then top with the remaining mushroom-spinach sauce and sprinkle with the remaining mozzarella and remaining Parmesan.

6. Cover and cook until the lasagna is heated through, about 4 hours on low. Let the lasagna cool for 20 minutes. Using the sling, transfer lasagna to serving platter and serve.

crockpot lasagna 13

peaches and cream scones

peaches cream scones 4

Scones are just an excuse to eat dessert for breakfast. It’s a better disguised excuse then chocolate muffins, I will grant you, but in the end, equally bad for you. I think I might sound like I’m complaining. I’m not complaining.

peaches cream scones 1

Cream scones are one of my favorite weekend morning accompaniments to coffee. The cream makes them so tender, and when they’re only lightly sweetened, like these, they’re perfect either topped with jam or baked with fresh fruit. A sweet biscuit, peaches, and cream – you can’t tell me that doesn’t sound like one heck of a dessert.

peaches cream scones 6

Lynne chose the cream scones for Tuesdays with Dorie, and she has the recipe posted. I left out the currants and added one peach, peeled, chopped, and frozen, to the dough after the liquids were partially mixed in.

One year ago: Brrrownies
Two years ago: Brioche Plum Tart
Three years ago: Chocolate Pudding (comparison of 2 recipes)

peaches cream scones 3

thai grilled-beef salad

thai steak salad 4

My habit is that on weekdays, I eat vegetarian and am healthy, and on weekends, I eat meat and am not healthy. I save alcohol and lately even dessert for weekends. It all evens out in the end so that I’m relatively fit and trim, but I’m starting to wonder – would it be so bad to eat meat and be healthy, all at the same time?

thai steak salad 1

Steak doesn’t have to mean huge T-bones and potatoes. It can mean slivers of beef mixed with herbs and served with cucumbers. This flank steak is seasoned with salt and (white) pepper, grilled and sliced, then dressed with a mixture of lime juice and fish sauce. Toasted white rice powder deepens the flavors while fresh herbs lighten them.

thai steak salad 3

I wonder how many other great meat-topped salads are out there that I’ve been overlooking. Although even if there aren’t any others worth trying, I’d be perfectly happy making this one over and over again. Eating healthy on weekends doesn’t feel like a sacrifice when it tastes so good – and besides, I still get to have a glass of wine on the side.

thai steak salad 5

One year ago: Garlic Mustard Glazed Skewers
Two years ago: Seafood Lasagna
Three years ago: Vanilla Ice Cream

Printer Friendly Recipe
Thai Grilled-Beef Salad (from Cooks Illustrated)

Serves 4 to 6

1 teaspoon sweet paprika
1 teaspoon cayenne pepper
1 tablespoon white rice
3 tablespoons lime juice (from 2 limes)
2 tablespoons fish sauce
2 tablespoons water
½ teaspoon sugar
1½ pound flank steak, trimmed
Salt and white pepper, coarsely ground
4 shallots, sliced thin
1½ cups fresh mint leaves, torn
1½ cups fresh cilantro leaves
1 Thai chile, stemmed and sliced thin into rounds
1 seedless English cucumber, sliced ¼ inch thick on bias

1. Heat the paprika and cayenne in an 8-inch skillet over medium heat; cook, shaking the pan, until fragrant, about 1 minute. Transfer to a small bowl. Return the now-empty skillet to medium-high heat, add the rice, and toast, stirring frequently, until deep golden brown, about 5 minutes. Transfer to a second small bowl and cool for 5 minutes. Grind the rice with a spice grinder, mini food processor, or mortar and pestle until it resembles fine meal, 10 to 30 seconds (you should have about 1 tablespoon rice powder).

2. Whisk the lime juice, fish sauce, water, sugar, and ¼ teaspoon toasted paprika mixture in a large bowl and set aside.

3. For a Charcoal Grill: Open the bottom vent completely. Light a large chimney starter filled with charcoal briquettes (6 quarts). When the top coals are partially covered with ash, pour the coals evenly over half of the grill. Set the cooking grate in place, cover, and open the lid vent completely. Heat the grill until hot, about 5 minutes.

For a Gas Grill: Turn all burners to high, cover, and heat the grill until hot, about 15 minutes. Leave the primary burner on high and turn off the other burner(s).

4. Clean and oil the cooking grate. Season the steak with salt and white pepper. Place the steak over the hot part of the grill and cook until it’s beginning to char and beads of moisture appear on the outer edges of the meat, 5 to 6 minutes. Flip the steak and continue to cook on the second side until charred and the center registers 125 degrees, about 5 minutes longer. Transfer to a plate, tent loosely with aluminum foil, and let rest for 5 to 10 minutes (or allow to cool to room temperature, about 1 hour).

5. Slice the meat, against the grain and on the bias, into ¼-inch-thick slices. Transfer the sliced steak to the bowl with the fish sauce mixture. Add the shallots, mint, cilantro, chile, and half of the rice powder; toss to combine. Transfer to a platter lined with cucumber slices. Serve, passing the remaining rice powder and toasted paprika mixture separately.

thai steak salad 6

pizza bianca with goat cheese and greens

kale goat cheese pizza 4

When it comes to grilled pizza, I’m a slow learner. We’ve made crusts so burned that we had to chip flakes of blackened bread off before we could eat it. We’ve also made pizza with doughy undercooked crusts and with unmelted cheese and raw toppings. About the only problem we haven’t had is the dough sticking to the grate, so at least there’s that.

kale goat cheese pizza 1

This was my most successful attempt at grilling pizza so far, but even so, it’ll be a while before there’s any kind of grilled pizza tutorial from me. Instead, I will provide my standard foolproof oven method for a very non-standard pizza. My ears perk up whenever anyone mentions goat cheese, which is no surprise since it’s so creamy and tangy. But I like kale almost as much, which is maybe more surprising.

kale goat cheese pizza 2

This is the first time I’ve eaten them together, but it’s a combination that makes good sense, because the tart goat cheese will balance the earthy kale. With crushed red pepper spicing things up and mozzarella holding everything together, this was one different and delicious pizza – with charcoal flavor or not. It was almost as good as the pizza margherita we made to go with it, and that’s really saying something.

kale goat cheese pizza 3

One year ago: Vanilla Bean Cupcakes
Two years ago: Sourdough Bagels
Three years ago: Salmon Clubs with Avocado Butter

Printer Friendly Recipe
Pizza Bianca with Goat Cheese and Greens (adapted from Love and Olive Oil)

1 pound pizza dough (½ of this recipe), fully risen and at room temperature
2 teaspoons olive oil
3 cloves garlic, minced
¼ teaspoon crushed red pepper
1 bunch kale, washed, stems removed
salt
4 ounces (½ cup) part-skim mozzarella, shredded
4 ounces goat cheese, crumbled

1. Place a pizza stone on the bottom rack of the oven and preheat the oven to 500ºF. Divide the dough in two and shape each portion into a ball. Set the balls of dough aside, loosely covered, to allow the gluten to relax.

2. Heat the oil, garlic, and crushed red pepper in a Dutch oven over medium heat until the garlic sizzles. Add the kale, ¼ teaspoon salt, and 2 tablespoons of water; cover and cook, stirring occasionally, until the kale wilts, about 5 minutes. Remove the lid and continue cooking and stirring until the water evaporates, about 1 minute.

3. Work with one ball of dough at a time on a lightly floured surface or a damp cloth. Flatten the dough, then pick it up and gently stretch it out, trying to keep it as circular as possible. Curl your fingers and let the dough hang on your knuckles, moving and rotating the dough so it stretches evenly. If it tears, piece it together. If the dough stretches too much, put it down and gently tug on the thick spots. Transfer the round of dough to a large square of parchment paper; slide onto a pizza peel.

4. Top one round of dough with half of each of the kale mixture and cheeses. Slide the pizza with the parchment onto the hot baking stone. Bake for 8-10 minutes, until the crust is browned around the edges. Transfer the pizza to a cooling rack without the parchment. Let the pizza rest for 5 minutes before serving. Repeat with the remaining ingredients.

kale goat cheese pizza 5

chocolate chocolate chunk muffins

chocolate chunk muffins 5
How is a muffin different from a cupcake? Let me count the ways.

1) Frosting: A cupcake without frosting is just wrong. Muffins, while sometimes glazed, are never served with a tall swirl of sugary icing. But cupcakes with a coating of soft glaze are beautiful as well.

2) Add-ins: Many muffins have some textural contrast, whether it’s chunks of fruit or bran or poppy seeds. Most cupcakes are smooth-textured; fruit is pureed, chocolate is melted. But what about pumpkin muffins? Or carrot cake?

chocolate chunk muffins 3

3) Mixing method and texture: The classic cake mixing method starts with sugar beaten into softened butter, which is smoothed with egg, then thickened with flour and leaveners. It results in an even-textured, fluffy cake. Muffins, by contrast, are usually made by whisking together the dry ingredients, separately whisking together the wet ingredients, and then folding the two together. The resultant texture is coarse with large air pockets. But not all cakes are mixed with the cake method, and not all muffins are mixed with the muffin method.

4) Course: Cupcakes are dessert. Muffins are breakfast.

So while, by this set of guidelines, these chocolate chocolate chunk muffins do seem to be muffins, they could certainly pass for dessert. Or, if you can’t get enough of their sweet, tender, moist crumb and rich bites of solid chocolate, enjoy them for both breakfast and dessert. I know I did.

chocolate chunk muffins 7

One year ago: Tarte Noire
Two years ago: Tribute to Katherine Hepburn Brownies
Three years ago: Blueberry Pie

Printer Friendly Recipe
Chocolate-Chocolate Chunk Muffins (from Dorie Greenspan’s Baking: From My Home to Yours, for Tuesdays with Dorie)

Makes 12 muffins

Two ounces of chocolate chunks mixed into the dough is a restrained amount that reflects the breakfast intentions of these muffins. For more richness, feel free to increase that up to as much as 6 ounces. I mixed in some white chocolate as well.

6 tablespoons (¾ stick) unsalted butter
4 ounces bittersweet chocolate, coarsely chopped
2 cups (9.6 ounces) all-purpose flour
⅔ cup (4.67 ounces) sugar
⅓ cup unsweetened cocoa powder, sifted
1 tablespoon baking powder
½ teaspoon baking soda
½ teaspoon salt
1¼ cups buttermilk
1 large egg
2 teaspoon pure vanilla extract

Center a rack in the oven and preheat the oven to 375 degrees F. Butter or spray the 12 molds in a regular-size muffin pan or fit the molds with paper muffin cups. Alternatively, use a silicone muffin pan, which needs neither greasing nor paper cups. Place the muffin pan on a baking sheet.

Melt the butter and half the chopped chocolate together in a bowl over a saucepan of simmering water; or do this in a microwave. Remove from the heat.

In a large bowl, whisk together the flour, sugar, cocoa, baking powder, baking soda and salt. In a large glass measuring cup or another bowl, whisk the buttermilk, egg and vanilla extract together until well combined. Pour the liquid ingredients and the melted butter and chocolate over the dry ingredients and, with the whisk or a rubber spatula, gently but quickly stir to blend. Don’t worry about being thorough — a few lumps are better than overmixing the batter. Stir in the remaining chopped chocolate. Divide the batter evenly among the muffin molds.

Bake for 20 minutes, or until a thin knife inserted into the center of the muffins comes out clean. Transfer the pan to a rack and cool 5 minutes before carefully removing each muffin from its mold.

chocolate chunk muffins 6