strawberry buttermilk cake

strawberry buttermilk cake 6

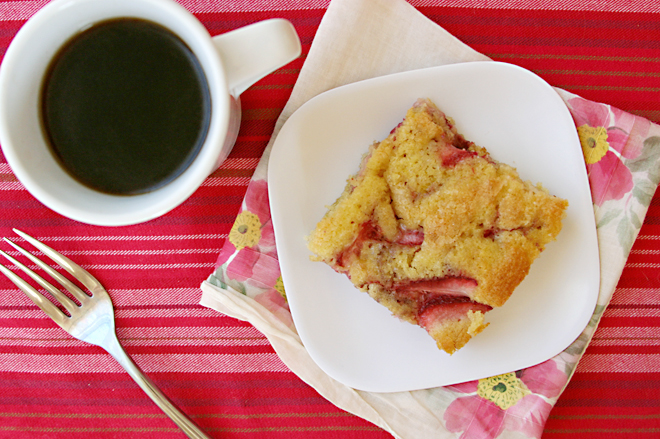
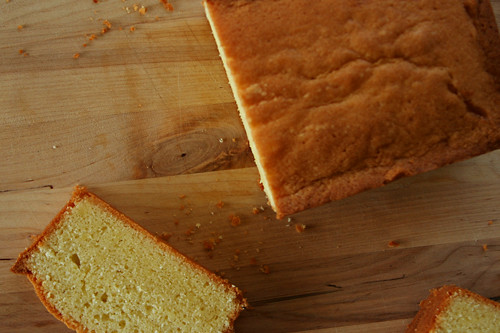
I woke up yesterday wanting cake. Not wanting to eat cake, so much, although that part is nice, but wanting to watch butter and sugar swirl in the mixer bowl and gradually turn into a smooth batter. This despite plans to make Danish dough, two Danish fillings, fajitas, grapefruit cookies (which didn’t happen because I’d gotten my mixer fix with the cake), and a batch of Tartine country bread dough to freeze (which didn’t happen because I ran out of flour). No one said anything about being practical.

strawberry buttermilk cake 3

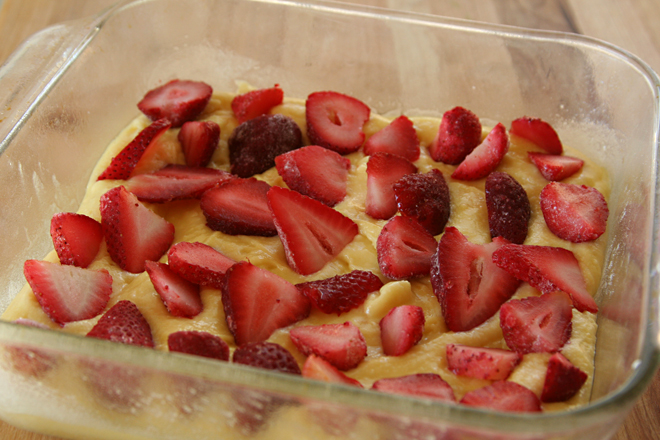
I started poking around the internet for recipes, and chose this one because it uses buttermilk, which I have right now, and it wasn’t loaded with butter, which is always nice when you’re planning to eat cake for breakfast. I did not have any fresh berries, but I always keep strawberries in the freezer for our weekday smoothies. And it didn’t require an hour in the oven; key on a government holiday that included sleeping in.

strawberry buttermilk cake 4

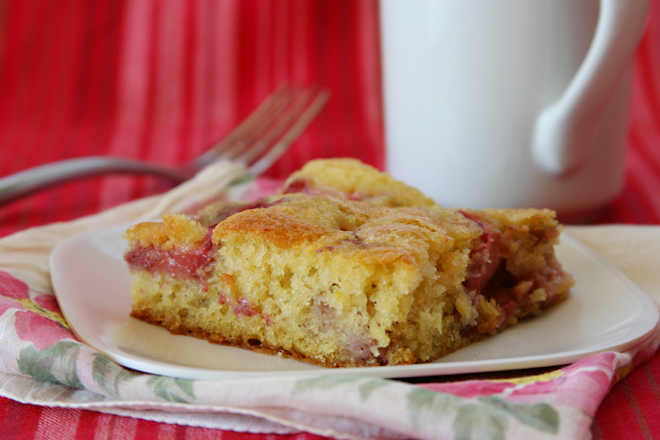
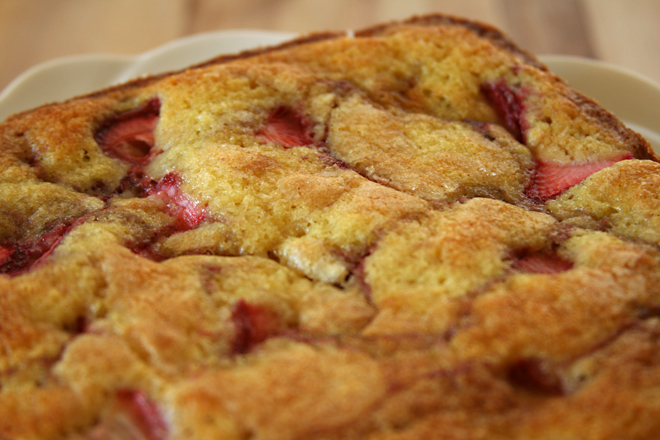
The cake was everything I’d been craving. The most important part of the craving was my favorite mixing method of beating butter and sugar until fluffy, whipping in an egg and vanilla, and alternating the additions of buttermilk and dry ingredients. But cake for breakfast doesn’t hurt either.

strawberry buttermilk cake 5

One year ago: Eggplant Rollatini
Two years ago: Pasta with Baked Ricotta and Sweet Tomato Sauce
Three years ago: Vegetarian Chili
Four years ago: Salmon Cakes, Flaky Biscuits, Hashed Brussels Sprouts

Printer Friendly Recipe
Berry Buttermilk Cake (rewritten but not changed from Gourmet via Smitten Kitchen)

Serves 6

Two things: The original recipe calls for fresh raspberries, which are probably a better choice than the (frozen) strawberries I used. Strawberries are juicier than other berries, so my cake was a little wetter than is probably ideal. I also thought it was too sweet, which could be because strawberries aren’t as tart as raspberries, but still, next time I’ll only use ½ cup of sugar.

1 cup (4.8 ounces) all-purpose flour
½ teaspoon baking powder
½ teaspoon baking soda
¼ teaspoon salt
½ stick unsalted butter, room temperature
⅔ cup (4.67 ounces) plus 1½ tablespoons sugar, divided
1 teaspoon grated lemon zest
½ teaspoon pure vanilla extract
1 large egg
½ cup well-shaken buttermilk
1 cup (5 ounces) fresh raspberries (or other berries)

1. Adjust a rack to the middle position and heat the oven to 400 degrees. Butter and flour a 9-inch round cake pan. In a small bowl, whisk together the flour, baking powder, baking soda, and salt.

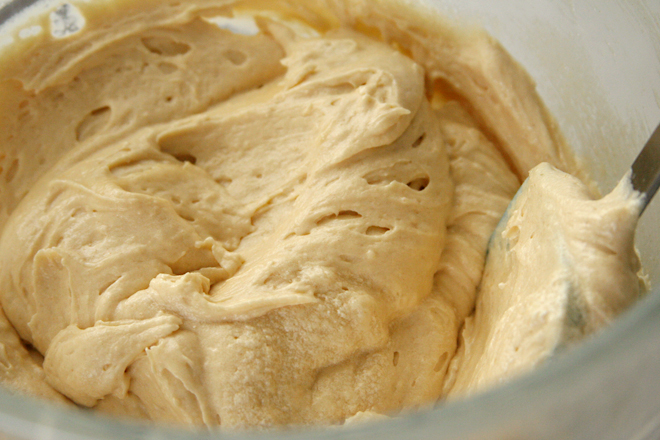
2. In a stand mixer fitted with the paddle attachment (or in a medium bowl using a hand mixer), beat the butter, sugar, and lemon zest (if using) on medium-high speed until pale and fluffy, about 2 minutes. Add the egg and vanilla, beating until combined. Reduce the mixer speed to low; add one-third of the flour mixture, then half of the buttermilk. Continue alternating the dry ingredients and buttermilk, ending with the dry ingredients.

3. Scrape the batter into the prepared pan, smoothing the top. Scatter the berries evenly over the top, then sprinkle with the remaining 1½ tablespoons sugar. Bake until the cake is golden and a toothpick inserted into the center comes out clean, 25 to 30 minutes. Transfer the cake to a cooling rack; cool for 10 minutes. Remove the cake from the pan and cool another 10-15 minutes before serving.

strawberry buttermilk cake 7

hidden berry cream cheese torte

berry cream cheese torte 7

I don’t think of myself as much of a shopper. The majority of the clothes I’ve bought over the last year have been thrifted, I rarely buy books or CDs since we moved to a town without a big bookstore, I have no interest in cars beyond dependability and gas mileage, and the only decorations in my office at the place I’ve worked for a year and a half are a bird-shaped mirror that makes me smile every time I see it and three posters on local geology that a coworker was trying to get rid of.

berry cream cheese torte 2

But ingredients are becoming a weakness. I blame living in a small isolated town; because there are so many foods I can’t buy here, when I do have access to a fun new ingredient, I snatch it up. This is why I have a container of truffle salt I’ve only used once and several types of ground and whole mustard seeds which I never got around to using in homemade mustard recipes. It’s probably a good thing Dave rushed me out of the Middle Eastern market we went to for lunch in Albuquerque, so I only had time to buy a container of za’atar and a jar of boysenberry preserves.

berry cream cheese torte 1

I haven’t used the za’atar yet, but the jam was perfect in this light, creamy cheesecake. I added a little more than the recipe called for, and I wished I had used even more. This is one impulse buy I don’t regret one bit.

berry cream cheese torte 4

One year ago: Cardamom Crumb Cake
Two years ago: Cafe Volcano Cookies
Three years ago: Buttery Jam Cookies

Printer Friendly Recipe
Hidden Berry Cream Cheese Torte (from Dorie Greenspan’s Baking: From my Home to Yours)

8 servings

I used 8 ounces of cream cheese, since that’s the normal size of the packages. I also left out the spices.

Crust:
1¾ cups all-purpose flour
½ cup (3.5 ounces) sugar
¼ teaspoon salt
1½ sticks (12 tablespoons) unsalted butter, cut into small pieces and chilled
2 large egg yolks
1 teaspoon pure vanilla extract

Filling:
⅓ cup thick berry or cherry jam
9 ounces cream cheese, at room temperature
8 ounces (1 cup) cottage cheese, at room temperature
¾ cup sugar
¼ teaspoon salt
Pinch of ground cinnamon
Pinch of freshly grated nutmeg
2 large eggs, preferably at room temperature
Confectioners’ sugar, for dusting (optional)

Getting ready: Butter a 9-inch springform pan, dust the inside with flour, and tap out the excess. Place on a baking sheet lined with parchment or a silicone mat.

To make the crust: Put the flour, sugar and salt in a food processor and pulse just to blend. Toss in the pieces of butter and pulse until the mixture resembles coarse meal. Stir the egg yolks and vanilla together with a fork, and, still pulsing the machine, add them and continue to pulse until the dough comes together in clumps and curds—restrain yourself, and don’t allow the dough to form a ball.

Turn the dough out onto a work surface. If you want to roll the dough, gather it into a ball, wrap it in plastic wrap and refrigerate it for about 20 minutes before rolling. (I like to roll this, and all sweet crusts, between sheets of plastic wrap.) Or simply press the dough into the pan. The dough should come about 1½ inches up the sides of the springform. Refrigerate for at least 30 minutes.

Center a rack in the oven and preheat the oven to 375 degrees. Fit a piece of buttered aluminum foil against the crust, covering it completely. Fill the crust lightly with rice, dried beans or pie weights and slide the pan into the oven. Bake the crust for 20 minutes, then carefully remove the foil and weights and bake for another 5 minutes or so—you don’t want the crust to get too brown. Transfer to a rack to cool while you make the filling. Lower the oven temperature to 350 degrees.

To make the filling: Stir the jam and spread it over the bottom of the crust—it’s okay to do this while the crust is still warm.

Put the cream cheese and cottage cheese into the food processor and process, scraping down the sides of the bowl a few times, for 2 minutes, until you’ve got a smooth, satiny mix. Add the sugar, salt and spices and process for another 30 seconds. With the machine running, add the eggs and process, scraping the bowl as needed for a final minute. Pour the filling over the jam.

Bake the cake for 60 to 70 minutes, or until the filling is uniformly puffed and no longer jiggly. Gently transfer the springform pan to a cooling rack and allow the torte to cool to room temperature, during which time the filling will collapse into a thin, elegant layer.

Run a blunt knife between the crust and the sides of the pan, then open and remove the sides of the springform. If the sides of the crust extend above the filling and you don’t like this look, very gently saw off the excess crust using a serrated knife. Chill the torte slightly or thoroughly before serving and dust with confectioner’s sugar.

berry cream cheese torte 5

earl grey madeleines

earl grey madeleines 3

Coffee makes me feel like bees are buzzing in my head, so I save it for the weekends. At work, I stick to tea, and I’ve developed a little ritual with my electric kettle, collection of looseleaf teas, and steeper that drips from below when I set it onto my mug. I’m picky about my teas too; I don’t like any teas with weird fruity flavors, and I prefer my black tea with some bitter bite to it.

earl grey madeleines 1

I like Earl Gray tea, but it can’t be too orangey. I once bought one that tasted like a creamsicle, and I threw the whole tin away. Rishi makes my favorite black tea, but their Earl Grey is too strong for me. For months, I’ve been mixing Rishi Earl Grey tea leaves with another black tea I have that isn’t as bitter as I like. My morning mug of tea is an art.

earl grey madeleines 2

Overly strong tea leaves are perfect for putting into dessert though, where they have to battle to be noticed past the sugar and butter. The batter for these madeleines smelled and tasted noticeably of Earl Grey, but the flavor was muted once baked. They smelled more tea-y than they tasted. Clearly, the perfect way to really taste your Earl Grey with your Earl Grey madeleines is to have a mug of tea alongside your tea cake.

earl grey madeleines 4

Nicole chose these madeleines for Tuesdays with Dorie and has the recipe posted. Watch them carefully if you make them! I baked mine for 9 minutes, and it was definitely too long.

One year ago: Maple Tuiles
Two years ago: All-Occasion Sugar Cookies
Three years ago: Rosy Poached Pear and Pistachio Tart

earl grey madeleines 5

apple pie cake

apple pie cake 13

Those accursed diamonds. Dorie Greenspan tells a cute story about how her grandmother used to make a similar recipe to this one and cut it into diamonds. Notably however, Dorie did not suggest the diamond shape. She recommends squares.

apple pie cake 2

But I thought the diamonds sounded so elegant and pretty. I considered and then disregarded how fragile the sharp diamond corners would be. I also considered and disregarded the impracticality of cutting a rectangular pan of pie-cake into diamonds. I powered on.

apple pie cake 6

The result was more crumbs than diamonds. I usually consider the fallen crumbs to be a little treat to snack on, but when half of a large pan of pie-cake crumbles as you cut it, that can be dangerous. Once the crumbs started getting really out of control, I shoved them all in a bowl before I could even consider eating them.

apple pie cake 7

Bu not even one coworker mentioned the broken diamonds when they came by to tell me that these might be the best thing I’ve ever brought to share. It didn’t even get mentioned when one coworker announced over the intercom how amazing they were. (I blushed.) I’m actually a little bit glad that I cut them into impractical diamonds, because now I have a bowl full of apple pie-cake crumbs stashed in my freezer.

apple pie cake 10

One year ago: Almost-Fudge Gateau
Two years ago: Sugar-Topped Molasses Spice Cookies
Three years ago: Thanksgiving Twofer Pie

Printer Friendly Recipe
Russian Grandmother’s Apple Pie-Cake (from Dorie Greenspan’s Baking: From my Home to Yours)

As usual with Dorie’s recipes, I bumped up the salt – ¾ teaspoon in the dough and a pinch in the apples. And I completely forgot the raisins.

For The Dough
2 sticks (8 ounces) unsalted butter, at room temperature
1 cup sugar
2 large eggs
1 tablespoon baking powder
½ teaspoon salt
Juice of 1 lemon
3¼ – 3½ cups all-purpose flour

For The Apples
10 medium apples, all one kind or a mix
Squirt of fresh lemon juice
1 cup moist, plump raisins (dark or golden)
¼ cup sugar
1¼ teaspoons ground cinnamon

Sugar, preferably decorating (coarse) sugar, for dusting

To Make The Dough: Working with a stand mixer, preferably fitted with a paddle attachment, or with a hand mixer in a large bowl, beat the butter and sugar together on medium speed until smooth, about 2 minutes. Add the eggs and continue to beat until the mixture is light and fluffy, about 3 minutes more. Reduce the mixer speed to low, add the baking powder and salt and mix just to combine. Add the lemon juice – the dough will probably curdle, but don’t worry about it. Still working on low speed, slowly but steadily add 3¼ cups of the flour, mixing to incorporate it and scraping down the bowl as needed. The dough is meant to be soft, but if you think it looks more like a batter than a dough at this point, add the extra ¼ cup flour. (The dough usually needs the extra flour.) When properly combined, the dough should almost clean the sides of the bowl.

Turn the dough out onto a work surface, gather it into a ball and divide it in half. Shape each half into a rectangle. Wrap the dough in plastic wrap and refrigerate for at least 2 hours, or for up to 3 days. (The dough can be wrapped airtight and frozen for up to 2 months; defrost overnight in the refrigerator.)

To Make The Apples: Peel and core the apples and cut into slices about ¼ inch thick; cut the slices in half crosswise if you want. Toss the slices in a bowl with a little lemon juice – even with the juice, the apples may turn brown, but that’s fine – and add the raisins. Mix the sugar and cinnamon together, sprinkle over the apples and stir to coat evenly. Taste an apple and add more sugar, cinnamon, and/or lemon juice if you like.

Getting Ready to Bake: Center a rack in the oven and preheat the oven to 375 degrees F. Generously butter a 9×13-inch baking pan (Pyrex is good) and place it on a baking sheet lined with parchment or a silicone mat.

Remove the dough from the fridge. If it is too hard to roll and it cracks, either let it sit at room temperature for about 15 minutes or give it a few bashes with your rolling pin to get it moving. Once it’s a little more malleable, you’ve got a few choices. You can roll it on a well-floured work surface or roll it between sheets of plastic wrap or wax paper. You can even press or roll out pieces of the dough and patch them together in the pan – because of the baking powder in the dough, it will puff and self-heal under the oven’s heat. Roll the dough out until it is just a little larger all around than your pan and about ¼ inch thick – you don’t want the dough to be too thin, because you really want to taste it. Transfer the dough to the pan. If the dough comes up the sides of the pan, that’s fine; if it doesn’t that’s fine too.

Give the apples another toss in the bowl, then turn them into the pan and, using your hands, spread them evenly across the bottom.

Roll out the second piece of dough and position it over the apples. Cut the dough so you’ve got a ¼ to ½ inch overhang and tuck the excess into the sides of the pan, as though you were making a bed. (If you don’t have that much overhang, just press what you’ve got against the sides of the pan.)

Brush the top of the dough lightly with water and sprinkle sugar over the dough. Using a small sharp knife, cut 6 to 8 evenly spaced slits in the dough.

Bake for 65 to 80 minutes, or until the dough is a nice golden brown and the juices from the apples are bubbling up through the slits. Transfer the baking pan to a cooling rack and cool to just warm or to room temperature. You’ll be tempted to taste it sooner, but I think the dough needs a little time to rest.

apple pie cake 14

brown sugar honey madeleines

brown sugar honey madeleines 4

My poor madeleine pan doesn’t get a lot of use. I love it; I got it for Christmas years ago, and seeing it in the cabinet has always made me happy. But I seldom bake with it.

brown sugar honey madeleines 1

There’s no good reason for this, because I love madeleines. They’re miniature handheld cakes. The batter is easy to mix up. They look fancy with no extra effort on my part. There are endless variations to experiment with. I think I just convinced myself to like madeleines more than cupcakes.

brown sugar honey madeleines 2

It’s possible that it’s just this recipe I love so much, with its brown sugar caramel notes. I wouldn’t know, since my only experience with traditional madeleines was years ago and a very qualified success at best. Clearly I need to try that recipe for madeleines again – and many more.

brown sugar honey madeleines 3

Di chose this recipe for Tuesdays with Dorie, and she has it posted. It’s originally designed for a mini madeleine pan, but considering how rarely I use my regular madeleine pan, I think a mini version is the last thing I need. I just added a couple minutes to the baking time recommended for minis. I had a difficult time prying the cakes out of the pan, even though it’s nonstick and I sprayed it with cooking spray. Next time I’ll give it a more thorough spritz of floury baking spray.

One year ago: Cranberry Shortbread Cake
Two years ago: Chocolate Caramel Chestnut Cake
Three years ago: Kugelhopf

brown sugar honey madeleines 5

far breton

far breton 3

This doesn’t seem to be a very popular opinion, but I love custards. Far Breton isn’t the most custardy custard I’ve ever eaten, but it’s certainly on the eggy side of the cake spectrum. I was looking forward to a light, lightly sweetened and beautifully browned cake.

far breton 5

I wasn’t so sure about the dried fruit, but I thought using small fruits like a mix of raisins, cherries, and cranberries would meld better with the batter than large prunes, and softening them in brandy couldn’t hurt. Unfortunately my math skills failed me and I messed up the proportions of the batter, using one-third of the total amount of egg and milk, and one-half of the full recipe worth of sugar, flour, and butter.

far breton 1

Dave and I both enjoyed the cake, even with the mixed up ratios of ingredients in the batter. I still think the dried fruit were out of place, probably because I like cake/custard so much more than I like dried fruit. I think, for my tastes, pure custard would be just right.

far breton 4

Nicole chose this recipe for Tuesdays with Dorie, and she has it posted. Like I mentioned above, I made a handful of involuntary changes that I don’t recommend (even if the final result was quite good)!

My post on the honey nut scones, also chosen for TWD this week, will be up tomorrow.

One year ago: Peanut Butter Blondies
Two years ago: Cherry-Fudge Brownie Torte
Three years ago: Rugelach

far breton 2

apple nut muffin cake

apple muffin cake 6

I wasn’t expecting great things from Pisa, although that wasn’t Pisa’s fault. I had a cold, because I learned the hard way that you have to eat the occasional fruit or vegetable, even on vacation. We had to get up early and rush to the train station, spend 2 hours on a train to get to Pisa, where we had 3 hours before we had to board another train to get to Rome, where I had a suspicion we’d get lost looking for the hotel. I knew it would be worth it to see the iconic Leaning Tower, but I wasn’t looking forward to the trains, the constant concern over my Kleenex supply, or the crowds I assumed surrounded the famous tower.

pisa

But I was wrong. Not about getting lost in Rome, which we did, and not about the need for Kleenex, which lasted for the next few days, but about Pisa having nothing to offer other than a poorly constructed tower and hordes of tourists. Instead, we took a relaxed walk down a lovely street full of bicyclists, shops, and cafes; peeked into a dark, quiet church that was perhaps my favorite of the trip; and detoured to a wonderful street market where, having learned our lesson, we bought some fruit to snack on while I ogled the squash blossoms, giant porcini mushrooms, crates of fresh figs, bins of artichokes, and baskets of uncured olives. Best of all, we found a farmacia that sold six-packs of Kleenex packets – a lifesaver for the 4-hour train ride ahead.

apple muffin cake 1

But that was Pisa and now I’m back in southeast New Mexico, where fresh figs are nowhere to be found, to say nothing of squash blossoms and fresh porcini mushrooms. (They do have Kleenex here, gladly.) So I skipped the fig cake chosen for Tuesdays with Dorie – but here’s the apple cake I missed while traveling.

apple muffin cake 3

I tried to pretty it up by adding streusel, but it melted into the cake and didn’t contribute much more than a delicious sugary crust. Not that the cake needed any help in the taste department, as it was already moist and sweet and pleasantly appley. Next time I’m in Pisa, I’ll pick up some fresh figs to make Dorie’s fig cake with; until then, apple muffin cake will have to do.

apple muffin cake 4

Katrina chose this for Tuesdays with Dorie a few weeks ago, and she has the recipe posted. If you want to add streusel to the top, try this one; the one I used didn’t work very well.  I doubled the salt, as usual, since I like my desserts saltier than Dorie.

One year ago: Apple Pie
Two years ago: Sweet Potato Biscuits
Three years ago: Chocolate Cupcakes

apple muffin cake 7

apple cider doughnuts

cider donuts 5

It’s going to be 95 degrees here today, but I’m trying to force it to feel like fall anyway. It isn’t just the temperature; there are no trees here to change colors, the air is always dry and crisp, and the only place to buy pumpkins and apples is the grocery store. I often prefer living in the desert, even with months of over 100-degree days in the summer, but every fall, I miss upstate New York.

cider donuts 2

I especially miss the cider mill I lived near when I was there, which was almost a fall festival of its own, every day. I loved stopping there and choosing one each of six different apple types, which made the best apple pies I’d ever eaten. In the weeks before Halloween, they’d cover most of the lot with pumpkins, not to mention the barrels of squash of every variety. Inside, you could watch them pulp the apples into cider on one side of the building, and on the other, they were frying doughnuts. Brushing fallen sugar off of our shirts after biting into fresh donuts became a yearly tradition.

cider donuts 3

You can’t buy jugs of fresh cider here or the donuts made with it, but I can make my own doughnuts using pulpy storebought apple juice. By reducing the apple cider/juice until it’s syrupy, you can increase the apple flavor of the doughnuts without increasing the stickiness of the dough. Concentrating apple juice and frying apply donuts smells like fall, and, in a pinch, that will have to epitomize the season in the desert.

cider donuts 6

One year ago: Burritos
Two years ago: Green Chile Rellenos
Three years ago: Stuffed Mushrooms with Sun-Dried Tomatoes

Printer Friendly Recipe
Apple Cider Doughnuts (slightly adapted from The Hearth Restaurant via Smitten Kitchen)

Makes 18 doughnuts and 18 doughnut holes

Despite generally being anti-shortening, I tried it for frying this time. However, I wasn’t happy with it; it started smoking well before it reached proper frying temperature. The doughnuts also seemed to absorb more fat than usual.

1 cup apple cider
3½ cups (16.8 ounces) flour, plus additional for the work surface
2 teaspoons baking powder
1 teaspoon baking soda
½ teaspoon ground cinnamon
½ teaspoon salt
⅛ teaspoon ground nutmeg
4 tablespoons (½ stick) butter, at room temperature
1 cup (7 ounces) granulated sugar
2 large eggs
½ cup buttermilk
Vegetable oil or shortening for frying
Topping (optional): ½ cup granulated sugar + 2 teaspoons cinnamon

1. In a small saucepan over medium heat, bring the apple cider to a simmer. Reduce the heat and simmer, uncovered, until reduced to ¼ cup, about 20 minutes. Set aside to cool. Meanwhile, combine the flour, baking powder, baking soda, cinnamon, salt and nutmeg.

2. Using an electric mixer on medium speed (with the paddle attachment, if using a standing mixer), beat the butter and granulated sugar until smooth, 1-2 minutes. Add the eggs, one at a time; continue to beat until the eggs are completely incorporated. Reduce the speed to low and gradually add half of the reduced apple cider and buttermilk, then all of the dry ingredients, then the remaining liquid ingredients, mixing just until combined.

3. Flour two sheets of parchment or wax paper; turn the dough out onto one floured sheet and cover with the second sheet. Roll the dough out to a thickness of ½-inch. Transfer the dough to the freezer until it is slightly hardened, about 20 minutes.

4. Using a floured 3-inch or 3½-inch doughnut cutter (or a round cutter plus a 1-inch round cutter or backside of a piping tip), cut out rings of dough. Place the cut doughnuts and doughnut holes onto one sheet of floured wax paper. Re-roll the scraps of dough, incorporating as little flour as possible. Refrigerate the doughnuts for 20 to 30 minutes.

5. Add oil or shortening to a deep-sided pan to measure a depth of about 3 inches. Heat over medium heat until the oil reaches 350°F. Place a wire rack over a baking sheet.

6. Carefully add three doughnuts and three holes to the oil; fry until golden brown, about 60 seconds. Flip the doughnuts and fry until the other side is golden, 30 to 60 seconds. Drain on the rack for one minute. Dip the top of the warm doughnuts into the cinnamon sugar mixture (if using) and serve immediately.

cider donuts 7

perfection pound cake

(The reason I’m talking about pound cake and not this week’s chosen recipe is because I’m off gallivanting around Italy and have been since before this month’s recipes were chosen.)

(Sorry to brag!)

perfection pound cake 4

I’m under no illusions that pound cake is easy despite its simple ingredients. In fact, it’s just the opposite – without any fancy flavors spicing things up, there’s no disguising an imperfect texture. After struggling with a traditional pound cake recipe that kept baking up too dense, I finally gave up and moved on to one in which the egg whites are whipped separately, which is the only leavener in the recipe. It guarantees a light texture without drying out the cake.

perfection pound cake 0

The majority of blog entries on Dorie’s recipe, which uses baking powder as the leavener, mention that it’s dry. I was tempted to tweak the ingredients to remedy any potential problems, but instead, I made the recipe exactly, following my best baking procedure – butter that’s soft but not too soft, all ingredients at room temperature, gradually adding each new ingredient, sifting the flour and gently folding it in rather than letting the mixer do the work (and potentially overmix the dough). But with ½ to ¾ cup more flour in this compared to my other recipes for the same amount of butter, and ¼ cup less sugar, I was worried that it was hopeless. If nothing else, I figured, pound cake is my absolute favorite thing to bake, so I wouldn’t be sad if it wasn’t perfect in the end.

perfection pound cake 2

And while it may not have been as moist as my favorite pound cake, it wasn’t dry. It was dense, but that isn’t necessarily a bad thing for a cake like this. And it tasted just like pound cake should – like sweet butter with a hint of caramel from the browned edges. In the end, I would call this a success.

perfection pound cake 6

One year ago: Double Apple Bundt
Two years ago: Chocolate-Crunched Caramel Tart
Three years ago: Caramel Peanut-Topped Brownie Cake

Printer Friendly Recipe
Perfection Pound Cake (from Dorie Greenspan’s Baking: From my Home to Yours)

I used cake flour, and I strongly recommend that you do as well. As I show at the end of this entry, cake flour makes a lighter, more tender pound cake. I did not put the loaf pan on sheet pans during baking, because that trick tends to result in under-risen cakes for me. This could have resulted in a shorter cooking time – I took the cake out of the oven at 60 minutes, when it was golden brown and a toothpick came out dry.

2 cups (9.6 ounces) all-purpose flour (or 2¼ cups (9 ounces) cake flour)
1 teaspoon baking powder
¼ teaspoon salt
16 tablespoons (2 sticks) unsalted butter, at room temperature
1 cup (7 ounces) sugar
4 large eggs, at room temperature
1 teaspoon pure vanilla extract

Getting Ready:
Center a rack in the oven and preheat the oven to 325 degrees F. Butter a 9×5-inch loaf pan or an 8½ by 4½-inch loaf pan. Put the pan on an insulated baking sheet or on two regular baking sheets stacked one on top of the other.

Whisk together the flour, baking powder, and salt.

Working with a stand mixer, preferably fitted with a paddle attachment, or with a hand mixer in a large bowl, beat the butter and sugar on high speed until pale and fluffy, a full 5 minutes. Scrape down the bowl and beater and reduce the mixer speed to medium. Add the eggs one at a time, beating for 1 to 2 minutes after each egg goes in. As you’re working, scrape down the bowl and beater often. Mix in the vanilla extract. Reduce the mixer speed to low and add the flour, mixing only until it is incorporated – don’t overmix. In fact, you might want to fold in the last of the flour, or even all of it, by hand with a rubber spatula. Scrape the batter into the buttered pan and smooth the top.

Put the cake into the oven to bake, and check on it after about 45 minutes. If it’s browning too quickly, cover it loosely with a foil tent. If you’re using a 9×5-inch pan, you’ll need to bake the cake for 70 to 75 minutes; the smaller pan needs about 90 minutes. The cake is properly baked when a thin knife inserted deep into the center comes out clean.

Remove the cake from the oven, transfer the pan to a rack and let rest for 30 minutes.

Run a blunt knife between the cake and the sides of the pan and turn the cake out, then turn it right side up on the rack and cool to room temperature.

Storing:
Wrapped well, the cake will keep for 5 to 7 days at room temperature (stale cake is great toasted) or up to 2 months in the freezer.

perfection pound cake 3

dulce de leche cupcakes

dulce de leche cupcakes 10

This was not my first attempt at dulce de leche cupcakes. My first attempt resulted in cupcakes that rose out of their wells, spread over the top of the pan, and baked into one solid mass. And they tasted like pancakes.

dulce de leche cupcakes 1

They weren’t even really dulce de leche cupcakes. They were brown sugar cupcakes with cream cheese dulce de leche frosting. I’m sure that combination is wonderful, but it wasn’t what I wanted, which was cake that was flavored with dulce de leche. Also cake that didn’t explode in the oven.

dulce de leche cupcakes 2

This is the cake that I wanted. It’s based on a yellow cake recipe (similar to Martha Stewart’s, which did well in this comparison), with dulce de leche replacing a portion of the milk. I had my doubts that the caramel flavor would be evident after baking, but I was very pleasantly surprised.

dulce de leche cupcakes 3

And then there’s the buttercream, which might be the best thing I’ve eaten in weeks. It’s so smooth and creamy, and so dulce de leche-y. With a drizzle of pure dulce de leche on top, these cupcakes were perfect, and a very far cry from my first attempt.

dulce de leche cupcakes 6

One year ago: Beer-Marinated Flank Steak
Two years ago: Zucchini Bread
Three years ago: Crawfish (or Shrimp), Roasted Tomato, and Farmer’s Cheese Pizza

Printer Friendly Recipe
Dulce de Leche Cupcakes (adapted from Confections of a Foodie Bride)

I made these twice; the first time, they seemed dry, so I replaced a portion of the butter with canola oil and increased the buttermilk.

1½ cups (7.2 ounces) all-purpose flour
1½ cups (6 ounces) cake flour
2 teaspoons baking powder
¼ teaspoon baking soda
12 tablespoons (1½ sticks) unsalted butter, softened
1⅓ cup (9.33 ounces) granulated sugar
¾ teaspoon salt
½ cup dulce de leche
4 large eggs, at room temperature
¼ cup canola oil
2 teaspoon vanilla extract
¾ cup buttermilk, room temperature
Dulce de Leche Swiss Meringue buttercream, recipe below

1. Adjust an oven rack to the idle position; heat the oven to 350 degrees. Line 24 muffin wells with paper cups. In a medium bowl, whisk together the flours, baking powder, and baking soda.

2. In a stand mixer fitted with the paddle attachment (or a large bowl if using a hand-held mixer), beat the butter, sugar, and salt on medium speed until light and fluffy, about 2 minutes, scraping down the sides of the bowl as necessary. With the mixer running, gradually add the dulce de leche; beat another minute, until thoroughly incorporated. Add the eggs one at a time, beating well after each addition, then mix in the oil and vanilla. Reduce the mixer speed to low; add the dry ingredients in three additions, alternating with the buttermilk and ending with the dry ingredients. Beat each addition just until incorporated.

3. Divide the batter between the prepared muffin cups, filling each cup about two-thirds full. Bake for 16-20 minutes, until a toothpick inserted into the center of a cupcake comes out clean. Transfer the pan to a wire rack to cool. Remove the cupcakes from the pan after 5 minutes. Cool completely before frosting.

Dulce de Leche Swiss Meringue Buttercream

4 egg whites
1¼ cups (8.75 ounces) granulated sugar
Pinch salt
24 tablespoons (3 sticks) unsalted butter, softened
⅓ cup dulce de leche
1 teaspoon vanilla extract

1. In the bowl of a stand mixer (or a large bowl if using a hand-held mixer), combine the egg whites, sugar, and salt. Set the bowl over a pot of simmering water, making sure the bottom of the bowl does not touch the water. Whisk constantly until the mixture reaches 160 degrees.

2. Fit the mixer with the whisk attachment; beat the egg white mixture on medium-high speed until stiff peaks form and it has cooled to room temperature, about 8 minutes. Reduce the mixer speed to medium and add the butter 2 tablespoons at a time, adding more once each addition has been incorporated. Increase the mixer speed to medium-high and beat until the buttercream is thick and smooth, 3-5 minutes. Add the dulce de leche and vanilla; mix until incorporated.

dulce de leche cupcakes 7