grapefruit margaritas

grapefruit margarita 4

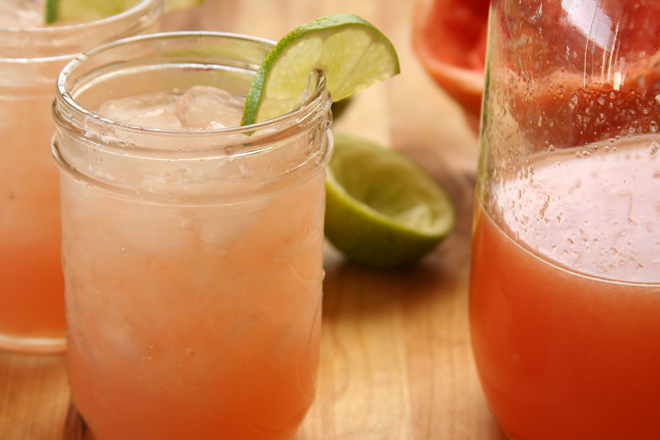
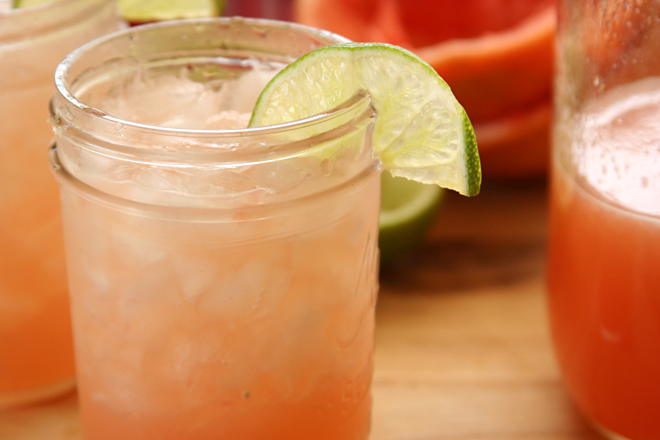
If 2010 was the year of the vodka gimlet, 2011 was dedicated to margaritas. It started with these, and then when grapefruits went out of season, we tried strawberry margaritas, pineapple margaritas, classic lime margaritas, and, most recently, cranberry margaritas. I love them all, but nothing holds a candle to the grapefruit version.

grapefruit margarita 2

It’s perfectly balanced – not too sweet, not too sour, not too strong. The light grapefruit mellows any harshness from the lime and alcohol, and the result is perfectly refreshing. As an added bonus, one grapefruit yields enough juice for four drinks – which is just the right amount to split between two people.

grapefruit margarita 3

One year ago: Feta and Shrimp Macaroni and Cheese
Two years ago: Apple Muffins
Three years ago: Twice Baked Potatoes with Broccoli, Cheddar, and Scallions
Four years ago: Maple Walnut Cupcakes

Printer Friendly Recipe
Grapefruit Margaritas (adapted from Confections of a Foodie Bride)

Technically 4 servings, but you’ll be sad if you only get one

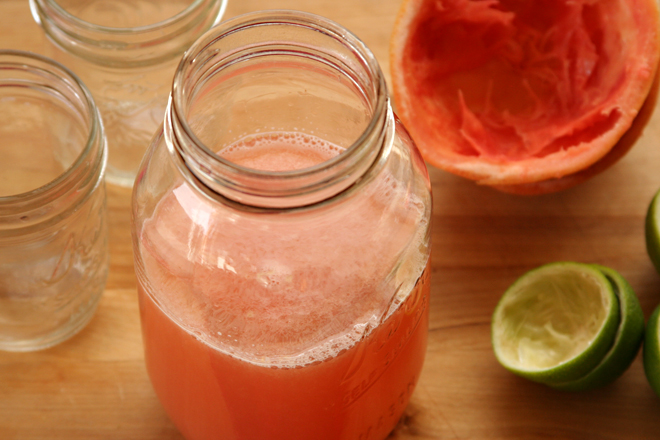
Of the many grapefruits I have juiced for margaritas, one grapefruit has always resulted in 4 shots of juice. Two limes will usually give two shots of juice, but not always, so it’s best to buy a third just in case.

As with all things, alcohol quality matters. I’ve used Cointreau, Gran Marnier, Gran Gala, Controy (which can only be purchased in Mexico), and Patron Citronge in these, all with good results. I’ve never used a bargain triple sec. For tequila, I tend to buy whatever is on sale in the $20-25 range.

2 shots lime juice
4 shots grapefruit juice
3 shots orange liqueur
3 shots tequila

In a pitcher or 4-cup measuring cup, mix all of the ingredients. Pour over crushed ice in individual glasses; serve immediately.

grapefruit margarita 5

ricotta

ricotta 12

Here are some things you need to know about making ricotta at home:

1) It really is as easy as they say. The process involves nothing more than heating milk and salt, stirring in lemon juice or vinegar, and straining the mixture.

2) It requires a lot of milk for a relatively small amount of cheese – you’ll start with about four times more volume of milk than you’ll end up with of cheese.

ricotta 3
right after adding the acids

3) About that milk – you can use the regular ol’ stuff from the grocery store, ultrapasteurization and all. That’s all I have access to, and I’ve made some nice ricotta with it.

4) If you’re feeling decadent, you can substitute some of the milk with cream. I started out using about seven times more milk than cream, but in the pictures you see here, I was almost out of cream and used about twenty times more milk than cream. I like this batch just as much as the others.

ricotta 4
right before straining

5) You can use either regular white vinegar or lemon juice. I read here that using all lemon juice gives the cheese a lemony flavor and vinegar is more neutral. However, I was worried about my cheese tasting like vinegar, which would be gross, so I always use a mixture of the two.

ricotta 5
after 5 minutes of straining with no cheesecloth or paper towel liner

6) The pH of the acid you add to curdle the milk matters. That’s one reason vinegar is more dependable than lemon juice; the acidity of lemons varies. It also means you can’t substitute other vinegars, because they might not be as acidic as white vinegar. I learned this the hard way when I realized I was out of regular vinegar and tried to use white wine vinegar instead; the milk didn’t form many curds.

ricotta 6
after 15 minutes of straining with no cheesecloth or paper towel liner

7) You don’t need cheesecloth. The first two times I made this cheese, I strained the mixture in my fine-mesh strainer. Worried that I was losing too much of good stuff, I tried using a double layer of paper towels, but it was draining too slowly and I got impatient and went back to just the strainer. That being said, I really am trying to remember to buy cheesecloth.

ricotta 7
after 15 minutes of straining with no liner, stirred

8 ) You’ll feel wasteful throwing all that whey down the drain, but the bit of internet research I did indicated that it isn’t good for bread dough, because the acid breaks the gluten molecules, weakening the dough’s structure.

9) It isn’t technically ricotta, which is made from the whey leftover from making other cheeses. (The word ricotta, in Italian, means re-cooked.) When I first heard this, I wondered why anyone would call it ricotta, since it isn’t made the same way. Then I made it myself and realized that it looks and tastes just like real ricotta.

ricotta 8
after 2 hours of straining with no liner

10) Homemade ricotta is better than the stabilizer-filled tubs you’ll find in most grocery stores. However, if you do happen to have access to real fresh ricotta, it’s probably cheaper to buy that rather than using half a gallon of milk to make 2 cups of cheese. As for which is better, the last time I bought fresh ricotta from an Italian market was a couple years ago, too long to remember the details of how good it was. I know it was really good, but I know this is really good too.

ricotta 10
finally bought cheesecloth; after 1 hour of straining with double layer of cheesecloth; smoother, creamier cheese

One year ago: Beef Short Ribs Braised in Tomato Sauce
Two years ago: Maple Oatmeal Scones
Three years ago: Chopped Salad
Four years ago: Country Crust Bread

Printer Friendly Recipe
Ricotta (adapted from Smitten Kitchen and Serious Eats)

Makes about 1 cup

You can adjust the amount of cream down (to 4 cups milk and no cream) or up (to 3 cups milk and 1 cup cream), depending on how rich you want the ricotta to be.

3½ cups whole milk
½ cup heavy cream
½ teaspoon salt
2 tablespoons white vinegar
1 tablespoon lemon juice

1. In a 2-quart saucepan over medium-high heat, heat the milk, cream, and salt to 190 degrees. Remove the pot from the heat, add the vinegar and lemon juice, stir once, and set aside for 5 minutes.

2. Place a fine-mesh strainer over a large bowl. Line the strainer with a double layer of cheesecloth or a single layer of paper towels. Pour the curdled milk mixture into the strainer. Set aside for about an hour. It will get thicker the longer it sits to drain.

ricotta 11

fresh orange cream tart

orange cream tart 5

I’ve come full circle. The second recipe I made as part of Tuesdays with Dorie was a lemon cream tart; the alternative offered for that recipe for lemon haters was this fresh orange cream tart, and now this is the second-to-last thing I baked for the group. I swore after that lemon tart that I was done with citrus creams, because, as good as they are, a full pound of butter in a 9-inch tart is extreme. But it was a never say never situation, because I made a lemon cream as part of this lemon meringue cake and now I’m making an orange cream to say I baked every single dessert recipe in the book.

orange cream tart 1

Fortunately, this time I was smart enough to give them all away without telling my guests that they were eating orange-flavored butter on a cookie. Plus I made them tiny, so each little tartelette only contained maybe one tablespoon of butter. Which is still a lot. It’s good enough that it might be worth the calories. But what I can say for sure is that making this one very rich dessert was worth it to say I finished off an entire cookbook.

orange cream tart 3

Three years ago, one very busy day of candy-making: Candied Orange Peels, Buckeyes, White Chocolate Lemon Truffles, Pumpkin Seed Brittle, Vanilla Bean Caramels

Printer Friendly Recipe
Fresh Orange Cream Tart (from Dorie Greenspan’s Baking: From my Home to Yours)

I skipped both the orange segments and the jelly garnishes.

For the Orange Filling:
1 cup (7 ounces) sugar
Grated zest of 3 oranges
Grated zest of 1 lemon
4 large eggs
Scant ¾ cup fresh blood-orange or Valencia orange juice
3 tablespoons fresh lemon juice
1¼ teaspoons unflavored gelatin
1 tablespoon cold water
2¾ sticks (22 tablespoons) unsalted butter, cut into tablespoon-size pieces, at cool room temperature

1 9-inch tart shell (round or square) made with Sweet Tart Dough or Sweet Tart Dough with Nuts, fully baked and cooled

3 orange segments, for decoration
⅓ cup quince or apple jelly mixed with ½ teaspoon of water, for glazing

Getting Ready: Have an instant-read thermometer, a strainer and a blender (first choice) or food processor at hand. Bring a few inches of water to a simmer in a saucepan.

Put the sugar and orange and lemon zest in a large heatproof bowl that can be set over the pan of simmering water. Off the heat, rub the sugar and zests together between your fingertips until the sugar is moist, grainy and very aromatic. Whisk in the eggs, followed by the orange and lemon juice.

Set the bowl over the pan and start stirring with the whisk as soon as the mixture feels tepid to the touch. You want to cook the cream until it reaches 180 degrees F. As you whisk – you must whisk constantly to keep the eggs from scrambling – you’ll see that the cream will start out light and foamy, then the bubbles will get bigger and then, as it gets closer to 180 degrees F, it will start to thicken and the whisk will leave tracks. Heads up at this point – the tracks mean the cream is almost ready. Don’t stop whisking or checking the temperature, and have patience – depending on how much heat you’re giving the cream, getting to temp can take as long as 10 minutes.

As soon as it reaches 180 degrees F, remove the cream from the heat and strain it into the container of the blender (or food processor); discard the zest.

Soften the gelatin in the cold water, then dissolve it by heating it for 15 seconds in a microwave oven (or do this in a saucepan over extremely low heat). Add the gelatin to the filling and pulse once just to blend, then let the filling cool to 140 degrees F, about 10 minutes.

Turn the blender to high (or turn on the processor) and, with the machine going, add the butter about 5 pieces at a time. Scrape down the sides of the container as needed as you incorporate the butter. Once the butter is in, keep the machine going – to get the perfect light, airy texture, you must continue to blend the cream for another 3 minutes. If your machine protests and gets a bit too hot, work in 1-minute intervals, giving the machine a little rest between beats.

Pour the cream into a container, press a piece of plastic wrap against the surface and refrigerate for at least 4 hours. (The cream can be refrigerated, tightly covered, for up to 5 days or frozen for up to 2 months; thaw overnight in the fridge.)

When you are ready to construct the tart, whisk the cream vigorously to loosen it. Spread the cream evenly in the crust. Arrange the orange segments in the center of the tart and prepare the glaze: bring the jelly and water to a boil. Use a pastry brush or pastry feather to lightly spread the jelly over the orange segments and cream. Serve now or refrigerate the tart until needed.

Sweet Tart Dough

1½ cups (7.2 ounces) all-purpose flour
½ cup (2 ounces) confectioner’s sugar
¼ teaspoon salt
1 stick plus 1 tablespoon (9 tablespoons) very cold (or frozen) unsalted butter, cut into small pieces
1 large egg yolk

Put the flour, confectioner’s sugar and salt in a food processor and pulse a couple of times to combine. Scatter the pieces of butter over the dry ingredients and pulse until the butter is coarsely cut in – you should have some pieces the size of oatmeal flakes and some the size of peas. Stir the yolk, just to break it up, and add it a little at a time, pulsing after each addition. When the egg is in, process in long pulses – about 10 seconds each – until the dough, which will look granular soon after the egg is added, forms clumps and curds. Just before you reach this stage, the sound of the machine working the dough will change – heads up. Turn the dough out onto a work surface and, very lightly and sparingly, knead the dough just to incorporate any dry ingredients that might have escaped mixing.

To Press the Dough into the Pan: Butter a 9-inch fluted tart pan with a removable bottom. Press the dough evenly over the bottom and up the sides of the pan, using all but one little piece of dough, which you should save in the refrigerator to patch any cracks after the crust is baked. Don’t be too heavy-handed – press the crust in so that the edges of the pieces cling to one another, but not so hard that the crust loses its crumbly texture. Freeze the crust for at least 30 minutes, preferably longer, before baking.

To Fully Bake the Crust: Center a rack in the oven and preheat the oven to 375 degrees F.

Butter the shiny side of a piece of aluminum foil and fit the foil, butter side down, tightly against the crust. (Since you froze the crust, you can bake it without weights.) Put the tart pan on a baking sheet and bake the crust for 25 minutes. Carefully remove the foil. If the crust has puffed, press it down gently with the back of a spoon. For a partially baked crust, patch the crust if necessary, then transfer the crust to a cooling rack (keep it in its pan).

Bake for another 8 minutes or so, or until it is firm and golden brown. Transfer the tart pan to a rack and cool the crust to room temperature before filling.

orange cream tart 4

earl grey madeleines

earl grey madeleines 3

Coffee makes me feel like bees are buzzing in my head, so I save it for the weekends. At work, I stick to tea, and I’ve developed a little ritual with my electric kettle, collection of looseleaf teas, and steeper that drips from below when I set it onto my mug. I’m picky about my teas too; I don’t like any teas with weird fruity flavors, and I prefer my black tea with some bitter bite to it.

earl grey madeleines 1

I like Earl Gray tea, but it can’t be too orangey. I once bought one that tasted like a creamsicle, and I threw the whole tin away. Rishi makes my favorite black tea, but their Earl Grey is too strong for me. For months, I’ve been mixing Rishi Earl Grey tea leaves with another black tea I have that isn’t as bitter as I like. My morning mug of tea is an art.

earl grey madeleines 2

Overly strong tea leaves are perfect for putting into dessert though, where they have to battle to be noticed past the sugar and butter. The batter for these madeleines smelled and tasted noticeably of Earl Grey, but the flavor was muted once baked. They smelled more tea-y than they tasted. Clearly, the perfect way to really taste your Earl Grey with your Earl Grey madeleines is to have a mug of tea alongside your tea cake.

earl grey madeleines 4

Nicole chose these madeleines for Tuesdays with Dorie and has the recipe posted. Watch them carefully if you make them! I baked mine for 9 minutes, and it was definitely too long.

One year ago: Maple Tuiles
Two years ago: All-Occasion Sugar Cookies
Three years ago: Rosy Poached Pear and Pistachio Tart

earl grey madeleines 5

cranberry apple brandy

cranberry apple brandy 3

When I was simmering sugar syrup, smashing fruit, and measuring alcohol for these cocktails, my mom made the excellent point that opening a bottle of wine is a heck of a lot easier. And while I appreciate how wine compliments food and how beer signals relaxation, I love cocktails too. Cocktails are special. They mean fun and celebration. You can’t help but be happy when enjoying a cocktail with friends and family. And that’s why they’re worth the trouble.

cranberry apple brandy 1

This one takes more work than the citrus squeezing, liquor measuring, and syrup simmering of my favorite vodka gimlets and magaritas, as apples need to be sliced, then crushed along with cranberries before the liquor and syrup are stirred in – and that’s in addition to the squeezing, measuring, and mixing of citrus, liquor, and syrup, respectively.

cranberry apple brandy 2

It’s a strong drink, undoubtedly, as it is mostly brandy.  But it has all of the ingredients in a good apple dessert – sugar, a touch of citrus to brighten the flavors, cranberries in case you needed another reminder that it’s the end of fall and the beginning of winter.  Fortunately, that’s just the time for celebrations worthy of the trouble involved with mixing up a seasonal cocktail.

cranberry apple brandy 4

One year ago: Cranberry Apple Galette
Two years ago: Carne Adovada
Three years ago: Baked Eggs with Spinach and Mushrooms

Printer Friendly Recipe
The Normandy
(from The Essential New York Times Cookbook by Amanda Hesser)

Serves 1

9 cranberries
2 thin slices green apple
1 teaspoon dark brown sugar
1 tablespoon fresh lemon juice
1 tablespoon simple syrup
2 ounces Calvados or other good-quality apple brandy

Combine 6 cranberries, 1 apple slice, the brown sugar, and lemon juice in a cocktail shaker and muddle (crush with a muddler or the back of a wooden spoon). Add the simple syrup, Calvados, and a few ice cubes, cover, and shake well. Strain into a rocks glass filled with ice and garnish with the remaining 3 cranberries and apple slice.

cauliflower with mustard-lemon butter

mustard cauliflower 3

While you don’t want to serve plain steamed vegetables on Thanksgiving, maybe not every dish needs to be drowned in cream, you know? These cauliflower have enough flavor from spicy mustard and tart lemon to stand up to the rich foods at Thanksgiving, but they’re also light enough to serve with any weeknight chicken dish.

mustard cauliflower 2

It’s almost too simple to provide a recipe for, as this is nothing more than roasted cauliflower topped with mustardy, lemony butter. Fortunately, that means it’s easy. Whether you’re making this for a busy holiday or on a busy weeknight, the cauliflower can be chopped in advance and the flavorings can be mixed. That means it takes even less time to make than green bean casserole – but it tastes a lot better and has a fraction of the calories.

mustard cauliflower 4

Two years ago: Pumpkin Biscotti
Three years ago: Bourbon Pumpkin Cheesecake

Printer Friendly Recipe
Cauliflower with Mustard-Lemon Butter (adapted from Bon Appétit via epicurious)

6 servings

If you aren’t a fan of cauliflower, I don’t see any reason that this method wouldn’t work just as well with broccoli or Brussels sprouts.

1 small head of cauliflower (about 1¾ pounds), cut into 1-inch florets
1 teaspoon kosher salt
2 tablespoons butter
2 tablespoons fresh lemon juice
4 teaspoons Dijon mustard
1 teaspoon finely grated lemon peel
1 tablespoon chopped fresh parsley

1. Heat the oven to 400 degrees. Arrange the cauliflower in a single layer on the prepared baking sheet; sprinkle with salt. Roast until the cauliflower is slightly softened, about 15 minutes.

2. Meanwhile, melt the butter in a small saucepan over medium heat. Whisk in the lemon juice, mustard, and lemon peel.

3. Scrape the mustard-lemon butter evenly over the cauliflower; toss to evenly coat the cauliflower and roast until crisp-tender, about 10 minutes longer. Transfer the cauliflower to a serving dish; sprinkle with parsley and serve warm.

mustard cauliflower 5

prosecco raspberry gelee

raspberry gelee 7

One New Year’s Eve, I was standing in line at the grocery store buying sushi rice (because I had a very exciting evening of cooking ahead of me to ring in the new year), when I heard the person behind me tell someone on her cell phone, “I’m buying vodka…and Grandma got the good jello!”

raspberry gelee 4The advantage of only making a half recipe – half a bottle of champagne to use up!

What, I wonder, is the “good jello”? Jell-o brand, and not store brand? I assure you that the two will make equally gag-worthy but redeemingly drunk-making jello shots.

raspberry gelee 2

I think I have found my own good jello, and it involves, as all good things must, bubbly wine. Not precisely prosecco, because apparently that Italian sparkling wine isn’t available in my area, but I’m sure my favorite New Mexico champagne will work just as well.

raspberry gelee 5

And good wine is key here, because very little is done to it. It’s mixed with raspberries, of course, and solidified, and slightly sweetened, and that’s it. In the end, it’s a dessert that tastes almost exactly like champagne with fruit, and the best part is that it even keeps its fizz. It keeps its buzz too, as I accidentally learned on a pleasant Sunday afternoon. I wouldn’t call this a jello shot, but it’s definitely good jello.

raspberry gelee 6

One year ago: Whole Wheat Bagels
Two years ago: Quick Baking Powder Pizza Crust
Three years ago: Eclairs

printer friendly recipe
Prosecco Raspberry Gelée (from Bon Appétit)

Mixing fresh raspberries with sugar doesn’t do much if you don’t cut or crush them, but just go with it. You’ll end up breaking them up slightly when you mix them with the rest of the ingredients, which will tint your gelée a pretty blush color.

I might add a couple tablespoons more sugar next time, just to make this feel more like dessert and less like a glass of wine that happens to be solid(ish).

I did use the orange-flower water, and I recommend it if you have it.

2 cups (9 ounces) fresh raspberries
¾ cup plus 2 tablespoons sugar, divided
2 tablespoons fresh lemon juice, divided
1 750-ml chilled bottle Prosecco (Italian sparkling wine), divided
3½ teaspoon unflavored gelatin (measured from two 1/4-ounce envelopes)
¾ teaspoon orange-flower water (optional)

1. Place the raspberries, ¼ cup sugar, and 1 tablespoon lemon juice in a medium bowl; toss gently to combine. Let stand at room temperature until the raspberries release their juices, tossing occasionally, 20-30 minutes.

2. Place ½ cup Prosecco in a small bowl. Sprinkle the gelatin over it and let stand 5 minutes to soften. Bring 1 cup Prosecco to a boil with the remaining ½ cup plus 2 tablespoons sugar, stirring until the sugar is dissolved. Remove from the heat; add the gelatin mixture and stir until dissolved.

3. Transfer the gelatin mixture to a large pitcher. Add the raspberries with their juices, the remaining Prosecco, the remaining 1 tablespoon lemon juice, and orange-flower water (if using), stirring to dissolve any sugar.

4. Using a slotted spoon, divide the raspberries equally among coupe glasses or other small wide shallow glasses or cups. Divide the Prosecco mixture equally among the glasses, about ¾ cup per glass. Chill gelée until firm, about 3 hours. (Gelées can be made up to 2 days ahead. Cover and keep chilled.)

raspberry gelee 8

farro and pine nut salad

farro tabbouleh 6

It’s a good thing I really like farro, because I accidentally bought 26 dollars worth of it. Apparently I need to pay more attention to the prices on the bulk bins. I should also start enjoying barley or wheat berries or some other equally healthy grain that doesn’t cost $12 per pound. (I actually looked at the prices the next time I was at the store, and farro cost about five times as much as the other grains.)

farro tabbouleh 1

I can’t pinpoint exactly what it is about farro that I like so much. I don’t think the flavor of the different grains are so different that I notice a big difference once dressing and other ingredients are mixed in, so it must be more textural. It’s all about a balance of the tender and the chewy. Rice is soft and tender. Barley is very chewy. Farro is just right.

farro tabbouleh 3

Usually I mix it with caramelized onions and feta, which, with a squirt of hot sauce, becomes one of my favorite meals that also happens to be incredibly healthy. But having two pounds of farro is good incentive to branch out. There are few things that aren’t improved with the addition of summer vegetables, pine nuts, chickpeas, and a squirt of lemon juice, farro included. It looks like I have another delicious farro meal that also happens to be healthy.

farro tabbouleh 4

One year ago: Grilled Potato and Vegetable Salad
Two years ago: Casatiello
Three years ago: Soba Salad with Feta and Peas

Printer Friendly Recipe
Farro and Pine Nut Salad (adapted from Self magazine via epicurious)

If you choose a grain other than farro, your cooking time will probably be different.

The original recipe included jalapenos, which is why they’re shown in the photo above, but I decided not to use them.

1 cup farro (or another whole grain, such as wheat berries, barley, or brown rice)
salt
1 clove garlic, unpeeled
¼ cup pine nuts
Juice from 1 lemon
½ small red onion, very thinly sliced
2 large heirloom tomatoes, chopped, or 1 pint grape tomatoes, halved
1 small cucumber, quartered and sliced ⅛-inch thick
1 (15-ounce) can chickpeas, rinsed and drained
1 cup feta, crumbled
3 tablespoons extra-virgin olive oil
¼ cup chopped fresh parsley

1. Bring 2 quarts of water to a roiling boil; add the farro and 2 teaspoons of salt. Cook for 20 minutes, until the farro is tender but slightly chewy. Drain.

2. Squeeze the juice of the lemon into a large bowl; add the onions and a pinch of salt. Set aside.

3. Heat a small not-nonstick pan over medium heat. Add the garlic and toast it, turning once, until browned, about 2 minutes. Remove the garlic from the pan. Add the pine nuts to the pan and cook, stirring constantly, until fragrant and slightly browned, 3-4 minutes. Remove from the pan. When the garlic is cool enough to handle, peel and mince it.

4. Stir the drained farro into the onion vinegar mixture, then add the remaining ingredients. Let the salad stand at room temperature for at least 10 minutes before serving.

farro tabbouleh 5

bruschetta with chickpea puree

chickpea bruschetta 5

I wouldn’t say I have a black thumb, but I certainly don’t have a green thumb. Every spring I get really excited about gardening. Besides the quality and convenience of produce from the backyard, I love to watch things grow. I especially enjoy watching seeds sprout, as the green shoot springs up and then slowly uncurls, stands tall, and spreads its first two leaves. I like creating something so impressive from almost nothing at all.

chickpea bruschetta 4

Gardening in southern New Mexico is relatively easy. Our growing season, from last frost to first frost, extends from March all the way to November. Overwatering and mold certainly aren’t problems, since it almost never rains here. Our soil is hardpacked clay, but it wasn’t difficult or expensive to build a small raised bed. A layer of mulch and the lack of rain keep most weeds at bay. With a timed sprinkler system, there’s little effort involved with keeping a garden beyond the initial planting.

chickpea bruschetta 3

Except for the bugs. Squash bugs always get my zucchini plants eventually. And last year I think grasshoppers ate more tomatoes than I did. This year, even worse, I bought a diseased tomato plant and it spread its fungus to the rest of the bunch. They’ll have to be pulled, I’m afraid.

chickpea bruschetta 2

So my hopes for panzanella, slow-roasted tomatoes, BLTs, pasta with tomatoes and fresh mozzarella, big pots of sauce to freeze, and a whole long list of other tomato recipes I love – this isn’t the year for that. Instead of topping grilled garlic-rubbed slices of Tartine’s country bread with fragrant tomatoes from my garden, I’ll have to find other ideas.

chickpea bruschetta 1

While nothing is going to live up to perfectly ripe summer tomatoes, I won’t complain about this chickpea spread. Something that could so easily be bland – a bowl of mashed beans – is kicked up with all sorts of good things, like tangy bits of red onion, spicy red pepper flakes, sweet balsamic vinegar, and tart lemon juice. Then it’s topped with crunchy toasted nuts and fresh herbs. It’s not garden-fresh tomatoes, but it’ll do in a pinch.

chickpea bruschetta 7

One year ago: Stuffed Squash Flowers
Two years ago: Dried Fruit Compote
Three years ago: Sautéed Shredded Zucchini

Printer Friendly Recipe
Bruschetta with Spicy Chickpea Purée (adapted from Rick Tramonto’s Fantastico via epicurious)

8 slices rustic bread
4 garlic cloves, peeled and halved lengthwise
½ teaspoon kosher salt
1 (16-ounce can) chickpeas, drained and rinsed
½ small red onion, minced
2 tablespoons extra virgin olive oil, plus more for drizzling
2 tablespoons fresh lemon juice
1 tablespoon balsamic vinegar
1 teaspoon crushed red pepper flakes (use more or less to taste)
½ teaspoons honey
Kosher salt and freshly ground black pepper
2 tablespoons pine nuts, toasted
1 tablespoon chopped fresh tarragon (optional)
1 tablespoon chopped fresh flat-leaf parsley
8 lemon wedges

1. In the bowl of a food processor fitted with the metal blade, pulse the chickpeas, onion, 2 tablespoons of oil, lemon juice, vinegar, red pepper, and honey. Scrape down the sides of the bowl several times and pulse until the mixture is smooth. Season to taste with salt and black pepper. The texture of the paste should be that of spreadable peanut butter; if necessary, thin it with water and pulse again.

2. Prepare gas or charcoal grill or preheat the broiler or a panini press. The heating elements or coals should be medium-hot. Cut the slices in half and brush both sides with a generous amount of olive oil. Season both sides with salt and pepper. Grill or broil the bread, turning once, until lightly browned on both sides. Rub 1 side of the toasts with garlic.

3. Spread the bean paste on the bruschetta. Sprinkle with pine nuts, tarragon (if using), and parsley. Drizzle with olive oil, and serve garnished with lemon wedges for squeezing over the bruschetta.

chickpea bruschetta 6

thai grilled-beef salad

thai steak salad 4

My habit is that on weekdays, I eat vegetarian and am healthy, and on weekends, I eat meat and am not healthy. I save alcohol and lately even dessert for weekends. It all evens out in the end so that I’m relatively fit and trim, but I’m starting to wonder – would it be so bad to eat meat and be healthy, all at the same time?

thai steak salad 1

Steak doesn’t have to mean huge T-bones and potatoes. It can mean slivers of beef mixed with herbs and served with cucumbers. This flank steak is seasoned with salt and (white) pepper, grilled and sliced, then dressed with a mixture of lime juice and fish sauce. Toasted white rice powder deepens the flavors while fresh herbs lighten them.

thai steak salad 3

I wonder how many other great meat-topped salads are out there that I’ve been overlooking. Although even if there aren’t any others worth trying, I’d be perfectly happy making this one over and over again. Eating healthy on weekends doesn’t feel like a sacrifice when it tastes so good – and besides, I still get to have a glass of wine on the side.

thai steak salad 5

One year ago: Garlic Mustard Glazed Skewers
Two years ago: Seafood Lasagna
Three years ago: Vanilla Ice Cream

Printer Friendly Recipe
Thai Grilled-Beef Salad (from Cooks Illustrated)

Serves 4 to 6

1 teaspoon sweet paprika
1 teaspoon cayenne pepper
1 tablespoon white rice
3 tablespoons lime juice (from 2 limes)
2 tablespoons fish sauce
2 tablespoons water
½ teaspoon sugar
1½ pound flank steak, trimmed
Salt and white pepper, coarsely ground
4 shallots, sliced thin
1½ cups fresh mint leaves, torn
1½ cups fresh cilantro leaves
1 Thai chile, stemmed and sliced thin into rounds
1 seedless English cucumber, sliced ¼ inch thick on bias

1. Heat the paprika and cayenne in an 8-inch skillet over medium heat; cook, shaking the pan, until fragrant, about 1 minute. Transfer to a small bowl. Return the now-empty skillet to medium-high heat, add the rice, and toast, stirring frequently, until deep golden brown, about 5 minutes. Transfer to a second small bowl and cool for 5 minutes. Grind the rice with a spice grinder, mini food processor, or mortar and pestle until it resembles fine meal, 10 to 30 seconds (you should have about 1 tablespoon rice powder).

2. Whisk the lime juice, fish sauce, water, sugar, and ¼ teaspoon toasted paprika mixture in a large bowl and set aside.

3. For a Charcoal Grill: Open the bottom vent completely. Light a large chimney starter filled with charcoal briquettes (6 quarts). When the top coals are partially covered with ash, pour the coals evenly over half of the grill. Set the cooking grate in place, cover, and open the lid vent completely. Heat the grill until hot, about 5 minutes.

For a Gas Grill: Turn all burners to high, cover, and heat the grill until hot, about 15 minutes. Leave the primary burner on high and turn off the other burner(s).

4. Clean and oil the cooking grate. Season the steak with salt and white pepper. Place the steak over the hot part of the grill and cook until it’s beginning to char and beads of moisture appear on the outer edges of the meat, 5 to 6 minutes. Flip the steak and continue to cook on the second side until charred and the center registers 125 degrees, about 5 minutes longer. Transfer to a plate, tent loosely with aluminum foil, and let rest for 5 to 10 minutes (or allow to cool to room temperature, about 1 hour).

5. Slice the meat, against the grain and on the bias, into ¼-inch-thick slices. Transfer the sliced steak to the bowl with the fish sauce mixture. Add the shallots, mint, cilantro, chile, and half of the rice powder; toss to combine. Transfer to a platter lined with cucumber slices. Serve, passing the remaining rice powder and toasted paprika mixture separately.

thai steak salad 6