strawberry daiquiris

strawberry daiquiris 4

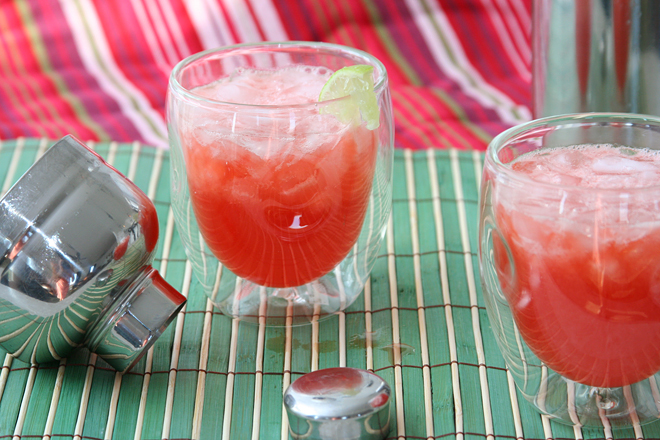
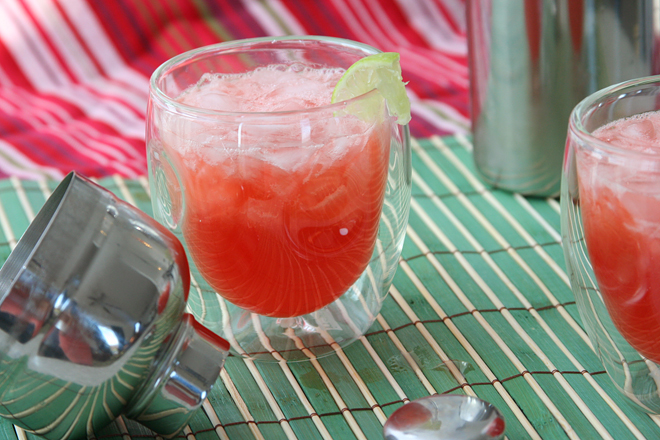
These ain’t your mama’s strawberry daiquiris. Or at least, they’re not my mama’s strawberry daiquiris, which are slushy and sugary and delicious and rightfully earn their classification as a frou frou drink.

strawberry daiquiris 7

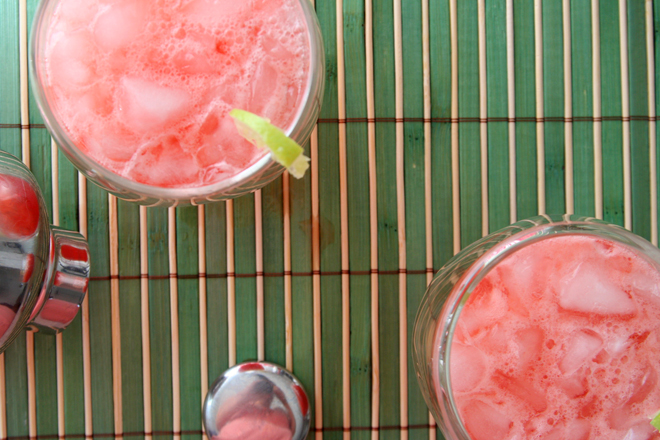
These strawberry daiquiris are no frou frou drink. They’re serious. Made from nothing but strawberry-infused rum, sugar syrup, and lime juice, they are also the most delicious cocktail I have ever had.

strawberry daiquiris 6

It’s all thanks to Dave, who found an interest in rum after we went on a Caribbean cruise with his parents last year. Our liquor cabinet is now half rum, which is fair since that’s all we drink now that Dave is willing to mix up a variety of rum drinks and I’m willing to let him bring them to me.

strawberry daiquiris 1

My part in this recipe is to think ahead enough to pour a bottle of rum over strawberries. Let them sit for a week (or really, just a few days if you’re in a hurry), strain, and you’re on your way to a seriously great cocktail. Just be careful, because these ain’t no frou frou drink.

strawberry daiquiris 3

Printer Friendly Recipe
Strawberry Daiquiris

4 drinks

Make the sugar syrup by heating 1 cup water and 1 cup sugar over medium heat until the sugar dissolves. Cool before using. Cover and refrigerate leftovers for several weeks.

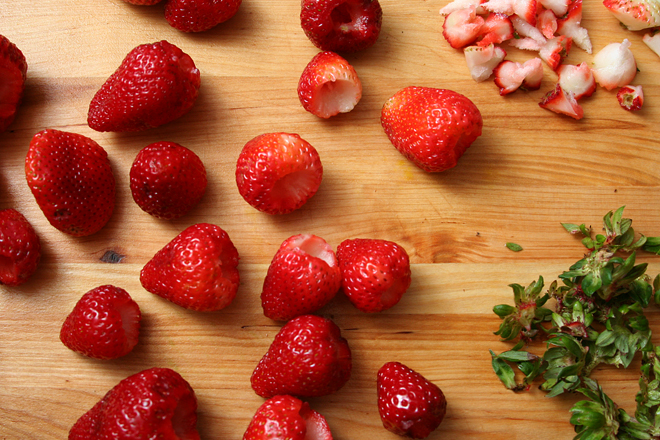
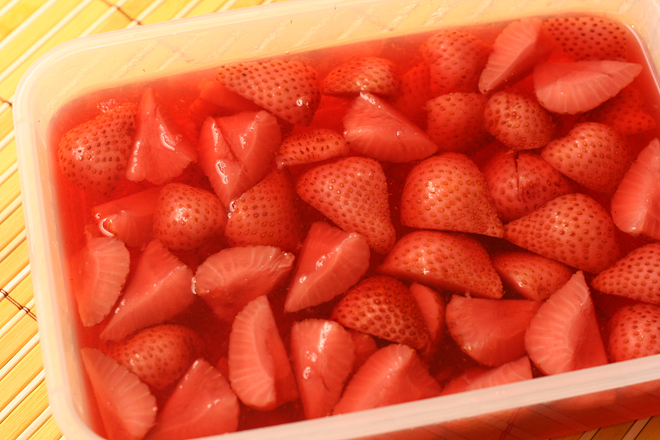
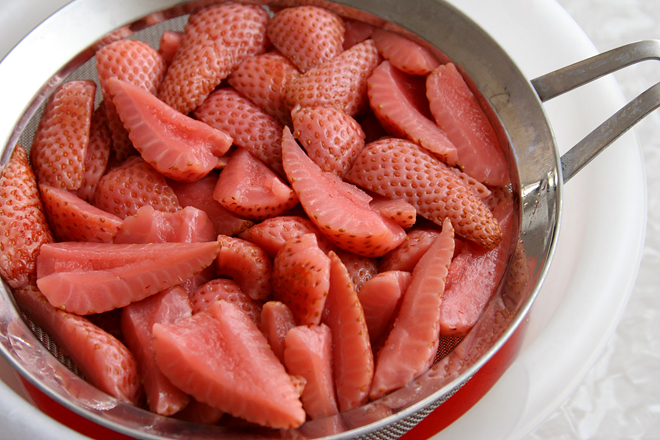
Make the strawberry rum by pouring 1 (750-ml) bottle of rum over 1 pound of stemmed and quartered strawberries. Strain after 5-7 days. Cover and refrigerate leftovers for several weeks.

Our favorite rum for mixing is Shellback Silver.

Update 6/5/2014 – Unfortunately, I had this recipe wrong initially.  The sugar syrup has now been reduced from ½ cup to ¼ cup.  We use ¼ cup, although we like our drinks on the tart side.

1½ cups strawberry rum
¾ cup lime juice
¼ cup sugar syrup

In a large measuring cup, mix the three ingredients. Fill a cocktail shaker with crushed ice; add half the rum mixture. Cover and shake until the sides of the cocktail shaker are frosty. Strain into two glasses. Add more ice and repeat with the remaining mix. Add some of the ice from the shaker into each glass. Serve immediately.

strawberry daiquiris 2

corn tortillas

corn tortillas 18

I don’t want to get melodramatic here, but these are almost life-changing. Certainly dinner-changing, and especially taco-changing.

corn tortillas 4

I have told you before about my quest for the best way to soften store-bought corn tortillas. My favorite method had to be effective and easy without adding a ton of fat. Fried tortillas are so good, but a significant amount of work, and obviously not healthy.

corn tortillas 8

I tried heating them under a damp kitchen towel, which worked okay, but the tortillas could get soggy and limp. The best I’d found was to spray both sides of the tortillas with oil and bake them until pliable but not crisp. Besides the addition of some, although not a lot, of fat, my biggest problem with this was that the tortillas would occasionally get too crisp to fold, and sometimes would just get chewy.

corn tortillas 11

Okay, so making fresh tortillas isn’t all that easy. But they’re so good – even as good as real deep-fried tortillas – and so healthy (no fat, whole grains), that I’ll spend the extra 15 minutes making them, even on a weeknight. If I only make enough for one meal, for the two of us, it isn’t so bad – just mix up two ingredients, maybe three if you want to add a pinch of salt, let it rest for a few minutes while you chop some taco fillings, roll it into balls, smash it with a tortilla press, sear it on a hot comal (or skillet) for a minute.

corn tortillas 12

As soon as you mix the masa harina with water, the dough will smell like the best corn tortillas, before you even cook them. Once you add some smoky char from the hot pan, then wrap them around fillings while they bend without breaking, you’ll see what I mean about a dinner-changing experience. But considering how often we make tacos now and how much better they are, life-changing isn’t too far of a stretch for me.

corn tortillas 14

Printer Friendly Recipe
Corn Tortillas (adapted from Serious Eats)

Makes 8 tortillas

I confess I have some specialized tools for tortillas. The cleaning lady at my office gave me the comal; she had two and hates to cook. I’m sure a cast-iron skillet will work just fine. I haven’t tried making tortillas without a press, but supposedly you can smash them under a skillet. They won’t get as thin, but a thicker fresh tortilla is still better than anything you can buy. The last item isn’t so special – just a scale – but I’ve had much more consistent results with getting the dough to the right hydration with a scale than I did with measuring cups.

4 ounces (about ¾ cup) masa harina
5 ounces water
pinch salt

1. In a medium bowl, mix the three ingredients until large crumbles form, then bring the dough together into a ball. Wrap in plastic wrap and set aside for ten minutes. Meanwhile, cut both sides of a gallon zip-top bag. Transfer the bag to a tortilla press with the crease of the bag at the hinge of the press.

2. Heat a not-nonstick skillet (preferably cast iron) over medium-high heat for at least 5 minutes.

3. Divide the dough into 8 equal portions. Roll each portion into a ball.

4. Place a ball onto the plastic-lined tortilla press, slightly off-center toward the hinge of the press. Press the tortilla just until it shows around the edges of the tortilla press. Open the press, peel the plastic wrap off the top of the tortilla, and invert the tortilla, still on the plastic, onto a towel. Slowly peel the plastic off of the tortilla. Replace the plastic in the tortilla press and repeat with the remaining balls of dough.

5. Transfer one tortilla to the hot pan; cook, without moving, until the tortilla bubbles and smokes, 30 seconds to 1 minute. Using a thin spatula, flip the tortilla; cook for another 15 to 30 seconds. Transfer the tortilla to a kitchen towel, wrapping it loosely. Repeat with the remaining tortillas, stacking them in the towel.

6. Let the tortillas sit in the towel to steam for a few minutes after the last tortilla is cooked, then serve. Kept wrapped, the tortillas will stay warm for about half an hour.

corn tortillas 1

shrimp and avocado ceviche

shrimp ceviche 6

Both times I’ve had barbacoa tacos for dinner, I’ve made this the same day – but not as an appetizer. When dinner is one of your absolute favorite foods, an appetizer just takes up valuable stomach space. But I love this dip almost as much as the barbacoa, and they’re a great match, so we have it for lunch instead.

shrimp ceviche 3

I appreciate that the shrimp are cooked first. Maybe that’s cheating, maybe that makes it something other than ceviche – I don’t care. It means I can have it without worrying about food poisoning, and that’s good enough for me.

shrimp ceviche 4

The cooked shrimp are marinated in lime juice, then mixed with avocados, cucumbers, onions, and cilantro. The dressing is made from more lime juice, olive oil, and, oddly, ketchup. I liked the tomatoey sweetness from the ketchup, but I didn’t like a lot of it – the second time I made this, I cut the ketchup down by half, and next time, I’ll use just half of that.

shrimp ceviche 2

Not that a little extra ketchupiness has stopped this from being my new favorite chip topper – yes, even more so than plain guacamole.  It has the avocado I love, but balanced by all this citrusy crunch.  This for lunch and barbacoa tacos for dinner make for a ridiculously good day of eating.

shrimp ceviche 7

One year ago: Fish Tacos
Two years ago: Tartine Country Bread
Three years ago: Spinach Artichoke Pizza
Four years ago: Tofu Mu Shu
Five years ago: Crockpot Pulled Pork

Printer Friendly Recipe
Shrimp and Avocado Ceviche (adapted from Rick Bayless’s Mexico One Plate at a Time via epicurious)

6 servings

I used 51/60 shrimp for this. The second time, I cut the shrimp in half after peeling so that they’d be about the same size as everything else in the dip – better for getting all sorts of goodies on a single chip.

½ cup plus 2 tablespoons fresh lime juice
1 pound unpeeled small shrimp
½ medium white onion, chopped into ¼ inch pieces
⅓ cup chopped fresh cilantro, plus several sprigs for garnish
2 tablespoons ketchup
2 tablespoons vinegary Mexican bottled hot sauce
1 tablespoon extra virgin olive oil
1 cup diced peeled cucumber or jicama (or a mix)
2 small ripe avocados, peeled, pitted and cubed
salt
Several lime slices for garnish
tortilla chips for serving

1. In a small saucepan, bring 2 cups of salted water to a boil; add 2 tablespoons of the lime juice and the shrimp. Cover the saucepan and let the water return to a boil. Once it boils, immediately remove the pot from the heat and pour off all the liquid. Replace the cover and let the shrimp steam off the heat for 8 minutes. Transfer the shrimp to a large glass or stainless steel bowl to cool completely. Once cook, peel and devein the shrimp. Toss the shrimp with the remaining ½ cup lime juice; cover and refrigerate for about an hour.

2. After the shrimp has marinated, in a small strainer, rinse the diced onion under cold water, then shake off the excess liquid. Add to the shrimp bowl along with the cilantro, ketchup, hot sauce, olive oil, cucumber and/or jicama, avocado, and ¼ teaspoon salt. Cover and refrigerate if not serving immediately.

3. Spoon the ceviche into sundae glasses, martini glasses, or small bowls; garnish with sprigs of cilantro and slices of lime. Serve with tortilla chips.

shrimp ceviche 5

chipotle shrimp

chipotle shrimp 4

One of the disadvantages-that-isn’t of living in New Mexico is that, with year-round access to a freezer full of Hatch green chiles, pretty much every other chile gets neglected. In the first three years after we moved here, I didn’t cook with poblanos, serranos, anaheims, or even chipotle chiles.  Hatch green (and, not as often, red) chile was the focus.

chipotle shrimp 1

This year we spent four hours peeling, seeding, chopping, and freezing Hatch green chiles only to realize afterward that this batch was a dud, with no flavor at all.  It’s unfortunate, but our pizzas, burgers, and beans have all been disappointing since we’ve started rationing out last year’s far superior chiles.  We’re impatient for next year’s harvest, but we’ve got five months to go.

chipotle shrimp 2

The upside is a resurgence of alternate chiles in our kitchen. Last week I made some smoky guacamole with roasted red peppers and poblanos, and chipotles are no longer languishing in the back of the freezer, forgotten. This recipe is a significant contribution to the disappearing chipotles, because any dish that takes twenty minutes to deliver a healthy bowl of spicy sauce and shellfish is going to be a favorite. Next year, it’ll be even better, when I use chipotles together with Hatch chiles, but for now, chipotles are all I’ve got.

chipotle shrimp 3

One year ago: Tomato and Four Cheese Lasagne
Two years ago: Shrimp Canapés a la Suede
Three years ago: Mediterranean Pepper Salad
Four years ago: Chocolate Whiskey Cake
Five years ago: Raspberry Bars

Printer Friendly Recipe
Chipotle Shrimp (adapted from Rick Bayless’s Mexican Everyday via Pink Parsley)

Serves 4 as a main course

1 (28-ounce) can diced fire-roasted tomatoes in juice
2-3 canned chipotles en adobo
1 tablespoon chipotle canning sauce
1 tablespoon vegetable oil
3 garlic cloves, minced or pressed through a garlic press
salt
2 pounds shrimp, peeled and deveined
1 cup rice, cooked (about 3 cups cooked rice)
about ¼ cup loosely packed, roughly chopped cilantro

1. Process the tomatoes, chipotle chiles, chipotle sauce, and ½ teaspoon salt in the blender until pureed.

2. Heat the oil in a large skillet over medium heat. Add the garlic and stir until fragrant, about 1 minute. Add the tomato mixture and cook, uncovered, for about 5 minutes, stirring frequently. Taste and season with salt if necessary.

3. Add the shrimp to the pan, and cook, stirring constantly, until the shrimp are pink and curled up, about 6 minutes. Serve over rice with cilantro.

chipotle shrimp 5

egg sandwiches with goat cheese, scallions, and prosciutto

goat cheese egg sandwiches 3

Egg sandwiches are my favorite breakfast. Yes, I’m making such a bold statement. And it’s generally not something I need much creativity in. A slice of salty ham, some bracingly sharp cheddar, and tender eggs on pretty much any kind of bread is just right for me.

goat cheese egg sandwiches 1

But this weekend I was in the mood for something brighter. Remembering the perfection of the combination of goat cheese, chives, and scrambled eggs in this (handy) scrambled egg tutorial, I mixed up goat cheese with the scallions I had in the fridge. The hint of funk in prosciutto would complement the tangy cheese.

whole wheat flour

And for a sandwich I had such high hopes for, only just the right bread would do; the sweet honey-glazed rolls in the freezer were not the right choice. This meant mixing up two quick pre-doughs the night before I wanted my sandwiches, one whole wheat with salt to soften the whole grains, and the other white bread flour with yeast for complexity of flavor. It meant putting the pre-doughs in the mixer with more salt, yeast, and flour first thing in the morning while I waited for my tea to steep.

goat cheese egg sandwiches 2

It meant waiting well over two hours for breakfast to be ready while the dough rose (in the turned off oven with the light on and a mug of steaming water) and baked. But it was worth it, oh it was. The rolls were perfect, light and tender but sturdy enough to hold up a thick layer of creamy cheese with slivers of ham and a perfectly cooked layer of egg. The scallions added just the right amount of green flavor to the sandwich. They were even better on the second day in a row that we ate these, when the bread was already made, so breakfast took 15 minutes to make and not two hours.

goat cheese egg sandwiches 4

One year ago: Puffed Poached Pear Tart
Two years ago: Oreo Cheesecake Cookies
Three years ago: Bourbon Pound Cake
Four years ago: Red Velvet Whoopie Pies

Printer Friendly Recipe
Egg Sandwiches with Goat Cheese, Scallions, and Prosciutto

4 medium (about hamburger bun-sized) sandwiches

4 ounces goat cheese, softened
4 scallions, white and green parts, minced
4 eggs
½ teaspoon salt
1 tablespoon milk
2 teaspoons olive oil
4 medium rustic rolls (like ciabatta), halved crosswise
4 ounces sliced prosciutto

1. In a medium bowl, combined the goat cheese and scallions; set aside. In a separate medium bowl, whisk the eggs, salt, and milk until a few large bubbles form.

2. Heat the oil in a 12-inch nonstick skillet over medium heat. Add the egg mixture and lower the heat to medium-low. After about a minute, gently stir the eggs. After about another minute, they should be starting to set; use a large spatula to flip sections of egg so the other side can set as well. Turn off the heat but don’t move the pan. Residual heat from the pan will finish cooking the eggs without drying the out while you build the sandwiches.

3. Spread the cut sides of both halves of each roll with the goat cheese mixture. Top the bottom half with a layer of eggs, then sliced prosciutto. Top with the other half of the roll. Serve immediately.

goat cheese egg sandwiches 5

flatbreads with honey, sea salt, and thyme

honey flatbread 6

On our very last day in Italy, almost exactly one year ago, we took it easy. One last order of “due cappuccini”, one last walking tour, one last cathedral, one last gelato, one last lunch. That lunch was one of many memorable meals on that trip. We ate on the street on a warm day. We ordered pecorino and honey to go with the ubiquitous bread. It was the first time I’d paired honey with cheese, and I was impressed at how well they went together.

honey flatbread 1

It was all downhill from there. Two weeks of restaurant meals, dehydration, and poor sleep had caught up to Dave, and he wanted nothing more than a nap and proximity to a box of Kleenex. We ate dinner in the apartment – bread, cheese, sausage, a basket of cherry tomatoes I’d bought from a farmer’s market, a bottle of wine. Then we set our alarms for 4:30 the next morning and said our goodbyes to Italy.

honey flatbread 3

I’ve been hooked on bread with cheese and honey since that day, and this might be the perfect way to combine the ingredients – just a thin crisp of bread topped with shavings of nutty cheese and generous spoonfuls of honey. The sea salt is absolutely necessary to balance all the sweet honey, and the crunch of the snowflake-sized flakes is a nice touch. It’s not the same as the first time I paired cheese with honey, but it isn’t bad. It isn’t bad at all.

honey flatbread 4

One year ago: Chewy Brownies
Two years ago: Palmiers
Three years ago: Applesauce Snack Cake
Four years ago: Pain Ordinaire

Printer Friendly Recipe
Flatbread with Honey, Thyme, and Sea Salt (adapted from Smitten Kitchen)

I used a firm Gruyere, which was really delicious.  Deb used a Mahon, which I’ve never even heard of and certainly can’t find where I live.  Parmigiano-Reggiano would be great as well.

⅓ to ½ cup honey
1¾ cups (7.75 ounces) all-purpose flour
1 teaspoon baking powder
¾ teaspoon table salt
½ cup water
⅓ cup olive oil
¾ cup (1.5 ounces) grated gruyere cheese
1 tablespoon fresh thyme
Flaky sea salt such as Maldon

1. Place a baking stone on the middle rack of the oven and heat the oven to 450 degrees. In a small saucepan, heat the honey over low heat.

2. In a medium bowl, combine the flour, baking powder, and salt. Make a well in the center of the dry ingredients; pour the water and oil into the well. Stir the liquids into the flour until a dough forms, then knead the dough about five times, until it forms a smooth ball.

3. Divide the dough into four equal portions. On a sheet of parchment paper, roll one portion into an oval approximately 12 inches long by 6 inches wide.

4. Transfer the parchment paper with the dough to the heated baking stone. Bake for 5 minutes, until lightly golden. Remove the dough from the oven and evenly distribute a quarter of the grated cheese over the surface. Return the dough to the oven until it’s browned at the edges, 3-4 additional minutes. Immediately drizzle 1-2 tablespoons of honey over the surface of the bread, then sprinkle with a quarter of the thyme and a generous pinch of sea salt. Cut the bread into pieces; serve warm. Repeat with the remaining portions of dough.

honey flatbread 5

migas

migas 9

I’ve been raving about migas since the first time I made them, several months ago. They’re such a perfect breakfast for me that I’ve had them almost every weekend since. Somewhere along the way, after I talked my brother into making them, he pointed out that they’re basically just scrambled eggs.

migas 1

Which is true, and in a way, sums up what it is I love about them – their simplicity. Scrambled eggs is not a complicated breakfast, so that must mean that migas are also not a complicated breakfast. And beyond that, it’s healthy and filling and flexible.

migas 3

The recipe I’ve given here is one of my favorite ways to make it, and the simplest way I like it. First, I bake lightly oiled corn tortillas until browned. I tried frying them once, but since baking results in crisp tortillas every bit as good as those that are fried, but is healthier, I’m sticking with that. However, it’s not uncommon that I’ll use the crumbs at the bottom of the tortilla chip bag either, when they’re too small to dip in salsa but there’s too many to throw away.

migas 5

The other ingredients I consider crucial to migas are chiles and cheese. I use roasted and peeled Hatch green chiles, but any chile you like would be fine. I suspect that while beans are a common side, adding them to the migas themselves isn’t traditional, but the sweetness they add to the dish is too good to skip.

migas 2

In addition to these standards, I’ve also added chorizo (shown here), spaghetti squash, and random unlabeled spicy tomato stuff I found in the freezer (probably meant for this dish, but who can be sure). It’s not a dish that requires precision or even consistency. Every single time I’ve made it, it’s been different, but it always been delicious – and easy.

migas 6

One year ago: Greek Yogurt Dill Dip
Two years ago: Roasted Red Pepper Pasta Salad
Three years ago: White Cake (comparison of 3 recipes)
Four years ago: Danish Braids (for the Daring Bakers)

Printer Friendly Format
Migas (adapted from Homesick Texan)

4 servings

When I add chorizo, I brown it before adding the cooking the onion, replacing the oil with the fat rendered from the sausage. When I’ve added pre-cooked leftover squash, I add it with the beans and tortillas.  I often add the salsa with the beans too, although the texture of the finished isn’t as firm as when it’s added as a garnish.

8 corn tortillas
8 eggs
salt
4 ounces chopped green chiles
1 tablespoon oil
1 onion, chopped
2 garlic cloves, minced
½ teaspoon ground cumin
1 (15-ounce) can black or pinto beans, drained and rinsed
2 ounces (½ cup) shredded cheddar, Monterey jack, or pepper jack
salsa
cilantro

1. Heat the oven to 425 degrees. Arrange an oven-safe cooling rack on a baking sheet. Light spray both sides of the tortillas with nonstick spray; lay them in a single layer on the cooling rack and bake, flipping once, for 12-16 minutes, until browned and crisp. Break into bite-sizes pieces.

2. In a medium bowl, beat the eggs, ¼ teaspoon salt, and green chiles with a whisk until large bubbles start to form around the edges of the bowl.

3. In a large nonstick skillet, heat the oil over medium heat. Add the onions and a pinch of salt; sauté, stirring occasionally, until just browned around the edges, 5-8 minutes. Pour in the egg mixture and cook without stirring for about a minute, then drag a spatula through the eggs a few times to lightly stir them. Let the eggs set for approximately 30 seconds, then stir again. Add the tortilla pieces, beans, and cheese. Cook and stir the eggs until set. Serve immediately, topping each portion with salsa and cilantro.

migas 7

fish tacos

fish tacos 7

For a while there, I made fish tacos more than any other meal. That might only be once a month or so, but for this household, once a month is considered heavy rotation. Unsurprisingly, with that much iteration, the original recipe has gone through some modifications.

fish tacos 1

In fact, I now have two versions that I alternate between, an easy weeknight version cooked on the stove, plus a smokier grilled option using a firmer fish. The indoor recipe is similar to the original, except now I like to combine all of the toppings – cabbage, red onion, yogurt-based cilantro-lime sauce – into one slaw before building the tacos, which distributes the flavors better along with taming the onion’s bite and weighing down the cabbage – so you can fit more of it into each taco. The other important tweak is a squeeze of lime juice after the fish cooks, which refreshes the flavor of the marinade.

fish tacos 2

When I have more time, I’ll (have Dave) heat the grill, and we’ll cook the fish outside. I like thin tilapia filets for cooking on the stovetop, but something firmer, like halibut, is required for the grill. And if the grill is already hot, I’m definitely going toast the tortillas on there, and I might consider grilling the onions as well.

fish tacos 3

Sadly, I don’t make fish tacos as often anymore, because I realized that the tilapia available in my town isn’t sustainably produced. Halibut, my favorite variety for grilling, isn’t sold at all here, so I only get to make that when I buy it in the Big City.  But, catfish is readily available here, and it seems like it would make excellent tacos.  I’ll have to test that out with one – or both – of my new and improved fish taco recipes.

fish tacos 4
And if you run out of fish, this recipe works great with shrimp too!

One year ago: Lemon Bars (comparison of 3 recipes)
Two years ago: Cream Cheese Spritz
Three years ago: Strawberry Lemon Sorbet
Four years ago: Snickery Squares

Printer Friendly Recipe
(Grilled or Pan-Seared) Fish Tacos with Cilantro Lime Slaw

Serves 4

Marinade:
¼ cup lime juice (from 3-4 limes)
1 tablespoon olive oil
1 teaspoon salt
¼ teaspoon ground cumin
2 cloves garlic, peeled and smashed
¼ cup minced cilantro, stems and leaves
6 (4 to 5-ounce) tilapia filets if pan-searing; 4 (6-ounce) halibut filets if grilling

Slaw:
2 tablespoons lime juice (from 1-2 limes)
½ small red onion, quartered lengthwise and thinly sliced
¼ teaspoon table salt
⅛ teaspoon ground black pepper
¾ cup Greek yogurt (or a mixture of yogurt and mayonnaise)
¼ cup minced cilantro
½ cabbage, cut into quarters, cored, and sliced thin

For the tacos:
1 tablespoon olive oil (if pan-searing)
1 tablespoon lime juice
8 (5-inch) flour tortillas
other possible toppings: green chile, avocados, cheese, salsa

1. In a medium bowl, combine all of the marinade ingredients, including the fish. Refrigerate 15 minutes.

2. Meanwhile, make the slaw by combining the 2 tablespoons lime juice, red onion, ¼ teaspoon salt, pepper, and yogurt in a large bowl. Add the ¼ cup cilantro and cabbage, folding to evenly coat.

3. To pan-sear the fish: Heat 1 tablespoon of oil in a large nonstick skillet over medium-high heat. Add the fish and cook, without moving, until browned, about 3 minutes. Flip the fish and continue to cook until evenly flaky, an additional 2-3 minutes. To grill the fish: Heat a grill to medium-high. Oil the grill grate; grill the fish for about 8 minutes, turning once halfway through cooking.

4. Using two spoons, shred the fish into bite-size pieces. Pour the remaining lime juice over the fish; toss to combine.  Build the tacos by layering fish, slaw, and desired toppings on tortillas.

fish tacos 6

california roll burgers

sushi burgers 7

I am not the most effusive of food bloggers. I’m not much for “OMG OMG make this ASAP” types of statements. I understand that we all have different tastes, different health requirements, different time constraints; what is a perfect recipe for me might not seem so to you. But, most importantly, those types of statements need to be saved for the really special recipes.

sushi burgers 2

This is a really special recipe. If you consider the best burger I’ve ever eaten to be really special, that is. And I think it is, because I have eaten some pretty fantastic burgers, starting with the classic green chile cheeseburger, including lamb burgers with feta and tzatziki, and not to mention the fancy schmancy fig-glazed burger with onion jam.

sushi burgers 3

All are wonderful, and I don’t plan on giving them up, but this one is my new favorite burger. Admittedly, this is coming from a sushi lover who lives over 150 miles from the nearest sushi restaurant, so I’m always excited when I can get sushi flavors without requiring raw fish or hours of rolling.

sushi burgers 4

I thought at first that mild turkey burgers would work better with the light shellfish and vegetable toppings, but it turned out that the turkey was too timid, and I could hardly taste it over the king crab, avocado, and wasabi. It was still the best burger I’d ever had though. But I tried again, this time using hearty ground beef instead of turkey and pasteurized lump crab (soaked in milk for 20 minutes to null fishy odors, as per Cook’s Illustrated’s recent crab cake recipe) instead of king crab. And then that was the best burger I’d ever had.

sushi burgers 5

And next time, I’ll get the best of both worlds by using ground beef and king crab, and then that will be the best burger I’ve ever had. This small-town desert girl has figured out how to get her sushi fix, and that’s worth getting excited about.

sushi burgers 6

One year ago: Chocolate Chip Bundt Cake
Two years ago: Stuffed Butterflied Leg of Lamb
Three years ago: Fresh Strawberry Scones
Four years ago: Hash Browns with Sautéed Vegetables and Poached Eggs

Printer Friendly Recipe
California Roll Burgers (adapted from Use Real Butter)

6 burgers

The fish sauce replaces salt in this burger recipe, while also providing a dose of umami. I’ve tried it with regular burgers and didn’t notice any difference, but I like it here because the flavor matched the toppings I used for this burger. If it isn’t something you keep around, use ¾ teaspoon salt instead.

If you prefer, you can replace the Greek yogurt with additional mayonnaise.

1 pound ground beef (no leaner than 90%)
2 tablespoons fish sauce
¼ teaspoon sugar
¼ teaspoon black pepper
6 ounces shelled crab (from 2 king crab legs, or use pasteurized lump crab)
¼ cup mayonnaise, divided
2 sheets nori, cut into strips
¼ cup Greek yogurt
1-2 tablespoons powdered wasabi
1 tablespoon soy sauce
6 burger buns, halved horizontally
2 avocadoes, peeled, seeded, and sliced
1 cucumber, sliced thinly
sesame seeds

1. In a large bowl, combine the ground beef, fish sauce, sugar, and pepper. Form into 6 patties, about ½-inch thick and 4 inches wide. In a medium bowl, combine the crab, 2 tablespoons mayonnaise, and nori. In a small bowl, combine the remaining 2 tablespoons mayonnaise with the Greek yogurt, wasabi powder, and soy sauce.

2. Prepare a medium-hot grill. Using a paper towel, grease the grate with vegetable oil. Grill the beef patties for 5 minutes; flip, and continue grilling another 5 minutes. Meanwhile, toast the burger buns on the hottest part of the grill.

3. Spread the wasabi mayonnaise on both sides of the buns. Top with slices of avocado, a burger patty, the crab salad, cucumber slices, and a sprinkle of sesame seeds. Serve immediately.

sushi burgers 9

lentil tacos

lentil tacos 5

While I loved these tacos, the real news here is that I’ve figured out how to soften corn tortillas without requiring a lot of fat or a lot of effort. I’m not saying they’re as good as fried tortillas, but in a healthy pinch, they’ll more than do. They still have the corny flavor I love and hold a generous scoop of gloppy filling, so I’m very pleased.

lentil tacos 4

I’ve started replacing flour tortillas with corn tortillas, at least for healthy weekday meals, saving the refined flour and partially hydrogenated fat-containing flour tortillas for weekend splurges. (And no, I do not want to make my own tortillas. Even I have limits, especially when the tortillas I can buy in New Mexico taste so good, partially hydrogenated fat notwithstanding.) Not only are they healthier, but they taste better. But I struggled for years with corn tortillas’ tendency to crack when folded, unless they were (deliciously) saturated with oil.

lentil tacos 2

I’d tried heating them on the grill, but they cracked as soon as they started to cool. I tried wrapping them in foil and heating them in the oven, but that didn’t solve the problem. I tried wrapping them in a damp cloth in a warm oven, which was an improvement, as the tortillas on the top and bottom of the stack were moist enough to fold without cracking, but those in the middle still broke.

lentil tacos 3

The trick, I’ve found, is to lay a damp dishtowel on a baking sheet, spread the tortillas over it in a single layer, then top with a second damp cloth. Heat the whole configuration in a warm oven while you make your filling. Then take the tortillas out of the oven, remove the top cloth, dollop on your chili-spiced lentils and some traditional-for-good-reason toppings, and dinner is easy, healthy, and delicious.

lentil tacos 7

One year ago: Brown Rice
Two years ago: Pizza with Figs, Prosciutto, Gorgonzola, Balsamic, and Arugula
Three years ago: Anadama Bread
Four years ago: Marshmallows

Printer Friendly Recipe
Lentil Tacos (adapted from epicurious via Prevention RD)

Serves 4

With such a soft filling, these tacos really need a topping with some crunch.  I think very thinly sliced cabbage would be perfect, but lettuce would work well too. In a pinch, I’ve used coarsely chopped mung bean sprouts, and that wasn’t bad at all.

2 teaspoons olive oil
1 yellow onion, finely chopped
1 garlic clove, minced
1 tablespoon chili powder
2 teaspoons ground cumin
1 teaspoon dried oregano
1 cup dried lentils, rinsed
½ teaspoon salt
2 cups low-sodium vegetable or chicken broth
2 tablespoons minced fresh cilantro
10 taco-sized corn tortillas
toppings: cheese, avocado, salsa, tomato, lettuce

1. In a 3- or 4-quart saucepan, heat the oil over medium heat. Add the onion and sauté, stirring occasionally, until just browned around the edges, about 8 minutes. Add the garlic and spices; cook, stirring constantly, for about a minute, until fragrant. Add the lentils, salt, and broth; cover and simmer for 25-30 minutes, until the lentils are tender. Uncover; simmer for 6-8 minutes, until mixture is thickened. Using a potato masher or wooden spoon, break up some of the lentils. Stir in the cilantro.

2. While the lentils cook, heat the oven to 275 degrees. Arrange a dampened dishtowel on a baking sheet. Spread the tortillas over the towel in a single layer (some overlap is expected), then top with a second dampened dishtowel. Heat in the oven for 10 minutes, until the tortillas are warm and soft.

3. Divide the filling and toppings evenly among the tortillas. Serve immediately.

lentil tacos 6