black bean quinoa salad with tomatillo salsa

black bean quinoa 7

A few weeks ago, I was skiing, and I was having fun, but I felt stale. I felt like I was doing the same things I always do when I ski, back and forth across the slope, not too fast, just nice and comfortable. After a morning of this, I was getting impatient with myself – why are you so timid, I asked myself? Go faster, mix it up, challenge yourself, get out of that comfort zone. So I did, and I fell, and I twisted my knees, had to sit in the lodge and read a book the next day while my friends skied, and I couldn’t run or progress in my weightlifting routine for three weeks (and counting*).

black bean quinoa 1

My weeknight dinner routine has felt stale lately too. So many grain salads, so many beans. It seems like I always use quinoa the same way, in some sort of salad. And how many different ways can I possibly combine black beans, chiles, and avocadoes?

black bean quinoa 3

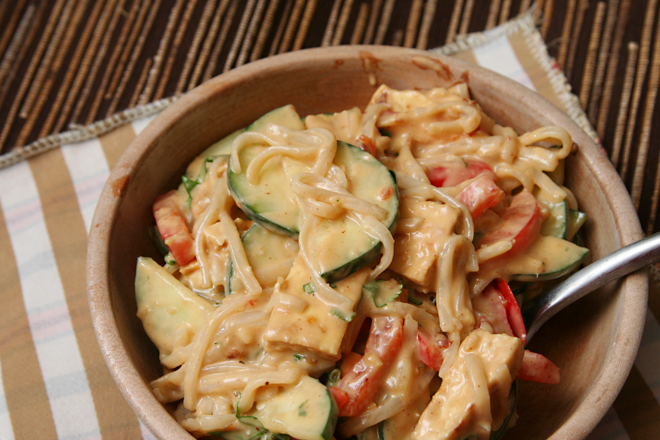
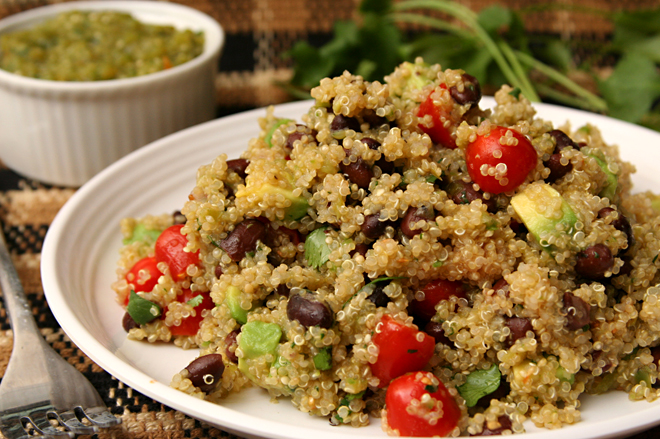
On the other hand, maybe I’m in this rut because it works – it’s healthy, it’s fast, and it’s good. Sometimes it’s better to stick with what works. Quinoa salads work. Black beans and cilantro works. And avocado works on everything. This was one of the best meals I’ve made lately. Mixing it up is overrated.

black bean quinoa 4

*Eventually, I decided that if resting wasn’t helping my knees heal, I might as well run. (Impeccable logic, right?) A couple runs in, my knees feel better than they have in weeks. Crossing my fingers to start weightlifting again this weekend!

black bean quinoa 6

One year ago: Chocolate Frosting (comparison of 3 recipes)
Two years ago: Dorie Greenspan’s Best Chocolate Chip Cookies
Three years ago: Devil’s Food White Out Cake
Four years ago: Cream Cheese Brownies

Printer Friendly Recipe
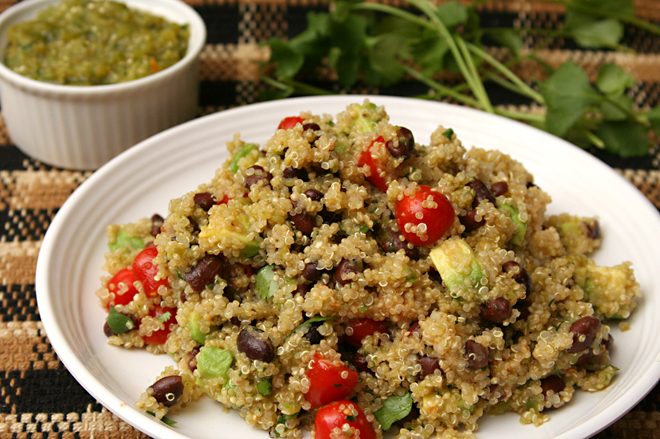
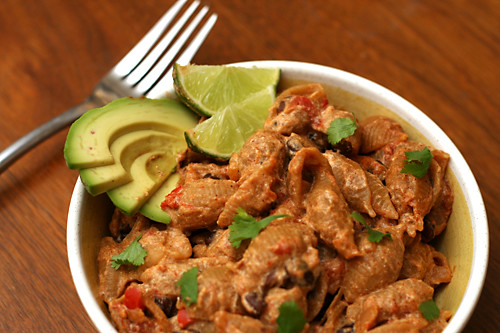
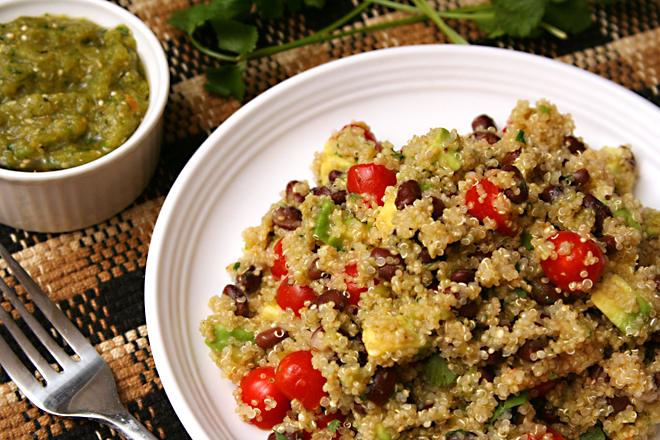
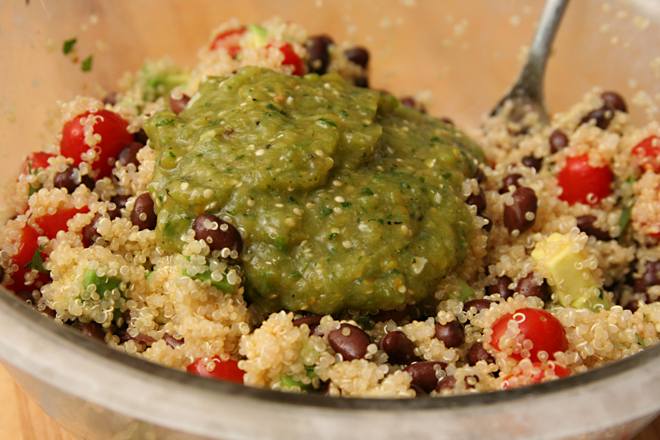
Black Bean Quinoa Salad with Tomatillo Salsa (adapted slightly from Cate’s World Kitchen)

Serves 3-4

I substituted about 4 ounces of roasted peeled Hatch green chiles for one of the jalapenos.

1 cup quinoa, rinsed
salt
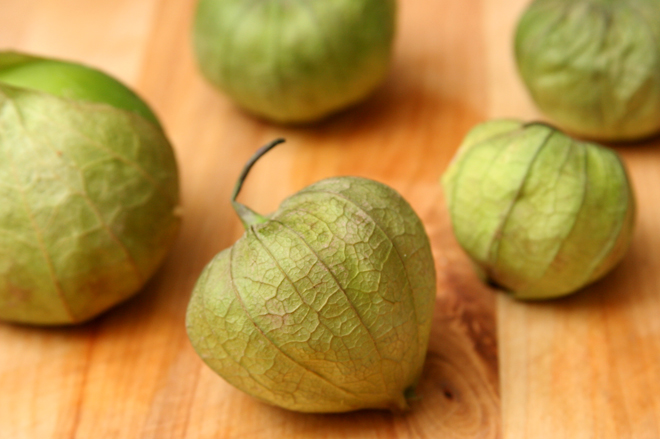
4 tomatillos, papery skins removed
3 cloves garlic, unpeeled
2 jalapenos, stemmed and seeded
¾ cup cilantro, divided
juice of 1 lime
1 (15-ounce) can black beans, rinsed and drained
1 cup grape tomatoes, halved
1 avocado, diced

1. In a medium saucepan over high heat, bring 1 cup water, ¼ teaspoon salt, and the quinoa to a boil. Cover the pot, reduce the heat to low, and simmer for 15 minutes. After 15 minutes, remove the pot from the heat and let sit, still covered, for 10 minutes.

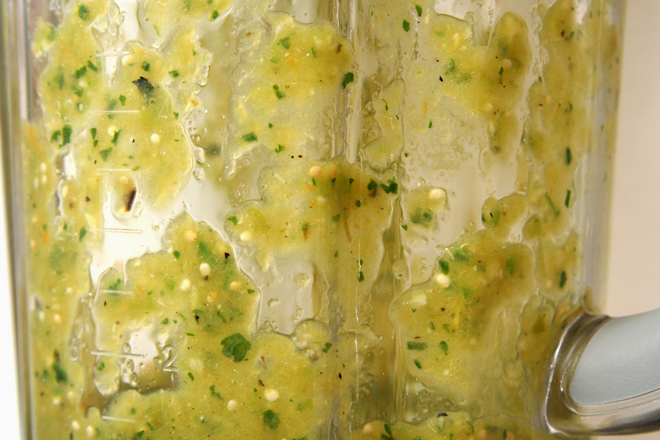
2. Meanwhile, adjust an oven rack to the upper-middle position and heat the broiler. Broil the tomatillos and garlic until the tomatillos are browned, 5-8 minutes. Peel the garlic; transfer it to a blender with the tomatillos, ½ teaspoon salt, jalapenos, and ½ cup cilantro. Puree.

3. Transfer the quinoa to a large bowl. Stir in the lime juice. Once the quinoa cools to slightly warmer than room temperature, add the beans, tomatoes, avocado, remaining ¼ cup cilantro, and salsa. Serve.

black bean quinoa 5

pasta with salmon in pesto cream sauce

salmon pesto pasta 3

I never know what to do about Valentine’s Day. On the one hand, I’m not interested in the traditional stuff; I don’t want gifts or chocolate or a heart-covered card with a canned message. I’ll never say no to flowers, although I don’t love the responsibility of keeping the cat from eating them. On the other hand, Valentine’s Day is hard to ignore, because the rest of the world is definitely into it. I’m not one to scoff at something because it’s mainstream; I’d rather join in on the fun.

salmon pesto pasta 1

I thought that, at the very least, I’d make a nice meal. But Valentine’s Day is on a Tuesday this year, so I couldn’t get too ambitious. Dave’s favorite meal, salmon pesto pasta, would have fit the bill perfectly. It hardly takes longer to cook than it takes pasta to boil, assuming that your pesto is already prepared.  For all that it’s so easy, the finished dish is deserving of being Dave’s all-time favorite dinner, with generous bites of salmon held to pasta by a sauce that’s creamy but not too heavy, since it’s made from evaporated milk instead of heavy cream.

salmon pesto pasta 2

But, we’ve been having salmon pesto pasta a lot lately, trying to use up last year’s surplus of pesto before this year’s basil starts growing. I decided it wasn’t special enough for Valentine’s Day, even my lazy attitude toward the holiday, so instead we’re having prosciutto-wrapped salmon, farro risotto, and roasted Brussels sprouts. Dave will be so disappointed, but it will be short-lived, because salmon pesto pasta is so easy that we can just have it next week for a non-holiday.

salmon pesto pasta 5

One year ago: Chocolate Oatmeal Drops
Two years ago: Jalapeno Baked Fish with Roasted Tomatoes and Potatoes
Three years ago: Pot Roast
Four years ago: Apple Galette

Printer Friendly Recipe
Pasta and Salmon with Pesto Cream Sauce

Serves 4

I usually make half of this recipe to serve two people, and the smaller 5-ounce can of evaporated milk is perfect.  I tried using more, so that the full recipe would use a whole 15-ounce can of evaporated milk, but all the dairy blunted the other flavors.

12 ounces pasta, preferably a short shape (rotini, penne, farfalle, orechiette)
salt
2 (6 to 8 ounce) salmon filets
10 ounces evaporated milk
½ lemon
½ cup pesto
parmesan, for serving

1. Adjust a rack to the upper position and heat the broiler. Line a baking sheet with foil.

2. Bring about 4 quarts of water to a boil over high heat. Once the water boils, add the pasta and 1 tablespoon of salt. Cook the pasta until it is slightly undercooked, about 1 minute less than the package indicates the pasta will be done. Drain.

3. Meanwhile, place the salmon, skin-side down, on the prepared baking sheet. Season it liberally with salt. Broil until the salmon is lightly browned on top and flakes easily with a fork, 6-10 minutes. Set aside to cool slightly.

4. Return the empty pasta-cooking pot to medium-high heat. Add the evaporated milk and ¼ teaspoon salt. Simmer, scraping the bottom of the pot often to prevent sticking, until the milk is reduced to about ⅓ cup, about 5 minutes. Add the pasta to the milk, and cook, stirring constantly, for about one more minute, until the pasta is al dente.

5. Use two spoons to break up the salmon into bite-sized pieces. Squeeze the lemon juice over the flaked salmon. Add the salmon and pesto to the pasta; stir gently to combine and serve immediately, topping with parmesan.

salmon pesto pasta 4

This is an update from a earlier blog entry. For a meal we love as much as this one, I thought a new entry was worthwhile.

grapefruit margaritas

grapefruit margarita 4

If 2010 was the year of the vodka gimlet, 2011 was dedicated to margaritas. It started with these, and then when grapefruits went out of season, we tried strawberry margaritas, pineapple margaritas, classic lime margaritas, and, most recently, cranberry margaritas. I love them all, but nothing holds a candle to the grapefruit version.

grapefruit margarita 2

It’s perfectly balanced – not too sweet, not too sour, not too strong. The light grapefruit mellows any harshness from the lime and alcohol, and the result is perfectly refreshing. As an added bonus, one grapefruit yields enough juice for four drinks – which is just the right amount to split between two people.

grapefruit margarita 3

One year ago: Feta and Shrimp Macaroni and Cheese
Two years ago: Apple Muffins
Three years ago: Twice Baked Potatoes with Broccoli, Cheddar, and Scallions
Four years ago: Maple Walnut Cupcakes

Printer Friendly Recipe
Grapefruit Margaritas (adapted from Confections of a Foodie Bride)

Technically 4 servings, but you’ll be sad if you only get one

Of the many grapefruits I have juiced for margaritas, one grapefruit has always resulted in 4 shots of juice. Two limes will usually give two shots of juice, but not always, so it’s best to buy a third just in case.

As with all things, alcohol quality matters. I’ve used Cointreau, Gran Marnier, Gran Gala, Controy (which can only be purchased in Mexico), and Patron Citronge in these, all with good results. I’ve never used a bargain triple sec. For tequila, I tend to buy whatever is on sale in the $20-25 range.

2 shots lime juice
4 shots grapefruit juice
3 shots orange liqueur
3 shots tequila

In a pitcher or 4-cup measuring cup, mix all of the ingredients. Pour over crushed ice in individual glasses; serve immediately.

grapefruit margarita 5

ricotta

ricotta 12

Here are some things you need to know about making ricotta at home:

1) It really is as easy as they say. The process involves nothing more than heating milk and salt, stirring in lemon juice or vinegar, and straining the mixture.

2) It requires a lot of milk for a relatively small amount of cheese – you’ll start with about four times more volume of milk than you’ll end up with of cheese.

ricotta 3
right after adding the acids

3) About that milk – you can use the regular ol’ stuff from the grocery store, ultrapasteurization and all. That’s all I have access to, and I’ve made some nice ricotta with it.

4) If you’re feeling decadent, you can substitute some of the milk with cream. I started out using about seven times more milk than cream, but in the pictures you see here, I was almost out of cream and used about twenty times more milk than cream. I like this batch just as much as the others.

ricotta 4
right before straining

5) You can use either regular white vinegar or lemon juice. I read here that using all lemon juice gives the cheese a lemony flavor and vinegar is more neutral. However, I was worried about my cheese tasting like vinegar, which would be gross, so I always use a mixture of the two.

ricotta 5
after 5 minutes of straining with no cheesecloth or paper towel liner

6) The pH of the acid you add to curdle the milk matters. That’s one reason vinegar is more dependable than lemon juice; the acidity of lemons varies. It also means you can’t substitute other vinegars, because they might not be as acidic as white vinegar. I learned this the hard way when I realized I was out of regular vinegar and tried to use white wine vinegar instead; the milk didn’t form many curds.

ricotta 6
after 15 minutes of straining with no cheesecloth or paper towel liner

7) You don’t need cheesecloth. The first two times I made this cheese, I strained the mixture in my fine-mesh strainer. Worried that I was losing too much of good stuff, I tried using a double layer of paper towels, but it was draining too slowly and I got impatient and went back to just the strainer. That being said, I really am trying to remember to buy cheesecloth.

ricotta 7
after 15 minutes of straining with no liner, stirred

8 ) You’ll feel wasteful throwing all that whey down the drain, but the bit of internet research I did indicated that it isn’t good for bread dough, because the acid breaks the gluten molecules, weakening the dough’s structure.

9) It isn’t technically ricotta, which is made from the whey leftover from making other cheeses. (The word ricotta, in Italian, means re-cooked.) When I first heard this, I wondered why anyone would call it ricotta, since it isn’t made the same way. Then I made it myself and realized that it looks and tastes just like real ricotta.

ricotta 8
after 2 hours of straining with no liner

10) Homemade ricotta is better than the stabilizer-filled tubs you’ll find in most grocery stores. However, if you do happen to have access to real fresh ricotta, it’s probably cheaper to buy that rather than using half a gallon of milk to make 2 cups of cheese. As for which is better, the last time I bought fresh ricotta from an Italian market was a couple years ago, too long to remember the details of how good it was. I know it was really good, but I know this is really good too.

ricotta 10
finally bought cheesecloth; after 1 hour of straining with double layer of cheesecloth; smoother, creamier cheese

One year ago: Beef Short Ribs Braised in Tomato Sauce
Two years ago: Maple Oatmeal Scones
Three years ago: Chopped Salad
Four years ago: Country Crust Bread

Printer Friendly Recipe
Ricotta (adapted from Smitten Kitchen and Serious Eats)

Makes about 1 cup

You can adjust the amount of cream down (to 4 cups milk and no cream) or up (to 3 cups milk and 1 cup cream), depending on how rich you want the ricotta to be.

3½ cups whole milk
½ cup heavy cream
½ teaspoon salt
2 tablespoons white vinegar
1 tablespoon lemon juice

1. In a 2-quart saucepan over medium-high heat, heat the milk, cream, and salt to 190 degrees. Remove the pot from the heat, add the vinegar and lemon juice, stir once, and set aside for 5 minutes.

2. Place a fine-mesh strainer over a large bowl. Line the strainer with a double layer of cheesecloth or a single layer of paper towels. Pour the curdled milk mixture into the strainer. Set aside for about an hour. It will get thicker the longer it sits to drain.

ricotta 11

rice noodle salad with peanut dressing

rice noodle peanut butter salad 5

I was going through a protein rut recently, where I seemed to be cooking with beans more weeknights than not. We try not to eat meat on weekdays, we take hard-boiled eggs to work everyday as snacks, and cheese has too much fat. So what does that leave me? I’d completely forgotten about soy.

rice noodle peanut butter salad 1

Think of tofu as a sponge that soaks up flavor. True, on its own, it tastes like water and has a jello-like squishiness, but when you sauté it and soak it in sauce, it’s hardly discernible from chicken, except cheaper and easier to work with. Plus, it won’t dry out like boneless skinless chicken breasts.

rice noodle peanut butter salad 3

This sauce has plenty of flavor for the tofu to absorb. Ginger, garlic, soy sauce, sugar, rice vinegar, and sesame oil, all mixed into creamy peanut butter, make for one heck of a combination. There are plenty of vegetables to provide brightness and crunch.  This was so good we had it two weeks in a row – alternating with dinners involving beans, of course.

rice noodle peanut butter salad 4

One year ago: Pasta Puttanesca
Two years ago: Asian-Style Chicken Noodle Soup
Three years ago: Pasta with Broccoli, Sausage, and Roasted Red Peppers

Printer Friendly Recipe
Rice Noodle Salad with Peanut Dressing (adapted from Cate’s World Kitchen)

My noodles stuck together in one big clump, so I chopped them up after cooking. I know that’s against standard noodle procedure, but in the end, it worked perfectly.

Serves 4-6

Having made this a bunch more times, I’ve found that it’s even better with the juice of a lime squeezed into the sauce.

2 teaspoons olive oil
1 pound tofu
salt
8 ounces rice noodles (linguine shape)
½ inch fresh ginger, peeled and finely chopped
4 cloves garlic, chopped
½ cup creamy peanut butter
3 tablespoons soy sauce
2 teaspoons brown sugar
3 tablespoons rice vinegar
1 tablespoon sesame oil
¼ cup warm water
chili garlic sauce to taste (optional)
1 medium cucumber, sliced into half moons
1 red bell pepper, cut into matchsticks
2 green onions (green parts only), sliced
¼ cup chopped fresh cilantro

1. Heat the oil in a medium nonstick skillet over medium-high heat. Slice the tofu lengthwise into ½-inch thick slabs; pat dry on a dishtowel. Transfer the tofu to the oil and cook, without moving, for 4-6 minutes, until browned on the bottom. Flip the tofu and brown the second side. Remove the tofu from the skillet and cut into bite-sized cubes.

2. Bring a large pot of water to a boil. Add a large pinch of salt and the rice noodles; cook until tender. (Check the package instructions for exact cooking times.) Drain and rinse the pasta.

3. In a large bowl, whisk together the peanut butter, soy sauce, ginger, garlic, sugar, rice vinegar, sesame oil, water, and chili garlic sauce until smooth. Fold the tofu into the sauce, then add the remaining ingredients, reserving some of the green onions and cilantro for a garnish.

rice noodle peanut butter salad 6

banh mi

banh mi 4

For me, taste will trump authenticity every time. Spaghetti and meatballs is more Italian-American than Italian, most of my favorite sushi rolls didn’t originate in Japan, and Vietnamese banh mi sandwiches include a whole mess of ingredients that aren’t available to me. I don’t want to miss out on any of these foods just because they don’t closely resemble the versions in their original countries.

banh mi 1

I’m not saying that I have no interest in more authentic versions of banh mi. I’m just saying that a sandwich made of grilled meat, pickled vegetables, fresh herbs, and spicy tangy sauce is too good to wait around for daikon radish to show up at my grocery store, because it never will. Regular radishes will have to stand in for the daikon radish. And I’m sure pâté is a particularly luscious addition, but still not one that’s worth the trouble of searching southern New Mexico for it.

banh mi 2

Besides, the mixture of storebought mayo, sriracha, and fish sauce is good enough to make any sandwich tempting. One with tangy pickled vegetables and tender grilled pork, all piled on an airy baguette, has become one of my favorite sandwiches ever. It may be a far cry from its origins, but it’s too good to care.

banh mi 3

One year ago: Cheesecake (comparison of 3 recipes)
Two years ago: Twice-Baked Potato Cups
Three years ago: Banana and Peanut Butter Stuffed French Toast

Printer Friendly Recipe
Vietnamese-Style Grilled Pork Sandwiches (from America’s Test Kitchen Feed)

I used a mixture of Greek yogurt and mayonnaise, heavy on the yogurt, instead of just mayonnaise in the sauce.

Sliced cucumbers are a nice addition, and as you can see, the carrots and radishes work just fine if they’re thinly sliced instead of julienned. (I haven’t figured out how to julienne things on my mandoline.)

Serves 4

½ cup rice vinegar
3 tablespoons sugar
2 tablespoons sriracha
4 tablespoons fish sauce
1 (6-inch) piece daikon radish, peeled and julienned
1 carrot, peeled and julienned
¾ cup mayonnaise
1 pork tenderloin (about 1 pound)
2 teaspoons five-spice powder
1 (24-inch) baguette, cut into 4 pieces and split partially open lengthwise
1 cup fresh cilantro leaves

1. Combine vinegar and sugar in microwave-safe bowl. Heat until sugar has dissolved, about 90 seconds. Add 1 tablespoon sriracha, 2 tablespoons fish sauce, daikon, and carrot to bowl and toss to combine. Set aside for 15 minutes.

2. Meanwhile, whisk mayonnaise, remaining 1 tablespoon sriracha, and remaining 2 tablespoons fish sauce together in second bowl.

3. Rub pork with five-spice powder. Grill over hot fire until browned on all sides and pork registers 145 degrees, 12 to 14 minutes. Transfer to cutting board, tent with foil, and let rest 5 minutes. Grill bread until lightly toasted, about 1 minute.

4. Slice pork crosswise into thin slices. Drain vegetables. Spread mayonnaise on inner sides of bread halves. Arrange slices of pork on bread and top with vegetables and cilantro. Serve.

greek yogurt dill dip

dill dip 6

I’m probably starting to sound like a broken record – “OMG OMG Greek yogurt is soooo awesome!!!” It’s just that I’m finding so many places where the similarities between Greek yogurt and sour cream give me opportunities to enjoy some of my favorite used-to-be-indulgent foods. Creamy white dips are my newest revelations.

dill dip 1

Most white dips are nothing more than dressed up mayonnaise and sour cream; in other words, they are a bowl of fat. But even though Greek yogurt is the same thickness and color as sour cream and it tastes tart like sour cream, per ounce, it has one-third of the calories, one-tenth of the fat, and three times the protein of sour cream.

dill dip 2

And it isn’t just the sour cream you’re replacing. I love mayonnaise, but I’ve found that its flavor stands out even when there’s seven times more yogurt in a mixture than mayonnaise. That means that now I can mix up a creamy white dip as an afternoon snack to serve with whole grain bread, instead of saving it for a special occasional splurge. I suspect this dill dip, a childhood favorite of mine, it just the start of experimenting with used-to-be-fat-laden dips.

dill dip 4

One year ago: Roasted Red Pepper Pasta Salad
Two years ago: Mushroom Salad
Three years ago: Kung Pau Shrimp

Printer Friendly Recipe
Greek Yogurt Dill Dip (I got this recipe from my mom, but I’m guessing it’s originally a Spice Islands recipe)

Serves 6 to 8

Beau Monde seasoning is a Spice Islands spice mix. I keep some around just for this dip, but it can be hard to find. Fortunately, it looks like you can make up your own.

My dip in the pictures is a little soupier than it should be because not only did I grate the onion instead of mince, but I doubled the amount of it.

Feel free to use whatever fat level of Greek yogurt you like best. I always use 2% Greek yogurt.

1¾ cups Greek yogurt
¼ cup mayonnaise
¼ cup fresh minced dill (or 1 tablespoon dried dill leaves)
1 tablespoon Beau Monde seasoning
3 tablespoons minced onion
1 loaf seedless rye bread, unsliced

1. In a medium bowl, stir together the yogurt, mayonnaise, dill, Beaumonde seasoning, and onion. Cover and chill for at least 4 hours or up to two days.

2. Tear bite-size pieces from the center of the loaf of bread until the cavity is large enough to hold the dip. Spoon the dip into the hole; serve on a large platter with the torn bread pieces.

dill dip 3

summer berry pie

summer berry pie 5

Dave enjoys and then forgets the vast majority of what I give him to eat. And how not to? I make so many different things that even I’m surprised sometimes when I scan through old unused pictures (two types of cucumber salad? orange-glazed tofu? raspberry muffins? The pictures prove I made these things, but I don’t remember any of it).

summer berry pie 3

But once in a while, I make something that stands out to Dave enough to not only remember it, but request it again and again, even years later. I hadn’t made this pie in two years, but once berries start to come into season, Dave starts asking about it.

summer berry pie 4

Often, fresh fruit pies are associated with the gel-shellacked versions you get in buffet lines. This pie replaces that gel with the barest coating of fruit jelly, which gives the fruit a beautiful shine without adding any flavorless goo. Instead, a layer of fruit puree holds the filling together while intensifying the bright berry flavor. With ripe sweet berries and a dollop of freshly whipped cream, it’s no wonder this dessert is so memorable.

summer berry pie 6

One year ago: Triple Chocolate Espresso Brownies
Two years ago: Strawberries and Cream Pie
Three years ago: Croque Madame

Printer Friendly Recipe
Summer Berry Pie (from Cooks Illustrated)

Serves 8 to 10

Currant jelly is smooth and bright red, so very attractive in this pie. However, I didn’t want to buy it because I don’t use it for anything else. I used raspberry jam, which I probably should have strained but didn’t.

Crust:
5 ounces graham crackers, broken into rough pieces (9-11 full crackers)
2 tablespoons granulated sugar
5 tablespoons unsalted butter, melted and warm

Filling:
2 cups (about 9 ounces) fresh raspberries
2 cups (about 11 ounces) fresh blackberries
2 cups (about 10 ounces) fresh blueberries
½ cup (3½ ounces) granulated sugar
3 tablespoons cornstarch
⅛ teaspoon table salt
1 tablespoon lemon juice
2 tablespoons red currant jelly

Whipped cream:
1 cup heavy cream (cold)
1 tablespoon granulated sugar
1 teaspoon vanilla extract

1. FOR THE CRUST: Adjust an oven rack to the middle position and heat the oven to 325 degrees. In a food processor, process the graham crackers until evenly fine, about 30 seconds. You should have one cup of crumbs. Add the sugar; pulse to combine. Continue to pulse while adding the warm melted butter in a steady stream; pulse until the mixture resembles wet sand. Transfer to a 9-inch glass pie plate; use the bottom of a ramekin or measuring cup to press the crumbs evenly into the bottom and up the sides. Bake the crust until fragrant and beginning to brown, 15 to 18 minutes; transfer to wire rack and cool completely while making the filling.

2. FOR THE FILLING: Combine the berries in a large colander and gently rinse; spread the berries on towel-lined rimmed baking sheet and gently pat dry with additional towels.

3. In a food processor, puree 2½ cups of the mixed berries until smooth and fully pureed, about 1 minute. Strain the puree through a mesh strainer into small nonreactive saucepan, scraping and pressing on seeds to extract as much puree as possible (you should have 1¼ to 1½ cups). Whisk the sugar, cornstarch, and salt in a small bowl to combine, then whisk the mixture into the puree. Bring the puree to a boil over medium heat, stirring constantly with a wooden spoon; when the mixture reaches a boil and is thickened to consistency of pudding, remove from heat, stir in the lemon juice, and set aside to cool slightly.

4. While the puree is cooling, place the remaining berries in a medium bowl. Heat the jelly in a second small saucepan over low heat until fully melted; drizzle the melted jelly over the berries and gently toss them together until the berries are glazed. Pour the slightly cooled puree into the cooled pie shell and smooth the top with a rubber spatula. Distribute the glazed berries evenly over the puree and gently press into the surface. Loosely cover pie with plastic wrap; refrigerate until chilled and the puree has set, about 3 hours (or up to 1 day).

5. FOR THE WHIPPED CREAM: Add the cream, sugar, and vanilla to the chilled bowl of an electric mixer. Beat at low speed until small bubbles form, about 30 seconds. Increase the speed to high and continue beating until the cream is smooth, thick, and nearly doubled in volume, about 20 seconds for soft peaks or about 30 seconds for stiff peaks. If necessary, finish beating by hand to adjust the consistency.

summer berry pie 7

creamy taco mac

creamy taco mac 6

I rarely miss eating meat on weekdays. I was never big on “meat and three” types of meals, so vegetarian food suits me just fine. Besides, it’s usually easy to replace meat with a substitute, and by substitute, I don’t mean fake meat (“smeat”, as my friend calls it). I mean beans, especially black beans.

creamy taco mac 1

Making this recipe vegetarian was no problem, but I was also determined to make it all in the same pot. I’ve made Cooks Illustrated’s Skillet Lasagna many times, in which the pasta is cooked right in the simmering sauce, so I adapted the same cooking method for taco mac. The different ratios of pasta to tomatoes complicated finding the right ratio of liquid to pasta, but after a few tries, I landed on the right amount.

creamy taco mac 2

What really gave me fits was how to make the sauce creamy in a healthy way – and if this was going to be a weeknight dish, it needed to be healthy. First, I tried Cara’s method of stirring in pureed cottage cheese. This worked fine, but I knew I was too lazy to puree cottage cheese for such a simple meal. Both unpureed cottage cheese and ricotta cheese looked curdled and barf-like. In the end, the answer, like it so often is, was Greek yogurt. It perfectly mimics the sour cream called for in the original recipe but with dramatically less fat and more protein.

creamy taco mac 3

Finally then, this fills all my qualifications as a great weeknight dish. It’s vegetarian, it’s healthy, it’s nutritionally balanced – all that and the only dishes you need to dirty are a cutting board, knife, and the cooking pot. With meals as good as this, it’s no wonder I don’t crave meat on weekdays.

creamy taco mac 4

One year ago: Pasta with Asparagus and Goat Cheese
Two years ago: Pork Tenderloin with Rhubarb Sauce
Three years ago: Pigs in a Blanket

Update: I changed the recipe to use ½ more water. Two cups might be enough, but it cuts it close. If your sauce is too liquidy at the end, it’s simple to simmer it down for a few minutes.

Printer Friendly Recipe
Creamy Taco Mac
(adapted from Delish via Annie’s Eats and from Cook’s Illustrated’s Skillet Lasagna recipe)

6 servings

1 tablespoon olive oil
1 medium onion, chopped small
1 red pepper, chopped small
Table salt
3 medium cloves garlic, minced or pressed through a garlic press (about 1 tablespoon)
1 tablespoon ground chili powder
1 teaspoon ground cumin
¼ teaspoon ground cayenne
16 ounces dry pasta
1 (28-ounce) can diced tomatoes
2½ cups water
1 (30-ounce) can black beans, drained
1 (7-ounce) container Greek yogurt
2 tablespoons cilantro
1 avocado, diced (optional)

1. Heat the oil in a large nonstick skillet over medium heat until shimmering. Add the onion, pepper, and ½ teaspoon salt and cook until the onion begins to brown, about 5 minutes. Stir in the garlic and spices and cook until fragrant, about 30 seconds.

2. Add the pasta, diced tomatoes with juices, water, and beans. Cover and bring to a simmer. Reduce the heat to medium-low and simmer, stirring occasionally, until the pasta is tender, about 20 minutes.

3. In a small bowl, stir about half of the simmering pasta mixture into the yogurt. Stir this tempered yogurt into the pasta. Cover and simmer over low heat until heated, 2-3 minutes. Sprinkle with cilantro and avocado, if using. Serve.

chicken gyros

chicken gyros 14

Elly’s chicken gyros are so very popular for good reason – it’s a simple recipe with exceptional results. I, of course, can’t keep anything simple. After I made Elly’s recipe a few times, I noticed how similar it is to chicken fajitas – marinated chicken wrapped in flat bread with vegetables. My favorite chicken fajita recipe has a few tricks up its sleeve that I love, so I started incorporating those into Elly’s chicken gyro recipe.

chicken gyros 1

My favorite trick is saving a portion of the marinade (before mixing it with raw meat, of course) to stir into the cooked and shredded chicken, reviving any flavors that might be lost during cooking. Another portion of the marinade is stirred into the vegetables, brightening their flavor while the vinegar tames the onion’s bite. I also insist on taking advantage of everyone’s favorite cooking method – fire. I love grilling the chicken and then toasting the pita over the remaining coals.

chicken gyros 2

I’m fairly certain that traditionally, gyros aren’t topped with red peppers and feta, and the first few times I made this recipe, I served those on the side as part of Mediterranean Pepper Salad. But each time, more and more of the salad made its way onto the gyro, and eventually I stopped keeping them separate at all. With the vegetables right on top of the marinated grilled chicken and toasted flatbread, topped with tart white sauce, these were even more similar to chicken fajitas, except – dare I say – even better.

chicken gyros 5

One year ago: Croissants (Martha Stewart’s recipe)
Two years ago: Rhubarb Scones
Three years ago: Pita (cook these right on the grill instead of baking!)

Printer Friendly Recipe
Chicken Gyros (adapted from Elly Says Opa and from Cooks Illustrated’s Chicken Fajita recipe)

Greek yogurt is often sold in 7-ounce containers. If you don’t have extra plain yogurt around to use in the marinade, using 2 tablespoons of the Greek yogurt meant for the tzatziki recipe in your marinade won’t hurt your tzatziki at all.

Chicken:
¼ cup juice from 1 to 2 lemons
2 tablespoons olive oil
3 medium garlic cloves, crushed
1 tablespoon red wine vinegar
1 teaspoon sugar
table salt and ground black pepper
2 tablespoons plain yogurt
3 boneless, skinless chicken breasts (about 1½ pounds), trimmed of fat, tenderloins removed, pounded to ½-inch thickness

Tzatziki:
½ cucumber, unpeeled, shredded
½ teaspoon kosher salt
7 ounces Greek yogurt
1 tablespoon freshly squeezed lemon juice
½ tablespoon white wine vinegar
½ tablespoon minced fresh dill (optional)
1 clove garlic, minced
¼ teaspoon freshly ground black pepper

For serving:
½ red onion, quartered lengthwise and sliced thinly
1 large red bell pepper, quartered lengthwise and sliced thinly
½ cucumber, quartered lengthwise and sliced thinly
1 tomato, chopped medium, or 1 cup grape tomatoes, halved
½ cup feta, crumbled
4-6 (6-inch) pocketless pitas

1. In a medium bowl, whisk together the lemon juice, oil, garlic, vinegar, sugar, 1 teaspoon salt, and ¾ teaspoon pepper. Reserve 3 tablespoons of the marinade in a small bowl; set aside. Add the yogurt and another teaspoon salt to the remaining marinade. Place the chicken in the marinade; cover with plastic wrap and refrigerate 15 minutes.

2. Meanwhile, using a large chimney starter, ignite 6 quarts of charcoal briquettes and burn until the coals are fully ignited, about 20 minutes. Empty the coals into the grill, spreading them in a single layer; place an additional 20 unlit coals over the lit coals on one side of grill to create a two-level fire. Position the grill grate over the coals and heat the grate for 5 minutes; scrape clean with a grill brush. (For a gas grill, light all burners and turn to high, cover, and heat the grill until hot, about 15 minutes; scrape the grill grate clean with a grill brush. Leave one burner on high heat while turning the remaining burner(s) down to medium.)

3. For the tzatziki: Place the cucumber in a strainer set over a medium bowl and add the salt. Set aside for at least 15 minutes to drain. Transfer the cucumber to a clean kitchen towel and squeeze dry. Combine the drained cucumber with the yogurt, lemon juice, vinegar, dill, garlic, and pepper.

4. Add 2 tablespoons of the reserved marinade to a bowl; add the sliced onion to the marinade. Set aside to lightly pickle while you prepare the remaining toppings. Mix all of the vegetables and feta into the bowl with the onion.

5. Remove the chicken from the marinade and place it smooth side down on the hotter side of the grill; discard the remaining marinade. Cook the chicken until it’s well browned, 4 to 5 minutes; using tongs, flip the chicken and continue grilling until it’s no longer pink when cut into with a paring knife or an instant-read thermometer inserted into the thickest part registers about 160 degrees, 4 to 5 minutes longer. Transfer to a plate; cover to keep warm.

6. Working in 2 or 3 batches, place the pitas in a single layer on the cooler side of the now-empty grill and cook until warm and lightly browned, about 20 seconds per side (do not grill too long or the pitas will become brittle). As the pitas are done, wrap them in a kitchen towel or a large sheet of foil.

7. Slice the chicken into ¼-inch strips and toss with the remaining tablespoon of reserved marinade in another bowl; arrange the chicken and vegetables on a large platter and serve with the warmed pitas.

chicken gyros 8