raspberry ricotta scones

raspberry ricotta scones 7

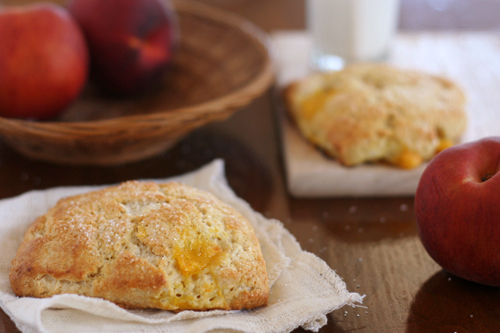
I’ve largely gotten out of my scone phase from a few years ago. Back then, I was making a new scone recipe almost once a month. One batch of scones, frozen before baking, would last a couple weekends, which made for some wonderfully relaxed weekend mornings, with nothing to do but turn the oven on, transfer the frozen scones to a baking sheet, and boil water for the French press. Twenty minutes later, I’d sit down with a scone, a mug, and a food magazine.

raspberry ricotta scones 2

The problem with this scenario is that there’s very little nutrition in a scone. I’m not against a little butter for breakfast, but as we’ve become more active lately, we require breakfasts that fill us up and provide energy. I don’t want to imagine Dave on one of his weekly racquetball marathons with nothing but butter, flour, and sugar for fuel.

raspberry ricotta scones 3

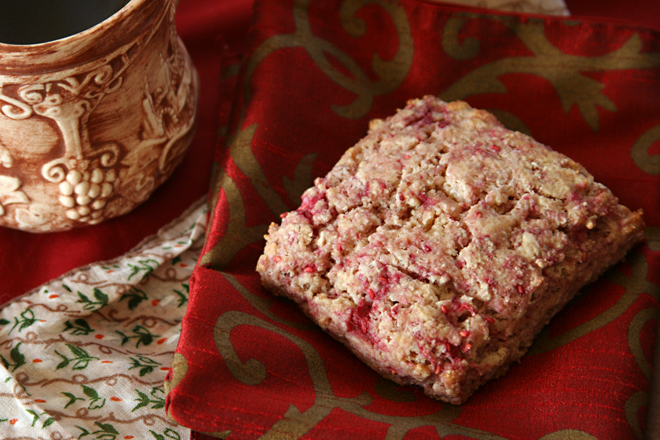
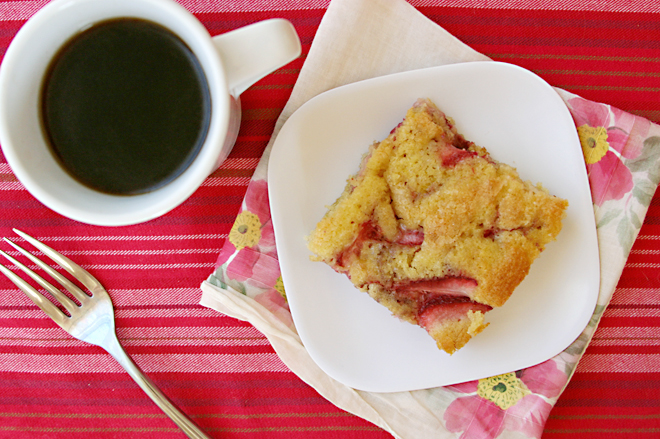
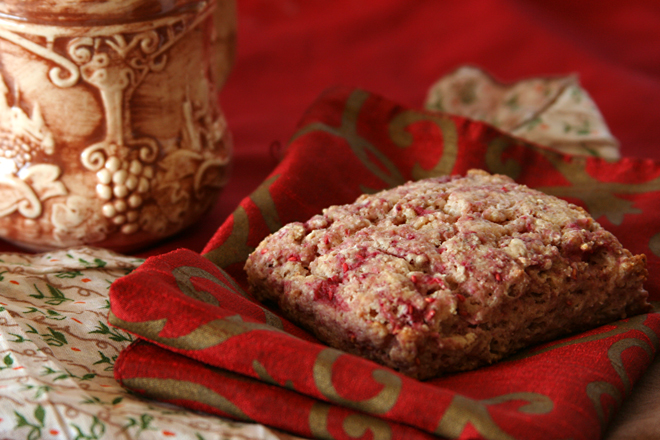
On quiet mornings when we don’t have a busy day ahead though, scones hit the spot. And this one is even better, because it does have some extra health benefits from protein-rich ricotta and fiber-rich whole grains. Moreover, this is one of the best scones I’ve ever made.

raspberry ricotta scones 4

I’ve admittedly become more and more enamored with whole grains and the nutty depth of flavor they add to baked goods, and this was a perfect example of how a portion of whole wheat flour isn’t a sacrifice to be made for health reasons, but an improvement in flavor. I think this recipe has me headed toward another scone phase.

raspberry ricotta scones 5

One year ago: Corniest Corn Muffins
Two years ago: How to adapt any bread to be whole wheat
Three years ago: Lemon Cup Custard
Four years ago: Spaghetti and Meatballs

Printer Friendly Recipe
Raspberry Ricotta Scones (slightly adapted from Smitten Kitchen)

Makes 9

Baked scones are best fresh out the oven. If you want to make these in advance, form and cut the scones, then transfer the unbaked scones to a ziploc bag to freeze. There’s no need to defrost before baking, but you will need to add a few extra minutes to the baking time.

I used whole wheat pastry flour, which I prefer in quick breads. But if you only have regular whole wheat flour, I’m sure it will be fine.

¾ cup (6.5 ounces) whole milk ricotta
⅓ cup heavy cream
1 cup (4.8 ounces) whole wheat flour
1 cup (4.8 ounces) all-purpose flour
1 tablespoon baking powder
¼ cup (1.75 ounces) granulated sugar
½ teaspoon table salt
6 tablespoons (¾ stick) cold unsalted butter, cubed
1 cup (4.75 ounces) raspberries, fresh or frozen

1. Adjust a rack to the middle position and heat the oven to 425 degrees. Line a baking sheet with parchment paper or a silicone mat. In a large measuring cup, combine the ricotta and heavy cream.

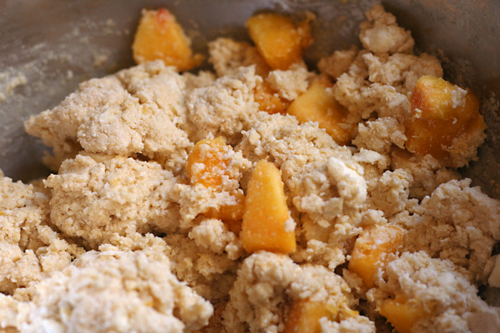
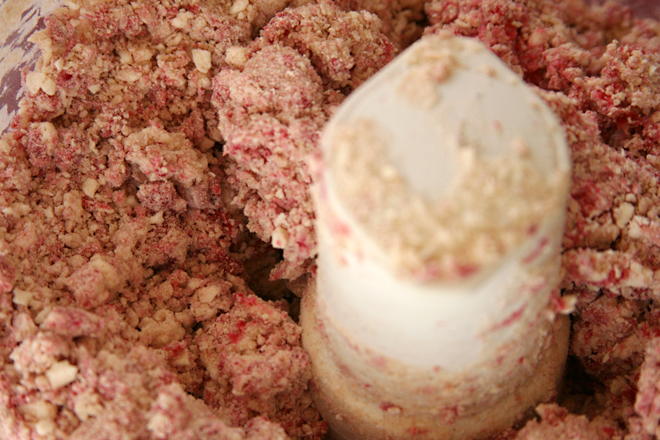
2. Combine the flours, baking powder, sugar, and salt in the food processor. Add the butter and pulse until the butter is cut into pea-sized pieces. Add the raspberries and pulse a few times to break them down. Add the ricotta mixture; pulse just until the dough is evenly moistened but still looks crumbly.

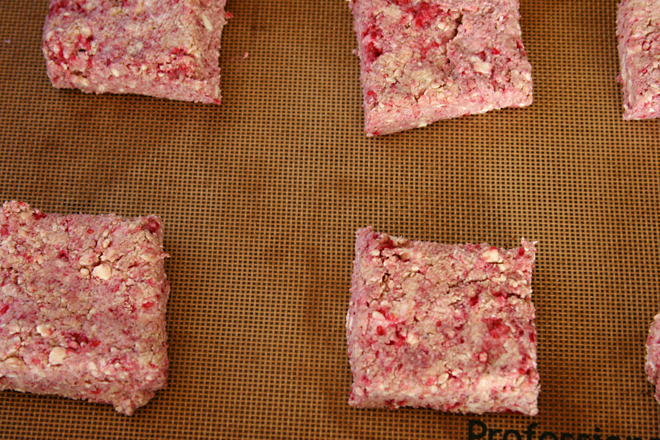
3. Transfer the dough to a work surface and pat into a ball. Knead the dough a few times, then pat it out into a 7-inch square that is about 1-inch thick. Cut the dough into 9 squares.

4. Transfer the scones to the prepared baking sheet. Bake until golden brown around the bottom edges, 16-20 minutes. Transfer the scones to a wire rack and cool about 10 minutes before serving.

raspberry ricotta scones 8

strawberry buttermilk cake

strawberry buttermilk cake 6

I woke up yesterday wanting cake. Not wanting to eat cake, so much, although that part is nice, but wanting to watch butter and sugar swirl in the mixer bowl and gradually turn into a smooth batter. This despite plans to make Danish dough, two Danish fillings, fajitas, grapefruit cookies (which didn’t happen because I’d gotten my mixer fix with the cake), and a batch of Tartine country bread dough to freeze (which didn’t happen because I ran out of flour). No one said anything about being practical.

strawberry buttermilk cake 3

I started poking around the internet for recipes, and chose this one because it uses buttermilk, which I have right now, and it wasn’t loaded with butter, which is always nice when you’re planning to eat cake for breakfast. I did not have any fresh berries, but I always keep strawberries in the freezer for our weekday smoothies. And it didn’t require an hour in the oven; key on a government holiday that included sleeping in.

strawberry buttermilk cake 4

The cake was everything I’d been craving. The most important part of the craving was my favorite mixing method of beating butter and sugar until fluffy, whipping in an egg and vanilla, and alternating the additions of buttermilk and dry ingredients. But cake for breakfast doesn’t hurt either.

strawberry buttermilk cake 5

One year ago: Eggplant Rollatini
Two years ago: Pasta with Baked Ricotta and Sweet Tomato Sauce
Three years ago: Vegetarian Chili
Four years ago: Salmon Cakes, Flaky Biscuits, Hashed Brussels Sprouts

Printer Friendly Recipe
Berry Buttermilk Cake (rewritten but not changed from Gourmet via Smitten Kitchen)

Serves 6

Two things: The original recipe calls for fresh raspberries, which are probably a better choice than the (frozen) strawberries I used. Strawberries are juicier than other berries, so my cake was a little wetter than is probably ideal. I also thought it was too sweet, which could be because strawberries aren’t as tart as raspberries, but still, next time I’ll only use ½ cup of sugar.

1 cup (4.8 ounces) all-purpose flour
½ teaspoon baking powder
½ teaspoon baking soda
¼ teaspoon salt
½ stick unsalted butter, room temperature
⅔ cup (4.67 ounces) plus 1½ tablespoons sugar, divided
1 teaspoon grated lemon zest
½ teaspoon pure vanilla extract
1 large egg
½ cup well-shaken buttermilk
1 cup (5 ounces) fresh raspberries (or other berries)

1. Adjust a rack to the middle position and heat the oven to 400 degrees. Butter and flour a 9-inch round cake pan. In a small bowl, whisk together the flour, baking powder, baking soda, and salt.

2. In a stand mixer fitted with the paddle attachment (or in a medium bowl using a hand mixer), beat the butter, sugar, and lemon zest (if using) on medium-high speed until pale and fluffy, about 2 minutes. Add the egg and vanilla, beating until combined. Reduce the mixer speed to low; add one-third of the flour mixture, then half of the buttermilk. Continue alternating the dry ingredients and buttermilk, ending with the dry ingredients.

3. Scrape the batter into the prepared pan, smoothing the top. Scatter the berries evenly over the top, then sprinkle with the remaining 1½ tablespoons sugar. Bake until the cake is golden and a toothpick inserted into the center comes out clean, 25 to 30 minutes. Transfer the cake to a cooling rack; cool for 10 minutes. Remove the cake from the pan and cool another 10-15 minutes before serving.

strawberry buttermilk cake 7

flip over cherry cake

flipover cherry cake 5

Unless I did something very wrong, calling this a cake is a bit of a stretch. In fact, it’s very similar to a cobbler recipe I’ve made, which used the same technique of pouring batter over melted butter, topping that with the fruit, and baking. It seems an odd method to me; why not mix the butter with the rest of the batter?

flipover cherry cake 3

Maybe leaving the butter separate contributes to the “flip-over” aspect of this “cake”, which can also turn it into a cobbler with the dough on top of the fruit. It’s perfectly edible – sugary, fruity, and buttery – but I have to admit that I like my bready parts to be more substantial. On the other hand, a scoop of Greek yogurt made this a good excuse to eat dessert for breakfast.

flipover cherry cake 4

Becky chose this fruity cake/cobbler/pudding for Tuesdays with Dorie, and she has the recipe posted. I substituted cherries for the plums and increased the salt.

One year ago: Tarte Fine
Two years ago: Cottage Cheese Pufflets
Three years ago: Creme Brulee (comparison of 2 recipes, in which Dorie’s won)

flipover cherry cake 7

blueberry barbecue salmon

blueberry salmon 7

Dave and I sometimes go to lunch at a little coffeehouse that used to have only one sandwich option each day. There was no pattern to which sandwich would be available when, so we would just cross our fingers for reubens or the turkey pesto panini. It’s fortunate that neither of us is picky, but there was one sandwich I got there that I disliked – tuna salad with chunks of apples.

blueberry salmon 1

I’m working my way around to sweet and savory combinations, and thinly sliced apple on a sandwich with cheddar and turkey sounds appealingly crisp and sweet. I like applesauce with pork. But I could not wrap my mind around chunks of apple in tuna salad, so, like a picky little brat, I picked them all out.

blueberry salmon 3

And yet blueberries in barbecue sauce sounds like a perfect match. Barbecue sauce is a mix of tangy, spicy, and sweet flavors, so why not throw some fruit into the mix to add to the sweet balance. I had never eaten salmon with barbecue sauce, but salmon is so rich and meaty that it’s a perfect match.

blueberry salmon 2

In the end, I could hardly taste the blueberry anyway, although the barbecue sauce was a particularly vibrant shade of purple. Maybe that means this wasn’t a true test of my sweet plus savory acceptance, but I still think it’s one step closer. Just don’t give me one of those chicken salads with grapes in it.

blueberry salmon 4

Housekeeping: If you’re reading this through a feed reader like Google Reader, you’re missing out on my brand new design! Click on over to check it out. I’ve also added a couple of new pages – a long overdue list of my favorite food blogs and a few notes on how I approach recipe writing and categorizing. Finally, I’ve created a Facebook page for The Way the Cookie Crumbles, because apparently between this blog, Twitter, and at least half of my personal conversations, I wasn’t getting enough avenues to talk about food.

One year ago: Penne alla Vodka
Two years ago: Amaretto Cheesecake
Three years ago: Mashed Potatoes with Kale

Printer Friendly Recipe
Blueberry Barbecue Salmon (adapted from How Sweet It Is via Pink Parsley)

Serves 4

4 (6-oz) salmon fillets, skin on
kosher salt and freshly ground pepper
1 teaspoon olive oil
1 shallot, minced
1 clove garlic
pinch red pepper flakes
½ cup fresh blueberries, rinsed and patted dry
⅓ cup ketchup
1 tablespoon apple cider vinegar
1 tablespoon balsamic vinegar
2 tablespoons brown sugar
1 teaspoon Dijon mustard
1 teaspoon Worcestershire sauce

1. Prepare the grill to its highest setting. Pat the salmon dry and season it liberally with salt and pepper.

2. In a small saucepan, heat the oil over medium heat. Add the shallots and cook, stirring occasionally, until just starting to brown around the edges, stirring occasionally. Add the garlic and red pepper flakes and cook, stirring constantly, until fragrant, about 30 seconds. Reduce the heat to medium-low, add the blueberries, and cook until they begin to soften and burst, about 10 minutes. Use the back of a spoon to mash them, then add the ketchup, vinegars, brown sugar, mustard, and Worcestershire sauce. Whisk well to combine and break up the blueberries, then increase the heat to medium. Stirring often, cook until the mixture begins to bubble, then lower the heat to medium low. Continue to cook, stirring frequently, until the sauce has thickened, another 10-20 minutes. The sauce will be thicker and clumpier than traditional barbecue sauce.

3. Use a paper towel and tongs to oil the grates of the grill well, then lay the salmon, flesh-side-down, on the grill. Cook 5 minutes, then carefully flip. Brush the salmon with half the barbecue sauce, then cook an additional 3-5 minutes, or until it is mostly cooked through but still pink in the center. Remove from grill, brush with the remaining sauce, and serve.

blueberry salmon 5

sweet corn hash

sweet corn hash 5

I went to the local farmer’s market for the first time in over a year this morning and was sadly reminded why I hadn’t gone to the local farmer’s market for over a year. Apparently a farmer to the locals is someone who makes little crafts, not someone who grows stuff. The only vegetable for sale was zucchini, and we already have plenty of that.

sweet corn hash 2

So I’ve been buying my summer corn at the grocery store, which just seems wrong, doesn’t it? Ears of corn should be bought out of the back of a truck on the side of the road. That doesn’t seem to be an option here, but it would be a shame to go the whole summer without eating corn just because I can’t find a local vendor selling it.

sweet corn hash 1

It doesn’t take much more than the word “hash” to get me excited about a recipe. It’s hard to go wrong with a dish based on browned potatoes topped with eggs. Buying corn at the grocery store instead of the farmers market might not feel as satisfying, but it works just fine, especially once the corn is mixed with lightly caramelized onions, browned potatoes, and crisp bacon.

sweet corn hash 7

One year ago: Whole Wheat Challah
Two years ago: Potato Tomato Tart
Three years ago: Fruit Bruschetta

Printer Friendly Recipe
Sweet Corn Hash (adapted from Joy the Baker)

Serves 4

Joy roasted her potatoes, but I thought it would be easier to brown them in the skillet with the rest of the ingredients. She also adds butter at the end to increase the richness of the dish, but I figured a couple slices of bacon would have the same affect, while contributing great flavor of its own.

We also stirred in some chopped roasted green chile, because ‘tis the season.

4 slices bacon, chopped
4 medium red potatoes, cubed
1 onion, chopped
4 ears corn, kernels removed
¼ cup parsley, minced
salt and ground black pepper
4 eggs

1. In a large nonstick skillet over medium heat, cook the bacon until almost crisp. While the bacon cooks, put the potatoes in a medium microwave-safe bowl; spoon a couple teaspoons of rendered bacon fat from the skillet into the bowl; stir. Cover the potatoes loosely and microwave on high for 3 minutes, stirring twice.

2. Add the onions and potatoes to the skillet with the bacon; cook, stirring occasionally, until browned, about 8 minutes. Stir in the corn and most of the parsley. Lower the heat to medium-low. Using the back of a spoon, create 4 wells in the hash. Break one egg into each well; season with salt and pepper. Cover the pan and cook, without stirring, until the white is set, about 8 minutes. Garnish with the remaining parsley; serve immediately.

sweet corn hash 6

spice-rubbed picnic chicken

picnic chicken 7

Family vacations require a careful balance of time together and time apart. Originally, my family found that cruises worked well – everyone does their own thing during the day and we meet up for dinner. The last few years, we’ve started renting a house on the beach for a week. We still make sure to have dinner together every evening, but now we have to cook it ourselves.

picnic chicken 1

Despite my love for spending time in the kitchen, I have a greater love of sitting on the beach drinking margaritas. No one in my family is willing to cook dinner for the group every night. Instead, we take turns. On one trip, I made pasta with tomatoes and fresh mozzarella, salad, and crostini topped with white beans and with tuna. Last year, everyone built and then grilled their own pizza. Fajitas and chicken gyros are also crowd-pleasers.

picnic chicken 2

Between shredding cheese, preparing toppings, and stretching out ten rounds of dough, last year’s pizza extravaganza was ambitious. This year, I wanted something easier. This baked chicken is perfect because it’s actually meant to be cooked in advance, which means I can do it whenever I need a quick break from the sun.

picnic chicken 4

I mixed up the spices at home, so all I need to do on vacation is rub them on the raw chicken the day before it’s my turn to cook and store the meat in the refrigerator overnight. The chicken soaks up spice and salt, which also helps it retain moisture as it bakes. It ends up tasting like barbecued chicken that’s been smoking all day on the grill, but it’s completely undemanding. Undemanding is what vacation is all about.

picnic chicken 5

One year ago: Green Goddess Salad
Two years ago: Lemon Meringue Cake
Three years ago: Tuscan-Style Couscous Salad

Printer Friendly Recipe
Spice-Rubbed Picnic Chicken (from Cooks Illustrated)

Serves 8

If you have space to store 5 pounds of chicken pieces in your refrigerator all lined up on a baking sheet, you are lucky to be so rich in fridge space. I just pile the spiced chicken in a bowl with a cover.

As you can see from the pictures, I did not cut the breasts into smaller pieces. Obviously it took longer to cook, but it worked fine.

5 pounds bone-in, skin-on chicken pieces (breasts, thighs, drumsticks, or a mix with breasts cut into 3 pieces or halved if small), trimmed of excess fat and skin
2 tablespoons kosher salt
3 tablespoons brown sugar
2 tablespoons chili powder
2 tablespoons sweet paprika
2 teaspoons ground black pepper
¼-½ teaspoon cayenne pepper

1. Use a sharp knife to make 2 or 3 short slashes in the skin of each piece of chicken, taking care not to cut into meat. Combine the salt, sugar, and spices in a small bowl and mix thoroughly. Coat the chicken pieces with the spices, gently lifting the skin to distribute the spice rub underneath but leaving it attached to chicken. Transfer the chicken skin side up to wire rack set over rimmed foil-lined baking sheet, lightly tent with foil, and refrigerate 6 to 24 hours.

2. Secure the skin of each breast piece with 2 or 3 toothpicks placed near the edges of the skin.

3. Adjust an oven rack to the middle position; heat the oven to 425 degrees. Roast the chicken until the thickest part of smallest piece registers 140 degrees on an instant-read thermometer, 15 to 20 minutes. Increase the oven temperature to 500 degrees and continue roasting until the chicken is browned and crisp and the thickest parts of the breast pieces register 160 degrees, 5 to 8 minutes longer, removing pieces from the oven and transferring to a clean wire rack as they finish cooking. Continue to roast the thighs and/or drumsticks, if using, until the thickest part of the meat registers 170 to 175 degrees, about 5 minutes longer. Remove from the oven; transfer the chicken to a rack and let it cool completely before refrigerating or serving.

picnic chicken 6

pesto

pesto 4

Pesto is super simple, right? Just dump some ingredients into the food processor, and thirty seconds later, you have pesto. And while that’s true, with a few extra simple steps, you can ensure that your pesto will live up to its maximum potential every single time.

pesto 1

Traditionally, pesto was made in a mortar and pestle, which smashes the ingredients into each other instead of cutting them like the food processor does. It sounds horribly tedious. You don’t want to do that.

pesto 2

However, it is important to do more than slice basil with the food processor blade. Consider that when you want to smell an herb, what do you do? You rub it between your fingers, not tear it in half, because bruising the leaves is what produces flavor. So to maximize the flavor of your basil, you need to bruise the leaves before cutting them.

pesto 3

You can do this with almost no extra effort using a trick I picked up from Jamie Oliver – just put the basil in the food processor, but with the plastic dough blade instead of the knife blade. It takes only a few seconds longer and produces just one more small utensil to clean, but it makes a big difference in flavor. Before I started using this trick, sometimes my pesto would taste grassy, but now it always tastes basil-y.

pesto 8

You probably also know that toasting nuts brings out their flavor, and it isn’t hard to do on the stovetop. I also like to toast the garlic, because I am not a fan of the tongue-stinging sharpness of raw garlic. Toasting the unpeeled cloves in a dry skillet tames garlic’s bite with very little effort. And that’s it – you’ve maximized the potential of every ingredient in pesto, ensuring dependably outstanding pesto, and it only took an extra minute or two.

pesto 7

One year ago: Yogurt-Marinated Lamb Kebabs
Two years ago: Tortellini Soup with Carrots, Peas, and Leeks
Three years ago: Summer Rolls

Printer Friendly Recipe
Pesto

2 ounces pine nuts
2 cloves garlic, unpeeled
Salt
1 large bunch (6 ounces) basil leaves, washed and dried
1-3 tablespoons extra virgin olive oil
½ ounce (¼ cup) freshly grated parmesan

1. Heat a small empty not-nonstick skillet over medium heat for several minutes. Add the pine nuts and cook, stirring constantly, for about a minute, until they’re golden brown and fragrant. Pour the nuts into a food processor bowl fitted with the knife attachment. Add the garlic to the skillet and toast, without stirring, for about 1 minute. When the first side is dark brown, turn the garlic cloves onto another flat side and continue toasting for another minute. Peel the garlic and transfer it to the food processor with the pine nuts.

2. Add ¼ teaspoon salt to the garlic and pine nuts. Process until the nuts and garlic are finely ground, 10-15 seconds. Replace the knife attachment with the plastic dough blade. Add the basil to the food processor and pulse until the basil is bruised and fragrant, about ten 1-second pulses. Remove the dough blade from the bowl and return the knife attachment. Process until basil is finely chopped, a few seconds.

3. With the machine running, slowly pour the oil into the feed tube. Scrape the sides of the bowl; process until evenly mixed. Stir in the parmesan. Serve, refrigerate for a few days, or freeze for months.

pesto 5

peaches and cream scones

peaches cream scones 4

Scones are just an excuse to eat dessert for breakfast. It’s a better disguised excuse then chocolate muffins, I will grant you, but in the end, equally bad for you. I think I might sound like I’m complaining. I’m not complaining.

peaches cream scones 1

Cream scones are one of my favorite weekend morning accompaniments to coffee. The cream makes them so tender, and when they’re only lightly sweetened, like these, they’re perfect either topped with jam or baked with fresh fruit. A sweet biscuit, peaches, and cream – you can’t tell me that doesn’t sound like one heck of a dessert.

peaches cream scones 6

Lynne chose the cream scones for Tuesdays with Dorie, and she has the recipe posted. I left out the currants and added one peach, peeled, chopped, and frozen, to the dough after the liquids were partially mixed in.

One year ago: Brrrownies
Two years ago: Brioche Plum Tart
Three years ago: Chocolate Pudding (comparison of 2 recipes)

peaches cream scones 3

baked eggs in mushrooms with zucchini ragout

zucchini ragout 5

When Cara asked me to guest post and offered the suggestion of focusing on a vacation that I’m excited about, I jumped at the chance to chatter to a new audience about my upcoming trip to Italy. Italy! Venice! The Cinque Terre! Tuscany! Rome! And then there’s the stuff that I’m really excited about – wine and espresso and cheese and pesto and bread and seafood. Also wine. Check out Cara’s blog to read about the Baked Eggs in Mushrooms with Zucchini Ragout I made, which involves no wine or espresso or pesto or bread or seafood. At least there’s cheese.

summer berry pie

summer berry pie 5

Dave enjoys and then forgets the vast majority of what I give him to eat. And how not to? I make so many different things that even I’m surprised sometimes when I scan through old unused pictures (two types of cucumber salad? orange-glazed tofu? raspberry muffins? The pictures prove I made these things, but I don’t remember any of it).

summer berry pie 3

But once in a while, I make something that stands out to Dave enough to not only remember it, but request it again and again, even years later. I hadn’t made this pie in two years, but once berries start to come into season, Dave starts asking about it.

summer berry pie 4

Often, fresh fruit pies are associated with the gel-shellacked versions you get in buffet lines. This pie replaces that gel with the barest coating of fruit jelly, which gives the fruit a beautiful shine without adding any flavorless goo. Instead, a layer of fruit puree holds the filling together while intensifying the bright berry flavor. With ripe sweet berries and a dollop of freshly whipped cream, it’s no wonder this dessert is so memorable.

summer berry pie 6

One year ago: Triple Chocolate Espresso Brownies
Two years ago: Strawberries and Cream Pie
Three years ago: Croque Madame

Printer Friendly Recipe
Summer Berry Pie (from Cooks Illustrated)

Serves 8 to 10

Currant jelly is smooth and bright red, so very attractive in this pie. However, I didn’t want to buy it because I don’t use it for anything else. I used raspberry jam, which I probably should have strained but didn’t.

Crust:
5 ounces graham crackers, broken into rough pieces (9-11 full crackers)
2 tablespoons granulated sugar
5 tablespoons unsalted butter, melted and warm

Filling:
2 cups (about 9 ounces) fresh raspberries
2 cups (about 11 ounces) fresh blackberries
2 cups (about 10 ounces) fresh blueberries
½ cup (3½ ounces) granulated sugar
3 tablespoons cornstarch
⅛ teaspoon table salt
1 tablespoon lemon juice
2 tablespoons red currant jelly

Whipped cream:
1 cup heavy cream (cold)
1 tablespoon granulated sugar
1 teaspoon vanilla extract

1. FOR THE CRUST: Adjust an oven rack to the middle position and heat the oven to 325 degrees. In a food processor, process the graham crackers until evenly fine, about 30 seconds. You should have one cup of crumbs. Add the sugar; pulse to combine. Continue to pulse while adding the warm melted butter in a steady stream; pulse until the mixture resembles wet sand. Transfer to a 9-inch glass pie plate; use the bottom of a ramekin or measuring cup to press the crumbs evenly into the bottom and up the sides. Bake the crust until fragrant and beginning to brown, 15 to 18 minutes; transfer to wire rack and cool completely while making the filling.

2. FOR THE FILLING: Combine the berries in a large colander and gently rinse; spread the berries on towel-lined rimmed baking sheet and gently pat dry with additional towels.

3. In a food processor, puree 2½ cups of the mixed berries until smooth and fully pureed, about 1 minute. Strain the puree through a mesh strainer into small nonreactive saucepan, scraping and pressing on seeds to extract as much puree as possible (you should have 1¼ to 1½ cups). Whisk the sugar, cornstarch, and salt in a small bowl to combine, then whisk the mixture into the puree. Bring the puree to a boil over medium heat, stirring constantly with a wooden spoon; when the mixture reaches a boil and is thickened to consistency of pudding, remove from heat, stir in the lemon juice, and set aside to cool slightly.

4. While the puree is cooling, place the remaining berries in a medium bowl. Heat the jelly in a second small saucepan over low heat until fully melted; drizzle the melted jelly over the berries and gently toss them together until the berries are glazed. Pour the slightly cooled puree into the cooled pie shell and smooth the top with a rubber spatula. Distribute the glazed berries evenly over the puree and gently press into the surface. Loosely cover pie with plastic wrap; refrigerate until chilled and the puree has set, about 3 hours (or up to 1 day).

5. FOR THE WHIPPED CREAM: Add the cream, sugar, and vanilla to the chilled bowl of an electric mixer. Beat at low speed until small bubbles form, about 30 seconds. Increase the speed to high and continue beating until the cream is smooth, thick, and nearly doubled in volume, about 20 seconds for soft peaks or about 30 seconds for stiff peaks. If necessary, finish beating by hand to adjust the consistency.

summer berry pie 7