summer vegetable gratin

summer vegetable gratin 6

Can I talk about my garden some more? I’m sorry, I’m just really excited about it. I’m finding that I get nearly the same enjoyment from my vegetable garden as I do from cooking lately. I can’t stop myself from wandering between the beds, just looking at the plants; looking for new fruit growing, checking on whether anything is ripening, plucking weeds, crushing stinkbugs.

summer vegetable gratin 1

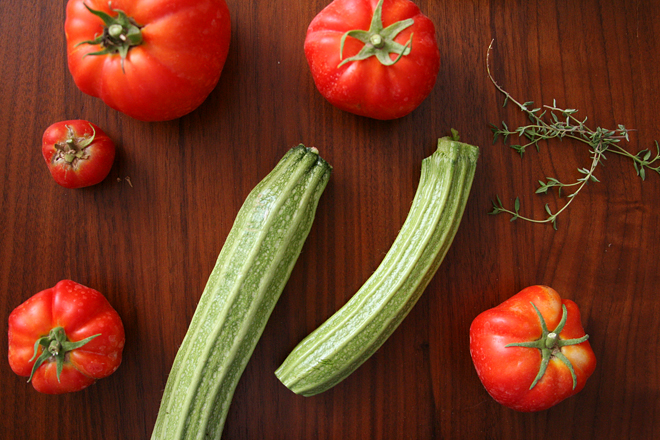
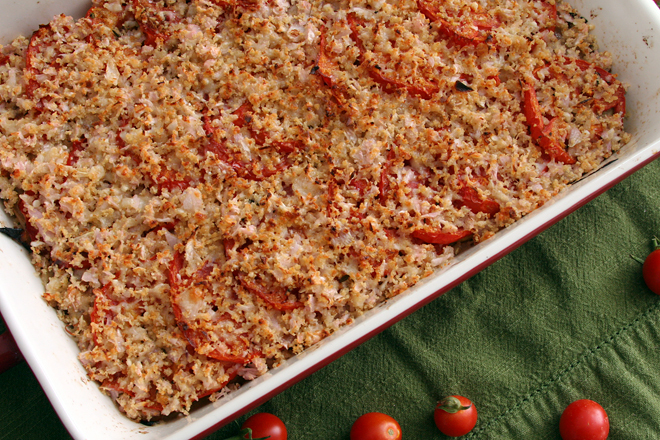
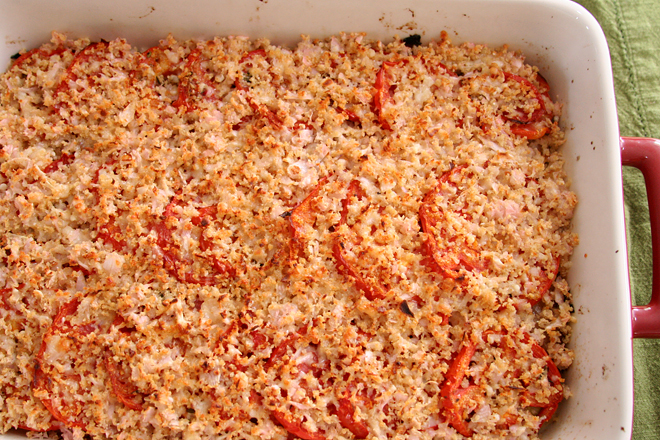
I’m so proud that I grew half of the vegetables in this dish. Despite my hit or miss success with gardening, the tomatoes, zucchini, thyme, and basil in this dish all came from the backyard (or the basil would have if I’d remembered to use it).

summer vegetable gratin 5

It’s one of those dishes that toes the line between being healthy and feeling indulgent. I brought it to a comfort food-themed potluck where I knew there would be a lot of (really delicious) cheesy baked pasta, hoping that a second helping of vegetable gratin would keep me from a third helping of macaroni and cheese. It didn’t work – I had both a second helping of gratin and a third helping of mac and cheese – but at least only my healthy-ish gratin leftovers came home with me. My favorite part of gardening is the part that involves eating, and this combination of summer vegetables and herbs is exactly why that is.

summer vegetable gratin 10

Printer Friendly Recipe
Summer Vegetable Gratin (from Cook’s Illustrated)

6-8 servings

I didn’t use this much oil. I sprayed the pan with cooking spray instead of using a tablespoon of oil, and then I used less with the garlic, maybe just 1 tablespoon instead of three.

6 tablespoons extra-virgin olive oil
1 pound zucchini, ends trimmed and sliced crosswise into ¼-inch-thick slices
1 pound summer squash (yellow), ends trimmed and sliced crosswise into ¼-inch-thick slices
2 teaspoons table salt
1½ pounds ripe tomatoes (3 to 4 large), sliced ¼-inch thick
2 medium onions, halved lengthwise and sliced thin pole to pole (about 3 cups)
¾ teaspoon ground black pepper
2 medium garlic cloves, minced or pressed through garlic press (about 2 teaspoons)
1 tablespoon minced fresh thyme leaves
1 large slice white sandwich bread, torn into quarters
2 ounces Parmesan cheese, grated (about 1 cup)
2 medium shallots, minced (about ¼ cup)
¼ cup chopped fresh basil leaves

1. Adjust an oven rack to the upper-middle position and heat the oven to 400 degrees. Brush a 13- by 9-inch baking dish with 1 tablespoon oil; set aside.

2. Toss the zucchini and summer squash slices with 1 teaspoon salt in a large bowl; transfer to a colander set over a bowl. Let stand until the zucchini and squash release at least 3 tablespoons of liquid, about 45 minutes. Arrange the slices on a triple layer of paper towels; cover with another triple layer of paper towels. Firmly press each slice to remove as much liquid as possible.

3. Place the tomato slices in a single layer on a double layer of paper towels and sprinkle evenly with ½ teaspoon salt; let stand 30 minutes. Place a second double layer of paper towels on top of the tomatoes and press firmly to dry the tomatoes.

4. Meanwhile, heat 1 tablespoon of oil in a 12-inch nonstick skillet over medium heat until shimmering. Add the onions, remaining ½ teaspoon salt, and ¼ teaspoon pepper; cook, stirring occasionally, until the onions are softened and dark golden brown, 20 to 25 minutes. Set the onions aside.

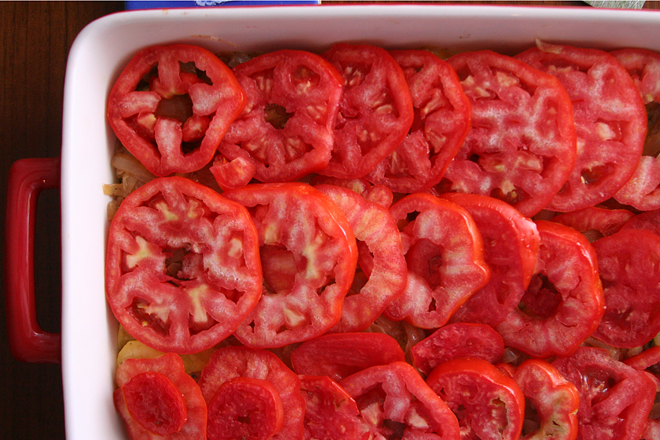
5. Combine the garlic, 3 tablespoons oil, remaining ½ teaspoon pepper, and thyme in a small bowl. In a large bowl, toss the zucchini and summer squash in half of the oil mixture, then arrange in the greased baking dish. Arrange the caramelized onions in an even layer over the squash. Slightly overlap the tomato slices in a single layer on top of the onions. Spoon the remaining garlic-oil mixture evenly over the tomatoes. Bake until the vegetables are tender and the tomatoes are starting to brown on the edges, 40 to 45 minutes.

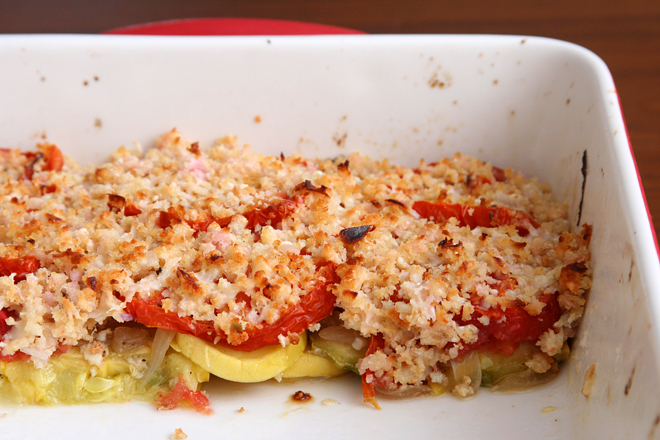
6. Meanwhile, process the bread in a food processor until finely ground, about 10 seconds. (You should have about 1 cup crumbs.) Combine the bread crumbs, remaining tablespoon oil, Parmesan, and shallots in a medium bowl. Remove the baking dish from the oven and increase the heat to 450 degrees. Sprinkle the bread-crumb mixture evenly on top of the tomatoes. Bake the gratin until bubbling and the cheese is lightly browned, 5 to 10 minutes. Sprinkle with the basil and let sit at room temperature for 10 minutes before serving.

summer vegetable gratin 8

goat cheese-stuffed mini peppers

goat cheese stuffed peppers 3

I’ve been lucky to have a lot of opportunities for tapas lately. It started, I believe, last year when Dave and I met my brother for a weekend in Los Angeles, and we shared an exceptional tapas meal. Since then, my brother is tapas-crazy.

goat cheese stuffed peppers 1

On our family’s recent trip to the beach, we collaborated to serve nine different tapas to eleven people (in a house with no dishwasher). Two weeks later, Dave and I had the opportunity to go tailgating in the parking lot of an opera house before seeing Carmen; tapas was the obvious choice again. Less than a week after that, a friend hosted a potluck dinner, and the theme she chose was tapas.

goat cheese stuffed peppers 2

These are among some of my favorite of the options at each dinner, with nods also going to gazpacho and anything with bread (obviously). There are so many bread-based snack options that I love offering something different, especially something with vegetables. But the vegetables are filled with cheese, so they can hold their own on a table filled with garlicky shrimp and things-on-bread. With this recipe in my pocket, I’m ready for many more tapas dinners.

goat cheese stuffed peppers 4

Printer Friendly Recipe
Goat Cheese-Stuffed Mini Peppers

Makes 24 appetizers

I don’t take the seeds or veins out of these when I make them. It hasn’t been a problem.

24 miniature sweet peppers
8 ounces soft goat cheese
2 scallions, finely chopped
2 tablespoons lemon juice
Pinch salt
Pinch black pepper

1. Adjust a rack to the middle position and heat the oven to 400 degrees. Cut a 1 to 2-inch slit down the side of each pepper. Arrange the peppers in a single layer on a rimmed baking sheet, cut-side up. Roasted until softened and slightly browned, about 20 minutes. Set aside to cool slightly.

2. Meanwhile, mix the goat cheese, scallions, lemon juice, salt, and pepper. Transfer the mixture to a piping bag with a wide tip or a zip-top bag with a corner cut off. (I tried spooning the filling into the peppers once, and it didn’t work at all. Piping is definitely the way to go.)

3. Squeeze the goat cheese mixture into each pepper, widening the cut in the pepper if necessary. Serve at room temperature (can be made 2 days in advance).

black bean burgers

black bean patties 4

I actually don’t have any need for a black bean burger. Because Dave and I eat either vegetarian or fish during the week, I’m always ready for some meat by the weekend. And I don’t eat much bread on weekdays either (other than my daily bagel at work – best part of the workday!), so I wouldn’t pair vegetarian burgers with buns. But on top of slaw, now that works.

black bean patties 1

This recipe doesn’t have (much of) my other issue with most vegetarian burgers, which is that they’re usually bound with large amounts of breadcrumbs or other grains, so you’re, in essence, putting carbs on a bun. This mix does have some bread crumbs, but it’s also bulked up with extra protein from cheese and nuts. They’re not there for your health though – they provide a nice variation in texture, so the burgers aren’t uniform, and they’re certainly not mushy, thanks to some time the beans spend in the oven getting dehydrated.

black bean patties 3

The mix itself was so good that I couldn’t stop eating it. Formed into patties and browned, it was that much better. What isn’t better with crisp, caramelized sides? I’m sure they’re great on a bun with your favorite burger toppings, but I loved them on a simple lime-cilantro slaw. I have finally found a place for black bean burgers in my life, and I have found the black bean burger to take that place.

black bean patties 6

Printer Friendly Recipe
Black Bean Burgers
(rewritten but hardly adapted from The Food Lab)

Makes 8 to 12 burgers (the patties in the pictures are each one-tenth of the recipe)

If your cashews aren’t toasted already, put them in the oven before the beans. Don’t do what I did and combine the two on one baking sheet; they’re treated separately in the food processor.

The recipe makes a lot. I formed the mixture into patties and froze most of them. They defrost and cook up perfectly.

According to the original recipe, you can grill these as well as pan-fry them, but I didn’t try it. You’d want to brush the sides with oil before grilling.

2 (15-ounce) cans black beans, rinsed and drained
3 tablespoons vegetable oil, divided
1 medium onion, finely chopped
1 large poblano pepper, finely chopped
3 medium cloves garlic, minced
1 chipotle chile in adobo sauce, finely chopped, plus 1 teaspoon sauce
¾ cup toasted cashews
½ cup finely crumbled feta or cotija cheese
¾ cup panko bread crumbs
2 tablespoons mayonnaise
1 large egg
Kosher salt and freshly ground black pepper

1. Heat the oven to 350 degrees. Spread the black beans evenly on a rimmed baking sheet; bake until the edges are splitting, about 20 minutes.

2. Meanwhile, heat 1 tablespoon oil in a large saucepan over medium heat. Add the onion, poblano, and a pinch of salt, and cook, stirring occasionally, until the onion is just beginning to brown at the edges, about 8 minutes. Add the garlic; cook, stirring constantly, until fragrant, about 1 minute. Remove from the heat and stir in the chipotle chile and sauce. Transfer the mixture to a large mixing bowl.

3. In a food process, pulse the cashews until the largest pieces are about ¼-inch. Transfer to the bowl with the vegetables. Transfer the dried black beans and cheese to the food processor and pulse until the largest pieces are about ¼-inch. Transfer to the bowl with the cashews. Add the bread crumbs, mayonnaise, egg, 1 teaspoon salt, and ½ teaspoon pepper to the mixing bowl. Stir until evenly combined.

4. Form the mixture into patties ¾-inch thick. You can make them any size you want; I made about ten patties from this recipe, and they were each about 4 inches in diameter.

5. In a large nonstick skillet, heat 1 tablespoon oil over medium heat. Add half of the patties and cook, without moving, until crisp and browned on the bottom, about 5 minutes. Flip the patties and continue cooking until the second side is browned, another 5 minutes. Repeat with the remaining patties.

Lime-Cilantro Slaw

½ cabbage, sliced thinly
¼ cup lime juice
½ cup Greek yogurt
4 green onions (or half of a small red onion), minced
¼ teaspoon salt
1 large or 2 small carrots, shredded
2 tablespoons finely chopped cilantro

Combine all ingredients.

black bean patties 5

braised artichokes with creamy dipping sauce

braised artichokes 8

My sister’s kids aren’t particularly picky, but sometimes I push their limits without meaning to. Like the time I thought they’d get a kick out of eggs cooked in bacon toast cups, but instead they were like, Hey, now where does the jelly go? And at least that wasn’t a vegetable.

braised artichokes 2

I don’t even remember why I thought artichokes would be a good idea in the first place, but then when I started thinking about it, I got worried. They tend to turn a military shade of green once they’re cooked. I tried to get the kids excited about saying “okey dokey artichokey”, but I was pulling at strings and knew it.

braised artichokes 4

And then, oddly, they loved the artichokes. I think it was the number one rule of feeding children that worked in my favor – opportunities to dip. Plus, maybe, just maybe, I was right, and the fun of pulling off leaves and scraping the “meat” off with your teeth was more important than the brownish green shade of the vegetables. It certainly is for me, as this is one of my absolute favorite foods.

braised artichokes 7

Printer Friendly Recipe
Braised Artichokes with Creamy Dipping Sauce

Serves 3 to 6 as a first course, depending on how big your artichokes are and how big your appetite is

Trimming artichokes isn’t hard, but you might want to watch a youtube video or two if you’re not familiar with the process.

99% of artichoke recipes call for transferring the trimmed ‘chokes to a bowl of water with a lemon squeezed into it to keep them from browning. Not only does it not work, but they look and taste the same after cooking, so I’ve skipped this step. (But a recent issue of Cook’s Illustrated tested it and found it the lemon water worthwhile.)

If your artichokes are really big, you might need to use a 12-inch sauté pan instead of a Dutch oven to fit them in a single layer.

If you’re mayonnaise-adverse, crème fraiche would be a great substitute. Greek yogurt or sour cream would work if you stir it in off the heat so the dairy doesn’t curdle.

3 medium artichokes
1 tablespoon olive oil
3 cloves garlic, minced
¾ cup water
½ cup white wine
¼ teaspoon black pepper
½ teaspoon salt
2 tablespoons mayonnaise
1 tablespoon parsley leaves, minced

1. Working with one artichoke at a time, cut off the top 2 inches of the artichoke. Working around the artichoke, use scissors to cut off the sharp tips of the leaves. Trim the base of the stem, then trim off the outside millimeter or so of the stem. Cut the artichoke in half from top to bottom and use a paring knife to cut out the sharp purple leaves and fuzzy choke from the center. Rinse the artichoke under running water to remove any remaining fuzz.

2. Heat the olive oil in a 5- or 6-quart Dutch oven over medium heat. Add the garlic and cook, stirring constantly, until fragrant, about 30 seconds. Arrange the artichokes cut-side down in the pot, overlapping the stems in the middle. Add the water, wine, pepper, and salt. Cover the pot, reduce the heat to medium-low, and braise artichokes until tender when pierced with a knife, about 30 minutes for small artichokes and 40 minutes for very large artichokes. (If you’re not ready to serve the artichokes right away, remove the pot from the heat and leave the cover on; the ‘chokes will stay hot for up to 30 minutes.)

3. Transfer artichoke halves to a serving platter or plates. There should about ⅓ cup liquid remaining in the pot; if there’s less, add water until there’s a total of ⅓ cup liquid; if there’s more, simmer the liquid to reduce it slightly. Add the mayonnaise and parsley to the liquid; whisk to combine and pour into individual dipping containers.

braised artichokes 10

spicy mexican beans and rice

mexican rice and beans 6

It’s been a long road since I shared something vaguely similar to this recipe, well over six years ago. At the time, I said that I had a goal to make more crockpot recipes. Since then, I have made exactly three crockpot recipes worth sharing, and one of those I’ve never made again. In general, I’m more into low-and-slow oven cooking than crockpotting. Heck, I recently even made “crockpot” pulled “pork” (it was venison; still delicious) in the oven.

mexican rice and beans 1

The long road of not-crockpotting has led me to adapt my old favorite crockpot recipe for the stove. The way the original recipe is written, with bone-in chicken thighs, the crockpot is a good choice. However, I always make this as an easy, healthy, vegetarian weeknight meal, leaving the chicken out. Why spend 10 hours, the whole day when I’m away for work, slow-cooking canned beans with some seasonings?

mexican rice and beans 3

So instead of adapting stovetop or oven recipes for the crockpot like most people do, I’ve adapted a crockpot recipe for the stove. I replaced the chicken soup mix with aromatics and spices, the chicken with a greater variety of beans, and the fresh tomatoes with canned tomatoes (in season year round!). It really isn’t any harder than the crockpot recipe was, and it tastes just as good.  With this new crockpot-less recipe, it might be time to retire my crockpot entirely.  Surely I can think of another fun new kitchen tool that I don’t really need to take up that cabinet space, right?

mexican rice and beans 5

Printer Friendly Recipe
Spicy Mexican Beans and Rice

8 servings

2 tablespoons vegetable or olive oil
1 large or 2 small to medium onions, diced
salt
4 cloves garlic, minced
2 teaspoons chili powder
1 teaspoon cumin
½ teaspoon oregano
½ cup green chile, roasted, peeled, and diced
2 chipotle chiles, minced
2 (15-ounce) cans black beans, drained and rinsed
1 (15-ounce) can kidney beans, drained and rinsed
1 (15-ounce) can pinto beans, drained and rinsed
1 (14-ounce) diced tomatoes
1 cup chicken broth
juice from 1 lime
6 cups cooked rice from 2 cups uncooked rice
cilantro, minced
optional toppings: queso fresco or cheddar cheese, diced avocado, Greek yogurt or sour cream

Heat the oil in a large saucepan over medium heat. Add the onion and a pinch of salt and cook, stirring occasionally, until just beginning to brown at the edges, about 8 minutes. Add the garlic, chili powder, cumin, and oregano; cook, stirring constantly, until fragrant, about 30 seconds. Add the green chile, chipotle chiles, beans, tomatoes, and broth; cover, bring to a simmer, then reduce the heat to low and lightly simmer until the flavors are blended, at least 20 minutes or up to an hour if you aren’t in a hurry. If the mixture is too liquidy, remove the cover, increase the heat to medium, and simmer until the desired thickness is reached. Taste and add salt if necessary. Stir in the lime juice. Serve over rice, topped with cilantro and other toppings as desired.

mexican rice and beans 8

brussels sprouts and kale salad with pecorino and almonds

brussels sprouts kale salad 11

I never would have served my dad kale six months ago. For his whole life, he’s been a classic meat and potatoes guy, heavy on the meat. He’d put vegetables on his plate every night, and he’d always eat them – all two forkfuls that he’d served himself.

brussels sprouts kale salad 2

He made a sudden switch last fall in an attempt to lower his cholesterol and blood pressure. (It worked, by the way.)  However, he didn’t just start eating more vegetables and less meat. He didn’t become a pescatarian, or even a vegetarian. No, he went all the way from meat and potatoes to vegan – vegan with no fat, not even from avocados.

brussels sprouts kale salad 8

He’s loosened up the rules quite a bit since then, although I get the idea that rice and beans still play a big role in his diet. So when my parents visited, I took a chance and served my new favorite salad, almost a slaw of thinly sliced Brussels sprouts and Tuscan kale. It’s bright from lemon juice, but the pecorino provides a bit of richness. I love the crunch of the almonds. It’s a strange world, although not a bad one, where I am comfortable feeding my dad kale but not the Italian sausage dish that was the main course of this meal.

brussels sprouts kale salad 4

Printer Friendly Recipe
Brussels Sprouts Kale Salad with Pecorino (adapted from Bon Appétit via epicurious)

6 to 8 servings

Slicing the Brussels Sprouts isn’t as tedious as it sounds; it’ll probably take you ten minutes. However, the slicing blade on a food processor should do the trick too.

1 teaspoon plus ¼ cup extra-virgin olive oil, divided
½ cup slivered almonds, coarsely chopped
¼ cup fresh lemon juice
2 tablespoons Dijon mustard
1 small shallot, minced
1 small garlic clove, finely grated
¼ teaspoon kosher salt plus more for seasoning
Freshly ground black pepper
16 ounces Brussels sprouts, trimmed, halved and sliced thin
2 bunches Tuscan kale (about 8 ounces total), center stem discarded, leaves thinly sliced
1 cup (2 ounces) finely grated Pecorino

1. In a small skillet over medium heat, heat 1 teaspoon of the olive oil. Add the almonds and toast, stirring constantly, until browned and fragrant, 2-4 minutes. Transfer the almonds to a plate; set aside.

2. In a small bowl, mix the lemon juice, mustard, shallots, garlic, salt, and pepper. Whisk in the remaining olive oil.

3. Combine the Brussels sprouts, kale, dressing, almonds, and pecorino. Serve immediately or cover and chill for up to 8 hours.

brussels sprouts kale salad 9

roasted cauliflower soup with feta

cauliflower feta soup 5

While spinach with feta hasn’t quite reached the level of “Oh my god, if I eat this one more time, I’ll go crazy”, it’s certainly a far cry from the “wow, I can’t believe how delicious something as simple as the combination of spinach and feta is.” (Seriously, if you haven’t tried it, check it out – feta is creamy and salty and briny, so it covers all of the bases that a good salad dressing does.) After I eat a banana with peanut butter about halfway through my workday afternoons, when the only snacks I have left are spinach with feta and vegetables with hummus, I think to myself, “well, that’s it, the rest of the afternoon’s snacks are just to be endured and not enjoyed.”

cauliflower feta soup 1

I don’t always, or even often, for that matter, want to spend part of my weekend making snacks for the week, but it’s occasionally worth it for some variety. This soup covers the same basic nutritional bases as spinach with feta would – vegetables and dairy protein. Surely raw spinach has more fiber and nutrients than roasted and boiled cauliflower, but let’s not overthink things.

cauliflower feta soup 2

The important thing is that I actually look forward to eating this every day, instead of wavering between disinterest and dread. And not just because it isn’t the same thing I’ve eaten everyday for the last three years – it’s a great soup. The pureed cauliflower makes it seem rich and creamy, while the feta and squeeze of lemon juice brighten up the flavors. Having something to look forward to when you’re six hours into a nine-hour workday is worth a bit of extra cooking on the weekend.

cauliflower feta soup 4

Printer Friendly Recipe
Roasted Cauliflower Soup with Feta (adapted from Two Peas and Their Pod)

1 head of cauliflower, cut into 1 to 2-inch florets
2 tablespoons olive oil, divided
Salt
2 stalks celery, diced
1 onion, diced
3½ cups vegetable or chicken broth
2 sprigs thyme
2 ounces feta
1 tablespoon lemon juice
2 tablespoons parsley, minced

1. Place a rimmed baking sheet in the oven and heat the oven to 400 degrees. When the oven is hot, remove the baking sheet, add one tablespoon of olive oil plus a generous sprinkling of salt, then the cauliflower. Spray the top of the cauliflower with cooking spray. Roast, stirring twice, for 20-25 minutes, until a couple sides of each floret are deeply browned.

2. In a 5-quart pot, heat the remaining 1 tablespoon oil over medium heat. Add the celery, onion, and a pinch of salt; cook, stirring occasionally, until softened and the onion is translucent, 6-8 minutes. Add the roasted cauliflower, broth, and thyme. Bring to a simmer over medium-high heat, then reduce the heat to medium-low and simmer for 20 minutes. Puree, either with an immersion blender or in batches with a stand-up blender.

3. Stir the feta, lemon juice, and parsley into the soup. Taste for seasoning, adjusting as necessary, and serve immediately. (Can also be made several days in advance.)

cauliflower feta soup 3

grilled potato salad with watercress

potato salad watercress 5

Dave’s birthday, 2 weeks after Christmas, is at a sort of inconvenient time of year. My dad’s is January 2nd, and even that is better – in my family, the holidays are just one day longer than they are for everyone else. But a week later, you’ve had all the cookies and wine and cheese (or whatever your splurges happen to be) you want, but you haven’t had more than a few days to detox from the decadence. And yet, it’s time for banana cream pie.

potato salad watercress 1

I got Dave a cute little cast iron saucepan for the grill, so I had to plan a meal that would allow him to use it. He also got a new grill for Christmas, so I specifically planned a meal that would use both of our grills – barbecue pork ribs, grilled potato salad, grilled broccoli. And then the weather sucked, although we pushed through and grilled the ribs and potatoes still, but I roasted the broccoli.

potato salad watercress 2

It wasn’t the most indulgent meal ever, but extra vegetables are always welcome this time of year, so I chose the potato salad that actually looked like a salad. It’s not a traditional potato salad coated in mayonnaise, but I didn’t feel like we lost out for the healthier option. This was crisp and fresh, healthy enough for January, but still with satisfying browned potatoes and creamy cheese. It was just light enough to justify a big piece of banana cream pie for dessert.

potato salad watercress 4

Printer Friendly Recipe
Grilled Potato Salad with Watercress (from Bon Appetit via epicurious)

I’ve reduced both the potatoes (because I was trying to be healthier) and the blue cheese (because it can be too intense) from the original recipe, but I’m sure the original amounts are great too.

¼ cup sherry wine vinegar
1 large shallot, chopped
2 teaspoons Dijon mustard
½ cup olive oil, plus more for grilling potatoes
6 medium red-skinned potatoes, unpeeled (about 1½ pounds)
2 bunches watercress, stems trimmed
3 green onions, chopped
¼-½ cup crumbled blue cheese

1. Combine vinegar, shallot, and mustard in medium bowl. Gradually whisk in ½ cup oil. Season vinaigrette to taste with salt and pepper.

2. Cook potatoes in large pot of boiling salted water until almost tender, about 16 minutes. Drain; cool completely. Cut potatoes into ¼- to ½-inch-thick rounds. Brush or spray rounds on both sides with oil; sprinkle with salt and pepper.

3. Prepare grill for medium-high heat. Grill potatoes until golden and cooked through, about 3 minutes per side. Dice the potatoes into ½-inch cubes.

4. In a large serving bowl, mix the watercress, scallions, and most of the vinaigrette. Add the potatoes and the remaining dressing, and gently mix to coat. Top with the blue cheese; serve immediately.

potato salad watercress 3

kale salad with currants, pine nuts, and parmesan

kale salad with currants 6

So, it turns out that I really like kale. It isn’t at all something I eat just because it’s dark green and probably really good for me. I like the flavor, earthy and vegetal together. I like the texture, how cooked kale is still chewy, unlike spinach which almost immediately turns to mush, and how raw kale doesn’t get soggy. And I like the convenience – it stays fresh for a while in the fridge and you can make salads with it days ahead of time, and they get better instead of worse.

kale salad with currants 2

I made this for a pizza party I hosted. The party started right after work, plus I had to deal with the pizza dough, so making salad right beforehand wasn’t an option. I took a risk and served kale; I wasn’t sure how it would go over, but I assumed there were enough friendly flavors in this salad to please most palates.

kale salad with currants 3

The salad might not have been as popular as the Nutella banana pizza or mascarpone-stuffed strawberries, but people seemed to like it.  There were leftovers, but that was okay, because even several days after I’d made the salad, it was still crisp and delicious. Plus it meant more kale for me – and I really like kale.

kale salad with currants 4

Printer Friendly Recipe
Kale Salad with Pine Nuts, Currants, and Parmesan (adapted from Bon Appetit via epicurious)

3 tablespoons balsamic vinegar
2 tablespoons dried currants
1 tablespoon unseasoned rice vinegar
1 tablespoon honey
1 tablespoon extra-virgin olive oil
1 teaspoon salt
2 bunches Tuscan (lacinato) kale (about 1 pound), center ribs and stems removed, leaves thinly sliced crosswise
2 tablespoons pine nuts, lightly toasted
Parmesan cheese shavings

1. Place the vinegar and currants in a small pot; bring to a simmer over medium-high heat, then remove from the heat. Let soak 15-30 minutes, while you prepare the other ingredients; drain, reserving vinegar.

2. Whisk vinegar leftover from soaking the currants, the rice vinegar, honey, oil, and salt in large bowl. Add the kale, currants, and pine nuts; toss to coat. Let marinate 20 minutes at room temperature, or cover and refrigerate overnight. Season to taste with salt and pepper. Sprinkle cheese shavings over salad and serve.

kale salad with currants 5

mulled wine cranberry sauce

mulled wine cranberry sauce 2

This, finally, is the cranberry sauce I’ve been looking for – the one that is worth making not just because making cranberry sauce is fun, but because this is better than anything you could buy. And it’s no more effort than any other cranberry sauce; the only difference between this and the most basic recipe is that wine is used to simmer the cranberries instead of water, and there are a handful of warm winter spices thrown in.

mulled wine cranberry sauce 4

With so much wine, you might think that the sauce ends up tasting like wine, but that isn’t the case. It tastes like something much more than the in-your-face tart and sweet of regular cranberry sauce, but it isn’t particularly boozy. It’s just deeper, more complex, with a little buzz on your tongue.

mulled wine cranberry sauce 5

Unfortunately, with half a bottle of wine stirred into one bag of cranberries, there’s no chance of claiming that all the alcohol cooks off, so this isn’t the best cranberry sauce for kids. That’s why my friend offered to bring a can of jellied cranberry sauce for her kids when I invited them over for a big turkey feast.

mulled wine cranberry sauce 6

When she forgot, we figured what the heck, what harm could a few tablespoons of winey cranberries do? Not much at all, it turns out, as her son took one spoonful of sauce, noted that there was wine in it, and pushed it aside in favor of the stuffing. So maybe it’s not for everyone, but it’s definitely my new favorite.

mulled wine cranberry sauce 7
(turkey cranberry green chile sandwich on a crescent roll)

Printer Friendly Recipe
Mulled Wine Cranberry Sauce (adapted from Bon Appetit via epicurious)

I pressed the sauce through a food mill right after simmering, because I like my cranberry sauce smooth.

zest from 1 orange
1½ cups red wine
½ cup (3.5 ounces) packed brown sugar
½ cup finely chopped crystallized ginger
½ teaspoon ground cinnamon
¼ teaspoon ground cloves
¼ teaspoon ground nutmeg
12 ounces fresh cranberries

Combine all of the ingredients in a medium saucepan. Bring to a boil over medium-high heat, stirring until the sugar dissolves. Reduce the heat to low and simmer uncovered until the berries burst and the mixture thickens, about 20 minutes. Transfer sauce to bowl; chill until cold. (Can be prepared 1 week ahead. Cover and keep refrigerated.)

mulled wine cranberry sauce 3