chickpea and rosemary soup

chickpea rosemary soup 7

I confess that this soup came out through a series of blunders. I had originally planned to make African coconut curry soup, with the belief that it was a new recipe and I could submit it to Branny’s SouperBowl charity fundraiser for ASPCA. It turns out though, that it’s the exact same recipe I submitted last year. Whoops.

chickpea rosemary soup 1

I started jotting down what I had in mind instead, a tomato broth with lots of garlic, red pepper flakes, and rosemary, reminiscent of this braised white bean recipe. It also included the chickpeas I’d bought for the curry soup and pasta, which I’d been craving. But then that soup starting sounding familiar too.

chickpea rosemary soup 3

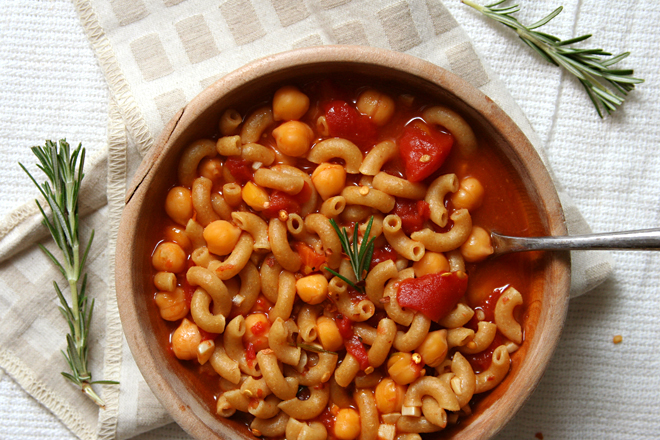
Apparently I wouldn’t be striking bold new soup ground. But that’s okay. I didn’t want something new, I wanted something warm and comforting and easy, easier than my favorite pasta e fagioli recipe. This simple chickpea and pasta soup, infused with piney rosemary, hit the spot perfectly – maybe even better than the originally planned curry soup would have.  I have no regrets for all my blunders that led me to this soup.

chickpea rosemary soup 4

Participation in Branny’s fundraiser requires that the blog post be dedicated to a pet. I dedicate mine to my cat, Daisy, who is also warm and comforting and easy, at least when she isn’t puking on the carpet.

daisy

One year ago: Almond Biscotti
Two years ago: Banana Cream Pie
Three years ago: Crispy Baked Chicken Strips
Four years ago: Fish Tacos

Printer Friendly Recipe
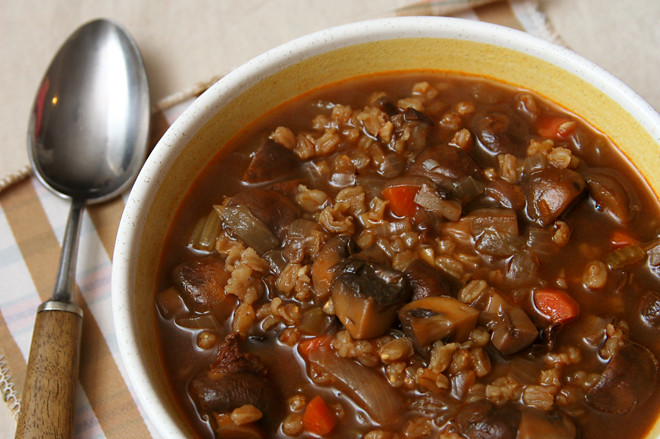
Rosemary Chickpea Soup

Serves 4 to 6

I used 8 ounces of pasta. It seemed like a lot, but I didn’t mind. Still, if you’d like less pasta, 4 ounces (or anywhere in between) would work well.

1 tablespoon olive oil
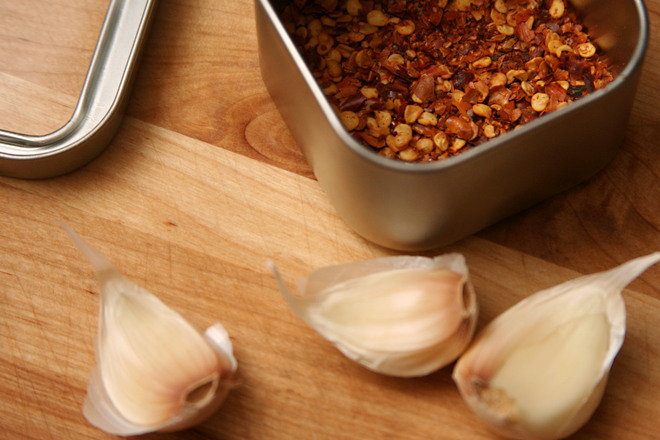
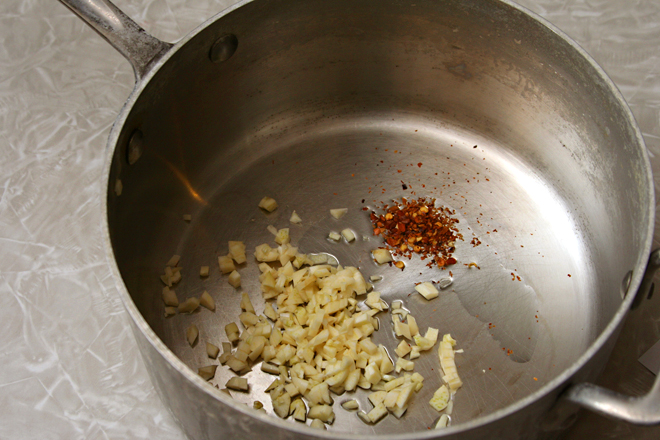
8 cloves garlic, minced
½ teaspoon red pepper flakes
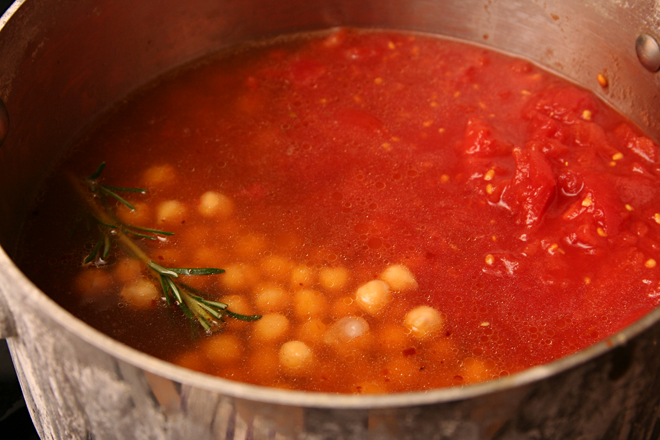
1 (28-ounce) can diced tomatoes
2 (15-ounce) cans chickpeas, rinsed and drained
4 cups broth (chicken or vegetable)
½ teaspoon salt
2 sprigs fresh rosemary
Parmesan rind, if you have one
4-8 ounces small pasta, such as ditalini or macaroni

In a large saucepan over medium heat, heat the oil, garlic, and red pepper flakes. Once the oil starts to sizzle, stir for about 1 minute, then add the tomatoes with their juices, the chickpeas, broth, salt, rosemary, and parmesan rind (if using). Increase the heat to medium-high; once the liquid comes to a lively simmer, add the pasta, return the mixture to a boil, then reduce the heat to medium and simmer until the pasta is tender. Remove the rosemary sprigs, adjust the salt if necessary, and serve.

chickpea rosemary soup 6

lentil salad with squash and goat cheese

lentil squash salad 4

The Great Cookie Craze that is December perplexes me. I understand that with various holiday-related celebrations, there are more opportunities for feasts and drinks than at other times of the year, but the cookie mania goes beyond parties. People send dozens of treats out to families and friends, most of whom are making their own dozens of cookies. The number of cookies in the world exponentially increases for a month.

lentil squash salad 2

The tide turns in January, which, without any significant celebration of its own, becomes the Undo the Holidays month. Poor January, but really, it isn’t such a bad thing. After all, healthy food tastes good too, particularly healthy food that includes goat cheese.

lentil squash salad 3

Tart goat cheese mixed with sweet winter squash is becoming one of my favorite flavor combinations, and kale, with its bitter notes, and lentils, with its meatiness, make it even better. Or, if kale isn’t your thing, arugula adds some freshness to the plate. Nothing about this salad feels like punishment for the past month’s excesses.  But have a cookie afterward anyway; December shouldn’t get to have all the fun.

lentil squash salad 5

One year ago: Nutty Chocolately Swirly Sour Cream Bundt Cake
Two years ago: Chocolate Oatmeal Almost Candy Bars
Three years ago: Herbed Lima Bean Hummus
Four years ago: Pissaladiere

Printer Friendly Recipe
Lentil Salad with Squash and Goat Cheese (adapted from Bon Appétit via Smitten Kitchen)

Serves 4

The original recipe calls for arugula, which I used the first time I made this. (Actually, the pictures seem to indicate I used mixed greens.) The second time, I used kale, which I like even more. I wrote the directions for kale into the recipe; if you use arugula instead, simply add it to the salad at the end. You can also use a smaller pot to cook the lentils if you’re not adding the kale.

¾ cup green lentils
salt
1 butternut squash, peeled and cut into ½-inch cubes, seeds reserved
1 tablespoon plus 1 teaspoon olive oil, divided
1 teaspoon ground cumin
1 teaspoon paprika
1 bunch kale, ribs removed, leaves coarsely chopped
4 ounces goat cheese, crumbled
1 tablespoon red wine vinegar, plus additional to taste

1. Place the butternut squash on a sheet pan. Add 1 tablespoon of the olive oil, the spices, and ½ teaspoon salt; toss to coat. Roast the squash for 25 minutes, turning once. In a small bowl, mix the cleaned squash seeds with the remaining 1 teaspoon oil and a pinch of salt. Add the seeds to the baking sheet with the squash and continue to roast until the squash is tender and the seeds are browned.

2. Combine the lentils, ½ teaspoon salt, and 3 cups of water in a 3- to 4-quart saucepan; bring to a boil over medium-high heat. Reduce the heat, cover, and simmer until the lentils are tender, 18-20 minutes. Add the kale to the pot during the last 2-3 minutes of simmering. (The kale will overwhelm the size of the pot at first but will quickly wilt.)

3. Combine the lentils, squash, kale, goat cheese, and vinegar. Season with salt, pepper, and extra vinegar, if desired. Serve.

lentil squash salad 6

rice noodle salad with peanut dressing

rice noodle peanut butter salad 5

I was going through a protein rut recently, where I seemed to be cooking with beans more weeknights than not. We try not to eat meat on weekdays, we take hard-boiled eggs to work everyday as snacks, and cheese has too much fat. So what does that leave me? I’d completely forgotten about soy.

rice noodle peanut butter salad 1

Think of tofu as a sponge that soaks up flavor. True, on its own, it tastes like water and has a jello-like squishiness, but when you sauté it and soak it in sauce, it’s hardly discernible from chicken, except cheaper and easier to work with. Plus, it won’t dry out like boneless skinless chicken breasts.

rice noodle peanut butter salad 3

This sauce has plenty of flavor for the tofu to absorb. Ginger, garlic, soy sauce, sugar, rice vinegar, and sesame oil, all mixed into creamy peanut butter, make for one heck of a combination. There are plenty of vegetables to provide brightness and crunch.  This was so good we had it two weeks in a row – alternating with dinners involving beans, of course.

rice noodle peanut butter salad 4

One year ago: Pasta Puttanesca
Two years ago: Asian-Style Chicken Noodle Soup
Three years ago: Pasta with Broccoli, Sausage, and Roasted Red Peppers

Printer Friendly Recipe
Rice Noodle Salad with Peanut Dressing (adapted from Cate’s World Kitchen)

My noodles stuck together in one big clump, so I chopped them up after cooking. I know that’s against standard noodle procedure, but in the end, it worked perfectly.

Serves 4-6

Having made this a bunch more times, I’ve found that it’s even better with the juice of a lime squeezed into the sauce.

2 teaspoons olive oil
1 pound tofu
salt
8 ounces rice noodles (linguine shape)
½ inch fresh ginger, peeled and finely chopped
4 cloves garlic, chopped
½ cup creamy peanut butter
3 tablespoons soy sauce
2 teaspoons brown sugar
3 tablespoons rice vinegar
1 tablespoon sesame oil
¼ cup warm water
chili garlic sauce to taste (optional)
1 medium cucumber, sliced into half moons
1 red bell pepper, cut into matchsticks
2 green onions (green parts only), sliced
¼ cup chopped fresh cilantro

1. Heat the oil in a medium nonstick skillet over medium-high heat. Slice the tofu lengthwise into ½-inch thick slabs; pat dry on a dishtowel. Transfer the tofu to the oil and cook, without moving, for 4-6 minutes, until browned on the bottom. Flip the tofu and brown the second side. Remove the tofu from the skillet and cut into bite-sized cubes.

2. Bring a large pot of water to a boil. Add a large pinch of salt and the rice noodles; cook until tender. (Check the package instructions for exact cooking times.) Drain and rinse the pasta.

3. In a large bowl, whisk together the peanut butter, soy sauce, ginger, garlic, sugar, rice vinegar, sesame oil, water, and chili garlic sauce until smooth. Fold the tofu into the sauce, then add the remaining ingredients, reserving some of the green onions and cilantro for a garnish.

rice noodle peanut butter salad 6

mushroom farro soup

mushroom farro soup 6

What a difference a few drops of vinegar make. I sat down to eat my soup and couldn’t shake the thought that it was missing something. It seemed like enough salt, but I thought maybe if I dribbled in some umami-y soy sauce, that would do the trick. On the way to the cabinet, I saw the bottle of sherry vinegar that I’d put on the counter to add to the soup and forgotten about it. It turns out, that’s exactly what the soup needed.

mushroom farro soup 3

It isn’t that the soup is so bad without it, not by any means. With a flavor base of browned onions and carrots, then garlic and tomato paste, and finally a pile of sliced fresh mushrooms, there’s plenty of sweet and meat flavors (although no actual meat). A pinch of truffle salt didn’t hurt matters either, and porcini mushrooms along with their rehydrating broth take the mushroominess up another notch.

mushroom farro soup 4

Farro gives the soup substance, and altogether it adds up to a dark, deeply flavored soup that is, nonetheless, missing something. A spoonful of sherry (or red wine) vinegar adds a touch of brightness that balances the rich flavors of the mushrooms. And then the soup is just right.

mushroom farro soup 5

One year ago: Red Pepper Risotto
Two years ago: Brussels Sprouts Braised in Cream
Three years ago: Sausage Apple Hash

Printer Friendly Recipe
Mushroom Farro Soup (adapted from The New York Times via Smitten Kitchen)

4 servings

I added a stalk of celery too, because I had some in the fridge. I wouldn’t buy it just for this recipe though.

Feel free to substitute barley or wheat berries for the farro, but you’ll need to adjust the cooking time for different grains.

The photos of the final soup are of leftovers. Overnight, the farro soaks up some of the broth, making a thicker soup with softer grains. The soup is wonderful fresh, but I might even prefer it leftover.

¼ ounce dried porcini mushrooms, rinsed
1 tablespoon olive oil
1 medium onions, diced fine
1 medium carrot, diced fine (or 1 carrot and 1 stalk of celery)
2 cloves garlic, minced
2 teaspoons tomato paste
1 pounds cremini mushrooms, sliced ⅛-inch thick
¼ cup sherry
2 cups broth (I prefer chicken)
½ cup farro, rinsed
Salt and black pepper
2 teaspoons sherry vinegar

1. Place the dried mushrooms in a small bowl with ½ cup water; cover the bowl with plastic wrap, use a paring knife to make about 5 holes in the plastic wrap, and microwave on high for 30 seconds. Set aside for 10 minutes to let the mushrooms soften. Use a fork to lift the softened mushrooms out of the liquid. Mince the mushrooms and strain the liquid through a coffee filter to remove grit, reserving the strained liquid. (This is the official method; I never do it this way, I just let the grit settle to the bottom of the liquid and leave the bit of gritty liquid behind when I use the liquid later in the recipe.)

2. In a large saucepan, heat the oil over medium heat. Add the onions and carrots and cook, stirring occasionally, until the onions just start to brown around the edges, about 8 minutes. Add the garlic and tomato paste; cook, stirring constantly, until fragrant, about 30 seconds.

3. Add the fresh mushrooms; cook, stirring occasionally, until they release their liquid, 3-5 minutes. Increase the heat to medium-high and cook until the liquid evaporates and the mushrooms just begin to brown, about 10 minutes. Add the sherry; scrape up any browned bits on the bottom of the pan. Add the broth, farro, minced porcini, the liquid leftover from soaking the mushrooms, 2 teaspoons salt, and ½ teaspoon pepper. Bring to a simmer over high heat, then reduce the heat to medium and simmer for about 40 minutes, until the farro is tender. (The soup can be stored at this point for up to 5 days. Heat on the stove over medium heat just before serving.) Stir in the sherry vinegar. Add more salt and pepper if necessary; serve.

mushroom farro soup 7

squash kale pizza

squash kale pizza 6

This recipe knocked me out of a months-long pizza rut. At about two homemade pizza dinners a month, that’s a lot of green chile-turkey pepperoni-mushroom pizza. Not that anyone around here was complaining.

squash kale pizza 1

It’s the complimentary earthy flavor that squash and kale both have, combined with the contrasting sweetness of the squash and slight bitterness of the kale that make this pizza work so well. Onions with savory centers and caramelized tips bridge the gap, then the whole thing is topped with plenty of cheese, which is what really matters. I don’t know if it’s going to rival green chile-turkey pepperoni-mushroom for our next rut, but it was definitely a nice diversion.

squash kale pizza 3

One year ago: Beef in Barolo
Two years ago: Steak au Poivre
Three years ago: Red Velvet Whoopie Pies

Printer Friendly Recipe
Kale and Butternut Squash Pizza (from Bev Cooks via Cate’s World Kitchen)

I used acorn squash the first time I made this and delicata squash the second time. So technically, I haven’t made butternut squash and kale pizza yet!

Dough for two 10-inch pizza crusts (half of this recipe)
1½ tablespoons olive oil, divided
salt and freshly ground pepper
1 medium butternut squash, peeled, seeded and cut into bite-sized cubes
2 small red onions, cut into wedges
3 cups kale (from about 1 bunch), cut in thin ribbons
2 garlic cloves, sliced
2 cups (8 ounces) shredded mozzarella cheese

1. Place a pizza stone on the bottom rack of the oven and preheat the oven to 400 degrees. Divide the dough in two and shape each portion into a ball. Set the balls of dough aside for 10 to 30 minutes, loosely covered, to allow the gluten to relax.

2. Transfer the squash and onions to a large baking sheet; season with a generous pinch of salt and pepper and coat with 1 tablespoon of oil. Bake, stirring once halfway through, until softened and browned, about 30 minutes.

3. Heat the remaining ½ tablespoon of oil with the garlic in a large skillet; add the kale and a pinch of salt; cook, stirring constantly, until wilted, about 2 minutes. Remove from the heat.

4. Work with one ball of dough at a time on a lightly floured surface or a damp cloth. Flatten the dough, then pick it up and gently stretch it out, trying to keep it as circular as possible. Curl your fingers and let the dough hang on your knuckles, moving and rotating the dough so it stretches evenly. If it tears, piece it together. If the dough stretches too much, put it down and gently tug on the thick spots. Transfer the round of dough to a large square of parchment paper; slide onto a pizza peel.

5. Top the dough with half of each of the roasted vegetables, kale, and cheese. Slide the pizza with the parchment onto the hot baking stone. Bake for 8-10 minutes, until the crust is browned around the edges. Transfer the pizza to a cooling rack without the parchment. Let the pizza rest for 5 minutes before serving. Repeat with the remaining ingredients.

squash kale pizza 4

lentil marinara

lentil marinara 5

When my coworker came back to work after spending weeks in the hospital (and in my small town, that means a hospital over two hours away from home) with his sick newborn baby, I figured they could use a home-cooked meal. I thought tomato soup, homemade bread, and some nice cheese to make grilled sandwiches would be the perfect comfort food. Unfortunately, it would require a trip to the store and a couple free hours to cook, and when I saw how exhausted my friend was, I figured getting something to him soon was more important than getting the perfect meal to him.

lentil marinara 1

So I made extras of what I was having for dinner that night. Spaghetti is warm and familiar, so fits the comfort food bill, and who doesn’t like the pasta and tomato sauce combination? The lentils, though, might seem strange to some people.

It makes perfect sense to me, because lentils are a great protein source, and while I can’t claim that they taste like beef, there is something meaty-like about them. Besides, what’s more comforting than knowing that your dinner is not only delicious, it’s healthy?

lentil marinara 2

And now I have another friend who needs comfort food after the death of her father on Thanksgiving day. Unfortunately, I can’t just bring her my leftovers, because she lives a thousand miles away. I don’t think virtual comfort food is quite the same, but at least she’ll know I’m thinking about her and her family and wishing them the best during a difficult time.

lentil marinara 3

One year ago: Pasta with Brussels Sprouts and Pine Nuts
Two years ago: Thai-Style Chicken Soup
Three years ago: Pumpkin Ginger Muffins

Printer Friendly Recipe
Lentil Marinara (adapted from Branny Boils Over)

6-8 servings

I simmered this for 30-45 minutes, but, if you have the time, I suspect that a longer simmering time while covered would really help the lentils absorb the tomato flavor.

I like canned whole tomatoes for sauce because they break down better, but if you don’t mind larger tomato chunks in your sauce, diced tomatoes will work fine. I chop canned whole tomatoes by sticking kitchen shears into the can and snipping away.

Update 4/23/12 – I’ve made this a couple more times, and I’ve decided that it’s probably too heavy on the lentils.  Using up a whole bag at once is nice, but 8 ounces of lentils for 2 cans of tomatoes will make a tastier sauce.

2 tablespoons oil
1 onion, diced
4 garlic cloves, minced
¼ teaspoon red pepper flakes
½ teaspoon oregano
¼ cup white or red wine
2 (28-ounce) cans whole tomatoes, coarsely chopped
1 (1-pound) bag brown lentils, rinsed and picked over
3 cups water
1 teaspoon salt

1. In a large saucepan over medium heat, heat the oil until it flows like water when the pan is tilted. Add the onion and a pinch of salt and cook, stirring occasionally, until the onion just starts to brown around the edges, about 8 minutes. Add the garlic and red pepper flakes and cook, stirring constantly, until fragrant, about 30 seconds.

2. Add the wine, scraping any browned residue on the bottom of the pan. Increase the heat to medium-high and add the remaining ingredients. Bring to a simmer, then reduce the heat to medium-low and cook, stirring occasionally, about 30 minutes, until the lentils are tender and the sauce is thickened.

lentil marinara 4

yukon gold and sweet potato gratin

sweet potato gratin 5

This is not the potato dish I made for my big Thanksgiving meal last year. Last year, I made a potato and wild mushroom gratin, which followed my goal of including more vegetables in the meal. This gratin doesn’t fit that theme.

sweet potato gratin 2

Here’s the thing though: I cannot remember anything about that dish. I don’t remember it being bad, at least, but I don’t remember how good it was. Maybe there were too many mushrooms? I don’t know.

sweet potato gratin 3

I only made this Yukon gold and sweet potato gratin last week, but even if it had been last year, I know I would remember it. Potatoes baked in herby cream sauce and topped with nutty cheese are usually a hit, but adding sweet potatoes to the mixture makes it even better. I can’t guarantee the same thing for adding wild mushrooms to potato gratin.

sweet potato gratin 4

One year ago: Green Chile Mayonnaise
Two years ago: Wheat Berries with Caramelized Onions, Feta, and Lentils
Three years ago: Bacon-Wrapped Pork Tenderloin Medallions

Printer Friendly Recipe
Yukon Gold and Sweet Potato Gratin (adapted from Bon Appétit via epicurious)

8 servings

1½ pounds medium Yukon Gold potatoes, peeled, sliced ⅛-inch thick
1½ pounds medium red-skinned sweet potatoes (yams), peeled, sliced ⅛-inch thick
1 cup heavy cream
1 cup whole milk
2 tablespoons butter
2 garlic cloves, minced
2 tablespoons minced fresh thyme
1½ teaspoons salt
¾ teaspoon black pepper
1¼ cups (5 ounces) coarsely grated Gruyére cheese

2. Heat the oven to 400 degrees. In a small saucepan, combine the cream, milk, butter, and garlic; bring to simmer. Remove from the heat.

2. Butter a 13x9x2-inch glass baking dish. Evenly spread half of the potatoes on the bottom of the dish. Top with half of the thyme, salt, pepper, and cheese. Repeat the layering with the remaining potatoes, salt, pepper, and cheese. Pour the cream mixture over the gratin, pressing lightly to submerge the potato mixture as much as possible. (Can be made 6 hours ahead. Cover with plastic wrap and chill. Remove plastic wrap before baking.)

3. Cover the gratin tightly with foil. Bake 30 minutes. Uncover and continue baking until the top of the gratin is golden and most of the liquid is absorbed, about 25 minutes longer. Let stand 10 minutes before serving.

sweet potato gratin 6

roasted root vegetable stuffing

root vegetable stuffing 6

When I was creating my Thanksgiving menu last year, it occurred to me that most of the traditional Thanksgiving courses are based on carbs – stuffing, potatoes, rolls. The only traditional non-carb sides are the green bean casserole that nobody likes and the sugar-laden cranberries. I have nothing against carbs, and I know all about splurging for a holiday, but I actually like vegetables. Plus, if you include lower calorie food in the menu, you can eat more before filling up!

root vegetable stuffing 1

I would go so far as to almost call this healthy, although it depends on the cornbread you use. It’s mostly vegetables – vegetables whose natural sugars are intensified through roasting. The sweet earthy root vegetables meld perfectly with similarly flavored cornbread.

root vegetable stuffing 2

Beyond the parsnips and rutabaga, it’s a typical dressing recipe with eggs and broth binding the ingredients together before the mixture is baked until it’s crisp on top (but maybe not dry and burned like mine). The result is a dressing that’s almost too good to be topped with white wine gravy.

root vegetable stuffing 4

Two years ago: Glazed Lemon Cookies
Three years ago: Wheatmeal Shortbread Cookies

Printer Friendly Recipe
Cornbread Dressing with Roasted Root Vegetables (adapted from Bon Appétit via epicurious)

Serves 6

6 ounces shallots, peeled, halved if small, quartered if large
8 ounces carrots, sliced ¼-inch thick on the diagonal
8 ounces parsnips, sliced ¼-inch thick on diagonal
8 ounces rutabaga, cut into ½-inch cubes
salt and pepper
olive oil
4 large garlic cloves, unpeeled
1 tablespoon fresh thyme
1 tablespoon chopped fresh rosemary
2 teaspoons minced fresh sage
2 cups ½-inch cubes of cornbread
2 large eggs, lightly beaten
2 tablespoons unsalted butter, melted
1 cup low-salt chicken broth (or Golden Turkey Stock)

1. Preheat the oven to 425 degrees. Spread the shallots, carrots, parsnips, and rutabaga in a single layer on a rimmed baking sheet. Season with a generous sprinkling of salt and pepper and drizzle with just enough olive oil to coat. Roast for about 45 minutes, stirring every 15 minutes, until the vegetables are soft and browned around the edges. Add the garlic during last 15 minutes. Set the roasted garlic aside; transfer the other vegetables to a large bowl.

2. Spread the cornbread cubes over the now-empty baking sheet. Bake until dry, 10-15 minutes, stirring about halfway through the cooking time.

3. Spray a baking dish with nonstick spray. Mince the garlic; add it to the vegetables along with the herbs and cornbread cubes. In a medium bowl, whisk the eggs, then whisk in the broth and butter; pour the egg mixture over the vegetable mixture and gently fold to combine.

4. Transfer the mixture to the prepared baking dish. Cover the pan with foil; bake until heated through, about 30 minutes. Uncover and bake until browned and crisp, about 15 minutes longer.

root vegetable stuffing 5

glazed pecans

glazed pecans 4

One of the hardest parts of making a full Thanksgiving dinner for two is dealing with the ridiculous amounts of food. Probably I could have made a course or two less than what people make for a huge group, right? But that would be too easy. I have to go the other direction and make every single course I would make for a crowd.

glazed pecans 1

If family and friends were coming over, I would want casual snacks set out to munch on while people sip their wine and wait for the appetizers to cool. With only the two of us, these little pecans were supposed to hold us over between breakfast and the big eating part of the day, but instead they became irresistible little nibbles whenever the pecan bowl was in sight.

glazed pecans 2

I was surprised by just how much I enjoyed these, because pecans aren’t one of my favorite nuts. I think of them as bitter, but once they were coated in a sweet herby glaze, the nut itself seemed almost meaty. Now I know that sharing them with a crowd is actually a bad idea – because I want them all for myself.

glazed pecans 3

Two years ago: Cranberry Orange Scones
Three years ago: Chickpea and Butternut Squash Salad

Printer Friendly Recipe
Rosemary and Thyme Candied Pecans (adapted from Seven Spoons)

Makes 8 servings

I bought demerara sugar just for this recipe and have found other uses for it, but if you don’t want to buy it, I’m sure brown sugar would work just fine.

2 tablespoons unsalted butter
¼ cup maple syrup
2 tablespoons demerara sugar
¾ teaspoon finely minced fresh thyme
½ teaspoon finely minced fresh rosemary
¼ teaspoon cayenne
Scant ⅛ teaspoon ground cinnamon
1 teaspoon coarse salt
1 pound pecan halves

1. Heat the oven to 375 degrees. Line a baking sheet with parchment paper or a silicone mat.

2. In a large saucepan over medium heat, melt the butter, then add the maple syrup and the sugar. Remove the pan from the heat and stir in the herbs, spices, and salt. Add the pecans to the butter mixture; stir to coat. Spread the nuts in a single layer on the prepared pan.

3. Bake, turning occasionally, until the nuts are glazed, shiny, and deep golden, around 15 minutes.
Cool completely, then store in an airtight container.

glazed pecans 5

fried eggs with garlic yogurt sauce

eggs garlic yogurt 6

I had no idea what I was in for when I planted mint in my backyard this spring. Not only did I not realize that it would encroach on the basil and oregano to either side of it, not to mention the jalapeno on the other side of the raised bed, but I’m not a big mint eater anyway. Mostly I figured it would make a pretty garnish for desserts.

eggs garlic yogurt 1

When I started to see what I was in for as a mint-grower, I thought I might get into mojitos, but as refreshing as they are, my loyalty still lies with margaritas. Eventually I gave up and let the mint have its way with my raised bed. It went to flower, which happily drew pollinators to my garden for the acorn squash, cucumber, and pea and/or green bean seeds I planted on a whim after all of my tomato plants died.

eggs garlic yogurt 2

This is one of the few recipes I’ve used mint in regularly this summer, and one of the only savory dishes I like it in. It’s a perfect weekend breakfast, in that it’s easy, healthy, filling but not too filling, and of course, it tastes good. It’s a classic favorite combination of breakfast foods, with eggs on toast covered in sauce, but instead of a rich sauce of egg yolks and butter, it’s a garlicky minty yogurt sauce

eggs garlic yogurt 4

One year ago: Raspberry Lemon Petits Fours
Two years ago: Pumpkin Cupcakes (comparison of 3 recipes)
Three years ago: Lavash Crackers

Printer Friendly Recipe
Fried Eggs with Garlic Yogurt Sauce (original recipe from Linda and Fred Griffith’s Garlic Garlic Garlic via my brother)

Serves 2-4

I’ve simplified the recipe even more than the original, which called for poached eggs plus a butter sauce; I only wanted to use one pan, not two, so I fry the eggs in the seasoned butter and then drizzle any liquid remaining in the skillet over the cooked eggs.

¾ cup Greek yogurt
2 garlic gloves, pressed through a garlic press or minced and mashed
2 teaspoons fresh mint, minced
salt
1 tablespoon butter
⅛ teaspoon cayenne
4 large eggs
4 small pitas or slices of toast or 2 English muffins

1. In a small bowl, stir together the yogurt, garlic, mint, and a pinch of salt. Set aside.

2. In a medium nonstick skillet over medium heat, melt the butter with the cayenne and a pinch of salt. Crack each egg into a small dish; tip them into the prepared pan and sprinkle with salt. Cover the pan, lower the heat to medium-low, and cook for 5-7 minutes for over-medium eggs.

3. Place the pita or toast on plates. Top each with a fried egg and a spoonful of the yogurt sauce, then drizzle any remaining seasoned butter from the skillet over the tops of the eggs. Serve immediately.

eggs garlic yogurt 5