whole wheat almond bread

almond bread 5

I’m not always as practical as I should be. Once I get an idea in my  head, I stubbornly cling to it regardless of whether it makes good sense. For example, yesterday I gathered up my laptop, its mouse, a glass of water, and a bowl of farro and lentils and carried it about twenty feet. The mouse kept falling, the water was sloshing over the rim of the glass, and the bowl was sliding around, precariously balanced on top of the laptop. Why didn’t I just make two trips, which probably would have taken less time in the end?  It is a mystery.

almond bread 2

Why didn’t I bake at least one of the loaves of almond bread in a regular bread pan that I’m familiar with? Why did I insist on baking both loaves in closed pans even though I have no experience baking in covered pans and didn’t know how it would affect the baking time or how I would test for doneness?

almond bread 4

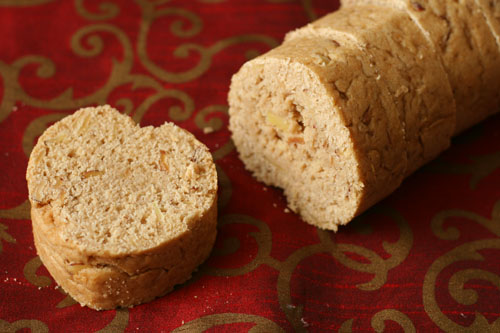
My mom found these pans during a mass cleaning of my grandmother’s kitchen, and although they were in their original packaging, there were no baking instructions with them. And the toothpick test doesn’t work when the center of your bread is five inches from the edge of the pan. The outside few inches of each loaf were perfectly baked, slightly sweet, and intensely nutty. The middle portions were doughy, slightly sweet, and intensely nutty. And that was the case for both loaves, because I just had to take a chance with the whole batch instead of taking the safe route with at least one of them. Typical.

almond bread 3

One year ago: Jamaican Jerk Chicken
Two years ago: Aligot (French Mashed Potatoes)
Three years ago: Poached Eggs with Arugula and Polenta Fingers

Printer Friendly Recipe
Whole Wheat Almond Bread (adapted from Joy the Baker)

Makes 2 small loaves

This is the baking time for a regular, uncovered bread pan. In a covered pan like I used, increase the baking time to 50-60 minutes and use a wooden skewer inserted into the center of the loaf to test for doneness.

2 cups whole wheat flour
2 cups (9.6 ounces) all-purpose flour
¼ cup (1.75 ounces) sugar
1 teaspoon salt
1 cup sliced, toasted almonds, divided
4 teaspoons baking powder
¼ teaspoon baking soda
¼ cup honey
2 large eggs
1½ cups almond milk
¼ teaspoon almond extract
4 tablespoons unsalted butter, melted

1. Preheat oven to 350 degrees F. Spray two 8.5 by 4.5-inch bread pans with non-stick cooking spray.

2. In a large bowl, whisk together the flours, sugar, salt, baking powder, baking soda, and almonds. In a medium bowl, whisk together honey, eggs, milk and melted butter. Add the wet ingredients to the dry ingredients. Fold until the batter is evenly mixed; small lumps of flour are okay.

3. Divide the batter between the prepared pans. Bake for 35-40 minutes, or until a toothpick inserted into the center of a loaf comes out dry. Set the pans on a wire rack and cool 10 minutes. Run a thin knife around the edge of the pans; invert onto the wire rack. Serve warm or at room temperature.

almond bread 6

tartine country bread

Sometimes I’ll be reading a recipe, and it’ll say “we simplified this horribly long complicated process with very little effect on the outcome!” and I always think, “nooo! I want to know the horribly long complicated process!” That’s why I made traditional lasagne Bolognese and barbecued a pork shoulder on the grill. And that is why I have now made bread without any commercial yeast – just the wild stuff.

That means that this bread takes at least a week from start to finish, probably a few days longer. Is it worth it? Oh, who knows. I’ve made some pretty fantastic bread using Peter Reinhart’s recipes too. But this isn’t about one loaf of bread. It’s about having a mixture of old fermented flour and wild fungus in your refrigerator, available to add just a little extra oomph to any bread you make.

I’ve jotted down the outline of Tartine’s Country Bread recipe below, but the beauty of this method goes far beyond this one loaf of bread, extraordinary though it may be. Because this isn’t about making sourdough bread. Tartine’s country bread isn’t sour, but it has a layer of complexity to it, a sweet savory-ness that makes it really special, not to mention the beautiful burnt red crust.

Chad Robertson has pages and pages of information in his book (and Martha Stewart has a tutorial on her site); my version here is merely the cliff notes. But the key here isn’t the nitpicky mixing, turning, rising, shaping directions. The key is that magical stinky starter you created. And with the starter mixture in your fridge, you have the power to add some of that complexity to every bread recipe you make. When I mix up a whole wheat pre-dough that uses yeast, I mix in some of this starter instead of instant yeast, which has resulted in some exceptional bagels recently. I’ve also started using the country bread dough for pizza, which makes for a bubbly crust with the bottom so crisp it’s almost crackly. This is why I like to know the whole horribly long complicated process – not only is the outcome often truly special, but it gives me the confidence to take the method and adapt it for my own needs.

One year ago: Turkey Burgers
Two years ago: Potato Galette
Three years ago: Orange Vanilla Opera Cake

Printer Friendly Recipe
Tartine’s Basic Country Bread (rewritten from Tartine Bread)

Makes 2 large loaves

The only ingredients in this bread are flour, water and some salt at the end. However, they’re mixed at so many different stages in the process that I’ve chosen not to include an ingredient list. Instead, the ingredients are bolded in the directions.

For pizza, I like to add a squeeze of honey (or a spoonful of sugar) to the dough to help it brown in the oven. The bread doesn’t get the same beautiful burnished color as the loaf because it isn’t covered while it bakes.

Make the starter:

I’ve provided precise measurements here, but it isn’t necessary to follow them exactly as long as your starter always has the consistency of a thick batter.

1. Mix ½ cup room temperature filtered water with ½ cup white bread flour and ½ cup whole wheat flour. Cover the bowl with a kitchen towel and set aside in a cool, shaded spot for two days.

2. Check the culture to see if any bubbles have formed around the sides and on the surface. If not, let it sit for another day. The culture is ready when it smells like stinky cheese and tastes very acidic. It’s okay if a dark crust has formed on top.

3. Discard three-quarters of the culture. To the remaining culture, add ¾ cup water, 6 tablespoons white bread flour and 6 tablespoons whole wheat flour. Stir vigorously until there are no lumps. Repeat this step once a day until…

4. Your starter is finished when it behaves in a predictable pattern after each feeding, from stinky and sharply acidic before feeding and sweet and milky just after feeding. The volume should increase for several hours after feeding, then begin to collapse.

To store and keep your starter: Lightly covered, the starter can be kept indefinitely in the refrigerator. (My mom keeps hers in a covered pitcher; I keep mine in a canning jar with a paper towel screwed on instead of the lid. A bowl with a cover would work fine.) To keep it active and healthy, feed it every week or two by following the directions below to make leaven for bread (step 1 of the bread part of the recipe).

Make the bread:

1. To make the leaven: Discard all but 1 tablespoon of the starter. Feed the remaining starter with 200 grams of warm water, 100 grams of whole wheat flour, and 100 grams of bread flour. Let the mixture rise overnight at room temperature. When it’s ready, the leaven should have risen slightly, float in room temperature water (test a small piece; you can still use this piece in the final dough), and smell like overripe fruit.

2. In a large (huge, actually) bowl, mix 700 grams of water and 200 grams of the leaven. (The remainder of the leaven is the starter that you’ll store and feed regularly.) Add 800 grams of bread flour and 200 grams of whole wheat flour; stir until the flour is evenly moistened. The dough won’t be smooth. Let it rest for 25 to 40 minutes while the gluten starts forming, the flour starts hydrating, and the flavor starts developing.

3. Add 20 grams of salt and 50 grams of water to the dough, and squeeze the dough to mix them in. This dough isn’t kneaded; instead, fold it a few times by using a dough scraper to scoop up one side of the dough and drape it over the rest of the dough.


before turning

4. Allow the dough to ferment for 3 to 4 hours and give it another few turns every 30 minutes. This takes the place of kneading. Be more gentle with the turning toward the end of the rising time. The dough is ready when it’s slightly increased in volume and is full of air bubbles (which will be visible on the sides if you’ve used a clear container).


after one turn


after two turns


ready to shape

5. Turn the dough out onto floured surface or a damp kitchen towel. Divide it into two portions. To shape each one into a round, cup your hands over the top of the dough and rotate the dough around on the counter. Cover the rounds with a damp towel and set them aside to rest for 20 to 30 minutes.

6. To increase the surface tension of the dough, ensuring that the bread rises up and not out in the oven, perform a series of folds. Working with one ball of dough at a time, stretch it out and fold it over several times, eventually ending up with a neat square. Cup your hands around the dough and rotate it on the counter to smooth the surface again.


one large loaf and several smaller portions instead of two equal portions

7. Transfer each round to a floured towel-lined bowl or basket with the seam facing up. (Actually, I prefer to use an oiled bowl, covered with a damp towel. If you want to freeze the dough, transfer it to a ziptop bag sprayed with nonstick spray and store in the freezer. Let it defrost overnight in the refrigerator before continuing with the recipe.) Let rise for 2-4 hours at room temperature or, for maximum flavor, overnight in refrigerator.

8. Half an hour before you’re ready to bake the bread, remove the dough from the refrigerator. Place a Dutch oven and its lid on the middle rack in the oven and heat the oven to 500 degrees. When the oven is hot, turn the dough out of its bowl onto a floured work surface or a damp kitchen towel so that the seam is down. Use a very sharp or serrated knife to cut four intersecting ½-inch deep slashes in the dough, forming a square of cuts. Carefully place the dough into the heated Dutch oven; cover the pot with its lid and transfer it to the oven. Immediately reduce the oven temperature to 450 degrees. Bake 20 minutes, then remove the lid and bake 20-25 minutes longer, until the bread is deep golden brown and an instant read thermometer inserted into the center of the loaf reads about 205 degrees. Remove the bread from the pan and cool on a wire rack for an hour before serving.

oatmeal nutmeg scones

For most of my life, I didn’t think much of nutmeg. It was just one member of the pumpkin pie consortium, of which only cinnamon could stand on its own, as far as I knew. The rest were generically fall-flavored. It wasn’t until I met Dave, professed nutmeg lover, that I started considering nutmeg as its own entity.

Now I think of nutmeg as warm, cozy, complex. (Or maybe the association I have between nutmeg and Dave has caused me to describe my husband instead of the seasoning?) Its spice adds richness to any dish, sweet or savory, and has become one of my favorite flavors.

Oatmeal reminds me of Dave too, as it was his staple breakfast – no sugar, no salt – when he lived alone. (It was bland, mushy, gross, but these aren’t words I associate with my husband.) I may not need complex, cozy scents to make me warm out here the desert, but I certainly won’t turn down a nutmeg oatmeal scone. You can bet Dave wouldn’t either.

Patricia chose these for Tuesdays for Dorie, and she will have the recipe posted. I didn’t make any changes.

One year ago: Strawberry Chocolate Ice Cream Pie
Two years ago: Chipster-Topped Brownies
Three years ago: Pecan Honey Sticky Buns

maple cornmeal biscuits

These are not Italian in any way. Dave and I booked a trip to Italy last week and thought we’d have an Italy day on Saturday, where we’d have espresso, eat Italian food, drink Italian wine, and plan out our adventure. Little of that happened. We ate maple cornmeal biscuits because I needed to make them for Tuesdays with Dorie.  At least we had them alongside frittata with swiss chard. We never got to the espresso, and it wasn’t until Sunday that we sat down to map out our vacation plans. The grilled lamb and asparagus we had for dinner could have been any cuisine, although the Barbera that accompanied dinner was wonderful.

I’m always jumping ahead to the wine. Let’s talk more about breakfast. Even though maple cornmeal biscuits are not Italian and we had them on (what was supposed to be) Italy day, they were very delicious – sweet and gritty. I suspect we’ll have many more Italy planning days between now and when we leave in September, and I just might start them all out with maple cornmeal biscuits, Italian or not.

Lindsay has the full recipe posted. I made no changes.

One year ago: Cherry-Cherry Bread Pudding
Two years ago: Fresh Mango Bread
Three years ago: Traditional Madeleines

quinoa with salmon, feta, and dill

I imagine that most people have a set of ten, twenty, or maybe even thirty dinners that they regularly make. Some people might try a new recipe every couple of weeks. But for the most part, I suspect that dinner on any given night is something familiar.

Then there are a class of people who have so many recipes they want to try that they know there simply aren’t enough nights in the week, month, year, life. Every time an old favorite is made is an opportunity lost to try something new. Not that I don’t have a rotation; it’s just that meals are considered on the rotation if they’re made only once or twice a year. Something in heavy rotation might be made six or seven times per year.

This was a surprise addition to my rotation. If I didn’t think we’d like it, I wouldn’t have made it, but I didn’t know we’d like it as much as we did. Dave compared it sushi bowls, with the grain base, fish, and cucumbers, but the lemon, dill, and feta take it in a different direction.

Of course, it takes more than good flavor to be added to my rotation – dishes have to be healthy, which means no refined carbs, limited oil and butter, and plenty of protein and vegetables. Recipes also have to be easy if there’s any hope of me making them often, and the limited amount of ingredient prep required here can be accomplished while the quinoa cooks. Not only have I made this three times in the last year, I’ve made it twice in the last month – heavy rotation indeed.

One year ago: Shrimp Burgers
Two years ago: Roasted Baby Artichokes
Three years ago: Double (or Triple) Chocolate Cookies

Printer Friendly Recipe
Quinoa with Salmon, Feta, and Dill (adapted from Apple a Day)

Serves 6

You can use also fresh salmon and cook it either on the stove or in the oven. Kelsey has directions for stovetop cooking. If you use fresh salmon instead of smoked, increase the salt in the quinoa cooking water to ½ teaspoon.

While you can serve this immediately after mixing, it will be better if you give the flavors some time to meld, even just 15 minutes. This is particularly true if you’re using salty smoked salmon.

1 cup quinoa
2 cups water
¼ teaspoon salt
1 lemon, juice and zest
8 ounces smoked salmon, chopped small
1 tablespoon extra virgin olive oil
½ cucumber, quartered lengthwise and sliced ¼-inch thick
½ cup feta cheese, chopped
1 tablespoon fresh dill, minced

1. Place the quinoa in a fine-mesh strainer; rinse until the water no longer foams. In a medium saucepan, bring the water to a boil. Add the quinoa, salt, and the zest of the lemon. Reduce the heat to low, cover, and simmer for 15 minutes. After 15 minutes, turn the heat off; let the quinoa set, still covered, for another 5 minutes. Drain off any unabsorbed water.

2. Squeeze the juice of the lemon over the quinoa, then mix in the salmon and remaining ingredients. Serve immediately or refrigerate overnight.

Oh yeah, I used red quinoa!  Regular quinoa will work every bit as well though.

cornmeal shortbread cookies

I had some major Murphy’s Law action going on in my kitchen last week. The first few days of it were subtle, but when my cupcakes exploded all over the pan and then sunk back into themselves like collapsed calderas, it got me thinking. I remembered the bagels I’d forgotten about and left out overnight to harden around the edges, and the crockpot full of red lentil stew that turned into red lentil soup when I accidentally added an extra cup of water. Then there was the leftover lentil soup that I burned. You know you’re having a bad week in the kitchen when you burn leftover soup.

These cookies, made from dough hastily pulled from the freezer after the cupcake debacle, came out wonderfully. I loved their square edges and straight sides. I enjoyed their crisp sandiness with a touch of grit from the cornmeal.

I kept waiting for the other shoe to drop. When the cookies were in the oven, I assumed they’d spread too much. When they didn’t, I assumed I’d over or underbake them. When I didn’t, I assumed I’d drop them. It wasn’t until they were safely in the hands of my coworkers that I breathed a sigh of relief.

In the end, I got more comments on these cookies than any treat I’ve brought to work in months. Most people said that were interesting, but everyone said they were good. If you’d like to try these interesting good cookies that I made for Tuesdays with Dorie, Valerie has the recipe posted.

One year ago: Chockablock Cookies
Two years ago: Chocolate Cream Tart
Three years ago: Fluted Polenta and Ricotta Cake

brown rice

I thought I’d already nailed my favorite brown rice recipe, but over time, I found myself not using it. There were two issues I was having.  One was that it takes an hour and a half, and I don’t have that kind of foresight on an average weeknight.  The other problem is that it starts on the stovetop and is transferred to the oven, which sounds simple enough, but I could never remember the cooking times and didn’t want to check a recipe for a basic side dish.  I have too much else to do and think about; rice can’t be complicated.

In the comments of that baked brown rice post, I was pointed toward a recipe for rice cooked like pasta. Also, Stacy recommended basmati brown rice over other varieties, claiming that it’s more fragrant and flavorful. Because the nutty scent of white rice is one of my favorite aspects of it, I was eager to try any trick to get that experience with brown rice.

This worked. The basmati rice smells sweet and nutty while it boils, exactly how white rice smells while it steams. And the best part is that it’s so simple to make that even I can get it done on an average weeknight.  That means we’ve pretty much eliminated another refined grain from our diets, with very little compromise in terms of effort or flavor.

One year ago: Chicken Fajitas
Two years ago: Anadama Bread
Three years ago: Sichuan Green Beans

Printer Friendly Recipe
Brown Rice
(adapted from Saveur via Pinch My Salt)

This recipe can be scaled up or down as much as you want.

8 cups water
1 cup rice, rinsed
2 teaspoons salt

Bring the water to a boil over high heat. Add the rice and salt; reduce the heat to medium and simmer uncovered, stirring occasionally, for 30 minutes. Drain the rice in a strainer and return it to the pot, off the heat. Cover tightly and let set for 10 minutes. Fluff with a fork; serve.

(This is Red Beans and Rice.)

protein waffles

I eat almost flawlessly healthfully on weekdays, and then undo all of that hard work on the weekends. Weekdays are full of vegetables, fruit, lean protein, whole grains, water. Weekends are all about butter, white flour, sugar, beef, wine (and/or beer and/or margaritas). While I have no intention of eating perfectly all the time – mostly because cooking with fat is FUN – perhaps a better balance is in order.

Not to jump to the punch line, but if the only compromise I have to make is eating these healthy waffles instead of cinnamon rolls or biscuit sandwiches for breakfast, I’ll take it. There was absolutely nothing weird about these waffles. Made from just eggs, oats, cottage cheese and protein powder, the flavor and texture were exactly what you would expect from any carb-filled, butter-rich variety, and yet they are perfectly healthy.

Not even one unhealthy ingredient. I have to keep saying it, over and over, because I can hardly believe it. Topped with homemade (not by me) jam and Greek yogurt, this is a perfect breakfast in every way. Now someone needs to come up with a no-compromise version of cinnamon rolls. And beer.

Three years ago: Chocolate Cream Pie

Printer Friendly Recipes
Protein Waffles (from Cara’s Cravings)

Substitutions I’ve made that worked: 2 whole eggs plus a dribble of milk for the 4 egg whites; regular oats for the instant oats Cara recommends; ½ tablespoon honey for the sweetener; vanilla ice cream protein powder, which is all that my grocery store sells and is so sweet that I don’t need any additional sugar at all

Substitution I made that didn’t work: Greek yogurt for the cottage cheese

I don’t recommend cooking this batter in a Belgian waffle iron.

4 egg whites
½ cup (4 ounces) low-fat cottage cheese
½ cup (40 grams) oats
1 scoop (25 grams) vanilla protein powder
2 packets of Truvia, or other sweetener to taste
½ teaspoon baking powder

Combine all ingredients in a blender and process until smooth.

Cook in waffle iron according to manufacturer’s directions, to desired crispiness. Spray with nonstick spray between each waffle.


corniest corn muffins

I hemmed and hawed over these more than muffins probably deserve. The issue is that while I like corn on its own, I struggle to enjoy the crisp kernels in soups, breads, or stews. On the other hand, it’s nice to have some textural contrast in muffins – and what better to provide that in a corn muffin than corn?

In the end, in the spirit of Not Being Picky, I left the corn in (without pureeing it like I’d also considered). And I’ll be darned if one of these, served alongside a small bowl of chili topped with large amounts of Greek yogurt and avocado, wasn’t one of the most satisfying meals I’ve eaten in days.

These muffins were chosen for Tuesdays with Dorie by Jill, and she will post the recipe. I reduced the sugar to ¼ cup (per Deb’s recommendation), added half a minced jalapeno, and did not increase the salt(!). The cornmeal I used (Arrowhead) was finely ground, which I believe is what leant my muffins such a tender, almost flaky texture.

One year ago: Thumbprints for Us Big Guys
Two years ago: Lemon Cup Custard (my pick)


sandwich thins

Ah, carbs. They’re the best, aren’t they? They don’t even need to be combined with carb’s best friend, butter, to be a treat. A hunk of airy-crumbed, chewy-crusted bread with a glass of dry red wine is a pleasure all on its own. A few slivers of cheese balance and enhance the flavors of each, but it isn’t necessary. All I need is the carbs.

Remember when the base of the food pyramid was carbs? Those were the good ol’ days. I’ve reversed my own personal food pyramid to be mostly fruits and vegetables, a goodly amount of protein, and a smattering of carbs (on weekdays; all bets are off on Saturday). A giant Kaiser roll, sadly, is more than a smattering.

Sandwich thins, however, are the perfect compromise between wanting carbs and not wanting to overdo it. But just because there’s less bread per sandwich doesn’t mean the bread can be less good. You still want it to be soft and tender, but also sturdy, and if it could be all that and still be whole grain, that would be no bad thing.

I hear you can buy these in the store or some such thing, but I’m not acquainted with the bread aisle at the grocery store, and anyway, what’s the fun in that? Buying things that we could spend hours of our busy schedules making from scratch is not what this blog is about.

One year ago: Mediterranean Pepper Salad
Two years ago: Lemon Cream Cheese Bars
Three years ago: Salmon Cakes, Flaky Biscuits, Hashed Brussels Sprouts

Printer Friendly Recipe
Sandwich Thins (adapted from food.com via Confections of a Foodie Bride)

Makes 16

I meant to follow the directions when I made this, but I didn’t actually read them before starting. So I mixed it like a regular bread dough, and it worked just fine.

I doubt wheat bran and vital wheat gluten are crucial to this recipe. If you don’t have vital wheat gluten, just use more white flour (or better yet, substitute bread flour, if you have it, for the all-purpose flour). If you don’t have wheat bran, substitute more whole wheat flour. Bread is forgiving.

1 egg
1¼ cups warm water
2 tablespoons olive oil
2 cups (10 ounces) whole wheat flour
1 cup (4.8 ounces) all-purpose flour
½ cup wheat bran
2 tablespoons vital wheat gluten
2 teaspoons instant yeast
¼ cup (1.75 ounces) sugar
1 teaspoons salt
2 tablespoons rolled oats

1. Stand mixer: In a large measuring cup, lightly beat the egg; whisk in the water and oil. In the bowl of a stand mixer fitted with the dough hook, mix the flours, bran, gluten, yeast, sugar, and salt. With the mixer on low speed, gradually add the liquid ingredients. Continue mixing on medium-low until the dough is elastic and supple, about 8 minutes. You may need to add a little more flour or water to get the correct consistency – soft but not sticky.

By hand: In a large measuring cup, lightly beat the egg; whisk in the water and oil. Mix the flours, bran, gluten, yeast, sugar, and salt in a large bowl. Make a well in the middle of the dry ingredients and pour in the liquid ingredients. Stir the mixture until the dough comes together. Transfer the dough to a floured board or countertop and knead, incorporating as little flour as possible, for about 10 minutes, until the dough is elastic and supple. You may need to add a little more flour or water to get the correct consistency – soft but not sticky.

2. Transfer the dough to an oiled bowl and cover with plastic wrap or a damp dishtowel. Set the dough aside to rise until it has doubled in volume, about 1½ hours.

3. Line 2 baking sheets with parchment paper or silicone mats. Divide the dough into 16 equal portions. Roll each portion into a ball; then flatten it between your palms. Place it on the baking sheet and press down, working the dough into a thin 5-inch round. Brush the tops with water; sprinkle with rolled oats. Cover with damp kitchen towels and let rise until slightly risen, about 45 minutes.

4. Preheat the oven to 350 degrees. Use the blunt end of a wooden skewer to poke 9 holes in each roll. Bake 12-15 minutes, until puffed and dry on top. Cool completely before slicing.