pita

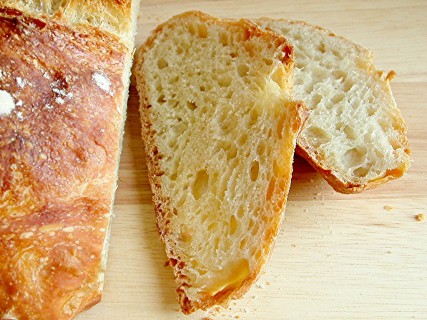
Pita is one of those things that is just so much better when made at home than bought from the grocery store. Or at least this recipe, which is the only pita I’ve made, is. The bread is more tender and of course flavorful than what I buy.

Pita isn’t any harder to make than other homemade bread. The dough is kneaded and allowed to rise, like other bread recipes. It’s then shaped into balls, left to rest a few minutes, and rolled into a thin oval. Like most kneaded doughs, this one doesn’t like to be rolled out and will probably need to rest half way through to let the gluten strands relax. Otherwise it’ll be like trying to roll out a giant rubber band.

Only the baking process differs substantially from other breads. Pita is baked on a pre-heated surface, which I’m guessing is what produces the characteristic pocket. I’ve seen recipes that use a pizza stone for this, but I’ve always just preheated a flour-coated baking pan. As much as I love my pizza stone, the baking pan seems a little easier.

These pita were a fantastic addition to the Middle Eastern feast I made a few weeks ago. But my lunch of leftovers the next day was at least as good as the dinner – hummus, falafel, and vegetables stuffed into the pita’s pocket made for an incredibly satisfying mid-day meal.

Pita (adapted from Ultimate Bread, by Eric Treuille and Ursula Feriggno)

UB note: The staple bread of the Middle East, called Khubz in Arabic, is more commonly known by its Greek name, Pita, in the west. Its soft, chewy crust, absorbent crumb, and hollow pouch make it the most versatile of breads, ideal to scoop up, dip in, wrap around, or be filled with all manner of food. Best served warm, Pita can be easily reheated: sprinkle lightly with water and warm in the oven. Keep Pita in a sealed plastic bag to prevent dryness.

Bridget note: The only things I’ve changed from the original recipe are adapting it for instant yeast and for a stand mixer.

Makes 8 breads

3½ (17.5 ounces) cups unbleached flour
2 teaspoons instant dry yeast
½ teaspoon sugar
1 teaspoon salt
1¼ cups water
1 tablespoons olive oil

1. Mix flour, salt, sugar, and yeast in bowl of standing mixer fitted with dough hook. Mix water and olive oil in 1-quart Pyrex liquid measuring cup. Turn machine to low and slowly add liquid. When dough comes together, increase speed to medium (setting number 4 on a KitchenAid mixer) and mix until dough is smooth, supple, and elastic, stopping machine two or three times to scrape dough from hook if necessary, about 10 minutes. Initially, the dough will be quite stiff. It will soften and stretch as you continue kneading. Turn dough onto lightly floured work surface; knead to form smooth, round ball, about 15 seconds. (Alternatively, you can knead by hand for 15 minutes.)

2. Place dough in very lightly oiled bowl, rubbing dough around bowl to lightly coat. Cover bowl with plastic wrap; place in warm oven until dough doubles in size, about 1½ hours.

3. Preheat oven to 425 degrees.

4. Divide the dough into 8 pieces. Shape each piece into a smooth ball. Let rest 10 minutes.

5. On a lightly floured work surface, roll out each ball to form an oval, 9 inches long and ¼ inches thick. Cover with a dish towel and proof until slightly risen, about 20 minutes.

6. Dust two baking sheets with flour and preheat in the oven for 5 minutes. Place the dough ovals on the hot baking sheets and return immediately to the oven. Bake for 5 to 10 minutes, until puffy. Wrap in a clean, dry cloth to keep the crusts soft and to prevent drying out.

I think these are the last of the pictures from my old camera. Woohoo!

kaiser rolls

I said recently that my health nut phase didn’t last long, and while I no longer stress about eating white rice or refined sugar, I do feel a little guilty buying white bread. There are some breads, mostly artisanal, that I prefer made with all white flour, but usually I like the flavor and nutrition of at least a portion of whole wheat flour.

I love Kaiser rolls for sandwiches, and Peter Reinhart’s Bread Baker’s Apprentice has some enticing pictures accompanying his recipe. The recipe follows Reinhart’s standard method of using a portion of pre-fermented dough to maximize the flavor of the final product.

The result, of course, was very good. But, there are a few changes I want to make. Mostly I want them to be a little sweeter. The only sugar in the recipe is just a bit of barley malt syrup. In the future, I’ll add honey or granulated sugar. Also, Reinhart’s photo looks like he used an egg wash or something, which he doesn’t call for in the recipe. His are so shiny and pretty, I think I might use an egg wash, or at least milk, next time.

Overall though, these were good, and fun. And with the whole wheat flour I added, just a bit healthier than what I would have got from the grocery store.

Kaiser Rolls (from Peter Reinhart’s Bread Baker’s Apprentice)

Makes 6 large rolls or 9 smaller rolls (I made 8 rolls and thought they were pretty big)

Bridget note: Next time, I’ll add 2 tablespoons honey or 3 tablespoons granulated sugar to the dough. I’ll also brush the rolls with milk just before baking.

1½ cups (8 ounces) pate fermentée
1¼ cups (10 ounces) unbleached bread flour
¾ teaspoon plus a pinch (0.2 ounce) salt
1 teaspoon (0.11 ounce) instant yeast
1 large egg, slightly beaten
1½ teaspoons (0.33 ounce) barley malt syrup
1½ tablespoons (0.75 ounce) vegetable oil or shortening, melted
10 tablespoons to ¾ cup (5 to 6 ounces) water lukewarm

1. Take the paté fermentée out of the refrigerator 1 hour before making the dough. Cut it up into about 10 small pieces with a pastry scraper or serrated knife. Cover it with a towel or plastic wrap and let sit for 1 hour to take off the chill.

2. Stir together the flour, salt, and yeast in a 4-quart bowl (or in the bowl of an electric mixer). Add the pate fermentée, egg, barley malt syrup, oil, and 10 tablespoons water. Stir (or mix on low speed with the paddle attachment) for 1 minute, or until the ingredients form a ball. If there is still some loose flour, add the remaining 2 tablespoons water.

3. Lightly dust the counter with flour, transfer the dough to the counter, and begin kneading (or mix on medium speed with the dough hook). Knead for about 10 minutes (6 minutes by machine), adding flour, if needed, to make a dough that is soft and supple, tacky but not sticky. The dough should pass the windowpane test and the internal temperature should register 77 to 81 degrees. Lightly oil a large bowl and transfer the dough to the bowl, rolling it to coat with the oil. Cover the bowl with plastic wrap.

4. Ferment at room temperature for 2 hours, or until the dough doubles in size. If the dough doubles in size before 2 hours have elapsed, remove it, knead it lightly to degas it, and return it to the bowl to continue fermenting until doubled from original size or until 2 hours have elapsed.

5. Remove the dough from the bowl and divide it into 6 to 9 equal pieces (4 ounces for large rolls, 2⅔-ounce pieces for smaller rolls). Form the pieces into rolls. Mist the rounds lightly with spray oil, cover with a towel or plastic wrap, and let the dough relax for 10 minutes. Meanwhile, line a sheet pan with baking parchment, lightly mist it with spray oil, and then dust with semolina flour or cornmeal.

6. Prepare the individual rolls by cutting them with a Kaiser rolls cutter or knotting them. To knot them, roll out a round of dough into a 12-inch strand (shorter for smaller rolls). Tie a simple knot. Loop the two ends through the center of the knot a second time (see pictures) Place the rolls, cut side down, on the parchment, mist lightly with spray oil, and loosely cover the pan with plastic wrap of a food-grade plastic bag.

7. Proof the rolls for 45 minutes at room temperature, then flip them over so the cut or folded side is facing up. Mist again with spray oil, cover the pan, and continue proofing for another 30 to 45 minutes, or until the rolls are double their original size.

8. Preheat the oven to 425 degrees with the oven rack on the middle shelf. Uncover the rolls and prepare them for baking. If you want seeds on your rolls, mist them with water and sprinkle poppy seeds over the top. If not, just mist them with water.

9. Place the pan in the oven, spray the oven walls with water, and close the door. After 10 minutes, rotate the pan for even baking and lower the oven setting to 400 degrees. Continue baking until the rolls are a medium golden brown and register approximately 200 degrees in the center. This will take 15 to 20 minutes for large rolls, or less for smaller rolls.

10. Remove the rolls from the pan and transfer to a cooling rack. Wait at least 30 minutes before serving.

Pate fermentée

This is twice what you need for one recipe of Kaiser rolls.

1 1/8 cups (5 ounces) unbleached all-purpose flour
1 1/8 cups (5 ounces) unbleached bread flour
¾ teaspoon salt
½ teaspoon instant yeast
¾ cup to ¾ cup plus 2 tablespoons (6 to 7 ounces) water

1. Stir together the flours, salt, and yeast in a 4-quart bowl (or in the bowl of a standing mixer). Add ¾ cup of the water, stirring until everything comes together and makes a coarse ball (or mix on low speed for 1 minute with the paddle attachment). Adjust the flour or water, according to need, so that the dough is neither too sticky nor too stiff. (It is better to err on the sticky side, as you can adjust easier during kneading. It is harder to add water once the dough firms up.)

2. Sprinkle some flour on the counter and transfer the dough to the counter. Knead for 4 to 6 minutes (or mix on medium speed with the dough hook for 4 minutes), or until the dough is soft and pliable, tacky but not sticky. The internal temperature should be 77 to 81 degrees.

3. Lightly oil a bowl and transfer the dough to the bowl, rolling it around to coat it with oil. Cover the bowl with plastic wrap and ferment at room temperature for 1 hour, or until it swells to about 1½ times its original size.

4. Remove the dough from the bowl, knead it slightly to degas, and return it to the bowl, covering the bowl with plastic wrap. Place the bowl in the refrigerator overnight. You can keep this in the refrigerator for up to 3 days, or freeze it in an airtight plastic bag for up to 3 months.

I’m out of town this week, walking along the ocean and hiking around a lake. I’ll be back next week to catch up on comments and other blogs!

pecan honey sticky buns (twd)

My experience with sticky buns is limited; I guess we were more of a cinnamon roll family. Madam Chow’s TWD choice for this week would be something new for me then.

Dorie is insistent that you don’t cut the brioche dough in half. But, I did anyway. (Actually, I made a third of the recipe.) It would have been the same amount of effort to make the whole thing, and it freezes well, but do I really need this incredibly buttery bread dough to be conveniently at my fingertips? Nah. I admit I had to get a little creative with my mixer since I was making such a small amount – I mixed with the paddle for a while after adding the butter, then switched to the dough hook for the last few minutes of kneading.

I had the same problem that a number of other TWD members did with this recipe – 2 hours of rising in the morning, plus putting the rolls together and baking makes for a long wait until breakfast. I think it would work to form the rolls the night before, put them in the fridge overnight, and let them rise in a warmed oven the next morning. That should cut the waiting time in half.

The brioche made for a really light and airy base for sticky buns. But, I wonder if all that butter is worth it once it’s drowned in glaze? I’m thinking my base for cinnamon rolls would work just fine, with only about a third of the butter.

Overall, I thought these were great. The bread was light and tender, the glaze wasn’t too sweet, and they weren’t nearly as sticky as I was expecting. I almost wish I had made some extra to store in the freezer!

Pecan Honey Sticky Buns (from Dorie Greenspan’s Baking: From My Home to Yours)

Makes 15 buns

For the Glaze:
1 cup (7 ounces) packed light brown sugar
1 stick (8 tablespoons) unsalted butter, cut into 4 pieces
¼ cup honey
1½ cups pecans (whole or pieces)

For the Filling:
¼ cup (1.75 ounces) sugar
3 tablespoons (packed) light brown sugar
1 tablespoon ground cinnamon
3 tablespoons unsalted butter, at room temperature

For the Buns:
½ recipe dough for Golden Brioche loaves (see below), chilled and ready to shape (make the full recipe and cut the dough in half after refrigerating it overnight)

Generously butter a 9 by 13-inch baking pan (a Pyrex pan is perfect for this).

To make the glaze: In a heavy-bottomed saucepan, bring the brown sugar, butter, and honey to a boil over medium-low heat, stirring frequently to dissolve the sugar. Pour the glaze into the buttered pan, evening it out as best you can by tilting the pan or spreading the glaze with a heatproof spatula. Sprinkle over the pecans.

To make the filling: Mix the sugars and cinnamon together in a bowl. If necessary, in another bowl, work the butter with a spatula until it is soft, smooth and spreadable.

To shape the buns: On a flour-dusted work surface, roll the chilled dough into a 16-inch square. Using your fingers or a pastry brush, spread the softened butter over the dough. Sprinkle the dough with the cinnamon sugar, leaving a 1-inch strip bare on the side farthest from you. Starting with the side nearest you, roll the dough into a cylinder, keeping the roll as tight as you can. (At this point, you can wrap the dough airtight and freeze it for up to 2 months . . . . Or, if you want to make just part of the recipe now, you can use as much of the dough as you’d like and freeze the remainder. Reduce the glaze recipe accordingly).

With a chef’s knife, using a gentle sawing motion, trim just a tiny bit from the ends of the roll if they’re very ragged or not well filled, then cut the log into 1-inch thick buns. (Because you trim the ragged ends of the dough, and you may have lost a little length in the rolling, you will get 15 buns, not 16.) Fit the buns into the pan cut side down, leaving some space between them.

Lightly cover the pan with a piece of wax paper and set the pan in a warm place until the buns have doubled in volume, about 1 hour and 45 minutes. The buns are properly risen when they are puffy, soft, doubled and, in all likelihood, touching one another.

Getting ready to bake: When the buns have almost fully risen , center a rack in the oven and preheat the oven to 375 degrees F.

Remove the sheet of wax paper and put the pan on a baking sheet lined with parchment or a silicone mat. Bake the sticky buns for about 30 minutes, or until they are puffed and gorgeously golden; the glaze will be bubbling away merrily. Pull the pan from the oven.

The sticky buns must be unmolded minutes after they come out of the oven. If you do not have a rimmed platter large enough to hold them, use a baking sheet lined with a silicone mate or buttered foil. Be careful – the glaze is super-hot and super-sticky.

Golden Brioche Loaves

2 packets active dry yeast (each packet of yeast contains approx. 2 1/4 teaspoons)
1/3 cup just-warm-to-the-touch water
1/3 cup just-warm-to-the-touch whole milk
3 1/3 cups all-purpose flour
2 teaspoons salt
3 large eggs, at room temperature
1/4 (1.75 ounces) cup sugar
3 sticks (12 ounces) unsalted butter, at room temperature but still slightly firm

What You’ll Need for the Glaze (you would brush this on brioche loaves, but not on the sticky buns):
1 large egg
1 tablespoon water

To Make The Brioche: Put the yeast, water and milk in the bowl of a stand mixer and, using a wooden spoon, stir until the yeast is dissolved. Add the flour and salt, and fit into the mixer with the dough hook, if you have one. Toss a kitchen towel over the mixer, covering the bowl as completely as you can – this will help keep you, the counter and your kitchen floor from being showered in flour. Turn the mixer on and off a few short pulses, just to dampen the flour (yes, you can peek to see how you’re doing), then remove the towel, increase the mixer speed to medium-low and mix for a minute or two, just until the flour is moistened. At this point, you’ll have a fairly dry, shaggy mess.

Scrape the sides and bottom of the bowl with a rubber spatula, set the mixer to low and add the eggs, followed by the sugar. Increase the mixer speed to medium and beat for about 3 minutes, until the dough forms a ball. Reduce the speed to low and add the butter in 2 tablespoon-sized chunks, beating until each piece is almost incorporated before adding the next. You’ll have a dough that is very soft, almost like batter. Increase the speed to medium-high and continue to beat until the dough pulls away from the sides of the bowl, about 10 minutes.

Transfer the dough to a clean bowl (or wash out the mixer bowl and use it), cover with plastic wrap and leave at room temperature until nearly doubled in size, 40 to 60 minutes, depending upon the warmth of your room.

Deflate the dough by lifting it up around the edges and letting it fall with a slap to the bowl. Cover the bowl with the plastic wrap and put it in the refrigerator. Slap the dough down in the bowl every 30 minutes until it stops rising, about 2 hours, then leave the uncovered dough in the refrigerator to chill overnight. (After this, you can proceed with the recipe to make the brioche loaves, or make the sticky buns instead, or freeze all or part of the dough for later use.)

The next day, butter and flour two 8½ by 4½-inch pans.

Pull the dough from the fridge and divide it into 2 equal pieces. Cut each piece of the dough into 4 equal pieces and roll each piece into a log about 3½ inches long. Arrange 4 logs crosswise in the bottom of each pan. Put the pans on a baking sheet lined with parchment or a silicone mat, cover the pans lightly with wax paper and leave the loaves at room temperature until the dough almost fills the pans, 1 to 2 hours. (Again, rising time with depend on how warm the room is.)

Getting Ready To Bake: Center a rack in the oven and preheat the oven to 400 degrees F.
To Make the Glaze: Beat the egg with the water. Using a pastry brush, gently brush the tops of the loaves with the glaze.

Bake the loaves until they are well risen and deeply golden, 30 to 35 minutes. Transfer the pans to racks to cool for 15 minutes, then run a knife around the sides of the pans and turn the loaves out onto the racks. Invert again and cool for at least 1 hour.

caesar salad

I almost never make salads. Not because I don’t like them, but because I don’t like them as a side dish. To me, salad doesn’t coordinate well with other dinner items. I do like when it’s served before a meal, or as a meal.

I went the route of serving Caesar salad as a meal the day that I made the peanut butter torte. I figured that if I was going to eat peanut butter and cream cheese and oreos and chocolate and whipped cream for dessert, something was going to have to give.

In one of Alton Brown’s first Good Eats episodes (um, before the show was very good), he discussed the original Caesar salad recipe, which was built tableside at a restaurant by chef Cesar Cardini. The recipe starts with a thin coating of oil on the lettuce, then salt, pepper, more oil, lemon juice, and a coddled egg. I’m not all about this method. I like to at least attempt to emulsify my salad dressing ingredients, and I also think that putting oil directly on the leaves keeps the other ingredients from flavoring the lettuce. Instead, I whisked the dressing ingredients thoroughly, then dressed the leaves with the mixture.

The only ingredient in this recipe that struck me as unusual was the coddled egg. Coddled eggs are cooked in boiling water for about one minute, so, yeah, they’re still mostly raw. I didn’t tell Dave about the raw-ish egg in the salad, and I tried not to think about it myself. I’m not worried about salmonella, I’m just grossed out by eating raw egg white. But I really don’t think the salad would have been as good without it. The egg gives the dressing not only smoothness and body, but a pleasant rich, but not overwhelmingly eggy, flavor.

Alton’s croutons are really exceptional. I had my doubts that grinding the garlic into the oil and then straining the oil to toast the bread in would add enough garlic flavor, but they were extremely garlicky and delicious.

Because I’m a flake, and I forgot while planning this meal that one of the key parts of Caesar salad is the croutons, I made Deb’s pizza bianca to go with the salad. I used my pizza dough recipe instead of the one she gives (although they’re very similar) and followed the directions in the recipe for forming the dough. (Keep in mind that Deb rolled her dough out much thinner.) Also, because Peter Reinhart’s constant reminders that a slow rise is better for artisan breads has stuck with me, I made the dough the day before (with less yeast) and let it rise in the refrigerator overnight. The next day I took it out and let it come to room temperature, then shaped it and put it back in the fridge until I wanted to bake it. It was very good. The only thing I’ll change next time is to use less olive oil on the top, because “Oh my god, there’s a fire in the oven!” aren’t words Dave likes to hear from me when I’m cooking.

Hail Caesar Salad (from Alton Brown’s Good Eats)

Bridget note: I made a few changes to the recipe. I dried the bread as slices instead of cut up into bite-size pieces, because they were easier to cut once they were dried. I didn’t use kosher salt. I found 2 cups of water to be far too little to be able to cover the eggs. I probably used a bit more Worcestershire sauce and Parmesan cheese.

1 loaf day old Italian bread
3 garlic cloves, mashed
9 tablespoons extra virgin olive oil
¼ teaspoon plus 1 pinch kosher salt
2 eggs
2 heads romaine lettuce, inner leaves only
7 grinds black pepper
1 lemon, juiced
6 drops Worcestershire sauce
¼ cup grated Parmesan cheese

Heat oven to 350 degrees.

Cut ½ to ¾-inch croutons from the loaf of bread and place on a baking sheet and put into the oven until dry but not browned.

Use a mortar and pestle to mash the garlic with 4 tablespoons of oil and 1/4 teaspoon kosher salt. Strain the oil into a skillet over medium heat. Add the dried croutons and fry, tossing constantly until all of the oil is absorbed and the croutons turn gold. Set aside.

Bring 2 cups water to a boil in a small saucepan. Add the eggs and cook for 1 minute. Chill in ice water to halt cooking. Set aside.

In a very large bowl, tear lettuce and toss with 3 tablespoons of olive oil. Sprinkle with the remaining kosher salt and the black pepper. Add the remaining olive oil. Toss well. Add the lemon juice and Worcestershire sauce. Break in the eggs. Toss until a creamy dressing forms. Toss in Parmesan cheese and serve with croutons.

cinnamon rolls

On one of my first trips to meet Dave’s family, his mom mentioned her plan to buy cinnamon rolls from the grocery store, and Dave insisted that I make fantastic cinnamon rolls that she needed to try. We were staying with friends, I didn’t have the recipe or any ingredients or equipment, but I didn’t want to pass up this chance to impress my boyfriend’s parents. I made the cinnamon rolls, and the in-laws were duly impressed. Six years later, my mother-in-law still talks about how good they were.

But I make better cinnamon rolls now. I’ve tried a few recipes and taken my favorite parts of each, and now I can say for certain that this is the best cinnamon roll that I have ever eaten. Dead serious.

Most cinnamon roll recipes are similar. The original recipe I used, the one that Dave’s mom raved about, is one my mother taught me. It’s the dough for country crust bread with softened butter and cinnamon sugar spread over the flattened dough and a simple powdered sugar glaze on top of the baked rolls. I used this recipe for years and can’t complain – it’s damn good.

But that didn’t stop me from trying new things. The next recipe I tried was published in the back of Knit One, Kill Two, a mystery novel about a knitter. I liked that the dough was richer, melted butter was spread over the dough instead of softened, and brown sugar was mixed with cinnamon for the filling instead of granulated. But the frosting in this recipe contained four ounces of cream cheese, and it was way too rich for me.

The next recipe I tried was Cooks Illustrated’s. Their dough is even richer, and the resultant rolls are therefore more tender. They don’t call for any butter in the filling, which I thought made the baked rolls too sticky. Their icing contains a whopping eight ounces of cream cheese, even though they refer to their rolls as “reserved” and “civilized”. Yikes. I also tried their Quick Cinnamon Buns, a recipe for chemically leavened cinnamon rolls. This recipe calls for a small amount of butter to be mixed in with the other filling ingredients. I like this method, as it reduces the amount of filling that spills out of the rolls when they’re rolled and cut, and it eliminates the stickiness I’d disliked in the other recipe without adding as much butter as my first two recipes had called for.

The recipe I currently use is hobbled together from all of these, although most of it comes from Cooks Illustrated. I follow their dough recipe almost exactly. I reduce the cinnamon in their filling recipe a bit because I found that the original amount was so spicy that it reminded me of Red Hots. I add a tablespoon of melted butter to the filling to hold the powder together. Rather than add more butter to an already decadent breakfast, I reduce the butter in the dough to compensate. For the glaze, I’ve gone back to my original powdered sugar and milk combination, with just one tablespoon of cream cheese mixed in to provide some extra flavor.

Like most bread recipes, cinnamon rolls require kneading, rising, shaping, proofing, baking, and cooling before they can be eaten. No one wants to wait for all this to happen before they can eat breakfast. Take heart – you can do everything up until the baking the night before. After the rolls are shaped and cut, put the pan in the refrigerator. In the morning, the rolls will need to warm up and they may need a bit more time to rise. You can speed this up by doing it in a warm oven. Heat your oven to its “warm” setting, then turn it off and put the rolls in the oven. They should be warm and ready to bake in half and hour or so. With minimal waiting time and almost no work at all, you can have a fantastic treat for breakfast.

Update 3/16/10: I’ve successfully used this method to make these cinnamon rolls whole wheat.  I made the pre-dough out of 10 ounces whole wheat flour, ½ teaspoon salt, and 7/8 cup (1 cup minus 2 tablespoons) water.  After letting that sit overnight, I mixed it with the rest of the ingredients – 2 tablespoons milk, 7 tablespoons unsalted butter, 2¼ teaspoons yeast, ¼ cup sugar, 1 egg and 2 yolks, 1 teaspoon salt, and about 10 ounces flour.

Cinnamon Rolls (adapted from Cooks Illustrated’s The New Best Recipe)

This was the first time I’ve used dental floss to cut the rolled and filled dough into rolls. It worked wonderfully, but a serrated knife will get the job done as well.

The pictures are showing a half recipe.

Dough:
½ cup milk
7 tablespoons unsalted butter
½ cup warm water (about 110 degrees)
1 envelope (2¼ teaspoons) yeast
¼ cup (1¾ ounce) sugar
1 large egg, plus 2 large egg yolks
1½ teaspoons salt
4-4 ½ cups (20 to 21¼ ounces) unbleached all-purpose flour, plus more for dusting the work surface

Filling:
¾ cup packed (5¼ ounces) light brown sugar
2 tablespoons ground cinnamon
1/8 teaspoon salt
1 tablespoon melted butter

Glaze:
1 cup (4 ounces) confectioners sugar, sifted to remove lumps
1 ounce cream cheese, softened
½ teaspoon vanilla extract
1-2 tablespoons milk

1. Heat the milk and butter in a small saucepan or in the microwave until the butter melts. Remove the pan from the heat and set aside until the mixture is lukewarm (about 100 degrees).

2. In the bowl of a standing mixer fitted with the paddle, mix together the water, yeast, sugar, egg, and yolks at low speed until well mixed. Add the salt, warm milk mixture, and 2 cups of the flour and mix at medium speed until thoroughly blended, about 1 minute. Switch to the dough hook, add another 2 cups of the flour, and knead at medium speed (adding up to ¼ cup more flour, 1 tablespoon at a time, if necessary) until the dough is smooth and freely clears the sides of the bowl, about 10 minutes. Shape the dough into a round, place it in a very lightly oiled large bowl, and cover the bowl with plastic wrap. Leave in a warm, draft-free spot until doubled in bulk, 1½ to 2 hours.

3. Mix together the filling ingredients in a small bowl. Grease a 13 by 9-inch baking dish.

4. After the dough has doubled in bulk, press it down and turn it out onto a lightly floured work surface. Using a rolling pin, shape the dough into a 16 by 12-inch rectangle, with a long side facing you. Mix together the filling ingredients in a small bowl and sprinkle the filling evenly over the dough, leaving a ½-inch border at the far edges. Roll the dough, beginning with the long edge closest to you and using both hands to pinch the dough with your fingertips as you roll. Moisten the top border with water and seal the roll. Lightly dust the roll with flour and press on it ends if necessary to make a uniform 16-inch cylinder. Cut the roll in 12 equal pieces and place the rolls cut-side up in the prepared baking dish. Cover with plastic wrap and place in a warm, draft-free spot until doubled in bulk, 1½ to 2 hours.

5. When the rolls are almost fully risen, adjust an oven rack to the middle position and heat the oven to 350 degrees. Bake the rolls until golden brown and an instant-read thermometer inserted into the center of one reads 185 to 188 degrees, 25 to 30 minutes. Cool for 10 minutes. Meanwhile, stir the glaze ingredients together until smooth. Glaze the rolls and serve.

bagels

15.jpg

I absolutely love bagels. If it made nutritional sense, I would eat them several times each day – with butter, with cream cheese, with jam, as a breakfast sandwich with egg and cheese, as a lunch sandwich with turkey and mayonnaise. As it is, I eat one every day, half with butter, the other half with cream cheese. It’s one of my favorite meals of the day, and it never gets old.

23.jpg

I’ve been making my own for years. The first recipes I tried were fairly standard bread recipes with the added step of boiling the bagels between the second rise and baking. Once I discovered retarding the bagels – replacing the second rise with an overnight stay in the refrigerator – my bagels improved dramatically. They became even better when I started using a pre-ferment.

33.jpg

Unfortunately, all of these steps make homemade bagels a fair bit of effort. I had to take a break from making my own when my wedding became imminent, and I was moving and finishing my PhD and starting a new job. After eating perfectly good grocery store bagels for the past several months, I had to ask myself why I had bothered to make my own.

44.jpg

52.jpg

Now I remember – because mine are better. And not only are they very tasty, I can add whole wheat flour to my heart’s desire and better control the portion size. I also get to enjoy one fresh from the oven, and nothing beats that.

62.jpg

Bagels (adapted from Peter Reinhart’s The Bread Baker’s Apprentice and Cooks Illustrated)

Make 12 small or 8 large bagels

Bridget notes: I’ve found that I get the best bagels when I use Cooks Illustrated’s ingredient list and Peter Reinhart’s methods. The recipes are similar; the biggest difference is that Cook’s Illustrated uses a firmer dough (i.e., more flour).

Both recipes call for high-gluten flour, which is difficult to find. You can make your own by adding some gluten flour to bread flour. Sometimes I do that. This time, I simply used about half white bread flour and half whole wheat flour.

Update 4.14.08 – I reduced the flour in the recipe to reflect more accurately how much I’m usually able to mix in before the dough gets too dry (from 11 ounces in the dough to 8 ounces).

Sponge:
½ teaspoon instant yeast
1¾ cup (9 ounces) bread flour
1¼ cup (10 ounces) water, room temperature

Dough:
¼ teaspoon instant yeast
1 3/4 cup (8 ounces) bread flour (approximately)
1 1/2 teaspoons salt
1 tablespoon barley malt syrup
1 tablespoon cornmeal

1. To make sponge, stir the yeast into the flour in the bowl of a stand mixer. Add the water, stirring only until it forms a smooth, sticky batter (like pancake batter). Cover the bowl with plastic wrap and leave at room temperature for approximately 2 hours, or until the mixture becomes very foamy and bubbly. It should swell to nearly double in size and collapse when the bowl is tapped on the countertop.

2. To make the dough, add the additional yeast to the sponge and stir. Then add most of the remaining flour and all of the salt and malt. Mix on low speed with the dough hook until the ingredients form a ball, slowly working in the remaining flour to stiffen the dough.

3. Knead at low speed for 6 minutes. The dough should be firm and stiff, but still pliable and smooth. There should be no raw flour – all the ingredients should be hydrated. If the dough seems too dry and rips, add a few drops of water and continue kneading. If the dough seems tacky or sticky, add more flour to achieve the stiffness required. The kneaded dough should feel satiny and pliable but not be tacky.

4. Immediately divide the dough into 8-12 equal pieces. Form the pieces into smooth balls.

5. Cover the balls with plastic wrap and allow them to rest for 20 minutes. Dust a baking sheet with the cornmeal.

6. Form each dough ball into a rope 9 inches long by rolling it under your outstretched palms. Do not taper the ends of the rope. Overlap the ends of the rope about 1 inch and pinch the entire overlapped area firmly together. If the ends of the rope do not want to stick together, you can dampen them slightly. Place the loop of dough around the base of your fingers and, with the overlap under your palm, roll the rope several times, applying firm pressure to seal the seam. The bagel should be roughly the same thickness all the way around.

7. Place each of the shaped pieces about an inch apart on the prepared pan. Cover loosely with plastic wrap. Let the pan sit at room temperature for about 20 minutes.

8. Check to see if the bagels are ready to be retarded in the refrigerator by using the ‘float test.” Fill a small bowl with cool or room-temperature water. The bagels are ready to be retarded when they float within 10 seconds of being dropped into the water. Take one bagel and test it. If it floats immediately return the tester bagel to the pan, pat it dry, cover the pan, and place it in the refrigerator overnight (it can stay in the refrigerator for up to 2 days). If the bagel does not float, return it to the pan and continue to proof the dough at room temperature, checking back every 10 to 20 minutes or so until a tester floats. The time needed to accomplish the float will vary, depending on the ambient temperature and the stiffness of the dough.

9. The following day (or when you are ready to bake the bagels), adjust the rack to the middle position and preheat the oven to 450 degrees. Bring a large pot of water to a boil (the wider the pot the better). Have a slotted spoon or skimmer nearby. Line a baking sheet with parchment paper.

10. Remove the bagels from the refrigerator and gently drop them into the water, boiling only as many as comfortably fit (they should float within 10 seconds). Stir and submerge bagels with Chinese skimmer or slotted spoon until very slightly puffed, 30 to 35 seconds. Remove rings from water; transfer to wire rack, bottom side down, to drain.

11. Transfer boiled rings, rough side down, to parchment paper-lined baking sheet. Bake until deep golden brown and crisp, about 12 minutes.

12. Remove the pans from the oven and let the bagels cool on a rack for 10-15 minutes before serving.

72.jpg

(almost) no-knead bread

32.jpg

If it weren’t for Smitten Kitchen, I wouldn’t have known what Cooks Illustrated was referring to in their article about Mark Bittman’s No-Knead Bread recipe that “instantly won over legions of followers”, including Deb. I’ve never made the original recipe, so I can’t attest to Cooks Illustrated’s claim that it sometimes produces “flat, irregular blobs” with a flat-tasting crumb. Their Almost No-Knead Bread recipe aims to solve any problems that were encountered with the original.

I made Cooks Illustrated’s updated version, and I thought it was great. This might be the most attractive loaf of bread I have ever baked. I loved the flavor as well. I thought it had a bit of a sourdough flavor to it, but without the work involved with real sourdough. I also like the open structure of the crumb – I love breads with lots of air bubbles. Another great thing – I estimate that all of the work for the recipe, from getting out ingredients to cleaning up, took a total of about 20 minutes.

22.jpg

One thing I don’t understand about both recipes is why we need a no-knead bread recipe? I don’t know anyone who kneads bread by hand. Most people who are interested enough in food to know about this recipe own Kitchenaid mixers or bread machines that do their bread-kneading for them. I actually mixed up this dough in my Kitchenaid’s mixer bowl and considered letting the mixer stir the dough for me. Leaving the machine on for another 8 minutes while it kneads wouldn’t have been any more work. The No-Knead bread fad would make more sense to me if the bread could be mixed the night before and immediately baked upon getting home from work the next day, but both the original and CI’s revised recipe require about the same amount of babysitting on the day they’re baked as a traditional bread recipe.

On the other hand, if this recipe is popular not for its lack of kneading, but simply because it produces a lovely and tasty loaf of bread, well then I can understand.

13.jpg

Almost No-Knead Bread (from Cooks Illustrated January 2008)

Makes 1 large round loaf

CI note: An enameled cast-iron Dutch oven with a tight-fitting lid yields best results, but the recipe also works in a regular cast-iron Dutch oven or heavy stockpot. (See the related information in “Making Your Dutch Oven Safe for High-Heat Baking” for information on converting Dutch oven handles to work safely in a hot oven.) Use a mild-flavored lager, such as Budweiser (mild non-alcoholic lager also works). The bread is best eaten the day it is baked but can be wrapped in aluminum foil and stored in a cool, dry place for up to 2 days.

3 cups unbleached all-purpose flour (15 ounces), plus additional for dusting work surface
¼ teaspoon instant or rapid-rise yeast
1½ teaspoons table salt
¾ cup plus 2 tablespoons water (7 ounces), at room temperature
¼ cup plus 2 tablespoons mild-flavored lager (3 ounces)
1 tablespoon white vinegar

1. Whisk flour, yeast, and salt in large bowl. Add water, beer, and vinegar. Using rubber spatula, fold mixture, scraping up dry flour from bottom of bowl until shaggy ball forms. Cover bowl with plastic wrap and let sit at room temperature for 8 to 18 hours.

2. Lay 12- by 18-inch sheet of parchment paper inside 10-inch skillet and spray with nonstick cooking spray. Transfer dough to lightly floured work surface and knead 10 to 15 times. Shape dough into ball by pulling edges into middle. Transfer dough, seam-side down, to parchment-lined skillet and spray surface of dough with nonstick cooking spray. Cover loosely with plastic wrap and let rise at room temperature until dough has doubled in size and does not readily spring back when poked with finger, about 2 hours.

3. About 30 minutes before baking, adjust oven rack to lowest position, place 6- to 8-quart heavy-bottomed Dutch oven (with lid) on rack, and heat oven to 500 degrees. Lightly flour top of dough and, using razor blade or sharp knife, make one 6-inch-long, ½-inch-deep slit along top of dough. Carefully remove pot from oven and remove lid. Pick up dough by lifting parchment overhang and lower into pot (let any excess parchment hang over pot edge). Cover pot and place in oven. Reduce oven temperature to 425 degrees and bake covered for 30 minutes. Remove lid and continue to bake until loaf is deep brown and instant-read thermometer inserted into center registers 210 degrees, 20 to 30 minutes longer. Carefully remove bread from pot; transfer to wire rack and cool to room temperature, about 2 hours.

42.jpg

daring bakers feb 2008: julia child’s french bread

18.jpg

I was excited to see that this month’s Daring Baker hosts, Mary and Sara, chose Julia Child’s french bread recipe. I’d heard of this recipe before and wanted to try it, but I didn’t want to buy the book it’s in, so this worked out great for me. The recipe is really long, and it sounds like that intimidated a few Daring Bakers. However, much of that length is because Julia’s writing style is so personal and friendly, and she gives a lot of detail. I really enjoyed making my way through her recipe. This is a quote I particularly liked, which also sums up my philosophy toward homemade bread: “It will turn into bread in the oven whatever happens, but you will have an easier time and a better loaf if you aim for ideal conditions.” Homemade bread is good even if you screw it up.

28.jpg

While I’m not a bread novice, I picked up a few tips from this recipe. One is to let the dough rise seam-side up and then flip it over before baking. This way the dough on top in the oven has no hardened crust that might impede the oven-rise. I also like the idea of using water to estimate what level the dough should rise to in its bowl.

All in all, this was great bread (although most of it is still in my overly stocked freezer). I have some other French bread recipes that I like at least as much, that have the added advantage of providing the baker with some more freedom in the timing. Probably the biggest difficulty of this recipe is finding the time to do it all in one day.

37.jpg

I made myself a tasty little sandwich with one of my mini-loaves, and now I’m trying to think of a great accompaniment to the baguette. I hear Julia Child’s coq au vin is amazing, and I do have the cookbook with that recipe. Although I hear that recipe is quite a project as well!

You can find the whole recipe here, and be sure to check out the rest of the Daring Bakers‘ bread!

46.jpg
Heehee…

challah

17.jpg

Obviously I like to cook. Hence the food blog. And I like to eat, so that works out well, but I also like to show off what I cook. (Hence the food blog.) Dave and I live hours away from his family and days away from mine, and we haven’t made many friends since we moved two months ago, so my opportunities to cook for people are few and far between.

The last time our best friends visited us, I was so busy getting married that all I managed to do was bake some brownies for intermittent snacking. I even had the bad manners to wake up the morning of the wedding and make myself some breakfast and then tell my friends “um, there’s probably more bagels.”

They’re visiting again in two weeks, and I’d love to make up for lost time. But they’re getting here the same day I get back from a trip to New Mexico to see my new nephew, so it’s going to be tricky. I’m trying to stock the freezer with some goodies. (They’re going to be here for less than 2 days. I’m ridiculous, I know.)

27.jpg

Challah, like all breads, happens to take well to freezing. It also happens to make some excellent French toast, which is (sort of) what I plan to do with this loaf.

This bread is beautiful, tender, and slightly sweet, with a subtle butter flavor. I did put most of it in the freezer, but the one slice I ate was delicious. Hopefully the breakfast I make out of it in a few weeks is just as good.

36.jpg

Challah (from Cooks Illustrated, January 2006)

CI note: We prefer to knead this dough in a standing mixer, but a food processor or your hands can do the job. If using a food processor, place the flour mixture in a processor fitted with the dough blade. Mix together the eggs, yolk, butter, and water in a large measuring cup and, with the processor running, add the egg mixture in a steady stream. Process until a ball of dough forms, about 1 minute. Remove the dough to a lightly floured surface and knead by hand for an additional minute, or until the dough becomes smooth and elastic. Alternatively, you can mix the dough by hand in a large bowl with a wooden spoon, until the dough comes together. Then transfer the dough to a lightly floured surface and knead until the dough forms a smooth ball. If the dough remains tacky, add more flour 1 tablespoon at a time. This method will take longer than using a standing mixer, but you will get the same results.

Makes 1 large loaf

3-3 ¼ cups unbleached all-purpose flour (15-16 ¼ ounces), plus more for dusting work surface
¼ cup sugar (1¾ ounces)
1 envelope instant yeast (about 2¼ teaspoons)
1 ¼ teaspoons salt
2 large eggs plus 1 large egg yolk
4 tablespoons unsalted butter (½ stick), melted
½ cup warm water plus 1 tablespoon (about 110 degrees)
1 large egg white (for wash)
1 teaspoon poppy seeds, or sesame (optional)
1. Whisk together 3 cups of flour, sugar, yeast, and salt in medium bowl; set aside. Mix together 2 eggs, egg yolk, melted butter, and ½ cup of water in bowl of standing mixer fitted with dough hook. Add flour mixture to wet mixture; knead at low speed until dough ball forms, about 5 minutes, adding remaining ¼ cup flour, 1 tablespoon at a time, as needed to prevent dough from sticking. Whisk reserved egg white with remaining 1 tablespoon water in small bowl, cover with plastic wrap, and refrigerate.

2. Transfer dough to very lightly oiled large bowl, turning dough over to coat with oil. Cover with plastic wrap and let rise in warm place until doubled in size, 1 ½ to 2 hours. Gently press dough to deflate, cover with plastic wrap, and let rise until doubled in size again, 40 to 60 minutes.

3. Lightly grease large baking sheet and set aside. Transfer dough to lightly floured work surface. Divide dough into 2 pieces, one roughly half size of other. (Small piece will weigh about 9 ounces, larger piece about 18 ounces.) Divide large piece into 3 equal pieces. Roll each piece into 16-inch-long rope, about 1 inch in diameter. Line up ropes of dough side by side and pinch ends together. Take dough rope on bottom and lay it over center rope. Take dough rope on top and lay it over center rope. Repeat until ropes of dough are entirely braided, then pinch ends together. Place braid on baking sheet. Divide smaller piece of dough into 3 equal pieces. Roll each piece into 16-inch-long rope, about ½ inch in diameter. Braid together, pinching ends to seal. Brush some of egg wash on top of large loaf and place small braid on larger braid. Loosely drape loaf with plastic wrap and let rise in warm place until loaf becomes puffy and increases in size by a third, 30 to 45 minutes.

4. Adjust oven rack to lower-middle position and heat oven to 375 degrees. Brush loaf with remaining egg wash and sprinkle with poppy or sesame seeds, if using. Bake until loaf is golden brown and instant-read thermometer inserted into side of loaf reads 190 degrees, 30 to 40 minutes. Place baking sheet on wire rack. Cool loaf completely before slicing.

45.jpg

olive oil bread

8.jpg

My plan for this loaf of bread was to have it and the rest of dinner ready before Dave got home from work on a Friday evening. The kitchen would be clean, a bottle of wine would be open, garlic would be roasted. We’d sit down together, drink the wine, spread roasted garlic on fresh bread while the rest of dinner was on hold until we were good and ready. Doesn’t that sound nice?

It didn’t work out that way. I was still rolling out pasta for the lasagna and because I was behind on cooking, I was way behind on cleaning. It was almost an hour after Dave got home before the lasagna was built and I could take a break to enjoy this bread and drink some wine. We spread roasted garlic on it (the bread, not the wine – ew), and when we ran out of garlic, we dipped it in green extra virgin olive oil.

Eventually I got the lasagna in the oven, but ignored the mess in the kitchen. When the lasagna was done baking, it was apparent that something had gone very wrong with it. In my hurry to finish cooking, I had taken some shortcuts. I skipped a step that Marcella Hazan specifically calls “something of a nuisance, but necessary.” All too true. The lasagna was sort of a disaster actually, but that was fine, because I was happy to fill up on bread.

The bread is based on two recipes – the method comes from Peter Reinhart’s recipe for Italian Bread in The Bread Baker’s Apprentice. This is a great book if you’re pretty serious about baking bread at home. Reinhart is all about forcing the maximum flavor out of each ingredient, which I love. The addition of olive oil stems from a recipe for Mantovana Olive Oil Bread in Ultimate Bread, by Eric Treuille and Ursula Ferrigno. This book is great for the less-serious home bread baker. The pictures throughout the book are wonderful and the recipes are varied and interesting, but I think you’ll have more consistent results following Reinhart’s methods.

The olive oil bread was delicious, although I would have preferred an even stronger olive oil flavor. I admit that I got a little scared by the amount of olive oil Treuille and Ferrigno call for and went easy on it. Also, I used regular olive oil, when I meant to use extra virgin. In short, it was really good – but there’s a potential for it could be even better. That just gives me an excuse to try it again soon.

Mantovana Olive Oil Bread (adapted from Peter Reinhart’s The Bread Baker’s Apprentice and Eric Treuille and Ursula Ferrigno’s Ultimate Bread)

Makes one 1-pound loaf

1 recipe biga (recipe follows)
4½ ounces (1 cup) unbleached bread flour
1¼ ounce (¼ cup) whole wheat flour
1 teaspoon salt
½ teaspoon instant yeast
½ teaspoon barley malt syrup (optional)
¼ cup water
¼ cup olive oil

1. Remove the biga from the refrigerator 1 hour before making the dough. Cut it into about 10 small pieces with a pastry scraper or serrated knife. Cover with a towel or plastic wrap and let sit for 1 hour to take off the chill.

12.jpg

2. Stir together the flour, salt, sugar, and yeast in a 4-quart bowl (or in the bowl of an electric mixer). Add the biga pieces, olive oil, barley malt, and water, and stir together (or mix on low speed with the paddle attachment) until a ball forms, adjusting the water or flour according to need. The dough should be slightly sticky and soft, but not batterlike or very sticky. If the dough feels tough and stiff, add more water to soften (it is better to have the dough too soft than too stiff at this point).

3. Sprinkle flour on the counter, transfer the dough to the counter, and begin kneading (or mixing on medium speed with the dough hook). Knead (or mix) for about 10 minutes, adding flour as needed, until the dough is tacky, but not sticky, and supple. The dough should pass the windowpane test (see below) and register 77 to 81 degrees. Lightly oil a large bowl and transfer the dough to the bowl, rolling it to coat it with the oil. Cover the bowl with plastic wrap.

To perform the windowpane test, cut off a small piece of dough from the larger batch and gently stretch, pull, and turn it to see if it will hold a paper-thin, translucent membrane. If it falls apart before it makes this windowpane, continue mixing for another minute or two and test again.

22.jpg

4. Ferment at room temperature for approximately 2 hours, or until the dough doubles in size.

31.jpg

5. Gently pat the dough into a rough rectangle. Without degassing the piece of dough, fold the bottom third of dough, letter style, up to the center and press to seal, creasing surface tension on the outer edge. Fold the remaining dough over the top and use the edge of your hand to seal the seam closed and to increase the surface tension all over. Lightly dust with a sprinkle of flour, cover with a towel or plastic wrap, and let rest for 5 minutes. Then complete the shaping, extending the loaves to about 12 inches in length. Line a sheet pan with baking parchment and dust with semolina flour or cornmeal. Place the loaves on the pan and lightly mist with spray oil. Cover loosely with plastic wrap.

41.jpg

6. Proof at room temperature for about 1 hour, or until the loaves have grown to about 1½ times their original size.

7. Place an empty heavy-duty sheet pan or cast-iron frying pan on either the top shelf of the oven or the oven flour. Preheat the oven to 500 degrees. Have hot water standing by. Score the bread with 2 parallel, diagonal slashes or 1 long slash.

5.jpg

8. Transfer the dough on the parchment paper to a peel or the back of a sheet pan. Transfer the dough to the baking stone (or bake on the sheet pan). Pour 1 cup hot water into the steam pan and close the door. After 30 seconds, spray the walls of the oven with water and close the door. Repeat once more after another 30 seconds. After the final spray, lower the oven setting to 450 degrees and bake until done, rotating 180 degrees, if necessary, for even baking. It should take about 20 minutes. The loaf should be golden brown and register at least 200 degrees at the center.

9. Transfer the loaves to a cooling rack and cool for at least 1 hour before slicing or serving.

6.jpg

Biga

Biga will keep in the refrigerator for up to 3 days, or in the freezer for about 3 months. You can use it as soon as it ferments, but I prefer to give it an overnight retarding to bring out more flavor.

5½ ounces (1¼ cups) unbleached bread flour
¼ teaspoon instant yeast
7 tablespoons to ½ cup water, at room temperature

1. Stir together the flour and yeast in a 4-quart bowl (or in the bowl of an electric mixer). Add 7 tablespoons of the water, stirring until everything comes together and makes a coarse ball (or mix on low speed for 1 minute with the paddle attachment). Adjust the flour or water, according to need, so that the dough is neither too sticky nor too stiff. (It is better to err on the sticky side, as you can adjust easier during kneading. It is harder to add water once the dough firms up.)

2. Sprinkle some flour on the counter and transfer the dough to the counter. Knead for 4 to 6 minutes (or mix on medium speed with the dough hook for 4 minutes), or until the dough is soft and pliable, tacky but not sticky. The internal temperature should be 77 to 81 degrees.

3. Lightly oil a bowl and transfer the dough to the bowl, rolling it around to coat it with oil. Cover the bowl with plastic wrap and ferment at room temperature for 2 to 4 hours, or until it nearly doubles in size.

4. Remove the dough from the bowl, knead it lightly to degas, and return it to the bowl, covering the bowl with plastic wrap. Place the bowl in the refrigerator overnight. You can keep this in the refrigerator for up to 3 days, or freeze it in an airtight plastic bag for up to 3 months.