fresh pasta with braised quail

quail pasta 7

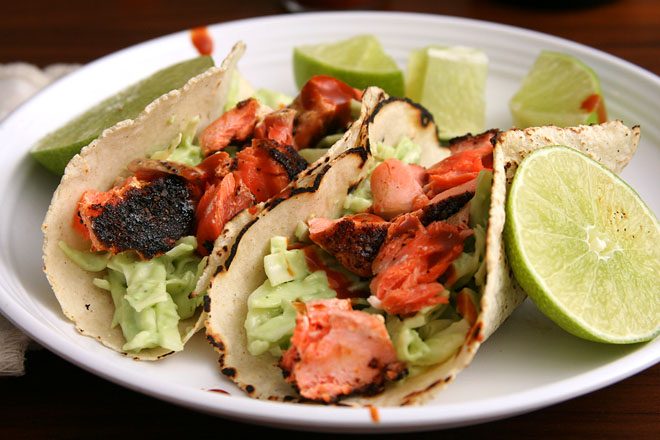
I have never seen a Meyer lemon for sale where I live. My local store used to stock blood oranges in the winter and rhubarb in the spring, but I didn’t see either this year. Sheets of nori? I’ve started ordering them online, along with golden syrup, peppermint extract, a big container of sprinkles, espresso powder, 00 Italian flour, herbal tea, looseleaf black and green tea, passionfruit concentrate, and my favorite brand of soy sauce. Living in a small town has its disadvantages.

quail pasta 3

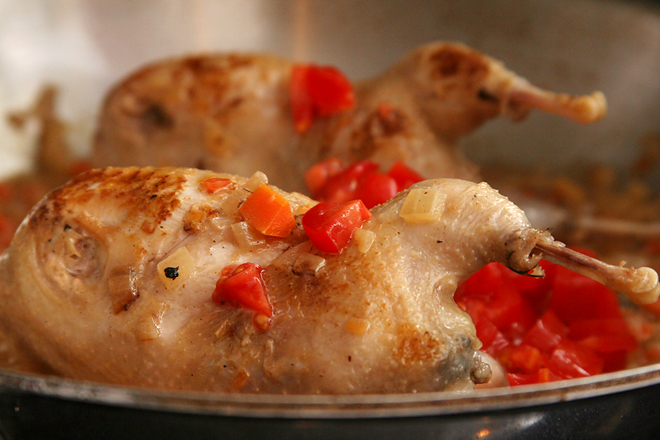
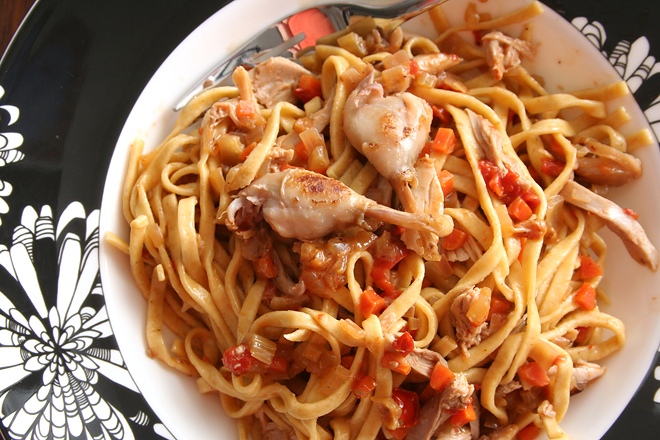
But I seem to have a steady supply of game meats. I’ve bought quail a few times, and this is my favorite way to use it (which isn’t to say that chicken drumsticks or thighs wouldn’t also be great in this dish). What I’ve learned about quail is that they are so tiny that it can be hard to find the meat. As someone who doesn’t much appreciate messing around with their food as they eat it, a salad topped with a whole quail was frustrating (although pretty).

quail pasta 4

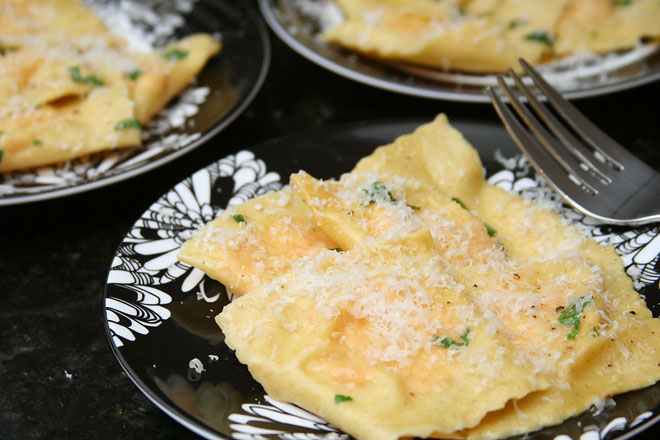
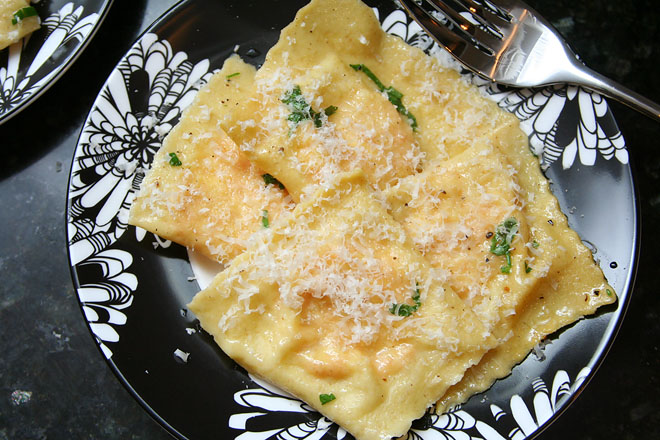
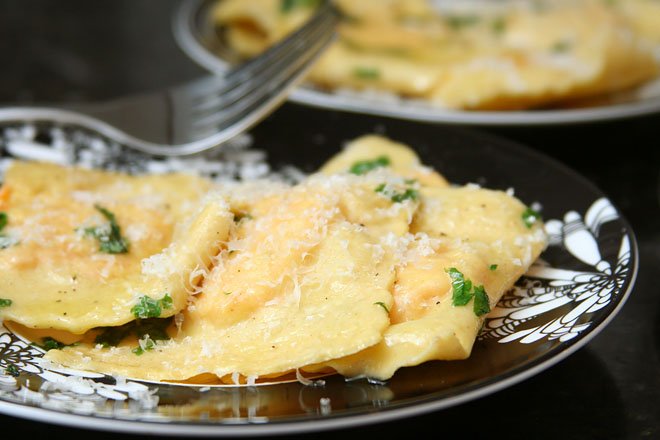
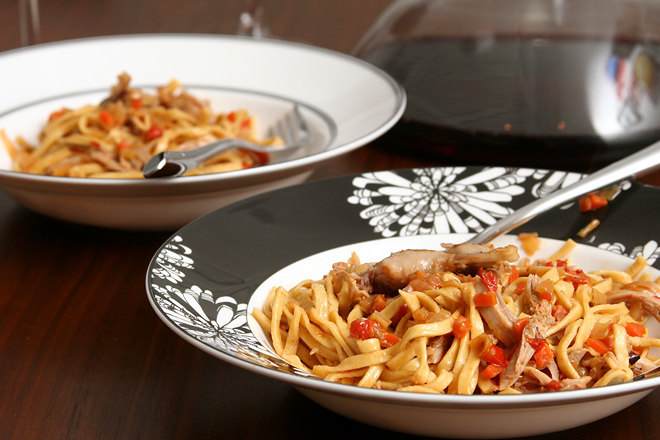
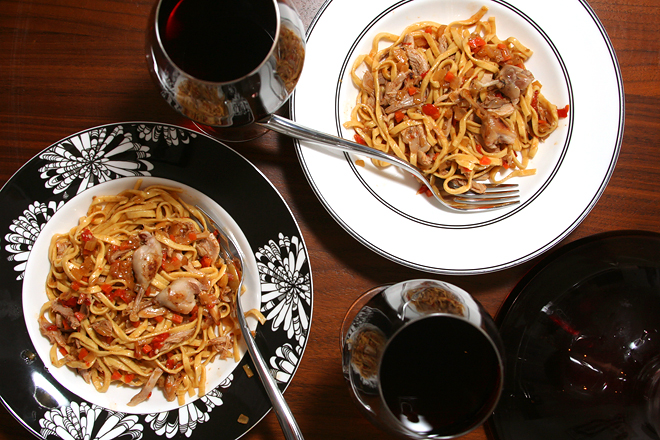
This pasta dish, with so little in it besides the quail, cooks it down to its essence. What sauce there is is concentrated quail stock. It’s intensely savory. It coats the pasta in the thin layer, with bits of shredded quail meat dispersed throughout. You can garnish the dish with teeny tiny drumsticks. And, amazingly, this is a dish I can actually find all the ingredients for in my little town.

quail pasta 8

Printer Friendly Recipe
Fresh Pasta with Braised Quail (adapted from Marcella Hazen’s Marcella Cucina via epicurious)

Serves 4

4 whole quail, washed and dried
salt and pepper
2 tablespoons extra virgin olive oil
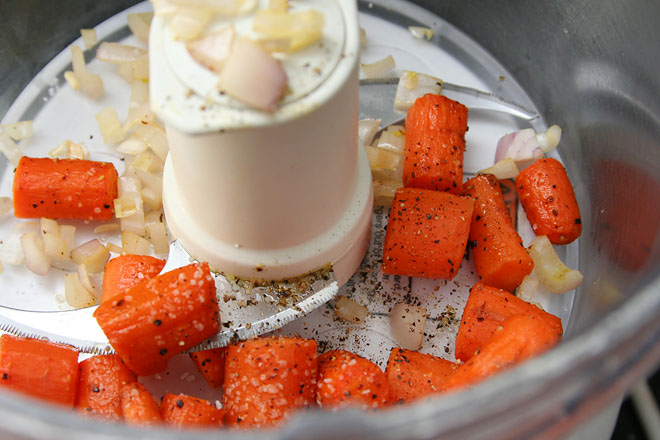
1 shallot, minced
½ stalk celery, minced
½ medium carrot, minced
1 fresh sage leaf, minced
6 rosemary leaves (remove from 1 sprig), chopped very fine
½ cup dry white wine
1 roma tomato, diced small
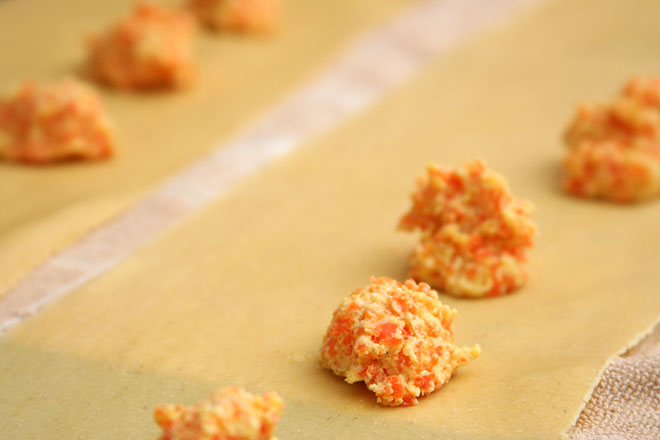
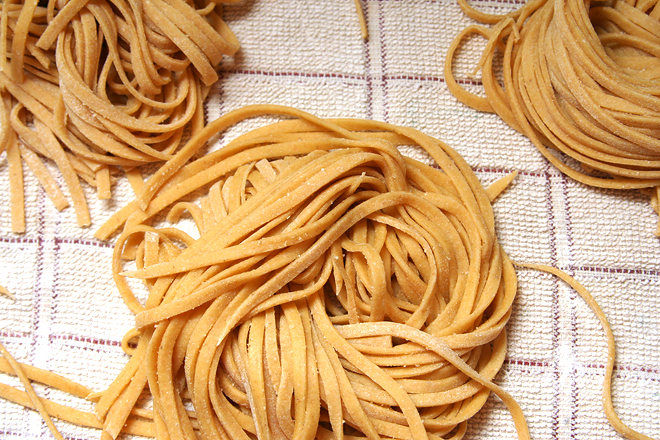
1 pound fresh pappardelle or fettuccine
½ cup (1 ounce) freshly grated parmesan cheese, plus more for serving

1. Season the quail generously with salt and pepper. Heat a large not-nonstick skillet over medium-high heat. Add the oil and quail, and cook without moving for 3-4 minutes, until well browned. Flip the quail; continue to cook until all sides are browned, propping the quail against the sides of the pan if necessary. Transfer the browned quail to a plate.

2. Reduce the heat to medium and add the vegetables and herbs; cook, stirring constantly, until they are fragrant and lightly browned, 1-2 minutes. Add the wine and use a spatula to scrape up any browned bits on the bottom of the pan. Reduce the heat to medium-low, return the quail to the skillet, and cover. Cook, turning occasionally, for 20 minutes. Add the tomato, cover, and cook for another 20-25 minutes, adding water as necessary to keep the pan from drying out, until the meat can easily be removed from the bones.

3. Remove the quail from the pan and shred the meat, discarding the bones. If desired, reserve the drumsticks with their meat for garnish.

4. Meanwhile, bring a large pot of salted water to a boil. Cook the pasta until just tender, 2-4 minutes or according to package instructions. Drain, reserving ½ cup of pasta cooking water.

5. Add the shredded quail meat, pasta, ¼ cup pasta cooking water, and parmesan to the pan with the sauce. Toss the contents together until well mixed, adding more pasta water if necessary to loosen the sauce. Serve immediately, topped with additional parmesan and the reserved drumsticks.

quail pasta 6

confetti cookies

confetti cookies 7

I had this great idea at the beginning of the year to send my eight nephews and one niece cookies for each of their birthdays. That’s less than one package per month, how hard could it be?

confetti cookies 2

Of course, that’s assuming that their birthdays are evenly dispersed, which they definitely are not. There were three the first week of February, which I scrambled to keep on top of, and then there are three the first week of April. At least I get two-thirds of them out of the way within a few months, I suppose.

confetti cookies 4

I haven’t been able to find the perfect cookie for each kid, but for my girlie-girl niece, it was an easy choice. Sprinkles! Pink! Crumbles of cake within the cookies that have more pink sprinkles! These really do scream “Happy Birthday!”, which makes them the perfect package for the birthday girl halfway across the country. And the Facebook picture of the cookies being enjoyed makes it all worth it. Only three more birthdays to go this year!

confetti cookies 6
Printer Friendly Recipe
Confetti Cookies (from Christine Tosi’s Momofuko Milk Bar via Eva Bakes)

I doubled the sprinkles in the cookie dough. The cookies needed more color, I decided.

Birthday Cake Crumbs:
50 grams (¼ cup) granulated sugar
13 grams (1 tablespoons) light brown sugar, lightly packed
45 grams (6 tablespoons) cake flour
¼ teaspoon baking powder
¼ teaspoon salt
1 tablespoon rainbow sprinkles
2 tablespoons vegetable or canola oil
1½ teaspoons vanilla extract

Cookies:
400 grams (3 cups) all-purpose flour
50 grams (⅔ cup) instant dry milk powder
2 teaspoons cream of tartar
1 teaspoon baking soda
80 grams (½ cup) rainbow sprinkles
16 tablespoons butter, at room temperature
1¼ teaspoons salt
1½ cups (300 grams) granulated sugar
1 tablespoon light corn syrup
2 large eggs
2 teaspoons vanilla extract
Birthday Cake Crumbs

1. For the Birthday Cake Crumbs: Heat the oven to 300 degrees. Line a rimmed baking sheet with parchment paper or a silicone mat.

2. In a medium bowl, combine the sugars, flour, baking powder, salt, and sprinkles. Add the oil and vanilla and stir until the mixture forms small clusters. Spread the clusters on the prepared pan. Bake for 20 minutes, stirring occasionally. The crumbs should still be slightly moist to the touch; they will dry and harden as they cool. Let the crumbs cool completely before using. (Stored in an airtight container, the crumbs will keep fresh for 1 week at room temperature or 1 month in the freezer.)

3. For the cookies: Line two baking sheets with parchment paper or silicone mats. In a medium bowl, mix the flour, dry milk powder, cream of tartar, and baking soda.

4. In the bowl of a stand mixer fitted with the paddle attachment (or a large bowl if using a hand mixer), beat the butter, salt, sugar, and corn syrup on medium-high speed until light and fluffy, 2 to 3 minutes. Add the eggs, one at a time, beating until incorporated, then mix in the vanilla; continue to beat on medium-high speed for 6 to 7 minutes. Reduce the mixer speed to low and gradually add the flour mixture, mixing just until incorporated. Stir in the Birthday Cake Crumbs.

5. Using an ice cream scoop, scoop the dough 4 inches apart onto the prepared baking sheets. Transfer the pans to the refrigerator and chill for at least one hour. (The prepared and portioned dough can be chilled for up to 1 week; if storing for longer than an hour, wrap the pans tightly in plastic wrap. If you’re storing for a while, you can save space by arranging the dough portions closer together on one baking sheet, then dividing them onto separate pans right before baking.)

6. Heat the oven to 350 degrees. Bake the cookies until very lightly browned around the edges, about 18 minutes.

7. Cool the cookies completely on the pans before transferring to a plate or to an airtight container for storage. The cookies can be stored for up to five days.
confetti cookies 5

blueberry lemon date bars

blueberry lara bars 4

Dave and I had a Serious Discussion last year about hiking. He loves it; I’m okay with it. I like the part that involves relaxing exercise (usually an oxymoron) in a pretty place, but not the part that requires several hours of driving. Dave doesn’t love the driving either, but for him, it’s worth it for the hiking. So we’ve compromised and are making more of an effort to get miles in; Dave’s goal this year is 100 miles.

blueberry lara bars 1

The more often we go, the more we get into a routine. Make coffee at home; stop for breakfast burritos to eat on the road; almonds, these bars, and camelbaks full of water for snacks; and a grain or pasta-based salad for lunch if it’s a long enough hike. Having a series of tasty foods lined up definitely helps get me motivated.

blueberry lara bars 2

Breakfast burritos win as my favorite food of the day, of course, but these bars are delicious too. They’re a perfect mid-morning treat, when you’re just over halfway up the mountain, the burrito has worn off, lunch is still a ways off, and your feet could use a break. They’re easy to make and last a while tightly wrapped in the fridge. I need to keep a stock handy; the easier it is to get out the door, the more likely we are to get those miles in.

blueberry lara bars 3

Printer Friendly Recipe
Blueberry Lemon Date Bars (slightly adapted from Use Real Butter)

Makes 8 bars

I should probably mention that I’ve never eaten a real Larabar, blueberry or otherwise.

I’ve found that these are great for plane rides too.

2 cups unsalted cashews
1 cup dried blueberries
1 cup dates, pitted
grated zest from 1 lemon
⅛ teaspoon salt
seeds of ½ vanilla bean

Transfer the cashews to the bowl of a food processor; pulse until coarsely ground. Add the blueberries, dates, lemon zest, salt, and vanilla seeds; process until the mixture forms large sticky clumps. Line an 8-by-8-inch baking dish with parchment or wax paper, with the paper coming up the sides by several inches. Press the mixture tightly into the lined pan. Cover and chill for at least 30 minutes (or up to several days). Use the ends of the parchment paper to lift the bars out of the pan. Cut into 8 bars; wrap individually. Can be stored in the refrigerator for several months.

coconut cake

tranportation cake 1

I’ve been plastering pictures of this cake on all of my social media outlets, and I’m starting to feel like quite the attention whore, but I’m just so dang proud of it. The decorations are cute; the buttercream is smooth; the tiers are centered. The railroad tracks have wood grain! And then, someone at the shower told me it was the best cake she’d ever eaten.

tranportation cake 3

Not only that, but there were no tears in the making of this cake. There was certainly struggle, and there wasn’t as much sleep as I would have liked, and I was sore the next day from all the fondant-kneading, but it was overall a much smoother process than the last fancy cake I made.

tranportation cake 5

The recipes were all familiar to me, so that helped. I keep meaning to do a comparison of vanilla cakes, but in the meantime, this one has always served me well, so I made that for the bottom layer. The middle was my favorite red velvet cake, and the top was a coconut cake I made years ago. People raved about the coconut cake more than either of the others, which was a surprise to me. The host and I had chose it for the smallest tier because coconut can be polarizing; either you love it or you hate it.

tranportation cake 16

The cake gets a lot of its flavor from cream of coconut, which seems to me to be the coconut equivalent of sweetened condensed milk. It’s very rich, and very sweet. You can use it to make a calorie-buster of a piña colada, which is maybe why it’s usually sold in the drink section. It also makes great cake – the best cake some people have ever eaten, and the best cake I’ve ever decorated.

tranportation cake 18

Coconut Cake (from Cook’s Illustrated)

1 large egg plus 5 large egg whites
¾ cup cream of coconut
¼ cup water
1 teaspoon vanilla extract
1 teaspoon coconut extract
2¼ cups cake flour (9 ounces), sifted
1 cup granulated sugar
1 tablespoon baking powder
¾ teaspoon table salt
12 tablespoons unsalted butter (1½ sticks), cut into 12 pieces, softened, but still cool

1. Adjust oven rack to lower-middle position and heat oven to 325 degrees. Grease two 9-inch round cake pans with shortening and dust with flour.

2. Beat egg whites and whole egg in large measuring cup with fork to combine. Add cream of coconut, water, vanilla, and coconut extract and beat with fork until thoroughly combined.

3. Combine flour, sugar, baking powder, and salt in bowl of standing mixer fitted with paddle attachment. Mix on lowest speed to combine, about 30 seconds. With mixer still running on lowest speed, add butter 1 piece at a time, then beat until mixture resembles coarse meal, with butter bits no larger than small peas, 2 to 2½ minutes.

4. With mixer still running, add 1 cup liquid. Increase speed to medium-high and beat until light and fluffy, about 45 seconds. With mixer still running, add remaining 1 cup liquid in steady stream (this should take about 15 seconds). Stop mixer and scrape down bowl with rubber spatula, then beat at medium-high speed to combine, about 15 seconds. (Batter will be thick.)

5. Divide batter between cake pans and level with offset or rubber spatula. Bake until deep golden brown, cakes pull away from sides of pans, and toothpick inserted into center of cakes comes out clean, about 30 minutes (rotate cakes after about 20 minutes). Do not turn off oven.

6. Cool in pans on wire racks about 10 minutes, then loosen cakes from sides of pans with paring knife, invert cakes onto racks and then re-invert; cool to room temperature.

7. While cakes are cooling, spread shredded coconut on rimmed baking sheet; toast in oven until shreds are a mix of golden brown and white, about 15 to 20 minutes, stirring 2 or 3 times. Cool to room temperature.

tranportation cake 20

carrot-ricotta ravioli

carrot ricotta ravioli 4

I recently made potstickers, and it reminded me how much easier dumplings like these ravioli are to make with homemade dough than with those little square wonton wrappers. With homemade pasta, you have a long strip of dough; after you drop dollops of filling along the strip, you can just fold the whole thing over at once, sealing the long end before cutting in between the filling. Contrast this with individually folding and sealing each square of dough when you use pre-made wonton wrappers. Granted, my method based on homemade dough can only make square dumplings, but it’s so easy that I’m tempted to make square potstickers from now on to avoid individually sealing each one.

carrot ricotta ravioli 1

This is an easy filling too. The carrots and shallots are roasted in large chunks, browning and sweetening in the oven. The vegetables are transferred to the food processor with ricotta and parmesan, and then your filling is made with the touch of a button.

carrot ricotta ravioli 2

The sauce, if you can call it that, is simply melted butter with parsley. A generous shaving of parmesan on the ravioli provides some salty contrast to the sweeter filling. Homemade ravioli is one of my favorite starter courses, and it really isn’t that hard – provided you start out with sheets of pasta and not a tedious stack of tiny squares.

carrot ricotta ravioli 5

Printer Friendly Recipe
Carrot-Ricotta Ravioli with Herbed Butter
(slightly adapted from Domenica Marchetti’s The Glorious Vegetables of Italy)

4 main course or 8 first-course servings

3 large carrots (12 ounces), peeled and cut into 1-inch chunks
1 large shallot, quartered
1 tablespoon extra virgin olive oil
Salt and freshly ground pepper
2 teaspoons unsalted butter
1 tablespoon heavy cream
5 ounces (½ cup firmly packed) ricotta
6 tablespoons freshly grated parmesan cheese, plus more for serving
pinch of freshly grated nutmeg
1 large egg yolk
1 recipe fresh pasta dough, rolled to the second-to-last setting on a pasta roller
8 tablespoons (1 stick) unsalted butter
2 tablespoons minced parsley
salt

1. Heat the oven to 400 degrees. In a baking dish, toss the carrots and shallot with the olive oil and season with salt and pepper. Cover with foil and bake for about 30 minutes, until tender and lightly browned. Let cool slightly.

2. In a food processor, combine the carrots, shallot, and cream and puree until smooth. Transfer the puree to a bowl. Stir in the ricotta, parmesan, and nutmeg and season with salt and pepper. Stir in the egg yolk.

3. Place one rounded teaspoon of filling every 2 inches along the length of a pasta sheet. Fold the pasta sheet lengthwise over the filling. Press around each ball of filling to seal the two layers of pasta together. Use a pizza cutter to cut between the filling to form squares of ravioli. Store the ravioli on a dry dish towel. Repeat with the remaining dough and filling. (Ravioli can be formed several hours in advance and covered and refrigerated or can be flash-frozen, then transferred to freezer bags and frozen for several weeks. Do not defrost before cooking.)

4. Bring a large pot of water to a boil; add a tablespoon of salt and lower the heat until the water is at a lively simmer. Meanwhile, in a large skillet over medium heat, melt the butter with ¼ teaspoon salt and the parsley.

5. Boil the ravioli in small batches until al dente, 2 to 3 minutes, using a skimmer or large slotted spoon to remove the ravioli from the boiling water and transfer them directly to the skillet with the butter. Once all the ravioli are boiled, lightly toss them in the butter to thoroughly coat. Serve immediately, topped with additional parmesan.

carrot ricotta ravioli 3

lemon cake with lemon curd filling and cream cheese frosting

fondant 22

Two years ago, I made this cake for a Tiffany-themed baby shower (and I’m just now telling you about it), and it became infamous for the cake that made me cry. I wouldn’t have told anyone that myself, but Dave blurted it out when we delivered the cake. “Never again!”, he told our friends.

tiffany fondant collage

I’m actually proud of the cake, but it’s true that it wasn’t a smooth process. When my friend showed me a picture of the cake and asked me to reproduce it for the baby shower she was hosting for her daughter, I ambitiously agreed. I had never worked with fondant before, but how hard could it be?

fondant 16

Well, pretty hard, actually, at least when you’re both inexperienced and a perfectionist. I found a few opportunities to practice before the shower and learned some valuable lessons, but on the morning of the shower, the ruffles and lace were still uncharted territory. Looking back, I can’t remember what caused the tears, but it could have been any number of things – the lace sticking to the mold, running out of fondant, running behind schedule.

fondant 18

Fortunately, whether the lace had obvious seams or the fondant cracked at the corners, I knew the cake itself would taste good. I’m much more confident in my baking skills than my decorating skills. I took one of my favorite white cakes and added lemon zest, so that, at least, was one part of this project that wasn’t complicated.

fondant 19

Despite my struggles, I think the cake turned out great, and the host seemed pleased. It tasted at least as good as it looked. Still, it was two years before anyone asked me to make a tiered cake with fondant for them again. That is what I’ll be doing this weekend. Any bets on how many times I cry this time?

fondant 24

Printer Friendly Recipe
Lemon Cake with Lemon Curd Filling and Cream Cheese Frosting
(adapted from Cook’s Illustrated’s Classic White Cake)

Makes a double-layer 8-inch or 9-inch cake

1 cup whole milk, at room temperature
6 large egg whites (¾ cup), at room temperature
2 teaspoons almond extract
1 teaspoon vanilla extract
zest of 1 small lemon
1¾ cups granulated sugar (12¼ ounces)
2¼ cups cake flour (9 ounces)
4 teaspoons baking powder
1 teaspoon table salt
12 tablespoons unsalted butter (1½ sticks), softened but still cool

1. Adjust an oven rack to middle position and heat oven to 350 degrees. Grease and flour two 8- or 9-inch-wide by 2-inch-high round cake pans and line with parchment paper. In a 4-cup liquid measure or medium bowl, whisk together milk, egg whites, and vanilla.

2. In bowl of standing mixer fitted with paddle attachment, mix the flour, sugar, baking powder, and salt at low speed. With the mixer running at low speed, add the butter one piece at a time; continue beating until the mixture resembles moist crumbs with no visible butter chunks. Add all but ½ cup milk mixture to crumbs and beat at medium speed until mixture is pale and fluffy, about 1½ minutes. With mixer running at low speed, add remaining ½ cup milk mixture; increase speed to medium and beat 30 seconds more. Stop mixer and scrape sides of bowl. Return mixer to medium speed and beat 20 seconds longer. Divide batter evenly between cake pans; using rubber spatula, spread batter to pan walls and smooth tops.

3. Bake until toothpick inserted in center of cakes comes out clean, about 20 minutes for 6-inch pans, 22 minutes for 8-inch pans, and 26 minutes for 10-inch pans. Loosen cakes from the sides of the pans with a small knife, cool in pan 10 minutes, then invert onto greased wire racks; peel off parchment. Invert the cakes again; cool completely on rack, about 1½ hours.

fondant 9

Lemon Curd Filling (from Cook’s Illustrated)

⅓ cup lemon juice, from 2 lemons
2 large eggs
1 egg yolk
½ cup sugar (3½ ounces)
2 tablespoons unsalted butter, cut into ½-inch cubes and chilled
1 tablespoon heavy cream
¼ teaspoon vanilla extract
pinch table salt

1. Heat lemon juice in small nonreactive saucepan over medium heat until hot but not boiling. Whisk eggs and yolk in medium nonreactive bowl; gradually whisk in sugar. Whisking constantly, slowly pour hot lemon juice into eggs, then return mixture to saucepan and cook over medium heat, stirring constantly with wooden spoon, until mixture registers 170 degrees on instant-read thermometer and is thick enough to cling to spoon, about 3 minutes.

2. Immediately remove pan from heat and stir in cold butter until incorporated; stir in cream, vanilla, and salt, then pour curd through fine-mesh strainer into small nonreactive bowl. Cover surface of curd directly with plastic wrap; refrigerate until needed.

fondant 2

Cream Cheese Frosting (adapted from Smitten Kitchen)

Makes 6 cups

You can use 12 ounces powdered sugar instead of 16 if you’re going to make pretty swirls with the icing instead of decorating. It’ll taste less sweet and more cream cheesy.

8 ounces cream cheese, room temperature
8 tablespoons (1 stick) butter room temperature
4 cups (16 ounces) powdered sugar
1 teaspoon pure vanilla extract

Place cream cheese and butter in a medium bowl. With a handheld electric mixer, beat until light and fluffy, about 2 minutes. Add sugar and vanilla. Beat on low speed to combine.

fondant 21

cappuccino fudge cheesecake

cappuccino fudge cheesecake 7

Cheesecake, the more I think about it, is an almost perfect choice for bringing to dinner parties. It’s universally loved. It’s rarely complicated to make. It can be made several days in advance (or farther in advance and frozen). It transports well. The only tiny potential issue is that a full slice of cheesecake after a big meal can be tough to tackle.

cappuccino fudge cheesecake 1

I get together with a group of friends every month; usually it’s some version of a potluck – perhaps the host will provide salad greens and dressings while everyone else contributes toppings (and wine). Or perhaps the host will provide corn tortillas and barbacoa and everyone else contributes toppings and sides. Last month, the host provided crostini, zuppa toscana, and salad. I was thrilled she didn’t have a dessert planned, providing me with an opening. Cappuccino fudge cheesecake seemed to fit the theme.

cappuccino fudge cheesecake 2

Still, I was worried that 2 pounds of cream cheese, 1¼ pounds of chocolate, 1½ cups of heavy cream, and 1½ cups of sour cream would be overkill after bread and soup and lasagna, so I pared down the recipe to something more reasonable. Considering how much my friends raved, I’m not sure I needed to make a smaller version. Yes, there were leftovers, but there was no shortage of people to take them home. I might start bringing cheesecake to all the parties; I can’t imagine anyone will complain.

cappuccino fudge cheesecake 4

Printer Friendly Recipe
Cappuccino Fudge Cheesecake (adapted from Bon Appetit via epicurious)

16 servings

Crust:
5 ounces chocolate cookies
1 tablespoon sugar
5 tablespoons butter, melted

Ganache:
1 cup heavy cream
12 ounces semisweet chocolate, chopped
3 tablespoons Kahlúa or other coffee-flavored liqueur

Filling:
3 (8-ounce) packages cream cheese, room temperature
1 cup (7 ounces) sugar
1½ tablespoons all-purpose flour
1½ tablespoons dark rum
1½ tablespoons instant espresso powder
1½ tablespoons ground whole espresso coffee beans (medium-coarse grind)
1 tablespoon vanilla extract
1½ teaspoons light molasses
3 large eggs

Topping:
1 cup sour cream
¼ cup (1.75 ounces) sugar
2 teaspoons vanilla extract
chocolate-covered espresso beans

1. For the crust: Spray the bottom of a springform pan with nonstick spray. Either grind the cookies with a food processor or place them in a ziptop bag and crush with a rolling pin. Add the sugar and butter to the crumbs and stir until evenly mixed. Press the crumbs into an even layer covering the bottom of the prepared pan and up the sides an inch or so. Put the pan in the freezer for 30 minutes.

2. Bring the heavy cream to a simmer in a small saucepan; pour over the chocolate and stir in the kahlua. Gently whisk until the chocolate is melted and the ganache is smooth. Pour 1½ cups of the ganache over the bottom of the crust. Freeze until the ganache layer is firm, about 30 minutes. Reserve the remaining ganache; cover and let stand at room temperature to use later for decorations.

3. For the filling: Position a rack in the middle of the oven and heat the oven to 350°F. Beat the cream cheese on low speed until smooth; add the sugar and beat until blended. Mix in the flour. Combine the rum, espresso powder, ground coffee, vanilla, and molasses in a small bowl until the instant coffee dissolves; beat into the cream cheese mixture. Beat in eggs one at a time, occasionally scraping down the sides of the bowl.

4. Pour the filling over the cold ganache in the crust. Place the cheesecake on a rimmed baking sheet. Bake until the top is brown, puffed and cracked at the edges, the center two inches moves only slightly when pan is gently shaken, and the cheesecake reads 150 degrees on an instant-read thermometer, about 1 hour 5 minutes. Transfer the cheesecake to a rack. Cool 15 minutes while preparing the topping (the top of the cheesecake will fall slightly). Maintain the oven temperature.

5. For the topping: Whisk the sour cream, sugar, and vanilla in a medium bowl to blend. Spread the topping over the hot cheesecake, spreading to cover the cheesecake filling completely. Bake until the topping is set, about 10 minutes. Transfer the cheesecake to a rack. Refrigerate the hot cheesecake on a rack until cool, about 3 hours.

6. Run a small sharp knife between the crust and pan sides to loosen the cake; release the pan sides. Transfer the cheesecake to a platter. Spoon the reserved ganache into a pastry bag fitted with small star tip. Pipe lines one inch apart atop the cheesecake. Repeat in the opposite direction, making a lattice. Pipe ganache around the top edge of the cake. Garnish with chocolate-covered espresso beans, if desired. Chill until the lattice is firm, at least 6 hours. (Cheesecake can be made 4 days ahead. Wrap loosely in foil, forming a dome over the lattice; keep chilled.)

cappuccino fudge cheesecake 6

poblanos stuffed with black beans and cheese

stuffed poblanos 3

Sometimes I try to have quick, healthy weeknight dinners that don’t include any grains. I’ve found that melty cheese is a satisfying way to replace the simple comfort of starches – although I’m not sure that replacing brown rice with cheese is much of a nutritional improvement.

stuffed poblanos 1

This has become a new favorite, in that it takes the main flavors of some of my fallback rice and bean dishes and stuffs them inside of a pepper. (I’m always reaching for the bag of frozen Hatch green chile we keep in the freezer so I can add it to the beans, and I have to remind myself that there’s plenty of spicy chiles in this recipe already.)

stuffed poblanos 2

With beans, Greek yogurt, and a simple guacamole, there’s plenty to keep me full here, even with a restrained amount of cheese. Even if it isn’t, in the end, any healthier than my normal bowl of rice and beans, it’s worth it for a meal as good as this one.

stuffed poblanos 5

Printer Friendly Recipe
Poblanos Stuffed with Black Beans and Cheese (inspired by Sara Forte’s The Sprouted Kitchen cookbook)

2 generous main course servings or 4 side dish servings

You can, of course, add more cheese, but I was trying to keep it light, and I found this amount to be satisfying.

4 medium poblano peppers
2 teaspoons oil
1 onion, diced
salt
2 cloves garlic, minced
1 (15-ounce) can black beans (about 2 cups)
½ cup salsa
3 ounces cheddar, monterey jack, cotija, or queso fresco, shredded or crumbled
1 avocado, peeled and seeded
juice from ½ lime
¼ cup Greek yogurt (or sour cream)
cilantro

1. Heat the oven to 425 degrees. Cut a slit in each pepper from the stem to the end. Place the peppers in a rimmed baking dish; bake for 15 minutes, until softened.

2. Meanwhile, heat the oil in a medium saucepan over medium heat. Add the onion and 1/4 teaspoon salt; cook, stirring occasionally, until the onion is translucent, about 5 minutes. Add the garlic and cook, stirring constantly, until fragrant, about 30 seconds. Add the salsa and beans. Simmer, uncovered for 10 minutes. Remove from the heat and stir half of the cheese into the beans.

3. Remove the peppers from the oven. When they’re cool enough to handle, use a paring knife to remove the seeds and veins. Pour out any liquid inside the peppers. Spoon one-quarter of the bean mixture into each pepper, then stuff the remaining cheese into the peppers over the beans. Transfer to the oven and bake until the cheese is spottily browned and the peppers are soft, 15-20 minutes.

4. In a small bowl, mash the avocado with a pinch of salt and half of the lime juice. In a separate bowl, mix the Greek yogurt with the remaining lime juice. Serve the roasted peppers with the avocado, yogurt, and a sprinkling of cilantro.

stuffed poblanos 4

salmon tacos with tomatillo-avocado slaw

salmon tacos 6

I’ve always made my fish tacos with white fish and been perfectly happy with that, but salmon actually makes a lot of sense. Just like barbacoa and chicken thighs, its richness makes a nice contrast to the crunchy slaw and tart dressing. Plus, I just really like salmon.

salmon tacos 1

In this case, it’s rubbed with chili spices, a little sugar, and just a bit of finely ground coffee for an extra bite. Rather than serving slices of avocado in the tacos, it’s pureed along with tomatillos and cilantro into the dressing for the slaw. As much as a pile of different toppings on tacos is fun, on a weeknight, I appreciate the simplification of mixing them all into one bowl with the cabbage.

salmon tacos 4

I don’t plan on pushing my white fish tacos aside – or my shredded beef tacos, or my Asian-inspired tacos, or even my lentil tacos – but we eat tacos often enough to enjoy plenty of variety. Combining one of my favorite types of fish with a creamy dressing made with avocados and stuffing it all into fresh corn tortillas? Plus it’s easy and healthy? Yes, this can be added to the list of tacos I make regularly.

salmon tacos 7

Printer Friendly Recipe
Dry-Rubbed Salmon Tacos with Tomatillo-Avocado Slaw (rewritten from Food and Wine via JBean Cuisine)

Serves 4

4 cups of pre-shredded coleslaw mix would work well here in place of the cabbage.

Tomatillo-avocado slaw:
2 tomatillos, husked and halved
2 tablespoons cilantro
1 small jalapeño, coarsely chopped
1 garlic clove, coarsely chopped
6 tablespoons sour cream or Greek yogurt
1 ripe avocado, halved, peeled, and pitted
salt to taste
lime juice to taste
½ head cabbage, cored and finely sliced

Salmon:
1 teaspoon ground cumin
1 teaspoon chili powder
½ teaspoon brown sugar
¼ teaspoon finely ground coffee
Salt and freshly ground black pepper
2 (8-ounce) salmon fillets
1 tablespoon olive oil
juice of ½ lime

For serving:
12 small flour or corn tortillas, heated and wrapped to keep warm
hot sauce, for serving

1. For the slaw: Transfer the tomatillos, cilantro, jalapeno, garlic, sour cream or Greek yogurt, and avocado to a blender or the bowl of a food processor. Process until smooth; season to taste with salt and lime juice. In a large bowl, stir the dressing into the cabbage. Set aside.

2. For the salmon: In a small bowl, combine the cumin, chili powder, brown sugar, coffee, and a generous pinch of salt and pepper. Dry the salmon fillets, then rub them with the spice mixture. If the salmon has skin, use all the rub on the skinless side; if the fillets are skinless, spread the spices on both sides.

3. Heat the oil in a large nonstick skillet over medium-high heat. Add the salmon (skin-side up if it has skin), and cook without moving until well-browned, about 4 minutes. Reduce the heat to medium, flip the salmon, and cook until the salmon just flakes, another 4-6 minutes. Transfer the salmon to a plate and break into approximately 1-inch pieces. Season with lime juice.

4. To serve: Top each tortilla with a portion of the salmon and the slaw; sprinkle with hot sauce. Serve immediately.

salmon tacos 5

beef satay with spicy mango dip

beef satay 5

People keep giving me venison. I have friends who enjoy hunting but have families that don’t love the flavor of venison. I have another friend who doesn’t prefer the front shoulder, so I’ve turned several into barbacoa (and then gave him the recipe, and that was the end of my venison front shoulder donations). I don’t even know how I ended up with the prized backstrap, a cut similar to the tenderloin, but I’m not complaining.

beef satay 1

Rather than search for venison-specific recipes, I consider venison interchangeable with beef or sometimes pork. My brother sent me this recipe, and while I didn’t have the right cut of beef, I did have venison backstrap. It’s an interesting recipe, with a marinade that includes ground cashews. It ends up as more of a paste, which sticks to the meat as it cooks.

beef satay 2

It may be unusual, but it works. Dave and I made the full recipe, which supposedly feeds four, and we had no leftovers. Someone needs to give me more venison backstrap so I can make this again immediately – and this time I won’t share the recipe.

beef satay 3

Printer Friendly Recipe
Beef Satay with Spicy Mango Dip
(rewritten from Linda Doeser’s Chinese: The Essence of Asian Cooking)

The recipe recommends serving with salad greens, but I mostly considered those garnish, while rice was important to soak up the sauce.

I made tamarind sauce the same way I do for pad Thai, by soaking tamarind paste in hot water, then straining out the solids and using the liquid in the recipe. You might also be able to find tamarind concentrate. If not, it won’t ruin the recipe to leave it out.

For the satay:
1 pound sirloin steak, thinly sliced across the grain and skewered
1 tablespoon coriander seeds
1 teaspoon cumin seeds
½ cup raw cashews
1 tablespoon vegetable oil
2 shallots or 1 small onion, finely chopped
½-inch piece fresh ginger, finely chopped
1 clove garlic, crushed
2 tablespoons tamarind sauce
2 tablespoons dark soy sauce
2 teaspoons sugar
1 teaspoon rice vinegar or white wine vinegar
Salad greens, to serve

For the spicy mango dip:
1 ripe mango, peeled and seeded
1 to 2 fresh red chiles, seeded and finely chopped
1 tablespoon fish sauce
Juice of 1 lime
2 teaspoons sugar
2 tablespoons chopped fresh cilantro
½ teaspoon salt

1. Heat a small not-notstick skillet over medium-high heat. Add the coriander and cumin seeds; toast, stirring constantly, until fragrant, about 30 seconds. Immediately transfer to a mortar and pestle or spice grinder. Let cool completely before grinding.

2. In the bowl of a food processor, combine the ground spices, cashews, oil, shallots, ginger, garlic, tamarind sauce, soy sauce, sugar, and vinegar. Process until the cashews are finely chopped. Coat the meat with the cashew mixture; cover and chill for at least 30 minutes or up to 8 hours.

3. For the dip: Process the mango, chiles, fish sauce, lime juice, sugar, cilantro, and salt in the food processor until smooth.

4. Prepare a medium-hot grill. Cook the skewers directly over the heat until browned and cooked through, 3-4 minutes per side. (Alternatively, cook for the same amount of time as close to the broiler element as possible.) Serve with the sauce and greens.
beef satay 4