
If it weren’t for Smitten Kitchen, I wouldn’t have known what Cooks Illustrated was referring to in their article about Mark Bittman’s No-Knead Bread recipe that “instantly won over legions of followers”, including Deb. I’ve never made the original recipe, so I can’t attest to Cooks Illustrated’s claim that it sometimes produces “flat, irregular blobs” with a flat-tasting crumb. Their Almost No-Knead Bread recipe aims to solve any problems that were encountered with the original.
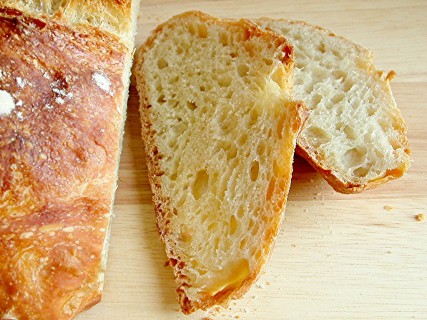
I made Cooks Illustrated’s updated version, and I thought it was great. This might be the most attractive loaf of bread I have ever baked. I loved the flavor as well. I thought it had a bit of a sourdough flavor to it, but without the work involved with real sourdough. I also like the open structure of the crumb – I love breads with lots of air bubbles. Another great thing – I estimate that all of the work for the recipe, from getting out ingredients to cleaning up, took a total of about 20 minutes.
One thing I don’t understand about both recipes is why we need a no-knead bread recipe? I don’t know anyone who kneads bread by hand. Most people who are interested enough in food to know about this recipe own Kitchenaid mixers or bread machines that do their bread-kneading for them. I actually mixed up this dough in my Kitchenaid’s mixer bowl and considered letting the mixer stir the dough for me. Leaving the machine on for another 8 minutes while it kneads wouldn’t have been any more work. The No-Knead bread fad would make more sense to me if the bread could be mixed the night before and immediately baked upon getting home from work the next day, but both the original and CI’s revised recipe require about the same amount of babysitting on the day they’re baked as a traditional bread recipe.
On the other hand, if this recipe is popular not for its lack of kneading, but simply because it produces a lovely and tasty loaf of bread, well then I can understand.

Almost No-Knead Bread (from Cooks Illustrated January 2008)
Makes 1 large round loaf
CI note: An enameled cast-iron Dutch oven with a tight-fitting lid yields best results, but the recipe also works in a regular cast-iron Dutch oven or heavy stockpot. (See the related information in “Making Your Dutch Oven Safe for High-Heat Baking” for information on converting Dutch oven handles to work safely in a hot oven.) Use a mild-flavored lager, such as Budweiser (mild non-alcoholic lager also works). The bread is best eaten the day it is baked but can be wrapped in aluminum foil and stored in a cool, dry place for up to 2 days.
3 cups unbleached all-purpose flour (15 ounces), plus additional for dusting work surface
¼ teaspoon instant or rapid-rise yeast
1½ teaspoons table salt
¾ cup plus 2 tablespoons water (7 ounces), at room temperature
¼ cup plus 2 tablespoons mild-flavored lager (3 ounces)
1 tablespoon white vinegar
1. Whisk flour, yeast, and salt in large bowl. Add water, beer, and vinegar. Using rubber spatula, fold mixture, scraping up dry flour from bottom of bowl until shaggy ball forms. Cover bowl with plastic wrap and let sit at room temperature for 8 to 18 hours.
2. Lay 12- by 18-inch sheet of parchment paper inside 10-inch skillet and spray with nonstick cooking spray. Transfer dough to lightly floured work surface and knead 10 to 15 times. Shape dough into ball by pulling edges into middle. Transfer dough, seam-side down, to parchment-lined skillet and spray surface of dough with nonstick cooking spray. Cover loosely with plastic wrap and let rise at room temperature until dough has doubled in size and does not readily spring back when poked with finger, about 2 hours.
3. About 30 minutes before baking, adjust oven rack to lowest position, place 6- to 8-quart heavy-bottomed Dutch oven (with lid) on rack, and heat oven to 500 degrees. Lightly flour top of dough and, using razor blade or sharp knife, make one 6-inch-long, ½-inch-deep slit along top of dough. Carefully remove pot from oven and remove lid. Pick up dough by lifting parchment overhang and lower into pot (let any excess parchment hang over pot edge). Cover pot and place in oven. Reduce oven temperature to 425 degrees and bake covered for 30 minutes. Remove lid and continue to bake until loaf is deep brown and instant-read thermometer inserted into center registers 210 degrees, 20 to 30 minutes longer. Carefully remove bread from pot; transfer to wire rack and cool to room temperature, about 2 hours.


Wow! Is some impressive looking bread. I will have to try this recipe!
lol, it’s not your fault, blame the salmon! High in fat but it’s still good for you 😉 We LOVE salmon so I try to make room for it every couple of weeks. Believe me, there are FAR worse pastas I could be indulging in! 😉 I get 29 points a day, so 10 points for one meal isn’t that terrible. I can’t wait to try it!
This looks wonderful! I’ve seen and read a lot about the CI no-knead bread, it’s on my list of things to try.
that is certainly one of the most beautiful loaves of bread i have seen!
i used the no knead recipe to make pizza this weekend; i rather enjoyed it 🙂
Lovely bread. This is right up my alley since I have no kitchen aid, no breadmaker…just me and my hands to whip various breads out. I love the no-knead at times just for a break!!
This looks so good. I’m going to have to try this. What a beautiful loaf!
Looks great! I just made no-knead bread!
Mmmm bread, I LOVE bread. It is my biggest weakness. 🙂
And since you love bread as much as I, I will now bestow upon you the “E for Excellent” rating.
http://amberskitchen.blogspot.com/2008/03/catch-up-time.html
I’ve made many no-knead breads and also the almost no-knead breads. I prefer the taste of the almost no knead bread. I do think it actually has improved it. Yours looks lovely, Bridget.
I have the Kitchen Aid mixer and love to whip up some nice loaves using the kneading hook. So quick and easy.
But I also like connecting with the dough. I have starting using a French technique being taught by Richard Bertinet. I have just done a post about his class. Mind you, my featured bread is rather a poor advertisement…my fault, totally, but very funny!
I like this technique as it adds air into the dough, uses no additional flour as in a kneading technique. I also like how the fresh yeast is rubbed into the flour. I have included a web address so you can watch Richard work the dough.
I guess I also like how so many different ways there are to make and bake breads.
Fascinating stuff, bread making.
Apologies for being so wordy.
I’ve made this bread a dozen times or more and love it – but for one thing. I cannot make a batch without the crust burning. How did you avoid that in the photos above? I’ve used the enameled cast iron pot, a traditional Lodge Dutch oven, parchment paper or not, different temps (start at 500, reduce to 425 to bake vs. the NYT 425). Help! I always have to cut off the bottom.
Thanks!
Marymerl, I take the bread out of the oven fifteen minutes at most after removing the dutch oven lid, instead of the “20-30 minutes” stated in the recipe. Thermometer shows it has reached 210 deg or more after that time in my oven. I previously tried reducing both temperatures by 25 deg. That yielded a softer crust, but also a heavier, wetter loaf and the crust lost some flavor.
I use a standard Lodge iron (non-enameled) 7-qt dutch oven.
worked great! I added a half cup of fully-cooked wheat berries and used 1/4 tsp of normal bread machine yeast (red star). I also didn’t cook it the full 20 min with the lid off, just stopped when the thermometer reached almost 210. Fantastic!! I’ve made the other no-knead many many times, and the only not-quite satisfying thing about that bread was that the finished product is a little too sticky on the inside. Not so this almost no knead. It was perfection!
After the 18hr rest, the dough was way too sticky to handle. Its very humid today? Any suggestions?
brian – Did you measure the flour by weight or by volume? If you measured by volume (3 cups), you probably didn’t use enough flour. Cooks Illustrated uses a ratio of 1 cup flour = 5 ounces, but I’ve found this to be pretty high. By contrast, Peter Reinhart (the author of several popular bread baking books) uses a ratio of 1 cup flour = 4.5 ounces. If you bake regularly and don’t have a digital scale, you should consider getting one – they’re cheap, more accurate, and more convenient than measuring with cups. I’m guessing the humidity didn’t help the situation either. I’m sorry this didn’t work out for you!
I have a question rather than a comment. Will baking a conventional white- or whole-wheat bread dough in a covered Dutch oven create the lovely crust in the no-knead/almost no-knead breads? If not, does anyone know the reason?
Mary – I don’t think it will, at least not to the same degree. I think the long resting time results in that crust because the complex carbohydrate molecules are broken down into simpler sugar molecules, and the sugar then caramelizes to form that beautiful crust. Flour needs to stay hydrated for a long time for that transformation to take place.