warm brussels sprouts salad with bacon and hazelnuts

brussels sprouts salad 12

The first time I made this was years ago, at a very different time in my life. It was a time in which I would consider individually pulling leaves off of Brussels sprouts, as the original recipe recommends. It was a time in which I expected my opinion of individually pulling leaves off of Brussels sprouts to be: tedious, but not too terribly bad, and ultimately worth it. It was a time before I had kids.

brussels sprouts salad 13

And you know what? Even then, it was too tedious. Even then, I didn’t actually think it was worth it.

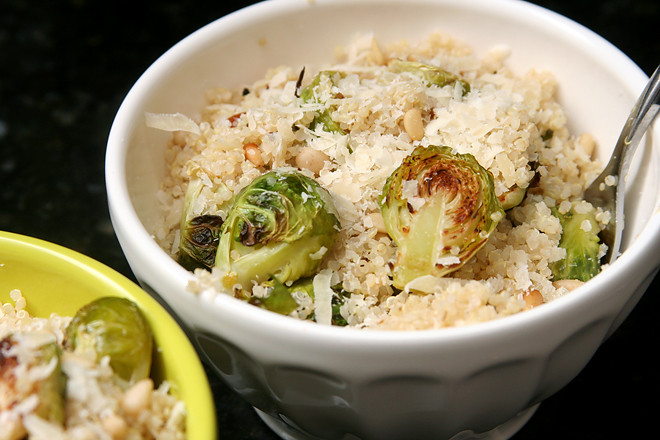
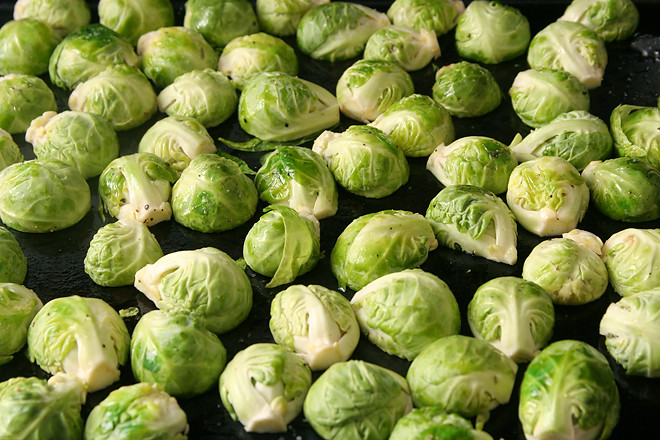
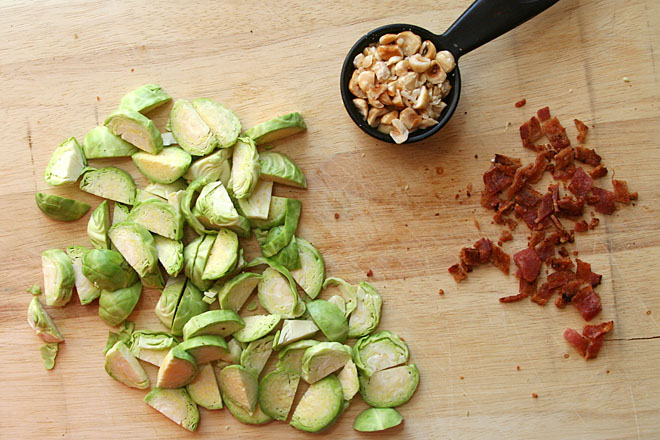
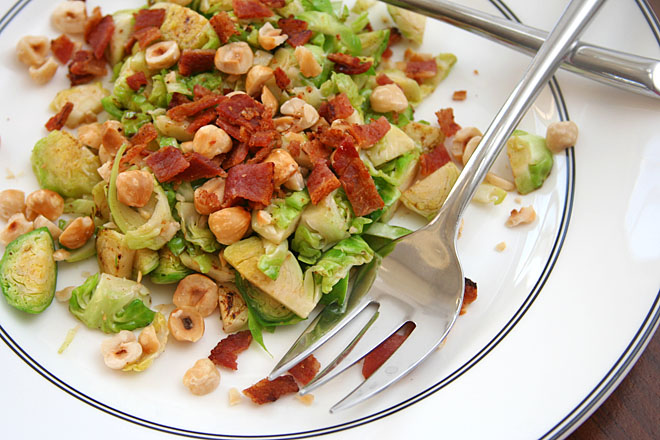
I will admit that it makes a nice presentation, but you know what else makes a nice presentation? Bacon crumbles. Let’s stick with that and just give our sprouts a quick slice. Heck, push them through the slicing blade of your food processor if you want. That salad will taste just as good.

brussels sprouts salad 8

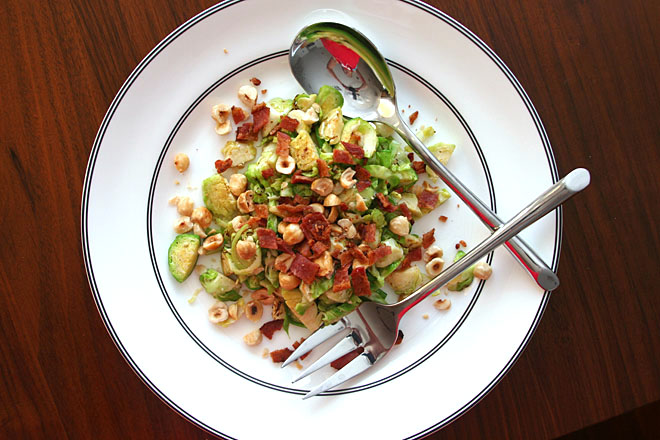
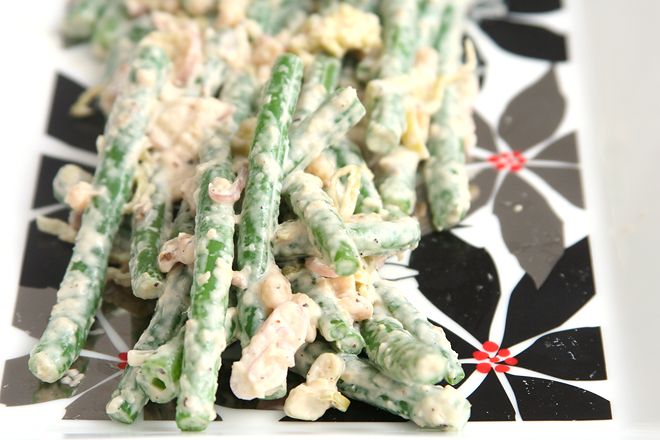
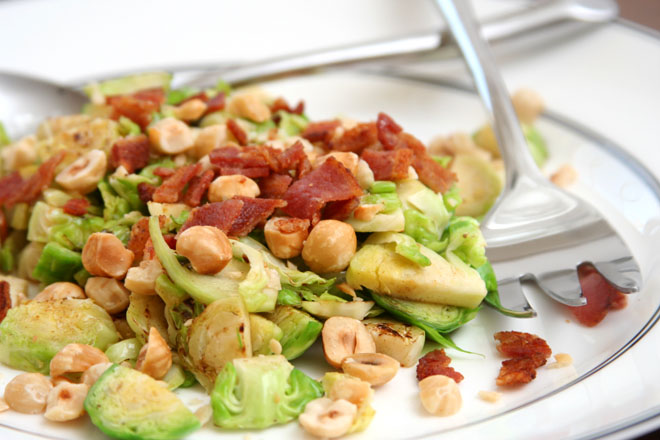
Bacon and Brussels sprouts are a common combination, and for good reason; the rich and flavorful bacon is a nice foil to the green vegetables. The hazelnuts add some crunch, and the dressing is just a bit tart, just a bit sweet from the honey. It might not be worth pulling each leaf off of a bunch of little sprouts, but it’s certainly worth making at any stage in life.

brussels sprouts salad 10

Printer Friendly Recipe
Warm Brussels Sprouts Salad with Bacon and Hazelnuts
(rewritten from Serious Eats)

The original recipe calls for crushing the nuts under a skillet, which I thought was an odd method to call for until I tried using a knife and ended up chasing hazelnuts rolling all over the cutting board and counter. Crushing doesn’t turn them into powder or paste, it just breaks them into smaller pieces.

I prefer using a nonstick skillet for this. A regular skillet works, but you’ll end up leaving lots of flavorful brown bits behind in the pan.

Serves 2

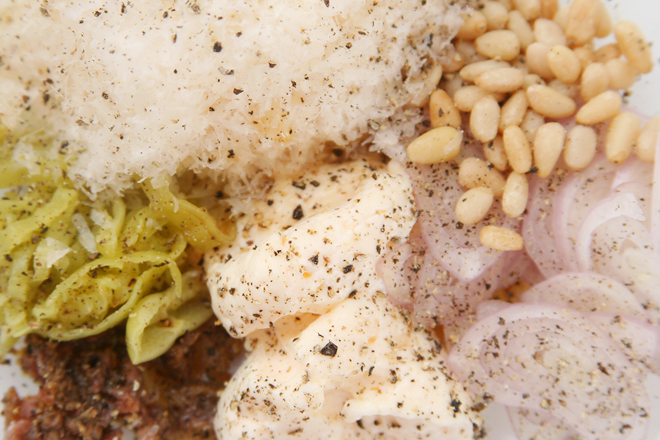
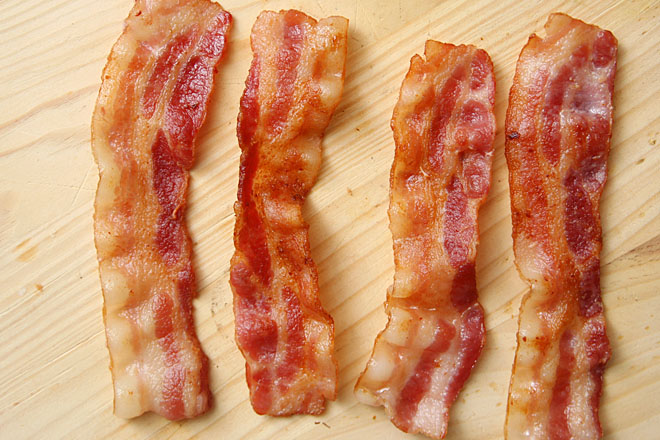
3 ounces bacon (2-3 slices, depending on thickness)
1 small shallot, minced (about 2 tablespoons)
1 tablespoon honey
1 tablespoon sherry (or red wine) vinegar
1 tablespoon extra-virgin olive oil
Kosher salt and freshly ground black pepper
12 ounces Brussels sprouts, halved through the stem and then sliced crosswise
½ cup hazelnuts, toasted, roughly chopped or crushed with a skillet

1. Place the bacon in a medium nonstick skillet over medium heat; cover and cook until it’s browned and crisp, turning occasionally, about 8 minutes. While the bacon cooks, add the shallot, honey, sherry vinegar, oil, ¼ teaspoon salt, and pinch of black pepper to a large bowl. Transfer the cooked bacon to a paper towel-lined plate. Pour 1 tablespoon of bacon fat into the bowl with the dressing ingredients. Leave approximately ½ tablespoon of bacon fat in the skillet; discard the remaining fat. Crumble or coarsely chop the bacon.

2. Heat the skillet with the bacon fat over high heat. Add the Brussels sprouts and cook, stirring constantly, until bright green and slightly wilted, about 2 minutes. Transfer to the bowl with the dressing. Toss the Brussels sprouts with the dressing; top with bacon and hazelnuts. Serve immediately.

brussels sprouts salad 9

chocolate hazelnut tarte soleil

nutella pastry 5

After the last two years, I feel like I have a certain standard to uphold for my contribution to the office holiday potluck. However, there was simply no time this year for a time-consuming project. I needed to find a recipe that looked like a showstopper but didn’t require the work of one.

nutella pastry 1

Two ingredients? This recipe fit the bill. Although, since, where I live, I can’t buy puff pastry made with real butter, I did make my own. (I used this recipe; while I think this one puffs more and isn’t much, if any, more effort, I didn’t have the mental fortitude for the multiple steps, even if each step takes just a minute or two.) In another life (like one before this), I would have made my own chocolate hazelnut spread too, but for once, I managed to be reasonable and bought this instead. As I’d hoped, It was more chocolately and less sweet than Nutella, although it still wasn’t particularly nutty.

nutella pastry 3

Okay, so this wasn’t as visually impressive as a foot-tall cake. But it’s pretty, and it tasted just as good as those past projects. It was flaky and buttery, chocolately without being too sweet. At this point in my life, it was perfect.

nutella pastry 6

Printer Friendly Recipe
Chocolate Hazelnut Tarte Soleil (adapted from Smitten Kitchen)

2 (1-pound sheets) thawed puff pastry dough
½ cup Nutella or other chocolate hazelnut spread
1 egg yolk beaten with 1 teaspoon water (for egg wash)

1. Adjust a rack to the middle position and heat the oven to 350 degrees. On a sheet of parchment paper or a silicone mat, roll one sheet of puff pastry dough into an approximate 12-inch circle. Use a 12-inch round plate or bowl as a guide to cut a 12-inch circle into the dough.

2. Spread the filling in an even layer over the round of puff pastry dough, leaving the outer 1-inch of the circle bare.

3. Repeat the rolling and cutting of the second portion of puff pastry dough to form another 12-inch round. Transfer this portion of dough to the top of the Nutella-covered puff pastry round, aligning it with the bottom ricle.

4. Place a small round cup or dish in the center of the circle, pressing it lightly to form a visual indentation without pressing through the dough. Remove the cup. Use a pizza roller to cut slits into the dough from the edge to the center circle. Each slit should be about an inch apart on the outer edge of the dough round, for a total of about 32 slits. Once all the slits are cut, pick up the outer edge of each segment while pressing gently on the center edge of the segment. Twist a couple times; repeat with all segments.

5. Transfer the pastry, still on the parchment paper or silicone mat, to a baking sheet. Brush with the egg wash. Bake for 30 to 35 minutes, until browned. Transfer the tart, still on the pan, to a cooling rack and allow to cool for ten minutes. Slide the tart onto a serving plate. Serve immediately or within about twelve hours.

nutella pastry 7

white chocolate macadamia nut cookies

white chocolate macadamia nut cookies 5

I’m behind on Christmas. I’ve been behind on everything since Thanksgiving. Every one of the baby’s naptimes through the weekend are currently booked with baking plans, and once that’s done, I’ll start preparing for our trip to visit family over the holidays. And at some point, I should probably buy some presents.

white chocolate macadamia nut cookies 1

These aren’t on my Christmas baking list, but maybe I should rethink that. I’d always considered white chocolate macadamia cookies bland before these – white chocolate mostly just tasting sweet, and macadamia nuts mostly just seeming rich and fatty without offering much flavor. But the addition of cream cheese adds some tanginess to counter the sweetness. The milk powder keeps the cookies soft and tender.

white chocolate macadamia nut cookies 2

They’re straightforward to make; browning the butter adds an extra step, but it isn’t a difficult one. With a long shelf-life, they can hold up to being shipped to your friends and family across the country. Most importantly, they’re one of the best cookies I made last year.

white chocolate macadamia nut cookies 4

Printer Friendly Recipe
White Chocolate Macadamia Nut Cookies
(rewritten but not adapted from Joy the Baker)

16 tablespoons (2 sticks) unsalted butter, softened
3 cups (14.4 ounces) all-purpose flour
1 cup instant milk powder
1½ teaspoon baking soda
¾ teaspoon baking powder
2 large eggs
2 teaspoons vanilla extract
8 ounces cream cheese, softened
1 cup (7 ounces) packed light brown sugar
1 cup (7 ounces) granulated sugar
1 teaspoon salt
2 cups coarsely chopped macadamia nuts
2 cups coarsely chopped white chocolate

1. In a medium not-nonstick skillet over medium heat, melt 8 tablespoons of the butter. Continue to cook the butter, swirling the pan occasionally, until the milk solids brown and sink and the butter smells nutty. Immediately remove it from the heat and pour the butter into a heatproof bowl. In a medium-sized bowl, combine the flour, milk powder, baking soda, and baking powder. Break the eggs into a small measuring cup, whisk them lightly, and mix in the vanilla.

2. Place the cream cheese and the remaining 8 tablespoons of butter in the bowl of a stand mixer fitted with the paddle attachment (or a large mixing bowl if you’re using a hand-held mixer). Beat on medium-low speed until the butter and cream cheese are smooth, then add the salt and both sugars. Continue beating on medium-low until the mixture is light and fluffy, about 2 minutes, scraping the sides of the bowl as needed. Add the browned butter and beat until evenly combined. With the mixer running, gradually add the egg mixture. Once the eggs have been added, scrape the sides of the bowl once, then continue mixing on medium speed for about 1 minute. Reduce the mixer speed to low and gradually add the flour mixture, mixing it’s mostly combined. Add the nuts and chocolate and mix until the flour is completely incorporated and the nuts and chocolate are evenly distributed. Cover and refrigerate for at least 1 hour or up to 3 days.

3. Heat the oven to 350 degrees. Line baking sheets with parchment paper or silicone mats. Scoop the dough in heaping tablespoons onto the prepared baking sheets. Bake the cookies, one sheet at a time, until they are browned around the edges and do not look wet on top, 8 to 12 minutes. Let the cookies cool on the cookie sheets for 5 minutes, then transfer to wire racks to cool completely.

white chocolate macadamia nut cookies 3

Save

bittersweet chocolate pumpkin tart

bittersweet chocolate pumpkin tart 4

This is the perfect pumpkin dessert for people who don’t like pumpkin desserts. There’s so much more chocolate than pumpkin, and chocolate has a stronger flavor than pumpkin, that this is a rich, silky chocolate tart that you can get away with serving for Thanksgiving because there’s a token scoop of pumpkin in the filling.

bittersweet chocolate pumpkin tart 2

It’s not hard to make, with a press-in crumb crust and a simple whisked filling. I made it on the spur of the moment when the baby’s nap went long. It also works out well for Thanksgiving because it can be made a couple days in advance.

bittersweet chocolate pumpkin tart 3

A friend told me that although she doesn’t like pumpkin desserts, she loved this one. Well sure, that’s because the pumpkin is buried under half a pound of chocolate. This is a pumpkin tart in name only, but that’s all you need for it to fit into your Thanksgiving menu.

bittersweet chocolate pumpkin tart 7

Printer Friendly Recipe
Bittersweet Chocolate Pumpkin Tart (adapted from Love and Olive Oil)

I chopped the chocolate in the food processor, then transferred it to a bowl, before making the crust in the food processor. I toasted the pecans by spreading them in a single layer on a plate and microwaving for about 2 minutes, stirring occasionally, until fragrant. I’m sure this can be made in a pie pan instead of a tart pan.

For the crust:
8 ounces vanilla wafer cookies
½ cup pecans, toasted
2 tablespoons packed light brown sugar
½ teaspoon ground cinnamon
⅛ teaspoon salt
4 tablespoons (½ stick) unsalted butter, melted

For the filling:
¾ cup heavy cream
¼ cup whole milk
8 ounces bittersweet (60-70%) chocolate, finely chopped
2 large eggs
1 teaspoon ground cinnamon
½ teaspoon ground ginger
¼ teaspoon ground cloves
⅛ teaspoon ground nutmeg
⅔ cup pumpkin purée
¼ cup brown sugar
¼ teaspoon salt
1 tablespoon bourbon (or 1 teaspoon vanilla extract)
cocoa (optional)

1. Heat the oven to 325 degrees. Place a 9-inch round or equivalently-sized tart pan with a removable bottom on a baking sheet.

2. In a food processor, process the cookies and pecans until finely ground. Add the sugar, cinnamon, and salt; pulse to combine. Add the melted butter and pulse until the crumbs are evenly moistened. Transfer the mixture to the tart pan; press firmly into the bottom and up the sides of the pan. Bake for 10 to 14 minutes, or until fragrant. Transfer to a cooling rack to cool slightly. Lower the oven temperature to 250 degrees.

3. In a small saucepan over medium-high, heat the cream and milk until just simmering. Pour the cream mixture over the chocolate and gently whisk until the chocolate is melted and the mixture is smooth.

4. In a large mixing bowl, whisk the eggs until broken up. Add the spices, pumpkin, sugar, and salt. Whisk in the chocolate mixture, then the bourbon or vanilla.

5. Spread the filling evenly in the baked tart shell. Transfer the tart pan on the baking sheet to the oven. Bake until the filling barely jiggles, 40 to 50 minutes. Cool on a wire rack. The tart can be covered and chilled for several days. Serve at room temperature. If desired, dust with cocoa just before serving.

bittersweet chocolate pumpkin tart 6

green bean salad with anchovies and peperoncini

green bean anchovy salad 4

I’m seeing anchovies in recipes more and more often, almost always with the disclaimer that they don’t make things taste fishy; instead, they increase the umami background in a dish. Used with discretion, they make food taste fuller and more balanced without standing out themselves. I became convinced of this years ago, but it seemed like people were still reluctant to recommend their use for fear of scaring off the fish-adverse.

green bean anchovy salad 1

Even here, with anchovies in the title, they’re not overbearing. Dave, who used to hate anchovies, had no problems with this salad. I love anchovies, so I loved this. Plus, it’s almost like a green bean-based caesar salad, and what’s not to enjoy there?

green bean anchovy salad 2

That being said, if you’re nervous about too much fishy flavor, just use two or three anchovies instead of six. (You’ll want to taste the dressing to make sure it’s salty enough though.) But I hope you’ll try it with some anchovies, because they really have a lot to offer to a dish. If you let it, this recipe can be a great introduction to a new ingredient.

green bean anchovy salad 3

Green Bean Salad with Anchovies and Peperoncini (rewritten but not really adapted from J. Kenji Lopez-Alt’s The Food Lab)

I replace half of the mayonnaise with Greek yogurt. I was also too lazy to properly blanch the green beans, so I just boiled them for two minutes instead of four and then drained them and let them cool at room temperature.

Kosher salt
2¼ pounds green beans, trimmed
½ cup mayonnaise
6 whole anchovy filets, chopped into a paste
2 ounces (about 1 cup) grated parmesan cheese
2 tablespoons fresh juice from 1 lemon
2 teaspoons Worcestershire sauce
Freshly ground black pepper
½ cup sliced pepperoncini, drained
2 medium shallots, finely sliced
¼ cup toasted pinenuts

1. In a large pot, bring 4 quarts of water and 1 tablespoon salt to a boil. Add the green beans and cook until they’re bright green and mostly tender with a slight crisp bite in the center, about 4 minutes. Drain the green beans and transfer them to a bowl of ice water. Let chill for about 5 minutes, until cold, then dry on paper or dish towels.

2. In a small bowl, combine the mayonnaise, parmesan, lemon juice, worcestershire sauce, and a generous grinding of black pepper. Coat the green beans with the dressing. Add the pepperoncini and shallots and stir to combine. Top with the pine nuts; serve.

Save

lahmahjoon (armenian lamb pizza)

lamb pomegranate pizza 3

Pizza was the first thing I cooked after having the baby. I’d prepped the dough, made the sauce, shredded the cheese, and sliced the pepperoni before going to the hospital, but even so, three days after giving birth, putting it all together and sliding it into the oven was about all I could handle. I was grateful that my mom and mother-in-law cooked the rest of the meals that first week.

lamb pomegranate pizza 1

It’s over a month later, and now I’m actually able to make a pizza with toppings that require chopping and pre-cooking. This pizza isn’t difficult, and it’s one of my favorites for when I want something nontraditional. I have a bottle of pomegranate molasses that I impulse-bought from The Spice House, but I think you could just add twice the amount of pomegranate juice and let it reduce. I often don’t like cinnamon in savory recipes, but the flavor blends in perfectly here.

lamb pomegranate pizza 2

We still took turns eating while the other soothed the baby, but at least we got to eat something that wasn’t made specifically because it takes well to freezing. We’re making progress! And I’m grateful, because it means more meals like this.

lamb pomegranate pizza 6

Lahmahjoon (Armenian Lamb Pizza) (adapted from Eating Well)

See here for baking instructions using a baking steel.

I used a slicing tomato instead of plum tomato because Dave did the shopping and I forgot to specify which type I wanted. But you should use plum tomatoes if you can.

1 tablespoon olive oil
2 shallots, minced
8 ounces ground lamb
½ teaspoon salt
4 medium plum tomatoes, chopped
1 tablespoon pomegranate molasses
1 teaspoon ground cinnamon
½ teaspoon freshly ground pepper
1 pound prepared pizza dough
⅓ cup (2 ounces) crumbled feta
1 tablespoon pine nuts
2 tablespoons minced fresh parsley

1. Place a pizza stone on the lowest rack in the oven; heat the oven to its highest setting, at least 500 degrees. Line a pizza peel or the back of a baking sheet with parchment paper.

2. In a medium skillet over medium heat, heat the oil, then add the shallots. Cook, stirring occasionally, until softened, about 2 minutes. Add the lamb and salt, and cook, stirring to break up the meat, until lightly browned, about 5 minutes. Add the tomatoes and cook until they begin to break down, about 3 minutes. Stir in the pomegranate molasses, cinnamon, and pepper.

3. Divide the dough in half. Stretch a portion of dough to a 10-inch round; lay it on the parchment paper. If necessary to even out thick areas and fix the shape of the dough, pull the edges to an even circle. Spread half of the lamb mixture over the dough, then top with half of the feta and pine nuts.

4. Transfer the pizza on the parchment paper to the heated stone. Cook until the bottom of the crust is spottily browned, 6-7 minutes. Use the metal spatula and pizza peel to remove the pizza from the oven and transfer it to a cooling rack. Sprinkle half of the parsley evenly over the pizza. Cool for about 5 minutes before cutting and serving. Repeat with the remaining dough and toppings.

lamb pomegranate pizza 5

quinoa with roasted brussels sprouts, pine nuts, and parmesan

quinoa brussels sprouts pine nuts 4

We had a great visit with family over Thanksgiving, but not nearly so nice a homecoming. Instead of the hour or two of relaxing we were picturing after a long day of travel home, we had half an inch of water covering the entire house, caused by a leak in the hose that feeds the refrigerator’s icemaker. This also put a kink in my plans to eat healthier after a week of pie, cookies, and cheesecake.

quinoa brussels sprouts pine nuts 1

Fortunately, I hoard freezer meals. If I make a recipe that freezes well and makes enough for multiple meals, I freeze some, but then I have trouble convincing myself to ever eat them. What if I need those one day?

quinoa brussels sprouts pine nuts 2

Well, I need them now. We ate hastily defrosted chili in between stunned shop-vaccing the first night, squash-black bean burritos the next night while we watched contractors cut into the walls and set out fans, and four cheese lasagna over the weekend when we were staying in a hotel but had an out-of-town friend’s housekey.

quinoa brussels sprouts pine nuts 3

I’m quickly depleting my freezer stash, so while things are somewhat stabilized and we’re living at home in our torn up house before reconstruction begins, I’m still keeping things very simple. This has become a staple. It’s not quite as easy as dumping a ziploc bag of stew into a pot and heating it up, but it’s straightforward enough to make in a kitchen full of boxes in between doing load after load of laundry. Best of all, it tastes like comfort food to us – maybe not tomato soup and grilled cheese level of comfort, but close enough for something so healthy. But now it’s time to start thinking about building my freezer stash back up to help get us through reconstruction.

quinoa brussels sprouts pine nuts 6

Printer Friendly Recipe
Quinoa with Roasted Brussels Sprouts, Pine Nuts, and Parmesan (adapted from a recipe I adapted from Gourmet)

Serves 4

1½ cups water
salt
1 cup quinoa, rinsed and drained
2 pounds brussels sprouts, trimmed and halved lengthwise
black pepper
2 tablespoons olive oil, divided
½ cup (6 ounces) pine nuts
2 cloves garlic, minced
¼ teaspoon red pepper flakes
3 tablespoons lemon juice
1 cup (2 ounces) parmesan, shredded

1. Place a rimmed baking sheet in the middle of the oven and heat the oven to 450 degrees. In a large saucepan over high heat, bring the water and ½ teaspoon salt to a boil. Add the quinoa, reduce the heat to low, cover, and cook for 15 minutes. Without removing the lid, remove the pot from the heat and set aside for another 15 minutes.

2. While the quinoa cooks, remove the heated baking sheet from the oven and spread 1 tablespoon of oil over its surface. Place the brussels sprouts on the sheet, generously season with salt and pepper, and stir to coat with the oil. Arrange the sprouts cut-side down. Transfer to the oven and cook for 12 minutes.

3. Meanwhile, in a small bowl, combine the remaining 1 tablespoon olive oil, the pine nuts, garlic, and red pepper flakes. After the brussels sprouts have roasted for 12 minutes, add the pine nut mixture to the baking sheet and roast for an additional 2-3 minutes, until the brussels sprouts are browned and tender and the nuts are just toasted. (Keep an eye on the nuts; they burn easily.)

4. Stir the lemon juice into the quinoa, then add the roasted sprouts and pine nuts and the parmesan. Stir to combine; serve immediately.

quinoa brussels sprouts pine nuts 5

mocha biscotti

cappuccino biscotti 5

My brother isn’t a coffee drinker, but when he travels with me and Dave, he indulges our desire for fancy coffee every morning. In Oregon last fall, he tried a variety of drinks, from the oversugared coffee slushy to a fancy shakerato. He was just going along with the crowd though; none of the drinks seemed to impress him.

cappuccino biscotti 2

In Iceland this summer, however, he settled on one drink, getting a swiss mocha every day with our morning pastries. I hadn’t tried a mocha since high school, but these were good – the bitter espresso balances the sweet hot cocoa. My favorite has always been a good cappuccino, but I even ordered my own mocha one afternoon.

cappuccino biscotti 3

Coffee is often added to chocolate desserts to enhance the chocolate flavor, but it was the coffee that I wanted to stand out here. With plenty of espresso powder and a shot of Kahlua, I think I succeeded. Even a non-coffee drinker would like these – although my brother can no longer count himself in that crowd, because now he makes mochas a regular treat even when he’s not on vacation.

cappuccino biscotti 4

Printer Friendly Recipe
Mocha Biscotti

Makes about 40 biscotti

3¼ cups (15.6 ounces) all-purpose flour
1 tablespoon baking powder
3 large eggs
8 tablespoons (1 stick) unsalted butter, melted
1¼ cups (8.75 ounces) sugar
½ teaspoon salt
1 tablespoon vanilla extract
1 tablespoon Kahlua or coffee liqueur
4 teaspoons espresso powder
6 ounces (about 1 cup) bittersweet chocolate chips or chopped chocolate
3 ounces (about ⅔ cup) slivered almonds

1. Adjust a rack to the middle position and heat the oven to 325 degrees. Line a baking sheet with parchment paper or a silicone mat. In a medium bowl, combine the flour and baking powder. Break the eggs into a small bowl or measuring cup, but do not whisk them together.

2. In a large pot over medium-low heat, heat the butter until it’s just melted. Remove the pot from the heat and stir in the sugar, then the salt, vanilla, Kahlua, and espresso powder. Stir in the egg yolks, then the egg whites, reserving about 1 tablespoon of egg white to use for an egg wash. Stir in the flour mixture until almost combined, then add the chocolate and almonds, folding until evenly combined and there are no pockets of dry flour.

3. Divide the dough into two portions and shape each into a log that is 2-inches wide and as long as your baking sheet. The dough is very sticky; it’s easiest to use a spatula and butter knife to push the dough into position instead of trying to use your hands.

4. Transfer the baking sheet to the oven and bake until just golden, 30-35 minutes. Transfer the pan to a cooling rack and let the loaves cool on the baking sheet for about 5 minutes, then use two spatulas to transfer the loaves from the pan to the cooling rack. Cool completely, about 30 minutes.

5. Place an oven-proof cooling rack on a rimmed baking sheet. Use a sharp knife to cut the loaves into ½-inch slices, on the diagonal if desired. Transfer half of the biscotti to the cooling rack in the pan, spaced about ¼-inch apart. Transfer the pan to the oven and bake for 15 minutes, until the edges just start to brown. (This baking step is to crisp the biscotti, but they’ll still feel somewhat soft when they’re hot.) Repeat with the remaining biscotti. (You can bake all of the biscotti at once if two pans fit on one level in your oven or if you have cooling racks that stack.) Let the biscotti cool completely on the rack before serving.

cappuccino biscotti 7

lavender almond peach tart

lavender almond peach tart 3I shouldn’t complain about too many good things happening at once, but there were moments when it all seemed just a little overwhelming. Within a month, there were two big international vacations, trips for work, nephews’ birthdays to bake for, and another tiered baby shower cake to deliver. I probably didn’t have to keep up with my normal routine of baking something for my coworkers once a week, but I figured if I planned ahead, I could handle it. lavender almond peach tart 1

So I prepped this tart dough and put it in the freezer, waiting for rhubarb to appear at the store, when I would mix up the simple filling for a quick dessert. Unfortunately, I never saw any rhubarb this year. It was peach season and a vacation later before I gave up on it.

lavender almond peach tart 2Life hadn’t slowed down by then, so it was lucky I had something partly prepped. It was easy enough to press the dough into a tart pan and make a simple peach jam. With nothing but tart dough and peaches, I thought the tart might be plain, but I loved the peaches with the floral lavender. As a bonus, it’s fun to bring a fairly fancy dessert to work and pretend my life is so effortless, when really I’m barely keeping up. lavender almond peach tart 5

Printer Friendly Recipe
Lavender Almond Peach Tart (adapted from Desserts for Breakfast; jam recipe rewritten from Cook’s Illustrated)

Serves 8

I started with ground almond meal instead of almonds.

I sliced the reserved dough and layered it over the jam, which was easy, but I don’t think it made for the prettiest presentation.

¾ cup (5.25 ounces) sugar
zest of 1 lemon
¾ cup (3.75 ounces) almonds
1 cup (4.8 ounces) all-purpose flour
½ tablespoon dried lavender buds
¼ teaspoon table salt
¼ teaspoon ground cardamom
11 tablespoons cold unsalted butter, cut into ½-inch cubes
1 large egg yolk
¼ teaspoon almond extract
1 cup peach jam, recipe follows
powdered sugar

1. Add the sugar and lemon zest to the bowl of a food processor; process until fragrant, about 10 seconds. Add the almonds, flour, lavender, salt, and cardamom; process until the ingredients are mixed and the almonds are finely ground. Add the butter and process until the largest butter pieces are the size of peas. Add the egg yolk and almond extract; process until the dough just comes together into a crumbly ball.

2. Press three-quarters of the dough into a 9-inch round or 14-by-4-inch rectangular tart pan. Freeze the lined pan for at least 30 minutes. Cover the remaining dough and store in the refrigerator. (Both the dough in the pan and the reserved dough can be stored in the freezer, covered tightly, for up to a month.)

3. Adjust a rack to the middle position and heat the oven to 350 degrees. Spread the cooled jam over the dough in the pan. Break the remaining dough into ½- to 1-inch pieces and scatter over the jam. Transfer to the oven and bake until the crust is browned and the filling is bubbling, 40-45 minutes. If the tart browns too quickly, loosely cover it with foil after 30 minutes. Transfer to a wire rack and cool to room temperature. Serve, dusted with powdered sugar, or loosely cover and store for up to 24 hours before serving.

Simple Peach Jam (rewritten from Cook’s Illustrated)

Makes about 1 cup

This jam cannot be canned. It probably makes a little more than 1 cup; I used it all in the tart.

8 ounces peaches, pitted, sliced, peeled if desired
½ cup plus 2 tablespoons (4.4 ounces) granulated sugar
1 tablespoon lemon juice

Combine the peaches, sugar, and lemon juice in a medium saucepan; bring to a simmer over medium-high heat, stirring occasionally. Reduce the heat to medium-low and simmer, stirring occasionally, until thickened and syrupy, 10 to 15 minutes. Cool to room temperature before using in the tart.

lavender almond peach tart 4

grenadine and orgeat

orgeat 1

Tiki might sound like it’s all fun and games, but it helps to go at it with a liberal dose of snobbery. I’ve found that ingredients in cocktails matter significantly more than they do with food. Use store-brand artificial vanilla in your cookies instead of “good” vanilla and no one will be the wiser, but cutting corners on your rum quality can make your drink taste like rubbing alcohol.

orgeat 2

The quality of your syrups won’t be as distinct as the rum, but they do matter; plus, the ingredients to make your own are often cheaper than purchasing the pre-made syrup. Not only that, but it’s a lot easier to find almonds for sale than orgeat, even a cheap artificially-flavored version. Grenadine, by contrast, is readily available, but check out the ingredients – is it high fructose corn syrup and citric acid? If you’re using good rum and juicing fresh citrus, doesn’t your cocktail deserve real grenadine based on pomegranate juice instead of artificially-colored HFCS?

orgeat 5

Grenadine couldn’t be simpler to make – mix unsweetened pomegranate juice with sugar, heat it up until the sugar dissolves, and stir in lemon juice and orange flower water. Unfortunately, orgeat is not nearly so easy, but homemade orgeat is so rich, so aromatic, I can’t imagine that a commercial version comes close.

orgeat 6

Orgeat, by the way, is pronounced “oar-zsa”, as in Zsa Zsa Gabor, and it’s a syrup made from almond milk. The first step is to milk the almonds, and there’s no denying that it’s a bit of a chore – soak, grind, soak some more, squeeze, add sugar and orange flower water. (Okay, so orange flower water might not be so easy to find, but it is readily available online, and you don’t need much.) Then taste it, and you’ll immediately see why it’s such a common ingredient in tropical cocktails.

grenadine 1

It’s a lot of work for a drink when you could just open a can of beer or a bottle of wine instead, isn’t it? Tiki is more of a hobby for us than just a cocktail. But with richly flavored homemade syrups, it’s a very tasty hobby.

grenadine 2

Grenadine (slightly adapted from CHOW)

Makes about 1½ cups

1 cup unsweetened pomegranate juice
1 cup (7 ounces) granulated sugar
½ teaspoon lemon juice
¼ teaspoon orange flower water

In a medium saucepan over medium heat, heat the pomegranate juice and sugar until the sugar dissolves. Remove from the heat and cool to room temperature. Add the lemon juice and orange flower water. Store, refrigerated, for up to a month. (Can also be frozen for longer storage.)

grenadine 3

Orgeat

Makes about 2 cups

2 cups (8 ounces) almonds
4 cups water, divided
1 cup (7 ounces) granulated sugar
2 ounces vodka or brandy
2 teaspoons orange flower water

1. In a medium bowl, mix the almonds with 2 cups of water. Cover and set aside to soak for 30 minutes.

2. Strain the almonds, discarding the water. Transfer the soaked almonds to a blender or food processor and process until most pieces are approximately the size of a grain of rice. Transfer the ground almonds back to the bowl and mix with another 2 cups of water. Cover and set aside to soak for 4 to 5 hours, stirring occasionally.

3. Line a strainer with a double layer of cheesecloth; place the strainer in a larger bowl. Strain the almonds through the cheesecloth. When most of the liquid has been removed from the almonds, wrap the cheesecloth around the almonds and squeeze out any remaining liquid, massaging the almonds to extract as much liquid as possible. Discard the almonds and cheesecloth.

4. Transfer the liquid to a medium saucepan and add the sugar. Heat over medium heat just until the sugar dissolves. Let cool to room temperature, then add the vodka or brandy and the orange flower water. Store, covered, in the refrigerator, for up to a month. (The orgeat can also be frozen.)

orgeat 3