marinated roasted tofu

marinated roasted tofu 10

I cannot eat another hard-boiled egg. For a long time, it seemed like the perfect snack to bring to work – portable, easy, packed full of protein and nutrients. And, most importantly, I loved hard-boiled eggs. The creamy yolk balances the watery white, and I would try to get just the right ratio of each in every bite.

marinated roasted tofu 3

A year and a half later, they’ve lost their charm. I considered switching to a new snack before it reached this point, but I couldn’t figure out what would have similar nutrient characteristics. I already eat plenty of beans, nuts, and dairy, so I needed a new protein source.

marinated roasted tofu 5

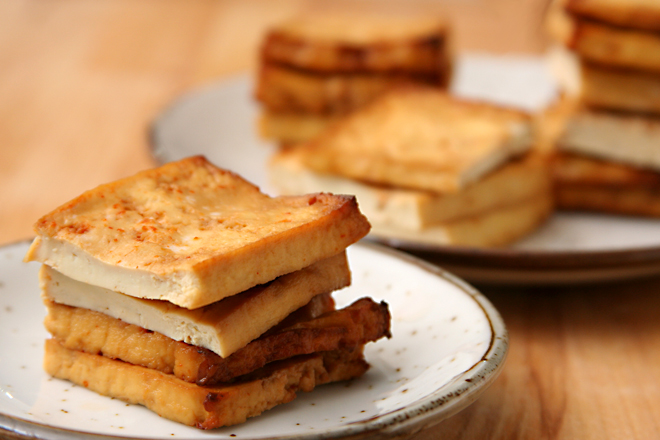
Soy is a comparable replacement, nutrition-wise, for eggs, but digging into a cube of spongy tofu wasn’t appetizing. But tofu is perfect for marinating, because it soaks up whatever flavor you add. Then you can roast it to concentrate the flavors of the marinade and firm up the texture.

marinated roasted tofu 6

I’ve eaten this tofu every afternoon at work for three weeks, and so far it’s one of my favorite daily snacks. (Still doesn’t hold a candle to my morning bagel, of course.) I’m sure I’ll go back to hard-boiled eggs eventually; maybe in another year and a half, when I get tired of tofu?

marinated roasted tofu 11

One year ago: Pasta e Fagioli
Two years ago: Oatmeal Raisin Muffins
Three years ago: World Piece Cookies
Four years ago: Chocolate Cupcakes

Printer Friendly Recipe
Marinated Roasted Tofu (adapted from Jeanne Lemlin’s Vegetarian Classics)

Serves 4

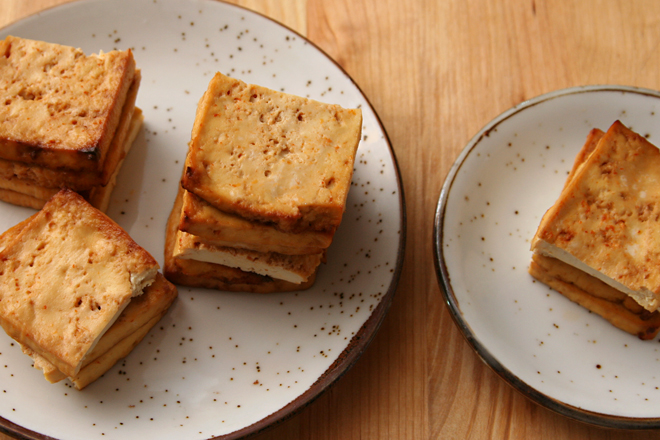
I like these plain as a snack, but they also make a good sandwich filling.

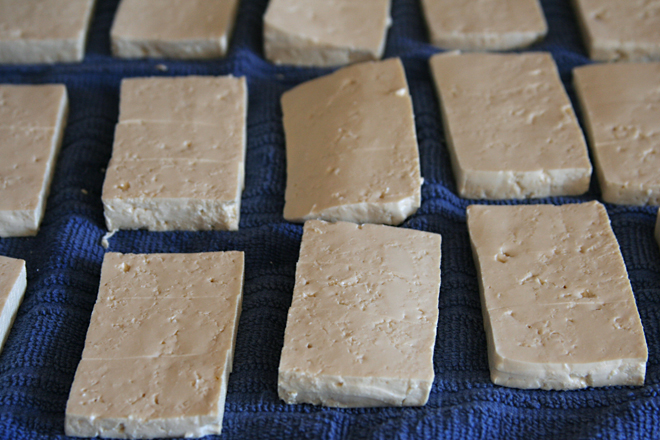
The pictures might be confusing – the first couple times I made these, I sliced the tofu into slabs and then cut the slabs into thirds.  Later, I got annoyed with arranging so many little tofu bites (I always make a double batch) on the cooling rack, so I kept the tofu as larger slices and cut them in half after baking.

1 pound firm tofu, drained
1½ tablespoons soy sauce
1 tablespoon dry sherry
1 tablespoon rice vinegar
1 teaspoon toasted sesame oil
1 teaspoon sriracha (optional)

1. On a dishtowel, slice the tofu crosswise into eight slabs approximately ½-inch thick. Arrange the slices in a single layer; cover with a second dish towel and pat dry.

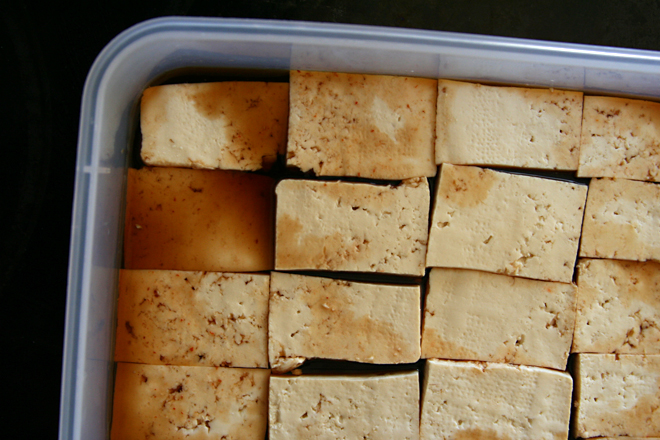
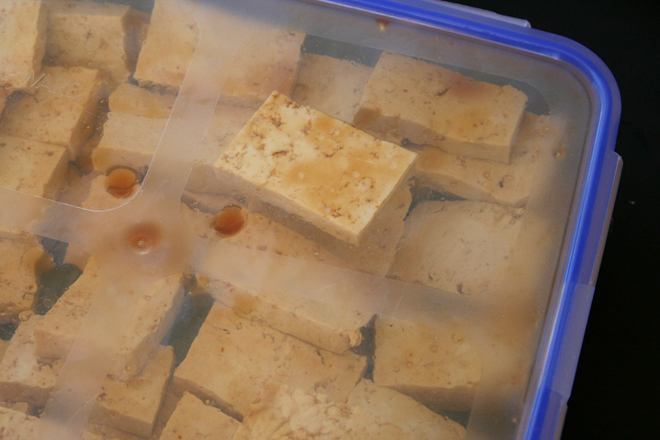
2. Meanwhile, mix the remaining ingredients in an 8-inch square container or baking dish. Add the tofu to the marinade in the dish; stir gently and set aside for at least 30 minutes, or refrigerate, covered, overnight.

3. Heat the oven to 450 degrees. Arrange an oven-safe cooling rack on a baking sheet. Transfer the marinated tofu slices to the cooling rack. Roast until dry and browned at the edges, 25 to 30 minutes. (If you don’t have an oven-safe cooling rack, bake the tofu in a baking dish in a single layer.) The roasted tofu can be refrigerated for at least 5 days.

marinated roasted tofu 12

rice noodle salad with peanut dressing

rice noodle peanut butter salad 5

I was going through a protein rut recently, where I seemed to be cooking with beans more weeknights than not. We try not to eat meat on weekdays, we take hard-boiled eggs to work everyday as snacks, and cheese has too much fat. So what does that leave me? I’d completely forgotten about soy.

rice noodle peanut butter salad 1

Think of tofu as a sponge that soaks up flavor. True, on its own, it tastes like water and has a jello-like squishiness, but when you sauté it and soak it in sauce, it’s hardly discernible from chicken, except cheaper and easier to work with. Plus, it won’t dry out like boneless skinless chicken breasts.

rice noodle peanut butter salad 3

This sauce has plenty of flavor for the tofu to absorb. Ginger, garlic, soy sauce, sugar, rice vinegar, and sesame oil, all mixed into creamy peanut butter, make for one heck of a combination. There are plenty of vegetables to provide brightness and crunch.  This was so good we had it two weeks in a row – alternating with dinners involving beans, of course.

rice noodle peanut butter salad 4

One year ago: Pasta Puttanesca
Two years ago: Asian-Style Chicken Noodle Soup
Three years ago: Pasta with Broccoli, Sausage, and Roasted Red Peppers

Printer Friendly Recipe
Rice Noodle Salad with Peanut Dressing (adapted from Cate’s World Kitchen)

My noodles stuck together in one big clump, so I chopped them up after cooking. I know that’s against standard noodle procedure, but in the end, it worked perfectly.

Serves 4-6

Having made this a bunch more times, I’ve found that it’s even better with the juice of a lime squeezed into the sauce.

2 teaspoons olive oil
1 pound tofu
salt
8 ounces rice noodles (linguine shape)
½ inch fresh ginger, peeled and finely chopped
4 cloves garlic, chopped
½ cup creamy peanut butter
3 tablespoons soy sauce
2 teaspoons brown sugar
3 tablespoons rice vinegar
1 tablespoon sesame oil
¼ cup warm water
chili garlic sauce to taste (optional)
1 medium cucumber, sliced into half moons
1 red bell pepper, cut into matchsticks
2 green onions (green parts only), sliced
¼ cup chopped fresh cilantro

1. Heat the oil in a medium nonstick skillet over medium-high heat. Slice the tofu lengthwise into ½-inch thick slabs; pat dry on a dishtowel. Transfer the tofu to the oil and cook, without moving, for 4-6 minutes, until browned on the bottom. Flip the tofu and brown the second side. Remove the tofu from the skillet and cut into bite-sized cubes.

2. Bring a large pot of water to a boil. Add a large pinch of salt and the rice noodles; cook until tender. (Check the package instructions for exact cooking times.) Drain and rinse the pasta.

3. In a large bowl, whisk together the peanut butter, soy sauce, ginger, garlic, sugar, rice vinegar, sesame oil, water, and chili garlic sauce until smooth. Fold the tofu into the sauce, then add the remaining ingredients, reserving some of the green onions and cilantro for a garnish.

rice noodle peanut butter salad 6

tofu mu shu

copy-of-img_5589

A friend of mine once, oh-so-innocently, asked me if I had any recipes with napa cabbage. Poor guy. You have to be careful talking to me about food, because I can go on forever. I sent him longwinded comments about a bunch of recipes. I also sent a recipe for tofu mu shu, which I overcomplicated by providing two versions, one a super-anal-Bridget-version and the other simpler. Of course I had only made the super anal one. Of course.

copy-of-img_5570

Mu shu is stir-fry wrapped in a thin bread-like shell. The first several times I made it with pork using Jen’s recipe, which is quite delicious. I did want a vegetarian version though, as we tend to save meat for special occasions (you know, like weekends). I haven’t been able to find the dried tofu cakes that Jen recommends substituting for the pork.

copy-of-img_5574

I’ve had good results from pressing firm tofu, marinating it briefly in soy sauce, and sautéing it in a very hot pan. Tofu prepared this way was excellent in mu shu, so it was included in my super-anal-Bridget-version.

copy-of-img_5580

The other difference between my two recipes is the shape of the chopped ingredients. Jen has exceptional knife skills, and her prepped ingredients for mu shu are beautifully julienned. Frankly, it takes me forever to do. Jen also cooks the eggs as one sheet, then removes it from the pan and cuts it into strips, which is far more attractive than clumpy scrambled eggs.

copy-of-img_5582

But are crisped tofu, julienned vegetables, and eggs cut into strips worth the extra time? I made my easy version first, with unbrowned tofu, scrambled eggs, and coarsely chopped vegetables. Two days later, I made the other version, sautéing the tofu, cooking the eggs as a sheet, and julienning the vegetables.

copy-of-img_5585

Dave and I didn’t notice a difference in flavor in the finished product. The easy version probably took me about 15 minutes less time. With pre-made mu shu pancakes, that makes this a pretty reasonable weeknight meal.

copy-of-img_5587

One consideration is that the more work-intensive method is more attractive, as the ingredients are all approximately the same shape. That could be an important consideration if you’re serving this to guests. I, for one, am happy to have a simpler version of this, so I can eat it that much more often.

copy-of-img_5588

One year ago: Pecan Honey Sticky Buns

Mu Shu Tofu (adapted from Use Real Butter)

Start to press the tofu before preparing the remaining ingredients.

Serves 6

1 (12-ounce package) firm or extra-firm tofu
3 tablespoons soy sauce
1 tablespoon toasted sesame oil
2 teaspoons cornstarch
3 teaspoons canola oil
3 eggs, beaten
8 ounces shiitake mushrooms, stemmed and cut into strips
3 cloves garlic, minced or julienned
1 medium head napa cabbage, halved and shredded
2 cups bean sprouts
4 green onions, sliced
1 can bamboo shoots, roughly chopped
12 mu shu shells
hoisin sauce

1. Cut tofu in half horizontally to make two flat rectangles. Layer it between double layers of paper towels or clean dish towels. Put all of that in a pie plate and put something heavy on top, maybe another pie plate with some cans in it or something. Set it aside while you prepare the other ingredients.

2. In a small bowl, mix together the soy sauce, sesame oil, and cornstarch. Cut the tofu into strips and add it to liquid ingredients; stir gently.

3. Heat 2 teaspoons canola oil in a 12-inch nonstick skillet over medium-high heat and add the mushrooms. Once the mushrooms are softened (2-3 minutes), add the garlic; cook and stir until fragrant, about 30 seconds. Add the eggs and stir vigorously with wooden spoon until scrambled and barely moist, about 20 seconds. Add the cabbage and bean sprouts. Sauté until the cabbage is wilted but still a little crunchy, 3-4 minutes. Add the remaining ingredients and the tofu mixture. Cook and stir until evenly heated.

4. Heat the mu shu shells according to the instructions on the package. Serve each mu shu shell with a smear of hoisin sauce down the middle. Place several spoonfuls of mu shu on the shell and fold the sides in.

copy-of-img_5593

tofu croutons

copy-of-img_1469

Let me give you some insight into what kind of person my husband is. For his birthday a few weeks ago, I offered to make whatever he wanted for dinner, for an entire weekend. The first two meals he chose, salmon pesto pasta and sushi, were predictable. The last one is what made me roll my eyes – he requested salad. When questioned about specifics, all he could come up with “lots of different kinds of lettuce is always nice.”

copy-of-img_1421

Really? Who requests leafy green salad for a birthday dinner? I like salad, but I don’t consider it a treat.

Fortunately, other than that general guideline, I could do whatever I wanted with it. I thought these tofu croutons would be a good protein source, and then I could serve the salad with tasty homemade garlic bread.

copy-of-img_1467

My first run-through with these croutons wasn’t absolutely successful. I followed the recipe exactly, but from the beginning, there were two things that I was uncertain about. One was the lack of salt. It’s not like tofu has so much flavor on its own that it can pass without anything extra to give it a boost. The other was the size that the tofu cubes were supposed to be cut into. They seemed big, but I wasn’t sure how much they would shrink after baking, so I kept them at the 1-inch cubes the recipe recommended.

copy-of-img_1439

The results were, sure enough, too big and too bland. The second time I made them, I cut the tofu into half-inch cubes and sprinkled some kosher salt over them before baking, and I liked them a lot more. The outsides are crispy, the insides are meaty, and the overall flavor is nutty. Their taste, texture, and nutrition make them a really great addition to salad.

copy-of-img_1468

One year ago: Potstickers

Tofu Croutons (adapted from Mark Bittman’s How to Cook Everything Vegetarian)

Enough croutons for 2-3 salad servings

I didn’t actually measure the salt when I sprinkled it on. I know I used too much, and I really don’t think you need much.

I only recently figured out that there’s two kinds of tofu – regular (or brick or Chinese) and silken (or Japanese). Regular is packed in water, not sold in the aseptic boxes. That’s what I used here. It has a chewier, “meatier” texture.

14 ounces firm tofu
¼ teaspoon kosher salt
1 tablespoon olive oil

1. Adjust an oven rack to the middle position and heat the oven to 400F.

2. Cut the block of tofu in half lengthwise (so from a rectangle into two flatter rectangles). Use a kitchen towel to press the tofu dry (or dry-ish – you don’t need to put tons of effort into this).

3. Cut the slices into ½-inch cubes. Put the cubes on a parchment-lined baking mat and sprinkle with the salt and drizzle with the oil. Toss gently to coat.

4. Bake at 400F for about an hour, until evenly browned. There’s no need to rotate them; they’ll brown evenly. Leftovers can be stored in the refrigerator for up to 3 days. Bring to room temperature before using.

ricotta spinach (and tofu) ravioli

A while ago, I wrote a comment on someone else’s blog about how tofu’s bad reputation comes from people trying to substitute tofu for tastier but fattier ingredients, like cheese and meat. And it’s true – I love tofu in recipes where it belongs – hot and sour soup, moo shu, peanut sesame noodles, stir fry. But, it turns out that I’m a hypocrite, because just a few days before I wrote that comment, I had made ravioli filling with ricotta, spinach, parmesan, and, yes, tofu.

This filling is a holdover from my brief stint as a brown rice-eating, refined sugar-avoiding health nut. The lifestyle wasn’t a keeper, but this recipe is. The trick is to process the tofu in a food processor before adding the other ingredients to ensure that the tofu is absolutely smooth. I also like the spinach processed, or at least very finely chopped, because the texture of cooked spinach is potentially stringy unless chopped finely.

This is my most successful attempt at making homemade ravioli. (And it was all done between 9pm and midnight on a Friday, because I’m a nut.) I made the dough by hand instead of using the food processor, since I’ve been more successful with hand-kneaded dough in the past. The picture is all out of whack – I was supposed to use 3 eggs and 2 cups of flour, this is 3 cups of flour and 2 eggs. I figured out the screw-up just in time.

In the past, I’ve always rolled out pasta dough for ravioli to the thinnest setting, but then they’re impossibly delicate. I kept the pasta just a bit thicker this time. I was also careful to form wider sheets of pasta, which meant I could form square raviolis instead of rectangles. It’s a small issue, but I was excited about the squares. For nice square ravioli, make sure you start rolling the dough by feeding the widest edge through first. Not only does this make for prettier ravioli, but the pasta sheets don’t become as long and difficult to handle.

The thicker dough made far better ravioli than I’ve made before! This is the first time I’ve been able to boil ravioli without it immediately tasting watery. The dough remained firm, and the ravioli, both the filling and the pasta, were delicious. The tofu doesn’t detract from the filling at all, and while I can’t say that it’s adding any flavor of its own, it sure is a healthy filler ingredient.

Spinach Ricotta Tofu Ravioli (dough ingredients and ravioli forming instructions from Cooks Illustrated; dough mixing and rolling method from Marcella Hazan; filling recipe is my own creation)

The instructions look long, but that’s only because I copied and pasted Marcella Hazan’s very detailed pasta instructions from her lasagna recipe. It’s not nearly as complicated as it looks.

I’m not providing you with a sauce recipe. I’ve been using a simple tomato sauce with these.

Ravioli take well to freezing. I didn’t eat any of these the day I formed them. I immediately flash froze them, and they’ve made for some handy easy meals in the weeks since.

For the dough:
2 cups (10 ounces) unbleached flour
3 large eggs

For the filling:
10 ounces fresh spinach
12 ounces firm tofu
15 ounces ricotta cheese
¾ cup (1.5 ounces) grated parmesan cheese
1 teaspoon salt
ground black pepper

For the pasta:

Pour the flour onto a work surface, shape it into a mound, and scoop out a deep hollow in its center. Break the eggs into the hollow.

Beat the eggs lightly with a fork for about 2 minutes as though you were making an omelet. Draw some of the flour over the eggs, mixing it in with the fork a little at a time, until the eggs are no longer runny. Draw the sides of the mound together with your hands, but push some of the flour to one side, keeping it out of the way until you find you absolutely need it. Work the eggs and flour together, using your fingers and the palms of your hands, until you have a smoothly integrated mixture. If it is still moist, work in more flour.

When the mass feels good to you and you think it does not require any more flour, wash your hands, dry them, and run a simple test: Press you thumb deep into center of the mass; if it comes out clean, without any sticky matter on it, no more flour is needed. Put the egg and flour mass to one side, scrape the work surface absolutely clear of any loose or caked bits of flour and of any crumbs, and get ready to knead.

Return to the mass of flour and eggs. Push forward against it using the heel of your palm, keeping your fingers bent. Fold the mass in half, give it a half turn, press hard against it with the heel of your palm again, and repeat the operation. Make sure that you keep turning the ball of dough always in the same direction, either clockwise or counterclockwise, as you prefer. When you have kneaded it thus for 8 full minutes and the dough is as smooth as baby skin, it is ready for the machine.

Cut the ball of dough into 6 equal parts.

Spread clean, dry, cloth dish towels over a work counter near where you’ll be using the machine.

Set the pair of smooth cylinders, the thinning rollers, at the widest opening. Flatten one of the pieces of dough by pummeling it with your palm, and run it through the machine. Fold the dough twice into a third of its length, and feed it by its narrow end through the machine once again. Repeat the operation 2 or 3 times, then lay the flattened strip of pasta over a towel on the counter. Since you are going to have a lot of strips, start at one end of the counter, leaving room for the others.

Take another piece of dough, flatten it with your hand, and turn it through the machine exactly as described above. Lay the strip next to the previously thinned one on the towel, but do not allow them to touch or overlap, because they are still moist enough to stick to each other. Proceed to flatten all the remaining pieces in the same manner.

Close down the opening between the machine’s rollers by one notch. Take the first pasta strip you had flattened and run it once through the rollers, feeding it by its wider end. Do not fold it, but spread it flat on the cloth towel, and move on to the next pasta strip in the sequence.

When all the pasta strips have gone through the narrower opening once, bring the rollers closer together by another notch, and run the strips of pasta through them once again, following the procedure described above. You will find the strips becoming longer, as they get thinner, and if there is not enough room to spread them out on the counter, you can let them hand over the edge. Continue thinning the strips in sequence, progressively closing down the opening between the rollers one notch at a time. This step-by-step thinning procedure, which commercial makers of fresh pasta greatly abbreviate or skip altogether, is responsible, along with proper kneading, for giving good pasta its body and structure. Continue thinning the pasta until the second-to-last setting.

For the filling:

Place cleaned spinach leaves and any water that clings to them in a nonreactive soup kettle. (If you’re using pre-washed bagged spinach, add 2 tablespoons water to the pot). Cover and cook over medium heat until spinach wilts, about 5 minutes. Cool spinach slightly and squeeze out the excess liquid; set aside.

Process the tofu in a food processor until smooth. Add the spinach and pulse to combine and finely chop. Add the remaining filling ingredients and pulse to combine.

To form ravioli:

Your sheets should be approximately 4 inches across. Place small balls of filling (about one rounded teaspoon each) in a line one inch from the bottom of the pasta sheet. Leave one and one-quarter inches between each ball of filling. Fold over the top of the pasta and line it up with the bottom edge. Seal bottom and the two open sides with your finger. Use fluted pastry wheel to cut along the two sides and bottom of the sealed pasta sheet. Run pastry wheel between balls of filling to cut out the ravioli.

To cook ravioli:

Bring 4 quarts water to boil in a large stockpot. Add salt and half the pasta. Cook until doubled edges are al dente, 4-5 minutes. With a slotted spoon, transfer ravioli to warmed bowls or plates; add sauce of choice. Meanwhile, put remaining ravioli in boiling water and repeat cooking process. (Or bring two pots of water to boil and cook both batches simultaneously.) Serve immediately. (Alternatively, after draining the boiled ravioli, layer them in a baking dish with sauce and put them in a warmed oven until ready to serve.)

four soups

1-copy.jpg

I have backlog of soups to be blogged, so I’m going to throw them all into one soupfest entry.

First up is lentil soup, which I was excited about because I found the fancy French lentils, but it seems like I’m cursed to never quite have all the right ingredients for this soup. The first time I made it, I was entrenched in step 3, after the vegetables are softened and the lentils are darkened, adding the wine, and running out of wine. Eh. I played around with some other acidic ingredients, and ended up with a delicious but teensy bit vinegary soup. This time it was chicken broth that I ran out of. Chicken broth! I never run out of chicken broth! I carefully monitor my Better Than Bouillon supply because I loooove Better Than Bouillon. Bummer. I substituted some vegetable (not better than) bouillon. Still a damn good soup. And healthy! The only non-healthy item in the whole thing is a few slices of bacon. That’s nothing.

4-copy.jpg

Next up is white chicken chili. This is the second time I’ve made this recipe, and I seem to remember liking it more the first time. It was far from bad this time – look at all that flavory goodness, how could it be bad?

2-copy.jpg

I just didn’t feel excited about it. Maybe it would have been as simple as adding salt. Another possibility is that adding 50% more beans than the recipe called for made the soup a little bland. I will make it again, but it’s on trial.

5-copy.jpg

Poor cream of mushroom soup. It’s been relegated to nothing more than an ingredient in bad casseroles, so when I saw a recipe for the real deal, I did a double take. People actually eat mushroom soup? Unheard of! Dave and I are both big mushroom fans, so I was excited about this soup. Unfortunately, it just didn’t deliver. It wasn’t bad, it was just so dominated by pureed mushrooms. It was a little intense, even for mushroom lovers like us. Maybe because I used all cremini mushrooms instead of the button mushrooms that the recipe calls for? Whatever, next time I’ll be trying this highly recommended recipe.

6-copy.jpg

And finally, we have my favorite of these four soups. I served this hot and sour soup with the potstickers, which we’re a little crazy about, so this soup had a tough job standing up to that. But it holds it’s own, oh yes. I loved the moo shu I made a few weeks ago, and this has most of the same ingredients, but in soup form. I also really like when tofu is used in recipes where it’s actually the original ingredient, instead of covering for some maligned but more flavorful meat. Mmm, and black vinegar. This is good stuff. And I’m all about the texture that the cornstarch gives the soup. It doesn’t thicken it to a paste, it just provides a little body. The soup has so many strong and contrasting flavors, I just love it. And, it’s healthy! In fact, it’s so light, that I don’t know if I can recommend serving it as a meal on its own. I made the full recipe, we ate it with potstickers for two meals, and then we snacked on it throughout the week. I wasn’t complaining about having hot and sour soup around all week!

So there you have it – a January’s worth of soups. Yum!

Hearty Lentil Soup (from Cooks Illustrated)

Lentils du Puy, sometimes called French green lentils, are our first choice for this recipe, but brown, black, or regular green lentils are fine, too. Note that cooking times will vary depending on the type of lentils used. Lentils lose flavor with age, and because most packaged lentils do not have expiration dates, try to buy them from a store that specializes in natural foods and grains. Before use, rinse and then carefully sort through the lentils to remove small stones and pebbles. The soup can be made in advance. After adding the vinegar in step 2, cool the soup to room temperature and refrigerate it in an airtight container for up to 2 days. To serve, heat it over medium-low until hot, then stir in the parsley.

Makes about 2 quarts, serving 4 to 6

3 slices bacon (about 3 ounces), cut into ¼-inch pieces
1 large onion, chopped fine (about 1½ cups)
2 medium carrots, peeled and chopped medium (about 1 cup)
3 medium cloves garlic, minced or pressed through garlic press (about 1 tablespoon)
1 can (14½ ounces) diced tomatoes, drained
1 bay leaf
1 teaspoon minced fresh thyme leaves
1 cup lentils (7 ounces), rinsed and picked over
1 teaspoon table salt
ground black pepper
½ cup dry white wine
4½ cups low-sodium chicken broth
1½ cups water
1½ teaspoons balsamic vinegar
3 tablespoons minced fresh parsley leaves

1. Fry bacon in large stockpot or Dutch oven over medium-high heat, stirring occasionally, until fat is rendered and bacon is crisp, 3 to 4 minutes. Add onion and carrots; cook, stirring occasionally, until vegetables begin to soften, about 2 minutes. Add garlic and cook until fragrant, about 30 seconds. Stir in tomatoes, bay leaf, and thyme; cook until fragrant, about 30 seconds. Stir in lentils, salt, and pepper to taste; cover, reduce heat to medium-low, and cook until vegetables are softened and lentils have darkened, 8 to 10 minutes. Uncover, increase heat to high, add wine, and bring to simmer. Add chicken broth and water; bring to boil, cover partially, and reduce heat to low. Simmer until lentils are tender but still hold their shape, 30 to 35 minutes; discard bay leaf.

2. Puree 3 cups soup in blender until smooth, then return to pot; stir in vinegar and heat soup over medium-low until hot, about 5 minutes. Stir in 2 tablespoons parsley and serve, garnishing each bowl with some of remaining parsley.

White Chicken Chili (from Cooks Illustrated)

Adjust the heat in this dish by adding the minced ribs and seeds from the jalapeño as directed in step 6. If Anaheim chiles cannot be found, add an additional poblano and jalapeño to the chili. This dish can also be successfully made by substituting chicken thighs for the chicken breasts. If using thighs, increase the cooking time in step 4 to about 40 minutes. Serve chili with sour cream, tortilla chips, and lime wedges.

Serves 6 to 8

3 pounds bone-in, skin-on chicken breast halves, trimmed of excess fat and skin
Table salt and ground black pepper
1 tablespoon vegetable oil
3 medium jalapeño chiles
3 poblano chiles (medium), stemmed, seeded, and cut into large pieces
3 Anaheim chile peppers (medium), stemmed, seeded, and cut into large pieces
2 medium onions, cut into large pieces (2 cups)
6 medium cloves garlic, minced or pressed through garlic press (about 2 tablespoons)
1 tablespoon ground cumin
1½ teaspoons ground coriander
2 (14.5-ounce) cans cannellini beans, drained and rinsed
3 cups low-sodium chicken broth
3 tablespoons fresh lime juice (from 2 to 3 limes)
¼ cup minced fresh cilantro leaves
4 scallions, white and light green parts sliced thin
1. Season chicken liberally with salt and pepper. Heat oil in large Dutch oven over medium-high heat until just smoking. Add chicken, skin side down, and cook without moving until skin is golden brown, about 4 minutes. Using tongs, turn chicken and lightly brown on other side, about 2 minutes. Transfer chicken to plate; remove and discard skin.

2. While chicken is browning, remove and discard ribs and seeds from 2 jalapeños; mince flesh. In food processor, process half of poblano chiles, Anaheim chiles, and onions until consistency of chunky salsa, ten to twelve 1-second pulses, scraping down sides of workbowl halfway through. Transfer mixture to medium bowl. Repeat with remaining poblano chiles, Anaheim chiles, and onions; combine with first batch (do not wash food processor blade or workbowl).

3. Pour off all but 1 tablespoon fat from Dutch oven (adding additional vegetable oil if necessary) and reduce heat to medium. Add minced jalapeños, chile-onion mixture, garlic, cumin, coriander, and ¼ teaspoon salt. Cover and cook, stirring occasionally, until vegetables soften, about 10 minutes. Remove pot from heat.

4. Transfer 1 cup cooked vegetable mixture to now-empty food processor workbowl. Add 1 cup beans and 1 cup broth and process until smooth, about 20 seconds. Add vegetable-bean mixture, remaining 2 cups broth, and chicken breasts to Dutch oven and bring to boil over medium-high heat. Reduce heat to medium-low and simmer, covered, stirring occasionally, until chicken registers 160 degrees (175 degrees if using thighs) on instant-read thermometer, 15 to 20 minutes (40 minutes if using thighs).

5. Using tongs, transfer chicken to large plate. Stir in remaining beans and continue to simmer, uncovered, until beans are heated through and chili has thickened slightly, about 10 minutes.

6. Mince remaining jalapeño, reserving and mincing ribs and seeds (see note above), and set aside. When cool enough to handle, shred chicken into bite-sized pieces, discarding bones. Stir shredded chicken, lime juice, cilantro, scallions, and remaining minced jalapeño (with seeds if desired) into chili and return to simmer. Adjust seasonings with salt and pepper and serve.

Per Serving:
Cal 370; Fat 6 g; Sat fat 1 g; Chol 115 mg; Carb 25 g; Protein 52 g; Fiber 7 g; Sodium 710 mg

Creamy Mushroom Soup (from Cooks Illustrated)

To make sure that the soup has a fine, velvety texture, puree it hot off the stove, but do not fill the blender jar more than halfway, as the hot liquid may cause the lid to pop off the jar.

Makes 8 cups, serving 6 to 8

6 tablespoons unsalted butter
6 large shallots, minced (about 3/4 cup)
2 small cloves garlic, minced (about 1 1/2 teaspoons)
½ teaspoon ground nutmeg, freshly grated
2 pounds white button mushrooms, wiped clean and sliced 1/4 inch thick
3½ cups chicken stock or canned low-sodium chicken broth
4 cups hot water
½ ounce dried porcini mushrooms, rinsed well
1/3 cup dry sherry or Madeira
1 cup heavy cream
2 teaspoons lemon juice from 1 lemon
Table salt and ground black pepper

Sauteed Wild Mushroom Garnish (optional)
2 tablespoons unsalted butter
8 ounces shiitake mushrooms or chanterelle, oyster, or cremini mushrooms, stems
trimmed and discarded, mushrooms wiped clean and sliced thin
Table salt and ground black pepper

1. Melt butter in large, heavy-bottomed Dutch oven over medium-low heat; when foaming subsides, add shallots and saute, stirring frequently, until softened, about 4 minutes. Stir in garlic and nutmeg; cook until fragrant, about 1 minute longer. Increase heat to medium; add sliced mushrooms and stir to coat with butter. Cook, stirring occasionally, until mushrooms release liquid, about 7 minutes. Reduce heat to medium-low, cover pot, and cook, stirring occasionally, until softened and mushrooms have released all liquid, about 20 minutes. Add chicken stock, water, and porcini mushrooms; cover and bring to simmer, then reduce heat to low and simmer until mushrooms are fully tender, about 20 minutes longer.

2. Pour soup into a large bowl. Rinse and dry Dutch oven. Puree soup in batches in blender until smooth, filling blender jar only halfway for each batch. Return soup to Dutch oven; stir in Madeira and cream and bring to simmer over low heat. Add lemon juice, season to taste with salt and pepper, and serve with sauteed mushroom garnish, if desired. (Can be cooled to room temperature and refrigerated up to 4 days.) If making ahead, add cream at serving time.

3. For the Sauteed Wild Mushroom Garnish (optional): Heat butter in medium skillet over low heat; when foam subsides, add mushrooms and sprinkle with salt and pepper. Cover and cook, stirring occasionally, until mushrooms release their liquid, about 10 minutes for shiitakes and chanterelles, about 5 minutes for oysters, and about 9 minutes for cremini. Uncover and continue to cook, stirring occasionally, until liquid released by mushrooms has evaporated and mushrooms are browned, about 2 minutes for shiitakes, about 3 minutes for chanterelles, and about 2 minutes for oysters and cremini. Sprinkle a portion of mushrooms over individual bowls of soup and serve.

Hot and Sour Soup (from Cooks Illustrated)

To make slicing the pork chop easier, freeze it for 15 minutes. We prefer the distinctive flavor of Chinese black vinegar; look for it in Asian supermarkets. If you can’t find it, a combination of red wine vinegar and balsamic vinegar approximates its flavor. This soup is very spicy. For a less spicy soup, omit the chili oil altogether or add only 1 teaspoon.

Serves 6 to 8 as an appetizer

7 ounces extra-firm tofu, drained
4 tablespoons soy sauce
1 teaspoon toasted sesame oil
3 tablespoons cornstarch, plus an additional 1 1/2 teaspoons
1 boneless, center-cut, pork loin chop (1/2 inch thick, about 6 ounces), trimmed of fat and cut into 1 inch by 1/8-inch matchsticks
3 tablespoons cold water, plus 1 additional teaspoon
1 large egg
6 cups low-sodium chicken broth
1 cup bamboo shoots (from one 5-ounce can), sliced lengthwise into 1/8-inch-thick strips
4 ounces fresh shiitake mushrooms, stems removed, caps sliced 1/4 inch thick (about 1 cup)
5 tablespoons black Chinese vinegar or 1 tablespoon red wine vinegar plus 1 tablespoon balsamic vinegar (see note above)
2 teaspoons chili oil (see note above)
1 teaspoon ground white pepper
3 medium scallions, sliced thin

1. Place tofu in pie plate and set heavy plate on top. Weight with 2 heavy cans; let stand at least 15 minutes (tofu should release about ½ cup liquid). Whisk 1 tablespoon soy sauce, sesame oil, and 1 teaspoon cornstarch in medium bowl; toss pork with marinade and set aside for at least 10 minutes (but no more than 30 minutes).

2. Combine 3 tablespoons cornstarch with 3 tablespoons water in small bowl and mix thoroughly; set aside, leaving spoon in bowl. Mix remaining ½ teaspoon cornstarch with remaining 1 teaspoon water in small bowl; add egg and beat with fork until combined. Set aside.

3. Bring broth to boil in large saucepan set over medium-high heat. Reduce heat to medium-low; add bamboo shoots and mushrooms and simmer until mushrooms are just tender, about 5 minutes. While broth simmers, dice tofu into ½-inch cubes. Add tofu and pork, including marinade, to soup, stirring to separate any pieces of pork that stick together. Continue to simmer until pork is no longer pink, about 2 minutes.

4. Stir cornstarch mixture to recombine. Add to soup and increase heat to medium-high; cook, stirring occasionally, until soup thickens and turns translucent, about 1 minute. Stir in vinegar, chili oil, pepper, and remaining 3 tablespoons soy sauce; turn off heat.

5. Without stirring soup, use soupspoon to slowly drizzle very thin streams of egg mixture into pot in circular motion. Let soup sit 1 minute, then return saucepan to medium-high heat. Bring soup to gentle boil, then immediately remove from heat. Gently stir soup once to evenly distribute egg; ladle into bowls and top with scallions.

Per Serving:
Cal 120; Fat 5 g; Sat fat 1 g; Chol 12 mg; Carb 12 g; Protein 8 g; Fiber 1 g; Sodium 1110 mg