paella

paella 8

I will always associate paella with the group of friends I hung out with in graduate school. We all enjoyed good food and good drinks, so whenever we got together, everyone would bring food and wine to share. One of my friends was from Spain, and he made paella at several of these get-togethers. Of course, it was fully authentic, cooked in a paella pan set on a tripod over an open flame. The smoked paprika, saffron, roasted red peppers, and rice came directly from Spain, picked up on his latest trip home to visit his parents. Sitting around the fire in my friends’ backyard, drinking good wine and eating paella is one of my most vivid food memories.

paella 1

I knew that cooking paella in a Dutch oven on the grill wouldn’t be the same, but I was hoping for just a twinge of that taste, that memory. That’s why I insisted on cooking it outside on the grill instead of using the much easier option of the stove and oven. Maybe it would pick up a hint of smokiness from the coals, but it was more than just the flavor I was after, it was that feeling.

paella 2

I got some of each. With the cast iron Dutch oven, the one Dave and I have taken camping for the last ten years, heated over coals on the grill, I got some of the fun of cooking outdoors. Dave sat outside with me with a glass of wine and let me babble on about different rice dishes in cultures around the world.

paella 3

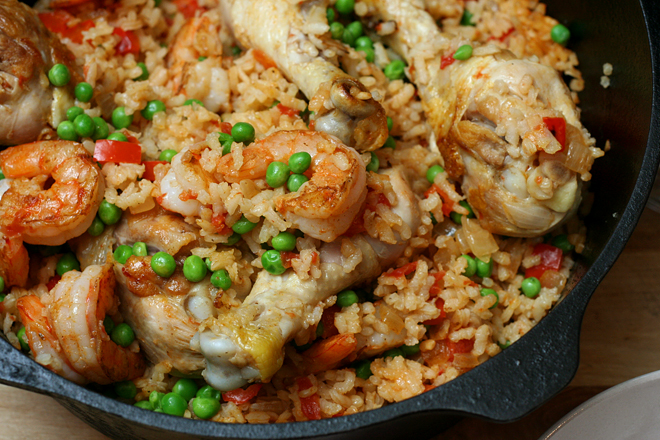
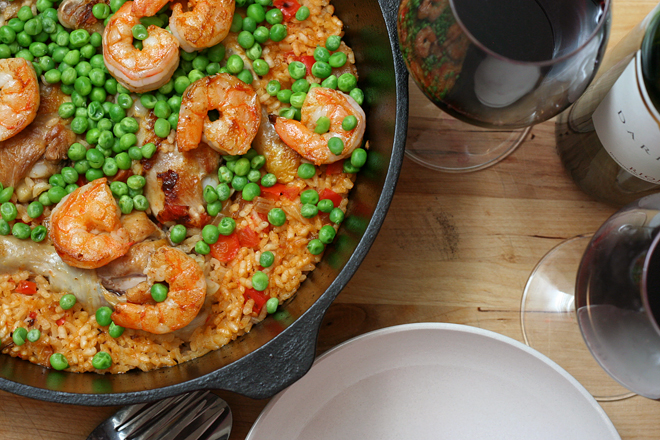
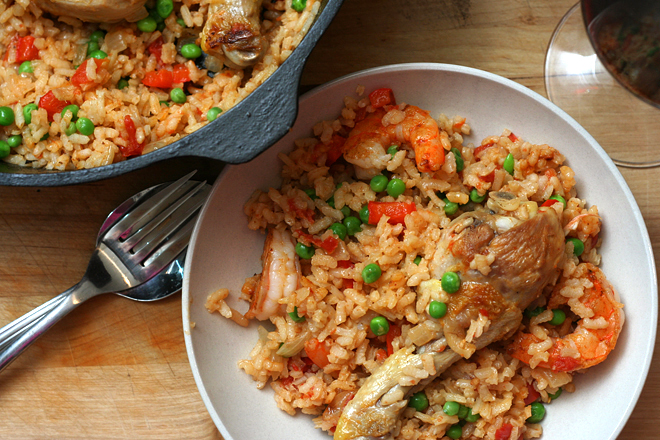
The food was good, but I need some paella practice before it’ll be up to the standards of what I remember. The biggest mistake I made was preventing the formation of a soccarat, a layer of crusty bits on the bottom of the pan, which is one of the best parts of paella. Letting rice stick to the bottom of the pan goes against years of rice-cooking training, and I ended up adding too much liquid, making a wetter, saucier paella. I also think I’ll leave out the tomatoes next time. They were included in a number of the paella recipes I looked at, but it’s not a flavor I associate with paella.

paella 6

Overall, it was a successful meal, in that I had fun making it and it tasted good. But next time, I’ll use the lessons I learned, like not stirring the rice and leaving out the tomato, and my paella will be that much better. However, I doubt it’ll ever taste as good as one cooked over a fire in a paella pan while enjoying the company of good friends.

paella 10

One year ago: Bruschetta with Chickpea Puree
Two years ago: Grilled Potato and Vegetable Salad
Three years ago: Casatiello
Four years ago: Soba Salad with Feta and Peas

Printer Friendly Recipe
Paella (adapted from Cooks Illustrated, Alton Brown, the New York Times, Leite’s Culinaria, and About.com)

Most of my problems came from not following this method, adding more liquid and stirring more often because I was worried about the rice cooking unevenly. However, it should be noted that the recipe given here has not been perfected.

The recipe specifically refers to charcoal grilling methods, but I think it could be easily adapted to a gas grill.

4 cups water
8 ounces shrimp, peeled, shells reserved
1 onion, half sliced, half diced
2 garlic cloves, 1 sliced, 2 minced
1 small bay leaf
1 large thyme sprig
salt and pepper
1 pounds chicken legs and/or thighs, bone-in, skin-on
2 tablespoons olive oil
1 red pepper, diced
½ teaspoon smoked paprika
¼ teaspoon crumbled saffron
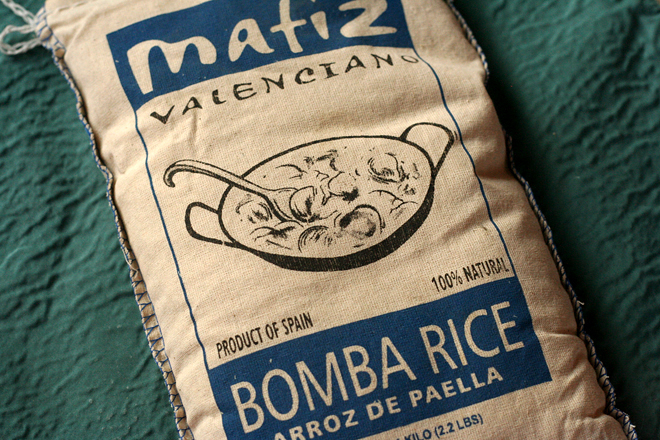
1 cup short-grain rice, preferably Bomba
7 ounces canned diced tomatoes with juice
2 tablespoons white wine
½ cup peas

1. In a medium-size pot over medium-high heat, bring the water, shrimp shells, sliced onion, sliced garlic, bay leaf, thyme sprig and 1 teaspoon salt to a boil. Reduce the heat to medium and simmer for about 30 minutes. Strain, discarding the solids. Return the broth to the saucepan, cover, and keep warm over low heat.

2. Combine the shrimp with 2 teaspoons olive oil, the minced garlic, ¼ teaspoon paprika, and a pinch of teaspoon salt. Mix well to coat with seasonings and let marinate at least 15 minutes or up to 1 hour.

3. Light about 2 quarts of charcoal briquettes; once the briquettes are lightly covered with gray ash, spread them over the bottom grate of the grill, then top with another 2 quarts of unlit coals.

4. Heat a 10-inch cast-iron skillet or Dutch oven directly over the coals. Add the shrimp and cook, without moving, until browned and pink on one side, 30 seconds to a minute. Flip the shrimp to brown the second side. Transfer to a plate.

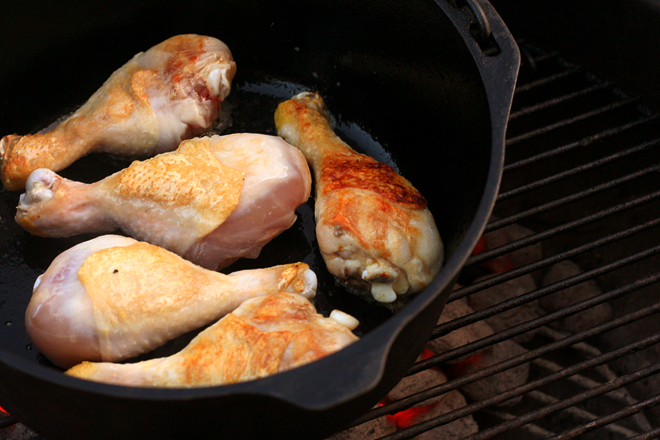
5. Season the chicken generously with salt and ground black pepper. Add 1 tablespoon of olive oil to the hot skillet (or Dutch oven). Add the chicken, skin-side down, and cook with moving until the bottom is deeply browned, 3-4 minutes. Turn each piece of chicken to brown the other side. Transfer the browned chicken to a plate. (Because the chicken is mostly raw and the shrimp is cooked and will only be briefly reheated, don’t put them on the same plate.)

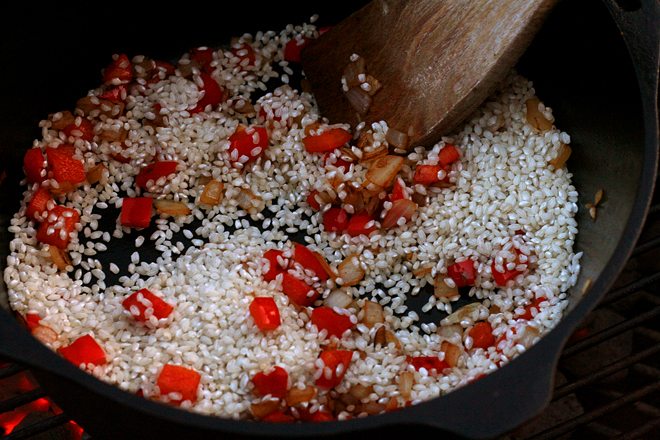
6. Add the diced onion, red pepper, and a pinch of salt to the skillet; sauté, stirring frequently, until softened and lightly browned, 8-10 minutes. Add the saffron and remaining ¼ teaspoon paprika and cook, stirring constantly, until fragrant, about a minute.

7. Add the rice, stirring well to coat with the onion mixture. Add the tomatoes, wine, half of the hot shrimp broth, ½ teaspoon salt, and the browned chicken. Bring to a brisk simmer, stirring once. Simmer, uncovered, until most of the broth has been absorbed, about 10 minutes.

8. Add the remaining broth and cook for an additional 10 minutes. Turn off the heat and arrange the peas and shrimp over the surface of the rice in one layer. Cover the pan with a clean dish cloth. Let the rice rest for 10 minutes before serving.

paella 9

vegetarian chili

copy-of-img_1785

When my sister plans meals for once-a-month freezer cooking, she usually tests a small batch of a recipe before making a larger batch to freeze. This is good practice, I recently learned. A few months ago, I made vegetarian chili to bring on a camping trip, and even though I was experimenting with the recipe, I was confident enough that it would turn out great that I made a huge batch and froze half. Mistake!

copy-of-img_1768

There are a lot of recipes where I think ground meat is just extraneous, and chili is a great example. There are so many other flavorings in chili that it doesn’t usually taste beefy, and the beans provide plenty of protein, so the meat isn’t nutritionally required either. It’s just filler, and expensive, sort of unhealthy filler at that.

When I noticed that my favorite vegetarian chili recipe was very similar to my favorite beef chili recipe, except for the beef, I decided to combine parts of each that I liked. Where I screwed up the first time was in not taking into account that with less filler, I’d need less tomatoes as well. The result was (a huge pot of) chili-flavored spaghetti sauce (that I had to share with friends on the camping trip – sorry guys!).

copy-of-img_1787

And before I could give it another try, I had to finish all of the frozen way-too-tomatoey stuff in the freezer. When I did finally make vegetarian chili again, I knew exactly what changes I wanted to make. I made a smaller batch this time, just in case, but wouldn’t you know it that I totally nailed it this time with a rich, spicy, meaty-even-without-meat bowl of chili that gets even better when topped with an assortment of garnishes.

copy-of-copy-of-img_1786

One year ago: Salmon Cakes, Flaky Biscuits, Hashed Brussels Sprouts – I made almost this exact same meal again recently (different biscuits though), and it’s just so good.  Restaurant quality food for sure.

Vegetarian Chili (adapted substantially from Jeanne Lemlin’s Vegetarian Classics and Cooks Illustrated’s The New Best Recipe)

I like to chop up the tomatoes a bit before adding them to the chili. I usually just stick a pair of kitchen shears into the can of tomatoes and start snipping.

I’ve never actually added the butter, in an effort to reduce the fat in the recipe. However, I’m guessing it helps mimic the richness that beef would provide.

2 tablespoons olive (or vegetable) oil
2 medium onions, diced
1 medium red bell pepper, cored, seeded, and finely diced
6 garlic cloves, minced or pressed through a garlic press
3 tablespoons chili powder
1 tablespoon ground cumin
1½ teaspoons ground coriander
¾ teaspoon red pepper flakes
1 teaspoon dried oregano
⅛ teaspoon cayenne pepper
1 (28-ounce) can diced tomatoes, undrained
2 (15-ounce) cans kidney beans, drained and rinsed
1 (15-ounce) can black beans, drained and rinsed
½ teaspoon salt
1 tablespoon soy sauce
1 tablespoon butter (optional)
Garnishes: lime wedges, sour cream, cheddar cheese, scallions, red onion, cilantro

1. Heat the oil in a large Dutch oven over medium heat. Stir in the onions, bell pepper, garlic, and spices and sauté, stirring occasionally, until the vegetables are softened and beginning to brown, about 10 minutes.

2. Add the tomatoes, beans, salt, and soy sauce. Increase the heat to medium-high and bring the chili to a boil, then reduce the heat to low. Cook, covered, at a low simmer for one hour, stirring occasionally. If the chili is too thin, cook uncovered until it’s your preferred consistency. Stir in the butter and serve with the garnishes.

stuffed sandwich rolls (aka monsters)

copy-of-img_8071

This is a recipe that has drastically changed throughout the years. Six years ago, I got the idea for sandwich filling sealed in biscuits from a book of backpacking recipes. I originally followed the recipe exactly, making biscuits with whole wheat and soy flour. They were so dense that they earned the name “monsters” with my group of backpacking friends. Every time I’ve made them since, I’ve adjusted the biscuit recipe slightly, making it lighter and adding flavor. Still, the biscuits always seem dry and dense.

copy-of-copy-of-img_7731

I finally had an epiphany this last time – the fundamental flaw in this recipe is that biscuits are used at all. Biscuits are best fresh out of the oven, not carried around in a backpack for three days. I’m guessing the backpacking recipe book developed the recipe with biscuits because they assumed that the average backpacker wasn’t comfortable baking with yeast. But as far as food preparation goes, I am not the average backpacker.

copy-of-img_7735

That led to Monsters 2.0 – meat and cheese sealed in my favorite sandwich bread. These were far better than the original Monsters. They stayed sealed better – the biscuit versions tended to pop open. They’re healthier, since biscuits usually contain high amounts of fat. And although yeast bread requires more patience than biscuits, I don’t think this new version involves any more actual effort than the biscuit version.

copy-of-img_7943

But the main advantage was, of course, in the eating. We ate these four days after I made them, and they still tasted fresh. And while food always tastes better in the woods, I think Monsters have their place at home as well. You can make a batch, bake them, freeze them, and then have a delicious sandwich ready whenever you need it.

copy-of-img_8066

Monsters 2.0 (Stuffed Sandwich Rolls) (bread recipe pieced together from Betty Crocker, Cooks Illustrated, and Peter Reinhart)

Makes 12 sandwiches

I apologize for the vagueness of “sandwich fillings” as an ingredient. You can use whatever you want, although cheese and meat is the obvious choice. I think ham makes the best filling because it keeps well. That being said, I always use turkey because one of my friends who I often make these for doesn’t eat red meat. I don’t know how we get away with eating turkey that hasn’t been refrigerated for days, but no one has ever had a problem with it. As far as how much to use – as much as possible. I’ll update this next time I make these with something more precise, but I never use enough filling. Definitely use more than you see in the photos.

3-3½ cups (15-17½ ounces) unbleached flour, plus extra for work surface
1½ teaspoons table salt
1 cup water, warm (110 degrees)
1 egg
2 tablespoons vegetable oil or unsalted butter, melted
¼ cup (1.75 ounces) granulated sugar or 3 tablespoons honey
1 package (2¼ teaspoons) rapid-rise yeast (also called instant)
Sandwich fillings (see note above)
2 tablespoons milk

1. Adjust an oven rack to middle position and heat the oven to 200 degrees. Once the oven temperature reaches 200 degrees, maintain heat for 10 minutes, then turn off the oven.

2. Mix flour, salt, and yeast in the bowl of a standing mixer fitted with the dough hook. Mix water, egg, butter, and honey in 1-quart Pyrex liquid measuring cup. Turn machine to low and slowly add liquid. When dough comes together, increase speed to medium (setting number 4 on a KitchenAid mixer) and mix until dough is smooth and satiny, stopping machine two or three times to scrape dough from hook if necessary, about 10 minutes. Turn dough onto lightly floured work surface; knead to form smooth, round ball, about 15 seconds.

3. Place dough in very lightly oiled bowl, rubbing dough around bowl to lightly coat. Cover bowl with plastic wrap; place in warm oven until dough doubles in size, 40 to 50 minutes.

4. Divide the dough into 12 equal pieces. Form the pieces into smooth balls. Cover the balls with plastic wrap and allow them to rest for 10 minutes.

5. On a lightly floured work surface, roll out each ball to form an oval ⅛-inch thick. Layer sandwich filling on one side of each oval, leaving a ½-inch border. Fold dough over filling, stretching it a bit if absolutely necessary. Seal the edges with the tines of a fork.

6. Cover the rolls loosely with plastic wrap. Let rise until puffy, 30-45 minutes.

7. Heat oven to 350F. Use the tines of a fork to re-seal the edges of the rolls. Using a pastry brush, brush the rolls with the milk.

8. Bake until rolls are golden, 25-40 minutes. Transfer the rolls to a cooling rack. Wait at least 30 minutes before serving.

asian peanut dip

copy-of-copy-of-img_80881

I keep my eye out for vegetables dips that aren’t ridiculously unhealthy. The thing is, when I serve some sort of meat that’s finger food, I don’t like to serve a vegetable that requires silverware. The perfect accompaniment is crudité (snobby way of saying vegetables eaten as a snack) with a dip, but most dips are nothing more than seasoned mayonnaise and sour cream. Not that I don’t love mayonnaise and sour cream, but I don’t always want to think of the dip as a treat.

copy-of-img_8078

I’ve found one vegetable dip that’s a little healthier, and now I have another one. When struggling to figure out what to serve with the shrimp tempura recipe I was testing for Cooks Illustrated, I remembered that my friend had recently made this great spicy peanut dip on a camping trip. She got the recipe from Backpacker magazine, but when I searched on the internet, I saw that there were many similar recipes, most just as easy as the one we had the on the trip. There were slight variations between each, and I decided to stick with the Backpacker magazine one because it uses rice vinegar instead of lime juice for its acidity, which I’d really enjoyed.

copy-of-img_8020

(Clearly at the time I didn’t realize I’d blog about this at some point, or I would have taken a more flattering/interesting photo.)

The recipe, designed as it is to be made outdoors on a single-burner backpacking stove, is simple. I’ve tweaked the instructions just slightly, to bring the most flavor out of the red pepper and to tame the bite of the garlic. I also increased the seasoning and decreased the amount of red pepper flakes. It seemed far spicier when I made it at home than it did on the trip, maybe because I heated the flakes in oil first. And of course we didn’t add the scallions when we were camping – who brings scallions on a multi-day canoeing trip?

copy-of-img_8080

Usually, we adapt our favorite meals to be appropriate outdoors. I think this is the first time I’ve adapted a backpacking recipe for home, but this is a great recipe to have. I know peanut butter isn’t exactly a low-fat ingredient, but it’s a heck of a lot healthier than mayonnaise or sour cream, and this dip is just as good as more decadent vegetable dips.

copy-of-img_8086

Asian Peanut Dip (adapted from Backpacker Magazine)

Serves 4

1 teaspoon canola or vegetable oil
1 garlic clove, minced
½ teaspoon red pepper flakes
½ cup water
½ cup peanut butter, creamy or chunky
4 tablespoons soy sauce
2 tablespoons rice vinegar
1 scallion, sliced
salt to taste

In a small saucepan over medium heat, heat oil, garlic, and red pepper flakes. Cook, stirring frequently, until garlic is fragrant, 1-2 minutes. Add water, increase heat to high, and bring to boil. When water boils, remove pan from heat and add peanut butter, stirring until smooth. Stir in remaining ingredients (saving some scallion slices for garnish, if desired). Return to heat and continue stirring for 2-4 minutes until mixture is thickened. Serve warm or cold with crackers or crudité.