roasted chicken with caramelized shallots

shallot chicken 4

I’ve always liked Saturday dinners to be special – more meat-oriented and complex than our usual weeknight vegetarian one-bowl dinners. On Saturday, it’s not uncommon that I’ll choose our wine first, and then decide what we’ll eat to go with it. However, my days of spending hours preparing seven tiny courses are definitely on hold.

shallot chicken 1

Now I try to choose dishes that can be almost completely prepped in advance, in hopes that Dave and I get to eat at the same time and without listening to a tired baby whine. This worked out perfectly with this dish, because I got the chicken ready to bake in the afternoon, then when the baby woke up from her evening catnap, I put it in the oven to roast while I fed her.

shallot chicken 2

It also helps that “prepped in advance” took less than ten minutes. Such a small amount of effort resulted in a dish with plenty of flavor. It was definitely worthy of a special Saturday night dinner – and the wine didn’t hurt either.

shallot chicken 5

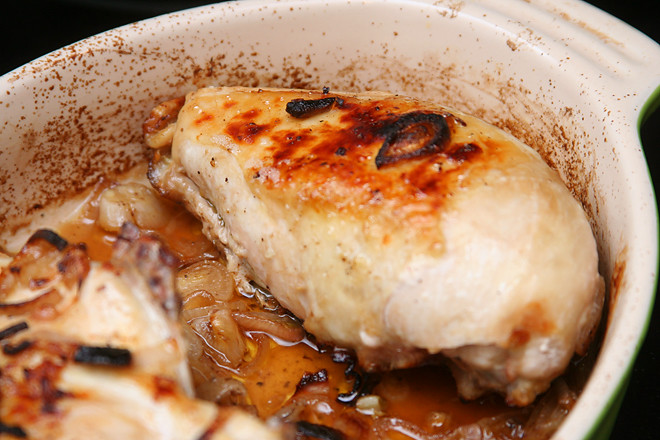
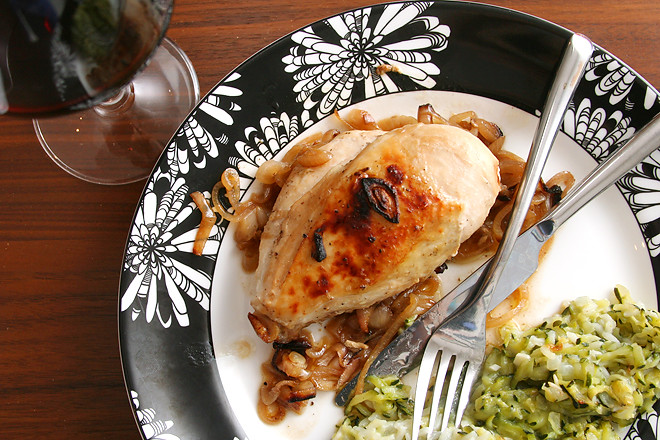
Roasted Chicken with Caramelized Shallots (from Susan Herrmann Loomis’s French Farmhouse Cookbook via Elly Says Opa)

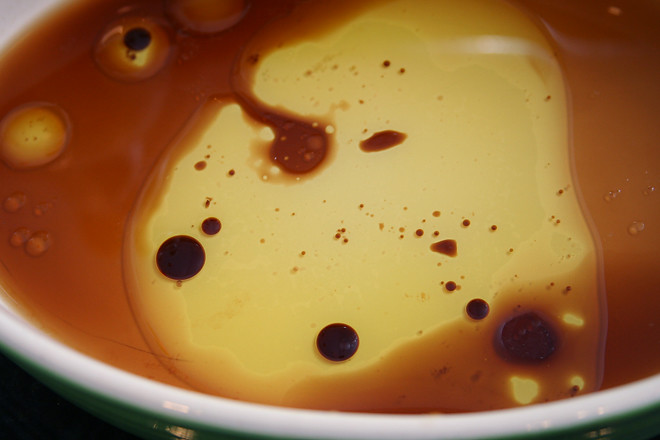
3 tablespoons olive oil
3 tablespoons red wine vinegar
1 tablespoon soy sauce
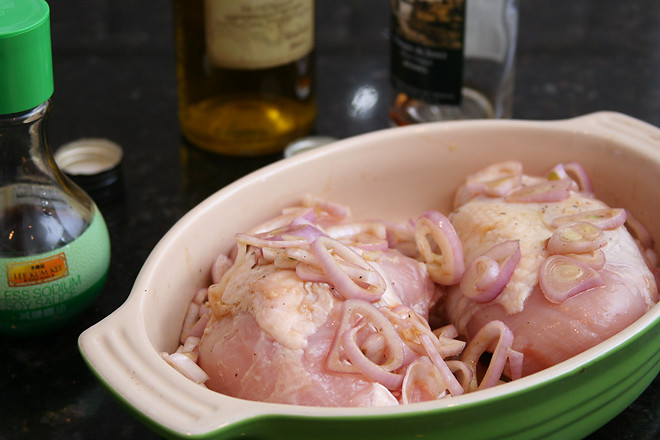
4 shallots, peeled & sliced
½ teaspoon salt
¼ teaspoon black pepper
4 bone-in, skin-on chicken breasts
minced parsley for garnish

1. Heat the oven to 425 degrees. In a baking dish big enough to fit the chicken in a single layer, combine the oil, vinegar, soy sauce, shallots, salt, and pepper. Add the chicken and turn to coat with the shallot mixture. Arrange the chicken skin-side up.

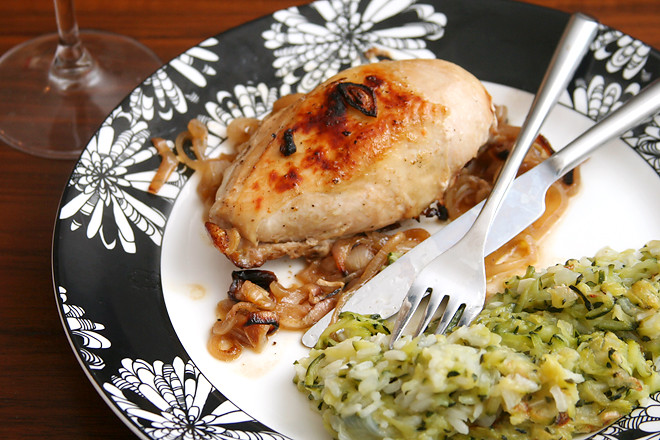
2. Transfer to the oven and roast for 20 minutes. Turn the chicken pieces over, coating them again with the shallot mixture. Continue to roast until the shallots are caramelized and an instant-read thermometer inserted into the thickest part of a chicken breast reads 165 degrees, about 20 minutes more. Remove from the oven and let rest about 5 minutes. Sprinkle with parsley before serving.

shallot chicken 3

Save

broiled salmon with marmalade-mustard glaze

marmalade mustard salmon 6

While I nursed the four-day-old baby, my mother-in-law asked when we wanted to eat dinner. She said it would take fifteen minutes to cook, and I told her that I should be ready by then, not having yet figured that the baby likes to savor her meals and takes far longer than fifteen minutes to eat.

marmalade mustard salmon 1

But I also didn’t believe my mother-in-law that she could make a full meal in someone else’s kitchen in fifteen minutes. However, it turns out that not everyone makes things as complicated as I do, and this easy dish served with instant rice and steamed broccoli was ready long before the baby was finished eating. It was the not the last time I’d eat my dinner lukewarm after the baby ate hers fresh.

marmalade mustard salmon 4

It was also not the last time we’d eat this dish. A recipe that can be made in an unfamiliar kitchen in fifteen minutes is a good one to have around. The glaze has plenty of flavor to spread around the whole meal, so I often serve it over a simple quinoa pilaf with vegetables mixed in. As a bonus, it tastes almost as good lukewarm as it does hot from the oven.

marmalade mustard salmon 5

Broiled Salmon with Marmalade-Mustard Glaze (slightly adapted from Cooking Light)

Serves 4

½ cup orange marmalade
2 tablespoons Dijon mustard
1 garlic clove, minced or pressed through a press, or ½ teaspoon garlic powder
½ teaspoon salt
¼ teaspoon black pepper
4 (6-ounce) salmon fillets

1. Adjust an oven rack to 6 inches below the broiler. In a medium bowl, combine the marmalade, mustard, garlic, salt, and pepper.

2. Arrange the salmon in a broiler-safe dish, skin-side down. Spread half of the marmalade mixture over the salmon.

3. Broil until the glaze is bubbling, about 6 minutes. Spread the remaining marmalade mixture over the salmon, and continue to broil until the salmon breaks into flakes or reads 125 degrees on an instant-read thermometer, about 2 additional minutes. Serve.

marmalade mustard salmon 7

skillet turkey meatballs with lemony rice

lemon turkey meatballs 5

Maybe we’re getting the hang of things. I’m still depending heavily on my freezer meals, but I can count on being able to cook a few nights per week. Last weekend, I even made salmon cakes, broiled asparagus with shallot-lemon vinaigrette, and biscuits for dinner one night. I prepped it all ahead of time, and then when we put the baby down to sleep, I finished cooking everything, plated it, poured the wine – and the baby woke up. Something else I’m getting the hang of: feeding myself while feeding the baby.

lemon turkey meatballs 3

I made this back when she was just three weeks old, when we definitely did not have the hang of things. But I got ahead of the game by making the meatballs (a double batch, with extra to freeze) in the afternoon. The dish is easy enough that it wasn’t much trouble to finish it up when the baby was sleeping that evening.

lemon turkey meatballs 2

And then she woke up while it was cooking, and I fed her, and since I wasn’t proficient at feeding myself while feeding the baby then, I ate my meatballs and rice lukewarm. Fortunately, this is a meal that tastes just fine at room temperature – lemony and light, but substantial enough to last through a night of baby-feeding. However, it was even better when I made it again a few weeks later and got to eat it hot.

lemon turkey meatballs 4

Skillet Turkey Meatballs with Lemony Rice (adapted from Cook’s Country via Elly Says Opa)

Serves 4

½ cup panko bread crumbs
1 large egg
6 scallions, white and green parts separated, divided
¼ cup freshly chopped parsley, divided
½ teaspoon dried oregano
salt and pepper
1 tablespoon grated lemon zest, divided
1 pound ground turkey
2 tablespoons olive oil
1 cup white rice
3 cloves garlic, minced
2¼ cups chicken broth
2 tablespoons lemon juice
½ cup (1 ounce) grated parmesan cheese
lemon wedges for serving

1. In a large mixing bowl, combine the panko and egg. Set aside, stirring occasionally, until the panko is moistened, about 15 minutes. Add 2 tablespoons of the scallion greens, 3 tablespoons parsley, the oregano, 1 teaspoon salt, ½ teaspoon pepper, and 1½ teaspoons lemon zest; stir to combine. Add the turkey; mix thoroughly. Form the mixture into balls approximately 1-inch in diameter; you should have about 24 meatballs.

2. In a 12-inch nonstick skillet over medium-high heat, heat the oil until it flows like water when the pan is tilted. Arrange the meatballs in the pan with space between them. Cook without stirring until the bottom sides are brown, about 2 minutes. Flip and brown the opposite side. Transfer the browned meatballs to a plate.

3. Leaving the remaining fat in the skillet, add the rice. Cook, stirring constantly, until the grains are translucent at the edges, 1-2 minutes. Add the garlic and scallion whites and cook, stirring constantly, until fragrant, about 30 seconds. Add the chicken broth, lemon juice, and 1½ teaspoons lemon zest; stir to combine, then arrange the meatballs in the rice. Bring to a simmer, then reduce the heat to low, cover, and cook until the rice is tender and the meatballs are cooked through, about 20 minutes. Remove from the heat and let set, covered, for an additional 5 minutes. Uncover and top with the parmesan cheese, remaining scallion greens, and remaining parsley; serve, with additional lemon wedges.

lemon turkey meatballs 6

quinoa with roasted brussels sprouts, pine nuts, and parmesan

quinoa brussels sprouts pine nuts 4

We had a great visit with family over Thanksgiving, but not nearly so nice a homecoming. Instead of the hour or two of relaxing we were picturing after a long day of travel home, we had half an inch of water covering the entire house, caused by a leak in the hose that feeds the refrigerator’s icemaker. This also put a kink in my plans to eat healthier after a week of pie, cookies, and cheesecake.

quinoa brussels sprouts pine nuts 1

Fortunately, I hoard freezer meals. If I make a recipe that freezes well and makes enough for multiple meals, I freeze some, but then I have trouble convincing myself to ever eat them. What if I need those one day?

quinoa brussels sprouts pine nuts 2

Well, I need them now. We ate hastily defrosted chili in between stunned shop-vaccing the first night, squash-black bean burritos the next night while we watched contractors cut into the walls and set out fans, and four cheese lasagna over the weekend when we were staying in a hotel but had an out-of-town friend’s housekey.

quinoa brussels sprouts pine nuts 3

I’m quickly depleting my freezer stash, so while things are somewhat stabilized and we’re living at home in our torn up house before reconstruction begins, I’m still keeping things very simple. This has become a staple. It’s not quite as easy as dumping a ziploc bag of stew into a pot and heating it up, but it’s straightforward enough to make in a kitchen full of boxes in between doing load after load of laundry. Best of all, it tastes like comfort food to us – maybe not tomato soup and grilled cheese level of comfort, but close enough for something so healthy. But now it’s time to start thinking about building my freezer stash back up to help get us through reconstruction.

quinoa brussels sprouts pine nuts 6

Printer Friendly Recipe
Quinoa with Roasted Brussels Sprouts, Pine Nuts, and Parmesan (adapted from a recipe I adapted from Gourmet)

Serves 4

1½ cups water
salt
1 cup quinoa, rinsed and drained
2 pounds brussels sprouts, trimmed and halved lengthwise
black pepper
2 tablespoons olive oil, divided
½ cup (6 ounces) pine nuts
2 cloves garlic, minced
¼ teaspoon red pepper flakes
3 tablespoons lemon juice
1 cup (2 ounces) parmesan, shredded

1. Place a rimmed baking sheet in the middle of the oven and heat the oven to 450 degrees. In a large saucepan over high heat, bring the water and ½ teaspoon salt to a boil. Add the quinoa, reduce the heat to low, cover, and cook for 15 minutes. Without removing the lid, remove the pot from the heat and set aside for another 15 minutes.

2. While the quinoa cooks, remove the heated baking sheet from the oven and spread 1 tablespoon of oil over its surface. Place the brussels sprouts on the sheet, generously season with salt and pepper, and stir to coat with the oil. Arrange the sprouts cut-side down. Transfer to the oven and cook for 12 minutes.

3. Meanwhile, in a small bowl, combine the remaining 1 tablespoon olive oil, the pine nuts, garlic, and red pepper flakes. After the brussels sprouts have roasted for 12 minutes, add the pine nut mixture to the baking sheet and roast for an additional 2-3 minutes, until the brussels sprouts are browned and tender and the nuts are just toasted. (Keep an eye on the nuts; they burn easily.)

4. Stir the lemon juice into the quinoa, then add the roasted sprouts and pine nuts and the parmesan. Stir to combine; serve immediately.

quinoa brussels sprouts pine nuts 5

stovetop macaroni and cheese

stovetop mac and cheese 8

There are three things that lead to difficulties with self-control for me – chocolate chip cookie dough, macaroni and cheese, and alcohol. I’ve found a handful of tricks for dealing with the alcohol one (although tiki drinks can be tricky since even one can be strong enough to lower my resistance to more!), but with the other two, the best way I’ve found of controlling them is not to be around them. We normally eat macaroni and cheese maybe once a year, even though it’s one of my favorite foods.

stovetop mac and cheese 3

I’ve told myself for years that when I got pregnant and couldn’t drink alcohol or eat cookie dough, I’d make up the extra calories with macaroni and cheese. It turns out that making up extra calories hasn’t been an issue; since I got that positive test back in May, all I’ve wanted to eat is dessert. Pasta is tasting extra delicious too, and yes, especially when it’s coated in cheese.

stovetop mac and cheese 4

I love the baked recipe I’ve been making for years, but then someone mentioned the blue box mac and cheese, and while I haven’t had severe cravings, maybe I’m more suggestible than I would normally be. I couldn’t stop thinking about that blue box. Unfortunately, the last time I bought it, I distinctly remember being disappointed that it was bland and mushy.

stovetop mac and cheese 5

I figured there had to be a way to make a creamy, smooth sauce using real ingredients. It turns out, the most popular recipes for stovetop mac and cheese aren’t so different from the blue box; you still coat the cooked pasta with butter, then add milk and cheese – except in this case, that cheese is real shredded cheddar, not a powder. And it tastes reminiscent of that blue box, in the best possible way. Plus, the pasta doesn’t dissolve in my mouth before I get to chew it! This is so good and so easy that maybe one day, my daughter will be nostalgic for this recipe instead of that blue box.

stovetop mac and cheese 7

Printer Friendly Recipe
Stovetop Macaroni and Cheese (not really adapted from Cook’s Illustrated)

I’ve only made this with all cheddar cheese. Monterey jack could make the sauce smoother, but it won’t be as flavorful. I tried a different recipe that called for a combination of cheddar and American cheese, and, while the sauce was creamier, the flavor of the American cheese dominated, and I prefer cheddar. With just cheddar, the sauce is plenty smooth and creamy for me.

So far, I’ve only made a half recipe (multiple times), using a 5-ounce can of evaporated milk. It seems like plenty of liquid.

2 large eggs
1 (12-ounce) can evaporated milk
¼ teaspoon hot pepper sauce
2 teaspoons table salt
¼ teaspoon ground black pepper
1 teaspoon dry mustard, dissolved in 1 teaspoon water
8 ounces elbow macaroni
4 tablespoons unsalted butter
12 ounces sharp cheddar cheese, American cheese, or Monterey Jack cheese, grated (about 3 cups)

1. Meanwhile, heat 2 quarts water to boil in large heavy-bottomed saucepan or Dutch oven. Add 1 1/2 teaspoons of the salt and macaroni; cook until almost tender, but still a little firm to the bite. Drain and return to pan over low heat. Add butter; toss to melt.

2. Meanwhile, mix eggs, 1 cup of the evaporated milk, pepper sauce, 1/2 teaspoon of the salt, pepper, and mustard mixture in small bowl; set aside.

3. Pour egg mixture over buttered noodles along with three-quarters of the cheese; stir until thoroughly combined and cheese starts to melt. Gradually add remaining milk and cheese, stirring constantly, until mixture is hot and creamy, about 5 minutes. Serve immediately.

stovetop mac and cheese 6

barbecue turkey meatballs with cheddar-corn quinoa

bbq meatballs quinoa 6

This recipe might work better cooked inside, but it includes corn and barbecue sauce – that means summer, and summer means grilling. Meatballs, unfortunately, are tricky on the grill. You’d think putting them on skewers would work fine, but they tend to slide right off. You could, instead, grill barbecue turkey burgers to serve over quinoa, but then you’re just eating bunless burgers, and that doesn’t sound nearly as delicious as meatballs.

bbq meatballs quinoa 2

So I’ve compromised on something a little bigger and a lot flatter than a meatball, but smaller than anything you’d put on a bun. The best name I can come up for these is, unfortunately, “patties”, which doesn’t sound nearly as tasty as meatballs. But it’s the same tasty ingredients; in this case, scallions, cilantro, and mustard add some interest to the meat mixture. The best part is the barbecue sauce slathered over the patties at the end of grilling.

bbq meatballs quinoa 4

The quinoa has plenty going on with smoky grilled corn and chunks of cheddar cheese, but the flavors don’t compete with the meatballs. The whole thing goes together really well, and it ends up feeling like a treat despite how healthy it is. It’s become one of my favorite summer meals.

bbq meatballs quinoa 7

Printer Friendly Recipe
Barbecue Turkey Meatballs with Cheddar-Corn Quinoa (adapted a bit from Pink Parsley)

Serves 4

I’m keeping ‘meatballs’ in the title because it sounds a lot more delicious than ‘patties’. We’ll just say these are flat meatballs.

Shredding cheese is faster, but I like to dice little cubes so I get bites of intense cheesiness.

I’ve been using this barbecue sauce, which has a strong molasses flavor. I’m not sure I’d like it for everything, but it’s great with this meal.

I was using part of an onion I’d already cut a chunk out of, so rings weren’t possible. Skewering works too, it’s just a little more work.

Meatballs:
¼ cup panko bread crumbs
1 large egg yolk
1 pound ground turkey
1 scallion, minced
1 tablespoon minced fresh cilantro
1 teaspoon dry mustard
¾ teaspoon salt
¼ cup barbecue sauce

Quinoa:
1 cup quinoa, rinsed and drained
1½ cups water
½ teaspoon salt
2 ears corn, shucked and rinsed
½ medium red onion, sliced into thin rings
1 tablespoon apple cider vinegar
3 tablespoons chopped fresh cilantro
1 scallion, sliced
1 cup (4 ounces) cubed or shredded sharp cheddar cheese
1 tablespoon olive oil
black pepper

1. Prepare a medium-hot grill. In a medium saucepan, combine the quinoa, water, and salt. Bring to a boil over high heat, then reduce the heat to low, cover, and simmer for 15 minutes. Remove the pot from the heat and let the quinoa sit for 10 additional minutes, still covered.

2. In a large bowl, combine the panko and egg yolk. Set aside for about 5 minutes, then stir to form a paste. Add the turkey, scallion, cilantro, mustard, and salt; mix to combine. Form into 12 small patties.

3. Place the corn directly over the coals and grill for about 10 minutes, turning occasionally, until tender and caramelized in places. Grill the onions until browned and tender. Grill the turkey patties until browned and cooked through, about 4 minutes per side. Generously brush the top of the patties with barbecue sauce, flip the patties, and brush the second side with the remaining barbecue sauce. Let cook for one additional minute.

4. Transfer the quinoa to a large bowl and stir in the apple cider vinegar, then the cilantro, scallion, cheese, olive oil, and black pepper. Cut the corn off the cob and add it to the bowl with the quinoa. Dice the grilled onions and stir them into the quinoa. Serve the turkey patties over the quinoa.

bbq meatballs quinoa 5

poblanos stuffed with black beans and cheese

stuffed poblanos 3

Sometimes I try to have quick, healthy weeknight dinners that don’t include any grains. I’ve found that melty cheese is a satisfying way to replace the simple comfort of starches – although I’m not sure that replacing brown rice with cheese is much of a nutritional improvement.

stuffed poblanos 1

This has become a new favorite, in that it takes the main flavors of some of my fallback rice and bean dishes and stuffs them inside of a pepper. (I’m always reaching for the bag of frozen Hatch green chile we keep in the freezer so I can add it to the beans, and I have to remind myself that there’s plenty of spicy chiles in this recipe already.)

stuffed poblanos 2

With beans, Greek yogurt, and a simple guacamole, there’s plenty to keep me full here, even with a restrained amount of cheese. Even if it isn’t, in the end, any healthier than my normal bowl of rice and beans, it’s worth it for a meal as good as this one.

stuffed poblanos 5

Printer Friendly Recipe
Poblanos Stuffed with Black Beans and Cheese (inspired by Sara Forte’s The Sprouted Kitchen cookbook)

2 generous main course servings or 4 side dish servings

You can, of course, add more cheese, but I was trying to keep it light, and I found this amount to be satisfying.

4 medium poblano peppers
2 teaspoons oil
1 onion, diced
salt
2 cloves garlic, minced
1 (15-ounce) can black beans (about 2 cups)
½ cup salsa
3 ounces cheddar, monterey jack, cotija, or queso fresco, shredded or crumbled
1 avocado, peeled and seeded
juice from ½ lime
¼ cup Greek yogurt (or sour cream)
cilantro

1. Heat the oven to 425 degrees. Cut a slit in each pepper from the stem to the end. Place the peppers in a rimmed baking dish; bake for 15 minutes, until softened.

2. Meanwhile, heat the oil in a medium saucepan over medium heat. Add the onion and 1/4 teaspoon salt; cook, stirring occasionally, until the onion is translucent, about 5 minutes. Add the garlic and cook, stirring constantly, until fragrant, about 30 seconds. Add the salsa and beans. Simmer, uncovered for 10 minutes. Remove from the heat and stir half of the cheese into the beans.

3. Remove the peppers from the oven. When they’re cool enough to handle, use a paring knife to remove the seeds and veins. Pour out any liquid inside the peppers. Spoon one-quarter of the bean mixture into each pepper, then stuff the remaining cheese into the peppers over the beans. Transfer to the oven and bake until the cheese is spottily browned and the peppers are soft, 15-20 minutes.

4. In a small bowl, mash the avocado with a pinch of salt and half of the lime juice. In a separate bowl, mix the Greek yogurt with the remaining lime juice. Serve the roasted peppers with the avocado, yogurt, and a sprinkling of cilantro.

stuffed poblanos 4

salmon tacos with tomatillo-avocado slaw

salmon tacos 6

I’ve always made my fish tacos with white fish and been perfectly happy with that, but salmon actually makes a lot of sense. Just like barbacoa and chicken thighs, its richness makes a nice contrast to the crunchy slaw and tart dressing. Plus, I just really like salmon.

salmon tacos 1

In this case, it’s rubbed with chili spices, a little sugar, and just a bit of finely ground coffee for an extra bite. Rather than serving slices of avocado in the tacos, it’s pureed along with tomatillos and cilantro into the dressing for the slaw. As much as a pile of different toppings on tacos is fun, on a weeknight, I appreciate the simplification of mixing them all into one bowl with the cabbage.

salmon tacos 4

I don’t plan on pushing my white fish tacos aside – or my shredded beef tacos, or my Asian-inspired tacos, or even my lentil tacos – but we eat tacos often enough to enjoy plenty of variety. Combining one of my favorite types of fish with a creamy dressing made with avocados and stuffing it all into fresh corn tortillas? Plus it’s easy and healthy? Yes, this can be added to the list of tacos I make regularly.

salmon tacos 7

Printer Friendly Recipe
Dry-Rubbed Salmon Tacos with Tomatillo-Avocado Slaw (rewritten from Food and Wine via JBean Cuisine)

Serves 4

4 cups of pre-shredded coleslaw mix would work well here in place of the cabbage.

Tomatillo-avocado slaw:
2 tomatillos, husked and halved
2 tablespoons cilantro
1 small jalapeño, coarsely chopped
1 garlic clove, coarsely chopped
6 tablespoons sour cream or Greek yogurt
1 ripe avocado, halved, peeled, and pitted
salt to taste
lime juice to taste
½ head cabbage, cored and finely sliced

Salmon:
1 teaspoon ground cumin
1 teaspoon chili powder
½ teaspoon brown sugar
¼ teaspoon finely ground coffee
Salt and freshly ground black pepper
2 (8-ounce) salmon fillets
1 tablespoon olive oil
juice of ½ lime

For serving:
12 small flour or corn tortillas, heated and wrapped to keep warm
hot sauce, for serving

1. For the slaw: Transfer the tomatillos, cilantro, jalapeno, garlic, sour cream or Greek yogurt, and avocado to a blender or the bowl of a food processor. Process until smooth; season to taste with salt and lime juice. In a large bowl, stir the dressing into the cabbage. Set aside.

2. For the salmon: In a small bowl, combine the cumin, chili powder, brown sugar, coffee, and a generous pinch of salt and pepper. Dry the salmon fillets, then rub them with the spice mixture. If the salmon has skin, use all the rub on the skinless side; if the fillets are skinless, spread the spices on both sides.

3. Heat the oil in a large nonstick skillet over medium-high heat. Add the salmon (skin-side up if it has skin), and cook without moving until well-browned, about 4 minutes. Reduce the heat to medium, flip the salmon, and cook until the salmon just flakes, another 4-6 minutes. Transfer the salmon to a plate and break into approximately 1-inch pieces. Season with lime juice.

4. To serve: Top each tortilla with a portion of the salmon and the slaw; sprinkle with hot sauce. Serve immediately.

salmon tacos 5

beef satay with spicy mango dip

beef satay 5

People keep giving me venison. I have friends who enjoy hunting but have families that don’t love the flavor of venison. I have another friend who doesn’t prefer the front shoulder, so I’ve turned several into barbacoa (and then gave him the recipe, and that was the end of my venison front shoulder donations). I don’t even know how I ended up with the prized backstrap, a cut similar to the tenderloin, but I’m not complaining.

beef satay 1

Rather than search for venison-specific recipes, I consider venison interchangeable with beef or sometimes pork. My brother sent me this recipe, and while I didn’t have the right cut of beef, I did have venison backstrap. It’s an interesting recipe, with a marinade that includes ground cashews. It ends up as more of a paste, which sticks to the meat as it cooks.

beef satay 2

It may be unusual, but it works. Dave and I made the full recipe, which supposedly feeds four, and we had no leftovers. Someone needs to give me more venison backstrap so I can make this again immediately – and this time I won’t share the recipe.

beef satay 3

Printer Friendly Recipe
Beef Satay with Spicy Mango Dip
(rewritten from Linda Doeser’s Chinese: The Essence of Asian Cooking)

The recipe recommends serving with salad greens, but I mostly considered those garnish, while rice was important to soak up the sauce.

I made tamarind sauce the same way I do for pad Thai, by soaking tamarind paste in hot water, then straining out the solids and using the liquid in the recipe. You might also be able to find tamarind concentrate. If not, it won’t ruin the recipe to leave it out.

For the satay:
1 pound sirloin steak, thinly sliced across the grain and skewered
1 tablespoon coriander seeds
1 teaspoon cumin seeds
½ cup raw cashews
1 tablespoon vegetable oil
2 shallots or 1 small onion, finely chopped
½-inch piece fresh ginger, finely chopped
1 clove garlic, crushed
2 tablespoons tamarind sauce
2 tablespoons dark soy sauce
2 teaspoons sugar
1 teaspoon rice vinegar or white wine vinegar
Salad greens, to serve

For the spicy mango dip:
1 ripe mango, peeled and seeded
1 to 2 fresh red chiles, seeded and finely chopped
1 tablespoon fish sauce
Juice of 1 lime
2 teaspoons sugar
2 tablespoons chopped fresh cilantro
½ teaspoon salt

1. Heat a small not-notstick skillet over medium-high heat. Add the coriander and cumin seeds; toast, stirring constantly, until fragrant, about 30 seconds. Immediately transfer to a mortar and pestle or spice grinder. Let cool completely before grinding.

2. In the bowl of a food processor, combine the ground spices, cashews, oil, shallots, ginger, garlic, tamarind sauce, soy sauce, sugar, and vinegar. Process until the cashews are finely chopped. Coat the meat with the cashew mixture; cover and chill for at least 30 minutes or up to 8 hours.

3. For the dip: Process the mango, chiles, fish sauce, lime juice, sugar, cilantro, and salt in the food processor until smooth.

4. Prepare a medium-hot grill. Cook the skewers directly over the heat until browned and cooked through, 3-4 minutes per side. (Alternatively, cook for the same amount of time as close to the broiler element as possible.) Serve with the sauce and greens.
beef satay 4

spanish chickpea and spinach stew

chickpea spinach stew 1

I wasn’t big on life-changing, be-a-better-person resolutions this year, but I did get inspired for a lot of projects. There’s the cookbook goal; a list of house projects; an effort to post on my blog’s Facebook page more often; and a desire to take more pictures. To hold myself accountable (and give myself a satisfying box to check when I complete something), I’m tracking everything.

chickpea spinach stew 5

My goal is to put effort into photography almost every day. It was easy the first few days, when we were traveling, but I was at a loss the first day back at work, when I don’t do much other than sit in my office all day, make dinner, and fold laundry. But of course I love food pictures, and dinner was right there, so I figured I might as well see if I could get a decent shot without much effort.

chickpea spinach stew 6

In this case, not only were the shots decent (maybe from all that practice I’ve been getting taking random dinner pictures!), but the meal itself was fantastic. I’m a sucker for tomato-based soups, but with all the other good stuff in there, I didn’t even feel the need to dip a grilled cheese sandwich into the bowl. It’s lucky that I’d snapped a few quick pictures before we ate, because there were no leftovers – not that making it again soon would have been a hardship.

chickpea spinach stew 2

Printer Friendly Recipe
Spanish Chickpea and Spinach Stew
(rewritten but not significantly changed from Serious Eats)

I was worried that the spinach would turn to mush after 40 minutes of simmering, but even the baby spinach I used was okay. A heartier spinach would likely be even better.

For the tomatoes, I transferred half of the tomatoes from the can to a small bowl and used scissors to chop them. I used an immersion blender to puree the remaining tomatoes and ginger in the tomato can.

1 (28-ounce) can whole peeled tomatoes
1 1-inch knob ginger, peeled
2 tablespoons extra-virgin olive oil (plus more for serving)
1 medium onion, finely sliced
4 cloves garlic, finely sliced
1 teaspoon sweet or hot smoked paprika
12 ounces fresh spinach, roughly chopped
2 (14-ounce) cans garbanzo beans (chickpeas), undrained
2 bay leaves
2 teaspoons soy sauce
Kosher salt
2 teaspoons sherry vinegar (optional)

1. Blend half the tomatoes, all the liquid from the can, and the ginger until smooth. Coarsely chop the remaining tomatoes.

2. In a large skillet over medium-high heat, cook the onion, garlic, and paprika, stirring occasionally, until the onion begins to brown, about 6 minutes. Add the tomato-ginger puree; stir to combine. Gradually add the spinach, then reduce the heat to medium and simmer, stirring occasionally, until the spinach is tender, about 10 minutes.

3. Add the chopped tomatoes, garbanzo beans (with their liquid), bay leaves, and soy sauce, and bring to a boil over high heat. Reduce to a bare simmer and cook, stirring occasionally, until thickened, about 30 minutes. Stir in the sherry vinegar. Season to taste with salt and serve immediately, drizzling with extra virgin olive oil.

chickpea spinach stew 4