pasta with zucchini cream sauce

pasta with zucchini cream sauce 7

I love love love Domenica Marchetti’s The Glorious Pastas of Italy. Although it isn’t my newest cookbook, it’s still the one that gets me the most excited to cook. But somehow I’d convinced myself that it was a cookbook for winter, full of baked pastas and braised meats. A recent perusal through the book proved me wrong. Not only are there four soups specifically designed for each season, there was this recipe, based on zucchini, the butt of everyone’s summer garden jokes.

pasta with zucchini cream sauce 3

I’ve never been presented with the problem of too much zucchini, but while I happen to love the vegetable, this might be more because I’m a terrible gardener. Regardless, this is yet another great way to use it.

pasta with zucchini cream sauce 5

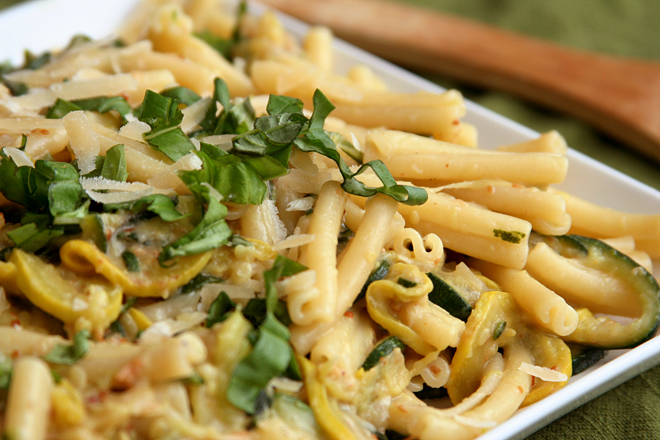
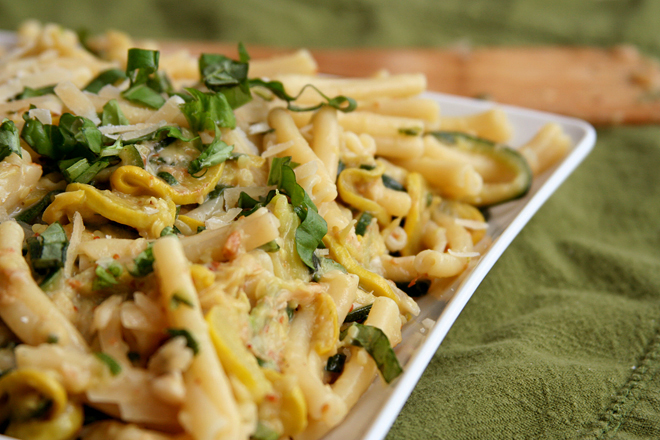
Summer squash can be difficult to cook without it getting mushy, but this recipe solves that problem for you. It’s supposed to be mush; the vegetables cook down into the sauce. There’s still toothy bites, but this isn’t pasta with zucchini; it’s pasta in sauce made from summer squash. Everything else is just playing a supporting role, with savoriness from the pancetta, body from the cream, and salty richness in the cheeses. It’s a great new way to eat this summer vegetable and a perfect example of why I love this cookbook so much.

pasta with zucchini cream sauce 6

Printer Friendly Recipe
Pasta with Zucchini Cream Sauce (adapted from Domenica Marchetti’s The Glorious Pastas of Italy)

Serves 4 as a side dish or starter course

I made this once without checking the recipe before shopping and had to substitute prosciutto for pancetta, skip the basil, and double the parmesan because I didn’t have pecorino. The dish was still delicious.

I’ve reduced the cream a bit, but the only major change I’ve made is to drastically reduce the amount of pasta, so every bite of pasta gets some creamy zucchini with it.

2 tablespoons extra-virgin olive oil
4 ounces thickly sliced pancetta, cut into narrow strips
2 cloves garlic, cut into paper-thin slices
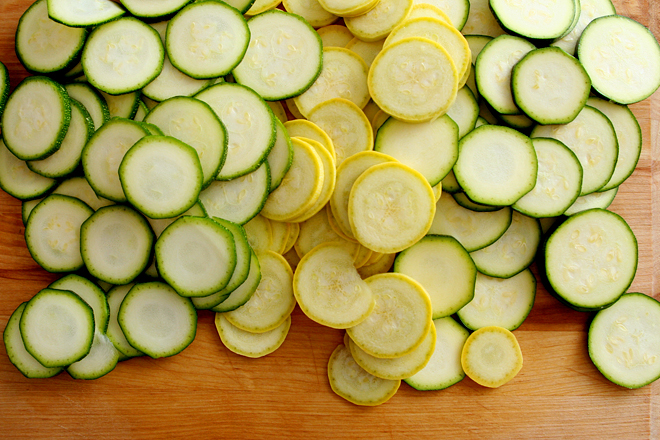
6 to 8 small to medium zucchini or other summer squash, sliced into thin coins
salt
freshly ground black pepper
¼ cup heavy cream
8 ounces dried pasta
½ cup freshly grated Parmigiano-Reggiano cheese
½ cup freshly grated pecorino Romano cheese
5 large fresh basil leaves, cut into narrow strips (chiffonade)

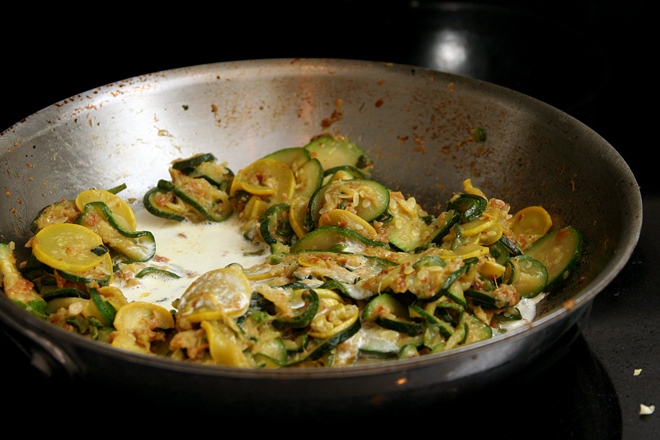
1. In a large skillet over medium heat, heat the olive oil until shimmering. Add the pancetta; cook, stirring occasionally, until lightly browned. Add the garlic; cook and stir until fragrant, about 30 seconds. Add the zucchini, 1 teaspoon salt, and ½ teaspoon pepper; stir to combine. Reduce the heat to medium and cook, stirring occasionally, until the squash breaks down, about 30 minutes. Stir in the cream.

2. Meanwhile, bring 3 quarts of water to a boil. Add 1 tablespoon salt and the pasta. Cook according to package instructions; drain, reserving 1 cup of the pasta water.

3. Add the pasta, ½ cup of the reserved water, and the cheeses to the zucchini mixture. Cook and stir until the pasta is coated, adding more water if necessary to loosen the sauce. Stir in the basil and serve immediately.

pasta with zucchini cream sauce 8

pasta with tiny meatball sauce

tiny meatball sauce 15

I haven’t been this excited about a cookbook in a while. This is the type of cookbook that makes me eager to get into the kitchen, particularly because I want to make every recipe in the book. I thought I would start with one of the most involved recipes, one of those “choose your own adventure” recipes that has you page flipping to find all the different components.

tiny meatball sauce 11

The first is fresh pasta, which I’ve made before, but the recipe in the book differed from my usual with the inclusion of semolina, salt, nutmeg, and, most significantly, oil. Once the pasta was cooked and sauced, I didn’t notice the extra flavorings, but the oil seemed to make rolling easier. I also made a new shape that required less rolling and cooked up pleasantly toothsome.

tiny meatball sauce 1

The second part is the sauce, which is a slow-cooked meat sauce, but with a twist. Instead of simmering the sauce with ground meat, or with beef meant to be shredded and added back to the sauce, the meat is kept in this sauce through hours of simmering, and then is removed. And not added back in. The meat is not part of the sauce, it’s just there to infuse it with flavor. It’s like you’re making tomato broth.

tiny meatball sauce 2

The last part, then, is the tiny meatballs. It’s a simple mixture, no bread for tenderizing, just meat, seasoning, and an egg to bind it. The recipe instructs you to form the meatballs “just larger than a chickpea”, but I’m not insane and would prefer to stay that way, so my tiny meatballs were about twice that size, and still plenty tiny for me. Twelve ounces of meat turned into 72 tiny meatballs.

tiny meatball sauce 7

I loved the tiny meatballs. I can see myself making them again sometime, even though I do not love forming tiny meatballs. I’ve also started to add a dribble of olive oil into my pasta dough, although I skip the semolina, nutmeg, and salt for simplicity’s sake.

tiny meatball sauce 8

While I enjoyed everything about the sauce – the flavor, the plateful of tomatoey meat we ate as an appetizer, the fun of braising – I’ll make it differently in the future. The original recipe calls for three types of meat, and it’s impractical for most home cooks to buy small portions of a variety of meats. Instead, I’ll just stick to our favorite – lamb – and I’ll use a bony cut like blade chops, because I suspect the bone will add even more flavor to the sauce than the meat did.

tiny meatball sauce 9

Obviously making a slow-braised sauce, homemade pasta, and forming 72 tiny meatballs is not an insignificant amount of effort. But it was the most fun I’ve had in the kitchen in months, with the added bonus that I learned some new tricks. I can’t wait to choose another recipe from my favorite new cookbook and do it again.

tiny meatball sauce 14

One year ago: Curry Coconut Chickpea Soup
Two years ago: Baked Ziti
Three years ago: Fresh Ginger and Chocolate Gingerbread
Four years ago: Deviled Eggs with Tuna

Printer Friendly Recipe
Maccheroni alla Chitarra with Ragù all’Abruzzese and Palottine, aka Pasta with Tiny Meatball Sauce (completely rewritten but hardly changed from Domenica Marchetti’s The Glorious Pasta of Italy)

Serves 8

I went ahead and bought three different types of meat for this, but I don’t think it’s necessary. Pick your favorite and buy just that one cut.

I don’t usually cook with veal, so I used 8 ounces ground beef plus 4 ounces ground pork plus ⅛ teaspoon gelatin, dissolved in the egg, in the meatballs instead.

Ragù:
2 (28-ounce) cans whole tomatoes with their juice
2 tablespoons olive oil
6 ounces boneless beef chuck roast, cut into four equal pieces
6 ounces boneless pork shoulder, cut into three equal pieces
6 ounces boneless lamb shoulder cut into three equal pieces
Salt
Freshly ground black pepper
1 onion, finely diced

Pasta:
4 cups (18 ounces) all-purpose flour
2 tablespoons semolina flour
1 teaspoon table salt
Pinch ground nutmeg
6 large eggs
2 tablespoons extra virgin olive oil

Meatballs:
12 ounces ground veal
½ teaspoon salt
Pinch freshly grated nutmeg
1 large egg, lightly beaten
Vegetable oil for cooking

1. For the ragù: If you have a food mill, press the tomatoes through the disk with the smallest holes, discarding the solids. If you don’t have a food mill, puree the tomatoes in a food processor or blender.

2. Generously season the meat with salt and black pepper. In a 5-quart Dutch oven over medium-high heat, heat the oil until it just starts to smoke. Add the meat and cook, without moving, until deeply browned on one side, about 2 minutes. Rotate the meat and brown on the second side. Transfer the meat to a plate.

3. Reduce the heat to medium, add the onion, and cook, stirring occasionally, until the onion softens but does not brown, about 4 minutes. Add the tomatoes, raise the heat to medium-high, and bring to a simmer. Add the meat back to the pot, reduce the heat to medium-low, and simmer, uncovered, for about 3 hours, until the meat is tender and the sauce is thickened. Remove the meat before using the sauce; reserve for another use (or just eat it right then, because it’s delicious).

4. For the pasta: Place the flours, salt, and nutmeg in the bowl of a food processor; pulse to combine. Add the eggs and oil; process until the mixture clumps together in large crumbs. Form a small portion of dough into a ball; if it’s too dry to stick together, add up to 2 tablespoons more oil; if it’s sticky, add up to ½ cup more flour. Wrap the dough in plastic wrap and set it aside for 30 minutes to rest.

5. Divide the dough into 8 portions. Work with one at a time, keeping the others covered with plastic wrap or a damp dishtowel. Flatten the dough and pass it through a pasta roller on the widest setting. Fold the dough in thirds, like a letter, and roll it through the widest setting again. Repeat the rolling and folding 3-4 more times, until the dough is smooth. Flour the dough (with semolina flour if you have it) as much as needed to prevent sticking. Adjust the pasta roller to the next-thinnest setting and roll the dough through twice, then repeat on the third-thinnest setting. Thin the dough to the fourth-narrowest setting on your pasta roller. Repeat the rolling, folding, and thinning with the remaining balls of dough. Pass each strip of dough through the thin cutters on the pasta roller to form long noodles that are approximately square in cross section.

6. For the meatballs: Use your hands to evenly combine the veal, salt, nutmeg, and egg. Form the mixture into balls about ½-inch in diameter.

7. In a 12-inch skillet, heat 3 tablespoons oil over medium-high heat until almost smoking. Add the meatballs, and cook until well browned a couple sides, about 4 minutes, turning about once a minute with a spatula. Transfer to the pot with the ragù; keep warm.

8. Bring a large pot of water to a boil. Add about a tablespoon of salt and the pasta and cook until al dente, about 5 minutes. Drain, reserving about a cup of the cooking water.

9. Return the drained pasta to the pot; toss with about two-thirds of the sauce and meatballs, adding some of the reserved cooking water if the sauce is too thick. Transfer the pasta to a warmed serving bowl (or individual bowls) and spoon the remaining sauce over the top. Serve immediately, with parmesan and crushed red pepper flakes to pass.

tiny meatball sauce 13

braised white beans with zucchini, tomatoes, and potatoes

Dave tends to have healthier food preferences than me. It was his suggestion that we eat vegetarian or seafood meals on weekdays and save meat for the weekends. My initial efforts to find a vegetarian cookbook that reflected how I liked to cook was years ago, and the pickings then, unlike now, were slim. Back then, most vegetarian cookbooks seemed to tend toward the gourmet end of the spectrum, with lengthy preparations and rare ingredients.

Jeanne Lemlin’s Vegetarian Classics was exactly what I was looking for. Generally, the dishes are quick, based on common ingredients and cooking techniques, and accessible to non-vegetarians. I liked it so much that I bought it for my sister. She’s a busy working mom with no interest in becoming a vegetarian, but I still thought this was a cookbook she’d get a lot of use of.

This recipe is one of my favorites from the book. It fulfills that ultimate trifecta – easy, healthy, delicious. It’s the slightest bit spicy from crushed red pepper, the zucchini is just tender, and the beans and potato soak up all of the garlicky tomato juice. And I have Dave to thank; otherwise, I don’t know that I ever would have searched out a vegetarian cookbook.

One year ago: Roasted Garlic Balsamic White Bean Dip
Two years ago: Honey Yogurt Dip
Three years ago: Apple Galette

Printer Friendly Recipe
Braised White Beans with Zucchini, Tomatoes, and Potatoes (adapted from Jeanne Lemlin’s Vegetarian Classics)

Serves 2-3

1 tablespoon extra virgin olive oil
4 garlic cloves, minced
¼ teaspoon crushed red pepper flakes
1 (14-ounce) can diced tomatoes
¼ cup water
¼ teaspoon dried rosemary, crushed
¼ teaspoon salt
1 medium Yukon gold potato, cut into ¼-inch dice
1 zucchini, quartered lengthwise and sliced into ¼-inch slices
1 (14-ounce) can Great Northern beans, rinsed and drained

1. Heat the oil, garlic, and red pepper in a 12-inch nonstick skillet over medium heat. Cook for about 30 seconds after the garlic begins to sizzle. (It should not become at all colored.) Stir in the tomatoes, water, rosemary, salt, and potatoes. Cook, covered, at a lively simmer for 15 minutes, or until the potatoes are almost cooked through.

2. Mix in the zucchini and beans. Cover the pan again and cook, stirring often, 10 minutes more, or until the zucchini and potatoes are tender. At this point check the consistency of the sauce; it should be thick and soupy, not dry or watery. Add a bit of water if the mixture doesn’t have much sauce; cook it uncovered if the juices seem watery. Serve in large pasta bowls, preferably, or on plates.

I have blogged about this recipe before, but I felt that a recipe as good as this one deserved a fresh entry.

how to adapt any bread recipe to be whole wheat

As much as I love Peter Reinhart’s Whole Grain Breads, I’ve only made a few recipes from the book. Instead, I’ve been busy using his techniques to adapt my old favorite bread recipes to whole wheat versions. While you can, in general, simply substitute up to half of the flour in a bread recipe with whole wheat, I guarantee that you’ll have better results if you use Reinhart’s trick.

Reinhart uses the same method for most of the breads in his book – about half of the whole wheat flour is combined with salt and liquid and the other half is combined with yeast and liquid. Both mixtures sit overnight before they’re mixed and kneaded into the dough. The resting time breaks down the long bran molecules, making the bread smoother, lighter, and sweeter – in short, more like a white bread.

The 100% whole wheat breads that I’ve tried from Reinhart’s book are truly exceptional. However, I guess I’m sort of a wimp about whole grains. I do like the flavor and texture of white bread, but of course I prefer the health factor of whole grain bread. Plus, I’m still interested in bread recipes outside of Reinhart’s book.

(the pre-dough before resting)

The solution is to mix up just one of Reinhart’s mixtures with whole wheat flour and let that rest overnight (or for around 8 hours), then continue with the recipe as written, mixing in the pre-dough. I’ve done this with all sorts of bread recipes – English muffins, pain ordinaire, light brioche buns, country crust bread, pizza crust.

(the pre-dough after resting and a bit of kneading)

In all cases, I take half of the flour in the recipe and mix it with ¼ teaspoon salt for every 4 ounces of flour. Then I mix in enough liquid – whatever liquid the recipe calls for – to moisten the flour until it forms a dough. Most bread recipes call for about 16 ounces flour total, so the pre-dough is simply 8 ounces of whole wheat flour, ½ teaspoon of salt, and ¾ cup of water (or whatever liquid the recipe calls for).  When the final dough is mixed, those ingredients are subtracted from the original recipe.

And every time, the result is essentially identical to an all-white version – the dough is smooth, elastic, and easy to work with. The bread is light and flavorful. And, I still get to play with an entire world of bread recipes. Win win win!

One year ago: Roasted Kale
Two years ago: Banana Walnut Pancakes

Printer Friendly Recipe
Whole Wheat Light Brioche Burger Buns (adapted from Smitten Kitchen and Peter Reinhart’s Whole Grain Breads)

Makes 8 buns

Pre-dough:
1¾ cups (8 ounces) whole wheat flour
½ teaspoon salt
¾ cup water

1. Mix all of the soaker ingredients together in a bowl for about 1 minute, until all of the flour is hydrated and the ingredients form a ball of dough.

2. Cover loosely with plastic wrap and leave at room temperature for 12 to 24 hours. (If it will be more than 24 hours, place the soaker in the refrigerator; it will be good for up to 3 days. Remove it 2 hours before mixing the final dough to take off the chill.)

Dough:
8 ounces (about 1⅔ cups) bread flour
1 teaspoon salt
2½ tablespoons unsalted butter, softened
pre-dough
¼ cup warm water
3 tablespoons warm milk
2 teaspoons instant yeast
2½ tablespoons sugar
1 large egg
extra flour or water for adjustments
egg wash: 1 tablespoon milk or 1 egg white or whole egg beaten with 1 tablespoon water
sesame seeds

1. If mixing with a stand mixer: Add the flour and salt to mixer bowl fitted with paddle attachment. Mix on low just to combine. Add the butter and mix on medium-low speed until the mixture resembles crumbs. Cut the pre-dough into about 12 pieces and add them to the flour mixture, tossing the pieces to coat (to keep them from immediately sticking back together). Replace the paddle attachment with the hook. Add the water, milk, yeast, sugar, and egg to the mixer bowl and mix on medium-low until combined, then continue kneading until smooth and elastic, 6-8 minutes. The dough should be just a bit loose and sticky; add flour if necessary.

If mixing by hand: In a large bowl, whisk flours with salt. Add butter and rub into flour between your fingers, making crumbs. Cut the pre-dough into about 12 pieces and add them to the flour mixture, tossing the pieces to coat (to keep them from immediately sticking back together). Add the water, milk, yeast, sugar, and egg and stir with a rubber spatula until a dough forms. Scrape dough onto clean, well-floured counter and knead, scooping dough up, slapping it on counter and turning it, until smooth and elastic, 8 to 10 minutes. The dough will be on the sticky side so it can be a bit messy, but keep in mind that the more flour you knead in, the tougher the buns will get. Try to leave them tackier than you would a round loaf.

2. Spray a bowl with nonstick spray; shape dough into a ball and place it in bowl. Cover bowl with plastic wrap or a damp towel and let rise in a warm place until doubled in bulk, one to two hours.

3. Line a baking sheet with parchment paper or a silicone mat. Divide dough into 8 equal parts. To shape each portion into an even round, gently pull the edges toward a pucker and pinch them together. Gently roll each into a ball and arrange them two to three inches apart on the prepared baking sheet. Cover loosely with a piece of plastic wrap lightly coated in nonstick spray (or a damp towel) and let buns rise in a warm place for about one hour.

4. Preheat oven to 400 degrees with rack in center. Brush egg wash on buns and sprinkle with sesame seeds. Bake, turning sheet halfway through baking, until tops are golden brown and an instant-read thermometer reads at least 185 degrees, about 15 minutes. Transfer to a rack to cool completely.

Printer Friendly Recipe
Whole Wheat Pain Ordinaire (adapted from Eric Treuille and Ursula Ferrigno’s Ultimate Bread and Peter Reinhart’s Whole Grain Breads)

Makes 1 loaf

Pre-dough:
1¾ cups (8 ounces) whole wheat flour
½ teaspoon salt
¾ cup water

1. Mix all of the soaker ingredients together in a bowl for about 1 minute, until all of the flour is hydrated and the ingredients form a ball of dough.

2. Cover loosely with plastic wrap and leave at room temperature for 12 to 24 hours. (If it will be more than 24 hours, place the soaker in the refrigerator; it will be good for up to 3 days. Remove it 2 hours before mixing the final dough to take off the chill.)

Dough:
1¾ cups (9½ ounces) all-purpose or bread flour
pre-dough
2 teaspoons instant yeast
⅔ cup water, room temperature
¾ teaspoon salt

1. Add the flour to a mixer bowl fitted with hook attachment (or a large bowl if mixing by hand). Cut the pre-dough into about 12 pieces and add them to the flour, tossing the pieces to coat (to keep them from immediately sticking back together). Add the water, yeast, and salt to the mixer bowl and mix on medium-low until combined (or stir with a rubber spatula), then continue kneading until smooth and elastic, 6-8 minutes (8-10 minutes if by hand). The dough should be soft but not sticky; add flour if necessary.

2. Lightly oil a large bowl and transfer the dough to the bowl, rolling it to coat with the oil. Cover the bowl with plastic wrap or a damp towel. Let rise until doubled in size, about 1½ to 2 hours.

3. Gently pat the dough into a rough rectangle. Fold the bottom third of dough, letter style, up to the center and press to seal, creasing surface tension on the outer edge. Fold the remaining dough over the top and use the edge of your hand to seal the seam closed and to increase the surface tension all over. Press evenly with the palms of both hands and roll the dough backward and forward until it is 10 inches in length. Line a pizza peel baking parchment. Place the loaf on the peel and lightly dust with flour. Cover loosely with plastic wrap or a damp towel.

4. Proof at room temperature for about 1 hour, or until the loaf has grown to about twice its original size. About half an hour into the second rise, place a baking stone on the bottom rack of the oven and preheat the oven to 500 degrees.

5. Using a very sharp knife or a serrated bread knife, cut 5 diagonal slashes, each about ¼ to ½-inch deep, across the top of the loaf. (Alternatively, cut one long slash that extends for the length of the loaf.)

6. Transfer the dough on the parchment to the baking stone. Close the oven and reduce the temperature to 450 degrees. Bake until golden brown and the temperature is at least 200 degrees at the center. Transfer the loaves to a cooling rack and cool for at least 1 hour before slicing and serving.

Printer Friendly Recipe
Whole Wheat Country Crust Bread (adapted from Betty Crocker and Peter Reinhart’s Whole Grain Breads)

Makes 1 sandwich loaf

Pre-dough:
1¾ cups (8 ounces) whole wheat flour
½ teaspoon salt
¾ cup water

1. Mix all of the soaker ingredients together in a bowl for about 1 minute, until all of the flour is hydrated and the ingredients form a ball of dough.

2. Cover loosely with plastic wrap and leave at room temperature for 12 to 24 hours. (If it will be more than 24 hours, place the soaker in the refrigerator; it will be good for up to 3 days. Remove it 2 hours before mixing the final dough to take off the chill.)

Dough:
1¾ cups (9½ ounces) unbleached flour
1 teaspoon table salt
¼ cup water, warm (110 degrees)
1 egg
2 tablespoons vegetable oil or unsalted butter, melted
¼ cup (1.75 ounces) granulated sugar
2 teaspoons instant yeast

1. Add the flour to mixer bowl fitted with hook attachment (or a large bowl if mixing by hand). Cut the pre-dough into about 12 pieces and add them to the flour, tossing the pieces to coat (to keep them from immediately sticking back together). Add the salt, water, egg, oil, sugar, and yeast to the mixer bowl and mix on medium-low until combined (or stir with a rubber spatula), then continue kneading until smooth and elastic, 6-8 minutes (8-10 minutes if by hand). The dough should be soft but not sticky; add flour if necessary.

2. Lightly oil a large bowl and transfer the dough to the bowl, rolling it to coat with the oil. Cover the bowl with plastic wrap or a damp towel. Let rise until doubled in size, about 1½ to 2 hours.

3. Form dough into loaf by gently pressing the dough into a rectangle, one inch thick and no wider than the length of the loaf pan. Next, roll the dough firmly into a cylinder, pressing with your fingers to make sure the dough sticks to itself. Turn the dough seam side up and pinch it closed. Finally, place dough in greased 9-by-5-by-3-inch loaf pan and press it gently so it touches all four sides of the pan.

4. Cover with plastic wrap or a damp towel; set aside in warm spot until dough almost doubles in size, about 45 minutes. Heat oven to 350 degrees.

5. Remove plastic wrap from loaf pan; place pan in oven. Bake until instant-read thermometer inserted at angle from short end just above pan rim into center of loaf reads 195 degrees, about 40 to 50 minutes. Remove bread from pan, transfer to a wire rack, and cool to room temperature. Slice and serve.

100% whole wheat sandwich bread

Copy of IMG_8503

My guidelines for nutrition can pretty much be summed up by:

  1. Only eat when hungry. But don’t eat too much.
  2. Don’t eat processed crap.
  3. Eat as many fruits and vegetables as you can stand.
  4. Don’t be a baby about whole grains.

Copy of IMG_8488
I’ve been getting worse and worse about that last one recently. I’ve walked by Reinhart’s book on whole grain breads in the bookstore so many times and never even bothered to pick it up. It’s just that white bread, made well, is so darn good, you know? I’m not talking about Wonder Bread or something, I mean a nice sweet tender sandwich bread or a fantastic complex rustic baguette.

Copy of IMG_8491

But my interest was sparked when I saw the whole wheat bagels that Stefany made from this book. They look at least as good as any bagels I’ve made – but they’re so much healthier.  Within a week, I tried the recipe, was pleased with the results, and bought the book.

Copy of IMG_8494

It’s Peter Reinhart, so we’re not talking about the most simple recipes here. In general, they’re two day affairs. The first day, you mix two things. One is a thick paste of whole wheat flour, liquid, and salt, and the other one is a mixture of whole wheat flour, liquid, and yeast. These both set overnight (or longer, if necessary) and are incorporated into the rest of the dough the next day. On the day of baking, you follow essentially a normal bread-baking procedure, from mixing and kneading, through rising, shaping, proofing, and baking.

Copy of IMG_8498

Most homemade whole wheat bread recipes call for, at most, half whole wheat flour. This recipe uses 100% whole wheat flour, and it’s as good as any of those other recipes. It’s tender and light, just like you want from a sandwich bread. And it tastes seriously good. Obviously it tastes whole wheaty, but it has more to it than that. The long soaks from the pre-doughs give the bread a full flavor that includes sweetness and a bit of acidity. I am officially hooked on 100% whole wheat breads.

Copy of IMG_8500

One year ago: Lemon Pancakes with Blueberry Syrup

Printer Friendly Recipe
100% Whole Wheat Sandwich Bread (from Peter Reinhart’s Whole Grain Breads)

Reinhart also has a “Transitional Whole Wheat Sandwich Bread” that is made the same way, except it uses white unbleached bread flour in the biga. If you decide to make this version instead, keep in mind that you’ll need a little less water when working with white flour (1-2 teaspoons per ounce of flour).

Soaker:
1¾ cups (227 grams) whole wheat flour
½ teaspoon (4 grams) salt
¾ cup plus 2 tablespoons (198 grams) milk, buttermilk, yogurt, soy milk, or rice milk

1. Mix all of the soaker ingredients together in a bowl for about 1 minute, until all of the flour is hydrated and the ingredients form a ball of dough.

2. Cover loosely with plastic wrap and leave at room temperature for 12 to 24 hours. (If it will be more than 24 hours, place the soaker in the refrigerator; it will be good for up to 3 days. Remove it 2 hours before mixing the final dough to take off the chill.)

Biga:
1¾ cups (227 grams) whole wheat flour
¼ teaspoon (1 gram) instant yeast
¾ cup (170 grams) filtered or spring water, at room temperature (about 70F)

1. Mix all the biga ingredients together in a bowl to form a ball of dough.  Using wet hands, knead the dough in the bowl for 2 minutes to be sure all of the ingredients are evenly distributed and the flour is fully hydrated. The dough should feel very tacky. Let the dough rest for 5 minutes, then knead it again with wet hands for 1 minute. The dough will become smoother but still be tacky.

2. Transfer the dough to a clean bowl, cover tightly with plastic wrap, and refrigerate for at least 8 hours and up to 3 days.

3. About 2 hours before mixing the final dough, remove the biga from the refrigerator to take off the chill. It will have risen slightly but need not have risen significantly in order to use it in the final dough.

Final dough:
All of the Soaker
All of the biga
7 tablespoons (56.5 grams) whole wheat flour, plus extra for adjustments
5/8 teaspoon (5 grams) salt
2¼ teaspoons (7 grams) instant yeast
2¼ tablespoons (42.5 grams) honey or agave nectar
1 tablespoon (14 grams) unsalted butter, melted, or vegetable oil

1. Using a metal pastry scraper, chop the soaker and the biga into 12 smaller pieces each (sprinkle some of the extra flour over the pre-doughs to keep the pieces from sticking back to each other).

2. If mixing by hand, combine the soaker and biga pieces in a bowl with all of the other ingredients except the extra flour and stir vigorously with a mixing spoon or knead with wet hands until all of the ingredients are evenly integrated and distributed into the dough. It should be soft and slightly sticky; if not, add more flour or water as needed.

If using a stand mixer, put the pre-dough pieces and all of the other ingredients except the extra flour into the mixer with the paddle attachment (preferable) or dough hook. Mix on slow speed for 1 minute to bring the ingredients together into a ball. Switch to the dough hook and mix on medium-low speed, occasionally scraping down the bowl, for 2 to 3 minutes, until the pre-doughs become cohesive and assimilated into each other. Add more flour or water as needed until the dough is soft and slightly sticky.

3. Dust a work surface with flour, then toss the dough in the flour to coat. Knead by hand for 3 to 4 minutes, incorporating only as much extra flour as needed, until the dough feels soft and tacky, but not sticky. Form the dough into a ball and let it rest on the work surface for 5 minutes while you prepare a clean, slightly oiled bowl.

4. Resume kneading the dough for 1 minute to strengthen the gluten and make any final flour or water adjustments. The dough should have strength and pass the windowpane test, yet still feel soft, supple, and very tacky. Form the dough into a ball and place it in the prepared bowl, rolling to coat with oil. Cover loosely with plastic wrap and let rise at room temperature for approximately 45 to 60 minutes, until it is about 1½ times its original size.

5. Transfer the dough to a lightly floured work surface.  To shape it for a loaf pan, pat it out to a square approximately 1-inch thick, then roll the dough into a cylinder.  Place the dough in a greased 4 by 8½-inch bread pan. Cover the dough loosely with plastic wrap and let rise at room temperature for approximately 45 to 60 minutes, until it is about 1½ times its original size.

6. Preheat the oven to 425F. When the dough is ready to bake, place it in the oven and bake for 20 minutes. Rotate the loaf 180 degrees and continue baking for another 20 to 30 minutes, until the loaf is a rich brown on all sides, sounds hollow when thumped on the bottom, and registers at least 195F in the center.

7. Transfer the bread to a cooling rack and allow it to cool for at least 1 hour before serving.

Copy of IMG_8506

mushroom salad

copy-of-img_5931

I used to read cookbooks like novels. I don’t require pictures, and I don’t like to skip around – I’ll be annoyed making the chocolate cake from Chapter 10 if I’m still reading through Chapter 2’s salads. It feels like a spoiler; like when I was sad to see Gandalf die in The Fellowship of the Ring, and Dave tried to make me feel better by telling me that he comes back in the next book/movie. I hate spoilers.

copy-of-img_5920

These days, though, I can’t seem get through an entire cookbook. I think I need a new method – like accepting that it’s okay not to read every step in every recipe. I’m only on Chapter 3 (Eggs, Dairy and Cheese, yum) in Bittman’s How to Cook Everything Vegetarian, which I got for Christmas. I’m still very happy with the cookbook – everything I’ve made from it has been great, and the recipes get me excited to cook. But right now, it’s just sitting on my shelf while I focus on other things. Since I haven’t read much more than the soups and salads chapters, that’s all I ever make from the book.

copy-of-img_5925

These mushrooms, from the salad chapter, made a handy side dish for meatball sliders. They’re nice and easy – after sautéing the quartered mushrooms with some aromatics, you mix them with vinegar and olive oil. Then just set them aside to marinate.

The simple mixture was surprisingly good. I was worried that Dave wouldn’t like them, because he doesn’t like pickled anything, but they weren’t sour, just a little tangy. It makes the big green cookbook on my shelf that much more enticing.

copy-of-img_5935

One year ago: Cappuccino Cream Puff Rings

Mushroom Salad, Italian-American Style (from Mark Bittman’s How to Cook Everything Vegetarian)

I didn’t actually measure anything, which is normal for me for a Bittman recipe. He presents his recipes more as ideas to get you started than rules to follow. I’m guessing I used less oil, and I just added vinegar to taste.

¼ cup extra virgin olive oil
1 pound butter or other mushrooms, trimmed and quartered
salt and freshly ground black pepper
¼ cup minced onion
1 tablespoon slivered garlic
½ cup red wine vinegar
½ cup chopped parsley leaves for garnish

1. Put 3 tablespoons oil in a wide skillet over medium heat. When hot, add the mushrooms, and cook, stirring occasionally and sprinkling with salt and pepper, until they give up their liquid and begin to brown, about 10 minutes. Lower the heat a bit and add the onion, then cook until the onion softens, another 5 minutes or so. Add the garlic and cool, stirring occasionally, about 2 minutes more. Turn off the heat.

2. Transfer the mushrooms to a bowl and stir in the vinegar and remaining tablespoon of oil. Let cool to room temperature for at least 30 minutes. Garnish and serve or let sit at room temperature for another hour or two before serving.

anadama bread

copy-of-img_5945

It’s a good thing I had well-behaved friends for the most part in high school, because I am apparently highly susceptible to peer pressure. A new baking group has recently been formed, somewhat similar to Tuesday with Dorie, but baking their way through Peter Reinhart’s Bread Baker’s Apprentice. I resisted joining the group for a few weeks, because I really don’t need another baking obligation. But I’ve had this book for years and love it, plus if this group can improve my bread-baking skills as much as TWD has improved my dessert-baking skills, it’ll be worth it. And when I heard that Reinhart supported the group, I made the decision to join. I’m a sucker for cookbook authors who support blogs.

I had some trouble figuring out how to fit a new baking group into my blog. I can only produce 3-4 blog entries per week, and I’d like the majority to be unaffiliated with a group. I think I’ve decided on short, simple (I’m doing something simply?!) entries with one photo and a brief analysis of the recipe. Since I joined the group a few weeks after it started, I’m doing a bit of catch up.

Anadama bread is a sandwich bread made with cornmeal and molasses. Reinhart’s MO is to soak grains and/or ferment dough slowly to release as much flavor from them as possible. In this recipe, that means soaking the cornmeal overnight before kneading in the remaining ingredients and continuing with rising and shaping. Reinhart recommends coarser-grained polenta over cornmeal, and it smelled particularly corny after soaking, which was nice.

Overall, this was a nice bread. The texture was very light. I definitely think it needs more salt (the recipe calls for 1.5 teaspoons for 20 ounces of flour; I’ll add at least 2 teaspoons next time). Also, the polenta grains didn’t soften in the bread as much as I would like, adding a crunchiness, but not a good crunchiness. I’ll use regular cornmeal next time. Or I might just stick to the last anadama bread recipe I tried, but adjust the method to soak the cornmeal overnight.

True to most groups who cook their way through a cookbook, we won’t all be posting the recipes. However, Michelle plans to post the recipes on her blog.

orange-oatmeal-currant cookies

copy-of-img_4655

Is it possible to have a cookbook crush? I received Tartine in the mail three weeks ago, and I’ve hardly put it down since. I heard about the book when Mark recommended it, so I flipped through it one day in the bookstore. I flip through a lot of the books in the bookstore, but I can usually resist buying. I didn’t buy Tartine immediately, but after my initial look-through, I couldn’t put it out of my mind. The croissants! The shortbread! The banana cream pie!

copy-of-img_4591

There are a number of reasons to be excited about this book. The photography is beautiful. The desserts are garnished elegantly.  The author, Elisabeth Pruett (with her husband Chad Robertson) sets a friendly tone and provides plenty of helpful tips.

copy-of-img_4589

But as with any cookbook, it all comes down to the recipes. What I love about Tartine’s recipes is that they’re classics – lemon bars, clafoutis, gingerbread cookies – but they’re taken up a notch. The banana cream pie has a thin layer of chocolate on the bottom crust to keep it crisp. The croissant dough is built from a sponge and then a slow rise. The lemon bars have a crust made from browned butter that’s topped with an extra thick layer of curd.

copy-of-img_4594

You do have to work for those extra steps, so this book won’t be for everyone. But for someone like me, who enjoys the process as much as the result, the book is a perfect fit. There isn’t one recipe in the book that I’m not eager to make.

copy-of-img_4601

The first recipe I made was the Banana Date Tea Cake, which isn’t something that would normally sound good to me, but that’s what’s special about this book – everything sounds good. And the tea cake was delicious, with a moist, cinnamon-scented crumb that was just a little crisp at the edges. This is definitely one of my favorite banana breads. I have two old bananas sitting around right now, and I’m kicking myself for not buying dates.

copy-of-img_4573
miniature banana date tea cake

And these cookies honestly might be my new favorite (well…maybe not), and they’re certainly the best oatmeal cookie I’ve eaten. The method is mostly traditional – the butter and sugar are creamed, eggs are beaten in, and the dry ingredients are stirred in just until they’re incorporated. It’s a freezer cookie, so you wrap the dough up and chill it, then when you’re ready to bake, just slice off cookies.

copy-of-img_4644

The cookies are perfectly balanced – slightly crisp on the edges, but mostly a soft chewy center, with tartness from the currants and a hint of orange and of spice. For a cookie, they feel almost light, with currants where chocolate often is and oatmeal adding plenty of healthy bulk. I’m looking for excuses to make them again, and I’m thinking particularly about Mother’s Day. It’s going to be impossible to make my way through Tartine if each recipe is so good that I have to make it twice to get enough.

copy-of-img_4645

One year ago: Red Beans and Rice

Orange-Oatmeal-Currant Cookies (from Tartine, by Elisabeth Pruett and Chad Robertson)

Makes 80 2-inch cookies

The recipe stressed the importance of being chilled overnight, but my dough was plenty chilled after a few hours in the freezer. Zante currants are the kind that you’ll find dried.

1½ cups (7 ounces) zante currants
2 cups (10 ounces) all-purpose flour
½ teaspoon baking soda
½ teaspoon nutmeg, freshly grated
1 cup (8 ounces/16 tablespoons) unsalted butter, at room temperature
1¼ cups (8¾ ounces) sugar
1 large whole egg
1 large egg yolk
1 teaspoon vanilla extract
2 tablespoons light corn syrup
1 tablespoon blackstrap or other dark molasses
½ teaspoon salt
4 teaspoon orange zest, grated
1½ cups (5½ ounces) old-fashioned rolled oats

In a small bowl, combine the currants and warm water to cover and set aside for about 10 minutes until the currants are plumped. Drain well and set aside.

Sift together the flour, baking soda, and nutmeg into a mixing bowl and set aside. Using a stand mixer fitted with the paddle attachment, beat the butter on medium-high speed until light and creamy. Slowly add the sugar and mix on medium speed until light in color and fluffy. Stop the mixer and scrape down the sides of the bowl with a rubber spatula as needed. Add the whole eggs, egg yolk, vanilla, corn syrup, molasses, salt, and orange zest and beat until well mixed. Stir in the flour mixture, currants, and oats until well incorporated.

Divide the dough into 2 equal portions. Working on a large sheet of parchment paper, shape each portion into a log about 14 inches long and 2 inches in diameter. Gently Press each log to give it an oval shape. Wrap tightly in parchment paper or plastic wrap and place in the refrigerator or freezer overnight.

Preheat the oven to 350F. Line a baking sheet with parchment paper or a nonstick liner.

Unwrap the logs. Using a sharp knife, slice the logs into ovals about ¼ inch thick. Arrange the ovals on the prepared baking sheets. Bake until the edges of the cookies are lightly browned but the centers remain pale, 7-10 minutes. You may bake both pans at the same time, but rotate them 180 degrees at the midway point if they are not baking evenly. Transfer the cookies to wire racks to cool. The cookies will be soft when they cool. They will keep in an airtight container at room temperature for up to 2 weeks.

copy-of-img_4647

the real deal (marcella hazan’s lasagne bolognese)

dscn2543.jpg

I’ve been kept away from cooking for too long. Between holiday traveling and moving, it’s been at least a month since I did any serious cooking or baking. Every time I have a cooking dry spell like this, I end up thinking of food constantly. I start to make lists of what I want to make. And it seems like the dish that occupies the most of my thoughts is always lasagna.

I love lasagna in all of its forms – meat, mushroom, spinach, artichoke, tomato, béchamel. This time I wanted to make a classic meat lasagna. I keep trying new recipes because I haven’t yet found one that I love. I decided it was high time to try Marcella Hazan’s recipe. I coveted Hazan’s Essentials of Classic Italian Cooking for several years before receiving it as a wedding gift from my sister-in-law. Yay! This is the first recipe I’ve made from it.

I’ve often heard about those lasagna recipes that take all day. Most modern recipes are trying to simplify and shorten the process, but I’ve always been curious about the original. If someone spends all day on a recipe, it must be worth it, right?

I was about to find out. Reading Hazan’s recipe for Baked Green Lasagne with Meat Sauce, Bolognese Style, was like the Choose Your Own Adventure books I read as a kid. Turn to page 129 for pasta made with the machine method, or page 143 for the hand-rolled method. On page 129, I was directed to page 89 for instructions on cooking the spinach. Yeesh. I took the recipe(s) one step at a time, and everything really did go without a hitch.

The recipe involves a lot of patience. Hazan is not much into modern tools that make life easier; she’s all about doing things the hard way. I’ve made béchamel sauce many times, always by melting butter, stirring in flour, whisking in cold milk, stirring until it boils. Hazan instructs this all to be done over low heat, and the milk is pre-heated, then added to the butter-flour mixture 2 tablespoons at a time. Then this mixture is stirred, of course constantly, over low heat until it thickens. Over low heat, it takes a long time to thicken. But once it does, it makes the smoothest béchamel sauce I’ve ever made, albeit one that tastes somewhat of raw flour.

The bolognese sauce is similar in that there’s a lot of “gentle simmering.” Hazan is very specific that the sauce must simmer for at least 3 hours after the tomatoes are added. What she fails to mention is that the recipe takes about an hour even before that point. One cup of milk takes quite some time to completely bubble away at a gentle simmer.

dscn2482.jpg

Of course the pasta dough could not be made in the food processor, it must be done by hand. I was determined to follow the recipe exactly, so I trudged on. And this is what I got…

dscn2499.jpg

Obviously the egg is supposed to stay in the well in the center of the flour, not glop out a breach in the side. Next time I’ll mix the egg and spinach together in a bowl, even add some flour to it before I move to a flat work surface to complete the additions of flour.

dscn2501.jpg

This is the first time I’ve rolled out pasta without wanting to scream! Really, rolling out the pasta just went splendidly, and I’m so glad that I finally learned a good technique for this.

dscn2529.jpg

The two sauces are mixed together and alternately layered with pasta. Hazan specifies that there should be at least 6 layers. I lost count, but I know I had more than that, and I only used probably 2/3 of the pasta sheets before I ran out of sauce.

dscn2542.jpg

All in all, the lasagna took about 7 hours, keeping in mind that I was taking my time. Was the recipe worth all this? Well…the short answer is no. It was good, but not that good. Dave and I agreed that it tasted somewhat meatloaf-ish. The long answer is that I was fairly certain going in that there would be things I’d want to change in the recipe for later editions. For one thing, the only cheese in the entire recipe is 2/3 cup of parmesan. I gather (from wikipedia) that this is the traditional Bolognese method for lasagna. But I’m an all-American girl, and I want mozzarella! I’d also like less carrot and celery to counteract the “meatloafness”, and more onion. I want to try adding some flavorings to the béchamel as well.

So I will be attempting this recipe again, but probably in a less authentic Italian form. I trust that it will go much faster now that I understand the methods involved. If nothing else, I’m grateful to have learned how to roll out homemade pasta to the thinnest setting without any swearing.

I’m typing out the whole recipe for you below, so you can see for yourself the pickiness that is a Marcella Hazan recipe. I followed the recipe just about exactly.

Baked Green Lasagne with Meat Sauce, Bolognese Style

Serves 6

Bolognese Sauce
Béchamel Sauce
Green pasta dough
1 tablespoon salt
2 tablespoons butter, plus more for greasing a 9- by 12-inch bake-and-serve lasagna pan, no less than 2½ inches high
2/3 cup fresh grated parmigiano-reggiano cheese

1. Prepare the meat sauce and set aside.

2. Prepare the béchamel, keeping it rather runny, somewhat like sour cream. When done, keep it warm in the upper half of a double boiler, with the heat turned to very low. If a film should form on top, just stir it when you are ready to use it.

3. Make green pasta dough. Roll it out as thin as it will come. Leave the strips as wide as they come from the rollers, and cut them into 10-inch lengths.

4. Set a bowl of cold water near the range, and lay some clean, dry cloth towels flat on a work counter. Bring 4 quarts of water to a rapid boil, add 1 tablespoon salt, and as the water returns to a boil, slip in 4 or 5 of the cut pasta strips. Cook very briefly, just seconds after the water returns to a boil after you dropped in the pasta. Retrieve the strips with a colander scoop of slotted spatula, and plunge them into the bowl of cold water. Pick up the strips, one at a time, rinse them under cold running water, and rub them delicately, as though you were doing fine hand laundry. Squeeze each strip very gently in your hands, then spread if flat on the towel to dry. When all the pasta is cooked in the manner, 4 or 5 strips at a time, and spread out to dry, pat it dry on top with another towel.

*Explanatory note: The washing, wringing, and drying of pasta for lasagna is something of a nuisance, but it is necessary. You first dip the partly cooked pasta into cold water to stop the cooking instantly. This is important because if lasagna pasta is not kept very firm at this stage it will become horribly mushy later when it is baked. And you must afterward rinse off the moist starch on its surface, or the dough will become glued to the towel on which it is laid out to dry, and tear when you are ready to use it.

5. Preheat the oven to 400 degrees.

6. Thickly smear the bottom of a lasagna pan with butter and about 1 tablespoon of béchamel. Line the bottom of the pan with a single layer of pasta strips, cutting them to fit the pan, edge to edge, allowing no more than ¼ inch for overlapping.

7. Combine the meat sauce and the béchamel and spread a thin coating of it on the pasta. Sprinkle on some grated parmesan, then add another layer of pasta, cutting it to fit as you did before. Repeat the procedure of spreading the sauce and béchamel mixture, then sprinkling with Parmesan. Use the trimmings of pasta dough to fill in gaps, if necessary. Build up to at least 6 layers of pasta. Leave yourself enough sauce to spread very thinly over the topmost layer. Sprinkle with parmesan and dot with butter.

*Ahead-of-time note: The lasagna may be completed up to 2 days in advance up to this point. Refrigerate under tightly sealing plastic wrap.

8. Bake on the uppermost rack of the preheated oven until a light, golden crust formed on top. It should take between 10 and 15 minutes. If after the first few minutes you don’t see any sign of a crust beginning to form, turn up the oven another 50 to 75 degrees. Do not bake longer then 15 minutes altogether.

9. Remove from the oven and allow to settle for about 10 minutes, then serve at table directly from the pan.

Bolognese Sauce:
1 tablespoon oil
3 tablespoon butter
½ cup chopped onion
2/3 cup chopped celery
2/3 cup chopped carrot
3/4 pound ground beef chuck
salt
black pepper, ground fresh from the mill
1 cup whole milk
whole nutmeg
1 cup dry white wine
1½ cup canned imported Italian plum tomatoes, cut up, with their juice

1. Put the oil, butter and onion in the pot, and turn the heat on to medium. Cook and stir the onion until is has become translucent, then add the chopped celery and carrot. Cook for about 2 minutes, stirring the vegetables to coat them well.

2. Add the ground beef, a large pinch of salt, & a few grindings of pepper. Crumble the meat with a fork and cook until beef has lost its raw, red color.

3. Add the milk and let simmer gently, stirring frequently, until it has bubbled away completely. Add a tiny grating – about 1/8 teaspoon – of nutmeg and stir.

4. Add the wine, let simmer until it has evaporated, then add the tomatoes and stir thoroughly to coat all ingredients well. When the tomatoes begin to bubble, turn the heat down so that the sauce cooks at the laziest of simmers, with just an intermittent bubble breaking through the surface. Cook, uncovered, for 3 hours or more, stirring from time to time. While the sauce is stirring, you are likely to find that it begins to dry out and the fat separates from the meat. To keep it from sticking, continue the cooking, adding ½ cup of water whenever necessary. At the end, however, no water at all must be left and the fat must separate from the sauce. Taste and correct for salt.

Béchamel Sauce:
3 cups milk
6 tablespoons butter
4½ tablespoons flour
¼ teaspoon salt

1. Put the milk in a saucepan, turn the heat to medium-low, and bring the milk just to the verge of boiling, to the point when it begins to form a ring of small, pearly bubbles.

2. While heating the milk, put the butter in a heavy-bottomed, 4- to 6-cup saucepan, and turn the heat to low. When the butter has melted completely, add the flour and stirring it with a wooden spoon. Cook, while stirring constantly, for about 2 minutes. Do not allow flour to become colored. Remove from heat.

3. Add the hot milk to the flour-and-butter mixture, no more than 2 tablespoons of it at a time. Stir steadily and thoroughly. As soon as the first 2 tablespoons have been incorporated into the mixture, add 2 more, and continue to stir. Repeat this procedure until you have added ½ cup milk; you can now put in the rest of the milk ½ cup at a time, stirring steadfastly, until all the milk has been smoothly amalgamated with the flour and butter.

4. Place the pot over low heat, add the salt, and cook, stirring without interruption, until the sauce is as dense as thick cream. If you find any lumps forming, dissolve them by beating the sauce rapidly with a whisk.

Pasta:
6 ounces fresh spinach, cooked, or 1/3 package frozen leaf spinach
2 large eggs
1½ cups unbleached flour

Pour the flour onto a work surface, shape it into a mound, and scoop out a deep hollow in its center. Break the eggs and add the chopped spinach into the hollow.

Beat the eggs and spinach lightly with a fork for about 2 minutes as though you were making an omelet. Draw some of the flour over the eggs, mixing it in with the fork a little at a time, until the eggs are no longer runny. Draw the sides of the mound together with your hands, but push some of the flour to one side, keeping it out of the way until you find you absolutely need it. Work the eggs and flour together, using your fingers and the palms of your hands, until you have a smoothly integrated mixture. If it is still moist, work in more flour.

When the mass feels good to you and you think it does not require any more flour, wash your hands, dry them, and run a simple test: Press you thumb deep into center of the mass; if it comes out clean, without any sticky matter on it, no more flour is needed. Put the egg and flour mass to one side, scrape the work surface absolutely clear of any loose or caked bits of flour and of any crumbs, and get ready to knead.

Return to the mass of flour and eggs. Push forward against it using the heel of your palm, keeping your fingers bent. Fold the mass in half, give it a half turn, press hard against it with the heel of your palm again, and repeat the operation. Make sure that you keep turning the ball of dough always in the same direction, either clockwise or counterclockwise, as you prefer. When you have kneaded it thus for 8 full minutes and the dough is as smooth as baby skin, it is ready for the machine.

Cut the ball of dough into 6 equal parts.

Spread clean, dry, cloth dish towels over a work counter near where you’ll be using the machine.

Set the pair of smooth cylinders, the thinning rollers, at the widest opening. Flatten one of the pieces of dough by pummeling it with your palm, and run it through the machine. Fold the dough twice into a third of its length, and feed it by its narrow end through the machine once again. Repeat the operation 2 or 3 times, then lay the flattened strip of pasta over a towel on the counter. Since you are going to have a lot of strips, start at one end of the counter, leaving for for the others.

Take another piece of dough, flatten it with your hand, and urn it through the machine exactly as described above. Lay the strip next to the previously thinned one on the towel, but do not allow them to touch or overlap, because they are still moist enough to stick to each other. Proceed to flatten all the remaining pieces in the same manner.

Close down the opening between the machine’s rollers by one notch. Take the first pasta strip you had flattened and run it once through the rollers, feeding it by its narrow end. Do not fold it, but spread it flat on the cloth towel, and move on to the next pasta strip in the sequence.

When all the pasta strips have gone through the narrower opening once, bring the rollers closer together by another notch, and run the strips of pasta through them once again, following the procedure described above. You will find the strips becoming longer, as they get thinner, and if there is not enough room to spread them out on the counter, you can let them hand over the edge. Continue thinning the strips in sequence, progressively closing down the opening between the rollers one notch at a time. This step-by-step thinning procedure, which commercial makers of fresh pasta greatly abbreviate or skip altogether, is responsible, along with proper kneading, for giving good pasta its body and structure.

dscn2562.jpg