roasted cherry ice cream

cherry ice cream 7

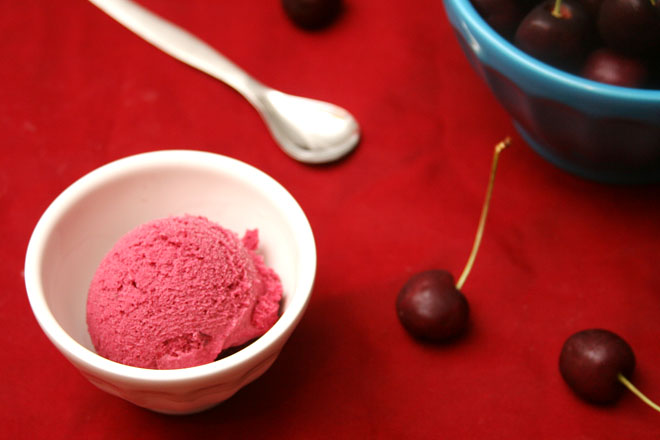
In addition to all the other excitement around here, we found out the day that we closed on our new house that I’m pregnant. I’m so relieved that, at over four months along now, I’m past the stage of being tired all the time. One thing that hasn’t changed throughout this pregnancy? My desire for cold, creamy desserts.

cherry ice cream 1

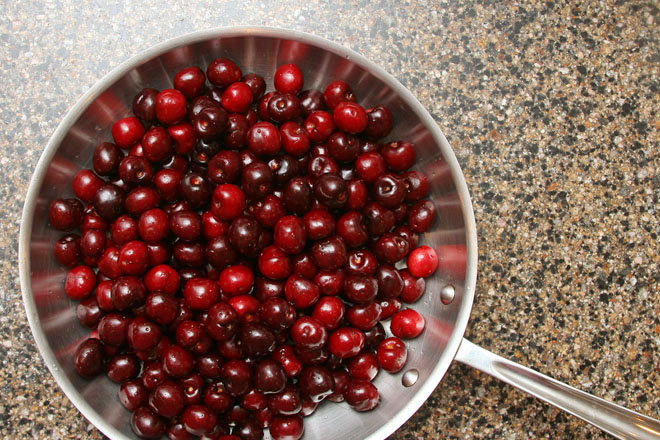
Ice cream isn’t usually a craving of mine, so it’s been fun to take this opportunity to play with recipes that wouldn’t normally catch my eye. This one seemed worth the extra effort even back when dragging myself off the couch took all of my limited energy. But it certainly has some tedious steps. Even pulling all the stems out of 3½ pounds of cherries takes a while. Then you just throw the chreries in the oven with some sugar, and once they’re soft and squishy, you squeeze the pits out – which is faster than pitting fresh cherries even with a pitter, but still slow.

cherry ice cream 2

But the worst is pushing the mixture through a fine-mesh strainer. Based on the flecks of solid fruit in the picture on Serious Eats, compared to my smooth un-flecked custard, I believe my strainer is finer-mesh than Stella’s, which could be why straining was such an arduous, frustrating task. Next time I’ll just use my food mill on its finest setting – it’s not nearly as fine as my strainer, but it’ll be good enough, I expect.

cherry ice cream 4

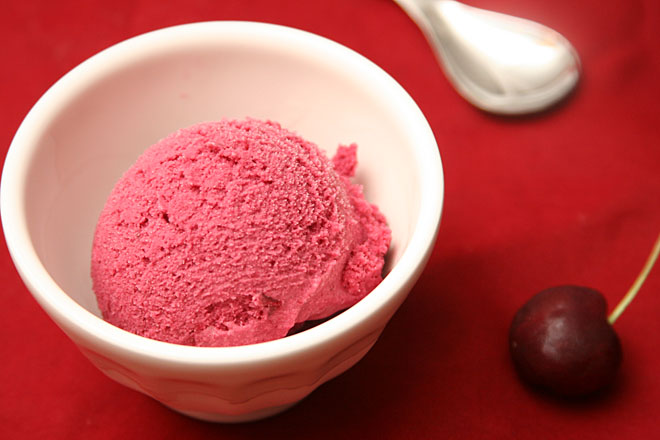
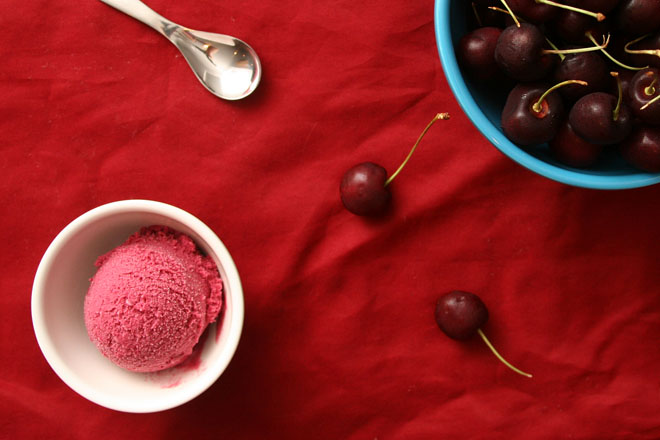
I would say it was worth the effort in the end, because this ice cream is intensely cherry-y. It’s so fruity that it almost tastes more like sherbet than cream-filled ice cream. It was the perfect treat at the end of a work- and toddler-filled day, when I could sit down with a book, a mug of tea, and a scoop of ice cream and then not move for at least an hour.

cherry ice cream 9

Printer Friendly Recipe
Roasted Cherry Ice Cream (rewritten but not adapted from Stella Parks at Serious Eats)

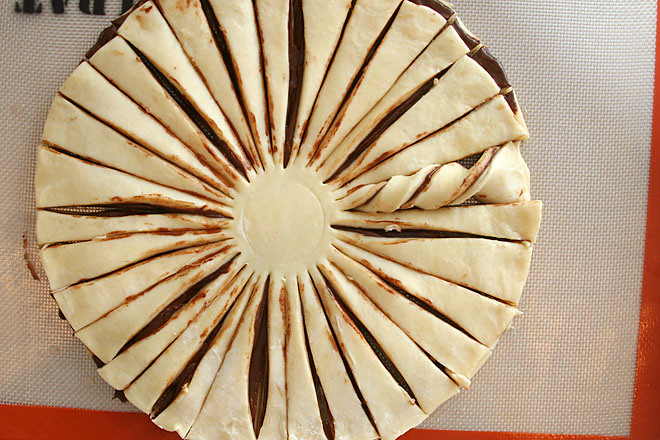
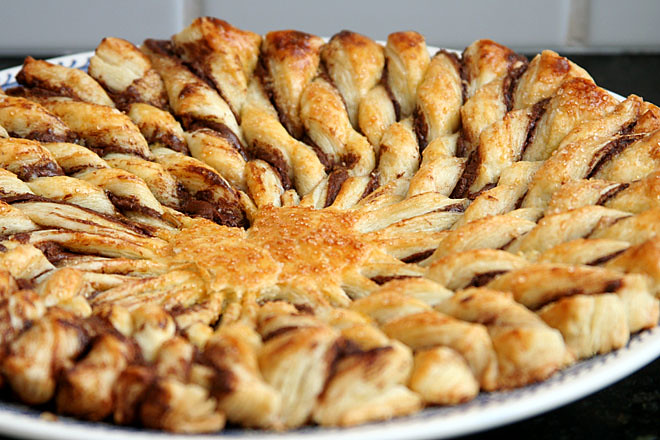
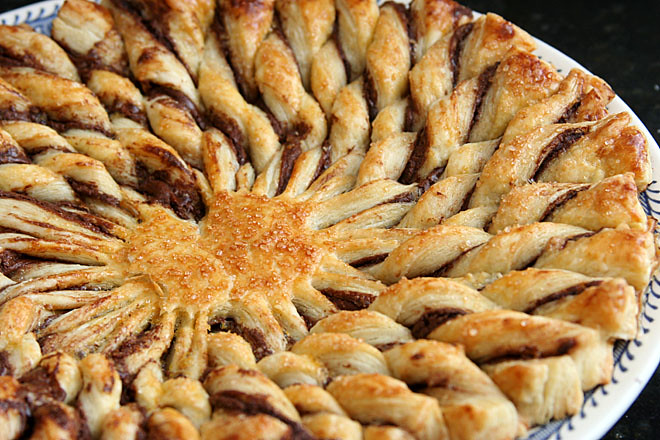
I used the leftover cherry solids in sweet rolls, substituting it for the cinnamon-sugar mixture in this recipe.

To get the amount of strained cherry juice required by the recipe, I had to return the cherry pulp to the saucepan, add water, heat it up, then strain again. And again. And again. Don’t use your finest-mesh strainer for this. I’ll try a food mill on its finest setting next time.

3½ pounds (56 ounces; about 10 cups) whole cherries, washed and stemmed but not pitted
¾ cup (5¼ ounces) granulated sugar
⅛ teaspoon kosher salt
1¾ cups (14 ounces) heavy cream
1 tablespoon lemon juice

1. Heat the oven to 450 degrees. Mix the cherries and sugar in a 12-inch stainless-steel skillet. Roast, stirring occasionally, until the cherries are wilted and soft, about 40 minutes. Let cool slightly, then use your fingers to pull the cherries apart and remove the pits. Transfer the cherry pits to a medium saucepan. Transfer the pitted cherries to a food processor bowl. Leave the cherry juice in the skillet.

2. Add the heavy cream to the saucepan with the cherry pits. Bring to a simmer over medium heat. Remove from the heat, cover, and set aside to steep.

3. Pulse the cherries in the food processor until minced but not pureed. Transfer them back to the skillet with the juice. Heat the cherries and juice over medium heat; reduce the heat to retain a simmer and cook until jammy, about 5 minutes. Strain the mixture through a fine-mesh strainer (see note). You should have 20 ounces of cherry juice. Discard the cherry solids or reserve for another use (stored in the refrigerator, they can be kept for up to three weeks and used like jam).

4. Strain the cream into the same container as the cherry juice; discard the pits. Stir in the salt and the lemon juice. Chill the mixture until it is 40 degrees, either for several hours in the refrigerator or more quickly by setting the bowl of custard inside a larger bowl filled with ice water.

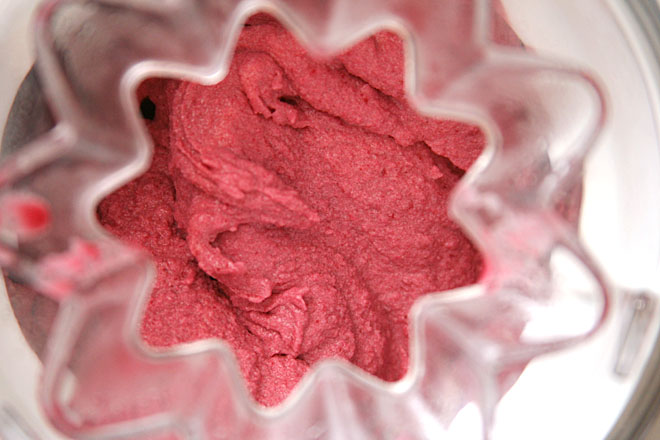
5. Churn the custard in a prepared ice cream maker until it’s the consistency of soft-serve ice cream, about 25 minutes. Immediately transfer to a chilled container. Freeze until firm, about 4 hours.

cherry ice cream 8

honey bundt cake

honey cake 3

For the first few weeks at my old job, I was probably known as “the girl whose desk is by the men’s bathroom” due to the unfortunate arrangement of my office. But it wasn’t long before I became “the girl who brings in treats”, and that label stuck for my seven years there. Fortunately, it also wasn’t too long before I got moved to a new office.

honey cake 1

Eventually, people started giving me ingredients to use up – apples or peaches from their trees, pecans, and, one of my favorites, the annual Christmas jar of honey from my beekeeping boss. I hoarded the honey. Dave got into the habit of putting some in his tea every day until I made him stop so I could hog it all to myself. But I needed a recipe that would really showcase it, not something that was “honey cake” in name only.

honey cake 2

This recipe caught my eye because the cake is sweetened completely with honey. As a result, it actually tastes like honey, but even with no granulated sugar, the texture isn’t compromised. It’s dense and moist, but not soggy or heavy.

honey cake 5

Much to the regret of my coworkers, I quit that job last summer. Since then, Dave and I have started new jobs, sold our old house, started working from home, moved to a rental house in my hometown, bought a house, and moved again. Things are good right now. Really good. Pretty much the only thing I miss about that old life was having an office full of people eager for sweet snacks to break up their workday.

honey cake 4

Printer Friendly Recipe
Honey Bundt Cake (from Cook’s Country)

Cake:
2½ cups (12½ ounces) all-purpose flour
1¼ teaspoons salt
1 teaspoon baking powder
½ teaspoon baking soda
½ cup water
4 large eggs
¼ cup plus 2 tablespoons unsweetened applesauce
¼ cup vegetable oil
¼ cup orange juice
1 teaspoon vanilla extract
1¾ cups honey

Glaze:
1 cup (4 ounces) confectioners’ sugar
4½ teaspoons water
1 teaspoon vanilla extract
Pinch salt

1. For the cake: Adjust an oven rack to the middle position and heat the oven to 325 degrees. Heavily spray a 12-cup nonstick Bundt pan with baking spray with flour. Whisk the flour, salt, baking powder, and baking soda together in large bowl. Whisk the water, eggs, applesauce, oil, orange juice, and vanilla together in a separate bowl until combined. Whisk the honey into the egg mixture until fully incorporated.

2. Whisk the honey mixture into the flour mixture until combined. Scrape the batter into the prepared pan. Bake until a skewer inserted into the middle of the cake comes out clean, 45 to 55 minutes, rotating the pan halfway through baking.

3. Let the cake cool in the pan on a wire rack for 30 minutes. Using a small spatula, loosen the cake from the sides of the pan and invert onto a rack. Let cool completely, about 2 hours. (The cooled cake can be wrapped with plastic wrap and stored at room temperature for up to 3 days.)

4. For the glaze: Whisk together all ingredients. Drizzle the glaze evenly over top of the cake. Let sit until the glaze is firm, about 30 minutes. Serve.

tahini-swirled brownies

tahini brownies 6

These took me by surprise. I like to experiment, and my coworkers are willing testers. I thought tahini in brownies sounded more interesting than the customary peanut butter. I was not, however, expecting it to be better than peanut butter.

tahini brownies 1

These did actually taste similar to peanut butter brownies, but the tahini was just a little more subtle. Instead of battling the chocolate for dominance, it was a quieter complement.

tahini brownies 2

No one ever complains about treats in the office kitchen, and certainly they didn’t mind brownies, even brownies with ground up sesame seeds in them instead of ground up peanuts. My favorite comment was from a coworker who grew up in New York, who said these reminded him of the halvah he remembers eating as a kid. I’ve never had halvah, but after these, I am definitely on board with tahini in desserts.

tahini brownies 3

Printer-Friendly Recipe
Tahini-Swirled Brownies (rewritten and doubled, but not changed from Milk Street)

8 tablespoons (1 stick) butter
8 ounces bittersweet chocolate, chopped
6 tablespoons (32 grams) cocoa
6 eggs
2¼ cups (446 grams) granulated sugar
2 tablespoons vanilla
2 teaspoons salt
1½ cups (360 grams) tahini
⅔ cup (94 grams) all-purpose flour

1. Adjust an oven rack to the middle position and heat the oven to 350 degrees. Spray an 8-inch square pan with cooking spray.

2. In a medium saucepan over medium heat, melt the butter. Remove the pan from the heat, add the chocolate and cocoa, and stir until melted and smooth.

3. In a large mixing bowl, whisk the eggs with the sugar, vanilla, and salt until slightly thickened, about 1 minute. Whisk in the tahini. Add the flour; use a rubber spatula to stir until just combined. Measure out 1 cup of this mixture; set aside. Add the chocolate to the remaining egg/tahini mixture and stir to combine.

4. Scrape the batter into the prepared pan and spread evenly. Dollop the reserved tahini over the chocolate mixture; drag a sharp knife through the dollops to create swirls.

5. Transfer the pan to the oven and bake until the edges are set and the center appears slightly moist, about 40 minutes. Cool to room temperature before serving.

tahini brownies 5

strawberry balsamic slab pie

strawberry balsamic pie 4

After grabbing a slice from the office kitchen, one of my coworkers asked me why I decided to add balsamic vinegar to pie. My answer of “because the recipe called for it” surely did not impress him. However, it’s a great question: What does the vinegar add to this pie?

strawberry balsamic pie 2

I was surprised that the recipe calls for strawberry juice to be drained off and discarded (we used it in place of the sugar syrup in daiquiris). I suppose the balsamic vinegar is replacing the strawberry juice. No one could taste the vinegar or the angostura bitters in the baked pie, but we all agreed that it was particularly delicious and intensely strawberry-y.

strawberry balsamic pie 3

The changes I made from the original recipe weren’t intentional; I was basing my recipe off of a friend, who’d adjusted the thickener herself. As a result, the filling is more solid, which is perfect for a slab pie intended to be eaten out of hand instead of cut into slices and served plated. In the end, even if I can’t explain just what made it so good, there isn’t a thing I’d change about this pie, from the thickener to the straining of juices and nontraditional additions.

strawberry balsamic pie 6

Printer Friendly Recipe
Strawberry Balsamic Slab Pie (adapted from Emily Elson’s and Melissa Elson’s Four and Twenty Blackbirds Pie Book via Apple a Day; crust rewritten from Serious Eats)

Crust:
3¾ cups (18 ounces) all-purpose flour
3 tablespoons sugar
1½ teaspoon kosher salt (or ¾ teaspoon table salt)
30 tablespoons butter (3¾ sticks) cold unsalted butter, cut into ½-inch cubes
9 tablespoons cold water

Filling and topping:
4½ tablespoons granulated sugar
3 pounds fresh strawberries, rinsed and quartered
1 large Granny Smith apple, grated
3 tablespoons balsamic vinegar
1 cup (7 ounces) light brown sugar, packed
3 tablespoons cornstarch
3 tablespoons Minute tapioca
3 grinds fresh black pepper
¾ teaspoon kosher salt (or ⅓ teaspoon table salt)
egg wash (1 large egg whisked with 1 teaspoon water and a pinch of salt)
demerara or other coarse sugar, or regular granulated sugar

1. For the crust: In a food processor, process approximately two-thirds of the flour, the sugar, and the salt just to combine, a few pulses. Add the butter; pulse until the dough is evenly combined and begins to form clumps. Add the remaining flour and pulse just until the flour is evenly distributed. Transfer the dough to a large bowl; sprinkle the water over the dough and use a rubber spatula to fold the dough until the water is absorbed. Divide the dough into two portions, with one portion slightly larger than the other. Wrap tightly in plastic wrap and refrigerate for at least 2 hours or up to 2 days.

2. For the filling: In a large bowl, combine the strawberries and granulated sugar; set aside at room temperature for 1 hour. Strain the strawberries, discarding the liquid (or reserving it for another use). Return the strained strawberries to the bowl; add the apple, balsamic vinegar, brown sugar, cornstarch, tapioca, black pepper, and salt.

3. Arrange an oven rack to the middle position and heat the oven to 425 degrees. On a 12-by-17-inch sheet of parchment paper, roll out the larger portion of the dough to the edges of the parchment paper. Transfer the dough, still on the parchment paper, to a 10-by-15-inch baking sheet. Roll the smaller portion of dough to a 10-by-15-inch rectangle. Leave it whole to top the slab pie, or cut strips or other shapes.

4. Spread the strawberry mixture evenly over the dough in the pan. Top with the remaining dough. If you’ve left the top layer of dough whole, cut many 2-inch slashes into it. Brush the dough with the egg wash and sprinkle with demerara or other sugar.

5. Transfer the pan to the oven. Bake for 20 minutes, then reduce the heat to 375 degrees; continue baking for an additional 35 minutes, until the crust is browned and the filling is bubbling. Transfer to a cooling rack; cool to room temperature before serving.

strawberry balsamic pie 5

chocolate hazelnut tarte soleil

nutella pastry 5

After the last two years, I feel like I have a certain standard to uphold for my contribution to the office holiday potluck. However, there was simply no time this year for a time-consuming project. I needed to find a recipe that looked like a showstopper but didn’t require the work of one.

nutella pastry 1

Two ingredients? This recipe fit the bill. Although, since, where I live, I can’t buy puff pastry made with real butter, I did make my own. (I used this recipe; while I think this one puffs more and isn’t much, if any, more effort, I didn’t have the mental fortitude for the multiple steps, even if each step takes just a minute or two.) In another life (like one before this), I would have made my own chocolate hazelnut spread too, but for once, I managed to be reasonable and bought this instead. As I’d hoped, It was more chocolately and less sweet than Nutella, although it still wasn’t particularly nutty.

nutella pastry 3

Okay, so this wasn’t as visually impressive as a foot-tall cake. But it’s pretty, and it tasted just as good as those past projects. It was flaky and buttery, chocolately without being too sweet. At this point in my life, it was perfect.

nutella pastry 6

Printer Friendly Recipe
Chocolate Hazelnut Tarte Soleil (adapted from Smitten Kitchen)

2 (1-pound sheets) thawed puff pastry dough
½ cup Nutella or other chocolate hazelnut spread
1 egg yolk beaten with 1 teaspoon water (for egg wash)

1. Adjust a rack to the middle position and heat the oven to 350 degrees. On a sheet of parchment paper or a silicone mat, roll one sheet of puff pastry dough into an approximate 12-inch circle. Use a 12-inch round plate or bowl as a guide to cut a 12-inch circle into the dough.

2. Spread the filling in an even layer over the round of puff pastry dough, leaving the outer 1-inch of the circle bare.

3. Repeat the rolling and cutting of the second portion of puff pastry dough to form another 12-inch round. Transfer this portion of dough to the top of the Nutella-covered puff pastry round, aligning it with the bottom ricle.

4. Place a small round cup or dish in the center of the circle, pressing it lightly to form a visual indentation without pressing through the dough. Remove the cup. Use a pizza roller to cut slits into the dough from the edge to the center circle. Each slit should be about an inch apart on the outer edge of the dough round, for a total of about 32 slits. Once all the slits are cut, pick up the outer edge of each segment while pressing gently on the center edge of the segment. Twist a couple times; repeat with all segments.

5. Transfer the pastry, still on the parchment paper or silicone mat, to a baking sheet. Brush with the egg wash. Bake for 30 to 35 minutes, until browned. Transfer the tart, still on the pan, to a cooling rack and allow to cool for ten minutes. Slide the tart onto a serving plate. Serve immediately or within about twelve hours.

nutella pastry 7

white chocolate macadamia nut cookies

white chocolate macadamia nut cookies 5

I’m behind on Christmas. I’ve been behind on everything since Thanksgiving. Every one of the baby’s naptimes through the weekend are currently booked with baking plans, and once that’s done, I’ll start preparing for our trip to visit family over the holidays. And at some point, I should probably buy some presents.

white chocolate macadamia nut cookies 1

These aren’t on my Christmas baking list, but maybe I should rethink that. I’d always considered white chocolate macadamia cookies bland before these – white chocolate mostly just tasting sweet, and macadamia nuts mostly just seeming rich and fatty without offering much flavor. But the addition of cream cheese adds some tanginess to counter the sweetness. The milk powder keeps the cookies soft and tender.

white chocolate macadamia nut cookies 2

They’re straightforward to make; browning the butter adds an extra step, but it isn’t a difficult one. With a long shelf-life, they can hold up to being shipped to your friends and family across the country. Most importantly, they’re one of the best cookies I made last year.

white chocolate macadamia nut cookies 4

Printer Friendly Recipe
White Chocolate Macadamia Nut Cookies
(rewritten but not adapted from Joy the Baker)

16 tablespoons (2 sticks) unsalted butter, softened
3 cups (14.4 ounces) all-purpose flour
1 cup instant milk powder
1½ teaspoon baking soda
¾ teaspoon baking powder
2 large eggs
2 teaspoons vanilla extract
8 ounces cream cheese, softened
1 cup (7 ounces) packed light brown sugar
1 cup (7 ounces) granulated sugar
1 teaspoon salt
2 cups coarsely chopped macadamia nuts
2 cups coarsely chopped white chocolate

1. In a medium not-nonstick skillet over medium heat, melt 8 tablespoons of the butter. Continue to cook the butter, swirling the pan occasionally, until the milk solids brown and sink and the butter smells nutty. Immediately remove it from the heat and pour the butter into a heatproof bowl. In a medium-sized bowl, combine the flour, milk powder, baking soda, and baking powder. Break the eggs into a small measuring cup, whisk them lightly, and mix in the vanilla.

2. Place the cream cheese and the remaining 8 tablespoons of butter in the bowl of a stand mixer fitted with the paddle attachment (or a large mixing bowl if you’re using a hand-held mixer). Beat on medium-low speed until the butter and cream cheese are smooth, then add the salt and both sugars. Continue beating on medium-low until the mixture is light and fluffy, about 2 minutes, scraping the sides of the bowl as needed. Add the browned butter and beat until evenly combined. With the mixer running, gradually add the egg mixture. Once the eggs have been added, scrape the sides of the bowl once, then continue mixing on medium speed for about 1 minute. Reduce the mixer speed to low and gradually add the flour mixture, mixing it’s mostly combined. Add the nuts and chocolate and mix until the flour is completely incorporated and the nuts and chocolate are evenly distributed. Cover and refrigerate for at least 1 hour or up to 3 days.

3. Heat the oven to 350 degrees. Line baking sheets with parchment paper or silicone mats. Scoop the dough in heaping tablespoons onto the prepared baking sheets. Bake the cookies, one sheet at a time, until they are browned around the edges and do not look wet on top, 8 to 12 minutes. Let the cookies cool on the cookie sheets for 5 minutes, then transfer to wire racks to cool completely.

white chocolate macadamia nut cookies 3

Save

apple cranberry pie

apple cranberry pie 6

It’s not like me to be still tweaking my menu just a few days before Thanksgiving. I even had to rework my timeline as a result! But the change made my timeline simpler with more reasonable expectations of what I can fit in my oven at once (i.e., not four casseroles, rolls, and a tray of roasting vegetables).

apple cranberry pie 4

If you, too, are still looking for recipes, this is one worth adding. It’s a nice variation from a strictly traditional apple pie, while still within the Thanksgiving theme of fall ingredients and, of course, pie. Plus, both of the fillings and the dough for the crust can be made a couple days before the holiday, which is always an advantage when you’re trying to serve a huge meal to a crowd.

apple cranberry pie 5

Cranberries and apples, both sweet and tart, accented by flaky pastry, are a great combination. Hopefully you’re a step ahead and already have your turkey salting, your cranberry sauce in the refrigerator, and your pies chosen. If not, this one is a great addition to your holiday.

apple cranberry pie 8

Apple-Cranberry Pie (from Cook’s Illustrated)

Makes one 9-inch pie

2 cups fresh or frozen cranberries
¼ cup orange juice
1 cup granulated sugar (7 ounces) plus 1 tablespoon for top of pie
½ teaspoon ground cinnamon
½ teaspoon table salt
¼ cup water
1 tablespoon cornstarch
3½ pounds sweet apples (6 to 7 medium), such as Golden Delicious or Braeburn, peeled, cored, and cut into ¼-inch-thick slices
pie dough for double-crust pie
1 egg white, beaten lightly

1. Bring the cranberries, juice, ½ cup sugar, ¼ teaspoon cinnamon, and ¼ teaspoon salt to a boil in a medium saucepan over medium-high heat. Cook, stirring occasionally and pressing the berries against the side of the pot, until the berries have completely broken down and the juices have thickened to a jamlike consistency (a wooden spoon scraped across the bottom should leave a clear trail that doesn’t fill in), 10 to 12 minutes. Remove from the heat, stir in water, and cool to room temperature, about 30 minutes. (Can be covered and refrigerated for up to 2 days.)

2. Meanwhile, mix ½ cup sugar, the remaining ¼ teaspoon cinnamon, the remaining ¼ teaspoon salt, and the cornstarch in a large microwave-safe bowl; add the apples and toss to combine. Microwave on high power, stirring with a rubber spatula every 3 minutes, until the apples are just starting to turn translucent around the edges and the liquid is thick and glossy, 10 to 14 minutes. Cool to room temperature, about 30 minutes. (Can be covered and refrigerated for up to 2 days.)

3. While the fillings cool, adjust an oven rack to the lowest position, place a rimmed baking sheet on the oven rack, and heat the oven to 425 degrees. Remove one disk of dough from the refrigerator and roll it out on a floured work surface to a 12-inch circle about ⅛- inch thick. Roll the dough loosely around the rolling pin and unroll it into a pie plate, leaving at least 1-inch overhang. Ease the dough into the plate by gently lifting the edge of the dough with one hand while pressing into the plate bottom with the other hand. Leave the dough that overhangs the plate in place; refrigerate until the dough is firm, about 30 minutes.

4. Transfer the cooled cranberry mixture to the dough-lined pie plate and spread into an even layer. Place the apple mixture on top of the cranberries, mounding slightly in the center; push down any sharp apple edges.

5. Roll the second disk of dough on a floured work surface to a 12-inch circle about ⅛-inch thick. Roll the dough loosely around the rolling pin and unroll over the pie, leaving at least 1-inch overhang on each side.

6. Using kitchen shears, cut evenly through both layers of overhanging dough, leaving a ½-inch overhang. Fold the dough under itself so that the edge of the fold is flush with the outer rim of the pie plate. Flute the edges using a thumb and forefinger or press with the tines of a fork to seal. Brush the top and edges of the pie with egg white and sprinkle with the remaining tablespoon sugar. Using a sharp paring knife, cut four 1½-inch slits in the top of the dough in a cross pattern.

7. Place the pie on the preheated baking sheet and bake until the top is light golden brown, 20 to 25 minutes. Reduce the oven temperature to 375 degrees, rotate the baking sheet, and continue to bake until the crust is deep golden brown, 25 to 30 minutes longer. Transfer the pie to a wire rack to cool at least 2 hours. Cut into wedges and serve.

apple cranberry pie 7

Save

Save

Save

easy foolproof pie dough

pie crust 7

If you eat the filling and leave the thick edge of your pie crust on the plate, you’re making your pie crust wrong. Your pie crust should be crisp, browned, and flaky. Just a little bit sweet so it goes with the fruity filling, rich and buttery. Pie crust isn’t better than the filling, but it isn’t worse either, and every bit of it, including the thick crimped edges, is necessary to balance all the filling.

pie crust 1

I’ve tried some of those creative additions (sour cream, vodka), but mostly, I’ve stuck with a traditional crust recipe – butter is cut into flour, salt, and a smidge of sugar, then water is added until it just comes together. But I had a bad habit of adding too much water, so it wasn’t foolproof for me. No one complained; it was still tastier and flakier than a store-bought crust, but it tended to slump when baked.

pie crust 2

I don’t consider myself an amateur pie crust maker at this point, but apparently I still needed something foolproof. This recipe solves my problem. The butter is processed into a portion of the flour, not until it’s broken up into pea-sized bits, but until it’s a crumbly, homogeneous mixture. Then the rest of the flour and some water is mixed in.

pie crust 4

After resting, the dough rolls out smoothly and trouble-free, without ripping or cracking. You can freeze it either before or after rolling. Then it bakes up golden, puffy, light, crisp. It’s everything you want from a pie crust, just easier to make. It definitely holds its own against any filling.

pie crust 6

Easy Pie Dough (not really adapted from The Food Lab)

My butter cubes came straight from the freezer, which might be why it took a lot more than 25 pulses for the dough to form clumps.

2½ cups (12.5 ounces) all-purpose flour
2 tablespoons sugar
1 teaspoon kosher salt
20 tablespoons butter (2½ sticks) cold unsalted butter, cut into ½-inch cubes
6 tablespoons cold water

1. Combine two thirds of flour with sugar and salt in the bowl of a food processor. Pulse to blend. Spread the butter evenly over flour mix; pulse until no dry flour remains and the dough just begins to collect in clumps, about 25 short pulses. Use a rubber spatula to spread the dough evenly around the bowl of the food processor. Sprinkle with the remaining flour and pulse until dough is just barely broken up, about 5 short pulses. Transfer the dough to a large bowl.

2. Sprinkle with the water, then, using a rubber spatula, fold and press the dough until it comes together into a ball. Divide in half and form each half into a 4-inch disk. Wrap tightly in plastic wrap and refrigerate for at least 2 hours before rolling and baking.

Save

Save

bittersweet chocolate pumpkin tart

bittersweet chocolate pumpkin tart 4

This is the perfect pumpkin dessert for people who don’t like pumpkin desserts. There’s so much more chocolate than pumpkin, and chocolate has a stronger flavor than pumpkin, that this is a rich, silky chocolate tart that you can get away with serving for Thanksgiving because there’s a token scoop of pumpkin in the filling.

bittersweet chocolate pumpkin tart 2

It’s not hard to make, with a press-in crumb crust and a simple whisked filling. I made it on the spur of the moment when the baby’s nap went long. It also works out well for Thanksgiving because it can be made a couple days in advance.

bittersweet chocolate pumpkin tart 3

A friend told me that although she doesn’t like pumpkin desserts, she loved this one. Well sure, that’s because the pumpkin is buried under half a pound of chocolate. This is a pumpkin tart in name only, but that’s all you need for it to fit into your Thanksgiving menu.

bittersweet chocolate pumpkin tart 7

Printer Friendly Recipe
Bittersweet Chocolate Pumpkin Tart (adapted from Love and Olive Oil)

I chopped the chocolate in the food processor, then transferred it to a bowl, before making the crust in the food processor. I toasted the pecans by spreading them in a single layer on a plate and microwaving for about 2 minutes, stirring occasionally, until fragrant. I’m sure this can be made in a pie pan instead of a tart pan.

For the crust:
8 ounces vanilla wafer cookies
½ cup pecans, toasted
2 tablespoons packed light brown sugar
½ teaspoon ground cinnamon
⅛ teaspoon salt
4 tablespoons (½ stick) unsalted butter, melted

For the filling:
¾ cup heavy cream
¼ cup whole milk
8 ounces bittersweet (60-70%) chocolate, finely chopped
2 large eggs
1 teaspoon ground cinnamon
½ teaspoon ground ginger
¼ teaspoon ground cloves
⅛ teaspoon ground nutmeg
⅔ cup pumpkin purée
¼ cup brown sugar
¼ teaspoon salt
1 tablespoon bourbon (or 1 teaspoon vanilla extract)
cocoa (optional)

1. Heat the oven to 325 degrees. Place a 9-inch round or equivalently-sized tart pan with a removable bottom on a baking sheet.

2. In a food processor, process the cookies and pecans until finely ground. Add the sugar, cinnamon, and salt; pulse to combine. Add the melted butter and pulse until the crumbs are evenly moistened. Transfer the mixture to the tart pan; press firmly into the bottom and up the sides of the pan. Bake for 10 to 14 minutes, or until fragrant. Transfer to a cooling rack to cool slightly. Lower the oven temperature to 250 degrees.

3. In a small saucepan over medium-high, heat the cream and milk until just simmering. Pour the cream mixture over the chocolate and gently whisk until the chocolate is melted and the mixture is smooth.

4. In a large mixing bowl, whisk the eggs until broken up. Add the spices, pumpkin, sugar, and salt. Whisk in the chocolate mixture, then the bourbon or vanilla.

5. Spread the filling evenly in the baked tart shell. Transfer the tart pan on the baking sheet to the oven. Bake until the filling barely jiggles, 40 to 50 minutes. Cool on a wire rack. The tart can be covered and chilled for several days. Serve at room temperature. If desired, dust with cocoa just before serving.

bittersweet chocolate pumpkin tart 6

blueberry and cream cookies

blueberries and cream cookies 6

This is usually my view while baking lately. I like it, except for the constant challenge of keeping the baby from grabbing the spatula, or sticking her hands in the way of the mixer paddle, or kicking a bowl full of eggs. Also, I’ve been guilty of dripping batter on her head while grabbing a spoonful to taste.

blueberries and cream cookies 1

It’s best if I just wait until nap time to put things in the oven or take them out, although in a pinch, I’ve found I can tilt her away from the oven and hold her limbs down when one hand while I grab a hot baking pan with the other. This recipe, then, is perhaps not the best choice for baking with the baby, since it has an extra oven step of making milk crumbs by toasting a combination of dried milk powder, sugar, flour, and butter.

blueberries and cream cookies 2

After that, it’s mixed like a standard cookie, with the sugar creamed into the butter, the egg beaten in, and the dry ingredients added at the end. Then, the dough is scooped for baking, except you don’t bake it then. It needs to chill before baking to reduce how much the cookies spread. Then, when the baby is sleeping, or sitting on the floor putting things in her mouth, or jumping like a crazy person in her bouncer, you can finally put the cookies in the oven, and shortly afterward, enjoy a soft and sweet cookie, studded with tart bits of blueberries.

blueberries and cream cookies 3

Printer Friendly Recipe
Blueberry and Cream Cookies (adapted from Christina Tosi’s Momofuko Milk Bar via Bon Appetit)

I did not chill my dough overnight. I left it in the fridge for a couple hours, just until it was cold. It seemed fine.

Milk Crumbs:
6 tablespoons nonfat dry milk powder
¼ cup all purpose flour
1½ tablespoons sugar
1 tablespoon cornstarch
⅓ teaspoon salt
2 tablespoons unsalted butter, melted

Cookies:
2⅔ cups (12.8 ounces) all-purpose flour
1 teaspoon baking powder
½ teaspoon baking soda
16 tablespoons (2 sticks) unsalted butter, room temperature
¾ cups (5.25 ounces) sugar
¾ cups (5.25 ounces) brown sugar
½ teaspoon salt
¼ cup light corn syrup
1 large egg
Milk crumbs
1 cup dried blueberries

1. For the milk crumbs: Heat the oven to 275 degrees. Line a large rimmed baking sheet with parchment paper or a silicone mat. In a small bowl, combine the milk powder, flour, sugar, cornstarch, and salt; toss to mix evenly. Add the butter; stir with fork until clusters form. Spread the mixture evenly on the prepared sheet. Bake until the crumbs are dry and crumbly but still pale, about 10 minutes, stirring twice during baking. Cool completely on the sheet. (The crumbs can be made 1 week ahead. Store in an airtight container at room temperature.)

2. For the cookies: In a medium bowl, combine the flour, baking powder, and baking soda; set aside. In the bowl of a stand mixer fitted with the paddle attachment (or a large bowl if using a hand mixer), beat the butter, sugars, and salt on medium speed until light and fluffy, 2-3 minutes. Add the corn syrup, then the egg, beating until the mixture is very pale, about 10 minutes. Reduce the mixer speed to low and gradually add the flour mixture, mixing just until incorporated. Add the milk crumbs and blueberries; mix on low speed just until evenly combined. Line two baking sheets with parchment paper or silicone mats. Scoop the dough in heaping tablespoons onto the prepared baking sheets. Cover and refrigerate for at least 24 hours or up to 2 days.

3. Heat the oven to 375 degrees. Bake the cookies, one sheet at a time, until they are golden, 10-12 minutes. Let the cookies cool on the cookie sheets for 2 minutes, then transfer to wire racks to cool completely. Repeat with the remaining cookies.

blueberries and cream cookies 4