Archives for May 2008

crockpot pulled pork

crockpot pulled pork new
Updated photo 5/31/12

My brother has a habit of giving out remarkably vague “recipes.” For example: “Put some pig or cow in the slow cooker with some liquid. Use a spice rub if you want. Cook until you get home from work, then give the fat to the dog and shred the meat.”

Um. Right.

I needed more information. Does the size of the roast matter? Whether it has a bone? I used pork shoulder, and Cooks Illustrated has a recipe for barbecue pulled pork, so I adapted some of their instructions – the ingredients and method for the spice rub – for this slow cooker version. I was reluctant to add liquid to the slow cooker liner with the meat, because I had some idea that it would dilute the flavor in the meat, so I added just a bit of water and some liquid smoke. I cooked it for about 10 hours, added some barbecue sauce, then cooked it for 1 hour longer.

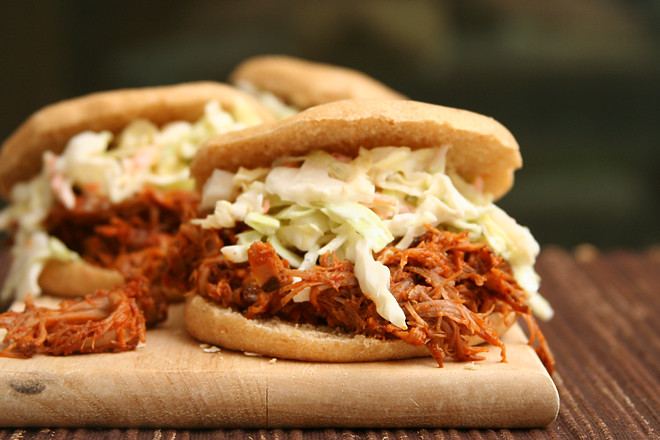
Oh my gosh, it’s so good. I almost didn’t want to add barbecue sauce, because the meat tastes so good without it, but of course it was that much better once I added it. And it makes a ton of food. I’m going to guess that the pork shoulder I used, which was probably the smallest I could find, was about twenty servings. I froze most of it, and it reheats really well.

I learned a few things from this. For one, there’s no need to worry about liquid diluting the flavor of the meat – the meat exudes a surprising amount of liquid anyway. It’s best to add just a bit of water to help the slow cooker get the cooking started. Also, as far as cooking times go, longer seems to be better. So, as my brother said, start dinner cooking before you go to work, and when you get home 9 or 10 hours later, you’ll be just in time to shred the meat, add the barbecue sauce, and let that all cook together for a bit.

Overall, served with coleslaw, this makes for a fantastic meal. I know that crockpot pulled pork recipes are a dime a dozen, but trust me that this spice rub adds far more flavor than root beer ever could. Plus, it’s not much work at all, so with minimal effort you can stock your freezer with multiple nights’ worth of easy and tasty meals.

Update 9.21.08: Last time I made this, I used a pork shoulder that just barely fit in my crockpot; I think it was in the 7.5 pound range.  After 8.5 hours, the pork wasn’t tender enough to be pulled, at least on the inside.  So I recommend erring on the longer side of this cooking range, especially if you’re using a large roast.

Slow Cooker Pulled Pork (spice rub from Cooks Illustrated)

Spice Rub:
1 tablespoon ground black pepper
1-2 teaspoons cayenne pepper
2 tablespoons chili powder
2 tablespoons ground cumin
2 tablespoons dark brown sugar
1 tablespoon dried oregano
4 tablespoons paprika
2 tablespoons table salt
1 tablespoon granulated sugar
1 tablespoon ground white pepper

1 (6-8 pound) bone-in pork shoulder
½ teaspoon liquid smoke (optional)
2 cups barbecue sauce

1. Mix all spice rub ingredients in small bowl.

2. Massage spice rub into meat. Wrap tightly in double layer of plastic wrap; refrigerate for at least 3 hours. (For stronger flavor, the roast can be refrigerated for up to 3 days.)

3. Unwrap roast and place it in slow cooker liner. Add liquid smoke, if using, and ¼ cup water. Turn slow cooker to low and cook for 8-10 hours, until meat is fork-tender.

4. Transfer roast to cutting board; discard liquid in liner. “Pull” by tearing meat into thin shreds with two forks or your fingers. Discard fat.

5. Place shredded meat back in slow cooker liner; toss with 1 cup barbecue sauce, and heat on low for 30-60 minutes, until hot. Serve with additional barbecue sauce.

orange vanilla opera cake (db may 2008)

Lately I’ve become fixated with Bo Friberg’s The Professional Pastry Chef. I don’t want and have never wanted to be a professional pastry chef. But I flipped through this book and I was hooked. (Actually, in my arrogance, I grabbed The Advanced Pastry Chef first.) Page after page of beautifully plated desserts; this was more than food, this was art. Suddenly the fuss necessary to produce eye-catching desserts seemed worthwhile.

So I was elated when Ivonne, Lis, Fran, and Shea announced their choice of an opera cake for this month’s Daring Baker challenge. Layers of almond-based cake brushed with syrup, interspersed with buttercream, topped with mousse and glaze – this is exactly what I had in mind to try. I haven’t bought The Professional Pastry Chef yet, but at least I have a reason to get some practice.

The rules for the recipe were somewhat flexible in that we could flavor our cake any way we wanted – as long as it was light-colored. I would have enjoyed trying a traditional dark chocolate opera cake, but this was fun too. I’ve been loving creamsicle-like flavors lately, so I made my pastry orange and vanilla-flavored.

I hit a snag or two along the road, but nothing that couldn’t be overcome. A shortage of parchment paper meant I couldn’t adequately line my pan and the cake didn’t come out cleanly, but I was able to piece it together better than I expected. My first batch of white chocolate seized when I tried melting it, even though I used high-quality (Callebaut) chocolate and a double boiler. My orange glaze, which I adapted from a recipe Tyler Florence developed to top scones, wasn’t stable at room temperature, even though I added more powdered sugar than I’d expected to need.

No matter, everything came together in the end. The cake was good, although not as flavorful as I would have liked. I was warned before I made mine that it might be too sweet, so I added a pinch of salt to the jaconde to add some balance. I was also hoping that the orange would help balance the sweetness, but there wasn’t nearly enough orange or vanilla flavor. I didn’t end up using the zest of the orange anywhere, which certainly would have helped. And I’ve never been able to get a strong vanilla flavor in something baked. Maybe I should try rubbing the vanilla seeds into the sugar, like Dorie recommends with citrus zest?

Even if the flavor didn’t knock my socks off, I’m really glad I made this. I learned so much and used so many techniques that were new to me. I also think it’s great that we were given the freedom to develop our own flavors, which encouraged me to be creative. I’m eager to try the traditional dark chocolate version now, and this time I’ll make sure it’s rich and flavorful!

Orange-Vanilla Opera Cake

This is exactly the recipe I used, including my adaptations for orange and vanilla flavors. This recipe is half of what was given to us by the Daring Baker hosts this month. Double this amount of buttercream would probably provide the right amount to create layers of equal thickness to the cake; mine are a little thin.

Joconde: (adapted from Dorie Greenspan’s Paris Sweets)

The joconde can be made up to 1 day in advance and kept wrapped at room temperate

You can buy almond meal in bulk food stores or health food stores, or you can make it at home by grinding almonds in the food processor with two tablespoons of the flour that you would use in the cake.

2 tablespoons unsalted butter, melted and cooled
3 large egg whites, at room temperature
1 tablespoon granulated sugar
1 cup (112 grams) ground blanched almonds
1 cup (3.5 ounces) icing sugar, sifted
3 large eggs
1 vanilla bean, split and scraped
½ teaspoon vanilla
Pinch salt
¼ cup (1.25 ounces) all-purpose flour

1. Adjust an oven rack to the middle position. Preheat the oven to 425 degrees. Line a 12½ x 15½-inch jelly-roll pan with parchment paper and brush with ½ tablespoon of the melted butter.

2. In the bowl of a stand mixer fitted with the whisk attachment (or using a handheld mixer), whip the whites on low speed until they become foamy, then whip on medium-high speed until the whites reach soft peaks. Add the granulated sugar, and whip on high speed until the whites are stiff and glossy.

3. In a separate mixer bowl (or the same bowl, cleaned and dried) fitted with the paddle attachment, beat almond flour, icing sugar, eggs, salt and vanillas on medium speed until light and voluminous, about 3 minutes. Add flour and beat at low speed until it disappears.

4. Use a rubber spatula to gently fold the meringue into the almond mixture, then fold in the remaining melted butter until just combined. Spread the batter evenly in the prepared pan.

5. Bake the cake until it is lightly browned and just springy to the touch, 5-9 minutes.

6. Put the pan on a cooling rack and run a sharp knife along the edges of the cake to loosen it from the pan. Cover the pan with a sheet of parchment or wax paper, turn the pan over, and unmold. Carefully peel away the parchment, then turn the parchment over and use it to cover the cake. Let the cake cool to room temperature.

Syrup: (adapted from Dorie Greenspan’s Paris Sweets)

The syrup can be made up to 1 week in advance and kept covered in the refrigerator.

¼ cup water
1.2 ounces granulated sugar
1 tablespoon Grand Marnier

In a small saucepan, combine water and sugar. Bring to a boil, while stirring to dissolve ingredients. Stir in liqueur. Remove from heat and allow syrup to cool.

Buttercream: (adapted from Dorie Greenspan’s Baking: From My Home to Yours)

The buttercream, packed in an airtight container, can be frozen for 1 month or refrigerated for 4 days. Bring it to room temperature and beat it briefly to restore its consistency.

¼ cup (1.75 ounces) granulated sugar
1 large egg white
pinch salt
6 tablespoons unsalted butter, at room temperature
1 tablespoon fresh orange juice
¼ teaspoon pure vanilla extract

Put the sugar and egg whites in a mixer bowl or another large heatproof bowl, fit the bowl over a plan of simmering water and whisk constantly, keeping the mixture over the heat, until it feels hot to the touch (160 degrees on an instant-read thermometer), about 3 minutes. The sugar should be dissolved, and the mixture will look like shiny marshmallow cream. Remove the bowl from the heat. Working with the whisk attachment or with a hand mixer, beat the meringue on medium speed until it is cooledto room temperature, about 5 minutes.

Switch to the paddle attachment if you have one, and add the butter 2 tablespoons at a time. Once all the butter is in, beat the buttercream on medium-high speed until it is thick and very smooth, 6-10 minutes. During this time the buttercream may curdle or separate – just keep beating and it will come together again.

On medium speed, gradually beat in the orange juice, waiting until each addition is absorbed before adding more, and then the vanilla. You should have a shiny smooth, velvety, pristine white buttercream. Press a piece of plastic against the surface of the buttercream and set aside briefly.

White chocolate mousse: (from Tish Boyle and Timothy Moriarity’s Chocolate Passion)

The mousse can be made ahead and refrigerated until you’re ready to use it.

3.5 ounces white chocolate
½ cup plus 1½ tablespoons heavy cream
½ tablespoon Grand Marnier

1. Melt the chopped white chocolate and the 3 tablespoons of heavy cream. Whisk gently and let cool to room temperature.

2. Place the remaining heavy cream into a 4 1/2-quart bowl of a heavy-duty electric mixer fitted with the wire whisk attachment. Add the liqueur. Beat on high speed until soft peaks form.

3. Using a wire whisk, gently stir in about 1 cup of the whipped cream to the cooled white chocolate mixture. Using a rubber spatula, fold in the remaining cream. Do not over-mix or the mousse will become grainy. Cover and refrigerate until ready to use.

Orange glaze: (adapted from Tyler Florence)

2 tablespoons unsalted butter
2 cups (8 ounces) powdered sugar, sifted
2 oranges, juiced and zested

Combine butter, 2 cups (7 ounces) sugar, orange zest, and juice over a double boiler. Cook until butter and sugar are melted and mixture has thickened. Pour through fine mesh strainer, then beat until smooth and slightly cool, adding more sugar if necessary to reach desired consistency.

Assembly:

Line a baking sheet with parchment or wax paper. Cut and trim cake into three 10 x 5-inch rectangles. Place one section of cake on the baking sheet and moisten it gently with the 1/3 of the syrup. Spread half of the buttercream over this layer. Top with another piece of cake and moisten with 1/3 of the syrup. Spread the remaining buttercream on the cake and then top with the third section of cake. Use the remaining syrup to wet the cake and then refrigerate until very firm, at least half an hour.

Spread the mousse on the top of the last layer of cake. Refrigerate for 2-3 hours to give the mousse the opportunity to firm up.

Pour the cooled glaze over the top of the chilled cake, spreading to evenly coat the cake if necessary. Refrigerate the cake to set the glaze.

Serve the cake slightly chilled. This recipe will yield approximately 10 servings.

pecan honey sticky buns (twd)

My experience with sticky buns is limited; I guess we were more of a cinnamon roll family. Madam Chow’s TWD choice for this week would be something new for me then.

Dorie is insistent that you don’t cut the brioche dough in half. But, I did anyway. (Actually, I made a third of the recipe.) It would have been the same amount of effort to make the whole thing, and it freezes well, but do I really need this incredibly buttery bread dough to be conveniently at my fingertips? Nah. I admit I had to get a little creative with my mixer since I was making such a small amount – I mixed with the paddle for a while after adding the butter, then switched to the dough hook for the last few minutes of kneading.

I had the same problem that a number of other TWD members did with this recipe – 2 hours of rising in the morning, plus putting the rolls together and baking makes for a long wait until breakfast. I think it would work to form the rolls the night before, put them in the fridge overnight, and let them rise in a warmed oven the next morning. That should cut the waiting time in half.

The brioche made for a really light and airy base for sticky buns. But, I wonder if all that butter is worth it once it’s drowned in glaze? I’m thinking my base for cinnamon rolls would work just fine, with only about a third of the butter.

Overall, I thought these were great. The bread was light and tender, the glaze wasn’t too sweet, and they weren’t nearly as sticky as I was expecting. I almost wish I had made some extra to store in the freezer!

Pecan Honey Sticky Buns (from Dorie Greenspan’s Baking: From My Home to Yours)

Makes 15 buns

For the Glaze:
1 cup (7 ounces) packed light brown sugar
1 stick (8 tablespoons) unsalted butter, cut into 4 pieces
¼ cup honey
1½ cups pecans (whole or pieces)

For the Filling:
¼ cup (1.75 ounces) sugar
3 tablespoons (packed) light brown sugar
1 tablespoon ground cinnamon
3 tablespoons unsalted butter, at room temperature

For the Buns:
½ recipe dough for Golden Brioche loaves (see below), chilled and ready to shape (make the full recipe and cut the dough in half after refrigerating it overnight)

Generously butter a 9 by 13-inch baking pan (a Pyrex pan is perfect for this).

To make the glaze: In a heavy-bottomed saucepan, bring the brown sugar, butter, and honey to a boil over medium-low heat, stirring frequently to dissolve the sugar. Pour the glaze into the buttered pan, evening it out as best you can by tilting the pan or spreading the glaze with a heatproof spatula. Sprinkle over the pecans.

To make the filling: Mix the sugars and cinnamon together in a bowl. If necessary, in another bowl, work the butter with a spatula until it is soft, smooth and spreadable.

To shape the buns: On a flour-dusted work surface, roll the chilled dough into a 16-inch square. Using your fingers or a pastry brush, spread the softened butter over the dough. Sprinkle the dough with the cinnamon sugar, leaving a 1-inch strip bare on the side farthest from you. Starting with the side nearest you, roll the dough into a cylinder, keeping the roll as tight as you can. (At this point, you can wrap the dough airtight and freeze it for up to 2 months . . . . Or, if you want to make just part of the recipe now, you can use as much of the dough as you’d like and freeze the remainder. Reduce the glaze recipe accordingly).

With a chef’s knife, using a gentle sawing motion, trim just a tiny bit from the ends of the roll if they’re very ragged or not well filled, then cut the log into 1-inch thick buns. (Because you trim the ragged ends of the dough, and you may have lost a little length in the rolling, you will get 15 buns, not 16.) Fit the buns into the pan cut side down, leaving some space between them.

Lightly cover the pan with a piece of wax paper and set the pan in a warm place until the buns have doubled in volume, about 1 hour and 45 minutes. The buns are properly risen when they are puffy, soft, doubled and, in all likelihood, touching one another.

Getting ready to bake: When the buns have almost fully risen , center a rack in the oven and preheat the oven to 375 degrees F.

Remove the sheet of wax paper and put the pan on a baking sheet lined with parchment or a silicone mat. Bake the sticky buns for about 30 minutes, or until they are puffed and gorgeously golden; the glaze will be bubbling away merrily. Pull the pan from the oven.

The sticky buns must be unmolded minutes after they come out of the oven. If you do not have a rimmed platter large enough to hold them, use a baking sheet lined with a silicone mate or buttered foil. Be careful – the glaze is super-hot and super-sticky.

Golden Brioche Loaves

2 packets active dry yeast (each packet of yeast contains approx. 2 1/4 teaspoons)
1/3 cup just-warm-to-the-touch water
1/3 cup just-warm-to-the-touch whole milk
3 1/3 cups all-purpose flour
2 teaspoons salt
3 large eggs, at room temperature
1/4 (1.75 ounces) cup sugar
3 sticks (12 ounces) unsalted butter, at room temperature but still slightly firm

What You’ll Need for the Glaze (you would brush this on brioche loaves, but not on the sticky buns):
1 large egg
1 tablespoon water

To Make The Brioche: Put the yeast, water and milk in the bowl of a stand mixer and, using a wooden spoon, stir until the yeast is dissolved. Add the flour and salt, and fit into the mixer with the dough hook, if you have one. Toss a kitchen towel over the mixer, covering the bowl as completely as you can – this will help keep you, the counter and your kitchen floor from being showered in flour. Turn the mixer on and off a few short pulses, just to dampen the flour (yes, you can peek to see how you’re doing), then remove the towel, increase the mixer speed to medium-low and mix for a minute or two, just until the flour is moistened. At this point, you’ll have a fairly dry, shaggy mess.

Scrape the sides and bottom of the bowl with a rubber spatula, set the mixer to low and add the eggs, followed by the sugar. Increase the mixer speed to medium and beat for about 3 minutes, until the dough forms a ball. Reduce the speed to low and add the butter in 2 tablespoon-sized chunks, beating until each piece is almost incorporated before adding the next. You’ll have a dough that is very soft, almost like batter. Increase the speed to medium-high and continue to beat until the dough pulls away from the sides of the bowl, about 10 minutes.

Transfer the dough to a clean bowl (or wash out the mixer bowl and use it), cover with plastic wrap and leave at room temperature until nearly doubled in size, 40 to 60 minutes, depending upon the warmth of your room.

Deflate the dough by lifting it up around the edges and letting it fall with a slap to the bowl. Cover the bowl with the plastic wrap and put it in the refrigerator. Slap the dough down in the bowl every 30 minutes until it stops rising, about 2 hours, then leave the uncovered dough in the refrigerator to chill overnight. (After this, you can proceed with the recipe to make the brioche loaves, or make the sticky buns instead, or freeze all or part of the dough for later use.)

The next day, butter and flour two 8½ by 4½-inch pans.

Pull the dough from the fridge and divide it into 2 equal pieces. Cut each piece of the dough into 4 equal pieces and roll each piece into a log about 3½ inches long. Arrange 4 logs crosswise in the bottom of each pan. Put the pans on a baking sheet lined with parchment or a silicone mat, cover the pans lightly with wax paper and leave the loaves at room temperature until the dough almost fills the pans, 1 to 2 hours. (Again, rising time with depend on how warm the room is.)

Getting Ready To Bake: Center a rack in the oven and preheat the oven to 400 degrees F.
To Make the Glaze: Beat the egg with the water. Using a pastry brush, gently brush the tops of the loaves with the glaze.

Bake the loaves until they are well risen and deeply golden, 30 to 35 minutes. Transfer the pans to racks to cool for 15 minutes, then run a knife around the sides of the pans and turn the loaves out onto the racks. Invert again and cool for at least 1 hour.

franks and beans

I can’t remember how I got it in my head to make franks and beans. I thought I had mentioned it in a blog post, but I can’t find it. Was it a comment on someone else’s blog? I thought I just idly mentioned it somewhere, and then I started thinking “yum…pork and beans…”  (Ah, Elizabeth found it for me – in my post about red beans and rice.)

Of course, god forbid I take the easy way out and buy some baked beans, add hot dogs and brown sugar and bake them for a while, like I used to do when I was a kid. (Of course, we used the cheese-filled hot dogs then. Ew!) No, I have to go all out and make beans from scratch. Glutton for punishment.

But I couldn’t find any recipes for hot dogs and beans with the beans made from scratch, so I made a Boston baked beans recipe and added cut up hot dogs to the onions while they sautéed.

I figured that if I cut the hot dogs on a diagonal, they were more elegant and I could pretend that I wasn’t eating incredibly low-class food.

But if I cut them straight across, they were more bite-sized. Ah well.

I messed up the recipe just a bit. I was cutting it in half, but I used a saucepan less than half the area of the pan called for for a full recipe, so the sauce didn’t thicken as much as I would have liked. You can see in the picture how liquidy the beans are. Also, when adding hot dogs, I might skip the salt pork next time and maybe increase the bacon by an ounce or two. Other than those minor glitches, though, this was a fun way to revisit childhood!

Boston Baked Beans (from Cooks Illustrated January 2003)

Serves 4 to 6

CI note: The beans can be made ahead. After cooking, cool them to room temperature and refrigerate in an airtight container for up to 4 days.

Bridget note: I added 2 hot dogs, cut into bite-sized pieces, to the sautéing onions.

4 ounces salt pork, trimmed of rind and cut into ½-inch cubes
2 ounces bacon (2 slices), cut into ¼ -inch pieces
1 medium onion, chopped fine
½ cup mild molasses
1 tablespoon mild molasses
1½ tablespoons brown mustard
1 pound dried small white beans (about 2 cups), rinsed and picked over
Table salt
1 teaspoon cider vinegar
Ground black pepper

Adjust oven rack to lower-middle position; heat oven to 300 degrees. Add salt pork and bacon to 8-quart Dutch oven; cook over medium heat, stirring occasionally, until lightly browned and most fat is rendered, about 7 minutes. Add onion and continue to cook, stirring occasionally, until onion is softened, about 8 minutes. Add ½ cup molasses, mustard, beans, 1¼ teaspoons salt, and 9 cups water; increase heat to medium-high and bring to boil. Cover pot and set in oven. Bake until beans are tender, about 4 hours, stirring once after 2 hours. Remove lid and continue to bake until liquid has thickened to syrupy consistency, 1 to 1½ hours longer. Remove beans from oven; stir in remaining tablespoon of molasses, vinegar, and additional salt and pepper to taste. Serve.

ricotta spinach (and tofu) ravioli

A while ago, I wrote a comment on someone else’s blog about how tofu’s bad reputation comes from people trying to substitute tofu for tastier but fattier ingredients, like cheese and meat. And it’s true – I love tofu in recipes where it belongs – hot and sour soup, moo shu, peanut sesame noodles, stir fry. But, it turns out that I’m a hypocrite, because just a few days before I wrote that comment, I had made ravioli filling with ricotta, spinach, parmesan, and, yes, tofu.

This filling is a holdover from my brief stint as a brown rice-eating, refined sugar-avoiding health nut. The lifestyle wasn’t a keeper, but this recipe is. The trick is to process the tofu in a food processor before adding the other ingredients to ensure that the tofu is absolutely smooth. I also like the spinach processed, or at least very finely chopped, because the texture of cooked spinach is potentially stringy unless chopped finely.

This is my most successful attempt at making homemade ravioli. (And it was all done between 9pm and midnight on a Friday, because I’m a nut.) I made the dough by hand instead of using the food processor, since I’ve been more successful with hand-kneaded dough in the past. The picture is all out of whack – I was supposed to use 3 eggs and 2 cups of flour, this is 3 cups of flour and 2 eggs. I figured out the screw-up just in time.

In the past, I’ve always rolled out pasta dough for ravioli to the thinnest setting, but then they’re impossibly delicate. I kept the pasta just a bit thicker this time. I was also careful to form wider sheets of pasta, which meant I could form square raviolis instead of rectangles. It’s a small issue, but I was excited about the squares. For nice square ravioli, make sure you start rolling the dough by feeding the widest edge through first. Not only does this make for prettier ravioli, but the pasta sheets don’t become as long and difficult to handle.

The thicker dough made far better ravioli than I’ve made before! This is the first time I’ve been able to boil ravioli without it immediately tasting watery. The dough remained firm, and the ravioli, both the filling and the pasta, were delicious. The tofu doesn’t detract from the filling at all, and while I can’t say that it’s adding any flavor of its own, it sure is a healthy filler ingredient.

Spinach Ricotta Tofu Ravioli (dough ingredients and ravioli forming instructions from Cooks Illustrated; dough mixing and rolling method from Marcella Hazan; filling recipe is my own creation)

The instructions look long, but that’s only because I copied and pasted Marcella Hazan’s very detailed pasta instructions from her lasagna recipe. It’s not nearly as complicated as it looks.

I’m not providing you with a sauce recipe. I’ve been using a simple tomato sauce with these.

Ravioli take well to freezing. I didn’t eat any of these the day I formed them. I immediately flash froze them, and they’ve made for some handy easy meals in the weeks since.

For the dough:
2 cups (10 ounces) unbleached flour
3 large eggs

For the filling:
10 ounces fresh spinach
12 ounces firm tofu
15 ounces ricotta cheese
¾ cup (1.5 ounces) grated parmesan cheese
1 teaspoon salt
ground black pepper

For the pasta:

Pour the flour onto a work surface, shape it into a mound, and scoop out a deep hollow in its center. Break the eggs into the hollow.

Beat the eggs lightly with a fork for about 2 minutes as though you were making an omelet. Draw some of the flour over the eggs, mixing it in with the fork a little at a time, until the eggs are no longer runny. Draw the sides of the mound together with your hands, but push some of the flour to one side, keeping it out of the way until you find you absolutely need it. Work the eggs and flour together, using your fingers and the palms of your hands, until you have a smoothly integrated mixture. If it is still moist, work in more flour.

When the mass feels good to you and you think it does not require any more flour, wash your hands, dry them, and run a simple test: Press you thumb deep into center of the mass; if it comes out clean, without any sticky matter on it, no more flour is needed. Put the egg and flour mass to one side, scrape the work surface absolutely clear of any loose or caked bits of flour and of any crumbs, and get ready to knead.

Return to the mass of flour and eggs. Push forward against it using the heel of your palm, keeping your fingers bent. Fold the mass in half, give it a half turn, press hard against it with the heel of your palm again, and repeat the operation. Make sure that you keep turning the ball of dough always in the same direction, either clockwise or counterclockwise, as you prefer. When you have kneaded it thus for 8 full minutes and the dough is as smooth as baby skin, it is ready for the machine.

Cut the ball of dough into 6 equal parts.

Spread clean, dry, cloth dish towels over a work counter near where you’ll be using the machine.

Set the pair of smooth cylinders, the thinning rollers, at the widest opening. Flatten one of the pieces of dough by pummeling it with your palm, and run it through the machine. Fold the dough twice into a third of its length, and feed it by its narrow end through the machine once again. Repeat the operation 2 or 3 times, then lay the flattened strip of pasta over a towel on the counter. Since you are going to have a lot of strips, start at one end of the counter, leaving room for the others.

Take another piece of dough, flatten it with your hand, and turn it through the machine exactly as described above. Lay the strip next to the previously thinned one on the towel, but do not allow them to touch or overlap, because they are still moist enough to stick to each other. Proceed to flatten all the remaining pieces in the same manner.

Close down the opening between the machine’s rollers by one notch. Take the first pasta strip you had flattened and run it once through the rollers, feeding it by its wider end. Do not fold it, but spread it flat on the cloth towel, and move on to the next pasta strip in the sequence.

When all the pasta strips have gone through the narrower opening once, bring the rollers closer together by another notch, and run the strips of pasta through them once again, following the procedure described above. You will find the strips becoming longer, as they get thinner, and if there is not enough room to spread them out on the counter, you can let them hand over the edge. Continue thinning the strips in sequence, progressively closing down the opening between the rollers one notch at a time. This step-by-step thinning procedure, which commercial makers of fresh pasta greatly abbreviate or skip altogether, is responsible, along with proper kneading, for giving good pasta its body and structure. Continue thinning the pasta until the second-to-last setting.

For the filling:

Place cleaned spinach leaves and any water that clings to them in a nonreactive soup kettle. (If you’re using pre-washed bagged spinach, add 2 tablespoons water to the pot). Cover and cook over medium heat until spinach wilts, about 5 minutes. Cool spinach slightly and squeeze out the excess liquid; set aside.

Process the tofu in a food processor until smooth. Add the spinach and pulse to combine and finely chop. Add the remaining filling ingredients and pulse to combine.

To form ravioli:

Your sheets should be approximately 4 inches across. Place small balls of filling (about one rounded teaspoon each) in a line one inch from the bottom of the pasta sheet. Leave one and one-quarter inches between each ball of filling. Fold over the top of the pasta and line it up with the bottom edge. Seal bottom and the two open sides with your finger. Use fluted pastry wheel to cut along the two sides and bottom of the sealed pasta sheet. Run pastry wheel between balls of filling to cut out the ravioli.

To cook ravioli:

Bring 4 quarts water to boil in a large stockpot. Add salt and half the pasta. Cook until doubled edges are al dente, 4-5 minutes. With a slotted spoon, transfer ravioli to warmed bowls or plates; add sauce of choice. Meanwhile, put remaining ravioli in boiling water and repeat cooking process. (Or bring two pots of water to boil and cook both batches simultaneously.) Serve immediately. (Alternatively, after draining the boiled ravioli, layer them in a baking dish with sauce and put them in a warmed oven until ready to serve.)

traditional madeleines (twd)

I hemmed and hawed about whether to try Tara’s choice of madeleines for this week’s TWD recipe. I don’t have a madeleine pan, and I’m feeling stubborn about buying a pan that has such a specific use. I found out that a mini-muffin pan can be substituted, but I don’t have one of those either. Some people tried baking their madeleines in spoons, but my spoons aren’t very rounded and I wasn’t keen on putting them in the oven. It was suggested that those of us without the proper equipment blog about a previous TWD recipe that we missed instead, and I was all ready with a Snickery Squares entry.

But once the Snickery Squares were eaten, I decided to try out the madeleines anyway, in a regular muffin pan. The recipe says that it makes 12 madeleines, so I planned to divide the batter evenly between the 12 muffin cups. (Actually, I halved the recipe and made six.) I lined the bottom of the muffin cups with cookie press stamps to add some decoration to my tea cakes. I figured that I had nothing to lose if things didn’t work out – the recipe is neither work nor calorie intensive.

I have to admit that this is my first madeleine experience; not just making them, but eating them as well. That means that I have no basis for comparison for how this recipe compares to others and how the muffin madeleines compare to the traditional shell shapes. However, I can make some judgments about what I want from a tea cake.

The muffin pans seemed to work well enough, although I didn’t get the characteristic and elusive hump that’s so desired. But I didn’t feel that my madeleines were tender enough. Honestly, I think there’s too much butter in them, and the batter just couldn’t support and incorporate all of it. I’m also a little surprised by how coarse my crumb was; I must not have beat the eggs and sugar long enough.

Overall though, I’m pleased by the idea of a cookie-sized cake. While I doubt that there’s a madeleine pan in my near future, I might try out some other shapes to see if I can come up with the light and tender tea cake that I want.

Traditional Madeleines (from Dorie Greenspan’s Baking: From My Home to Yours)

⅔ cup all-purpose flour
¾ teaspoon baking powder
Pinch of salt
½ cup sugar
Grated zest of 1 lemon
2 large eggs, at room temperature
2 teaspoons pure vanilla extract
¾ stick (6 tablespoons) unsalted butter, melted and cooled
Confectioners’ sugar, for dusting

Whisk together the flour, baking powder and salt.

Working in a mixer bowl, or in a large bowl, rub the sugar and lemon zest together with your fingertips until the sugar is moist and fragrant. Add the eggs to the bowl. Working with the whisk attachment, or with a hand mixer, beat the eggs and sugar together on medium-high speed until pale, thick and light, 2 to 3 minutes. Beat in the vanilla. With a rubber spatula, very gently fold in the dry ingredients, followed by the melted butter. Press a piece of plastic wrap against the surface of the batter and refrigerate it for at least 3 hours, or for up to 2 days. This long chill period will help the batter form the hump that is characteristic of madeleines. (For convenience, you can spoon the batter into the madeleine molds, cover and refrigerate, then bake the cookies directly from the fridge; see below for instructions on prepping the pans.)

GETTING READY TO BAKE: Center a rack in the oven and preheat the oven to 400 degrees F. Butter 12 full-size madeleine molds, or up to 36 mini madeleine molds, dust the insides with flour and tap out the excess. Or, if you have a nonstick pan (or pans), give it a light coating of vegetable cooking spray. If you have a silicone pan, no prep is needed. Place the pan(s) on a baking sheet.

Spoon the batter into the molds, filling each one almost to the top. Don’t worry about spreading the batter evenly, the oven’s heat will take care of that. Bake large madeleines for 11 to 13 minutes, and minis for 8 to 10 minutes, or until they are golden and the tops spring back when touched. Remove the pan(s) from the oven and release the madeleines from the molds by rapping the edge of the pan against the counter. Gently pry any recalcitrant madeleines from the pan using your fingers or a butter knife. Transfer the cookies to a rack to cool to just warm or to room temperature.

If you are making minis and have more batter, bake the next batch(es), making certain that you cool, then properly prepare the pan(s) before baking.

Just before serving, dust the madeleines with confectioners’ sugar.

snickery squares

Sometimes when I cook, I want to make absolutely the best version of that dish possible. I want to coax the maximum potential from every single ingredient, and I’m willing to do whatever it takes to make it happen.

Other times, I just want to use up the container of dulce de leche in the fridge.

I only made a quarter of the Florida Pie recipe, which left me with leftover sweetened condensed milk. I made it into dulce de leche, thinking it would preserve better that way and that I’d have more options on how to use it. Half a Snickery Squares recipe called for almost exactly the amount of dulce de leche I needed to use up. (Um, I think. There was no measuring.)

I didn’t want to get out and then wash all of my food processor parts for half a recipe of shortbread crust, so I mixed that by hand. I didn’t want to bother with half an egg yolk, so I used heavy cream. I made the caramel peanuts as instructed, and that was fun. Caramel always fascinates me, and the peanuts sounded like plastic pieces once they cooled. Due to laziness and ingredient availability, I tweaked the chocolate topping ingredients just a bit. Everything seemed to come together nicely, even with the shortcuts.

I didn’t expect to love this dessert. I don’t dislike Snickers bars, but neither am I a fan. And I’ve heard a few reviews saying that these bars are really rich, so I was expecting another over-the-top Dorie creation.

Holy smokes, this is the best treat I’ve made in months. It’s certainly my favorite of the recipes I’ve made from Dorie’s Baking book. The shortbread crust is sturdy but tender, the dulce de leche adds complexity, the peanuts provide crunch, and the bittersweet chocolate ties everything together and keeps it from being too sweet.

There are a few tiny changes I would make to the recipe next time. I’d reduce the sugar in the crust. I was surprised by how sweet it was when I tasted it plain, and I think it would make a better contrast to the filling if it weren’t so sweet. I’ll probably use heavy cream in the crust in the future, like I did this time, because it seemed to work fine and it’s easier than dealing with an egg yolk. And I’d reduce the peanuts from 1½ cups to 1 cup, because I really couldn’t fit them all in the pan. I’d correspondingly reduce the sugar in the filling to ¼ cup (for a full recipe).

But really, this is nitpicking. The squares are amazing how they are, and after two days of them beckoning me from the kitchen, begging for nibbles to be taken and already-clean edges to be shaved off, I’m relieved but sad to have just sent the last square off to work with Dave.

Snickery Squares (from Dorie Greenspan’s Baking: From My Home to Yours)

Bridget notes: Next time I’ll reduce the granulated sugar in the crust to 3 tablespoons and the powdered sugar to 1 tablespoon. I’ll reduce the peanuts to 1 cup, the sugar in the filling to ¼ cup, and the water in the filling to 2½ tablespoons. However, these changes aren’t to say that the bars aren’t amazing how they are.

For the Crust:
1 cup (5 ounces) all-purpose flour
¼ (1.75 ounces) cup sugar
2 tablespoons (0.5 ounce) powdered sugar
¼ teaspoon salt
8 tablespoons (1 stick) unsalted butter, cut into small pieces and chilled
1 large egg yolk, lightly beaten

For the Filling:
⅓ cup (2.33 ounces) sugar
3 tablespoons water
1½ cups salted peanuts
About 1½ cups store-bought dulce de leche

For the Topping:
7 ounces bittersweet chocolate, coarsely chopped
4 tablespoons (½ stick) unsalted butter, cut into 8 pieces, at room temperature

Getting Ready: Preheat oven to 350F. Butter an 8-inch square pan and put it on a baking sheet.

To Make the Crust: Toss the flour, sugar, powdered sugar and salt into a food processor and pulse a few times to combine. Toss in the pieces of cold butter and pulse about 12 times, until the mixture looks like coarse meal. Pour the yolk over the ingredients and pulse until the dough forms clumps and curds – stop before the dough comes together in a ball.

Turn the dough into the buttered pan and gently press it evenly across the bottom of the pan. Prick the dough with a fork and slide the sheet into the oven. Bake the crust for 15-20 minutes, or until it takes on just a little color around the edges. Transfer the pan to a rack and cool to room temperature before filling.

To Make the Filling: Have a parchment or silicone mat-lined baking sheet at the ready, as well as a long-handled wooden spoon and a medium heavy bottomed saucepan.

Put the sugar and water in the saucepan and cook over medium-high heat, stirring, until the sugar dissolves. Keeping the heat fairly high, continue to cook the sugar, without stirring, until it just starts to color. Toss the peanuts and immediately start stirring. Keep stirring, to coat the peanuts with sugar. Within a few minutes, they will be covered with sugar and turn white-keep stirring until the sugar turns back into caramel. When the peanuts are coated with a nice deep amber caramel, remove the pan from the heat and turn the nuts out onto the baking sheet, using the wooden spoon to spread them out as best you can. Cool the nuts to room temperature.

When they are cool enough to handle, separate the nuts or break them into small pieces. Divide the nuts in half. Keep half of the nuts whole or in biggish pieces for the filling, and finely chop the other half for the topping.

Spread the dulce de leche over the shortbread base and sprinkle over the whole candied nuts.
To Make the Topping: Melt the chocolate in a heatproof bowl set over a saucepan of barely simmering water. Remove chocolate from the heat and gently stir in the butter, stirring until it is fully blended into the chocolate.

Pour the chocolate over the dulce de leche, smoothing it with a long metal icing spatula, then sprinkle over the rest of the peanuts. Slide the pan into the fridge to set the topping, about 20 minutes; if you’d like to serve the squares cold, keep them refrigerated for at least 3 hours before cutting.

Cut into 16 bars.

Also – I just got a new camera. This is the first post I’ve used it on, and I guess I was little excited, huh?

asparagus and arugula salad with cannellini beans and balsamic vinegar

The combination of my upcoming beach trip and Tuesdays With Dorie has prompted a series of main dish salads for dinner. I’m surprising myself by how much I’m enjoying it. I was especially surprised by this salad, which I expected to be edible but not special. I’m so glad I chose the recipe even though I wasn’t excited about it, because it was so good that now I’m waiting for an opportunity to make it again.

arugula green beans white beansupdated photo 1/12/2015, with green beans substituted for asparagus

The salad is composed of two rather distinct parts. The base is a bed of arugula, dressed with a very simple balsamic vinaigrette. This is topped with a mixture of red onions that have been browned, asparagus that is sautéed just until tender, and cannellini beans, all of which is dressed with the same vinaigrette. It’s an unusual but delicious combination.

I did drastically reduce the arugula. The recipe calls for 14 ounces (although I’m unsure if this is before or after it’s stemmed), but even one whole 5-ounce bag of pre-washed arugula seemed like a lot. Five ounces ended up being the perfect amount. That’s the only change I made, and I even used a cheapo balsamic vinegar, with no noticeable adverse affects on the salad.

Last time I made salad, I flaked out on the meal-planning and made bread to go with it, even though croutons are a primary feature of Caesar salads. This time, I didn’t serve anything else with the salad and realized half-way through eating it that there was no carbs involved anywhere. Next time I swear I’ll get it right.

Asparagus and Arugula Salad with Cannellini Beans and Balsamic Vinegar (from Cooks Illustrated May 2003)

Serves 4 to 6 as a first course or 2 to 3 as a main dish

5 tablespoons extra-virgin olive oil
½ medium red onion, sliced 1/8 inch thick (about 1 cup)
1 pound asparagus, trimmed of tough ends and cut on diagonal into 1-inch pieces)
Table salt and ground black pepper
1 can (15 ounces) cannellini beans, rinsed and drained (about 1½ cups)
2 tablespoons balsamic vinegar, plus 2 teaspoons
14 ounces arugula (1 large bunch), washed, dried, and stemmed (about 6 cups lightly packed)

1. Heat 2 tablespoons oil in 12-inch nonstick skillet over high heat until beginning to smoke; stir in onion and cook until beginning to brown, about 1 minute. Add asparagus, ¼ teaspoon salt, and ¼ teaspoon pepper; cook until asparagus is browned and tender-crisp, about 4 minutes, stirring once every minute. Off heat, stir in beans; transfer to large plate and cool 5 minutes.

2. Meanwhile, whisk remaining 3 tablespoons oil, vinegar, ¼ teaspoon salt, and 1/8 teaspoon pepper in medium bowl until combined. In large bowl, toss arugula with 2 tablespoons dressing and divide among salad plates. Toss asparagus mixture with remaining dressing, place a portion over arugula, and serve.

florida pie (twd)

I’m guessing there are recipes in Dorie’s book that aren’t obscenely rich. In fact, there’s a whole section on muffins! But the TWD recipe choosers have thus far gravitated toward the decadent side of the book, at least since I joined. This week is no exception, as Dianne’s choice of Florida Pie has well over a cup of cream in addition to the can of sweetened condensed milk, the butter in the crust, and a fair amount of coconut.

Fortunately, it’s all worth it because I love citrus desserts, especially Key lime pie. I only recently realized that I liked coconut, so this was a fun way to incorporate it into a favorite dessert.

I didn’t follow the recipe quite as closely as I normally do. I did make the coconut cream the recommended way, by simply boiling heavy cream and sweetened shredded coconut together until they reduce and thicken. For the lime filling, however, I was surprised that Dorie didn’t call for zest, and since I like my citrus desserts on the puckery side, I added about 2 limes worth. Where I strayed from the recipe the most was in the freezing steps, of which Dorie has two – one after the filling is added, and one after the meringue is toasted. I’m not sure what the purpose of either of these freezing stages is – perhaps to keep the filling cold while the pie is broiled? I used a blow torch to brown the meringue, and I didn’t want my pie frozen, so I skipped both visits to the freezer.

Overall, the pie (or in my case, tartelettes) were good. I do love lime. I have to admit that I consider the coconut more of a distraction than an improvement, but I enjoyed the dessert regardless.

Florida Pie (from Dorie Greenspan’s Baking: From My Home to Yours)

1 9-inch graham cracker crust, fully baked and cooled, or a store-bought crust
1⅓ cups heavy cream
1½ cups shredded sweetened coconut
4 large eggs, separated
1 14-ounce can sweetened condensed milk
½ cup fresh Key (or regular) lime juice (from about 5 regular limes)
¼ cup of sugar

Getting Ready: Center a rack in the oven and preheat the oven to 350 degrees F. Put the pie plate on a baking sheet lined with parchment or a silicone mat.

Put the cream and 1 cup of the coconut in a small saucepan and bring it to a boil over medium-low heat, stirring almost constantly. Continue to cook and stir until the cream is reduced by half and the mixture is slightly thickened. Scrape the coconut cream into a bowl and set it aside while you prepare the lime filling.

Working with a stand mixer, preferably fitted with a paddle attachment, or with a hand mixer in a large bowl, beat the egg yolks at high speed until thick and pale. Reduce the mixer speed to low and beat in the condensed milk. Still on low, add half of the lime juice. When it is incorporated, add the remaining juice, again mixing until it is blended. Spread the coconut cream in the bottom of the graham cracker crust, and pour over the lime filling.

Bake the pie for 12 minutes. Transfer the pie to a cooling rack and cool for 15 minutes, then freeze the pie for at least 1 hour.

To Finish the Pie with Meringue: Put the 4 egg whites and the sugar in a medium heavy-bottomed saucepan and heat over medium-low heat, whisking all the while, until the whites are hot to the touch. Transfer the whites to a stand mixer, fitted with the whisk attachment, or use a hand mixer in a large bowl, and beat the whites at high speed until they reach room temperature and hold firm peaks. Using a rubber spatula, fold the remaining ½ cup coconut into the meringue.

Spread the meringue over the top of the pie, and run the pie under the broiler until the top of the meringue is golden brown. (Or, if you’ve got a blowtorch, you can use it to brown the meringue.) Return the pie to the freezer for another 30 minutes or for up to 3 hours before serving.

hash browns with sauteed vegetables and poached eggs

I’ve become enamored with poached eggs lately. They’re such a great topping for so many breakfast ideas. Besides eggs benedict, I like to serve them on toast with a bit of cheddar cheese sprinkled over. Hash browns and a bed of sautéed vegetables is my favorite poached eggs base.

The trick to great hash browns is to use starchy potatoes like russets, but to rinse some of the outside starch off of the shreds, then thoroughly dry them before starting to cook. Because I consider this breakfast one of my healthier options, I use olive oil for cooking both the vegetables and the potatoes, although vegetable oil and butter are also good choices. How often you stir the potatoes depends on how you like your hash browns. If you want a crispy base and a tender interior within a bed of potatoes, pack the shreds into a medium-size pan and leave them alone until the bottom browns, 5-6 minutes. Then flip the whole mound over and brown the second side. I tend to put the potatoes in a large skillet and stir every few minutes. After 10-15 minutes, they’re pretty evenly split between crispy browned and tender.

The vegetables you use are completely adaptable. My favorite combination is red onion, red peppers, and mushrooms. This time I used spinach instead of the red peppers, and I loved it. I like the vegetables chopped so that I can get some of each in one bite, so pretty small. (I’m particular about how vegetables are chopped anyway.)

Mound some cooked potatoes on a plate, spread the sautéed vegetables over it, and top with a poached egg – it’s a perfect combination of flavors and nutrition. Once the egg is cut into, warm yolk drips down and blends with the potatoes, and your morning is off to a terrific start.

Hash Browns, Sautéed Vegetables, and Poached Eggs (Poached Egg recipe from Cooks Illustrated)

Serves 2

1½ tablespoons olive oil
6-8 cremini or button mushrooms, halved if large and sliced thin
salt
½ small red onion, halved and sliced thin
1½ ounces spinach, cleaned and chopped very coarse
ground black pepper
1 pound russet potatoes, peeled and washed
2-4 eggs, each cracked into a small handled cup
2 tablespoons white vinegar

1. Heat oven to 200 degrees, then turn it off. Place 2 large plates in warm oven.

2. Heat ½ tablespoon of olive oil in a large nonstick skillet over medium-high heat. When shimmering but not smoking, add mushrooms and a pinch of salt. Cook, stirring occasionally, until liquid released by mushrooms has evaporated. Add onion and cook until browned at edges. Add spinach and cook, stirring constantly, until just wilted. Season with salt and pepper to taste and transfer to a bowl. Put bowl in warmed oven.

3. While vegetables cook, shred potatoes in food processor with shredding blade or on large holes of box grater. Rinse thoroughly in a strainer, then move to a clean kitchen towel and squeeze and pat dry.

4. Heat 1 tablespoon olive oil in the same skillet (no need to wash) over medium heat until shimmering but not smoking. Add potatoes and ¼ teaspoon salt and mix thoroughly. Cook potatoes, stirring every 2-3 minutes, until slightly browned and cooked throughout, a total of 15-20 minutes.

5. While potatoes cook, fill an 8- to 10-inch nonstick skillet nearly to the rim with water, add 1 teaspoon salt and the vinegar, and bring the mixture to boil over high heat. Lower the lips of each cup just into water at once; tip eggs into boiling water, cover, and remove from heat. Poach until yolks are medium-firm, exactly 4 minutes. For firmer yolks (or for extra large or jumbo eggs), poach 4 ½ minutes; for looser yolks (or for medium eggs), poach 3 minutes.

6. While eggs are cooking, divide potatoes between warmed plates. Top with sautéed vegetables. With a slotted spoon, carefully lift and drain each egg over skillet, then lay each over vegetables. Season to taste with salt and pepper and serve immediately.