Archives for April 2012

dolmades

dolmades 10

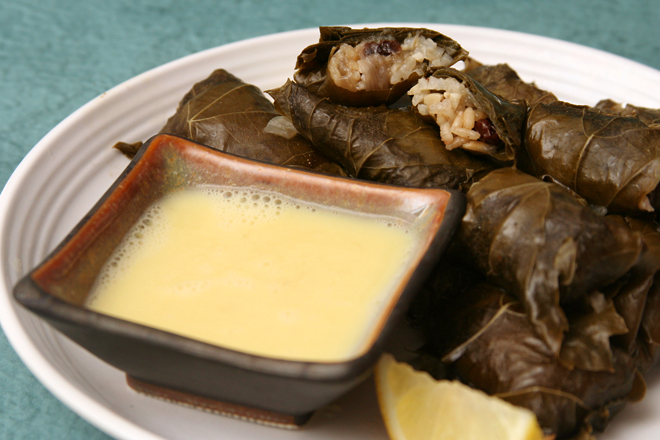
Someone please tell me to stop making recipes that involve individually filling and shaping portions after a full workday! Last week it was these dolmades, this week it was tortellini. (Tortellini, it turns out, are a lot more time-consuming to make than ravioli. A lot.) Evenings after work are not a good time to take on ambitious cooking projects.

dolmades 2

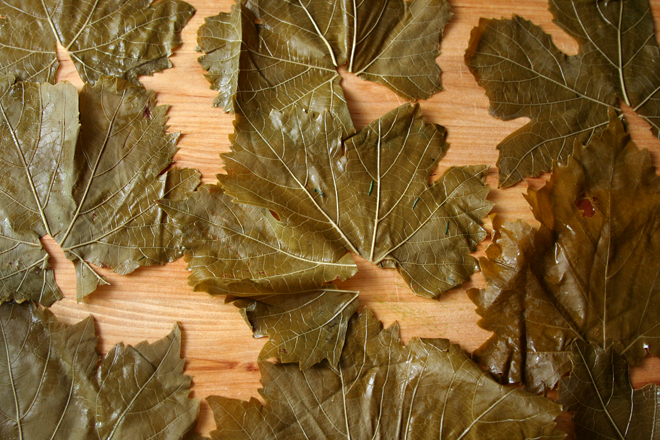
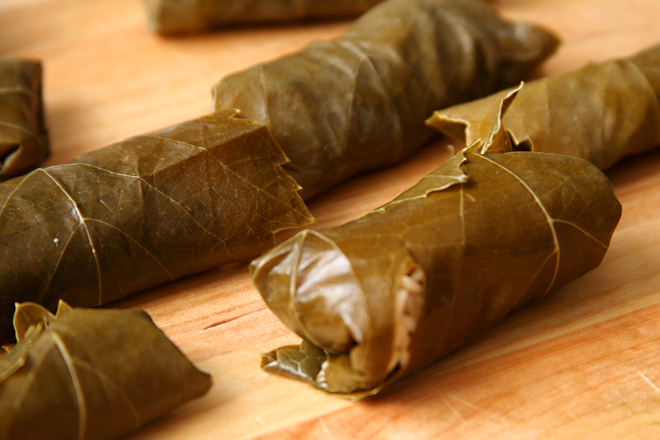
It didn’t help that this venture started out with a jar full of grape leaves stuffed so tightly they wouldn’t come out. All I could think of to do was rip out the middle leaves in a messy clump to loosen up the remainder, which wasn’t very satisfying. Then I discovered that grape leaves are not a shape that lends itself to easy rolling. And finally, at the end of it all, I realized that the early step of boiling the grape leaves before filling them was more important than I had counted on when I cut it short in my rush to get dinner on the table.

dolmades 3

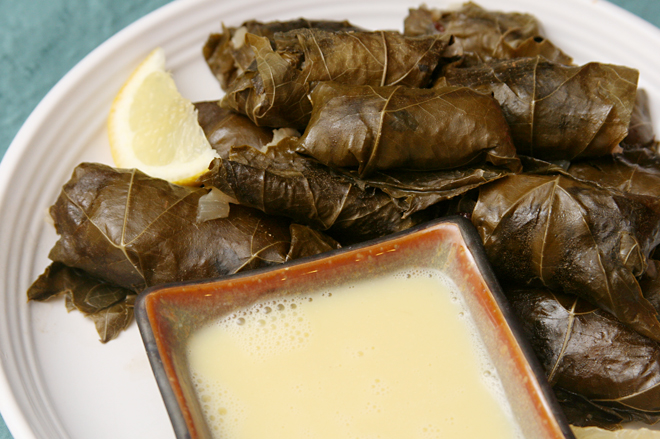
And then I learned that it doesn’t matter how smoothly the dolmades come together, because the combination of grape leaves, rice, and a lemony sauce will always be a hit. Even if the grape leaves mostly unroll. And they’re just a little tough. Even if dinner is nearly an hour late. Or maybe they tasted so good because dinner was an hour late?

dolmades 4

One year ago: Cornmeal Shortbread Cookies
Two years ago: Chockablock Cookies
Three years ago: Brownies (comparison of 4 recipes)
Four years ago: Cheesecake Pops (Daring Bakers)

Printer Friendly Recipe
Dolmades (adapted from Elly Says Opa and Emeril Live)

Makes about 36

1 (8-ounce) jar grape leaves, or 36 medium-sized fresh leaves
1 tablespoon olive oil
1 onion, diced
3 cloves garlic, minced
½ cup pine nuts
1 cup long-grain rice
1 teaspoon salt
½ cup currants (or raisins)
⅔ cup broth + additional for cooking dolmades
1 lemon
2 tablespoons chopped parsley
Avgolemono sauce (recipe follows)

1. Bring a medium pot of water to a simmer. Remove the grape leaves from the jar and drop them in batches of 4 or 5 into the hot water. Leave them in the simmering water for 4-5 minutes, then spread them flat on a towel-lined work surface. Cut the stem from each grape leaf, as needed.

2. In a large skillet over medium- high heat, heat the olive oil. Add the onions and sauté until translucent, about 6 minutes. Add the garlic and pine nuts and sauté for 2 minutes. Add the rice, salt, currants, broth, and the juice of half the lemon. Simmer, stirring occasionally, until the liquid is absorbed. Stir in the parsley.

3. To assemble the dolmades, place 1 grape leaf on the work surface, dull side (or underside) of the leaf up. Place 1 to 2 teaspoons of rice filling near the stem end of the leaf. Fold the stem (bottom) end up over the filling, fold the sides toward the filling in the center, then roll up the leaf into a small cylindrical package, being careful not to fold too tightly, as the rice will expand during cooking.

4. Place the dolmades in a large Dutch oven or wide sauté pan, seam side down. Add the juice from the remaining lemon half, plus enough broth to just cover the dolmades. Rest a heavy plate or baking dish directly on top of the dolmades. Bring to a boil over high heat, lower the heat, and simmer for 30 minutes, or until the rice is tender. Serve with avgolemeno sauce.

Avgolemono Sauce (adapted from Elly Says Opa)

2 eggs
⅓ cup fresh lemon juice (about 2-3 lemons)
liquid from cooking dolmades

In a medium bowl, whisk the eggs with the lemon juice until combined. Slowly drizzle the hot dolmades cooking liquid into the egg/lemon mixture, whisking continuously to avoid scrambling the eggs.

dolmades 9

wedding cake sugar cookies

wedding cake cookies 9

It’s possible that cookies soaked in espresso and rum might not be the best idea for children, so I planned to make something in addition to tiramisu for my coworker’s rehearsal dinner. When I was discussing ideas with the bride, I almost offered to decorate sugar cookies, and then I realized that that might be insane. I planned to make raspberry squares instead, but in the end, sane has never been my strong suit. I mixed up a batch of sugar cookie dough the day after the bridal shower.

wedding cake cookies 1

I had spent some time with the bride discussing her decorations, because I’m a girl and I’m into that stuff, so I knew her cake was going to be white fondant covered in black damask with a red ribbon around the bottom. The lack of a wedding cake cookie cutter did not stop me from charging off to make a cookie imitation of this. The lack of cookie decorating skills did not stop me from attempting to make tiny swirls and, even trickier, letters.

wedding cake cookies 4

Still, I thought they came out well, and it wasn’t difficult to work in the time to decorate them. I made the dough a week before the dinner, rolled and cut it the next day, then froze the unbaked cookies for a few days. I baked, outlined, and flooded them three days before the party, detailed them two days beforehand, had time to go out with a friend the night before, and made tiramisu the morning of the rehearsal dinner. And then I took a well-deserved nap.

wedding cake cookies 6

One year ago: Semolina Bread
Two years ago: Shrimp Burgers
Three years ago: Pasta with Cauliflower, Walnuts, and Ricotta Salata
Four years ago: Creamy Buttermilk Coleslaw

wedding cake cookies 8

I used my favorite recipe from this roll-out sugar cookie comparison.

tiramisu

tiramisu 12

I got confused when my coworker told me, while studiously avoiding eye contact, that the only thing they needed to figure out for another coworker’s rehearsal dinner was the dessert. I started trying to evaluate our previous history of eye contact. Was the lack of eye contact normal between us, or was that a hint? I was willing to help her out, but I was going to feel awfully silly if I jumped in to bake for thirty people I’d never met if it wasn’t necessary.

tiramisu 5

Well, I did volunteer, of course, because it was an opportunity to make desserts without eating them all myself! The dinner had an Italian theme, with big pans of lasagna, loaves of garlic bread, and pots of Italian wedding soup, so tiramisu was a natural choice. It didn’t hurt that I’d made this recipe once, years ago, and had wanted a reason to make it again ever since.

tiramisu 6

It’s the perfect balance of sweet and bitter and tinged with alcohol. The ladyfingers soak up just enough of the coffee and rum to turn soft and cakey, but not enough to get mushy. The creamy mascarpone layer is like a rich custard filling between layers of cake. The cocoa and grated chocolate (optional, but I added it) provide a welcome hint of chocolate, but it doesn’t dominate.

tiramisu 8

I made a double batch for the party (and was lucky enough to have a friend come over to dip and arrange nearly a hundred ladyfingers in the pan) and kept a tiny taster serving for myself. It was a smart move, because there wasn’t one bit leftover from the rehearsal dinner. Savoring my tiramisu at home that night, I didn’t regret volunteering to bake this dessert one bit.

tiramisu 13

One year ago: Lemon Ricotta Strawberry Muffins
Two years ago: Slaw Tartare
Three years ago: Chocolate Amaretti Torte
Four years ago: Breakfast Strata with Sausage, Mushrooms, and Monterey Jack

Printer Friendly Recipe
Tiramisù (from Cook’s Illustrated)

Cook’s Illustrated’s notes: Brandy and even whiskey can stand in for the dark rum. Cook’s Illustrated prefers a tiramisù with a pronounced rum flavor; for a less potent rum flavor, halve the amount of rum added to the coffee mixture in step 1. Do not allow the mascarpone to warm to room temperature before using it; it has a tendency to break if allowed to do so. Be certain to use hard, not soft ladyfingers.

2½ cups strong black coffee, room temperature
1½ tablespoons instant espresso powder
9 tablespoons dark rum
6 large egg yolks
⅔ cup (4.67 ounces) sugar
¼ teaspoon table salt
1½ pounds mascarpone cheese
¾ cup heavy cream (cold)
14 ounces ladyfingers (42 to 60, depending on size)
3½ tablespoons cocoa, preferably Dutch-processed
¼ cup semisweet or bittersweet chocolate, grated (optional)

1. Stir coffee, espresso, and 5 tablespoons of the rum in a wide bowl or baking dish until the espresso dissolves; set aside.

2. In the bowl of a standing mixer fitted with the whisk attachment, beat the yolks at low speed until just combined. Add the sugar and salt and beat at medium-high speed until pale yellow, 1½ to 2 minutes, scraping down the bowl with a rubber spatula once or twice. Add the remaining 4 tablespoons rum and beat at medium speed until just combined, 20 to 30 seconds; scrape the bowl. Add the mascarpone and beat at medium speed until no lumps remain, 30 to 45 seconds, scraping down the bowl once or twice. Transfer the mixture to a large bowl and set aside.

3. In the now-empty mixer bowl (there’s no need to clean the bowl), beat the cream at medium speed until frothy, 1 to 1½ minutes. Increase the speed to high and continue to beat until the cream holds stiff peaks, 1 to 1½ minutes longer. Using a rubber spatula, fold one-third of the whipped cream into the mascarpone mixture to lighten, then gently fold in the remaining whipped cream until no white streaks remain. Set the mascarpone mixture aside.

4. Working with one at a time, drop half of the ladyfingers into the coffee mixture, roll, remove, and transfer to 13 by 9-inch glass or ceramic baking dish. (Do not submerge the ladyfingers in the coffee mixture; the entire process should take no longer than 2 to 3 seconds for each cookie.) Arrange the soaked cookies in a single layer in the baking dish, breaking or trimming the ladyfingers as needed to fit neatly into the dish.

5. Spread half of the mascarpone mixture over the ladyfingers; use a rubber spatula to spread the mixture to the sides and into the corners of the dish and smooth the surface. Place 2 tablespoons of the cocoa in a fine-mesh strainer and dust the cocoa over the mascarpone.

6. Repeat the dipping and arrangement of ladyfingers; spread the remaining mascarpone mixture over the ladyfingers and dust with the remaining 1½ tablespoons cocoa. Wipe the edges of the dish with a dry paper towel. Cover with plastic wrap and refrigerate for 6 to 24 hours. Sprinkle with the grated chocolate, if using; cut into pieces and serve chilled.

tiramisu 11

lentil tacos

lentil tacos 5

While I loved these tacos, the real news here is that I’ve figured out how to soften corn tortillas without requiring a lot of fat or a lot of effort. I’m not saying they’re as good as fried tortillas, but in a healthy pinch, they’ll more than do. They still have the corny flavor I love and hold a generous scoop of gloppy filling, so I’m very pleased.

lentil tacos 4

I’ve started replacing flour tortillas with corn tortillas, at least for healthy weekday meals, saving the refined flour and partially hydrogenated fat-containing flour tortillas for weekend splurges. (And no, I do not want to make my own tortillas. Even I have limits, especially when the tortillas I can buy in New Mexico taste so good, partially hydrogenated fat notwithstanding.) Not only are they healthier, but they taste better. But I struggled for years with corn tortillas’ tendency to crack when folded, unless they were (deliciously) saturated with oil.

lentil tacos 2

I’d tried heating them on the grill, but they cracked as soon as they started to cool. I tried wrapping them in foil and heating them in the oven, but that didn’t solve the problem. I tried wrapping them in a damp cloth in a warm oven, which was an improvement, as the tortillas on the top and bottom of the stack were moist enough to fold without cracking, but those in the middle still broke.

lentil tacos 3

The trick, I’ve found, is to lay a damp dishtowel on a baking sheet, spread the tortillas over it in a single layer, then top with a second damp cloth. Heat the whole configuration in a warm oven while you make your filling. Then take the tortillas out of the oven, remove the top cloth, dollop on your chili-spiced lentils and some traditional-for-good-reason toppings, and dinner is easy, healthy, and delicious.

lentil tacos 7

One year ago: Brown Rice
Two years ago: Pizza with Figs, Prosciutto, Gorgonzola, Balsamic, and Arugula
Three years ago: Anadama Bread
Four years ago: Marshmallows

Printer Friendly Recipe
Lentil Tacos (adapted from epicurious via Prevention RD)

Serves 4

With such a soft filling, these tacos really need a topping with some crunch.  I think very thinly sliced cabbage would be perfect, but lettuce would work well too. In a pinch, I’ve used coarsely chopped mung bean sprouts, and that wasn’t bad at all.

2 teaspoons olive oil
1 yellow onion, finely chopped
1 garlic clove, minced
1 tablespoon chili powder
2 teaspoons ground cumin
1 teaspoon dried oregano
1 cup dried lentils, rinsed
½ teaspoon salt
2 cups low-sodium vegetable or chicken broth
2 tablespoons minced fresh cilantro
10 taco-sized corn tortillas
toppings: cheese, avocado, salsa, tomato, lettuce

1. In a 3- or 4-quart saucepan, heat the oil over medium heat. Add the onion and sauté, stirring occasionally, until just browned around the edges, about 8 minutes. Add the garlic and spices; cook, stirring constantly, for about a minute, until fragrant. Add the lentils, salt, and broth; cover and simmer for 25-30 minutes, until the lentils are tender. Uncover; simmer for 6-8 minutes, until mixture is thickened. Using a potato masher or wooden spoon, break up some of the lentils. Stir in the cilantro.

2. While the lentils cook, heat the oven to 275 degrees. Arrange a dampened dishtowel on a baking sheet. Spread the tortillas over the towel in a single layer (some overlap is expected), then top with a second dampened dishtowel. Heat in the oven for 10 minutes, until the tortillas are warm and soft.

3. Divide the filling and toppings evenly among the tortillas. Serve immediately.

lentil tacos 6

ginger fried rice

ginger fried rice 8

Telling someone you’re having fried rice for dinner – not with dinner, but for dinner – doesn’t sound very impressive. Someone asked me if I was adding a bunch of stuff to it, and I had to think about it before I realized that no…not really. It’s really just aromatics stirred into rice, topped with an egg and some soy sauce.

ginger fried rice 3

But it did seem to me that serving the egg fried and on top of the rice, instead of scrambled into the rice, made this more worthy of being a stand-alone dish. Plus, I added one leek per person, which seemed like a fair enough vegetable serving; not generous, perhaps, but adequate considering what else we’d eaten that day. With that, it has all the components many of my favorite weeknight dishes do – a whole grain, a vegetable, some protein.

ginger fried rice 5

It certainly tasted like it was worthy of having the dinner plate to itself. I thought the rice would be bland, without any sauce stirred into it, but a heavy dose of garlic and ginger, not to mention the grassy onionness of the leeks added plenty of flavor. The drips of soy sauce and toasted sesame oil offer hits of strong seasonings, especially once carried into the rice with the unctuous yolk. This won’t be the last time I have to tell someone I’m having something as simple as fried rice for dinner, so I’d better get used to it.

ginger fried rice 9

One year ago: Green Pea Ravioli in Lemon Broth
Two years ago: Brown Sugar Cookies
Three years ago: Pasta with Roasted Red Pepper Sauce
Four years ago: Sichuan Green Beans

Printer Friendly Recipe
Ginger Fried Rice (adapted from Mark Bittman via Smitten Kitchen)

I used 4 leeks, but since leeks are usually sold in bunches of three, I wrote the recipe for just three leeks.

Serves 4

2 tablespoons plus 1 teaspoon canola or peanut oil, divided
4 cloves garlic, minced
2 tablespoons minced ginger
salt
3 leeks, white and light green parts only, sliced ⅛-inch thick
4 cups day-old cooked rice (from 1 cup uncooked rice)
4 (or more) large eggs
2 teaspoons sesame oil
4 teaspoons soy sauce
1 green onion, sliced

1. Heat 1 tablespoon of the oil in a large nonstick skillet over medium heat; add the garlic and ginger. Cook, stirring often, until fragrant, about 1 minute. Add the leeks and a pinch of salt; cook, stirring often, until softened, about 10 minutes. Add another 1 tablespoon oil and the rice; cook until evenly heated, 3-4 minutes.

2. Meanwhile, heat the remaining 1 teaspoon oil in a medium nonstick skillet over medium heat. Crack the eggs into separate small cups. Add the eggs to the pan, season evenly with salt, and cover the pan. Cook until the whites are set but the yolks are still soft, 6-8 minutes.

3. Divide the rice between serving plates. Top with the fried eggs and a drizzle of both soy sauce and sesame oil. Garnish with green onions; serve immediately.

ginger fried rice 7

ultimate seven-layer dip

seven layer dip 4

Seven layer dip has become a holiday tradition in my family, and most of the work is usually assigned to a son-in-law. The rest of us have long-since fallen into a routine; my mom makes the turkey, my sister makes mashed potatoes, my brother makes stuffing, my dad is coerced into making the green bean casserole. For a long time, my mom asked my sister’s husband to make seven layer dip, but recently, that job has often gone to Dave.

seven layer dip 1

With a can of refried beans, sour cream, mayonnaise, cheese, and guacamole, it’s an irresistible treat best saved for holidays. When I saw Cook’s Illustrated’s version, I thought I might be able to lighten it up. This recipe uses canned black beans, pureed with seasonings, for the bean layer. The sour cream could easily be replaced with lower fat Greek yogurt. Chopped salsa-like vegetables added freshness.

seven layer dip 2

It creates a number of extra steps that result in this recipe being considerably more effort than Dave would be willing to exert – I think. Because it also resulted in a dip that Dave and I both raved about as we ate. Dave, vegetable lover that he is, loves the lighter, fresher taste. For me, the biggest difference was that every bite wasn’t full of guilt. That’s worth some extra effort.

seven layer dip 5

One year ago: Strawberry Daiquiri Ice Cream
Two years ago: Chicken Fajitas
Three years ago: Black Bean Squash Burritos
Four years ago: Lemon Cream Tart

Printer Friendly Recipe
Ultimate Seven-Layer Dip (from America’s Test Kitchen Feed)

Serves 8 to 10

CI note: This recipe is usually served in a clear dish so you can see the layers. For a crowd, double the recipe and serve in a 13 by 9-inch glass baking dish. If you don’t have time to make fresh guacamole as called for, simply mash 3 avocados with 3 tablespoons lime juice and ½ teaspoon salt.

This is exactly the original recipe. I made just a few small changes: Greek yogurt for the sour cream, cheddar for the pepper Jack, and I made a simple guacamole as described in Cook’s Illustrated’s note, above.

4 large tomatoes, cored, seeded, and chopped fine
2 jalapeño chiles, seeded and minced
3 tablespoons minced fresh cilantro
6 scallions, 2 minced and 4 with green parts sliced thin (white parts discarded)
2 tablespoons fresh lime juice plus 2 teaspoons, from 2 limes
¼ teaspoon salt
1 can black beans (16-ounces), drained but not rinsed
2 cloves minced garlic
¾ teaspoon chili powder
1½ cups sour cream
4 cups (16 ounces) shredded pepper Jack cheese
3 cups chunky guacamole
Tortilla chips for serving

1. Combine the tomatoes, jalapeños, cilantro, minced scallions, and 2 tablespoons lime juice in a medium bowl. Stir in ⅛ teaspoon salt and let stand until the tomatoes begin to soften, about 30 minutes. Strain the mixture into a bowl and discard the liquid.

2. Pulse the black beans, garlic, remaining lime juice, chili powder, and remaining salt in the food processor until it resembles a chunky paste. Transfer to a bowl and wipe out the food processor. Pulse the sour cream and 2½ cups (10 ounces) of the cheese until smooth. Transfer to a separate bowl.

3. Spread the bean mixture evenly over the bottom of an 8-inch square glass baking dish or 1-quart glass bowl. Spread the sour cream mixture evenly over the bean layer, and sprinkle evenly with the remaining cheese. Spread the guacamole over the cheese and top with the tomato mixture. Sprinkle with the sliced scallions and serve with tortilla chips. (The dip can be refrigerated for up to 24 hours. Let the dip stand at room temperature for 1 hour before serving.)

seven layer dip 6

lemon pound cake

lemon pound cake 4

Lemons have been added to the list of ingredients I like to buy in the Big City (which isn’t that big compared to a lot of other cities but is definitely big compared to the town I live in), along with coffee, chocolate, parmesan cheese, and cheap wine from Trader Joe’s. This is because organic lemons aren’t available in my town, and while I have nothing against lemon juice, my favorite part of the lemon by far is the zest. The problem is that lemons have a more limited shelf life than my other Big City buys and the fruit tends to get hard (or worse, soft) after a few weeks in the crisper drawer.

lemon pound cake 2

Around this time is when I start going into lemon mania mode, and a lemon cake soaked with lemon syrup and drizzled with lemon glaze is a fine way to use up some of the lemon excess. In fact, I was so focused on my primary goals of using up lemons and having fun in the kitchen that I pushed another priority aside, that of making the best possible recipe. When combining loads of butter with loads of sugar, I knew it couldn’t end up too bad.

lemon pound cake 3

And so, for no other reason than I think the stand mixer is more fun to use and easier to clean up, I used that instead of the food processor the original recipe calls for, but when the top of my cake came out a little flat, I started thinking that maybe I should have just followed directions. I took the cake to work without tasting it, saving myself a piece for the end of the workday. It was good I set some aside for myself, because this cake disappeared in less than half the time as some of the other treats I’ve brought in. Savoring my much-anticipated slice at the end of the day, I decided that mixer or food processor, it didn’t matter; this cake would be a success either way.

lemon pound cake 7

One year ago: Chocolate Chunk Oatmeal Cookies with Dried Cherries and Pecans
Two years ago: Vodka Gimlet
Three years ago: Cook’s Illustrated’s Perfect Chocolate Chip Cookies
Four years ago: Cinnamon Rolls

Printer Friendly Recipe
Lemon Pound Cake (adapted from Baked: New Frontiers in Baking via the now defunct Dinner and Dessert)

Makes one loaf

I made this with a stand mixer instead of a food process like the original recipe instructs for no reason other than I think the mixer is more fun to use and easier to clean up.

For the cake:
¾ cup (3 ounces) cake flour
¾ cup (3.6 ounces) all-purpose flour
1 teaspoon baking powder
⅛ teaspoon baking soda
¼ cup sour cream, at room temperature
2 tablespoons fresh lemon juice
1 teaspoon pure vanilla extract
16 tablespoons (2 sticks) unsalted butter, room temperature
½ teaspoon salt
1 cup + 2 tablespoons (7.9 ounces) sugar
2 tablespoons grated lemon zest (from about 2 lemons)
4 large eggs, at room temperature

For the syrup:
2½ tablespoons fresh lemon juice
2½ tablespoons sugar

For the glaze:
1 cup (4 ounces) confectioners’ sugar, sifted
2 tablespoons fresh lemon juice

1. Heat the oven to 350 degrees. Spray the sides and bottom of a 9-by-5-by-3-inch loaf pan with nonstick cooking spray. Line the bottom with parchment paper and spray the paper. Sift both flours, baking powder, and baking soda together in a medium bowl. In a small measuring cup, whisk together the sour cream, lemon juice, and vanilla.

2. In the bowl of a stand mixer fitted with the paddle attachment (or a large mixing bowl with a hand-held mixer), beat the sugar and zest together until fragrant. Add the butter and salt; beat on medium speed until the mixture is light and fluffy, 2-3 minutes. With the mixer running, add the eggs one a time. Once the eggs are in, stop and scrape the sides of the bowl, then continue beating for another 2-3 minutes. Reduce the mixture speed to low, add one-third of the flour mixture, then half of the sour cream mixture. Continue alternating additions of dry and wet ingredients, ending with the dry ingredients. Scrape the bowl and mix for another 20-30 seconds, until the flour is thoroughly incorporated.

3. Transfer the batter to the prepared pan, smoothing the top. Bake in the center of the oven for 20 minutes, rotate the pans, reduce the oven temperature to 325 degrees, and bake for another 30 to 35 minutes, or until a toothpick inserted in the center of the loaf comes out clean. Let cool in the pans for 15 minutes.

4. In a small saucepan over medium heat, heat the lemon juice and sugar until the sugar is completely dissolved. Once dissolved, continue to cook for 3 more minutes. Remove from the heat and set aside.

5. Inver the cake onto a cooling rack set over a rimmed pan. Use a toothpick to poke holes in the top and sides of the loaf. Brush the top and sides of the loaves with the lemon syrup. Let the syrup soak into the cake and brush again. Let the cake cool completely, at least 30 minutes. (The soaked but unglazed loaf will keep, wrapped in two layers of plastic wrap and frozen, for up to 6 weeks.)

6. In a small bowl, whisk together the confectioners’ sugar and the lemon juice. Pour the lemon glaze over the top of the loaf and let it drip down the sides. Let the lemon glaze harden, about 15 minutes, before serving. (The glazed loaves will keep for up to 3 days, wrapped tightly in plastic wrap, at room temperature.)

lemon pound cake 5

pizza with prosciutto, goat cheese, and roasted tomatoes

prosciutto goat cheese pizza 6

I wrote out a formula for pizza. And I realize that for some people, that takes the fun out of developing recipes, but I’m a scientist, so what do you expect from me? And here’s what I decided:

prosciutto goat cheese pizza 4

Many of my favorite foods have a balance of the five basic flavors – sweet, salty, sour, bitter, umami, and then I’m going to add heat or spice to this as well. A traditional pizza incorporates most of these; tomato sauce is acidic and rich in umani, the crust is often just a bit sweet, the cheese is salty, and a sprinkling of red chile flakes adds heat. Beyond the flavors, I like pizza best when there’s some sort of sauce (like tomato sauce, obviously), a glue (this would be the mozzarella in a traditional pizza), and toppings.

prosciutto goat cheese pizza 1

For this pizza, I started with goat cheese, because I hadn’t had it in a while and I love it. Goat cheese is tart, or sour, so that takes care of that flavor, but unlike many other cheeses, it doesn’t make a very good glue, so it would be incorporated as either the sauce or a topping. I wanted something sweet, and caramelized onions would be great, but slow-roasted tomatoes could work as well. Tomatoes have umami, but I thought meaty prosciutto would also go particularly well with the goat cheese. And I liked prosciutto better with tomatoes than onions. Prosciutto is salty, as was the dusting of parmesan I couldn’t resist sprinkling on top.

prosciutto goat cheese pizza 2

That gave me a bunch of toppings, and I could make the goat cheese into a sauce, but I still needed glue. I decided to stick to good ol’ mozzarella. You can never go wrong with putting mozzarella on pizza. And I still felt like the pizza might be missing something, especially something with light, fresh flavors, so I mixed pesto into the goat cheese, which also made it into a more spreadable sauce-like consistency. Red pepper flakes, common on pizza, added spicy heat.

prosciutto goat cheese pizza 3

And then after all my pizza math, I realized that I had hardly varied from traditional pizza, with tomatoes, mozzarella, and cured meat. All I did was change the order of layering – that, and develop an infallible formula for an infinite number of future pizza recipes. I’ll call that a success on all counts.

prosciutto goat cheese pizza 5

One year ago: Protein Waffles
Two years ago: Cherry Tomato Salad
Three years ago: Coconut Butter Thins
Four years ago: Perfect Party Cake

Printer Friendly Recipe
Pizza with Prosciutto, Goat Cheese, and Roasted Tomatoes

Makes one 12-inch pizza, serving about 3 people

1 cup grape tomatoes, halved
salt
cooking spray
1 pound pizza dough (⅓ of this recipe)
2 ounces goat cheese, room temperature
2 tablespoons pesto
¼ teaspoon red pepper flakes
4 ounces (1 cup) shredded mozzarella cheese
¼ cup (½ ounce) freshly grated parmesan
2 ounces prosciutto, sliced

1. Place a pizza stone on the bottom rack of the oven and preheat the oven to 300 degrees. Adjust another rack to the middle oven position. Line a baking sheet with parchment paper or a silicone mat. Arrange the tomatoes, cut-side up, on the baking sheet. Sprinkle lightly with salt and spray with cooking spray. Bake for 30 minutes, until shriveled.  Remove the tomatoes from the oven, set aside, and increase the oven temperature to 500 degrees.

2. Shape the dough into a ball. Set it aside for 10 to 30 minutes, loosely covered, to allow the gluten to relax. In a small bowl, combine the goat cheese, pesto, and red pepper flakes.

3. Working on a lightly floured surface or a damp cloth, flatten the dough, then pick it up and gently stretch it out, trying to keep it as circular as possible. Curl your fingers and let the dough hang on your knuckles, moving and rotating the dough so it stretches evenly. If it tears, piece it together. If the dough stretches too much, put it down and gently tug on the thick spots. Transfer the round of dough to a large square of parchment paper; slide onto a pizza peel.

4. Spread the goat cheese mixture over the dough, then evenly disperse the mozzarella, tomatoes, and parmesan over the goat cheese. Slide the pizza with the parchment onto the hot baking stone. Bake for 8-10 minutes, until the crust is browned around the edges. Transfer the pizza to a cooling rack without the parchment. Top with the prosciutto. Let the pizza rest for 5 minutes before serving.

prosciutto goat cheese pizza 8

strawberry lemonade bars

strawberry lemonade bars 8

I’m always trying to find desserts that Dave will eat because they’re so good he can’t resist, and not just to be polite. It isn’t that those desserts don’t exist – crème brulee, eclairs, and tapioca pudding come to mind – it’s just that the desserts he loves don’t require me to use the mixer, and where’s the fun in that? So the real challenge is finding a dessert that Dave loves to eat as much as I love to bake it.

strawberry lemonade bars 1

Strawberry lemonade bars weren’t a sure thing, but it was a good bet, I thought. He does like lemon bars – not as much as, say, snickerdoodles, but more than brownies at least. And his favorite ice cream flavor is strawberry, so strawberry lemonade bars seemed like they’d have potential.

strawberry lemonade bars 2

The browned flaky crust, taken from my lemon bar comparison last year, didn’t hurt, and neither did the creamy filling. The filling was not just a lemon bar filling with some strawberry juice added; it incorporated a generous portion of flour, necessary to hold all the extra liquid together. The result was a bar that was soft and gooey (maybe I should have cooked it longer) and tasted perfectly of lemons and strawberries. I loved the bars, and as for Dave – he liked them enough to eat a couple to be polite.

strawberry lemonade bars 5

One year ago: Caesar Salad
Two years ago: Whole Wheat Brioche
Three years ago: Blueberry Crumb Cake
Four years ago: Spinach Feta Pine Nut Tart

Printer Friendly Recipe
Strawberry Lemonade Bars (adapted from Annie’s Eats via Sophistimom)

For the crust:
8 tablespoons unsalted butter, at room temperature
⅓ cup (1.33 ounces) powdered sugar
1 cup (5 ounces) all-purpose flour
¼ teaspoon salt

For the filling:
1½ cups (10.5 ounces) sugar
⅔ cup (3.3 ounces) all-purpose flour
1½ tablespoons lemon zest (from 3 lemons)
⅛ teaspoon salt
1½ cups (8 ounces) frozen strawberries, thawed
3 large egg whites
1 large egg
⅔ cup freshly squeezed lemon juice (from 3 lemons)
Confectioners’ sugar, for dusting

1. Preheat the oven to 350 degrees. Spray an 8-by-8 inch baking pan with nonstick spray.

2. In the bowl of an electric mixer, beat the butter and sugar on medium-high speed until smooth, 1-2 minutes. Reduce the mixer speed to low and add the flour and salt, mixing just until incorporated.

3. Transfer the dough to the prepared baking pan, pressing into an even layer over the bottom of the pan. Bake the crust for about 25 minutes, or until light golden brown. Remove from the oven, maintaining the temperature.

4. While the crust is baking, prepare the filling. Combine the sugar, flour, lemon zest and salt in a blender. Add the strawberries; blend until smooth. Add the egg whites and eggs; blend until incorporated. Add the lemon juice, processing just until evenly mixed.

5. Pour the filling over the crust and bake until the center is just set and no longer jiggles when gently shaken, about 30-40 minutes. Transfer to a wire rack to cool to room temperature, then cover and refrigerate for at least 2 hours. Dust the top with confectioners’ sugar before cutting and serving.

strawberry lemonade bars 7