Archives for October 2015

slow ferment pizza dough

pizza dough 9

Since I make pizza once every two weeks or so, it’s only natural that my dough recipe has evolved over the years. The recipe I’ve been using lately doesn’t bear much resemblance to my favorite from several years ago beyond the obvious flour, water, and yeast. My current favorite couldn’t be easier to make – with a few caveats.

pizza dough 2

The first is that it’s best if you think ahead – far ahead, if you can. I usually mix the dough on Monday night to cook it on Friday night. That being said, if I didn’t decide I wanted pizza until Thursday, I’d still use this recipe, with just a one-night rest.

pizza dough 4

The second is that I’m using flour I special-ordered from Italy. I’ve entered the deep end, where flour for pizza is no longer taken out of the grocery budget, it comes out of my fun money allowance. But then I tried the recipe with bread flour (King Arthur), and to be honest, it was so good that it doesn’t seem like the special flour is worth the splurge.

pizza dough 5

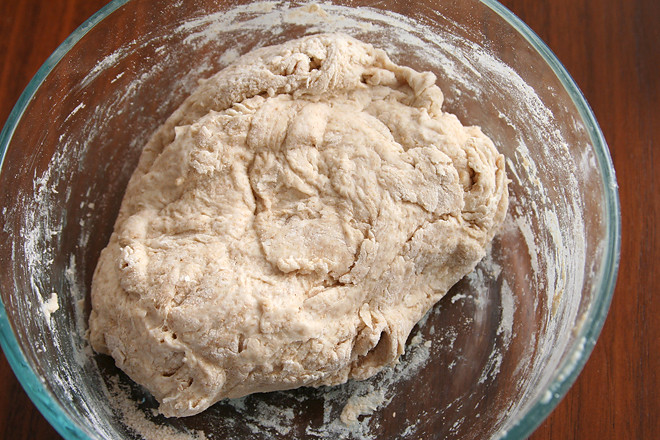
So, thinking in advance helps, and fancy flour might help, but after that, it’s just mixing up flour, water, yeast, sugar, and salt. I don’t bother with a whole wheat pre-dough; I just use half whole wheat flour in the dough, and the long wait in the fridge is plenty of time to soften the grains. I also don’t put much effort into kneading the dough. I mix it, put it in the fridge overnight, and spend a minute or two kneading it once it’s evenly hydrated. If you’d rather do all the work up front and forget about it for a few days, you can just knead it longer right after you mix it up.

pizza dough 6

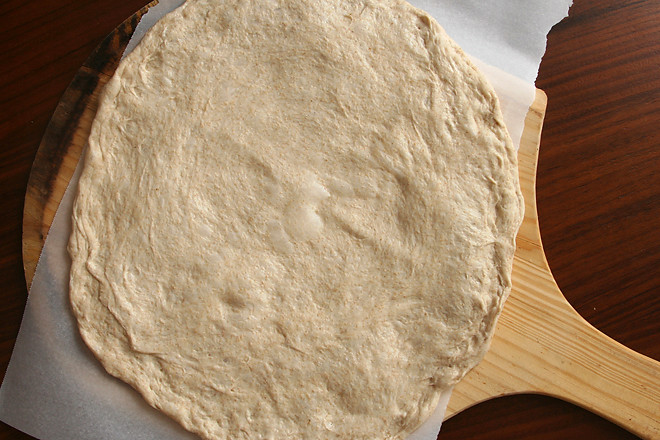
Then it sits in the back of the fridge until I’m ready for it at the end of the week. I come home from work on Friday, take the dough out to warm up, and go sit in my favorite chair with a book and my cat. An hour or two later, somewhat refreshed, the dough is easy to stretch out to a circle and ready to top.

pizza dough 14

Another pizza splurge I indulged in last year was a Baking Steel. It does make homemade pizza better, and I recommend it, but of course a pizza stone will do a fine job too. With the Baking Steel, it gets so hot that the dough crisps and browns within a few minutes, so I put it on a high rack and turn the broiler on when the pizza goes in. This is not recommended with a stone, since the direct heat could cause it to crack (heck, in my experience, anything causes them to crack!).

pizza dough 15

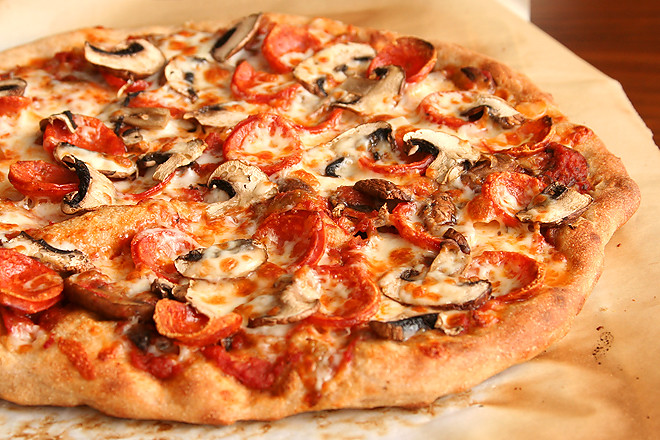
And then you’ve got pizza as good as you can get with a home oven. The bottom is crisp and browned, the middle is full of bubbles, the dough has great flavor on its own, even without whatever delicious toppings you pile on top. I’ve been making this new favorite for almost a year, and I have no plans to change it up – but you never know. There’s always something new to try, so maybe in a few years, I’ll be sharing yet another new and improved pizza method.

pizza dough 13

Printer Friendly Recipe
Slow Ferment Pizza Dough
(adapted from Serious Eats’ Cold-Fermented Pizza Dough)

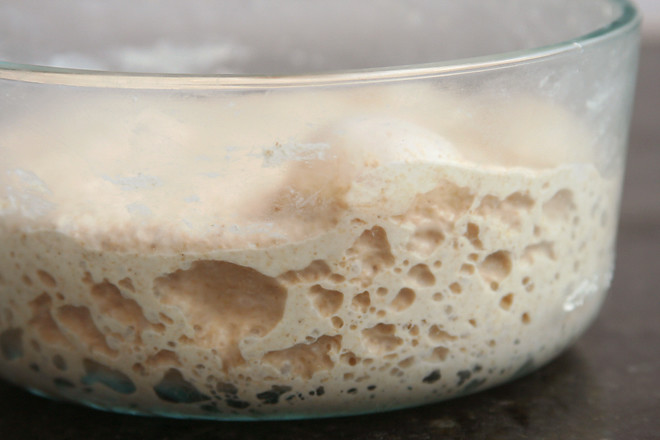
I’ve reduced the yeast from Kenji’s recipe, because with the full amount, my fermented dough was developing an unpleasant sour aroma.

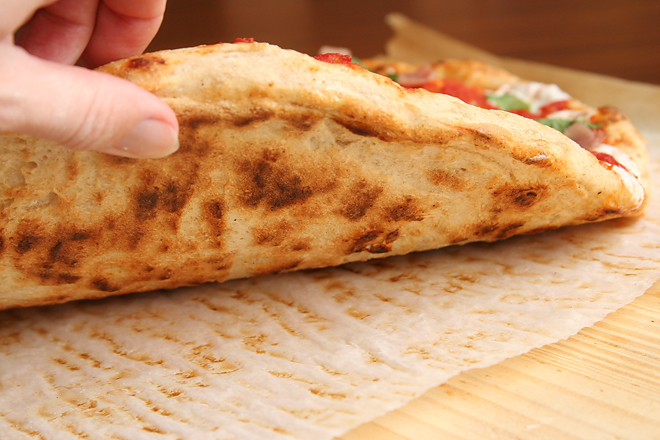
Whether baking on a steel or a stone, I’ve found that the dough is easiest to transfer to the oven with parchment paper, but it crisps and browns better if the paper is removed once the dough sets. Furthermore, a baking steel is hot enough to burn the paper after a couple minutes in the oven, creating a mess.

10 ounces (2 cups) bread flour or 00 flour
10 ounces (2 cups) whole wheat flour
2 teaspoon salt
⅔ teaspoon yeast
½ teaspoon sugar
1¾ cups water

1. In a medium bowl, combine all of the ingredients until there are no dry bits remaining. Tightly cover and store in the refrigerator, at least overnight or up to 5 days. The following day, knead the dough for about a minute, until it’s smooth and elastic. Cover and refrigerate. (Alternatively, the dough can be kneaded for about 5 minutes right after mixing, with no additional kneading necessary.)

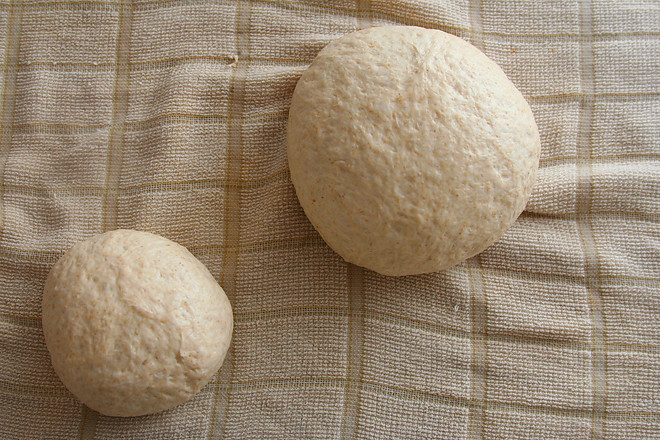
2. About two hours before baking, remove the dough from the refrigerator. Use a dough scraper or rubber spatula to transfer the dough from the bowl to a damp dishtowel or a lightly floured surface. Use a knife to divide the dough in half. Shape each portion into a ball. Cover the dough balls loosely with plastic wrap; leave at room temperature for 1½ to 2 hours, until the dough is easily stretched.

3. About 45 minutes before baking the pizzas, place a baking steel (about 6 inches from the broiler) or pizza stone (lowest rack) in the oven; heat the oven to its hottest setting. Line a pizza peel or the back of a baking sheet with parchment paper.

4. Stretch one portion of dough to a 10- to 12-inch round; lay it on the parchment paper. If necessary to even out thick areas and fix the shape of the dough, pull the edges to an even circle. Top with desired toppings.

5. Transfer the pizza on the parchment paper to the heated steel or stone. If using a steel, immediately turn the oven off and the broiler on to its hottest setting. After 1 minute, use a metal spatula to lift the pizza while using tongs to remove the parchment paper. Continue cooking until the cheese is bubbling and the bottom of the crust is spottily browned, about 4 additional minutes for a baking steel or 6-7 minutes for a baking stone. Use the metal spatula and pizza peel to remove the pizza from the oven and transfer it to a cooling rack. Cool for about 5 minutes before cutting and serving. Repeat with the remaining dough.

pizza dough 10

banana caramel whoopie pies

banana caramel whoopie pies 4

The thing I hate about whoopie pies is that they’re called whoopie pies. Remember that most of what I bake gets shared at work, and there’s something that feels unprofessional about leaving a post-it in the office kitchen with the word ‘whoopie’ on it. I get a few snickers every time I make them – except for the time I cheated and called them sandwich cookies instead.

banana caramel whoopie pies 1

They are their own category of sandwich cookie though, with a distinctly cakey cookie layer that makes them almost like cake and frosting that happens to look like cookies. In these, the frosting steals the show, with homemade caramel sauce mixed into creamy smooth buttercream. The cookies, however, aren’t to be overlooked either, and the banana is a great match for the caramel. Altogether, they’re worth a few giggles at work for such a tender cookie and generous layer of delicious buttercream.

banana caramel whoopie pies 3

Printer Friendly Recipe
Banana Caramel Whoopie Pies (from Annie’s Eats, who cobbled the pieces together from Martha Stewart [cookies] and David Lebovitz’s The Perfect Scoop [caramel sauce, which I’ve adapted])

If you don’t want to make swiss meringue buttercream, cream cheese frosting with caramel sauce would be great. If you don’t want to make caramel sauce, plain cream cheese frosting would still be good.

For the caramel sauce:
½ cup sugar
¼ cup water
1 teaspoon light corn syrup
½ cup plus 2 tablespoons heavy cream
¼ teaspoon salt
½ teaspoon vanilla extract

For the cookies:
2 cups (9.6 ounces) all-purpose flour
½ teaspoon baking powder
½ teaspoon baking soda
½ cup mashed banana (from about 2 small bananas)
½ cup sour cream
8 tablespoons (1 stick) unsalted butter, at room temperature
½ teaspoon salt
½ cup (3.5 ounces) granulated sugar
½ cup (3.5 ounces) light brown sugar
1 large egg
½ teaspoon vanilla extract

For the filling:
2 large egg whites, at room temperature
½ cup (3.5 ounces) granulated sugar
pinch salt
11 tablespoons unsalted butter, at room temperature
⅓ cup caramel sauce
1 teaspoon vanilla extract

1. For the caramel sauce: Add the sugar, water, and corn syrup to a 2-quart saucepan. Cover and heat over medium-high heat until simmering, then remove the cover and let simmer until the mixture is a deep amber color, swirling the pan occasionally at first and more often as the sugar browns. Add the cream, which will foam violently, and stir over medium-low heat to combine. Remove from the heat and stir in the salt and vanilla extract. Let the sauce cool to room temperature. (Caramel can be made up to a week in advance.)

2. For the cookies: Adjust a rack to the middle position and heat the oven to xx degrees. Line two baking sheets with parchment paper or silicone mats. In a medium bowl, combine the flour, baking powder, and baking soda. In a small bowl, whisk together the banana and sour cream.

3. Place the butter in the bowl of a stand mixer fitted with the paddle attachment (or a large mixing bowl if you’re using a hand-held mixer). Beat the butter on medium-low speed until it’s smooth, then add the salt and both sugars. Continue beating on medium until the mixture is light and fluffy, about 2 minutes, scraping the sides of the bowl as needed. With the mixer running, add the egg and vanilla extract. Reduce the mixer speed to low and gradually add half of the flour mixture, then all of the banana mixture, then the remaining flour mixture. Continue mixing on low just until evenly combined.

4. Transfer the dough to a large piping bag fitted with a ½-inch round tip (or a ziploc bag with a ½-inch opening cut into a corner). Pipe 1-inch rounds of dough onto the prepared baking sheets with 1 inch of space between them. Bake until firm, about 10 minutes. Transfer the baking sheets to cooling racks; allow the cookies to cool on the pans for 5 minutes, then transfer them directly to the cooling rack.

5. For the buttercream: In the stainless steel bowl of a stand mixer (or a large stainless steel bowl if using a hand-held mixer), combine the egg whites, sugar, and salt. Set the bowl over a saucepan containing 1 inch of simmering water, making sure the bottom of the bowl does not touch the water. Whisk constantly until the mixture reaches 160 degrees.

6. Fit the mixer with the whisk attachment; beat the egg white mixture on medium-high speed until stiff peaks form and it has cooled to room temperature, about 6 minutes. Reduce the mixer speed to medium and add the butter 1 tablespoon at a time, adding more once each addition has been incorporated. Increase the mixer speed to medium-high and beat until the buttercream is smooth and holds peaks, 3-5 minutes. Add the caramel sauce and vanilla; mix on low until incorporated.

7. Spread about 2 tablespoons of buttercream over the flat side of half of the cookies. Top with the remaining cookies, flat sides down. Serve immediately, or cover tightly and store in the refrigerator for up to 2 days, bringing to room temperature before serving.

banana caramel whoopie pies 2

caramel apple cinnamon rolls

apple cinnamon rolls 5

Okay, my coworkers are officially spoiled. Usually I pass off the treats I share with them as more for me to play in the kitchen than for them to indulge, but when your coworker brings you a pan of homemade cinnamon rolls still warm from the oven, covered in caramelly cream cheese frosting, you’re spoiled. And I’m spoiled too, because I got to eat a nice warm sweet roll (or two) at work too.

apple cinnamon rolls 1

It did take me all week, but that’s how yeast breads go on workdays. I could have skipped a whole wheat pre-dough on something so obviously not health food, but since it’s so easy and I knew it wouldn’t make anything worse, I figured a little extra fiber couldn’t hurt. After that rested overnight, I mixed the rest of the dough and let it rise most of the way before stashing it in the fridge. The third night, I rolled, filled, and cut the dough, then again let it partially rise before putting it in the fridge overnight. Finally, three days after starting the rolls, I woke up in the morning and preheated the oven to bake them.

apple cinnamon rolls 2

Well, the rolls took a little longer than I expected to bake and I was late to work that day, but no one minded. (My diabetic boss couldn’t care less about cinnamon rolls; he’s just a nice guy.) And I got a few “this is the best thing you’ve ever made” comments from my spoiled but appreciative coworkers, which, combined with indulging myself, makes it all worth it.

apple cinnamon rolls 4

Printer Friendly Recipe
Caramel Apple Cinnamon Rolls (adapted from Annie’s Eats)

Makes 12 full-size cinnamon rolls or 24 smaller cinnamon rolls

I made these partially whole wheat by making a pre-dough by stirring together 5 ounces whole wheat flour, ¼ teaspoon salt, and ½ cup water and letting it sit, covered, at room temperature overnight. The next day, I mixed this pre-dough with the butter, milk, yeast, sugar, and eggs before adding the remaining 1¼ teaspoons salt and 15-16 ounces flour.

Because I made small cinnamon rolls to share at work, even ¼-inch diced apples seemed too big. I gave them a few pulses in the food processor to chop them finer. The larger dice would work fine for full-size rolls though.

Dough:
6 tablespoons unsalted butter
½ cup milk
½ cup water
1 envelope (2¼ teaspoons) yeast
¼ cup (1.75 ounces) granulated sugar
2 large eggs
1½ teaspoons salt
4-4¼ cups (20 to 21¼ ounces) unbleached all-purpose flour, plus more for dusting the work surface

Filling:
2 tablespoons unsalted butter
3 large apples, peeled, cored and cut into ¼-inch cubes
¾ cup (5.25 ounces) brown sugar, divided
⅛ teaspoon salt
1 tablespoon ground cinnamon

Icing:
¼ cup caramel sauce
1 cup (4 ounces) powdered sugar
4 ounces cream cheese, softened

1. For the dough: Melt the butter in the microwave or in a small saucepan over medium-low heat. Add the milk and water. Transfer this mixture to the mixer bowl with the yeast, sugar, eggs, and salt. Mix on medium-low speed with the paddle attachment until evenly combined. Attach the dough hook, and, with the mixer running on medium-low speed, gradually add 4 cups (20 ounces) of flour. If the dough sticks to the bottom of the mixer bowl during kneading, add the remaining ¼ cup flour, 1 tablespoon at a time. Knead for 6 to 8 minutes, until the dough is smooth and elastic (or knead for about 10 minutes by hand). It will be soft. Coat the bowl and dough with a thin layer of vegetable oil. Cover and set aside to rise until doubled in size, 1½ to 2 hours.

2. For the filling: Meanwhile, melt the butter in a medium skillet over medium heat. Add the apples, ¼ cup (1.75 ounces) brown sugar, and salt. Cook, stirring occasionally, until the apples are softened, about 12 to 16 minutes. Remove from the heat and let cool. When cool, add the remaining ½ cup (3.5 ounces) brown sugar and the cinnamon.

3. Spray a 9-by-13-inch baking dish with oil. When the dough is sufficiently risen, transfer it to a lightly floured work surface. Roll it out to a 12-inch by 16-inch rectangle. (If you want to make small rolls, divide the dough in two and roll each portion out to 12-inches by 8-inches.) Spread the filling evenly over the dough, leaving a ½-inch border along one longer edge free of filling. Starting at the longer edge with filling (for both full-size and smaller rolls), roll the dough tightly, sealing it with the clean edge. Using either a serrated knife or unflavored dental floss, cut the dough into 12 (or 24, for smaller rolls) evenly-sized rolls. Arrange cut-side up in the prepared pan. Cover and set aside to rise until puffy, about 1 hour.

4. Adjust a rack to the middle position and heat the oven to 350 degrees. Uncover the rolls and transfer the dish to the oven. Bake until the tops are browned and an instant-read thermometer inserted near the center of the pan reads about 185 degrees. Transfer the pan to a cooling rack.

5. For the icing: Using a whisk or electric mixer, combine the caramel sauce and powdered sugar. Mix in the cream cheese until the mixture is smooth. Once the rolls have cooled for about 10 minutes, pour the icing over them. Serve warm.

apple cinnamon rolls 7

stovetop macaroni and cheese

stovetop mac and cheese 8

There are three things that lead to difficulties with self-control for me – chocolate chip cookie dough, macaroni and cheese, and alcohol. I’ve found a handful of tricks for dealing with the alcohol one (although tiki drinks can be tricky since even one can be strong enough to lower my resistance to more!), but with the other two, the best way I’ve found of controlling them is not to be around them. We normally eat macaroni and cheese maybe once a year, even though it’s one of my favorite foods.

stovetop mac and cheese 3

I’ve told myself for years that when I got pregnant and couldn’t drink alcohol or eat cookie dough, I’d make up the extra calories with macaroni and cheese. It turns out that making up extra calories hasn’t been an issue; since I got that positive test back in May, all I’ve wanted to eat is dessert. Pasta is tasting extra delicious too, and yes, especially when it’s coated in cheese.

stovetop mac and cheese 4

I love the baked recipe I’ve been making for years, but then someone mentioned the blue box mac and cheese, and while I haven’t had severe cravings, maybe I’m more suggestible than I would normally be. I couldn’t stop thinking about that blue box. Unfortunately, the last time I bought it, I distinctly remember being disappointed that it was bland and mushy.

stovetop mac and cheese 5

I figured there had to be a way to make a creamy, smooth sauce using real ingredients. It turns out, the most popular recipes for stovetop mac and cheese aren’t so different from the blue box; you still coat the cooked pasta with butter, then add milk and cheese – except in this case, that cheese is real shredded cheddar, not a powder. And it tastes reminiscent of that blue box, in the best possible way. Plus, the pasta doesn’t dissolve in my mouth before I get to chew it! This is so good and so easy that maybe one day, my daughter will be nostalgic for this recipe instead of that blue box.

stovetop mac and cheese 7

Printer Friendly Recipe
Stovetop Macaroni and Cheese (not really adapted from Cook’s Illustrated)

I’ve only made this with all cheddar cheese. Monterey jack could make the sauce smoother, but it won’t be as flavorful. I tried a different recipe that called for a combination of cheddar and American cheese, and, while the sauce was creamier, the flavor of the American cheese dominated, and I prefer cheddar. With just cheddar, the sauce is plenty smooth and creamy for me.

So far, I’ve only made a half recipe (multiple times), using a 5-ounce can of evaporated milk. It seems like plenty of liquid.

2 large eggs
1 (12-ounce) can evaporated milk
¼ teaspoon hot pepper sauce
2 teaspoons table salt
¼ teaspoon ground black pepper
1 teaspoon dry mustard, dissolved in 1 teaspoon water
8 ounces elbow macaroni
4 tablespoons unsalted butter
12 ounces sharp cheddar cheese, American cheese, or Monterey Jack cheese, grated (about 3 cups)

1. Meanwhile, heat 2 quarts water to boil in large heavy-bottomed saucepan or Dutch oven. Add 1 1/2 teaspoons of the salt and macaroni; cook until almost tender, but still a little firm to the bite. Drain and return to pan over low heat. Add butter; toss to melt.

2. Meanwhile, mix eggs, 1 cup of the evaporated milk, pepper sauce, 1/2 teaspoon of the salt, pepper, and mustard mixture in small bowl; set aside.

3. Pour egg mixture over buttered noodles along with three-quarters of the cheese; stir until thoroughly combined and cheese starts to melt. Gradually add remaining milk and cheese, stirring constantly, until mixture is hot and creamy, about 5 minutes. Serve immediately.

stovetop mac and cheese 6

berry jam and chocolate mousse tart

berry chocolate tart 8

It doesn’t always rain here, but when it does, it’s on the day of the backyard party you’ve been planning for six months. Fortunately, it wasn’t my party, but by the time the host decided she had to cancel, I had already spent several hours preparing several thousand calories worth of tarts to contribute. Of course we’d had nothing but warm, sunny days for weeks beforehand.

berry chocolate tart 3

With our plans suddenly cancelled, we weren’t sure what to do with ourselves – or what to eat for dinner. We ended up inviting a few people who were also invited to the party over to our house, hoping we could cobble together a meal from everyone’s party contributions. Unfortunately, that left us with a random assortment of mushrooms, two seafood dips, two tarts, and four cocktails.

berry chocolate tart 4

I stashed the tart with the longer shelf life in the fridge to bring to work on Monday, defrosted shrimp for the dips, and sautéed the mushrooms and put them on toast with melty cheese. We ordered in chicken wings to round out the meal (and to satisfy Dave’s craving) and passed around cocktails. It wasn’t the night I’d planned, but it was fun nonetheless.

berry chocolate tart 6

I didn’t let anyone leave until they’d eaten a slice of tart, and then I foisted (most of) the leftovers on them too. After eating my way through baking, having a slice with guests, and knowing I’d be having a slice of tart #2 on Monday, I figured I should limit myself to just a sliver for Sunday. But don’t think I didn’t have regrets after I’d indulged in my tiny sliver.

berry chocolate tart 5

Yes, this is a rich dessert and should be shared with a crowd, but it’s also so good it’s hard to give it away. The berries brighten up all that chocolate, and the airy mousse layer disguises the heavy cream that makes it so fluffy. As it was, I enjoyed this much more than I would have after stuffing myself with seafood boil, so maybe it’s good that the original party was cancelled.

berry chocolate tart 11

Printer Friendly Recipe
Berry Jam and Chocolate Mousse Tart
(adapted from Love and Olive Oil)

The original recipe calls for a homemade jam made from tart cherries, but it’s been years since I’ve seen frozen tart cherries for sale, and I’ve never seen them fresh. I went to amazon to order my own tart cherry jam, but then fell down the jam rabbit hole and ended up with marionberry instead. Any good berry or cherry jam would do here.

I don’t know if baking the tart crust is necessary. It’s not called for in the original recipe, but I was worried it would be crumbly without baking. I baked it at a very low temperature to avoid burning the chocolate. I also reduced the filling because I had too much (which I happily ate with a spoon).

Crust:
5 tablespoons unsalted butter
2 ounces dark or semisweet chocolate, finely chopped
1½ cups chocolate wafer cookie crumbs (from about 7 ounces cookies)
2 tablespoons granulated sugar
⅛ teaspoon table salt

Filling:
5½ ounces bittersweet chocolate, finely chopped
1 cup heavy whipping cream, divided
3 tablespoons unsalted butter, cut into ½-inch cubes
1 teaspoon vanilla extract
1 cup (8 ounces) berry jam

1. For the crust: In a small saucepan over medium-low heat or a microwave-safe bowl in the microwave, melt the butter. Remove from the eat and add the chocolate; stir until the chocolate is melted.

2. In a food processor, process the cookies until finely ground. (Alternatively, place the cookies in a large ziploc bag and use a rolling pin to crush them, then transfer to a bowl.) Add the sugar and salt; pulse to mix. Add the melted butter and chocolate and pulse until the crumbs are evenly moistened. Transfer the mixture to a 9-inch round or equivalent tart pan with a removable bottom and press firmly into the bottom and up the sides of the pan. Refrigerate at least 30 minutes or until firm.

3. Heat the oven to 200 degrees. Transfer the crust in the tart pan to a baking sheet. Bake at 200 degrees for 12 minutes. Cool to room temperature.

4. For the filling: Transfer the chocolate to a heatproof bowl. In a small saucepan over medium heat, heat ⅔ cup of the heavy cream until it simmers but is not boiling. Pour the hot cream over the chocolate; gently stir until the chocolate and cream are evenly mixed. Add the butter in ½-tablespoon increments, stirring until each one is melted before adding another. Stir in the vanilla extract.

5. In a separate bowl, whisk (or use a hand mixer) the remaining ⅓ cup heavy cream until it forms soft peaks. Gently fold one-third of the whipped cream into the chocolate mixture, then add the remaining cream, folding until no white streaks remain.

6. To assemble, spread the jam in an even layer over the bottom of the cooled crust. Pour the chocolate mixture over the jam and spread into an even layer. Refrigerate until set, at least 2 hours or overnight.

berry chocolate tart 9