swiss chard mushroom sausage lasagna

swiss chard lasagna 4

I have this weird thing with lasagna, in that I love it, and I love making it, but I have a hard time bringing myself to repeat recipes. I’m always searching for the next new lasagna recipe, but the truth is, my favorite lasagnas involve tomatoes and cheese and probably bechamel and something that tastes meaty (which could be mushrooms and not meat). And there’s only so many ways to combine those ingredients and still call it in a new recipe.

swiss chard lasagna 2

This one, however, I did make twice, because the first time wasn’t quite right. I was thinking that because I enjoy both bechamel and ricotta in lasagna, that I would enjoy having them both there. It turns out, though, that it was overkill, so I nixed the ricotta. Also, the original recipe didn’t include tomatoes or sausage, but they both mix in so well with béchamel and cheese and greens that I couldn’t resist adding them.

swiss chard lasagna 1

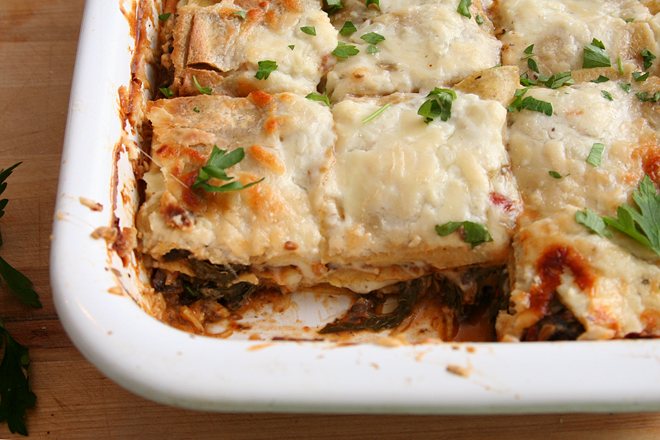
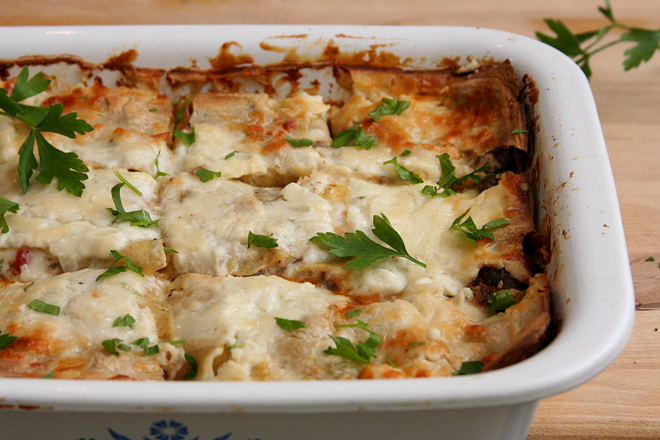
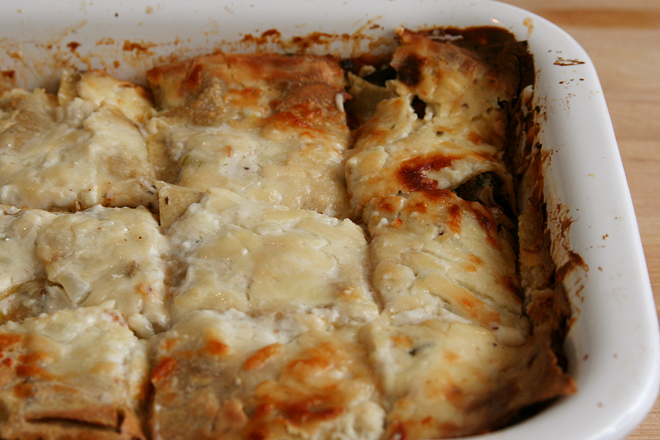
I can’t call this my favorite lasagna. With my compulsion to keep trying new recipes, I can’t claim any favorite. But this is certainly worth adding to the list of great recipes. It’s almost like a classic lasagna with some extra vegetables, and those vegetables fit in perfectly with the cheese and tomatoes and meat. It’s so good I might even make it again someday. But in the meantime, tell me: what’s your favorite lasagna recipe?

swiss chard lasagna 3

Printer Friendly Recipe
Swiss Chard Mushroom Sausage Lasagna (adapted from Bon Appetit via epicurious)

For instructions on boiling and rinsing the noodles, see step 4 of this recipe.  You’ll only need half of a recipe of fresh pasta.

Béchamel sauce:
3 tablespoons (½ stick) unsalted butter
¼ large onion, chopped fine
3 cloves garlic, minced
3 tablespoons all-purpose flour
3 cups milk
1 bay leaf
pinch nutmeg
½ teaspoon salt
¼ cup (½ ounce) grated parmesan cheese

Swiss chard and mushroom layer:
8 ounces Italian sausage, removed from casing
1 tablespoon olive oil
¾ large onion, diced
1 pound crimini mushrooms, sliced
salt
4 large garlic cloves, minced
¼ teaspoon dried crushed red pepper
1 (15-ounce) can diced tomatoes with juice
1 pound Swiss chard, center rib and stem cut from each leaf
pepper

Lasagna:
1 pound fresh lasagna noodles or 12 7-by-3-inch lasagna noodles, boiled and rinsed
4 ounces (1 cup) provolone, shredded
4 ounces (1 cup) mozzarella, shredded
2 ounces (1 cup) finely grated Parmesan cheese
2 tablespoons minced parsley

1. For the béchamel sauce: In a medium saucepan over medium heat, melt the butter. When the foaming subsides, add the onion and the garlic. Cook, stirring often, until the onions are softened and translucent, about 5 minutes. Add the flour and cook, stirring constantly, for 1 minute. Whisking constantly, slowly add the milk. Add the bay leaf, increase the heat to medium-high, and bring to a simmer, whisking constantly. When the mixture simmers, reduce the heat to medium-low, add the nutmeg and salt, and simmer 5 minutes. Remove the bay leaf and stir in the parmesan. Cover and set aside.

2. For the swiss chard and mushroom layer: Heat the oil in medium skillet over medium-high heat. Add the onion; sauté until the onion is tender, 3 to 4 minutes. Add the mushrooms and ½ teaspoon salt; cook, stirring occasionally, until the mushrooms release their liquid and then brown, about 8 minutes. Add the garlic and crushed red pepper; cook, stirring constantly, until fragrant, about 30 seconds. Add the tomatoes; simmer until slightly reduced, about 10 minutes. Mix in the chard; cook, stirring frequently, until wilted, about 5 minutes. Stir the sausage back into the sauce; season to taste with salt and ground black pepper.

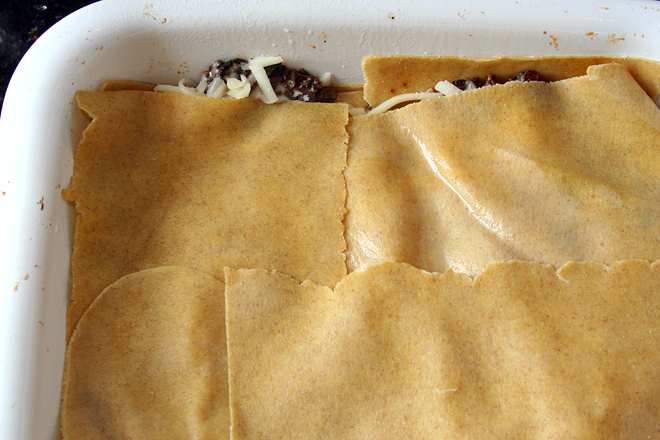
3. Heat the oven to 350 degrees. Spread a thin layer of the béchamel sauce on the bottom of a 9×13-inch baking dish. Cover the sauce with a slightly overlapping layer of boiled noodles, cutting them as needed to fill any gaps. Evenly spread ¾ cup of the sauce over the noodles. Top with one-third of the sausage-mushroom mixture and one-fourth of the cheeses.  Repeat the layers twice more. Layer a final layer of noodles, then cover with the remaining béchamel and cheeses.  Cover the pan with aluminum foil.

4. Bake, covered, for 30 minutes. Remove the foil and continue to bake until the lasagna is bubbling around the edges and golden on top, 20 to 30 minutes longer. Let stand at room temperature for 10 to 15 minutes. Sprinkle evenly with parsley and serve.

swiss chard lasagna 6

almond lemon cream cheese coffee cake

cream cheese coffee cake 5

I’ve gotten in the habit of eating just crumbs of each treat I bake. This sounds stingier than it is. While the goal really is to limit my indulging, what inevitably happens is that I “accidentally” create crumbs. Maybe one square of a bar cookie is too rectangular compared to the rest; I better shave a sliver off. Or maybe, in the work kitchen, someone only ate half a cookie (always the same person, and she usually comes back for the other half soon enough); that doesn’t look appetizing, so I’d better eat the other half. Oops, while I was cutting slices of cake, a whole chunk fell off this one; there’s no size limit on crumb, so it counts and I get to eat it.

cream cheese coffee cake 1

The result is that I eat more and enjoy it less. Instead, I’ve started cutting myself a serving and setting it aside until I get home from work, so I can sit down and truly savor it. That’s exactly what I did with this cake, and I was so excited to get home at eat my slice. Especially once my coworkers started coming by my office to rave about how good the cake was. This went faster than anything I’ve ever brought in!

Which, unfortunately, means it was gone by the time I found out that Dave had eaten my piece – in addition to the piece he’d already grabbed from the office kitchen. Oh, I know, it sounds terrible, but as much as I wanted to give him the guilt trip to end all guilt trips, the fact is that it wasn’t exactly his fault. I’d cut my slice and then set it on the counter too close to where he was laying out his lunch. He thought I put it there for him. Still, I was very, very sad.

cream cheese coffee cake 2

This did not stop the stream of coworkers telling me how good the cake was. Obviously I needed to make it again, so I did, less than a week later (I would have made it that very night if I’d had time!), and this time I hid my slice so there’d be no confusion. And it was as good as they said – Buttery and sweet, lemon-scented, some crunchy bites with almonds, and of course my favorite was the streak of cheesecake through the middle. It all worked out in the end, but I definitely learned a lesson.

cream cheese coffee cake 6

Printer Friendly Recipe
Lemon Almond Cream Cheese Coffee Cake (from Cook’s Illustrated)

I made almost no changes to the original recipe. I did substitute ¼ cup Greek yogurt for ¼ cup of the sour cream. Also, my tube pan has a detachable bottom, so I removed the sides, and then the cake was kind of stuck on the bottom portion with the center tube. The cake was too delicate to lift off of the bottom. I ended up chilling the cake overnight and removing the cake from the base in the morning, when it was firm. Then I let it warm up before serving.

Lemon sugar-almond topping:
¼ cup (1.75 ounces) sugar
1½ teaspoons finely grated zest from 1 lemon
½ cup sliced almonds

Cake:
2¼ cups (11¼ ounces) unbleached all-purpose flour
1⅛ teaspoons baking powder
1⅛ teaspoons baking soda
1 teaspoon table salt
10 tablespoons (1 stick plus 2 tablespoons) unsalted butter, softened but still cool
1 cup plus 7 tablespoons sugar
1 tablespoon finely grated zest plus 4 teaspoons juice from 1 to 2 lemons
4 large eggs
5 teaspoons vanilla extract
1¼ cups sour cream
8 ounces cream cheese, softened

1. For the topping: Adjust an oven rack to the middle position and heat the oven to 350 degrees. Stir together the sugar and lemon zest in a small bowl until combined and the sugar is moistened. Stir in the almonds; set aside.

2. For the cake: Spray a 10-inch tube pan with nonstick cooking spray. Whisk the flour, baking powder, baking soda, and salt together in a medium bowl; set aside. In a stand mixer fitted with the paddle attachment, beat the butter, 1 cup plus 2 tablespoons sugar (7.875 ounces), and the lemon zest at medium speed until light and fluffy, about 3 minutes, scraping down the sides and bottom of the bowl with a rubber spatula. Add the eggs 1 at a time, beating well after each addition, about 20 seconds, and scraping down the beater and sides of bowl as necessary. Add 4 teaspoons vanilla and mix to combine. Reduce the speed to low and add one-third of the flour mixture, followed by half of the sour cream, mixing until incorporated after each addition, 5 to 10 seconds. Repeat, using half of the remaining flour mixture and all of the remaining sour cream. Scrape the bowl and add the remaining flour mixture; mix at low speed until the batter is thoroughly combined, about 10 seconds. Remove the bowl from the mixer and fold the batter once or twice with a rubber spatula to incorporate any remaining flour.

3. Reserve 1¼ cups batter and set aside. Spoon the remaining batter into the prepared pan and smooth the top. Return the now-empty bowl to the mixer and beat the cream cheese, remaining 5 tablespoons sugar, lemon juice, and remaining teaspoon vanilla on medium speed until smooth and slightly lightened, about 1 minute. Add ¼ cup of the reserved batter and mix until incorporated. Spoon the cheese filling mixture evenly over the batter, keeping the filling about 1 inch from the edges of the pan; smooth the top. Spread the remaining cup of reserved batter over the filling and smooth the top. With a butter knife or offset spatula, gently swirl the filling into the batter using a figure-8 motion, being careful to not drag the filling to the bottom or edges of pan. Firmly tap the pan on the counter 2 or 3 times to dislodge any bubbles. Sprinkle the lemon sugar-almond topping evenly over the batter and gently press into batter to adhere.

4. Bake until the top is golden and just firm, and a long skewer inserted into cake comes out clean (skewer will be wet if inserted into cheese filling), 45 to 50 minutes. Remove the pan from the oven and firmly tap on counter 2 or 3 times (the top of the cake may sink slightly). Cool the cake in the pan on a wire rack for 1 hour. Gently invert the cake onto a rimmed baking sheet (the cake will be topping-side down); remove the tube pan, place a wire rack on top of the cake, and invert the cake sugar-side up. Cool to room temperature, about 1½ hours. Cut into slices and serve.

cream cheese coffee cake 4

shrimp and andouille over green chile cheese grits

shrimp and grits 4

For breakfast on Saturday, we had waffles and a fantastic sausage we picked up on a recent Texas wine-tasting trip. We had dinner at a friend’s cookout, and there were so many great side dishes there that I really didn’t need any grilled meat, but there were homegrown tomatoes and green chile for toppings, so I grabbed a hot dog anyway. For breakfast Sunday, migas with chorizo. For lunch, BLT salads. For dinner, andouille and shrimp over green chile cheese grits. We like our cured pork products.

shrimp and grits 1

I’ve ordered shrimp and grits several times in restaurants, but it was never so good as this. These grits are enriched with butter and cheese, and if your andouille isn’t spicy enough, a jalapeno is added to the grits (I used Hatch green chiles). The shrimp is browned in butter and andouille drippings, then cooked through in beer and broth. As if there isn’t enough going on, the whole thing is topped with a fried egg.

shrimp and grits 3

For as rich as it tastes and as full as I was afterward, it isn’t quite as bad as it sounds. For two servings plus some leftover grits, I used 1 tablespoon of butter, 2 ounces of cheese, no cream (I was out), and…okay, significantly more andouille than the recipe calls for. It was worth every greasy calorie, like cured meats always are.

shrimp and grits 6

Printer Friendly Recipe
Shrimp and Andouille over Green Chile Cheese Grits (adapted from Bon Appétit via epicurious)

Serves 4 generously

I replaced the jalapeno with about ½ cup of roasted, peeled, seeded, and diced Hatch green chiles. Anaheim or poblano would be a good substitute, but I’m sure the jalapeno is good too. I used smaller shrimp (60-70 per pound) and skipped the tarragon.

Grits:
4 cups water
salt
1 cup yellow grits (not instant)
1 cup (4 ounces) grated sharp white cheddar
1 tablespoon unsalted butter
1 jalapeño, seeded, diced
¼ cup heavy cream or milk
freshly ground pepper

Shrimp:
8 ounces andouille sausage
3 garlic cloves, minced
1 pound shrimp, peeled and deveined
¼ cup beer
¼ cup low-sodium chicken broth
1 tablespoon butter
4 large eggs
salt
1 tablespoon chopped fresh tarragon

1. In a medium saucepan over medium-high heat, bring the water and 1 teaspoon salt to a boil. While continuously stirring, add the grits. Reduce to the heat to low to maintain a very slow simmer. Cook, stirring occasionally in the beginning and more frequently as the mixture thickens, for about 30 minutes, until the grits are softened. Stir in the butter, jalapenos, cheese, heavy cream or milk, and pepper. Cover and set aside.

2. In a large skillet over medium heat, cook the sausage, stirring occasionally, until cooked through and lightly browned, about 8 minutes. Add the garlic; cook and stir until fragrant, about 1 minute. Add the shrimp, beer, and stock; cook, stirring frequently, until the shrimp are cooked through, about 5 minutes.

3. Meanwhile, melt the butter in a large nonstick skillet over medium heat. Add the eggs and season with salt. Cover the pan, reduce the heat to low, and cook until the whites are set and the yolks are soft, about 5 minutes.

4. Serve the shrimp mixture over the grits, topped with an egg and sprinkled with tarragon.

shrimp and grits 5

salad with pancetta, peperoncini, and parmesan

peperoncini pancetta salad 3

My favorite way to spend a Saturday night is cooking. It’s the only night of the week I feel like dinner can be a project; I’m busy being busy on weeknights, and I’m busy being lazy Friday and Sunday. So when I finally get the chance to cook a lot of food, I have a habit of cooking too much food.

peperoncini pancetta salad 1

One strategy I use to eat as much as possible without stuffing myself silly is to eat in courses, with time between each to allow for some digestion. Another is to serve food that’s fairly light, so I don’t get filled up by just a few bites.

peperoncini pancetta salad 2

This salad has become my go-to light salad course. It doesn’t hurt that it’s easy, plus the combination of ingredients is just perfect – briny peppers, salty meat, and parmesan to make it seem hearty and filling when it really isn’t. I’ve served it to pretty much everyone who’s come over for dinner in the last few months. I’ve also served at least four other courses each time, because there’s no better way for me to spend a Saturday night.

peperoncini pancetta salad 4

Printer Friendly Recipe
Salad with Pancetta, Peperoncini, and Parmesan

Serves 4 to 6

Before adding garlic to dressings, I always toast it, with the peel on, in a dry skillet over medium-high heat for a few minutes, until the peel is black where it hits the pan.  It tames the harsh bite of raw garlic.

Dressing:
2 cloves garlic, pressed through a garlic press
½ teaspoon salt
½ teaspoon pepper
1½ tablespoons fresh lemon juice
1 teaspoon Worcestershire sauce
1 teaspoon Dijon mustard
¼ cup extra virgin olive oil

Salad:
2 romaine hearts, washed and chopped
8 peperocini, stems removed, chopped fine
6 ounces pancetta, cooked and crumbled
½ cup (1 ounce) shredded parmesan

1. For the dressing: Mix everything.

2. For the salad: Mix everything; toss with dressing.

peperoncini pancetta salad 5

pasta with zucchini cream sauce

pasta with zucchini cream sauce 7

I love love love Domenica Marchetti’s The Glorious Pastas of Italy. Although it isn’t my newest cookbook, it’s still the one that gets me the most excited to cook. But somehow I’d convinced myself that it was a cookbook for winter, full of baked pastas and braised meats. A recent perusal through the book proved me wrong. Not only are there four soups specifically designed for each season, there was this recipe, based on zucchini, the butt of everyone’s summer garden jokes.

pasta with zucchini cream sauce 3

I’ve never been presented with the problem of too much zucchini, but while I happen to love the vegetable, this might be more because I’m a terrible gardener. Regardless, this is yet another great way to use it.

pasta with zucchini cream sauce 5

Summer squash can be difficult to cook without it getting mushy, but this recipe solves that problem for you. It’s supposed to be mush; the vegetables cook down into the sauce. There’s still toothy bites, but this isn’t pasta with zucchini; it’s pasta in sauce made from summer squash. Everything else is just playing a supporting role, with savoriness from the pancetta, body from the cream, and salty richness in the cheeses. It’s a great new way to eat this summer vegetable and a perfect example of why I love this cookbook so much.

pasta with zucchini cream sauce 6

Printer Friendly Recipe
Pasta with Zucchini Cream Sauce (adapted from Domenica Marchetti’s The Glorious Pastas of Italy)

Serves 4 as a side dish or starter course

I made this once without checking the recipe before shopping and had to substitute prosciutto for pancetta, skip the basil, and double the parmesan because I didn’t have pecorino. The dish was still delicious.

I’ve reduced the cream a bit, but the only major change I’ve made is to drastically reduce the amount of pasta, so every bite of pasta gets some creamy zucchini with it.

2 tablespoons extra-virgin olive oil
4 ounces thickly sliced pancetta, cut into narrow strips
2 cloves garlic, cut into paper-thin slices
6 to 8 small to medium zucchini or other summer squash, sliced into thin coins
salt
freshly ground black pepper
¼ cup heavy cream
8 ounces dried pasta
½ cup freshly grated Parmigiano-Reggiano cheese
½ cup freshly grated pecorino Romano cheese
5 large fresh basil leaves, cut into narrow strips (chiffonade)

1. In a large skillet over medium heat, heat the olive oil until shimmering. Add the pancetta; cook, stirring occasionally, until lightly browned. Add the garlic; cook and stir until fragrant, about 30 seconds. Add the zucchini, 1 teaspoon salt, and ½ teaspoon pepper; stir to combine. Reduce the heat to medium and cook, stirring occasionally, until the squash breaks down, about 30 minutes. Stir in the cream.

2. Meanwhile, bring 3 quarts of water to a boil. Add 1 tablespoon salt and the pasta. Cook according to package instructions; drain, reserving 1 cup of the pasta water.

3. Add the pasta, ½ cup of the reserved water, and the cheeses to the zucchini mixture. Cook and stir until the pasta is coated, adding more water if necessary to loosen the sauce. Stir in the basil and serve immediately.

pasta with zucchini cream sauce 8

cherry tomato cobbler with gruyere biscuits

tomato cobbler 9

I couldn’t figure out what wine to serve with this. On the one hand, it’s just vegetables. On the other, the gruyere and biscuits would make it pretty rich. A medium-bodied red would have been perfect, but all I had was chianti, which seemed too Italian. A rich white would have worked too, but I didn’t have one. In the end, I went with zinfandel, slightly worried that the wine would be too rich for the food.

tomato cobbler 3

It wasn’t. It wasn’t just the gruyere with enough flavor to stand up to the deep wine, it was the tomatoes themselves. They might just be vegetables (fruit, whatever), but after roasting in the oven for half an hour with shallots and thyme, they were sweet and tart and jammy all at once.

tomato cobbler 4

The original recipe calls for leaving the grape or cherry tomatoes whole before baking, but I dislike the saggy pouches of scalding mush that whole tomatoes become once cooked. By cutting them in half, the juice can mix with the other flavors, as well as reduce into a rich, flavorful sauce. It had so much flavor, in fact, that sips of rich wine and bites of earthy spinach was absolutely required between bites. It was a perfect combination.

tomato cobbler 11

Printer Friendly Recipe
Cherry Tomato Cobbler with Gruyere Biscuits (adapted from Martha Stewart via Pink Parsley)

6-8 servings

I used a mix of all-purpose white flour and of whole wheat pastry flour in the biscuits.  I only made a third of the recipe.

For the filling:
3 tablespoons extra virgin olive oil
6 shallots, diced
salt
4 garlic cloves, minced
½ teaspoon crushed red pepper flakes
1 tablespoon thyme leaves
3 pounds cherry tomatoes, halved
½ teaspoon black pepper
3 tablespoons all-purpose flour
Coarse salt and freshly ground pepper

For the biscuit topping:
2 cups (9.6 ounces) all-purpose flour
2 teaspoons baking powder
¼ teaspoon baking soda
1 teaspoon salt
8 tablespoons (1 stick) cold unsalted butter, cut into small pieces
1 cup grated Gruyere cheese (2¼ ounces), plus 1 tablespoon, for sprinkling
1½ cups buttermilk, plus more for brushing

1. Heat the oven to 400 degrees. Spray a 9-by-13-inch casserole dish with nonstick spray.

2. For the filling: Heat the oil in a large skillet over medium heat until shimmering. Add the shallots and a pinch of salt and cook just until the shallots begin to brown around the edges, about 5 minutes. Stir in the garlic, red pepper flakes, and thyme; cook until fragrant, about 30 seconds. Stir in the tomatoes, 1½ teaspoons salt, pepper, and flour. Remove from the heat; set aside.

3. For the topping: Combine the flour, baking powder, baking soda, and salt in the food processor. Add the butter and pulse until it is cut into pea-sized pieces. Add the cheese; pulse to combine. Pour in the buttermilk; pulse just until the dough is evenly moistened but still looks crumbly.

4. Transfer the dough to a large bowl and pat into a ball. Knead the dough a few times. Use a large spoon to arrange mounds of dough about ¼-cup in size over the tomatoes. Brush the biscuits with buttermilk and sprinkle with the remaining 1 tablespoon grated cheese.

5. Transfer the dish to the oven and bake until the biscuits are browned on top and the filling is bubbling, 35-45 minutes. Let rest 15 minutes before serving.

tomato cobbler 8

goat cheese almond strawberry cheesecake

goat cheese cheesecake 5

Sometimes you just nail it. I remember years ago, when I was barely starting to get into making rustic breads, I baked the best baguettes I’d ever made. I don’t remember what meal I cooked to serve with the bread, but I distinctly remember having leftovers of the main dish while we filled up on bread. Later, despite my best efforts, I was never able to reproduce that bread.

goat cheese cheesecake 1

Let’s hope this cheesecake doesn’t go the way of that bread, because I nailed it again and I definitely want it to be just as good next time. It might sound like an odd idea – how could goat cheese in cheesecake be even better than cream cheese? Honestly, I don’t know; I was trying to use up a big package of goat cheese.

goat cheese cheesecake 2

But, it was better. It was the best cheesecake I’ve ever made. Everyone who ate it raved; some said it was the best thing I’ve baked. Most said they wouldn’t have been able to taste the goat cheese if they hadn’t known it was there, and I agree; it was subtle, just a bit of extra tartness. The almond flavor wasn’t noticeable and even the strawberry was on the subtle side, but I’ll tell you this – there is not one thing I’d change about this, because it was perfection. And it had better be just as good, just as soft and creamy, next time I make it.

goat cheese cheesecake 3

Printer Friendly Recipe
Goat Cheese Almond Strawberry Cheesecake (adapted from Love and Olive Oil)

Crust:
8 ounces vanilla wafers, ground to make 2 cups crumbs
1 ounce (¼ cup) almond meal
pinch salt
5 tablespoons butter, melted

Filling:
2 (8-ounce) packages cream cheese, room temperature
8 ounces goat cheese, room temperature
1 cup (7 ounces) granulated sugar
⅛ teaspoon salt
¼ cup sour cream or Greek yogurt
2 tablespoons all-purpose flour
1 teaspoon vanilla extract
½ teaspoon almond extract
3 eggs, room temperature
6 ounces whole fresh or frozen strawberries, thawed and drained if frozen, pureed

1. For the crust: Heat the oven to 350 degrees. Spray the bottom of a springform pan with nonstick spray. Either grind the cookies with a food processor or place them in a ziptop bag and crush with a rolling pin. Add the almond meal, salt, and butter to the crumbs and stir until evenly mixed. Press the crumbs into an even layer covering the bottom of the prepared pan.

2. Bake the crust for 10 minutes, or until fragrant. Let cool on a wire rack. Reduce the oven temperature to 300 degrees.

3. For the cheesecake: With a mixer fitted with the paddle attachment (or with a hand mixer), beat the cream cheese and goat cheese at medium-low speed until smooth. Add the sugar and salt; continue mixing for about 2 minutes, until the mixture is light and creamy. Add the sour cream and flour, then vanilla and almond extracts, and the eggs one a time, mixing just until each one is incorporated.

4. Pour ¾ of the batter into the cooled crust. Mix the strawberry puree into the remaining batter. Dollop it over the plain batter in the crust and use a butter knife to gently swirl it.

5. Bake for 55 to 65 minutes or until the top is just barely jiggly. Remove the cake from the oven and place on a wire rack; run a thin knife or spatula around the edge to release the cake from the sides of the pan. Let cool completely to room temperature, then cover with plastic wrap and refrigerate overnight before serving.

goat cheese cheesecake 4

brisket and brie tacos

brisket tacos 5

My stubbornness knows no bounds or logic, as was evident in the cooking of this brisket. First, I refused to buy Dr. Pepper to use as a braising liquid. Dave and I don’t drink soda, and I’m not really into the whole high fructose corn syrup thing, so I didn’t want to buy a bottle only to use a fraction of it. Beer and honey would provide all the acidity and sweetness the brisket needed.

brisket tacos 2

I’m also not all that into the crockpot. I like it for certain things, particularly broth, but if I’m home anyway, usually I like the firmer texture and added browning of braising meats in the oven. This has always worked great for pot roast and stews, but I’m not sure it was the best method for much leaner brisket, which can more easily dry out.

brisket tacos 4

Not that I have any complaints though. Topping the tacos with brie certainly solves any potential problems the low fat content of the meat might have introduced. With a sweet and spicy barbecue sauce, stretchy Monterey jack cheese, and slices of creamy avocado, these tacos had plenty going on, despite or because of my stubborn changes.

brisket tacos 9

One year ago: Pizza with Prosciutto, Goat Cheese, and Roasted Tomatoes
Two years ago: Strawberry Daiquiri Ice Cream
Three years ago: Chicken Fajitas
Four years ago: Pasta with Roasted Red Pepper Sauce
Five years ago: Blueberry Poppy Seed Brunch Cake

Printer Friendly Recipe
Brie and Brisket Tacos (adapted from Rebecca Rather’s Pastry Queen via Confections of a Foodie Bride)

Serves 4, with leftover brisket

No one seems to brown brisket. I don’t know why that is, but I browned mine.

Brisket:
1 tablespoon canola or vegetable oil
1 (3-pound) brisket
salt
ground black pepper
1 tablespoon chili powder
3 cloves garlic, minced or pressed through a garlic press
1 (12-ounce) medium-dark beer
2 tablespoons honey

Raspberry chipotle barbecue sauce:
1 tablespoon olive oil
1 medium yellow onion, chopped
2 cloves garlic, minced or pressed through a garlic press
½ cup ketchup
1 chipotle chile in adobe sauce, minced
2 tablespoons lemon juice
¼ cup raspberries, fresh or frozen
1½ tablespoons Worcestershire sauce
1½ teaspoons dijon mustard
½ teaspoon salt
¼ teaspoon black pepper

Toppings:
12 corn tortillas, warmed
4 ounces brie, thinly sliced
1 cup (4 ounces) Monterey jack cheese

1. For the brisket: Heat the oven to 325 degrees. Heat the oil in a 5-quart Dutch oven over medium-high heat. Pat the meat dry, season it generously with salt, pepper, and the chili powder. Transfer the brisket to the Dutch oven and cook, without moving, for about 3 minutes, until deeply browned. Flip and brown the second side. Transfer the meat to a plate. Discard any fat in the pan (but leave the cooked-on brown bits).

2. Add the garlic to the pan and cook, stirring constantly, until fragrant, about 30 seconds. Pour the beer into the pot, scraping up the sticky brown bits on the bottom of the pot. Stir in the honey, then add the meat. Bring to a simmer over medium-high heat. Cover the Dutch oven and transfer it to the oven. Cook for 3 hours, turning every hour or so.

3. For the sauce: In a medium saucepan over medium heat, heat the oil until it runs like water when the pan is tilted. Add the onion; cook, stirring occasionally, until it just starts to brown around the edges, about 8 minutes. Add the garlic and cook, stirring constantly, until fragrant, about 30 seconds. Add the ketchup, chile, lemon juice, raspberries, Worcestershire sauce, mustard, salt, and pepper. Bring to a simmer, then reduce the heat to low, cover, and cook for 10 minutes. Puree, either with an immersion blender in the saucepan or by transferring the sauce to a blender.

4. When the brisket is tender, either slice it or shred it, leaving behind large chunks of fat. Layer brisket, sauce, brie, and Monterey jack cheese in the tortillas (plus Hatch green chile and avocado if you can’t imagine tacos with them). Serve immediately.

brisket tacos 6

pasta with broccoli, chickpeas, and garlic

broccoli chickpea pasta 5

Have I told you that we’re moving? In just a few days, in fact. It isn’t a big move as far as distance, as our new house is just a 15-minute drive away from our old one, but it is big as far as life steps. Having spent the majority of our twenties in graduate school, we watched our friends buy houses while we were still solidly in apartment mode. We’ve rented a nice little house for the last three years since we moved to New Mexico, but now, finally, we’re acting like grown-ups and buying our own place.

broccoli chickpea pasta 1

The process hasn’t been without its hiccups. Who knew that ordering lighting fixtures would be so complicated? I keep telling myself that, when we’re settled and I have bright and colorful pendants hanging over the breakfast bar, it’ll be worth it, but for now, I just wish we could find lights that aren’t actually purple when the website says they’re cobalt, or lights with cords that are long enough, or lights that work with the slopes of our vaulted ceilings. Not to mention the hours of packing, visits to the bank, trips to Lowe’s, and oh yeah, we’re going on vacation a week after closing.

broccoli chickpea pasta 2

When we’re not eating leftovers from the freezer, we’ve been eating a lot of quick meals like this one. Even better, I’ve gotten in the habit of buying those bags of pre-cut broccoli, which shaves another ten minutes off of prep time. At that point, it’s just an issue of boiling pasta while pan-roasting broccoli, pressing garlic into the pan with a pinch of red pepper flakes, and mixing everything together with a whole lot of lemon juice and parmesan to up the flavor ante. Dinner is served in no time at all, which means I can get back to procrastinating on packing by shopping for light fixtures.

broccoli chickpea pasta 4

One year ago: Star Wars Cookies
Two years ago: Cream Cheese Pound Cake
Three years ago: Roll-out Sugar Cookies (comparison of 3 recipes)
Four years ago: Roasted Kale
Five years ago: Spaghetti and Meatballs

Printer Friendly Recipe
Pasta with Broccoli, Chickpeas, and Garlic (adapted from Gourmet via epicurious)

Serves 6

Pasta dishes like this tend to cool quickly after being transferred to serving dishes, so I like to warm the empty bowls in an oven heated to about 200 degrees.

16 ounces whole wheat pasta
salt
3 tablespoons olive oil, divided
2 (12-ounce) bags fresh chopped broccoli (or 3 heads of broccoli, chopped into bite-sized pieces)
12 garlic cloves, minced or pressed through a garlic press
1 teaspoon dried hot red pepper flakes
2 (15-ounce) cans chickpeas, rinsed and drained
juice from 1 lemon
1 cup (2 ounces) finely grated parmesan, plus more for garnish

1. Bring 4 quarts water to a rapid boil over high heat. Add 1 tablespoon salt and the pasta. Cook according to package instructions. Before draining the cooked pasta, put about 1 cup pasta cooking water in a separate bowl and set aside. Return the drained pasta to the cooking pot.

2. Meanwhile, heat 2 tablespoons olive oil in a 12-inch skillet over medium-high heat. When hot, add the broccoli and a pinch of salt and cook, stirring occasionally, until bright green and browned in spots, 4-5 minutes. Add ¼ cup water; cover the pan for 1 minute to cook the broccoli through. Remove the lid and push the broccoli to the edges of the pan. Add the remaining tablespoon of oil, the garlic, and the red pepper flakes to the center of the pan. Cook, stirring constantly and excluding the broccoli as much as possible, for about 1 minute, then add the chickpeas and stir the mixture into the broccoli. Add the lemon juice and 1 teaspoon salt.

3. Transfer the broccoli to the pot with the pasta, stirring to incorporate. Add about half of the reserved pasta cooking water and 1 cup of cheese, stirring until the cheese melts evenly over the pasta. Taste and adjust for seasoning with more salt, lemon juice, or parmesan. Add more pasta cooking water if the pasta seems dry. Serve immediately in warmed bowls.

broccoli chickpea pasta 3

manchego cheese and garlic hot dogs

garlic hot dogs 5

Maybe I shouldn’t play favorites between four fun and delicious hot dog recipes, but this one had roasted garlic, so…it’s my favorite.

garlic hot dogs 1

One thing I found through making four types of hot dogs in four days was that most hot dogs benefit from being topped with something vinegary to cut through the fat of the meat. Mustard and pickle relish are the traditional choices. In this recipe, it’s sherry vinegar, mixed into a relish of roasted garlic and roasted red peppers.

garlic hot dogs 3

Roasted garlic is always sweet and creamy and delicious, and a hot dog was just as good as a vehicle for serving it as my other favorite – plain rustic bread. It’s no wonder this ended up my favorite of the hot dogs from our Hot Dog Week. The roasted garlic made it a shoo-in.

garlic hot dogs 2

One year ago: Pasta with Salmon in Pesto Cream Sauce
Two years ago: Chocolate Frosting (comparison of 3 recipes)
Three years ago: Bacon-Wrapped Goat Cheese and Almond-Stuffed Dates
Four years ago: Honey Yogurt Dip
Five years ago: Green Chile Chicken Enchiladas

Printer Friendly Recipe
Manchego Cheese and Garlic Hot Dogs (adapted from Bon Appétit via Annie’s Eats)

Makes 6 hot dogs

Relish:
2 large heads of garlic, top ½-inch cut off
5 teaspoons extra-virgin olive oil, divided
½ cup diced drained roasted red peppers
1 tablespoon chopped fresh parsley
Coarse kosher salt
Ground black pepper
Sherry wine vinegar or balsamic vinegar

Hot dogs:
6 grilled hot dog buns
6 grilled all-beef hot dogs
2 ounces Manchego cheese, grated

1. For the relish: Heat the oven to 400 degrees. Place each head of garlic, cut side up, in the center of a square of foil; drizzle each with 1 teaspoon of oil; enclose the garlic in the foil. Place the packets on the oven rack; roast until the garlic is tender, about 45 minutes. Open the packets; cool 15 minutes.

2. Squeeze the garlic cloves into a small bowl; mash. Mix in 3 teaspoons oil, the red peppers, and parsley. Season with salt, pepper, and sherry vinegar.

3. For the hot dogs: Arrange the buns on plates. Top each with a grilled hot dog, then cheese and garlic relish. Serve immediately.

garlic hot dogs 6