chocolate chip cookie dough cupcakes

chocolate chip cookie dough cupcakes 8

I might have mentioned, once or twice, that I am a fan of cookie dough. Any cookie is good, but chocolate chip is the best. And not any of those new recipes that are based on melted butter, those make greasy dough. I want the classic light and fluffy, pale, grainy dough. For me, the chocolate chips are mostly a distraction, but I figure they’re part of the package.

chocolate chip cookie dough cupcakes 3

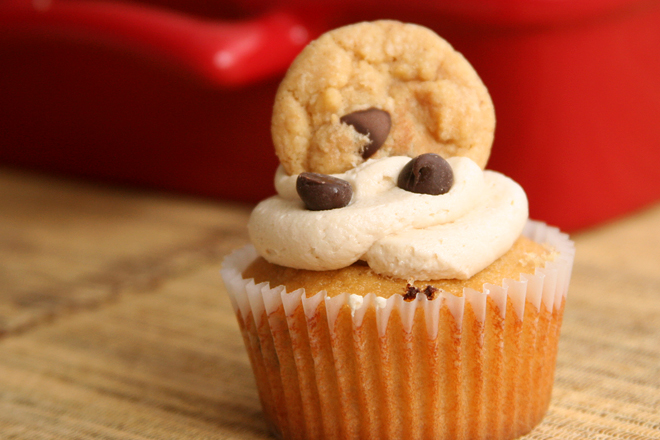
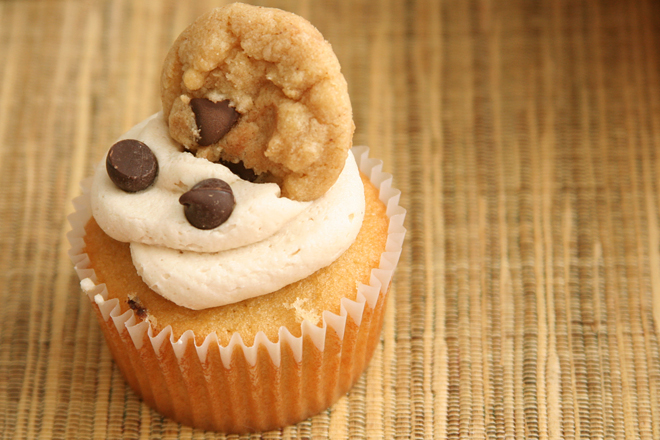
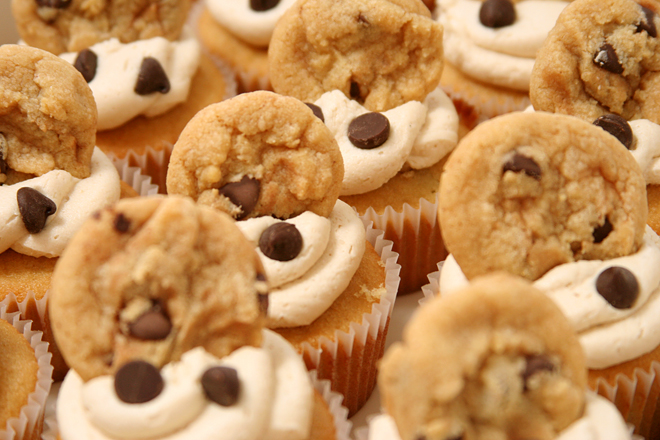
But it’s my birthday, and I guess chocolate chip cookie dough is not an appropriate celebratory dessert to share. I figured these were the next best thing. A yellow cake adapted with extra brown sugar and chocolate chips, an eggless cookie dough filling, frosting with brown sugar and even raw flour, all topped off with the most adorable chocolate chip cookies you’ve ever seen. Do you know how many opportunities this was to eat something resembling chocolate chip cookie dough? A lot.

chocolate chip cookie dough cupcakes 5

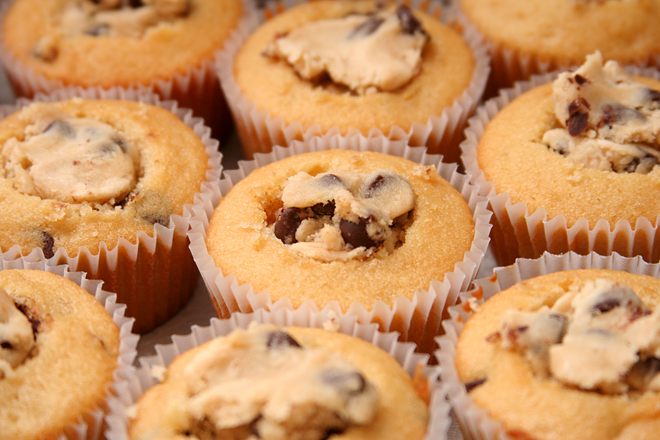
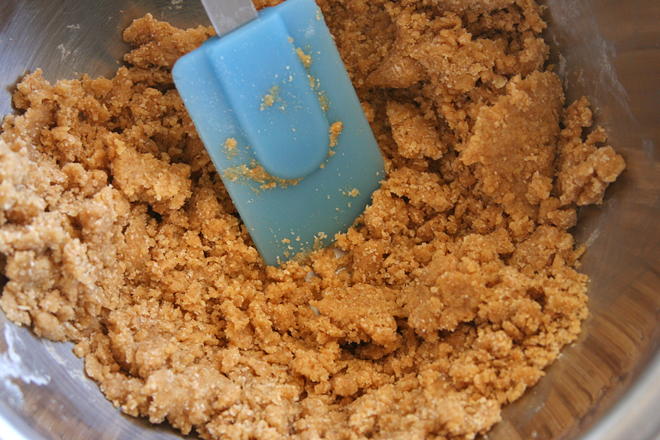
I have to admit that my favorite part was the filling – pure dough, with none of this cake distraction. The frosting was impressive too, the raw flour and brown sugar really made it resemble cookie dough. It was pretty much the perfect birthday cake for me, especially because there’s extra filling in the fridge for the rest of the weekend.

chocolate chip cookie dough cupcakes 6

Printer Friendly Recipe
Chocolate Chip Cookie Dough Cupcakes
(adapted from Annie’s Eats and Martha Stewart’s Yellow Cake recipe)

Makes 30 cupcakes

I baked the cookies a week early and froze them. I made the filling two days early. I made the cupcakes the night before, then filled, frosted, and garnished them the morning before I served them.

For the cake:
1½ cups (7.2 ounces) all-purpose flour
1½ cups (6 ounces) cake flour
2 teaspoons baking powder
½ teaspoon baking soda
12 tablespoons (1½ sticks) unsalted butter, softened
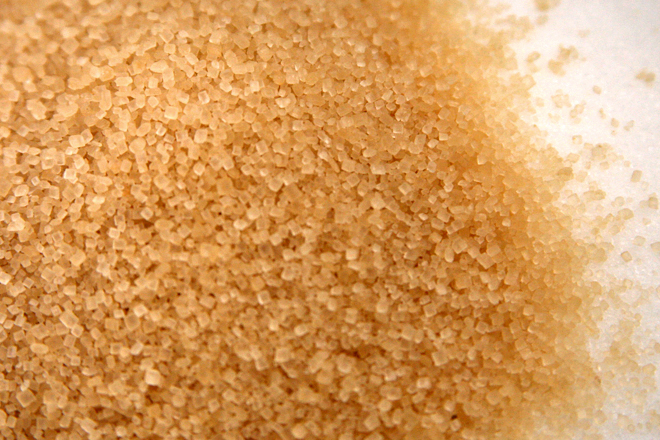
1¼ cups (8.75 ounces) brown sugar
½ cup (3.5 ounces) granulated sugar
1 teaspoon salt
4 large eggs, at room temperature
¼ cup canola oil
2 teaspoons vanilla extract
1¼ cups buttermilk, room temperature
1 cup (6 ounces) chocolate chips

For the filling:
8 tablespoons (1 stick) unsalted butter
½ teaspoon salt
½ cup (3.5 ounces) brown sugar
¼ cup (1.75 ounces) granulated sugar
2 tablespoons milk
1 teaspoon vanilla extract
1 cup plus 2 tablespoons (5.6 ounces) cups all-purpose flour
½ teaspoon baking soda
1 cup (6 ounces) chocolate chips

For the frosting:
16 tablespoons (2 sticks) unsalted butter, at room temperature
½ teaspoon salt
½ cup (3.5 ounces) light brown sugar, packed
2 cups (8 ounces) confectioners’ sugar
⅔ cup (3.2 ounces) all-purpose flour
2 teaspoons vanilla extract

For the garnish:
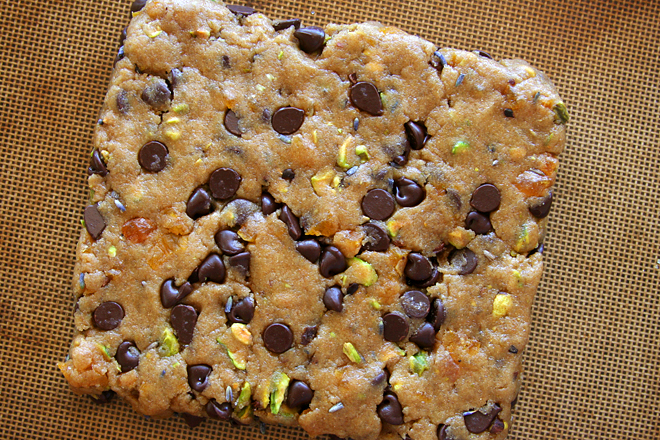
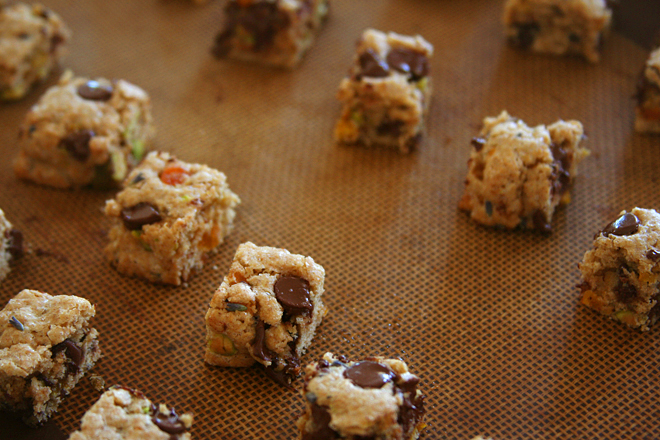
mini chocolate chip cookies (optional)
chocolate chips (optional)

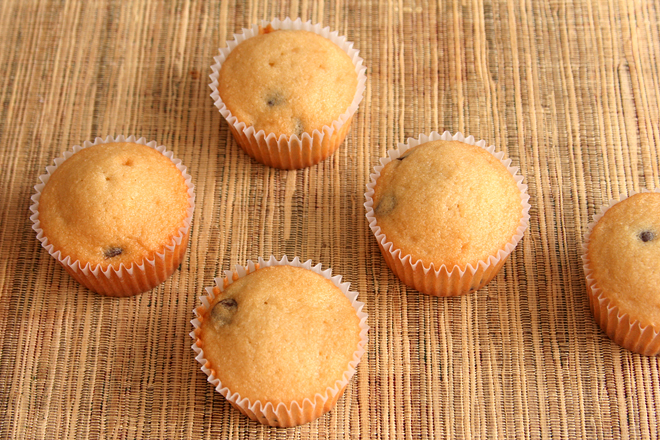
1. For the cake: Adjust an oven rack to the middle position; heat the oven to 350 degrees. Line 24 muffin wells with paper cups. In a medium bowl, whisk together the flours, baking powder, and baking soda.

2. In a stand mixer fitted with the paddle attachment (or a large bowl if using a hand-held mixer), beat the butter, sugars, and salt on medium speed until light and fluffy, about 2 minutes, scraping down the sides of the bowl as necessary. Add the eggs one at a time, beating well after each addition, then mix in the oil and vanilla. Reduce the mixer speed to low; add the dry ingredients in three additions, alternating with the buttermilk and ending with the dry ingredients. Beat each addition just until incorporated. Stir in the chocolate chips.

3. Divide the batter between the prepared muffin cups, filling each cup about two-thirds full. Bake for 16-20 minutes, until a toothpick inserted into the center of a cupcake comes out clean. Transfer the pan to a wire rack to cool. Remove the cupcakes from the pan after 5 minutes. Cool completely before filling and frosting.

4. For the filling: In the bowl of a stand mixer fitted with the paddle attachment (or a large bowl if using a stand mixer), beat the butter, salt, and sugars on medium speed until light and fluffy, 1-2 minutes. Add the milk, beating until incorporated, then mix in the vanilla. Reduce the mixer speed to low and gradually add the flour, mixing just until incorporated. Stir in the chocolate chips.

5. For the frosting: In a standing mixer fitted with the whisk attachment, beat the butter at medium-high speed until smooth, about 20 seconds. Add the brown sugar and salt; beat at medium speed until pale and fluffy. Reduce the speed to low and slowly add the confectioners’ sugar and flour; beat at medium-low speed until most of the sugar is moistened, about 45 seconds. Scrape the bowl, add the vanilla, and beat at medium speed until incorporated, about 10 seconds, then increase the speed to medium-high and beat until light and fluffy, about 4 minutes, scraping down the bowl once or twice.

6. To assemble: Use a paring knife to carve a cone out of the center of each cupcake, leaving at least ¼-inch of cake on the bottom of the cupcakes. Fill each divot with filling. Frost the cupcakes, completely covering the filling. Garnish with cookies and additional chocolate chips, if desired.

chocolate chip cookie dough cupcakes 7

all-grown-up s’mores bars

smores bars 5

I’m going to say something here, and it might shock you: These were too rich, and they were too chocolately. I know, you’re thinking that that isn’t possible because you love rich food. Or you’re thinking that the easy solution is to serve small pieces. But the problem goes beyond that – it’s an issue of balance, of mimicking everything that’s good about a s’more, but in an elegant way that doesn’t require a campfire.

smores bars 1

S’mores are mostly marshmallow, a generous amount of graham cracker, and just a small wedge of chocolate. Any more chocolate and the heat of the marshmallows won’t be able to melt it. It’s a ratio that’s pleased people for generations; we don’t need to change it now.

smores bars 2

These bars, on the other hand, were reversed: almost all chocolate and a smidgen of marshmallow. Both layers on their own were everything you could hope for, the chocolate mousse airy and smooth with enough bitterness to balance the fluffy toasted marshmallow topping. This wasn’t an issue of quality, just of relative quantities.

smores bars 4

So, for the recipe below, I’ve mixed around the ratios. No, I haven’t tried it myself, but each portion is basically the same recipe as the original, just scaled up (in the case of the marshmallow) or down (the chocolate). With these new proportions, you’ll have a treat to please everyone, with plenty of marshmallow and graham cracker and still more chocolate than you get in a real s’more, but not so much that it’s the only thing you notice. All that with no sticky fingers afterward.

smores bars 6

Printer Friendly Recipe
All-Grown-Up S’mores Bars (adapted from Jill O’Connor’s Sticky, Chewy, Messy, Gooey)

For the graham cracker crust:
3 cups crushed graham cracker crumbs (from about 26 full crackers)
8 tablespoons (1 stick) unsalted butter, melted
1 tablespoon granulated sugar

For the chocolate filling:
6 large egg yolks
1 cup plus 2 tablespoons confectioners’ sugar, sifted
2 tablespoons cognac or brandy
2 tablespoons Kahlua
1 teaspoon pure vanilla extract
⅛ teaspoon salt
12 tablespoons (1½ sticks) unsalted butter
1½ tablespoons Dutch-processed cocoa powder
9 ounces semisweet or bittersweet chocolate, finely chopped
1 cup plus 2 tablespoons heavy cream, whipped to soft peaks

For the Marshmallow Fluff meringue:
5 large egg whites
Pinch of salt
⅛ teaspoon cream of tartar
½ teaspoon pure vanilla extract
1½ cup Marshmallow Fluff

1. Heat the oven to 350 degrees. Spray a 9×13-inch baking pan with oil.

2. To make the crust: Combine the graham cracker crumbs with the melted butter and granulated sugar until well combined. Press into the bottom of the prepared ban. Bake the crust until it starts to brown and become crisp, about 10 minutes. Transfer to a wire rack and let cool completely.

3. To make the filling: Using an electric mixer, beat the egg yolks and confectioners’ sugar together in a large bowl until they are thick and the color of butter. Beat in the cognac, Kahlua, vanilla, and salt.

4. Melt the butter in a medium saucepan over low heat and whisk in the cocoa powder until smooth. Remove the pan from the heat, add the chocolate, and stir until the chocolate is melted and the mixture is smooth. Let cool slightly, then gradually beat into the egg mixture.

5. Fold the softly beaten heavy cream into the chocolate mixture just until combined. Spoon the chocolate cream over the graham cracker crust, smoothing it evenly with a spatula. Cover the pan with plastic wrap and refrigerate until very firm, at least 4 hours or up to overnight.

6. When ready to serve, make the meringue: Using an electric mixer set at low speed, beat the egg whites until foamy. Add the salt and cream of tartar and beat at medium speed until soft peaks form. Beat in the vanilla. Add the Marshmallow Fluff to the egg whites a little at a time, beating constantly until stiff peaks form. Spread the meringue on the chocolate layer, using the back of a spoon to create peaks. Toast the meringue using a kitchen torch or the broiler. Cut into squares and serve immediately.

smores bars 3

key lime bars

lime bars 6

Back in the old days, I made these all the time. Whenever I needed a dessert to go with Mexican food, or I wanted to bring something to a party that was sure to be popular but wasn’t too common, or I just wanted a refreshing treat, this was my go-to. “The old days”, of course, being before I had a blog and joined Tuesdays with Dorie, which started a love affair with recipes that are shiny and new. (But not a love affair that trumps that one I already have with chocolate chip cookies, of course.)

lime bars 2

If not for having made these before, they would be just the type of dessert I love to make – something a little different, but based on familiar flavors that people enjoy. Also there is cream cheese.

lime bars 3

Of course my desire to constantly try new things has led me to so many fun and delicious recipes, but this one makes me a little nostalgic for the old days. It’s easy, it’s handheld, it works for any season – really, it’s such a great dessert. I would make it more often if there weren’t thousands of other great desserts calling my name.

lime bars 5

Printer Friendly Recipe
Key Lime Bars (from Cook’s Illustrated)

Crust:
5 ounces animal crackers (about 1¼ cups crumbs)
3 tablespoons light or dark brown sugar packed
pinch salt
4 tablespoons butter, melted and cooled slightly

Filling:
2 ounces cream cheese, room temperature
1 tablespoon grated lime zest
1 (14-ounce) can sweetened condensed milk
1 large egg yolk
½ cup key lime juice or regular juice (do not use bottled juice)

Garnish (optional):
shredded coconut, toasted until crisp

1. Adjust an oven rack to the middle position and heat the oven to 325 degrees. Cut about a 12-inch length of extra-wide heavy duty foil; fold the cut edges back to form a 7½-inch width. With the folded sides facing down, fit the foil securely into the bottom and up the sides of an 8-inch square baking pan, allowing the excess to overhang the pan sides. Spray the foil with non-stick cooking spray.

2. To make the crust: In the workbowl of a food processor, pulse the animal crackers until they’re broken down, about ten 1-second pulses; then process the crumbs until evenly fine, about 10 seconds. Add the brown sugar and salt; process to combine, ten to twelve 1-second pulses. Drizzle the butter over the crumbs and pulse until the crumbs are evenly moistened with butter, about ten 1-second pulses. Press the crumbs evenly and firmly into the bottom of the prepared pan. Bake until deep golden brown, 18 to 20 minutes. Cool on a wire rack while making the filling. Do not turn off the oven.

3. To make the filling: While the crust cools, in a medium bowl, stir the cream cheese, zest and salt with rubber spatula until softened, creamy, and thoroughly combined. Add the sweetened condensed milk and whisk vigorously until it’s incorporated and no lumps of cream cheese remain; whisk in the egg yolk. Add the lime juice and whisk gently until incorporated (the mixture will thicken slightly).

4. To assemble and bake: Pour the filling into the crust; spread to the corners and smooth the surface with a rubber spatula. Bake until set and the edges begin to pull away slightly from the sides, 15 to 20 minutes. Cool on a wire rack to room temperature, 1 to 1½ hours. Cover with foil and refrigerate until thoroughly chilled, at least 2 hours.

5. Loosen the edges with paring knife and lift the bars from the baking pan using the foil extensions; cut the bars into 16 squares. Sprinkle with toasted coconut if using, and serve. (Leftovers can be refrigerated up to two days; crust will soften slightly. Let stand at room temperature, about 15 minutes before serving.)

lime bars 4

rhubarb snack cake

rhubarb cake 5

I never got around to telling you about my New Awesome Recipe Database back when it was new. It’s still awesome. But now that it’s well over a year old and has over 1500 recipes entered into it, it definitely isn’t new.

rhubarb cake 2

I love it. I built it myself, something I’d wanted to do for at least a decade. I remember getting Microsoft Access for Dummies from the library shortly after I moved out of my parents’ house for graduate school. But without anything to really push me or anyone around to help me, the project never got off the ground. It wasn’t until I had to use databases at work that it finally clicked.

rhubarb cake 3

I seem to have a bit of a natural aptitude for them, probably because I love organizing things and playing with data. There were a couple online recipe databases I could have downloaded and built upon, but they didn’t have all of the categories and features that I was looking for, so I made my own database from scratch. And almost a year and a half later, I still absolutely love it.

rhubarb cake 8

One of the ways it’s so useful is that when the grocery store carries relatively fresh-looking rhubarb, I snatch it up whether I have a plan for it or not. And then I can go to my Not-New Awesome Recipe Database and do a search of all the recipes I’ve saved over the last few years that include rhubarb.  Narrowing down to the one that only includes ingredients I already have and can be made after work takes no time at all.  The only problem, other than the tedium of entering recipes (my goal is 6 per weekday), is that searching for recipes is so easy and fun with my database that I hardly use my beautiful and inspiring cookbook collection anymore.  Until someday, when I enter those recipes into my Awesome Recipe database, and then I’ll have the best of both worlds.

rhubarb cake 7

One year ago: Shrimp Ricotta Ravioli
Two years ago: Barbecued Pulled Pork
Three years ago: Cream Cheese Spritz
Four years ago: Orange-Oatmeal-Currant Cookies
Five years ago: Snickery Squares

Printer Friendly Recipe
Rhubarb Snack Cake (adapted from Smitten Kitchen)

Makes about 24 servings

Crumb:
1 cup (4.8 ounces) all-purpose flour
¼ cup (1.75 ounces) light brown sugar
⅛ teaspoon table salt
¼ teaspoon ground cinnamon
4 tablespoons unsalted butter, melted

Cake:
1¼ pounds rhubarb, trimmed and cut into ½-inch lengths
1 tablespoon lemon juice
1⅓ cup (9.65 ounces) granulated sugar, divided
8 ounces (1 stick) unsalted butter, softened
½ teaspoon finely grated lemon zest
2 large eggs
1⅓ cups (6.4 ounces) all-purpose flour
1 teaspoon baking powder
¾ teaspoon table salt
¼ teaspoon ground ginger
⅓ cup (2.75 ounces) sour cream

1. To make the crumb mixture: In a small bowl, whisk the flour, brown sugar, salt, and cinnamon together, then stir in the melted butter. Set aside.

2. Heat the oven to 350 degrees. Spray the bottom and sides of a 9-by-13-inch baking pan with nonstick cooking spray, then line the bottom with parchment paper, extending the lengths up two opposite sides of the pan to form a sling. In a medium bowl, stir together rhubarb, lemon juice and ⅔ cup (4.67 ounces) sugar; set aside.

3. For the cake: In the bowl of a stand mixer fitted with the paddle attachment (or in a medium-sized mixing bowl with a hand-held mixer), beat the butter, remaining ⅔ cup (4.67 ounces) sugar, and the lemon zest until light and fluffy. Add the eggs, one at a time, scraping down the sides after each addition. In a small bowl, whisk together the flour, baking powder, salt and ground ginger. Add one-third of this mixture to the batter, mixing until just combined. Continue beating, adding half of the sour cream, half of the remaining flour mixture, the remaining sour cream, and then the remaining flour mixture, mixing between each addition until just combined.

4. Spread the batter in the prepared pan. Pour the rhubarb mixture over the batter, spreading it into an even layer. Scatter the crumbs evenly over the rhubarb layer.

5. Bake the cake for 50 to 60 minutes, or until a tester comes out free of the cake batter. It will be golden on top. Cool completely in the pan on a rack. To serve, use the parchment sling to remove the cake from the pan; cut into 2-inch squares.

rhubarb cake 6

whole wheat biscotti with pistachios, apricots, chocolate, and lavender

pistachio apricot biscotti 7

Sometimes you want the comfortable and familiar. You want brownies. You want vanilla or strawberry ice cream. And who am I to begrudge you a good ol’ chocolate chip cookie craving?

pistachio apricot biscotti 1

Sometimes, though, maybe you want something more interesting, maybe even a bit challenging. You want something more adult. But you should keep the chocolate. This is dessert we’re talking about here, a treat, not a chore.

pistachio apricot biscotti 3

For those times, you can add fruit. Nuts, maybe. Use whole grains and unrefined sugar. Add…flowers?  Why not?

pistachio apricot biscotti 4

I made a half batch of these for a gathering of myself, Dave, and two of our guy friends. They were all gone (except one, which was perfect with coffee the next morning) by the end of the evening, and I swear I didn’t eat them all myself! Grown-up food isn’t so bad.

pistachio apricot biscotti 5

One year ago: Ginger Fried Rice
Two years ago: Green Pea Ravioli with Lemon Broth
Three years ago: Pizza with Figs, Prosciutto, Gorgonzola, Balsamic, and Arugula
Four years ago: Pan-Roasted Asparagus
Five years ago: Sichuan Green Beans

Printer Friendly Recipe
Whole Wheat Biscotti with Pistachios, Apricots, Chocolate, and Lavender
(adapted from 5 Second Rule)

Makes 72 1-inch bites

You can probably choose one type of sugar and one type of flour. I was hedging my bets on the healthier additions.

I used 6 ounces of chocolate, and it was delicious but too much for the dough to hold onto, so I’ve reduced it slightly.

1 cup (4.8 ounces) whole wheat flour
½ cup plus 2 tablespoons (3 ounces) all-purpose flour
¼ cup (1.75 ounces) turbinado sugar
¼ cup (1.75 ounces) brown sugar
1 teaspoon baking powder
½ teaspoon salt
2 extra-large eggs
3 tablespoons olive oil
2 teaspoons vanilla extract
4 ounces (¾ cup) semisweet chocolate chips, chopped
½ cup finely diced dried apricots
½ cup pistachios, rough-chopped
1 teaspoon dried lavender

1. Heat the oven to 350 degrees. Line a baking sheet with a silicone baking mats or parchment paper.

2. In a large mixing bowl, whisk the flours, sugars, baking powder, and salt. In a separate bowl, whisk the eggs until well combined, then add the olive oil and vanilla extract. Pour the egg mixture into the flour mixture and use a rubber spatula to stir the ingredients until the dry ingredients are evenly moistened. Stir in the chocolate, apricots, pistachios, and lavender.

3. On a dry work surface, knead the dough until it’s no longer sticky. Transfer it to the prepared baking sheet and press into a ½-inch thick rectangle measuring about 10 by 6 inches. Bake for 22 to 25 minutes, or until the top no longer looks raw. Transfer the baking sheet with the dough to a cooling rack. Let dough cool for at least 5 minutes.
4. Transfer the dough to a cutting board. Cut each block into 6 long strips, then cut each strip at 1-inch intervals to form squares. Transfer the pieces back to the baking sheet. Bake for 10-14 minutes, until the squares just begin to brown at the edges. Transfer the cookies to a cooling rack to cool completely.

pistachio apricot biscotti 6

green pig macarons (green tea macarons with vanilla bean swiss meringue buttercream)

pig macarons 14

These might have come out okay in the end, but it was looking bleak at first – and in the middle, and even a bit toward the end. I might have been overly confident when I agreed to make shaped macarons, with just one previous attempt at the notoriously finicky cookie. To make matters worse, the inspiration blog entry was written in Hebrew.

pig macarons 1

I’m not the first person to make shaped macarons, but most people are using the traditional method for macarons, the one I used last year, in which egg whites are beaten with granulated sugar until stiff peaks form, then almond meal and powdered sugar are folded into the mixture. It’s fussy – the egg whites need to be aged overnight, just the right amount of folding is necessary to deflate the meringue just so, and the piped batter needs to sit at room temperature for an hour before baking. Annie promised to have a simpler, more dependable method, and I wanted to try it.

pig macarons 2

In this method, half of the egg whites are mixed into the almond meal and powdered sugar; the other half are whipped into a meringue with hot sugar syrup, then folded into the pasty almond meal mixture. The cookies are piped and baked immediately.

pig macarons 5

It sounded simple enough, but things started going wrong early on. First I ran out of almond meal, which I discovered after I’d measured out egg whites, sugar, and water to the gram. I had some slivered (not blanched; they still had skins) almonds in the pantry, so I ground those up and mixed them into the batter. One obstacle was overcome.

pig macarons 6

My next mistake was adding too much of the meringue mixture to the almond meal mixture. You’re only supposed to add as much of the meringue mixture for “thick ribbons to batter to run off the spatula”, but that required all of the meringue for me, and at that point, the batter was too loose, and the cookies spread when I piped them.

pig macarons 7

My next problem – there was always a next problem on this particular day – was trying to get the nose and ears on top of the main body of the cookie. Eventually I found that the best method seemed to be baking the plain macarons for the specified time, then piping the nose and ears on the firm surface of the cookie and rebaking them for a few minutes until the smaller portions set. The cookies seemed no worse for the extra time in the oven.

pig macarons 10

It’s a good thing that the Angry Birds pigs aren’t pristine shapes even in their original format on the game, because my cookies were anything but round, with ears of indeterminate size and shape. Sometimes the ears blended right into the rest of the cookie; sometimes the noses caved in. And by this point, my kitchen was covered in macaron batter, which, by the way, turns into concrete when it dries, and my bread dough was overrising while seemingly infinite batches of macarons hogged the oven.

pig macarons 11

The piggie faces, thankfully, were mostly saved by the addition of nostrils and pupils. Eyebrowns drawn on with a edible marker didn’t hurt either. And I think it speaks volumes about the dependability of this recipe that with all my foibles, the macarons rose enough to somewhat form those elusive foamy feet. (Not that my troubles were completely over.) But while they might not be as pristine as I had intended, the 6-year-old birthday boy didn’t seem to mind. I’m going to call this kitchen battle conquered, though it wasn’t easy.

pig macarons 13

One year ago: Chocolate Sugar Cookies
Two years ago: Fettuccini Alfredo
Three years ago: Toasted Vegetable Subs
Four years ago: Red Velvet Cake (comparison of 5 recipes)
Five years ago: Vanilla Frosting (comparison of 4 recipes)

Printer Friendly Recipe
Green Pig Macarons (Green Tea Macarons with Vanilla Bean Swiss Meringue Buttercream) (adapted from Thomas Keller and Sebastien Rouxel’s Bouchon Bakery via Annie’s Eats)

Makes 24 sandwich cookies

The very small amounts of almond meal, powdered sugar, and egg whites are for the white eyes. If you’re just making regular green tea macarons, you can skip that.

Where I went wrong with the batter was adding too much meringue. Once I got to the point where I had thick ribbons of batter, it was definitely too much meringue and the batter was too loose, spreading on the baking sheet. All I can recommend to correct this, until I gain more experience with macaron-making, is that you watch for VERY thick ribbons of batter falling off the spatula.

Green tea cookies:
212 grams almond meal, plus 16 grams
212 grams powdered sugar, plus 16 grams
1½ teaspoons matcha powder
82 and 90 grams egg whites, plus 6 grams (about 6 eggs total)
236 grams granulated sugar, plus ¼ teaspoon
158 grams water

Vanilla bean buttercream:
2 egg whites
½ cup (3.5 ounces) granulated sugar (vanilla sugar if you have it)
pinch table salt
12 tablespoons (1½ sticks) unsalted butter, softened
seeds from ½ vanilla bean
1 teaspoon vanilla extract

1. For the cookies: Preheat the oven to 350 degrees and place a rack in the middle of the oven. Line baking sheets with parchment paper. Fit one pastry bag with a ½-inch round tip and two with ¼-inch round tips (for the white eyes and the green ears and nose).

2. In a large bowl, combine the 212 grams almond meal, 212 grams powdered sugar, and matcha powder. Whisk together to blend and break up any clumps. Make a well in the center of the dry ingredients and pour in 82 grams of the egg whites. Blend the egg whites into the dry ingredients until evenly mixed. The mixture will be thick and paste-like. For the white eyes, in a small bowl, mix together the 16 grams of powdered sugar, 16 grams of almond meal, and 6 grams of egg whites.

3. Combine 236 grams granulated sugar and the water in a small saucepan over medium-high heat. When the temperature is around 210 degrees, combine the 90 gram portion of egg whites with ¼ teaspoon sugar in the bowl of a stand mixer. Begin whipping on medium-low speed. Continue whipping the whites on medium speed until they form soft peaks. If soft peaks are achieved before the syrup reaches the target temperature, reduce the speed to low to keep the whites moving.

4. Once the syrup reaches 248 degrees, immediately remove it from the heat. Increase the mixer speed to medium and pour the syrup down the side of the bowl in a slow drizzle until fully incorporated. Increase the mixer speed to medium-high and whip the meringue until stiff, glossy peaks form.

5. Add one third of the meringue mixture to the bowl with the almond mixture with the matcha. Fold in gently until the mixture is smooth. A bit at a time, gently fold in the remaining meringue until the batter is smooth and runs in thick ribbons off of the spatula. You may not need all of the meringue, so add it gradually. Repeat the process with the white batter.

6. Add most of the green batter to the pastry bag with the ½-inch tip. Hold the bag perpendicular to the baking sheet about ½-inch above the surface of the pan. Steadily pipe rounds about 1¼- to 1½-inches in diameter. The batter may create small peaks immediately after piping, but if it is the correct texture these will smooth themselves away after a minute or two. If the batter is too stiff, the peaks will remain and the tops of the shells may not be totally smooth. If the batter is too thin, the rounds will spread further.

7. For the ears: Transfer some green batter to a piping bag with a ¼-inch tip. Pipe small ears adjacent to the larger circles of batter.

8. Transfer the baking sheet to the oven and immediately reduce the temperature to 325 degrees. Bake for 9-12 minutes, until the tops are smooth and set and “feet” have formed around the bottom.

9. Transfer the white batter to a piping bag with an ⅛-inch tip. Remove the baked cookies from the oven and immediately pipe on a green nose in the middle of the circle and 2 white eyes to the side of the nose. Return the cookies to the oven for 3-4 minutes, until the nose and eyes are set. Add noses and eyes only to every other batch; the backs of the sandwiches will just need ears.

10. Transfer the baking sheet with the cookies to a cooling rack; cool 5 minutes, then peel the cookies away from the parchment and transfer to a cooling rack. Repeat as needed with the remaining batter, replacing the parchment paper with each batch, bringing the oven temperature back up to 350 degrees before baking each sheet.

11. For the buttercream: In the bowl of a stand mixer (or a large bowl if using a hand-held mixer), combine the egg whites, sugar, and salt. Set the bowl over a pot of simmering water, making sure the bottom of the bowl does not touch the water. Whisk constantly until the mixture reaches 160 degrees.

12. Fit the mixer with the whisk attachment; beat the egg white mixture on medium-high speed until stiff peaks form and it has cooled to room temperature, about 8 minutes. Reduce the mixer speed to medium and add the butter 2 tablespoons at a time, adding more once each addition has been incorporated. Increase the mixer speed to medium-high and beat until the buttercream is thick and smooth, 3-5 minutes. Add the vanilla seeds and extract; mix until incorporated.

13. To assemble: Pipe the buttercream onto the flat sides of half of the cookies. Top with the remaining cookies. Serve immediately or cover and store overnight in the refrigerator (bring to cool room temperature before serving).

Thirteen steps, and I forgot to tell you how to make the project-saving eyes and nostrils. Powdered sugar + milk + food coloring, stirred until smooth and dripped off the end of a toothpick.  Tedious, but it got the job done.

pig macarons 15

rosemary gruyere and sea salt crisps

gruyere crisps 7

Pretty much every year, I get it into my head that I want to make a big Thanksgiving-style turkey dinner. Geography doesn’t allow me to host the holiday for either my family or my in-laws, so I usually end up doing it on a random weekend in December. This time I had to wait until January. (My “insane amount of time spent in the kitchen” project for December was the Star Wars cookies, and there wasn’t time for another big project.)

gruyere crisps 2

I had some friends over, and they brought the stuffing, but the rest was up to me. I spent almost one full day of a 3-day weekend preparing as much as I could ahead of time and the greater part of the next day cooking, then entertaining. It was glorious.

gruyere crisps 3

I served these, along with glazed pecans and butternut squash phyllo cigars, as a snack before dinner (insurance against dinner being late – which, miracle of miracles, it wasn’t!). They’re a great recipe for a big meal like this, because almost all of the work can be done in advance – far in advance – and you still get to serve perfectly fresh crackers. I mixed, rolled, cut, docked, and froze the dough the weekend beforehand. The day of my dinner, all that was left to do was transfer the crackers to a baking sheet, spritz with water, and top with salt.  And beyond their convenience, their eminent snackability make these little grown-up Cheez-Its perfect for before a feast.

gruyere crisps 4

One year ago: Chickpea and Rosemary Soup
Two years ago: Curry Coconut Chickpea Soup
Three years ago: Butternut Squash Macaroni and Cheese
Four years ago: Crispy Baked Chicken Strips
Five years ago: Caramel Flan

Printer Friendly Recipe
Rosemary Gruyere and Sea Salt Crisps (from Deb Perelman’s The Smitten Kitchen Cookbook)

6 ounces (1½ cups) shredded Gruyere cheese
4 tablespoons butter
¾ cup (3.6 ounces) all-purpose flour
1 teaspoon finely minced fresh rosemary (from about 1 sprig)
¼ teaspoon fine sea salt, plus more for sprinkling

1. Combine all ingredients in a food processor, processing continuously until the mixture resembles coarse, craggy crumbs, about 2 minutes. Transfer the mixture to a large sheet of plastic wrap, gather it together into a ball, and flatten it into a thick square. Wrap in plastic wrap and chill for 15-20 minutes.

2. On a floured work surface, roll the dough to about ⅛-inch thickness. Cut the dough into 1-inch pieces. Dock each cracker with a skewer, then brush with water and sprinkle with sea salt. Transfer the crackers to a parchment- or silicone-lined baking sheet. Bake at 350 degrees for 10-12 minutes, or until the bottoms are lightly browned.

gruyere crisps 6

christmas star wars cookies

christmas all 1

I’m exceptionally proud of these cookies. Not necessarily for how they came out in the end, although I’m pleased with that too. But mostly for coming up with the idea completely on my own.

christmas vader

This is rare for me – I’m a good idea copier, and a proficient idea alterer, but a poor idea generator. I don’t even remember how I came up with the idea of Star Wars Christmas cookies, except that I wanted to send my in-laws cookies for Christmas and didn’t know how I could possibly live up to the original Star Wars cookies I sent them last spring. And, okay, maybe the picture of Darth Maul in a Santa suit on the front of the Star Wars Lego advent calendar we got our nephews for an early Christmas present helped.

christmas stormtrooper

But my creativity didn’t end with just coming up with the idea. Googling “Christmas Darth Vader”, “Christmas Yoda”, and “Christmas Stormtrooper” just showed me a few pictures of each character wearing a Santa hat. That wasn’t going to cut it, because I wanted the characters to be different.

christmas yoda

Combining the ultimate Star Wars bad guy and the ultimate Christmas good guy to make Vader Santas was a given, and the white stormtroopers would work well for snowmen. Yoda’s wide earspan would make good antlers, and hopefully the red nose would make the Rudolph idea obvious. That left Boba Fett…my least favorite of the character shapes got left with the leftover idea, and he just ended up with an elf hat.

christmas boba

It seems to have worked out, because we gave the cookies to a 4-year-old, and he identified the Star Wars/Christmas connection of each cookie immediately…except for Boba, and that’s no surprise. He’s got a red and green hat, that’s Christmassy enough. And hey, if that’s the best I can come up with, at least it was my own idea. And Rudolph Yoda’s red nose makes up for any weaknesses in the vaguely elf-like Boba.

One year ago: Herb-Roasted Pork Loin
Two years ago: Pumpkin Cinnamon Rolls
Three years ago: Twice-Baked Potatoes
Four years ago: Pumpkin Seed Brittle

christmas all 2

gingerbread cookies

gingerbread cookies 1

I have what I admit is a random prejudice against crisp, crunchy cookies. I want soft, I want tender, I want chewy. I think most people, or at least most people of my generation, agree with me, but I doubt it was always this way. Surely there was a time when crisp cookies were at least as popular as soft ones. How else would we have gingersnaps?

gingerbread cookies 8

Obviously when I went looking for a gingerbread cookie recipe, “snap” wasn’t going to be part of the title. I wanted chewy and sweet but not too sweet and spicy but not too spicy.

gingerbread cookies 6

What I got was just about the perfect cookie – by my soft cookie standards. It puffed quite a bit in the oven, but not enough to lose its shape. It could use some more spice, but that’s easy to fix next time. More importantly, it was just the right level of sweetness, and even better, perfectly chewy. At least I thought so; Dave said he prefers his ginger cookies crunchier. Unfortunately for him, the only way he’ll get snappier gingerbread cookies is to make them himself, because this recipe was too perfect for me to try another.

gingerbread cookies 2

One year ago: Pizza with Butternut Squash and Kale
Two years ago: Red Pepper Risotto
Three years ago: Steak au Poivre
Four years ago: Sausage Apple Hash

Printer Friendly Recipe
Gingerbread Cookies
(slightly adapted from Gourmet via epicurious)

Makes about 3 dozen, depending on the size of your cookie cutters

I chilled my cut cookies on the baking sheets, before baking, for about 10 minutes before transferring to the oven. This tends to help cut-out cookie retain their shape during baking, but these still puffed quite a bit.

I didn’t use the icing recipe linked here. I decorated my cookies with cream cheese frosting because it seemed easier and tastier. It was, but the cookies had to be stored in a single layer to avoid messing up the frosting.

The spices in the original recipe here were pretty mild; next time I’ll double them.

⅔ cup molasses (not robust)
⅔ cup (4.67 ounces) packed dark brown sugar
1 tablespoon ground ginger
1½ teaspoons ground cinnamon
½ teaspoon ground allspice
½ teaspoon ground cloves
2 teaspoons baking soda
16 tablespoons (2 sticks) unsalted butter, cut into tablespoon pieces
1 large egg, lightly beaten
3¾ cups (18 ounces) all-purpose flour, plus more for kneading and dusting
½ teaspoon salt

1. Bring the molasses, brown sugar, and spices to a boil in a 4- to 5-quart heavy saucepan over moderate heat, stirring occasionally; remove from heat. Stir in the baking soda (mixture will foam up), then stir in the butter 3 pieces at a time, letting each addition melt before adding next, until all of the butter is melted. Add the egg and stir until combined, then stir in the flour and salt.

2. Arrange a rack in the middle position and heat oven to 350°F. Line baking sheets with parchment paper or a silicone mat.

3. Transfer the dough to a lightly floured surface and knead, dusting with flour as needed to prevent sticking, until soft and easy to handle, 30 seconds to 1 minute. Halve the dough, wrapping one half in plastic wrap; keep at room temperature.

4. Roll out the remaining dough into a 14-inch round (⅛-inch thick) on a lightly floured surface. Cut out as many cookies as possible with cutters and carefully transfer them to the prepared baking sheets, arranging them about 1 inch apart.

5. Bake the cookies, one sheet a time, until edges are slightly darker, 8 to 10 minutes. Let the cookies cool for a couple minutes on the pan before transferring them to racks to cool completely. Make more cookies with remaining dough and scraps. Decorate cooled cookies as desired with decorating icing.

gingerbread cookies 3

chai snickerdoodles

chai snickerdoodles 5

Making a commitment to cook two pre-chosen recipes a month has been a great way to push my boundaries with the occasional challenging recipe, as well as check off some easier recipes that have been nagging me for years but I never got around to making. There’s not always a good reason that I needed the extra push, but sometimes the accountability is necessary to check that dish off the list. It’s been a great way to convince myself to try flavors I knew I would like but hadn’t quite convinced myself to make yet, like the ones in these cookies.

chai snickerdoodles 1

But. There is a problem sometimes. The problem is not that I end up making a recipe I’m not in the mood for because it’s the last day of the month, although that has happened. That’s part of the game. No, the problem is that I am then obligated to share recipes here that I don’t necessarily recommend. If I was a more organized person, I would make the recipes multiple times in the month until I had them perfect, but this is stretching my competence too far.

chai snickerdoodles 2

Instead, we have snickerdoodles that didn’t turn out just right. Which is particularly annoying, because they’re from a recipe I wholeheartedly endorsed several years ago. This time, however, they were crisp, without that light cakey bite I prefer in snickerdoodles. I can only guess that the difference is the temperature of the dough right before baking.

chai snickerdoodles 3

But this challenge was about chai, not snickerdoodles, and the chai spices were perfect. They weren’t drastically different from regular cinnamon-coated snickerdoodles, but the extra spices, especially the cardamom, made them a bit more special.  They weren’t perfect, but neither am I, so I have no choice but to share an imperfect recipe.

chai snickerdoodles 6

One year ago: Yukon Gold and Sweet Potato Gratin
Two years ago: Bacon Egg Toast Cups
Three years ago: Sopaipillas
Four years ago: Chocolate Chip Cookies (comparison of 4 recipes)

Printer Friendly Recipe
Chai Snickerdoodles (adapted from Cook’s Illustrated and The Novice Chef)

Makes about 60 cookies

Dough:
2¼ cups (11¼ ounces) unbleached all-purpose flour
2 teaspoons cream of tartar
1 teaspoon baking soda
16 tablespoons (2 sticks) unsalted butter, softened but still cool
½ teaspoon salt
1½ cups (10½ ounces) granulated sugar
2 large eggs

Chai mix for rolling dough:
4 tablespoons granulated sugar
1½ teaspoons ground cinnamon
1½ teaspoons ground cardamom
½ teaspoons ground ginger
¼ teaspoon ground cloves
¼ teaspoon nutmeg

1. Adjust oven racks to the middle position. Preheat the oven to 400 degrees. Line baking sheets with parchment paper or silicone mats. In a medium bowl, whisk together the flour, cream of tartar, baking soda and salt; set aside. In the bowl of an electric mixer fitted with the paddle attachment, cream the butter, salt, and sugar on medium speed until well combined, 1 to 1½ minutes. Scrape down the sides of the bowl, add the eggs, and beat again until combined, about 30 seconds. Add in the dry ingredients and beat at low speed until just combined, about 20 seconds.

2. In a small, shallow bowl, combine sugar and spices for rolling the dough. Stir or shake well to combine. Working with a scant tablespoon of dough each time, roll the dough into 1-inch balls. Roll the balls in the cinnamon sugar mixture and place them on the prepared baking sheets, about 2 inches apart.

3. Bake until the edges of the cookies are beginning to set and the center are soft and puffy, 8-10 minutes. Let the cookies cool on the baking sheets 2-3 minutes before transferring them to a wire rack to cool completely.

chai snickerdoodles 4