chocolate whopper malted drops (twd)

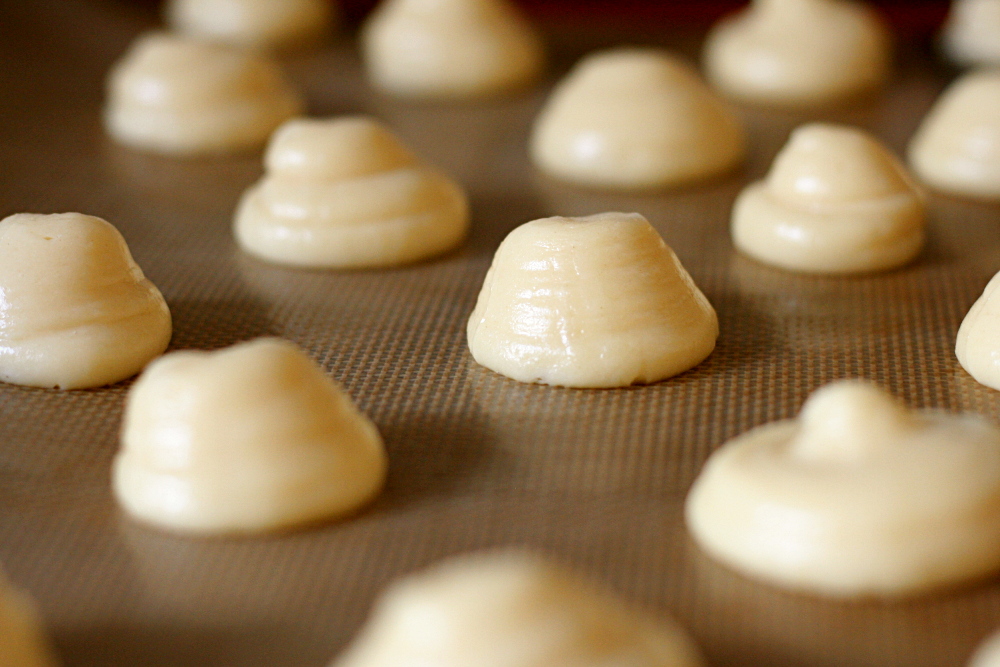
The Whopper cookies that Rachel chose for TWD are such a fun idea, and I think you’d be hard-pressed to find a recipe like this from any other source. With cocoa and malted milk powder in the dough and chopped Whoppers and chocolate chips as mix-ins, this recipe is pure Dorie.

It became clear to me right off the bat that chopping something as small and perfectly spherical as Whoppers would drive me to distraction. So instead, I dumped them in the food processor. It was risky, because food processors are far better at pulverizing than chopping, but it seemed worth it.

I was a little worried by the texture of the cookies right after they came out of the oven, because they seemed gummy. Had my partially powdered Whoppers ruined an entire batch of cookies? Fortunately, they improved greatly once they cooled, becoming pleasantly chewy and rich.

I compared batches baked right after the dough was made and baked the next day. Dave and I agreed that the batch chilled overnight was oh-so-slightly chewier with a more even texture, but that the difference was so subtle that the wait wasn’t worth it.

I thought it was a fun cookie – definitely a different idea, and a good one. Dave said they were nice, but not thrilling. Damned by faint praise.

Rachel has the recipe in her blog.

chunky peanut butter and oatmeal chocolate chipsters

I didn’t realize how picky I was about cookies until they started getting chosen for TWD recipes. First the all-too-nutritious granola grabbers, and now Stefany chooses oatmeal cookies. I’m not sure why I have a prejudice against oatmeal cookies, but I suspect it’s the raisins. I don’t hate raisins, but I don’t want them where chocolate chips should be.

But, these cookies do have chocolate chips instead of raisins. And they have peanut butter, which is never a bad thing.

What do you know, these were great! I’m think I’m over my oatmeal prejudice – there was absolutely nothing unpleasant about the oatmeal in these cookies. I also loved how the peanut butter flavor was noticeable but not overpowering.

Ever since the NY Times article about chocolate chip cookies, I’ve been experimenting with chilling cookie dough overnight before I bake it. This recipe especially lent itself to a comparison in resting-before-baking times because Dorie encourages the baker to chill the dough for 2 hours before baking. I expected ugly flat cookies from those that were baked immediately, but I was surprised to see that they baked up perfectly. Dave and I actually didn’t notice a significant difference between the cookies baked immediately and those chilled for 2 hours. In contrast, the cookies from the dough that was chilled overnight were more evenly chewy. I preferred the chewier cookies, but Dave didn’t agree with me. We don’t remember any noticeable difference in flavor.

Whether baked immediately or from chilled dough, these offer fun variety from my routine of more traditional cookies. The recipe is provided on Stefany’s site.

eclairs (daring bakers)

I was happy about Tony and Meeta’s choice of Chocolate Eclairs for this month’s Daring Baker recipe because I actually have some experience making éclairs, but I haven’t found a recipe that’s convinced me to use it faithfully. And because I’m somewhat confident in my éclair-making ability, I was comfortable tweaking the recipe.

When I was in college, there was a dessert shop nearby that made the best mini-cream puffs. My friends and I went there at least once per week, and sometimes I would bypass all of the beautiful and tempting cakes and pies so that I could have just a pile of little cream puffs. But usually I would get a wonderful slice of chocolate layer cake with a cream puff on the side. I could never resist those cream puffs. Those mini-cream puffs are what I strived to recreate with this recipe.

I used the chocolate glaze recipe suggested by Tony and Meeta.  The glaze was very good, although the recipe is perhaps unnecessarily complicated, requiring a chocolate sauce to be made first, which is then used as an ingredient in the chocolate glaze. I’m assuming this is only because Pierre Herme assumes that anyone who owns his book Chocolate Desserts will keep a supply of the chocolate sauce around. It was a good glaze, and I may use it in the future, but I’ll condense the steps to bypass the separate sauce-making process.

I used a raspberry pastry cream filling instead of the chocolate pastry cream that Herme suggests. While I suppose that all’s well that ends well, it’s not a recipe that I would recommend to others. I simply took my favorite vanilla pastry cream recipe and mixed in raspberry puree at the end. Unfortunately, there was too much puree and the pastry cream never set. I tried some other stuff, but ultimately I had to dissolve some gelatin in half-and-half and mix that in to stabilize the cream enough to be piped.

One thing I’ve never liked about regular-sized cream puffs and éclairs is how they have to be cut in half, filled, and stuck back together. I wanted to fill my miniature cream puffs without cutting them open, so I put my pastry cream into a bag with a simple round tip and squeezed pastry cream into the cream puffs through a small hole in the bottom. It wasn’t completely successful – the inside of the cream puffs were often split into two or more large portions, and only one portion got filled with this method. I think I could also squirt pastry cream into the cream puff from a hole in the top, which will then be covered with glaze.

These were the best cream puffs I’ve ever made. I do want to tweak the dough recipe, and obviously the pastry cream was kind of a bust, but they were the perfect size and so easy to eat. Every time I’ve made éclairs I’ve gotten better at it, and I hope next time it’ll be just perfect.

Pierre Hermé’s Chocolate Éclairs (adapted from Chocolate Desserts by Pierre Hermé, except for the pastry cream, which is adapted from Cooks Illustrated)

The pastry cream didn’t work out. But I already had the recipe written down and don’t want redo it.

Makes 20-24 eclairs

Cream Puff Dough:
½ cup (125g) whole milk
½ cup (125g) water
1 stick (4 ounces; 115 g) unsalted butter, cut into 8 pieces
¼ teaspoon sugar
¼ teaspoon salt
1 cup (140 g) all-purpose flour
5 large eggs, at room temperature

Raspberry Pastry Cream:
6 ounces raspberries
2 cups half-and-half
½ cup granulated sugar
pinch table salt
5 large egg yolks,
3 tablespoons cornstarch
4 tablespoons unsalted butter (cold), cut into 4 pieces
1½ teaspoons vanilla extract

Chocolate Sauce:
0.9 oz (26 g) bittersweet chocolate, finely chopped
3 tablespoons (50 g) water
5 teaspoons (25 g) crème fraîche or heavy cream
1 tablespoon (14 g) sugar

Chocolate Glaze:
⅓ cup (80 g) heavy cream
3½ ounce (100 g) bittersweet chocolate, finely chopped
4 teaspoon (20 g) unsalted butter, cut into 4 pieces, at room temperature
7 tablespoon (110 g) Chocolate Sauce, warm or at room temperature

For the éclairs:
1. Preheat your oven to 375 degrees F (190 degrees C). Divide the oven into thirds by
positioning the racks in the upper and lower half of the oven. Line two baking sheets with
waxed or parchment paper.

2. In a heavy bottomed medium saucepan, bring the milk, water, butter, sugar and salt to the boil.

3. Once the mixture is at a rolling boil, add all of the flour at once, reduce the heat to medium and start to stir the mixture vigorously with a wooden spoon. The dough comes together very quickly. Do not worry if a slight crust forms at the bottom of the pan, it’s supposed to. You need to carry on stirring for a further 2-3 minutes to dry the dough. After this time the dough will be very soft and smooth.

4. Transfer the dough into a bowl of a mixer fitted with the paddle attachment, or using your hand mixer or if you still have the energy, continue by hand. Add the eggs one at a time, beating after each egg has been added to incorporate it into the dough. You will notice that after you have added the first egg, the dough will separate, once again do not worry. As you keep working the dough, it will come back all together again by the time you have added the third egg. In the end the dough should be thick and shiny and when lifted it should fall back into the bowl in a ribbon. (Once the dough is made you need to shape it immediately. Or, you can pipe the dough and the freeze it. Simply pipe the dough onto parchment-lined baking sheets and slide the sheets into the freezer. Once the dough is completely frozen, transfer the piped shapes into freezer bags. They can be kept in the freezer for up to a month.

5. Fill a large pastry bag fitted with a 2/3-inch (2cm) plain tip nozzle with the warm cream puff dough. Pipe the dough onto the baking sheets in long, 4 to 4½ inches (about 11 cm) chubby fingers. Leave about 2 inches (5 cm) space in between each dough strip to allow them room to puff. The dough should give you enough to pipe 20-24 éclairs.

6. Slide both the baking sheets into the oven and bake for 7 minutes. After the 7 minutes, slip the handle of a wooden spoon into the door to keep it ajar. When the éclairs have been in the oven for a total of 12 minutes, rotate the sheets top to bottom and front to back. Continue baking for a further 8 minutes or until the éclairs are puffed, golden and firm. The total baking time should be approximately 20 minutes. (The éclairs can be kept in a cool, dry place for several hours before filling.)

For the pastry cream:
7. While the éclairs are baking, set a mesh strainer over a medium bowl. Add the raspberries to the strainer and use a spoon to mash them and press them through the strainer to create a seedless raspberry puree.

8. Heat half-and-half, 6 tablespoons sugar, and salt in medium heavy-bottomed saucepan over medium heat until simmering, stirring occasionally to dissolve sugar.

9. Meanwhile, whisk egg yolks in medium bowl until thoroughly combined. Whisk in remaining 2 tablespoons sugar and whisk until sugar has begun to dissolve and mixture is creamy, about 15 seconds. Whisk in cornstarch until combined and mixture is pale yellow and thick, about 30 seconds.

10. When half-and-half mixture reaches full simmer, gradually whisk simmering half-and-half into yolk mixture to temper. Return mixture to saucepan, scraping bowl with rubber spatula; return to simmer over medium heat, whisking constantly, until 3 or 4 bubbles burst on surface and mixture is thickened and glossy, about 30 seconds. Off heat, whisk in butter and vanilla. Strain the pastry cream through a fine-mesh sieve set over a medium bowl. Stir in the raspberry puree. Press plastic wrap directly on surface, and refrigerate until cold and set, at least 3 hours or up to 48 hours.

For the chocolate sauce:
11. Place all the ingredients into a heavy-bottomed saucepan and bring to a boil, making sure to stir constantly. Then reduce the heat to low and continue stirring with a wooden spoon until the sauce thickens.

12. It may take 10-15 minutes for the sauce to thicken, but you will know when it is done when it coats the back of your spoon. (You can make this sauce ahead of time and store it in the refrigerator for two weeks. Reheat the sauce in a microwave oven or a double boiler before using.)

For the chocolate glaze:
13. In a small saucepan, bring the heavy cream to a boil. Remove from the heat and slowly begin to add the chocolate, stirring with a wooden spoon or spatula.

14. Stirring gently, stir in the butter, piece by piece, followed by the chocolate sauce. (If the chocolate glaze is too cool (i.e. not liquid enough) you may heat it briefly in the microwave or over a double boiler.)

For the assembly:
15. Slice the éclairs horizontally, using a serrated knife and a gently sawing motion. Set aside the bottoms and place the tops on a rack over a piece of parchment paper.

16. The glaze should be barely warm to the touch (between 95 – 104 degrees F or 35 – 40 degrees C, as measured on an instant read thermometer). Spread the glaze over the tops of the éclairs using a metal icing spatula. Allow the tops to set and in the meantime fill the bottoms with the pastry cream.

17. Pipe or spoon the pastry cream into the bottoms of the éclairs. Make sure you fill the bottoms with enough cream to mound above the pastry. Place the glazed tops onto the pastry cream and wriggle gently to settle them.

18. The éclairs should be served as soon as they have been filled.

chocolate banded ice cream torte

Oh, I’ve been looking forward to someone picking this recipe for a while. I’m so glad Amy chose it for TWD this week. Alternating layers of rich dark chocolate and creamy tart raspberry ice cream sounds like a winning combination to me.

It was also great timing, because it was chosen shortly after I got The Perfect Scoop, so instead of trying to squeeze in an ice cream recipe between all the TWD and Daring Baker desserts plus my insatiable craving for chocolate chip cookies (dough, actually), I was able to make a David Lebovitz recipe for TWD. The book has so many recipes that I’m interested in trying, but of course I was limited by what would go with the chocolate. I decided that Blackberry Swirl Ice Cream was at least somewhat fun and new, and it was similar but not identical to the raspberry ice cream Dorie suggests.

The torte may look fancy, but the recipe isn’t much work to put together. The chocolate mixture was easy to make, so it was just an issue of waiting around for each layer to freeze solid enough before adding the next layer. I worked on it while I slow-roasted some cherry tomatoes.

One thing I thought was odd about this recipe was that Dorie keeps referring to the chocolate portion as “ganache.” I’ve always thought ganache was just chocolate and cream mixed together, but the recipe included only chocolate, butter, sugar, and eggs – basically brownie batter without the flour. I did some scouting around the internet, and all I came up with was ganache = chocolate + cream. So ganache doesn’t seem like to right word to use, but maybe someone who knows more about pastry can enlighten me.

Dictation aside, I liked the torte even more than I thought I would. Unfortunately, the ice cream didn’t have enough blackberry flavor to stand up to the chocolate. Dave didn’t even know I had used the blackberry ice cream until I told him, after he’d eaten his slice. The only other thing about this torte that I wasn’t really thrilled about was the texture of the chocolate portion. It seemed a little gummy. I wonder if reducing the number of eggs would help? I know some people had problems with their torte being too hard to slice, but my freezer is apparently weak. If the eggs are there to keep the chocolate soft enough to slice, I could stand to lose a few.

Regardless, yum. This is an impressive, easy, and creative dessert. The recipe is posted on Amy’s site.

blackberry swirl ice cream

I recognize, as I think most food bloggers do, that there are copyright issues with what we do. It’s all well and good to put a note saying where we got the recipe, but ultimately, it’s often unlawful to reprint the recipe at all. There are loopholes, of course. Rumor has it that ingredient lists can’t be copyrighted, so if the instructions are rewritten in our own words instead of the original author’s, everything is supposedly okay. But I’m generally too lazy to rewrite the instructions.

Cookbooks authors can respond to the copyright issue however they see fit. They can try to fight each of however many thousands of food bloggers are out there copying recipes, or they can do what I think is wiser – adopt the “if you can’t beat ‘em, join ‘em” mentality. Both David Lebovitz and Dorie Greenspan have clearly chosen to join us. They are both good about leaving comments on other blogs, in addition to keeping up their own blogs. Dorie has supported Tuesdays with Dorie from the beginning, when over a hundred bloggers published her recipes every single week. As well she should – I would not have bought, or even heard of, Dorie’s famous book if not for food blogs.

Neither would I have bought (or heard of) David’s The Perfect Scoop. Food bloggers love David, and while it is nice that he leaves comments on other blogs, what it always has to come down to is the quality of the recipes. David isn’t known as the master of homemade ice cream without reason.

The day before I decided to buy this book, I was saying that as much as I like ice cream, it’s just not as fun for me as baking with flour and butter and the oven. Furthermore, David has so many recipes on his website that I questioned whether I needed an ice cream book at all.

Um, apparently I do. For one thing, The Perfect Scoop is stuffed full of interesting ice cream recipes that I would never have considered trying but now can’t wait to make, including Guinness-Milk Chocolate, Olive Oil, Fresh Fig, Green Apple and Sparkling Cider, and I could go on and on. But the real reason I decided to buy the book can be attributed to a savvy move on David’s part and how cookbook authors can take advantage of having a food blog – he has a recipe for basic vanilla ice cream on his website. I’ve tried it. It is the best vanilla ice cream I’ve made, out of 4-5 recipes by some of my favorite recipe writers. So now not only do I have this book full of interesting recipes, but I have good evidence that the recipes will actually be good.

This blackberry swirl ice cream is a basic vanilla recipe with crushed blackberries swirled in. This certainly isn’t the most original recipe in the book, but I needed something that would go with chocolate for the next TWD recipe. Dave (um, my husband, not Lebovitz this time) loves blackberries and they’re at their peak right now.

It was as good as I expected. Dave and I agree that we might prefer a bit more blackberries stuffed in there, but we’re big fruit people, so that’s no surprise. Other than that, the vanilla portion was creamy, the blackberry portion was balanced between sweet and tart, the ice cream was beautiful, and the directions for the recipe were clear. I’m as excited as ever about this book.

Blackberry Swirl Ice Cream (from David Lebovitz’s The Perfect Scoop)

Ice cream:
1 cup whole milk
⅔ cup (4.6 ounces) sugar
pinch salt
1½ cups heavy cream
5 large egg yolks
½ teaspoon vanilla extract

Blackberry swirl:
1½ cups (5.6 ounces) blackberries, fresh or frozen
3 tablespoons sugar
1 tablespoon vodka
1 teaspoon lemon juice

1. To make the ice cream, warm the milk, sugar, and salt in a medium saucepan. Pour the cream into a large bowl and set a mesh strainer over the top.

2. In a separate medium bowl, whisk together the egg yolks. Slowly pour the warm milk into the egg yolks, whisking constantly, then scrap the warmed egg yolks back into the saucepan.

3. Stir the mixture constantly over medium heat with a heatproof spatula, scraping the bottom as your stir, until the mixture thickens and coats the spatula. Pour the custard through the strainer and stir it into the cream. Add the vanilla and stir until cool over an ice bath. Chill thoroughly in the refrigerator.

4. An hour or so before churning the ice cream, make the blackberry swirl by mash the blackberries together with the sugar, vodka, and lemon juice with a fork (if you using frozen blackberries, let them thaw a bit first) until they’re juicy but with nice-sized chunks of blackberries remaining. Chill until ready to use.

5. Freeze the ice cream custard in your ice cream maker according to the manufacturer’s instructions. As you remove it from the machine, layer it in the container with spoonfuls of the chills blackberry swirl mixture.

granola grabbers (twd)

No classic cookie recipes have been chosen for TWD since I joined. I like making cookies, so I was looking forward to Michelle’s choice for this week.

With all of the ingredients in this recipe, I thought at first that they’d be similar to Magic Cookie Bars. And then I looked closer at the recipe – 3 cups of granola and almost 3 more cups of other healthy-ish stuff compared to only 1 cup of flour. These were some sort of melding of granola bars and cookies. Hmm…that sounds…healthy.

And it tasted healthy. Too much granola! Too many raisins (any raisins in cookies is too many), too many nuts. I added 1 cup of chocolate chips to the recipe, and it was the saving grace. It also might have caused some problems – the cookies were a little crumbly, I think because there was just too many add-ins, and not enough dough to hold them together.

Dave and some other friends are going backpacking this weekend, so I baked (most of) the cookies as bar cookies, which hold up better with being squashed at the bottom of a pack. Unfortunately, in a rare move for me, I made the whole recipe. I was only able to pawn about half of that off on the backpackers, so I threw the rest in the freezer until further notice. I have a feeling they’re going to get sent to Iraq, which I feel kind of bad about, but I just don’t know what else to do with them. They’re not bad, they’re not good enough to bother eating. Plus, they’re not healthy – they just taste like it.

If you’d like to check out the recipe, Michelle has posted it.

black (and pink) and white chocolate cake

I thought long and hard about what to make for my birthday cake. The thing about this obsessed-with-baking phase that I’m going through is that the eating of the cake is almost secondary to the fun of making it. I had a fairly long list of desserts I was considering, split almost evenly between cheesecakes and somewhat-elaborate layer cakes. I settled on Dorie Greenspan’s Black and White Chocolate Cake because it seemed like a good balance between fancy and not so much work that I’d spend all day (the day before my birthday) baking. Or so I had hoped.

The cake consists of a straightforward buttermilk-vanilla cake, layered with chocolate pastry cream and vanilla cream. The chocolate pastry cream was easy and delicious, and the cake itself came together without any problems.

The white chocolate cream, unfortunately, was not so smooth (literally). This was one of the first TWD recipes, back when there were only a handful of members, so I had scanned a few of their entries and seen that the white chocolate cream might be a problem. I knew enough to use high quality white chocolate, which is less prone to problems in baking than cheaper versions. Valrhona and Guittard are recommended most often, but both require a special, out-of-my-way trip to either Whole Foods or Williams-Sonoma, and I’ve had good experiences with Green and Black’s White Chocolate, which is available at my regular grocery store.

The white chocolate cream is made by melting white chocolate with cream, then adding that mixture to cream that’s been whipped to very soft peaks and continuing to beat until firm peaks are achieved. Firm peaks. Not stiff peaks. I guess I should have considered the difference between those two more carefully. I knew, knew, that there was the potential to overbeat the mixture and cause curdling, and I was so careful, only beating for about a second at a time, then checking the consistency. I was waiting until the peaks could hold their shape.

But the mixture curdled first. I tried to save it, the same way I’ve saved curdled buttercream in the past, and I thought for a while that it might work, but it didn’t. I kicked myself over and over for not stopping whipping the cream mixture early enough. Then I mentally berated Dorie for not being more specific. She gives such wonderful detailed instructions sometimes, describing exactly what the food processor should sound like when tart dough is ready, but she can’t add a warning about this “firm peaks” issue. Bleah.

Even if I’d had the right ingredients, which I didn’t, I wasn’t enthusiastic about trying the white chocolate cream again. Instead, I made a white chocolate buttercream. But I accidentally only made enough to give the cake the thinnest of coatings. I was tired of dealing with fussy white chocolate, and I’d already incorporated raspberries into the cake, so then I made another buttercream, this time flavored with raspberries. But I was frustrated and bored by this time, so I screwed up the buttercream, twice (cooked the egg whites), because of I was inattentive.

So much for my relatively straightforward cake. To assemble, I mixed a portion of the white chocolate buttercream with some raspberry pastry cream I had leftover from another project, and used that as the white chocolate layer in the cake. I used the white chocolate buttercream as a crumb coat and the raspberry buttercream as a final layer.

I wasn’t disappointed in the final product. For one thing, it was really pretty. The cake itself was tasty, although it probably could have used a quick brush with a simple syrup. The dark chocolate pastry cream was fantastic. I wasn’t totally happy with either the white chocolate or the raspberry buttercream, but neither detracted from the final product, even if they didn’t add much. All in all, a satisfactory birthday cake.

Black and White Chocolate Cake (from Dorie Greenspan’s Baking: From My Home to Yours)

Makes 10 servings

For the Cake
2 cups cake flour
2 teaspoons baking powder
⅛ teaspoon baking soda
¼ teaspoon salt
1¼ sticks (10 tablespoons) unsalted butter, at room temperature
1 cup sugar
3 large eggs
1 large egg yolk
1 teaspoon pure vanilla extract
¾ cup buttermilk

For the Dark Chocolate Cream
2 cups whole milk
4 large egg yolks
6 tablespoons sugar
3 tablespoons cornstarch, sifted
¼ teaspoon salt
7 ounces bittersweet chocolate, melted
2½ tablespoons unsalted butter, cut into 5 pieces, at room temperature

For the White Chocolate Whipped Cream
6 ounces premium-quality white chocolate (such as Valrhona Ivoire or Guittard), finely chopped
1½ cups heavy cream

Chocolate shavings or curls, dark or white or a combination, for decoration (optional)

Getting Ready:
Center a rack in the oven and preheat the oven to 350 degrees F. Butter two 9-x-2-inch round cake pans, dust the insides with flour, tap out the excess and line the bottoms of the pans with parchment or wax paper. Put the pans on a baking sheet.

To Make the Cake:
Sift together the cake flour, baking powder, baking soda, and salt.

Working with a stand mixer, preferably fitted with a paddle attachment, or with a hand mixer in a large bowl, beat the butter on medium speed until soft and creamy. Add the sugar and beat for another 3 minutes. Add the eggs one by one, and then the yolk, beating for 1 minute after each addition. Beat in the vanilla; don’t be concerned if the mixture looks curdled. Reduce the mixer speed to low and add the dry ingredients alternately with the buttermilk, adding the dry ingredients in 3 additions and the milk in 2 (begin and end with the dry ingredients); scrape down the sides of the bowl as needed and mix only until the ingredients disappear into the batter. Divide the batter evenly between the two pans and smooth the tops with a rubber spatula.

Bake for 28 to 30 minutes, rotating the pans at the midway point. When fully baked, the cakes will be golden and springy to the touch and a thin knife inserted into the centers will come out clean. Transfer the cakes to a rack and cool for about 5 minutes, then unmold, remove the paper and invert to cool to room temperature right side up on the rack.

To Make the Dark Chocolate Cream:
Bring the milk to a boil.

Meanwhile, in a large heavy-bottomed saucepan, whisk the egg yolks with the sugar, cornstarch and salt until thick and well blended. Whisking without stopping, drizzle in about ¼ cup of the hot milk – this will temper, or warm, the yolks so they won’t curdle – then, still whisking, add the remainder of the milk in a steady stream. Put the pan over medium heat and, whisking vigorously, constantly and thoroughly (make sure to get into the edges of the pan), bring the mixture to a boil. Keep at a boil, still whisking, for 1 to 2 minutes. Remove the pan from the heat.

Whisk in the melted chocolate, and let stand for 5 minutes. Then whisk in the pieces of butter, stirring until they are fully incorporated and the chocolate cream is smooth and silky. Press a piece of plastic wrap against the surface of the cream to create an airtight seal and refrigerate the cream until chilled, or for up to 3 days. Or, if you want to cool the cream quickly, put the bowl with the cream into a large bowl filled with ice cubes and cold water and stir the cream occasionally until it is thoroughly chilled, about 20 minutes.

To Make the White Chocolate Whipped Cream:
Put the white chocolate in a heatproof bowl and put the bowl over a saucepan of gently simmering water. Stir frequently to melt the chocolate evenly. Meanwhile, bring ½ cup of the heavy cream to a boil.

When the white chocolate is melted, remove the bowl from the pan. Pour the hot cream into the melted chocolate and let it sit for a minute. Using a small spatula, stir the chocolate gently until it is smooth. Let it sit on the counter until it reaches room temperature – it can’t be the least bit warm when you add it to the whipped cream.

Working with the stand mixer with the whisk attachment or with a hand mixer in a large bowl, beat the remaining 1 cup heavy cream only until it holds the softest peaks. Turn the machine to high, add the cooled white chocolate all at once and continue to beat until the whipped cream holds firm peaks. Turn the whipped cream into a bowl, press a piece of plastic wrap gently against the surface to create an airtight seal and refrigerate for at least 2 hours, or up to 6 hours.

To Assemble the Cake:
If the tops of the cake layers have crowned, use a long serrated knife and a gentle sawing motion to even them. Slice each layer horizontally in half. Place one layer cut side down on a cardboard cake round or on a cake plate protected by strips of wax or parchment paper.

Remove the dark and white chocolate creams from the refrigerator and whisk each of them vigorously to loosen and smooth them. With a long metal icing spatula, spread enough dark chocolate cream (about 1 cup) over the cake layer to cover it completely. Top the cream with another cake layer, cut side up, and cover this layer with white chocolate whipped cream, making the white layer about the same thickness as the dark layer. Cover with a third layer, cut side up, and cover with another cup or so of the dark chocolate cream. (You’ll have some dark chocolate cream left over – use it as a dip for madeleines or sables.) Top with the final layer of cake, cut side down, and frost the sides and top with the remaining white chocolate whipped cream. If you’d like to decorate the top with chocolate shavings or curls, do it now.

Refrigerate for at least 3 hours, or overnight.

Serving: Remove the cake from the fridge about 20 minutes before serving. Use a serrated knife and a gentle sawing motion to cut it. Though the cake is particularly good with coffee or tea, it also goes well with a sweet or sparkling dessert wine.

Storing: While both the dark chocolate cream and white chocolate cream can be made ahead and kept tightly covered in the refrigerator, once assembled, the cake is best after about 3 hours in the fridge. However, it can be refrigerated overnight – just cover it loosely and keep it away from foods with strong odors.

The Raspberry Buttercream is the same recipe used for Dorie’s Perfect Party Cake, with raspberry puree substituting for the lemon juice. The White Chocolate Buttercream is the ingredients in this recipe using the method for Dorie’s buttercream.

blueberry sour cream ice cream (twd)

The blueberry sour cream ice cream that Dolores chose for TWD this week sounded interesting, and I wasn’t really sure how I’d feel about it. I had never tried sour cream in ice cream, or even really heard of it being used. I remember mixing sour cream into whipped cream for the cream puff filling and being surprised by how much I liked it, so I had high hopes for this ice cream.

The recipe itself was very simple. Bring sugar, berries, and lemon to a simmer, blend it with heavy cream and sour cream, chill, and churn. No one seemed to have any problems putting the recipe together this week, so that’s something. A few people even went ahead and made it without an ice cream maker.

I really liked it. Dave thought it was too sour creamy, but that might be my fault – I told him it was blueberry ice cream, and he said that the sour cream detracted from the blueberry flavor. But this is definitely blueberry sour cream ice cream – the sour cream gets equal billing with the blueberries.

The texture was smooth, not grainy at all. Some other TWD members have complained that the ice cream was too rich and left an unpleasant coating behind each bite, but I don’t really agree.

The ice cream admittedly isn’t a classic choice; the sour cream flavor definitely stands out. But I thought it was really good, and I enjoyed trying something different. Plus, it’s super easy.

Check out the recipe on Dolores’ site.

black and white banana loaf (twd)

I couldn’t figure out at first whether the banana loaf Ashlee chose for TWD this week was supposed to be a cake or a quick bread. Eventually I realized that it’s in the cake section of the book, only a few pages after the pound cake recipe. But that didn’t stop me from baking it in a muffin pan.

Other TWD members had a lot of problems with this recipe, claiming that the batter was too liquidy. I didn’t really have any issues, although the batter was curdled at the end and looked really gross. Also – for something that I thought would be pretty straightforward, this used a surprising amount of dishes.

My correctly-sized loaf pan is in the freezer full of mushroom lasagna, so I had to bake the recipe in smaller dishes. That meant I could play around with some different methods of combining the batters. I was eager to try polka-dots.  It was fairly successful; I think they’d work better in a larger pan, but this was a good learning experience.

But I thought it was really good. Dave said that it was good but not something that he’d ever really ask me make, so I must have liked it more than he did. I thought the little cakes had a nice texture – they’re really moist, but also nice and firm. The banana flavor is pretty subtle, which I don’t prefer in banana bread, but I liked in this cake.

The recipe can be found on Ashlee’s blog.

filbert gateau with praline buttercream (daring bakers)

There were a lot of similarities between the Filbert Gateau that Chris chose for this month’s Daring Baker challenge and the opera cake we made a few months ago. This works out well for me, because I could definitely use the cake-building practice. And I don’t know if I’m getting better at this whole baking thing or what, but this cake came together quite nicely for me.

I made the entire opera cake, from start to finish, in one day. I thought it would be fun, and while there were fun aspects, by the end, I never wanted to bake again (for two days). This time I got smart and did at least a small portion of the recipe ahead of time. There was still a good amount of baking to be done on the final day – most of the cake, the buttercream, the ganache, and the assembly, but it was manageable and fun.

The only part of the recipe that gave me fits was the praline. I have made caramel so many times before with nary a problem. But this time, I screwed it up four times in a row. I tried different methods, but each time, sugar crystals formed, interrupting my smooth caramel. I never did get it right – on the last attempt, there were only a few crystals in the liquid, and I decided that it would be a good learning experience for me to see what a screwed-up caramel was like. (How’s that for justification?) It turns out that screwed-up caramel is opaque and looks milky instead of being shiny and amber-colored and jewel-like. The taste was fine though, and I was grinding a good portion of it into paste anyway.

Everything else went smoothly. This was my most successful experience with these light egg-leavened cakes. But cutting the cake into layers created a lot of crumbs. I think I’ve heard that if I refrigerate or partially freeze the cake (wrapped well with plastic, I assume), it makes this process easier with no detrimental effects on the cake? Is this true?

This is the first time I’ve covered a cake with chocolate ganache. It’s not as smooth on the sides as I’d prefer, which I think is because my cake had fallen in the middle just a bit, so a lot of the ganache pooled there and there wasn’t as much to cover the sides. Even with my less-than-perfect coating, I think ganache makes for an impressive presentation.

Dave and I both enjoyed the flavor of the cake as well. The unsweetened whipped cream in between layers kept the cake from being too sweet, and the bittersweet chocolate was the perfect contrast to the sweet cake and buttercream. The cake wasn’t as praliney as I might have liked though. I wonder if I could mix in more praline paste with the buttercream? In the end though, this was a great learning experience and a lot of fun, with tasty results.

Filbert Gateau with Praline Buttercream (from Great Cakes, by Carol Walter)

Makes 1 10-inch cake, about 12 servings

1 Filbert Genoise
1 recipe sugar syrup, flavored with dark rum
1 recipe Praline Buttercream
½ cup heavy cream, whipped to soft peaks
1 recipe Apricot Glaze
1 recipe Ganache Glaze, prepared just before using

Filbert Genoise
Because of the amount of nuts in the recipe, this preparation is different from a classic genoise.

1½ cups hazelnuts, toasted/skinned
⅔ cup (2.65 ounces) cake flour, unsifted
2 tablespoons cornstarch
7 large egg yolks
1 cup (7 ounces) sugar, divided ¼ and ¾ cups
1 teaspoon vanilla extract
½ teaspoon grated lemon rind
5 large egg whites
¼ cup warm, clarified butter (100 – 110 degrees)

Position rack in the lower 3rd of the oven and preheat to 350 degrees. Grease and flour a 10″ X 2″ inch round cake pan.

Using a food processor, process nuts, cake flour, and cornstarch for about 30 seconds. Then, pulse the mixture about 10 times to get a fine, powdery mixture. You’ll know the nuts are ready when they begin to gather together around the sides of the bowl. While you want to make sure there aren’t any large pieces, don’t over-process. Set aside.

Put the yolks in the bowl of an electric mixer, with the whisk attachment, and beat until thick and light in color, about 3-4 minutes on med-high speed. Slowly, add ¾ cup of sugar. It is best to do so by adding a tablespoon at a time, taking about 3 minutes for this step. When finished, the mixture should be ribbony. Blend in the vanilla and grated lemon rind. Remove and set aside.

Place egg whites in a large, clean bowl of the electric mixer with the whisk attachment and beat on medium speed, until soft peaks. Increase to med-high speed and slowly add the remaining ¼ cup of sugar, over 15-20 seconds or so. Continue to beat for another ½ minute. Add the yolk mixture to the whites and whisk for 1 minute.

Pour the warm butter in a liquid measure cup (or a spouted container). Put the nut meal in a mesh strainer (or use your hand – working quickly) and sprinkle it in about 2 tablespoons at a time – folding it carefully for about 40 folds. Be sure to exclude any large chunks/pieces of nuts. Again, work quickly and carefully as to not deflate the mixture. When all but about 2 tablespoons of nut meal remain, quickly and steadily pour the warm butter over the batter. Then, with the remaining nut meal, fold the batter to incorporate, about 13 or so folds.

With a rubber spatula, transfer the batter into the prepared pan, smoothing the surface with the spatula or back of a spoon. (If collected butter remains at the bottom of the bowl, do not add it to the batter! It will impede the cake rising while baking.)

Tap the pan on the counter to remove air bubbles and bake in the preheated oven for 30-35 minutes. You’ll know the cake is done when it is springy to the touch and it separates itself from the side of the pan. Remove from oven and allow to stand for 5 minutes. Invert onto a cake rack sprayed with nonstick coating, removing the pan. Cook the cake completely.

*If not using the cake right away, wrap thoroughly in plastic wrap, then in a plastic bag, then in the refrigerator for up to 3 days. If freezing, wrap in foil, then the bag and use within 2-3 months.

Sugar Syrup
Makes 1 cup, good for one 10-inch cake – split into 3 layers

1 cup water
¼ cup (1.75 ounces) sugar
2 tablespoons dark rum or orange flavored liqueur

In a small, yet heavy saucepan, bring the water and sugar to a boil and simmer for 5 minutes. Remove from heat, add the liqueur. Cool slightly before using on the cake. *Can be made in advance.

Praline Buttercream
1 recipe Swiss Buttercream
⅓ cup praline paste
1½-2 tablespoons Jamaican rum (optional)

Blend ½ cup buttercream into the paste, then add to the remaining buttercream. Whip briefly on medium-low speed to combine. Blend in rum.

Swiss Buttercream
4 large egg whites
¾ cup sugar
1½ cups (3 sticks) unsalted butter, slightly firm
1½-2 tablespoons Grand Marnier or liqueur of your choice
1 teaspoon vanilla

Place the egg whites in the bowl of a electric mixer and beat with the whisk attachment until the whites are foamy and they begin to thicken (just before the soft peak stage). Set the bowl over a saucepan filled with about 2 inches of simmering water, making sure the bowl is not touching the water. Then, whisk in the sugar by adding 1-2 tablespoons of sugar at a time over a minutes time. Continue beating 2-3 minutes or until the whites are warm (about 120 degrees) and the sugar is dissolved. The mixture should look thick and like whipped marshmallows.

Remove from pan and with either the paddle or whisk attachment, beat the egg whites and sugar on medium-high speed until it’s a thick, cool meringue – about 5-7 minutes. (Do not overbeat). Set aside.

Place the butter in a separate clean mixing bowl and, using the paddle attachment, cream the butter at medium speed for 40-60 seconds, or until smooth and creamy. (Do not overbeat or the butter will become too soft.)

On medium-low speed, blend the meringue into the butter, about 1-2 tablespoons at a time, over about 1 minute. Add the liqueur and vanilla and mix for 30-45 seconds longer, until thick and creamy.

Refrigerate 10-15 minutes before using.

Wait! My buttercream won’t come together! Reheat the buttercream briefly over simmering water for about 5 seconds, stirring with a wooden spoon. Be careful and do not overbeat. The mixture will look broken with some liquid at the bottom of the bowl. Return the bowl to the mixer and whip on medium speed just until the cream comes back together.

Wait! My buttercream is too soft! Chill the buttercream in the refrigerator for about 10 minutes and rewhip. If that doesn’t work, cream an additional 2-4 tablespoons of butter in a small bowl – making sure the butter is not as soft as the original amount, so make sure is cool and smooth. On low speed, quickly add the creamed butter to the buttercream, 1 tablespoon at a time.

Refrigerate in an airtight container for up to 5 days, or can be frozen for up to 6 months. If freezing, store in 2 16-oz. plastic containers and thaw in the refrigerator overnight or at room temperature for several hours.

Praline Paste
1 cup (4½ ounces) hazelnuts, toasted/skinless
⅔ cup (4.65 ounces) sugar

Line a jelly roll pan with parchment and lightly butter.

Put the sugar in a heavy 10-inch skillet. Heat on low flame for about 10-20 min until the sugar melts around the edges. Do not stir the sugar. Swirl the pan if necessary to prevent the melted sugar from burning. Brush the sides of the pan with water to remove sugar crystals. If the sugar in the center does not melt, stir briefly. When the sugar is completely melted and caramel in color, remove from heat. Stir in the nuts with a wooden spoon and separate the clusters. Return to low heat and stir to coat the nuts on all sides. Cook until the mixture starts to bubble. (Remember – extremely hot mixture.) Then onto the parchment lined sheet and spread as evenly as possible. As it cools, it will harden into brittle. Break the candied nuts into pieces and place them in the food processor. Pulse into a medium-fine crunch or process until the brittle turns into a powder. To make paste, process for several minutes. Store in an airtight container and store in a cook dry place. Do not refrigerate.

Apricot Glaze
Good for one 10-inch cake

⅔ cup thick apricot preserves
1 tablespoon water

In a small, yet heavy saucepan, bring the water and preserves to a slow boil and simmer for 2-3 minutes. If the mixture begins to stick to the bottom of the saucepan, add water as needed.

Remove from heat and, using a strainer, press the mixture through the mesh and discard any remnants. With a pastry brush, apply the glaze onto the cake while the cake is still warm. If the glaze is too thick, thin to a preferred consistency with drops of water.

Ganache Glaze
Makes about 1 cup, enough to cover the top and sides of a 9 or 10 inch layer or tube cake

6 oz. (good) semisweet or bittersweet chocolate, like Lindt
6 oz. (¾ cup heavy cream
1 tablespoon light corn syrup
1 tablespoon Grand Marnier, Cointreay, or dark Jamaican rum (optional)
¾ teaspoon vanilla
½ – 1 teaspoon hot water, if needed

Blend vanilla and liqueur/rum together and set aside.

Break the chocolate into 1-inch pieces and place in the basket of a food processor and pulse until finely chopped. Transfer into a medium sized bowl and set aside.

Heat the cream and corn syrup in a saucepan, on low, until it reached a gentle boil. Once to the gently boil, immediately and carefully pour over the chocolate. Leave it alone for one minute, then slowly stir and mix the chocolate and cream together until the chocolate is melted and incorporated into the cream. Carefully blend in vanilla mixture. If the surface seems oily, add ½ – 1 teaspoon hot water. The glaze will thicken, but should still be pourable. If it doesn’t thicken, refrigerate for about 5 minutes, but make sure it doesn’t get too cold!

Assembling Cake

Cut a cardboard disk slightly smaller than the cake. Divide the cake into 3 layers and place the first layer top-side down on the disk. Using a pastry brush, moisten the layer with 3-4 tablespoon of warm sugar syrup. Measure out 1 cup of praline buttercream and set aside.

Spread the bottom layer with a ¼-inch thickness of the remaining buttercream. Cover with ½ of the whipped cream, leaving ¼-inch border around the edge of the cake. Place the middle layer over the first, brush with sugar syrup, spreading with buttercream. Cover with the remaining whipped cream.

Moisten the cut side of the third layer with additional sugar syrup and place cut side down on the cake. Gently, press the sides of the cake to align the layers. Refrigerate to chill for at least 30 minutes.

Lift the cake by sliding your palm under the cardboard. Holding a serrated or very sharp night with an 8-inch blade held parallel to the sides of the cake, trim the sides so that they are perfectly straight. Cut a slight bevel at the top to help the glaze drip over the edge. Brush the top and sides of the cake with warm apricot glaze, sealing the cut areas completely. Chill while you prepare the ganache.

Place a rack over a large shallow pan to catch the ganache drippings. Remove the gateau from the refrigerator and put it the rack. With a metal spatula in hand, and holding the saucepan about 10 inches above the cake, pour the ganache onto the cake’s center. Move the spatula over the top of the ganache about 4 times to get a smooth and mirror-like appearance. The ganache should cover the top and run down the sides of the cake. When the ganache has been poured and is coating the cake, lift one side of the rack and bang it once on the counter to help spread the ganache evenly and break any air bubbles. (Work fast before setting starts.) Patch any bare spots on the sides with a smaller spatula, but do not touch the top after the “bang”. Let the cake stand at least 15 minutes to set after glazing.

Garnish.