cheesecake pops (daring bakers april 2008)

My first impression when I saw Elle and Deborah’s choice for this month’s Daring Bakers challenge was that it was going to be a pain in the ass. Then I convinced myself that it wouldn’t be so bad. I figured it would be a valuable recipe to have in my arsenal. It’s transportable, perfectly portioned, visually impressive, okay to sit at room temperature for a few hours, and well-liked. And how hard could it be? Scoop out some cheesecake, poke a stick in it, dunk it in melted chocolate. Easy cheesy.

Uh-huh.

Mixing up the cheesecake batter was as easy as I expected. The flour is an unusual ingredient in cheesecake which I’m assuming is there to stabilize the cake enough to form balls. I ate a lot of batter during this part. I like batter.

But after the batter-eating, things got dicey. I made half the recipe in a pan exactly half the area of the pan the recipe called for. I baked it far longer than the recipe stated and took it out when a normal cheesecake would be done – when an instant read thermometer read 150 degrees and it was a bit jiggly in the center. I let it chill overnight.

The next day, the center was far too liquidy to be formed into balls, although the outer half of the pan was more solid. I found out later that others had this problem as well. They came up with creative solutions such as piping the batter instead of rolling it and keeping the batter frozen. I just ate the too-soft middle portion with a spoon. Yum.

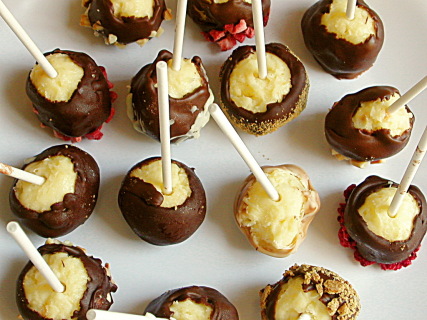
The rolling process was still a mess. It seemed like there was cheesecake everywhere. The dipping went similarly. Far messier than I had planned for.

But the real problem was that the balls weren’t stable outside of the freezer. Because the cake was so soft, the balls would fall right off the stick. Not good.

Tasty though. It’s hard to go wrong with cheesecake.

Cheesecake Pops

Makes 30-40 pops

5 8-oz. packages cream cheese at room temperature
2 cups (14 ounces) sugar
¼ cup (1.25 ounces) all-purpose flour
¼ teaspoon salt
5 large eggs
2 egg yolks
2 teaspoons pure vanilla extract
¼ cup heavy cream

Boiling water as needed

Thirty to forty 8-inch lollipop sticks

1 pound chocolate, finely chopped – you can use all one kind or half and half of dark,
milk, or white (Alternately, you can use 1 pound of flavored coatings, also known
as summer coating, confectionary coating or wafer chocolate – candy supply
stores carry colors, as well as the three kinds of chocolate.)
2 tablespoons vegetable shortening

(Note: White chocolate is harder to use this way, but not impossible)

Assorted decorations such as chopped nuts, colored jimmies, crushed peppermints, mini chocolate chips, sanding sugars, dragees) – Optional

Position oven rack in the middle of the oven and preheat to 325 degrees F. Set some water to boil.

In a large bowl, beat together the cream cheese, sugar, flour, and salt until smooth. If using a mixer, mix on low speed. Add the whole eggs and the egg yolks, one at a time, beating well (but still at low speed) after each addition. Beat in the vanilla and cream.

Grease a 10-inch cake pan (not a springform pan), and pour the batter into the cake pan. Place the pan in a larger roasting pan. Fill the roasting pan with the boiling water until it reaches halfway up the sides of the cake pan. Bake until the cheesecake is firm and slightly golden on top, 35 to 45 minutes.

Remove the cheesecake from the water bath and cool to room temperature. Cover the cheesecake with plastic wrap and refrigerate until very cold, at least 3 hours or up to overnight.

When the cheesecake is cold and very firm, scoop the cheesecake into 2-ounce balls and place on a parchment paper-lined baking sheet. Carefully insert a lollipop stick into each cheesecake ball. Freeze the cheesecake pops, uncovered, until very hard, at least 1 – 2 hours.

When the cheesecake pops are frozen and ready for dipping, prepare the chocolate. In the top of a double boiler, set over simmering water, or in a heatproof bowl set over a pot of simmering water, heat half the chocolate and half the shortening, stirring often, until chocolate is melted and chocolate and shortening are combined. Stir until completely smooth. Do not heat the chocolate too much or your chocolate will lose it’s shine after it has dried. Save the rest of the chocolate and shortening for later dipping, or use another type of chocolate for variety.

Alternately, you can microwave the same amount of chocolate coating pieces on high at 30 second intervals, stirring until smooth.

Quickly dip a frozen cheesecake pop in the melted chocolate, swirling quickly to coat it completely. Shake off any excess into the melted chocolate. If you like, you can now roll the pops quickly in optional decorations. You can also drizzle them with a contrasting color of melted chocolate (dark chocolate drizzled over milk chocolate or white chocolate over dark chocolate, etc.) Place the pop on a clean parchment paper-lined baking sheet to set. Repeat with remaining pops, melting more chocolate and shortening (or confectionary chocolate pieces) as needed.

Refrigerate the pops for up to 24 hours, until ready to serve.

carrot cake (twd)

I don’t really get carrot cake. I don’t hate it. But what’s the appeal? Vegetables in cake – it just ain’t right. Wouldn’t you rather have a more logical flavoring for cake – chocolate or vanilla or strawberries or butter? If it’s the spices you love, pair them with apples. If it’s the cream cheese frosting, spread it on chocolate cake. But don’t put vegetables in my dessert. It just ain’t right.

So I can’t say I was ecstatic to see Amanda’s choice for this week’s TWD recipe. Plus, while I usually enjoy the creativity that comes from having someone else choose a recipe for me, it’s a problem when I already have a similar recipe picked out to try. I’ve had my eye on Cooks Illustrated’s carrot cake recipe for years, I guess with the idea that if anyone could make me love carrot cake, it would be CI.

I thought I could kill two birds with one stone – I’d make Dorie’s recipe and CI’s, and that way I could compare them. My mom has a recipe she loves, so I threw that into the mix as well. They each call for four eggs, so it would be easy to quarter each recipe. Then I decided that that would still be too much carrot cake, so I got all OCD and decided to use one egg total, but still make all three recipes, so I made one twelfth of each recipe. It was a pain in the ass even with good math skills and a digital scale. I skipped all of the chunky ingredients (coconut, raisins, nuts) in Dorie’s recipe so that the recipes would be more equivalent and comparable.

The three recipes weren’t drastically different in their ingredient lists, although the mixing method varied. After baking, Dorie’s and CI’s carrot cakes look very similar, but my mom’s recipe, which was the only one that didn’t call for baking powder, didn’t rise nearly as much. (CI’s is the bottom layer, then my mom’s recipe, then Dorie’s.)

Unfortunately, I can’t give a good comparison of the three cakes. I’ve only had one slice, and the cream cheese frosting pleasantly dominated the taste of the cake. I’ll try harder next time, scraping off the frosting and eating the cake plain. And then finishing dessert off with a spoonful of pure, unadulterated sugary cream cheese frosting.

Update/Comparison: I really didn’t eat much of this cake, so I can’t give a very good comparison.  That being said, I think Dorie’s recipe was my favorite.  My mom’s needs baking powder so it will rise higher.  Cooks Illustrated uses both brown and granulated sugar, and I think using all granulated sugar gave the cake more flavor.  I do like CI’s mixing method though.  Because most of the ingredients are similar, in the future, I’ll probably use CI’s recipe with all granulated sugar.

Bill’s Big Carrot Cake (from Dorie Greenspan’s Baking: From My Home to Yours)

10 servings

For the cake:
2 cups all purpose flour
2 teaspoons baking powder
2 teaspoons baking soda
2 teaspoons ground cinnamon
¾ teaspoon salt
3 cups grated carrots (about 9 carrots, you can grate them in food processor fitted w/ a shredding a blade or use a box grater)
1 cup coarsely chopped walnuts or pecans
1 cup shredded coconut (sweetened or unsweetened)
½ cup moist, plump raisins (dark or golden) or dried cranberries
2 cups sugar
1 cup canola oil
4 large eggs

For the frosting:
8 ounces cream cheese, room temperature
8 tablespoons (1 stick) unsalted butter, at room temperature
1 pound (16 ounces) confectioners’ sugar
1 tablespoon fresh lemon juice or ½ teaspoon pure lemon extract
½ cup shredded coconut (optional)

Finely chopped toasted nuts and/or toasted shredded coconut (optional)

Getting ready: Position the racks to divide the oven into thirds and preheat the oven to 325 degrees Fahrenheit. Butter three 9- by 2-inch round cake pans, flour the insides, and tap out the excess. Put the two pans on one baking sheet and one on another.

To make the cake:
Whisk the flour, baking powder, baking soda, cinnamon and salt. In another bowl, stir together the carrots, chopped nuts, coconut, and raisins.

Working with a stand mixer, preferably fitted with a paddle attachment, or with a hand mixer in a large bowl, beat the sugar and oil together on a medium speed until smooth. Add the eggs one by one and continue to beat until the batter is even smoother. Reduce the speed to low and add the flour mixture, mixing only until the dry ingredients disappear. Gently mix the chunky ingredients. Divide the batter among the baking pans.

Bake for 40-50 minutes, rotating the pans from top to bottom and front to back at the midway point, until a thin knife inserted into the centers comes out clean. The cakes will have just started to come away from the sides of the pans. Transfer the cakes to cooling racks and cool for about 5 minutes, then run a knife around the sides of the cakes and unmold them. Invert and cool to room temperature right side up.

The cakes can be wrapped airtight and kept at room temperature overnight or frozen for up to 2 months.

To make the frosting:
Working with a stand mixer, preferably fitted with a paddle attachment or with a hand mixer in a large bowl, beat the cream cheese and butter together until smooth and creamy. Gradually add the sugar and continue to beat until the frosting is velvety smooth. Beat in the lemon juice or extract.

If you’d like coconut in the filling, scoop about half of the frosting and stir the coconut into this position.

To assemble the cake:
Put one layer top side up on a cardboard cake round or a cake plate protected by strips of wax or parchment paper. If you added the coconut to the frosting, use half of the coconut frosting to generously cover the first layer (or generously cover with plain frosting). Use an offset spatula or a spoon to smooth the frosting all the way to the edges of the layer. Top with the second layer, this time placing the cake stop side down, and frost with the remainder of the coconut frosting or plain frosting. Top with the last layer, right side up, and frost the top- and the sides- of the cake. Finish the top with swirls of frosting. If you want to top the cake with toasted nuts or coconut, sprinkle them on now while the frosting is soft.

Refrigerate the cake for 30 minutes, just to set the frosting before serving.

Serving: This cake can be served as soon as the frosting is set. It can also wait, at room temperature and covered with a cake keeper overnight. The cake is best served in thick slices at room temperature and while it’s good plain, it’s even better with vanilla ice cream or some lemon curd.

Storing: The cake will keep at room temperature for 2 to 3 days. It can also be frozen. Freeze it uncovered, then when it’s firm, wrap airtight and freeze for up to 2 months. Defrost, still wrapped, overnight in the refrigerator.

Simple Carrot Cake with Cream Cheese Frosting (from Cooks Illustrated’s The New Best Recipe)

2½ cups unbleached all-purpose flour
1¼ teaspoons baking powder
1 teaspoon baking soda
1¼ teaspoons ground cinnamon
½ teaspoon ground nutmeg
1/8 teaspoon gound cloves
½ teaspoon salt
1 pound (6-7 medium) carrots, peeled
1½ cups granulated sugar
½ cup packed light brown sugar
4 large eggs
1½ cups safflower, canola or vegetable oil

Cream cheese frosting

8 ounces cream cheese, softened but still cool
5 tablespoons unsalted butter, softened but still cool
1 tablespoon sour cream
½ teaspoon vanilla extract
1¼ cups confectioners’ sugar

For the cake:

1. Adjust an oven rack to the middle position and heat the oven to 350 degrees. Spray a 13 by 9-inch baking pan with nonstick cooking spray. Line the bottom of the pan with parchment and spray the parchment.

2. Whisk together the flour, baking powder, baking soda, cinnamon, nutmeg, cloves and salt in a large bowl; set aside.

3. In a food processor fitted with a large shredding disk, shred the carrots (you should have about 3 cups); transfer the carrots to a bowl and set aside. Wipe out the food processor workbowl and fit with the metal blade. Process the granulated and brown sugars and eggs until frothy and thoroughly combined, about 20 seconds. With the machine running, add the oil through the feed tube in a steady stream. Process until the mixture is light in color and well emulsified, about 20 seconds longer. Scrape the mixture into a medium bowl. Stir in the carrots and the dry ingredients until incorporated and no streaks of flour remain. If you like nuts in your cake, stir 1½ cups toasted chopped pecans or walnuts into the batter along with the carrots. Raisins are also a good addition; 1 cup can be added along with the carrots. If you add both nuts and raisins, the cake will need and additional 10 to 12 minutes in the oven. Pour into the prepared pan and bake until a toothpick or skewer inserted into the center of the cake comes out clean, 35 to 40 minutes, rotating the pan halfway through the baking time. cool the cake to room temperature in the pan on a wire rack, about 2 hours.

For the frosting
1. When the cake is cool, process the cream cheese, butter, sour cream, and vanilla in a clean food processor workbowl until combined, about 5 seconds, scraping down the bowl with a rubber spatula as needed. Add the confectioners’ sugar and process until smooth, about 10 seconds.

2. Run a paring knife around the edge of the cake to loosen from the pan. Invert the cake onto a wire rack, peel off the parchment, then invert again onto a serving platter. Using an icing spatula, spread the frosting evenly over the surface of the cake. Cut into squares and serve.

Carrot Cake (from my mom, and I don’t know where she got the recipe)

1½ (10.5 ounces) cup sugar
2 cups (10 ounces) flour
2 teaspoons baking soda
1 teaspoon salt (scant)
2 teaspoons cinnamon
1 cup cooking oil
3 cups (16 ounces) finely grated carrots (raw)
4 whole eggs

Sift dry ingredients into a large mixing bowl making sure they are thoroughly mixed. Add cooking oil and blend. Add eggs ONE at a time and mix (by hand). Stir in carrots. Bake in two deep cake pans sprayed with Pam. Bake at 350 for 30 to 40 minutes until cakes spring back in center or toothpick comes clean. Cool 10-15 minutes. Remove from pans and frost while warm.

Cream cheese frosting:
1 8 ounce package cream cheese (regular, not low or non-fat)
8 tablespoons (1 stick) butter
4½ cups (16 ounces) powdered sugar
1 teaspoons vanilla
1 cup chopped pecans (optional)

Let cheese and butter sit at room temperature for half an hour, then mix thoroughly. Add powdered sugar slowly, alternating with vanilla. Stir in nuts last. Frost and enjoy.

marshmallows (twd)

Who knew making marshmallows would be so much fun? Judy chose marshmallows as our TWD recipe this week, and while I didn’t think I’d be excited about eating them, I was interested in making them. And even though I know making marshmallows is common, and I trust Dorie’s recipes, I was surprised when I took my first bite, and it was, well, marshmallowy. Spongy soft, sugary sweet, coated in fine powder.

I was wrong about not being excited about eating them. Topping off of mug of hot cocoa, lightly charred and melted on a s’more, and plain in a pillowy mound are all satisfying methods for munching marshmallows. I’ve had to resist grabbing “just one more” every time I pass them in the kitchen.

And I found them relatively easy to make. Egg whites are whipped, a sugar syrup is made, gelatin is dissolved, and everything is beaten together and allowed to set. For the first time since I joined a blog baking group, problems arose with the recipe that I didn’t have. After months of curdled coffee buttercream, soupy lemon curd, flat party cakes, not-so-gooey gooey chocolate cakes, and a lemon cream that just wouldn’t reach the recommended temperature, my marshmallows whipped up nicely and solidified without separating. There was some confusion over Dorie’s instructions to beat the egg whites until they were “firm but still glossy”, and I almost always underbeat when I see “do not overbeat” in a recipe, and I think the problems people had may be attributed to that.

The rest of us were lucky enough to create pillowy soft sweet treats that are ready for any of your favorite marshmallow applications, or just dissolving pleasantly in your mouth without any accompaniment.

Marshmallows (from Dorie Greenspan’s Baking: From My Home to Yours)

Including marshmallows as a spoon dessert may seem like cheating – after all, they’re eaten with fingers (or, by campers, from sticks picked up in the forest) – but making them at home is too much fun to miss. And in fact this dessert is related to others in this chapter: the base is meringue – sweetened and strengthened by a cooked sugar syrup and fortified by gelatin.

There’s nothing difficult about making the marshmallows, but the meringue does need a long beating. While you can use a hand mixer, a stand mixer makes the job easier.

Makes about 1 pound marshmallows

About 1 cup potato starch (found in the kosher foods section of supermarkets) or cornstarch
2 tablespoons light corn syrup
2 ¼-ounce packets unflavored gelatin
3 large egg whites, at room temperature
¾ cup cold water
1 tablespoon pure vanilla extract
1¼ cups plus 1 tablespoon sugar

GETTING READY: Line a rimmed baking sheet — choose one with a rim that is 1 inch high — with parchment paper and dust the paper generously with potato starch or cornstarch. Have a candy thermometer at hand.

Put 1/3 cup of the water, 1¼ cups of the sugar and the corn syrup in a medium saucepan over medium heat. Bring the mixture to a boil, stirring until the sugar dissolves. Once the sugar is dissolved, continue to cook the syrup — without stirring — until it reaches 265 degrees F on the candy thermometer, about 10 minutes.

While the syrup is cooking, work on the gelatin and egg whites. In a microwave-safe bowl, sprinkle the gelatin over the remaining cold water (a scant 7 tablespoons) and let it sit for about 5 minutes, until it is spongy, then heat the gelatin in a microwave oven for 20 to 30 seconds to liquefy it. (Alternatively, you can dissolve the gelatin in a saucepan over low heat.)

Working in the clean, dry bowl of a stand mixer fitted with the whisk attachment or in another large bowl with a hand mixer, beat the egg whites on medium-high speed until firm but still glossy — don’t overbeat them and have them go dull.

As soon as the syrup reaches 265 degrees F, remove the pan from the heat and, with the mixer on medium speed, add the syrup, pouring it between the spinning beater(s) and the sides of the bowl. Add the gelatin and continue to beat for another 3 minutes, so that the syrup and the gelatin are fully incorporated. Beat in the vanilla.

Using a large rubber spatula, scrape the meringue mixture onto the baking sheet, laying it down close to a short end of the sheet. Then spread it into the corners and continue to spread it out, taking care to keep the height of the batter at 1 inch; you won’t fill the pan. Lift the excess parchment paper up to meet the edge of the batter, then rest something against the paper so that it stays in place (I use custard cups).

Dust the top of the marshmallows with potato starch or cornstarch and let the marshmallows set in a cool, dry place. They’ll need about 3 hours, but they can rest for 12 hours or more.

Once they are cool and set, cut the marshmallows with a pair of scissors or a long thin knife. Whatever you use, you’ll have to rinse and dry it frequently. Have a big bowl with the remaining potato starch or cornstarch at hand and cut the marshmallows as you’d like — into squares, rectangles or even strips (as they’re cut in France). As each piece is cut, drop it into the bowl. When you’ve got 4 or 5 marshmallows in the bowl, reach in with your fingers and turn the marshmallows to coat them with starch, then, one by one, toss the marshmallows from one hand to the other to shake off the excess starch; transfer them to a serving bowl. Cut and coat the rest of the batch.

SERVING: Put the marshmallows out and let everyone nibble as they wish. Sometimes I fill a tall glass vase with the marshmallows and put it in the center of the table — it never fails to make friends smile. You can also top hot chocolate or cold sundaes with the marshmallows.

STORING: Keep the marshmallows in a cool, dry place; don’t cover them closely. Stored in this way, they will keep for about 1 week — they might develop a little crust on the outside or they might get a little firmer on the inside, but they’ll still be very good.

lemon cream tart (twd)

I don’t deal well with lemon desserts. I lose self-control. Lemon tastes so light and fresh that I have trouble wrapping my mind around all the butter that’s usually paired with it. The Extraordinary Lemon Cream Tart that Mary chose for this week’s Tuesdays With Dorie recipe is extreme in the amount of butter called for – just shy of a full pound for a 9-inch tart.

With only Dave to share it with, I had to consider my options concerning this dessert. Unless I planned to serve nothing but salads or do nothing but exercise for several days, I was going to have to find a way to control my lemon tart intake. I decided that I needed tartelette pans so I could cut the recipe in half. Plus tartelette pans are super cute.

One of the fun aspects of being in a group like TWD is the opportunity to troubleshoot recipes. When my gooey chocolate cakes were a bit overcooked the first time I made them, my first thought was that my oven temperature was off, but with 100 other people making the recipe and most having the same problem, it seemed like it was the recipe that was off.

This week the problem that popped up involved the temperature that our lemon mixture was supposed to reach while being stirred over a double boiler. Dorie wanted our mixture to get to 180 degrees, which she said would take about 10 minutes. That seemed accurate for about half of us, but for the other half (myself included), the temperature topped out around 155 degrees and stayed there. In our ongoing discussion of the recipe, it seemed like there might be a correlation between the material of the mixing bowl used and the temperature reached – metal bowls were more likely to reach 180 degrees than glass bowls (although there were a couple outliers). I’m interested in trying the recipe again with a metal bowl instead of the pyrex bowl I used.

But I doubt I’ll be making this again. Not that it wasn’t good, because it was – very good in fact. But there’s just so much butter in it. I don’t generally shy away from rich foods, but they have to be worth it. And with over 600 calories per slice at the serving size that Dorie suggests, this tart has a lot to live up to.

The lemon cream was delicious – smooth with just the right balance of sweet and tart. But lemon curd is delicious too, and it only takes 4 tablespoons to make enough curd for a 9-inch tart, as opposed to 21 tablespoons that this cream needed. I’ll have to settle for rich-but-not-ridiculous lemon curd in the future.

The Most Extraordinary Lemon Cream Tart (from Dorie Greenspan’s From My Home To Yours)

The filling in this tart is everything. It is the lemon cream I learned to make from Pierre Hermé, and it is the ne plus ultra of the lemon world. The tart is basic-a great crust, velvety lemon cream-and profoundly satisfying. It is also profoundly play-aroundable. You can add a fruit topping (circlets of fresh rasp-berries are spectacular with this tart) or a layer of fruit at the bottom; you can finish the tart with meringue; or you can serve it with anything from whipped cream to raspberry coulis.

1 9-inch tart shell made with Sweet Tart Dough, fully baked and cooled
1 cup sugar
Finely grated zest of 3 lemons
4 large eggs
½ cup fresh lemon juice (from 4-5 lemons)
2 sticks plus 5 tablespoons (10½ ounces) unsalted butter, cut into tablespoon-size
pieces, at room temperature

Getting Ready: Have an instant-read thermometer, a strainer and a blender (first choice) or food processor at hand. Bring a few inches of water to a simmer in a saucepan.

Put the sugar and zest in a large heatproof bowl that can be set over the pan of simmering water. Off the heat, rub the sugar and zest together between your fingers until the sugar is moist, grainy and very aromatic. Whisk in the eggs, followed by the lemon juice.

Set the bowl over the pan, and start stirring with the whisk as soon as the mixture feels tepid to the touch. Cook the lemon cream until it reaches 180 degrees F. As you whisk-you must whisk constantly to keep the eggs from scrambling-you’ll see that the cream will start out light and foamy, then the bubbles will get bigger, and then, as it gets closer to 180 degrees F, it will start to thicken and the whisk will leave tracks. Heads up at this point-the tracks mean the cream is almost ready. Don’t stop whisking or checking the temperature, and have patience-depending on how much heat you’re giving the cream, getting to temp can take as long as 10 minutes.

As soon as it reaches 180 degrees F, remove the cream from the heat and strain it into the container of the blender (or food processor); discard the zest. Let the cream stand, stirring occasionally, until it cools to 140 degrees F, about 10 minutes.

Turn the blender to high (or turn on the processor) and, with the machine going, add the butter about 5 pieces at a time. Scrape down the sides of the container as needed as you incorporate the butter. Once the butter is in, keep the machine going-to get the perfect light, airy texture of lemon-cream dreams, you must continue to blend the cream for another 3 minutes. If your machine protests and gets a bit too hot, work in 1-minute intervals, giving the machine a little rest between beats.

Pour the cream into a container, press a piece of plastic wrap against the surface to create an airtight seal and refrigerate for at least 4 hours or overnight. (The cream will keep in the fridge for 4 days and, or tightly sealed, in the freezer for up to 2 months; thaw it overnight in the refrigerator.)

When you are ready to assemble the tart, just whisk the cream to loosen it and spoon it into the tart shell. Serve the tart, or refrigerate ‘until needed.

Serving: It’s a particular pleasure to have this tart when the cream is cold and the crust is at room temperature. A raspberry or other fruit coulis is nice, but not necessary; so is a little crème fraîche. I know it sounds odd to offer something as rich as crème fraîche with a tart like this, but it works because the lemon cream is so light and so intensely citric, it doesn’t taste or feel rich.

Storing: While you can make the lemon cream ahead, once the tart is constructed, it’s best to eat it the day it is made.

Sweet Tart Dough:
Makes enough for one 9-inch crust

Storing: Well wrapped, the dough can be kept in the refrigerator for up to 5 days or frozen for up to 2 months. While the fully baked crust can be packed airtight and frozen for up to 2 months, I prefer to freeze the unbaked crust in the pan and bake it directly from the freezer-it has a fresher flavor. Just add about 5 minutes to the baking time.

In French, this dough is called pâte sablée because it is buttery, tender and sandy (that’s what sablée means). It’s much like shortbread, and it’s ideal for filling with fruit, custard or chocolate.

The simplest way to make a tart shell with this dough is to press it into the pan. You can roll out the dough, but the high proportion of butter to flour and the inclusion of confectioners’ sugar makes it finicky to roll. I always press it into the pan, but if you want to roll it, I suggest you do so between sheets of plastic wrap or wax paper or inside a rolling slipcover.

1½ cups all-purpose flour
½ cup (2 ounces) confectioners’ sugar
¼ teaspoon salt
1 stick plus 1 tablespoon (9 tablespoons) very cold (or frozen) unsalted butter, cut into small pieces
1 large egg yolk

Put the flour, confectioners’ sugar and salt in a food processor and pulse a couple of times to combine. Scatter the pieces of butter over the dry ingredients and pulse until the butter is coarsely cut in-you should have some pieces the size of oatmeal flakes and some the size of peas. Stir the yolk, just to break it up, and add it a little at a time, pulsing after each addition. When the egg is in, process in long pulses-about 10 seconds each-until the dough, which will look granular soon after the egg is added, forms clumps and curds. Just before you reach this stage, the sound of the machine working the dough will change-heads up. Turn the dough out onto a work surface and, very lightly and sparingly, knead the dough just to incorporate any dry ingredients that might have escaped mixing.

To press the dough into the pan: Butter a 9-inch fluted tart pan with a removable bottom. Press the dough evenly over the bottom and up the sides of the pan, using all but one little piece of dough, which you should save in the refrigerator to patch any cracks after the crust is baked. Don’t be too heavy-handed-press the crust in so that the edges of the pieces cling to one another, but not so hard that the crust loses its crumbly texture. Freeze the crust for at least 30 minutes, preferably longer, before baking.

Center a rack in the oven and preheat the oven to 375 degrees F.

Butter the shiny side of a piece of aluminum foil and fit the foil, buttered side down, tightly against the crust. (Since you froze the crust, you can bake it without weights.) Put the tart pan on a baking sheet and bake the crust for 25 minutes. Carefully remove the foil. If the crust has puffed, press it down gently with the back of a spoon.

Bake for another 8 minutes or so, or until it is firm and golden brown. (I dislike lightly baked crusts, so I often keep the crust in the oven just a little longer. If you do that, just make sure to keep a close eye on the crust’s progress-it can go from golden to way too dark in a flash.) Transfer the tart pan to a rack and cool the crust to room temperature before filling.

To patch a partially or fully baked crust, if necessary: If there are any cracks in the baked crust, patch them with some of the reserved raw dough as soon as you remove the foil. Slice off a thin piece of the dough, place it over the crack, moisten the edges and very gently smooth the edges into the baked crust. If the tart will not be baked again with its filling, bake for another 2 minutes or so, just to take the rawness off the patch.

blueberry poppy seed brunch cake

11.jpg

Because what better to serve with sausage-wrapped deep-fried hard-boiled eggs than cake, I made this blueberry poppy seed brunch cake last weekend. It has “brunch” in the title, so clearly it’s breakfast food. Disregard the stick of butter and half cup of sour cream. And the cup of sugar. Not including the glaze. It’s breakfast food, I tell you.

21.jpg

My sister gave me the Pillsbury Complete Cookbook when I left for college. It was my first cookbook, and it’s been really handy. It has a lot of basic recipes which were good to have when I was cooking on my own for the first time, but where it really shines is in its original recipes, like this cake and the salmon pesto pasta. A bunch of my favorite recipes are rooted in this book.

31.jpg

This cake is the best brunch cake I’ve made. The cake itself is tender and flavorful – the lemon zest adds brightness without making the cake taste lemony. The blueberry filling, which is spooned over the cake rather than mixed in, is the perfect compliment to the cake.

One warning though – the recipe specifies that if you’re using frozen berries, they should be thawed and drained on paper towels. Don’t skip this step! I recommend adding an extra teaspoon of flour to the filling if you use frozen blueberries as well. Otherwise, you might end up with this:

41.jpg

Oops.

Blueberry-Poppy Seed Brunch Cake (adapted from the Pillsbury Complete Cookbook)

8 servings

Cake:
2/3 cup (4.67 ounces) granulated sugar
8 tablespoons (1 stick) butter, softened
2 teaspoons lemon zest
1 egg
1½ cups (7.5 ounces) unbleached flour
2 tablespoons poppy seed
½ teaspoon baking soda
¼ teaspoon salt
½ cup sour cream

Filling:
2 cups fresh or frozen blueberries, thawed, drained on paper towels
1/3 cup (2.33 ounces) granulated sugar
2 teaspoons all-purpose flour
¼ teaspoon nutmeg

Glaze:
1/3 cup powdered sugar
1 to 2 teaspoons milk

1. Heat oven to 350 degrees. Grease and flour bottom and sides of 9 or 10-inch springform pan. In medium bowl, combine 1½ cups flour, poppy seed, baking soda and salt; set aside.

2. Beat butter and sugar with electric mixer on medium-high speed until light and fluffy, about 2 minutes. Add lemon zest and egg to butter-sugar mixture and beat well. Beat in one-half of dry ingredients. Beat in one-third of sour cream. Beat in remaining dry ingredients in two batches, alternating with sour cream, until incorporated. Transfer batter to prepared pan and spread evenly.

3. In another medium bowl, combine all filling ingredients; mix well. Spoon over center of batter.

4. Bake at 350 degrees for 45 to 55 minutes or until crust is golden brown. Cool 10 minutes; remove sides of pan.

5. In small bowl, blend powdered sugar and enough milk for desired drizzling consistency. Drizzle over warm cake. Serve warm or cool.

51.jpg

gooey chocolate cakes (twd)

copy-of-dscn5019.jpg

The popularity of Dorie Greenspan’s Baking: From My Home to Yours is infectious. I’ve been following the baking of the Tuesdays with Dorie group since it was formed in the beginning of this year, but I had no intention of joining, or even buying the book. I once fancied myself a collector of cookbooks, but now I feel silly for having a shelf of books when I only use a few of them. The last thing I needed was another cookbook, especially a baking book.

But after months of overwhelmingly good reviews of the book, plus flipping through it several times in bookstores, plus the fantastic Perfect Party Cake I made for the Daring Bakers, I broke down and bought the book. And TWD is a great way to make sure it doesn’t languish on my bookshelf unused, like so many other cookbooks. Furthermore, it’s actually nice to have someone else pick a recipe for me each week, because it insures that my baking stays creative and I don’t limit myself to my favorite types of recipes.

Leigh of Lemon Tartlet chose Gooey Chocolate Cakes as this week’s recipe, which is Dorie’s take on molten chocolate cakes. It’s a relatively simple dessert to put together, although my first attempt was moist, but certainly not gooey. I made them again and cooked them for one minute less, and they were gooey, but not runny. I made them again and cooked them for another half minute less, and they were exactly what I wanted in the beginning. Maybe it’s because I was using ramekins and not the muffin pan Dorie calls for, maybe my oven’s temperature cycles widely. They were good each time, but the more liquidy, the better, I think.

copy-of-dscn5025.jpg

(Please note that I did not make 18 molten chocolate cakes over the course of a week. That would be insane. I halved the recipe twice, and the second time I baked one in the afternoon to take pictures and stashed the other two in the fridge until I was ready for dessert that evening.)

You really can’t go wrong with molten chocolate cakes. I served mine with ice cream, as per Dorie’s insistence, plus made up a strawberry coulis. This dessert was a great introduction into this group!

Gooey Chocolate Cakes (from Dorie Greenspan’s Baking: From My Home to Yours)

6 servings

It’s been more than ten years since the molten chocolate cake won the hearts of just about every pastry chef here and in France. There doesn’t seem to be a chocolate lover on either side of the ocean who hasn’t savored this cake: small, dark and warm, with a lava-like runny center, sophisticated, easily dressupable and, best of all, truly easy to make. In fact, it’s one of few restaurant desserts that can be made at home with foolproof results, even if you’re not a star baker. The most important rule to remember in making these individual cakes is to use not only the best chocolate you can find, but the chocolate you most love to eat, since that’s the ingredient you will taste.

Usually these cakes are made in individual ramekins, but with all the ramekins stacked in my cupboard, I couldn’t come up with six that were the right size. Then I discovered that disposable aluminum foil muffin pans are ideal. I buy the kind that have six cups and come two pans to a package. I also wash them in the dishwasher and re-use them.

1/3 cup all-purpose flour
3 tablespoons unsweetened cocoa powder
¼ teaspoon salt
5 ounces bittersweet chocolate, 4 ounces coarsely chopped, 1 ounce very finely chopped
1 stick (8 tablespoons) unsalted butter, cut into 8 pieces
2 large eggs, at room temperature
1 large egg yolk, at room temperature
6 tablespoons sugar

Getting Ready: Center a rack in the oven and preheat the oven to 400 degrees. Butter (or spray – it’s easier) 6 cups of a regular-size muffin pan, preferably a disposable aluminum foil pan, dust the insides with flour and tap out the excess. Put the muffin pan on a baking sheet.

Sift the flour, cocoa and salt together.

Set a heat proof bowl over a saucepan of gently simmering water, put the coarsely chopped chocolate and the butter in the bowl and stir occasionally over the simmering water just until they are melted – you don’t want them to get so hot that the butter separates. Remove the bowl from the pan of water.

In a large bowl, whisk the eggs and yolk until homogenous. Add the sugar and whisk until well blended, about 2 minutes. Add the dry ingredients and, still using the whisk, stir (don’t beat) them into the eggs. Little by little, and using a light hand, stir in the melted chocolate and butter. Divide the batter evenly among the muffin cups and sprinkle the finely chopped chocolate over the batter.

Bake the cakes for 13 minutes. Transfer them, still on the baking sheet, to a rack to cool for 3 minutes. (There is no way to test that these cakes are properly baked, because the inside remains liquid.)

Line a cutting board with a silicone baking mat or parchment or wax paper, and, after the 3-minute rest, unmold the cakes onto the board. Use a wide metal spatula to lift the cakes onto dessert plates.

Serving: These should be served as soon as they are put on plates. The cakes are not meant to be served alone – they need something to play off their warm, gooey, soooooo chocolaty interior. Ice cream is the most obvious choice and, to my mind, the best in terms of texture and, of course, temperature. Any chocolate-friendly flavor will be good. Circling the cakes with crème anglaise is another good idea and, for those for whom too much is not enough, circling the cakes with crème anglaise and running a ring of bittersweet chocolate sauce through the custard is an even better idea.

Storing: Although the whole point of a warm, runny cake is to eat it when it is warm and runny, the cake is still delicious, but different, the following day. If you wrap the cooled cakes in plastic wrap and keep them at room temperature, the next day the texture of the center of the cake (the part that was once gooey) will remind you of ganache. Eating the cake will be like enjoying a bonbon: it will be firm on the outside and creamy within.

copy-of-dscn5016.jpg

perfect party cake (daring bakers march 2008)

copy-of-dscn4743.jpg

I was excited to see that Morven chose a recipe from Dorie Greenspan’s Baking: From My Home to Yours for this month’s Daring Baker challenge. This book is extremely popular among food bloggers, but I had never made anything from it. Oh, and also, I love cake. And I had too many egg whites in the freezer left over from the pound cake experiments.

The cake came together easily. We were allowed to change the flavoring from the original lemon if we chose, but I didn’t because I was interested in the subtly-lemon flavored cake. I’m a major batter eater, and this batter tasted great, which is always a good sign.

copy-of-dscn4720.jpg

Like a few of the Daring Bakers, my cakes didn’t rise as much as I expected. This may be a result of the previously-frozen state of my egg whites, but I suspect it’s because I used a bit too much flour. Apparently the copy of the recipe I used had a mistake (oops!) in the amount of flour called for. I was a little worried about cutting the thin layers in half and probably would have skipped that step if this hadn’t been a DB challenge. However, Dorie refers to this cake as “sturdy” and I imagine the extra flour makes it more so, so I had no problems whatsoever cutting my thin layers in half.

The buttercream is my favorite of the few meringue buttercreams I’ve made. The lemon juice gave it a flavor beyond lightly sweetened butter. It came together quickly and was easy to work with.

copy-of-dscn4771.jpg

I’m glad I was able to halve each layer, because the alternating stripes of raspberry jam and buttercream is so pretty. I was a little surprised that Dorie called for one quarter of the buttercream to be used in between each layer, leaving just one quarter for both the top and the sides. I tried to use less in between the layers, so that I’d have some more to work with on the outside. In the future, if I’m serving the cake immediately, I might make just ⅔ – ¾ of the buttercream recipe, and leave the sides of the cake bare. I think it would be really pretty. Plus it would cut down on the ridiculous amount of butter involved in this dessert.

Overall, I thought the cake was delicious. The lemon, the raspberry, and the sweet cake were great compliments. The cake was easy to work with, “sturdy”, as Dorie refers to it. I thought it was maybe just a bit dry, so I was relieved to hear that I used too much flour, because now I can say that the first recipe I made from Dorie Greenspan lived up to all the hype. And in fact, I bought the book a few days later!

copy-of-dscn4758.jpg

Perfect Party Cake (from Dorie Greenspan’s Baking: From My Home to Yours)

Dorie note: Stick a bright-coloured Post-it to this page, so you’ll always know where to turn for a just-right cake for any celebration. The original recipe was given to me by my great dear friend Nick Malgieri, of baking fame, and since getting it, I’ve found endless opportunities to make it – you will too. The cake is snow white, with an elegant tight crumb and an easygoing nature: it always bakes up perfectly; it is delicate on the tongue but sturdy in the kitchen – no fussing when it comes to slicing the layers in half or cutting tall, beautiful wedges for serving; and, it tastes just as you’d want a party cake to taste – special. The base recipe is for a cake flavoured with lemon, layered with a little raspberry jam and filled and frosted with a classic (and so simple) pure white lemony hot-meringue buttercream but, because the elements are so fundamental, they lend themselves to variation (see Playing Around), making the cake not just perfect, but also versatile.

For the Cake
2¼ cups (9 ounces) cake flour
1 tablespoon baking powder
½ teaspoon salt
1¼ cups whole milk or buttermilk (I prefer buttermilk with the lemon)
4 large egg whites
1½ cups (10½ ounces) sugar
2 teaspoons grated lemon zest
1 stick (8 tablespoons or 4 ounces) unsalted butter, at room temperature
½ teaspoon pure lemon extract

For the Buttercream
1 cup sugar
4 large egg whites
3 sticks (12 ounces) unsalted butter, at room temperature
¼ cup fresh lemon juice (from 2 large lemons)
1 teaspoon pure vanilla extract

For Finishing
2/3 cup seedless raspberry preserves stirred vigorously or warmed gently until spreadable
About 1½ cups sweetened shredded coconut

Getting Ready:
Center a rack in the oven and preheat the oven to 350 degrees F. Butter two 9 x 2 inch round cake pans and line the bottom of each pan with a round of buttered parchment or wax paper. Put the pans on a baking sheet.

To Make the Cake:
Sift together the flour, baking powder and salt.

Whisk together the milk and egg whites in a medium bowl.

Put the sugar and lemon zest in a mixer bowl or another large bowl and rub them together with your fingers until the sugar is moist and fragrant. Add the butter and working with the paddle or whisk attachment, or with a hand mixer, beat at medium speed for a full 3 minutes, until the butter and sugar are very light. Beat in the extract, then add one third of the flour mixture, still beating on medium speed. Beat in half of the milk-egg mixture, then beat in half of the remaining dry ingredients until incorporated. Add the rest of the milk and eggs beating until the batter is homogeneous, then add the last of the dry ingredients. Finally, give the batter a good 2- minute beating to ensure that it is thoroughly mixed and well aerated.

Divide the batter between the two pans and smooth the tops with a rubber spatula. Bake for 30-35 minutes, or until the cakes are well risen and springy to the touch – a thin knife inserted into the centers should come out clean. Transfer the cakes to cooling racks and cool for about 5 minutes, then run a knife around the sides of the cakes, unfold them and peel off the paper liners. Invert and cool to room temperature, right side up (the cooled cake layers can be wrapped airtight and stored at room temperature overnight or frozen for up to two months).

To Make the Buttercream:
Put the sugar and egg whites in a mixer bowl or another large heatproof bowl, fit the bowl over a plan of simmering water and whisk constantly, keeping the mixture over the heat, until it feels hot to the touch, about 3 minutes. The sugar should be dissolved, and the mixture will look like shiny marshmallow cream. Remove the bowl from the heat. Working with the whisk attachment or with a hand mixer, beat the meringue on medium speed until it is cool, about 5 minutes.

Switch to the paddle attachment if you have one, and add the butter a stick at a time, beating until smooth. Once all the butter is in, beat in the buttercream on medium-high speed until it is thick and very smooth, 6-10 minutes. During this time the buttercream may curdle or separate – just keep beating and it will come together again. On medium speed, gradually beat in the lemon juice, waiting until each addition is absorbed before adding more, and then the vanilla. You should have a shiny smooth, velvety, pristine white buttercream. Press a piece of plastic against the surface of the buttercream and set aside briefly.

To Assemble the Cake
Using a sharp serrated knife and a gentle sawing motion, slice each layer horizontally in half. Put one layer cut side up on a cardboard cake round or a cake plate protected by strips of wax or parchment paper. Spread it with one third of the preserves. Cover the jam evenly with about one quarter of the buttercream. Top with another layer, spread with preserves and buttercream and then do the same with a third layer (you’ll have used all the jam and have buttercream leftover). Place the last layer cut side down on top of the cake and use the remaining buttercream to frost the sides and top. Press the coconut into the frosting, patting it gently all over the sides and top.

Serving
The cake is ready to serve as soon as it is assembled, but I think it’s best to let it sit and set for a couple of hours in a cool room – not the refrigerator. Whether you wait or slice and enjoy it immediately, the cake should be served at room temperature; it loses all its subtlety when it’s cold. Depending on your audience you can serve the cake with just about anything from milk to sweet or bubbly wine.

Storing
The cake is best the day it is made, but you can refrigerate it, well covered, for up to two days. Bring it to room temperature before serving. If you want to freeze the cake, slide it into the freezer to set, then wrap it really well – it will keep for up to 2 months in the freezer; defrost it, still wrapped overnight in the refrigerator.

Playing Around
Since lemon is such a friendly flavour, feel free to make changes in the preserves: other red preserves – cherry or strawberry – look especially nice, but you can even use plum or blueberry jam.

Fresh Berry Cake
If you will be serving the cake the day it is made, cover each layer of buttercream with fresh berries – use whole raspberries, sliced or halved strawberries or whole blackberries, and match the preserves to the fruit. You can replace the coconut on top of the cake with a crown of berries, or use both coconut and berries. You can also replace the buttercream between the layers with fairly firmly whipped sweetened cream and then either frost the cake with buttercream (the contrast between the lighter whipped cream and the firmer buttercream is nice) or finish it with more whipped cream. If you use whipped cream, you’ll have to store the cake the in the refrigerator – let it sit for about 20 minutes at room temperature before serving.

copy-of-dscn4729.jpg

chocolate sandwich cookies

copy-of-dscn4429.jpg

I made these cookies without knowing what I was getting into. Based on the picture, I thought they’d be a rich, soft chocolate cookie topped with sweet vanilla icing. I didn’t bother reading the part of the description specifically referring to them as “crisp” until it was too late and I was committed.

So, they’re crisp cocoa-flavored cookies with vanilla icing. They’re Oreos. I don’t dislike Oreos, but I don’t think they’re worth making at home.

Especially with Martha Stewart’s recipe. She’s nitpicky. The recipe instructs that the dough should be flattened, chilled, rolled out, chilled, cut, chilled, and finally baked. Wow. I skipped all that. I rolled the dough into a cylinder and put it in the freezer until I was ready to bake it (which was two months later). Then I cut off slices.

Martha’s method would definitely produce more perfectly-shaped cookies. Mine weren’t nearly as uniformly round. But I’m happy with the easier method.

copy-of-dscn4432.jpg

I underbaked the cookies slightly in the hopes that they’d end up more chewy than crisp. They were softer, which was nice, but they were overwhelmingly cocoa-flavored. My kitchen smelled like a nice cup of hot cocoa when the cookies came out of the oven. Not a bad smell, but I was hoping for a deeper chocolate flavor.

So what do I do with a batch of cookies that I’m not impressed with? I make an oreo-cookie crust.

copy-of-dscn4439.jpg

Mmm…chocolate pie…I definitely enjoyed these cookies, in their proper place!

Chocolate Wafer Sandwich Cookies (from Martha Stewart’s Baking Handbook)

Makes about 2 dozen sandwich cookies

MS note: These crisp cookies can be sandwiched with Vanilla Cream Filling, freshly whipped cream, or your favorite ice cream.

Bridget note: If you’re not picky about your cookies being perfectly round, you can skip the rolling, chilling, and cutting, and simply roll the dough into a cylinder of 1½ inch diameter, wrap it in parchment paper, and freeze until firm, about 30 minutes. When you’re ready to bake, remove dough log from wrapping and, using sharp chef’s knife, slice dough into rounds 1/8 inch thick.

1¼ cups (6¼ ounces) all-purpose flour, plus more for dusting
¼ cup plus 2 (1 1/8 ounces) tablespoons Dutch-process cocoa powder
½ teaspoon baking powder
½ teaspoon baking soda
¼ teaspoon salt
1 stick (½ cup) unsalted butter, room temperature
2/3 cup (4 2/3 ounces) packed light-brown sugar
1/3 cup (2 1/3 ounces) granulated sugar
1 large egg
1 teaspoon pure vanilla extract
Vanilla Cream Filling (recipe follows)

Line two large baking sheets with parchment paper; set aside. In a large bowl, whisk together flour, cocoa, baking powder, baking soda, and salt; set aside. In the bowl of an electric mixer fitted with the paddle attachment, beat the butter and both sugars on medium sped until light and fluffy, 2 to 3 minutes. Add the egg and vanilla; beat to combine. With mixer on low speed, add flour mixture, and beat to combine, scraping down the sides of the bowl as needed.

Turn out the dough onto a piece of plastic wrap, and divide in half. With floured hands, shape each piece into a flattened rectangle, wrap with plastic wrap, and refrigerate until firm, about 30 minutes.

Place one rectangle of dough on a lightly floured work surface. Roll out dough to a scant 1/8-inch thickness, stopping every so often to release the dough by running an offset spatula underneath. You should end up with a rectangle that’s about 14 by 11 inches. Transfer dough to a prepared baking sheet, and freeze until very firm, about 30 minutes. Repeat with remaining dough.

Preheat the oven to 350 degrees. Place one rectangle of dough on a clean work surface. Working quickly, cut out rounds using a 2-inch cookie cutter. (If the dough begins to soften too much, return to the freezer for a few minutes.) Using a wide metal spatula, transfer rounds to a parchment-lined baking sheets, about 1½ inches apart. Gather together remaining scraps, reroll, and cut out more rounds. Freeze until firm, about 15 minutes. Repeat with the remaining rectangle of dough.

Bake, rotating sheets halfway through, until the centers of the cookies feel firm when lightly pressed, 12 to 14 minutes. Transfer to a wire rack to cool completely.

Using an offset spatula, spread 1 tablespoon desired filling onto the flat sides of half the cookies. Sandwich with remaining cookies, keeping the flat sides down. Unfilled cookies can be kept in an airtight container at room temperature for up to 1 week. Once filled, cookies are best eaten the day they are made, but they can be kept in an airtight container in the refrigerator for up to 3 days.

Vanilla Cream Filling

Makes enough to fill 2 dozen sandwich cookies

Bridget note: I used all butter in my filling, because butter is good.

1 1/3 (5 1/3 ounces) confectioners’ sugar
1/3 cup vegetable shortening
1/3 cup (5 1/3 tablespoons) unsalted butter, room temperature
½ teaspoon pure vanilla extract
pinch of salt

In the bowl of an electric mixer fitted with the paddle attachment, combine all ingredients. Beat on medium-high speed until fluffy and light, 3 to 4 minutes. Use immediately or refrigerate in an airtight container for up to 3 days. Let soften at room temperature before using.

copy-of-dscn4417.jpg

cook’s illustrated classic pound cake

12.jpg

Over the course of this blog, I’ve made no secret that I love Cooks Illustrated. An embarrassing number of the recipes I’ve discussed come from their magazine and cookbooks. When I want to try a new dish, I check the CI recipe first. Why not? Even if it isn’t exactly what I’m looking for, they discuss the goals for each recipe so clearly that at least I’ll know that their recipe isn’t right for me. But often it is. I’ve made hundreds of their recipes, and about half of those have been the best version of that dish that I’ve ever eaten. Most of the rest have still been great. There’s a very few recipes that I haven’t cared for, but even most of those can be attributed to personal taste. Their Northern Cornbread wasn’t near sweet enough for me (or Dave), but they made up for it with their All-Purpose Cornbread, which is the best I’ve had.

41.jpg

But there’s no excuse for this pound cake. I made it the first time a couple of years ago, and it didn’t turn out quite right. I had such faith in CI and I was so used my oven overbrowning things that I was convinced the problem wasn’t with the recipe. I tried the same recipe (different oven) recently, but it didn’t rise much at all. I was exceedingly careful with the recipe – I tested the temperature of the butter before starting, and checked the temperature of the oven with an oven thermometer. Still, I decided that the error must have been mine, especially because the recipe was designed specifically to be foolproof. So I tried again. Same result.

21.jpg

See this picture from their website?

31.jpg

This flat (they call it “bad”) cake is exactly what mine looked like. CI states that a “flat and dense” pound cake will result if the butter is too warm and the batter is overbeaten. But I took the temperature of the butter before starting! And I followed the mixing times and cues in the recipe!

And, by the way, I’m a good baker. And I was careful. I’m blaming the recipe.

It’s missing an ingredient which is in most other pound cake recipes that I’ve seen – baking powder. However, I’ve seen a few blog entries with reviews for these pound cakes which have called the cakes dry. I did not want a dry pound cake. I wanted a rich and tender and buttery and moist pound cake.

And I already had a rich and buttery and dense pound cake. So I didn’t want to start with a whole new recipe. And there was another thing holding me to this recipe – the batter is possibly the best I’ve ever eaten. Ever. And this is from someone who makes chocolate chip cookies just for the dough. I think this batter may be better than cookie dough. I didn’t want to lose that.

5.jpg

So I tweaked the recipe I’d been using. I simply added ½ teaspoon of baking powder with the flour.

And, oh my gosh, if this isn’t now a completely fantastic dessert. Every bite I took of this adapted pound cake was delightful. It’s buttery, it’s tender, it’s not a bit dry, and it’s not a brick of cake. The best part was the top crust, which was all of those things plus caramelized. I’m considering adding an additional ¼ teaspoon baking powder next time, but it’s not really necessary. I’m perfectly happy with this cake as it is. Just don’t trust the original recipe.

6.jpg

Classic Pound Cake (from Cooks Illustrated January 2007)

Makes one 9 by 5-inch loaf

CI note: As directed in the recipe, the butter and eggs should be the first ingredients prepared so they have a chance to stand at room temperature and lose their chill while the oven heats, the loaf pan is greased and floured, and the other ingredients are measured. Leftover cake will keep reasonably well for up to 3 days if wrapped tightly in plastic wrap and stored at room temperature.

Bridget note: Add baking powder with the flour! ½ to ¾ teaspoon of it. I also added the seeds of one Tahitian vanilla bean with the eggs and vanilla extract.

16 tablespoons unsalted butter (2 sticks), cold, plus extra for greasing pan
3 large eggs
3 large egg yolks
2 teaspoons vanilla extract
1¾ cups cake flour (7 ounces), plus extra for dusting pan
½ teaspoon table salt
1¼ cups sugar (8 3/4 ounces)

1. Cut butter into 1-tablespoon pieces and place in bowl of standing mixer; let stand at room temperature 20 to 30 minutes to soften slightly (butter should reach no more than 60 degrees). Using dinner fork, beat eggs, egg yolks, and vanilla in liquid measuring cup until combined. Let egg mixture stand at room temperature until ready to use.

2. Adjust oven rack to middle position and heat oven to 325 degrees. Generously butter 9 by 5-inch loaf pan; dust pan liberally with flour and knock out excess.

3. In standing mixer fitted with flat beater, beat butter and salt at medium-high speed until shiny, smooth, and creamy, 2 to 3 minutes, scraping bottom and sides of bowl once with rubber spatula. Reduce speed to medium; with mixer running, gradually pour in sugar (this should take about 60 seconds). Once all sugar is added, increase speed to medium-high and beat until mixture is fluffy and almost white in color, 5 to 8 minutes, scraping bottom and sides of bowl once. With mixer running at medium speed, gradually add egg mixture in slow, steady stream; this should take 60 to 90 seconds. Scrape bottom and sides of bowl; beat mixture at medium-high speed until light and fluffy, 3 to 4 minutes (mixture may look slightly broken). Remove bowl from mixer; scrape bottom and sides.

4. In 3 additions, sift flour over butter/egg mixture; after each addition, fold gently with rubber spatula until combined. Scrape along bottom of bowl to ensure that batter is homogenous.

5. Transfer batter to prepared loaf pan and smooth surface with rubber spatula. Bake until golden brown and wooden skewer inserted into center of cake comes out clean, about 70 to 80 minutes. Cool cake in pan on wire rack for 15 minutes; invert cake onto wire rack, then turn cake right side up. Cool cake on rack to room temperature, about 2 hours. Slice and serve.

7.jpg

raspberry bars

1.jpg

I’m a big fan of raspberries. I like them fresh, and in cheesecake, and as a sauce for other desserts. My wedding cake was chocolate cake with raspberry mousse. And because I like raspberries so much, I’m often disappointed by raspberry bars – there’s not enough raspberry flavor. When jam is the only source of fruit, the bars seem dry and the raspberry flavor is overcooked and muted. This recipe solves this problem in the simplest way – adding real raspberries.

2.jpg

These bars are wonderful and addicting. The raspberry flavor is bright and fresh without being too tart. The shortbread base is buttery and tender, but stable enough to support the cookie. And the streusel topping is crunchy and pretty. Plus, there’s oats in the topping, and that makes these cookies healthy. A half cup of oats offsets 18 tablespoons of butter, right?

3.jpg

Raspberry Streusel Bars (from Cooks Illustrated September 2005)

Makes twenty-four 2-inch squares

CI note: This recipe can be made in a standing mixer or a food processor. Frozen raspberries can be substituted for fresh; be sure to defrost them before combining with the raspberry preserves. If your fresh raspberries are very tart, add only 1 or 2 teaspoons of lemon juice to the filling. The bars are best eaten the day they are baked but can be kept in an airtight container for up to 3 days (the crust and streusel will soften slightly with storage).

Bridget note: I prefer walnuts in this recipe.

2½ cups unbleached all-purpose flour (12½ ounces)
2/3 cup granulated sugar (about 4¾ ounces)
½ teaspoon table salt
16 tablespoons unsalted butter (2 sticks) plus 2 tablespoons, cut into ½-inch pieces and softened to cool room temperature
¼ cup packed brown sugar (1¾ ounces), light or dark
½ cup rolled oats (1½ ounces), old-fashioned
½ cup pecans (2 ounces), chopped fine
¾ cup rasberry preserves (8½ ounces)
¾ cup fresh raspberries (3½ ounces)
1 tablespoon lemon juice from 1 lemon

1. Adjust oven rack to middle position; heat oven to 375 degrees. Cut 18-inch length foil and fold lengthwise to 8-inch width. Fit foil into length of 13 by 9-inch baking dish, pushing it into corners and up sides of pan; allow excess to overhang pan edges. Cut 14-inch length foil and fit into width of baking pan in same manner, perpendicular to first sheet. (If using extra-wide foil, fold second sheet lengthwise to 12-inch width.) Spray foil-lined pan with nonstick cooking spray.

2. In bowl of standing mixer fitted with flat beater, mix flour, granulated sugar, and salt at low speed until combined, about 5 seconds. With machine on low, add 16 tablespoons butter one piece at a time; then continue mixing on low until mixture resembles damp sand, 1 to 1½ minutes. (If using food processor, process flour, granulated sugar, and salt until combined, about 5 seconds. Scatter 16 tablespoons butter pieces over flour mixture and pulse until mixture resembles damp sand, about twenty 1-second pulses.)

3. Measure 1 ¼ cups flour mixture into medium bowl and set aside; distribute remaining flour mixture evenly in bottom of prepared baking pan. Using hands or flat-bottomed measuring cup, firmly press mixture into even layer to form bottom crust. Bake until edges begin to brown, 14 to 18 minutes.

4. While crust is baking, add brown sugar, oats, and nuts to reserved flour mixture; toss to combine. Work in remaining 2 tablespoons butter by rubbing mixture between fingers until butter is fully incorporated. Pinch mixture with fingers to create hazelnut-sized clumps; set streusel aside.

5. Combine preserves, raspberries, and lemon juice in small bowl; mash with fork until combined but some berry pieces remain.

6. Spread filling evenly over hot crust; sprinkle streusel topping evenly over filling (do not press streusel into filling). Return pan to oven and bake until topping is deep golden brown and filling is bubbling, 22 to 25 minutes. Cool to room temperature on wire rack, 1 to 2 hours; remove from baking pan by lifting foil extensions. Using chef’s knife, cut into squares and serve.

4.jpg