smitten kitchen recipes

t1.jpg

Smitten Kitchen is my new favorite cookbook. In the past month since discovering Deb’s blog, I’ve made seven of her recipes. When I’m trying to come up with cooking ideas, I just scan through her recipe page. Rather than rehash each dish in detail, I’m combining them into one entry.

bft.jpg

Boozy Baked French Toast

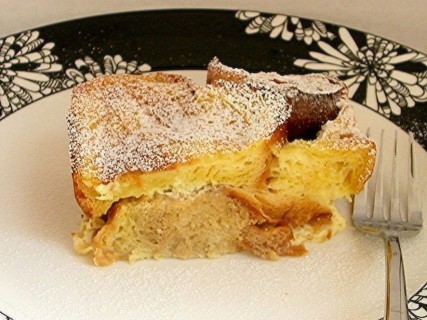
Of all of Deb’s recipes that I’ve made recently, this is my and Dave’s favorite. For one thing, it takes all of 10 minutes to put together, and that can be done the night before. In the morning, just cook it in the oven for half an hour, and voila – a great breakfast. The recipe is supposedly adaptable to whatever flavors you’re in the mood for or you have available, but I’ve only made it one way. I was planning to follow Deb’s recent favorite, with triple sec and orange zest, but I use “planning” loosely, as I didn’t actually bother to get either triple sec or orange zest. Instead, I used Grand Marnier as the alcohol, the zest of one grapefruit, and a splash of vanilla extract. It was fantastic. It was like Creamsicle French Toast. I made it again a week later, exactly the same way. This is why I have a loaf of challah in my freezer right now, and a grapefruit languishing in my crisper drawer, waiting for me to get back from New Mexico and make this great and easy dish for my friends who will be visiting.

copy-of-dscn3652.jpg

Artichoke Ravioli

I love the idea of homemade ravioli. I enjoy working with fresh pasta, and I like the option of customizing my ravioli filling to whatever strikes my interest – mushrooms, squash, seafood, and in this case, artichokes. The problem is, I sort of suck at making it. Both times I’ve tried, the pasta has been too watery after being boiled. This particular recipe is baked after being boiled, which helped dry it out somewhat, but clearly I need to work on my technique. Ravioli is too much tedious work to get anything less than amazing results. I’m not ready to give up yet. This filling was, fortunately, very good. The simple sauce was good too, although I used canned tomatoes instead of fresh, it being February and all.

copy-of-dscn3833.jpg

Creamy Baked Macaroni and Cheese

I already have a macaroni and cheese recipe that I love, but Deb’s photos of a crispy cheesy crust and creamy cheesy sauce had me intrigued to try a new recipe. Did I mention that it’s cheesy? This recipe uses twice as much cheese per pasta as my other favorite recipe. So I made it, and it was delicious, but Dave and I couldn’t decide if it was as good as my other favorite. So I made them side-by-side, which was, well, confusing. Neither recipe is particularly difficult, but I was making half recipes of each sauce, then storing half of that in the fridge so we could have an easy but fresh meal a few days later, which means that each sauce was topping only a quarter recipe of pasta. There was a screw-up here and there, but nothing vital. We weren’t able to pick a favorite. I know they’re both macaroni and cheese, but it felt like comparing apples and oranges. The Cooks Illustrated recipe is creamy and smooth, both in texture and flavor, while the new recipe was far sharper (did I mention that it has twice as much cheese as the other?) and a bit grainy, but oh, that crisp crust was fun. I think I’ll be combining the two in the future. I know Cooks Illustrated uses half cheddar because of its great flavor, and half Monterey jack because of its smooth melting qualities, but I’m going to try using 75% cheddar and 25% Monterey jack next time to get some more of that sharp flavor. I’m also going to skip the bread crumb topping and use more cheese instead, then put that under the broiler to brown the cheese. I think this will combine my favorite aspects of each recipe. (I was also just reminded of a recipe I used to love that uses smoked gouda, so I need to revisit that one. Hey, I love cheesy pasta.)

ribs.jpg

Hoisin and Honey Pork Ribs

When I was a kid, pork ribs were my favorite meal, and I requested them for every birthday. I grew out of that when I decided that ribs were too much effort and mess to eat when there was so little meat. But these ribs were certainly worth the effort. I wanted to make them because I recently tried hoisin sauce for the first time and loved it. This was my first time cooking pork ribs, plus I’m not usually very good with the broiler, but everything worked out great. Because the ribs are boiled first, the broiler is just to crisp them and caramelize the sauce, so it was easy.

ddl2b.jpg

Dulce de Leche Cheesecake Squares

This recipe called to me as soon as Deb posted it. Cheesecake filling, graham cracker crust, chocolate glaze, all mixed up with dulce de leche. I’m not really familiar with dulce de leche, but caramelized milk certainly sounds great. But wow, these were rich. I can usually handle rich foods without a problem, but these were too much even for me. It helped when I thought of them like candy instead of like a bar cookie and started cutting them into the 1-inch squares that the recipe recommends. I did enjoy them, but I don’t think I’ll be making them again.

t3.jpg

Truffles

It sounds like Valentine’s Day is becoming mostly an excuse for couples to enjoy a good meal together, which I think is great. Dave and I weren’t even going to do that (we were having the second day of mac and chz comparison on V-Day), and I was okay with that. I found out on February 13th that Dave wanted to do something extra, so I surprised him by making truffles the next day. I loosely followed the recipe for Robert Linxe’s truffles, except, less fancy. I didn’t use Volrhona chocolate, I didn’t wear gloves, and I didn’t simmer the cream multiple times. It wasn’t worried about details this time. It was my first time making truffles, and I think they came out well. I want to try them again, but comparing a number of different quality chocolates to see how much it really matters.

Pizza Dough

Deb discussed a recipe for pizza dough that replaced some of the water with white wine and added a little honey. I tried it, and while the dough wasn’t sweet and the wine flavor wasn’t obvious, it made a really good pizza crust. Even Dave, who didn’t know that I had changed the recipe, pointed out that it was particularly good. I forgot that this recipe was related to this entry in my blog, so I didn’t think to take a picture, which is unfortunate because the crust was really crisp and light.

Next on the list is Lighter-Than-Air Chocolate Cake. Flourless chocolate cakes are usually dense confections, so I’m interested in this very light version. And then, who knows? World Peace Cookies? Pretzel rolls? Risotto alla Barolo? There’s so many great recipes to choose from, all beautifully photographed and enticingly described.

ddl1.jpg

cream cheese brownies

14.jpg

I’m torn on my opinion of these brownies. On the one hand – totally delicious. But on a continuum from brownies to cheesecake, these may be too far on the cheesecake side for my preference. The chocolate part is intensely fudgy, the brownies are best served cold, and there’s a full 8-ounce package of cream cheese in an 8-inch square pan. They’re rich, and I love rich. But they’re not really brownies.

I made these for SuperBowl Sunday, and in a surprising display of self-control, it was a full 5 days before Dave and I finished the whole pan. What Dave doesn’t know is that in addition to the squares we’d have together with tea in the evenings, I kept shaving off bits of brownie for myself during the day. Just to “even out” a row. And then even it out some more.

Obviously I liked these! And I whole-heartedly recommend them if you want something that walks the line between brownie and cheesecake.

24.jpg 33.jpg

Cream Cheese Brownies (from Cooks Illustrated January 1999)

CI note: Knowing when to remove a pan of brownies from the oven is the only difficult part about baking them. If you wait until an inserted toothpick comes out clean, the brownies are overcooked. But if a toothpick inserted in the middle of the pan comes out with fudgy crumbs, remove the pan immediately. If you are a nut lover, you can stir 1 cup toasted walnuts or pecans into the brownie batter. To melt the chocolate and butter in a microwave oven, microwave chocolate alone at 50 percent power for 2 minutes. Stir chocolate; add butter; and continue microwaving at 50 percent for another 2 minutes, stopping to stir the mixture after 1 minute. If chocolate is not entirely melted, microwave an additional 30 seconds at 50 percent power.

Makes 16 2-inch brownies

2/3 cup unbleached all-purpose flour
¼ teaspoon table salt
½ teaspoon baking powder
2 ounces unsweetened chocolate
4 ounces bittersweet chocolate or semisweet chocolate
1 stick unsalted butter (4 ounces)
1¼ cups granulated sugar
2½ teaspoons vanilla extract
3 large eggs
8 ounces cream cheese at room temperature
1 egg yolk

1. Adjust oven rack to lower-middle position, and preheat oven to 325 degrees. Whisk flour, salt, and baking powder in a small bowl; set aside. Coat an 8-inch-square baking pan with cooking spray, and, fit an 8-by-16-inch sheet of aluminum foil in bottom of pan. (Foil overhangs both sides of the pan; use as handles to remove baked brownies from pan.) Coat foil with cooking spray.

2. In a medium heat-proof bowl set over a pan of almost simmering water, melt chocolate and butter, stirring occasionally until mixture is smooth. (Alternatively, melt chocolate and butter in microwave oven.) Remove melted chocolate mixture from heat; whisk in 1 cup sugar and 2 teaspoons vanilla; then whisk in 3 eggs, one at a time, fully incorporating each before adding the next. Continue whisking until mixture is completely smooth. Add dry ingredients; whisk until just incorporated.

3. In a small bowl, beat cream cheese with remaining ¼ cup sugar, ½ teaspoon vanilla, and egg yolk until of even consistency.

4. Pour half the brownie batter into prepared pan. Drop half the cream cheese mixture, by spoonfuls, over batter. Repeat layering and swirling with remaining brownie batter and cream cheese filling. Use blade of a table knife or a spoon handle to gently swirl batter and cream cheese filling, creating a marbled effect.

5. Bake until edges of brownies have puffed slightly, center feels not quite firm when touched lightly, and a toothpick or cake tester inserted into center comes out with several moist, fudgy crumbs adhering to it, 50 to 60 minutes.

6. Cool brownies in pan on a wire rack for 5 minutes. Use foil sling handles to lift brownies from pan. Place brownies on wire rack; allow them to cool to room temperature. Refrigerate until chilled, at least 3 hours. (To hasten cooling, place brownies in the freezer for about 1½ hours.) Cut into squares and serve. (Do not cut brownies until ready to serve. Whole bar can be wrapped in plastic wrap, then foil, and refrigerated up to 5 days.)

42.jpg

apple galette

13.jpg

It turns out that being unemployed is sort of boring. To procrastinate on being responsible and looking for a job, I cook a lot. (Then I eat a lot and then I work out a little. I’m gaining weight.) I’ve gotten in the habit of undertaking big cooking-fests on Fridays. For a few weeks in a row, I’ve planned and shopped for a big Friday meal, but didn’t plan anything for dessert. And I do not skip dessert. Unacceptable. I don’t keep a well-stocked pantry (not including the 7 different kinds of vinegar), so it can be difficult to find a recipe that works with what I have on hand. But I managed okay so far.

That’s how I ended up making this galette. I know, what kind of bored housewife “just throws together” a galette while also making homemade ravioli? And what kind of bad time-manager thinks that everything will still be done and the kitchen clean before her husband gets home?

But whatever, the galette was worth spending a couple hours in the kitchen after Dave was home and relaxing and probably hungry. Not that the galette was too time-consuming, so don’t worry about that. I managed to put it together in between kneading pasta dough, making ravioli filling, and roasting garlic for the leftover olive oil bread. And it was definitely worth the extra effort to make a dessert – the galette had the flakiest and most tender crust I’ve ever made, even though I didn’t use the instant flour that the recipe prefers. Plus, it’s beautiful, and can be made in advance – we ate it hours after I made it on Friday. When we finished it off the next day, I didn’t notice any loss of flavor or flakiness in the crust. It would be wonderful with vanilla ice cream, but I didn’t have any – and I couldn’t just throw that together without some advance planning!

23.jpg

Apple Galette (from Cooks Illustrated September 2007)

CI note: The galette can be made without instant flour, using 2 cups of all-purpose flour and 2 tablespoons of cornstarch. However, you might have to increase the amount of ice water. Although any apple will work in this recipe, we prefer Golden Delicious, Granny Smith, and Empire. If you don’t have an apple corer, halve the peeled apples and then use a melon baller or paring knife to remove the core from each half. Make sure to cut the apples as thinly as possible. If they are cut thicker than 1/8 inch, they will be hard to shingle. If the dough has chilled longer than 1 hour, let it stand at room temperature for 15 to 20 minutes to soften. If the dough becomes soft and sticky while being rolled, transfer it to a baking sheet and refrigerate it for 10 to 15 minutes. Check the bottom of the galette halfway through baking-it should be a light golden brown. If it is darker, reduce the oven temperature to 375 degrees. Serve with vanilla ice cream, lightly sweetened whipped cream, or creme fraiche.

Bridget note: I halved the recipe, and that’s what the pictures show.

Serves 8 to 10

Dough
1½ cups unbleached all-purpose flour (7½ ounces)
½ cup Wondra flour or Pillsbury Shake and Blend instant flour (2½ ounces)
½ teaspoon salt
½ teaspoon sugar
12 tablespoons cold unsalted butter , cut into 5/8-inch cubes (1½ sticks)
7-9 tablespoons ice water

Apple Filling
1½ pounds apples (3-4 medium or 4-5 small), see note above
2 tablespoons unsalted butter, cut into ¼-inch pieces
¼ cup sugar
2 tablespoons apricot preserves
1 tablespoon water
1. CUT IN BUTTER: Combine flours, salt, and sugar in food processor with three 1-second pulses. Scatter butter pieces over flour, pulse to cut butter into flour until butter pieces are size of large pebbles, about ½ inch, about six 1-second pulses.

2. ADD WATER: Sprinkle 1 tablespoon water over mixture and pulse once quickly to combine; repeat, adding water 1 tablespoon at a time and pulsing, until dough begins to form small curds that hold together when pinched with fingers (dough should look crumbly and should not form cohesive ball).

3. FORM MOUND: Empty dough onto work surface and gather into rough rectangular mound about 12 inches long and 5 inches wide.

4. FRAISAGE AND CHILL: Starting at farthest end, use heel of hand to smear small amount of dough against counter, pushing firmly down and away from you, to create separate pile of dough (flattened pieces of dough should look shaggy). Continue process until all dough has been worked. Gather dough into rough 12 by 5-inch mound and repeat smearing process. Dough will not have to be smeared as much as first time and should form cohesive ball once entire portion is worked. Form dough into 4-inch square, wrap in plastic, and refrigerate until cold and firm but still malleable, 30 minutes to 1 hour.

5. CUT APPLES: About 15 minutes before baking, adjust oven rack to middle position and heat oven to 400 degrees. Peel, core, and halve apples. Cut apple halves lengthwise into 1/8-inch-thick slices.

6. ROLL AND TRIM DOUGH: Place dough on floured 16 by 12-inch piece of parchment paper and dust with more flour. Roll dough until it just overhangs all four sides of parchment and is about 1/8 inch thick, dusting top and bottom of dough and rolling pin with flour as needed to keep dough from sticking. Trim dough so edges are even with parchment paper.

7. FORM BORDER: Roll up 1 inch of each edge and pinch firmly to create ½-inch-thick border. Transfer dough and parchment to rimmed baking sheet.

8. LAYER APPLES AND BAKE: Starting in one corner, shingle sliced apples to form even row across bottom of dough, overlapping each slice by about one-half. Continue to layer apples in rows, overlapping each row by half. Dot apples with butter and sprinkle evenly with sugar. Bake until bottom of tart is deep golden brown and apples have caramelized, 45 to 60 minutes.

9. GLAZE: While galette is cooking, combine apricot preserves and water in medium microwave-safe bowl. Microwave on medium power until mixture begins to bubble, about 1 minute. Pass through fine-mesh strainer to remove any large apricot pieces. Brush baked galette with glaze and cool on wire rack for 15 minutes. Transfer to cutting board. Cut in half lengthwise and then crosswise into individual portions; serve.

32.jpg

four vanilla frostings

opener.jpg

A week ago, I published a post on chocolate cupcakes and vanilla frosting. It’s already become my most popular post, because my site comes up when people search for vanilla frosting recipes. The problem is that I didn’t love the frosting I made to go with those cupcakes. I decided to do a more thorough test of frostings to help out the random internet searcher.

Oh, also, it’s my nephew’s 0th birthday. He was born on Monday. Isn’t he just the cutest little cuddly thing? I haven’t seen him in person yet, but when I do, he’d better be prepared to get some major squeezing. (And today is that cuddly little guy’s brother’s birthday, as well as my brother’s birthday.)

bryce.jpg 0th.jpg

Right, and I apparently need lots of justification to make some more cake.

A few notes on my methods. These frostings topped Cooks Illustrated’s Old-Fashioned Chocolate Layer Cake. CI has two recipes with this title – this is the one published in April 2006. It is, quite frankly, better than the one published in The New Best Recipe.

Also, I made the smallest practical amount of each frosting. This was ¼ of the recipe for everything except the Fluffy Icing, which I made half of.

The first frosting (blue) is Easy Vanilla Buttercream. This appears to be the most common vanilla frosting. It’s also called decorator’s icing, and it’s what I ate as a kid, because my mom decorated fancy cakes for us on our birthdays. You simply mix powdered (confectioner’s) sugar and butter together, with a bit of vanilla extract for flavor and a little milk or cream (you could easily use soy milk if necessary) to achieve the right consistency. This was my favorite of these four frostings, even though I know that I pooh poohed as too simple last week. It was Dave’s second favorite.

The second frosting (yellow-orange) is a Vanilla Buttercream from epicurious. For this buttercream, egg whites are whipped in a bowl while sugar is heated on the stove. When the sugar is hot and the egg whites are frothy, the hot sugar is drizzled into the egg whites with the mixer beating continuously, and then butter is slowly added. I had a bit of stress with this recipe because it provides a temperature for the sugar to be heated to without giving any visual clues, and I don’t have a candy thermometer. A quick check on the internet gave me some useful information, so I waited until a drop of the liquid sugar formed a ball that could be squeezed before beginning to add the sugar into the egg whites. A few of the reviewers on epicurious recommended using only ¾ of the butter. I like this idea because I like a sweeter and less buttery frosting, but the buttercream looked curdled until I added just about all of the butter. In the end, though, it was pretty good. It was Dave’s favorite and my second favorite of these four recipes.

The next frosting (green) is Cooks Illustrated’s Classic Buttercream. In this recipe, whole eggs, sugar, and vanilla are heated in a double boiler, then whipped until airy, when softened butter is slowly added. It was my least favorite and Dave’s second to least favorite. It had significantly less flavor than the other three frostings, to the point where I wonder if I forgot to add the vanilla. (I’m almost positive I didn’t forget.)

The last frosting (pink) is Cooks Illustrated’s Fluffy Icing. This is a seven-minute frosting. Egg whites, sugar, water, vanilla extract and cornstarch are heated in a double boiler, then whipped to stiff peaks. Mine refused to form stiff peaks, even after whipping for well beyond the recipe’s suggested times. I thought it was okay, although I liked the Easy Buttercream and epicurious’s recipe better. It didn’t necessarily go with the chocolate cupcakes, but I think it would be great with the lemon cake that CI originally published it to accompany. Dave didn’t like it at all, but I’ve had my eye on that lemon cake for a while, so he’ll have to try it again when I make that. And hey – no fat in this recipe!

To conclude, my preference, from most to least favorite, is Easy, epicurious, Fluffy, Classic. Dave’s are epicurious, Easy, Classic, Fluffy. I think the secret to making the Easy Vanilla Buttercream great is to whip it – whip it good. It becomes lighter and fluffier and easier to work with if it’s beat at high speed for several minutes. It had the strongest flavor, tasting somewhat tangy, and didn’t feel as buttery as the other two buttercreams.

Like I said before, I do think that the Fluffy Icing has its place, but its place isn’t topping chocolate cake. The Cooks Illustrated Classic Buttercream was lacking flavor, and both Magnolia’s Bakery and epicurious’s buttercreams were buttery and sweet. I’d probably choose Magnolia’s recipe over this epicurious one because Magnolia’s seems a bit stabler, and there’s no messing around with raw egg.

Easy Vanilla Buttercream (from Cooks Illustrated April 2007)

The buttercream frosting can be made ahead and refrigerated; if refrigerated, however, it must stand at room temperature to soften before use. If using a hand-held mixer, increase mixing times significantly (at least 50 percent). This recipe can be doubled to make enough for a two-layer cake.

Makes 3 cups

20 tablespoons (2½ sticks) unsalted butter, softened
2½ cups Confectioners’ sugar (10 ounces)
1/8 tablespoons table salt
2 teaspoons vanilla extract
2 tablespoons heavy cream

In standing mixer fitted with whisk attachment, beat butter at medium-high speed until smooth, about 20 seconds. Add confectioners’ sugar and salt; beat at medium-low speed until most of the sugar is moistened, about 45 seconds. Scrape down bowl and beat at medium speed until mixture is fully combined, about 15 seconds; scrape bowl, add vanilla and heavy cream, and beat at medium speed until incorporated, about 10 seconds, then increase speed to medium-high and beat until light and fluffy, about 4 minutes, scraping down bowl once or twice.

Vanilla Buttercream (from epicurious.com and Gourmet January 2004)

Makes about 6 cups.

4 large egg whites at room temperature for 30 minutes
Rounded ¼ teaspoon salt
2/3 cup water
1 1/3 cups plus 2 tablespoons sugar
4 sticks (2 cups) unsalted butter, cut into tablespoon pieces and softened
2 teaspoons vanilla

Combine whites and salt in a very large bowl. Stir together water and 1 1/3 cups sugar in a 3- to 4-quart heavy saucepan until sugar is dissolved, then bring to a boil over moderate heat, without stirring, brushing any sugar crystals down side of pan with a pastry brush dipped in water.

When syrup reaches a boil, start beating egg whites with an electric mixer at medium-high speed until frothy, then gradually add remaining 2 tablespoons sugar and beat at medium speed until whites just hold soft peaks. (Do not beat again until sugar syrup is ready.)

Meanwhile, put thermometer into sugar syrup and continue boiling until syrup registers 238 to 242°F. Immediately remove from heat and, with mixer at high speed, slowly pour hot syrup in a thin stream down side of bowl into whites, beating constantly. Beat, scraping down side of bowl with a rubber spatula, until meringue is cool to the touch, about 10 minutes in a standing mixer or 15 with a handheld. (It is important that meringue is properly cooled before proceeding.)

With mixer at medium speed, gradually add butter 1 piece at a time, beating well after each addition until incorporated. (Buttercream will look soupy after some butter is added if meringue is still warm. If so, briefly chill bottom of bowl in a large bowl filled with ice water for a few seconds before continuing to beat in remaining butter.) Continue beating until buttercream is smooth. (Mixture may look curdled before all of butter is added but will come back together by the time beating is finished.) Add vanilla and beat 1 minute more.

Classic Vanilla Buttercream Frosting (from Cooks Illustrated March 2000)

The whole eggs, whipped until airy, give this buttercream a light, satiny-smooth texture that melts on the tongue.

Makes about 4 cups

4 large eggs
1 cup granulated sugar
2 teaspoons vanilla extract
pinch table salt
1 pound unsalted butter (4 sticks), softened, each stick cut into quarters

1. Combine eggs, sugar, vanilla, and salt in bowl of standing mixer; place bowl over pan of simmering water. Whisking gently but constantly, heat mixture until thin and foamy and registers 160 degrees on instant-read thermometer.

2. Beat egg mixture on medium-high speed with whisk attachment until light, airy, and cooled to room temperature, about 5 minutes. Reduce speed to medium and add butter, one piece at a time. (After adding half the butter, buttercream may look curdled; it will smooth with additional butter.) Once all butter is added, increase speed to high and beat 1 minute until light, fluffy, and thoroughly combined. (Can be covered and refrigerated up to 5 days.)

Fluffy Vanilla Icing (from Cooks Illustrated March 2007)

3 cups, enough to frost one 4-layer cake

2 large egg whites
1 cup granulated sugar (7 ounces)
¼ cup water plus 1 tablespoon
1 teaspoon vanilla extract
1 tablespoon corn syrup

Combine all ingredients in bowl of standing mixer or large heatproof bowl and set over medium saucepan filled with 1 inch of barely simmering water (do not let bottom of bowl touch water). Cook, stirring constantly, until sugar is dissolved and mixture registers 160 degrees on instant-read thermometer, 5 to 10 minutes. Remove bowl from heat and transfer mixture to standing mixer fitted with whisk attachment. Beat on medium speed until soft peaks form, about 5 minutes. Increase speed to medium-high and continue to beat until mixture has cooled to room temperature and stiff peaks form, 5 minutes longer.

closer.jpg

chocolate cupcakes and vanilla frosting

1.jpg

My all-time favorite dessert is chocolate cake with vanilla frosting. I know, how blasé. I love the tender, rich cake and the contrasting fresh taste of vanilla in the icing. And of course, everything tastes better in mini, hence the cupcakes.

And this cake recipe, it’s It. It’s the last chocolate cake recipe I’ll ever need. Well, right, I’m interested in this one as well. Out of thousands of recipes on epicurious, it’s the most popular, so I’d be silly not to check it out. But until then, when I want something that I’ve already checked out, that I already know is chocolate cake perfection, I’ll turn to this recipe.

2.jpg

I’m having more difficulty finding an icing that I love. I’ve used the simple powdered sugar-butter-vanilla-milk frosting for most of my life, and I like it, I do. But I think I want something more from a frosting. Something fluffier and tasting a little less of powdered sugar. I’ve tried a few swiss meringue buttercream recipes and haven’t had much luck. It’s very possible that I’m doing something wrong, but the mouthfeel of the swiss meringue buttercreams that I’ve tried is all off – too much like butter, not enough like icing.

I found the recipe I used this time from the famous Magnolia Bakery, and the method wasn’t something that I had experience with. It’s unusual (to me at least) in that flour and milk are first stirred over medium heat until the mixture thickens, and then once this cools, it’s mixed into a whipped butter-sugar mixture. It was…weird. Not very flavorful, although I did like the texture. I’m also put off by this step: “Cover and refrigerate for 15 minutes (no less and no longer – set a timer!).” I was only making about one fifth of the recipe, and without any information on what was actually supposed to happen at 15 minutes, I didn’t know when I was supposed to use the frosting. Also, the dictatorial “no less and no longer” seems silly – won’t the temperature of the refrigerator, as well as the temperature that the frosting was made at, affect the rate of cooling in the fridge?

It looks like I’m still on the search for my ideal vanilla frosting. But at least I have one excellent chocolate cake to use as a base, and another chocolate cake just waiting to be tested. If you have a favorite vanilla icing, please let me know!

Update: A week later, I tested four more vanilla icings. To see my evaluation and the recipes, click here.

3.jpg

Old-Fashioned Chocolate Layer Cake (from Cooks Illustrated)

Serves 10 to 12

To make cupcakes instead of a layer cake, divide batter between 24 muffin pan cups. Bake until skewer inserted into center of cupcakes comes out clean, 18-20 minutes. I only bake one pan at a time. (Because I only have one pan. Also, I only made half the recipe.)

12 tablespoons unsalted butter (1½ sticks), very soft, plus extra for greasing pans
1¾ cups unbleached all-purpose flour (8¾ ounces), plus extra for dusting pans
4 ounces unsweetened chocolate, coarsely chopped
¼ cup Dutch-processed cocoa (¾ ounce)
½ cup hot water
1¾ cups sugar (12¼ ounces)
1½ teaspoons baking soda
1 teaspoon table salt
1 cup buttermilk
2 teaspoons vanilla extract
4 large eggs
2 large egg yolks

1. FOR THE CAKE: Adjust oven rack to middle position; heat oven to 350 degrees. Grease two 9-inch-round by 2-inch-high cake pans with softened butter; dust pans with flour and knock out excess. Combine chocolate, cocoa powder, and hot water in medium heatproof bowl; set bowl over saucepan containing 1 inch of simmering water and stir with rubber spatula until chocolate is melted, about 2 minutes. Add ½ cup sugar to chocolate mixture and stir until thick and glossy, 1 to 2 minutes. Remove bowl from heat and set aside to cool.

2. Whisk flour, baking soda, and salt in medium bowl. Combine buttermilk and vanilla in small bowl. In bowl of standing mixer fitted with whisk attachment, whisk eggs and yolks on medium-low speed until combined, about 10 seconds. Add remaining 1¼ cups sugar, increase speed to high, and whisk until fluffy and lightened in color, 2 to 3 minutes. Replace whisk with paddle attachment. Add cooled chocolate mixture to egg/sugar mixture and mix on medium speed until thoroughly incorporated, 30 to 45 seconds, pausing to scrape down sides of bowl with rubber spatula as needed. Add softened butter one tablespoon at a time, mixing about 10 seconds after each addition. Add about one-third of flour mixture followed by half of buttermilk mixture, mixing until incorporated after each addition (about 15 seconds). Repeat using half of remaining flour mixture and all of remaining buttermilk mixture (batter may appear separated). Scrape down sides of bowl and add remaining flour mixture; mix at medium-low speed until batter is thoroughly combined, about 15 seconds. Remove bowl from mixer and fold batter once or twice with rubber spatula to incorporate any remaining flour. Divide batter evenly between prepared cake pans; smooth batter to edges of pan with spatula.

3. Bake cakes until toothpick inserted into center comes out with a few crumbs attached, 25 to 30 minutes. Cool cakes in pans 15 minutes, then invert onto wire rack. Cool cakes to room temperature before frosting, 45 to 60 minutes.

4. TO MAKE FROSTING: Melt chocolate in heatproof bowl set over saucepan containing 1 inch of barely simmering water, stirring occasionally until smooth. Remove from heat and set aside. Meanwhile, heat butter in small saucepan over medium-low heat until melted. Increase heat to medium; add sugar, corn syrup, vanilla, and salt and stir with heatproof rubber spatula until sugar is dissolved, 4 to 5 minutes. Add melted chocolate, butter mixture, and cream to clean bowl of standing mixer and stir to thoroughly combine.

5. Place mixer bowl over ice bath and stir mixture constantly with rubber spatula until frosting is thick and just beginning to harden against sides of bowl, 1 to 2 minutes (frosting should be 70 degrees). Place bowl on standing mixer fitted with paddle attachment and beat on medium-high speed until frosting is light and fluffy, 1 to 2 minutes. Stir with rubber spatula until completely smooth.

Creamy Vanilla Frosting (from epicurious, where it was reprinted with permission from More From Magnolia: Recipes From The World-Famous Bakery and Magnolia’s Home Kitchen, by Allysa Torey)

Makes enough for one 3-layer 9-inch cake

6 tablespoons all-purpose flour
2 cups milk
2 cups (4 sticks) unsalted butter, softened
2 cups sugar
2 teaspoons vanilla extract

In a medium-size saucepan, whisk the flour into the milk until smooth. Place over medium heat and, stirring constantly, cook until the mixture becomes very thick and begins to bubble, 10-15 minutes. Cover with waxed paper placed directly on the surface and cool to room temperature, about 30 minutes.

In a large bowl, on the medium high speed of an electric mixer, beat the butter for 3 minutes, until smooth and creamy. Gradually add the sugar, beating continuously for 3 minutes until fluffy. Add the vanilla and beat well.

Add the cooled milk mixture, and continue to beat on the medium high speed for 5 minutes, until very smooth and noticeably whiter in color. Cover and refrigerate for 15 minutes (no less and no longer – set a timer!). Use immediately.

4.jpg

because i’ve always been your biggest flan (creme caramel/flan)

1.jpg

Flan, crème caramel, whatever. Turns out, there’s only the teeniest of differences. I was struggling to think of a dessert that fit a precise set of requirements – compatibility with the red wine we’d be drinking that night, not chocolate, and most importantly, not requiring any trips to the store. I really thought I’d hit on the perfect idea with flan, and it had even been on my list of things I’m all too eager to cook for some time now. But I kept hitting a snag, in that most of the recipes on epicurious called for sweetened condensed milk, and I didn’t have any.

Finally, I hit upon one that I had all the ingredients for. And I noticed something – the only significant difference between this recipe and Cooks Illustrated’s recipe for crème caramel is the fat content of the dairy. The flan recipe uses almost twice as much whipping cream as milk, whereas the crème caramel recipe uses an equal amount of light cream and milk. This was perfect for me, because I had made the crème caramel before and found the custard to be a little too light for my tastes. Furthermore, I had heavy cream on hand.

Well, I sort of had heavy cream. What I actually had was not one, but two expired cartons of cream, neither of which was the ultra-pasteurized stuff that lasts forever. Eww. But I was determined to make this, and I decided that one of the cartons was passable. I didn’t tell Dave about the questionable dairy in the custard, as I don’t think he’d have been pleased.

Oh, this dessert turned out really well. Much better than the previous time I’d made the crème caramel, when I believe I had overcooked the caramel. This time I fussed over it determinedly, swirling and watching, and even getting a container of honey out so I could judge just when the caramel became the “honey-caramel color” that the recipe instructed. It was perfect. I did have a little adventure with divvying up the caramel among only 3 ramekins instead of the four I was supposed to use, then hurriedly trying to scoop quickly hardening caramel into the 4th ramekin.

copy-of-2.jpg

After that, everything went pretty smoothly. This really isn’t a hard dessert to make, although the water bath is a bit of a pain. The blood-colored streaks on the ramekins are stains from the maroon towel I used to keep the ramekins stable in the water bath. Don’t they look so appetizing? Oh, and the stab wounds are from my tests to check if the custard was done cooking. Next time I need to be careful not to puncture the caramel. Between the bloody ramekins and the knife marks, I bet these just look so tempting, right? But this is actually an easy, fairly cheap, impressive recipe that can be made days in advance, and might therefore be perfect for a dinner party.

copy-of-3.jpg

Classic Crème Caramel (from Cooks Illustrated)

CI note: Though you can make one large creme caramel, we find that custards baked in individual ramekins cook faster, are more evenly textured, and unmold more easily. You can vary the amount of sugar in the custard to suit your taste. Most tasters preferred the full two-thirds cup, but you can reduce that amount to as little as one-half cup to create a greater contrast between the custard and the sweetness of the caramel. Cook the caramel in a pan with a light-colored interior, since a dark surface makes it difficult to judge the color of the syrup. Caramel can leave a real mess in a pan, but it is easy to clean. Simply boil lots of water in the pan for 5 to 10 minutes to loosen the hardened caramel.

Crumblycookie changes: I used heavy cream instead of light cream, 2% milk instead of whole milk, ½ of a vanilla bean instead of extract, and vanilla sugar instead of regular sugar.

Serves 8

Caramel
1 cup granulated sugar
1/3 cup water
2 tablespoons corn syrup
¼ teaspoon lemon juice

Custard
1½ cups whole milk
1½ cups light cream
3 large eggs
2 large egg yolks
2/3 cup granulated sugar
1½ teaspoons vanilla extract
Pinch table salt

1. For the caramel: In a medium nonreactive saucepan and without stirring, bring sugar, water, corn syrup, and lemon juice to simmer over medium-high heat, wiping sides of pan with wet cloth to remove any sugar crystals that might cause syrup to turn grainy. Continue to cook until syrup turns from clear to golden, swirling pan gently to ensure even browning, about 8 minutes. Continue to cook, swirling pan gently and constantly, until large, slow bubbles on mixture’s surface turn honey-caramel in color, 4 to 5 minutes longer. Remove pan immediately from heat and, working quickly but carefully (the caramel is over 300 degrees and will burn you if it touches your skin), pour a portion of the caramel into each of 8 ungreased 6-ounce ovenproof ramekins. Allow caramel to cool and harden, about 15 minutes. (Can be covered with plastic wrap and refrigerated for up to 2 days; return to room temperature before adding custard.)

2. For the custard: Adjust oven rack to center position and heat oven to 350 degrees. Heat milk and cream, stirring occasionally, in medium saucepan over medium heat until steam appears and/or an instant-read thermometer held in the liquid registers 160 degrees, 6 to 8 minutes; remove from heat. Meanwhile, gently whisk eggs, yolks, and sugar in large bowl until just combined. Off heat, gently whisk warm milk mixture, salt, and vanilla into eggs until just combined but not at all foamy. Strain mixture through fine mesh sieve into large measuring cup or container with pouring spout; set aside.

3. Bring 2 quarts water to boil in kettle. Meanwhile, fold dish towel to fit bottom of large baking dish or roasting pan and position in pan. Divide reserved custard mixture among ramekins; place filled ramekins on towel in pan (making sure they do not touch) and set pan on oven rack. Fill pan with boiling water to reach halfway up ramekins; cover entire pan loosely with aluminum foil so steam can escape. Bake until a paring knife inserted halfway between center and edge of the custards comes out clean, 35 to 40 minutes. Transfer custards to wire rack; cool to room temperature (Can be covered with plastic wrap and refrigerated up to 2 days.)

4. To unmold, slide a paring knife around entire mold perimeter, pressing knife against side of the dish. Hold serving plate over top of ramekin and invert; set plate on work surface and shake ramekin gently to release custard. Serve immediately.

For one large crème caramel: Follow recipe for Classic Crème Caramel, pouring caramel and custard into 1½-quart straight-sided soufflé dish rather than individual ramekins. Fill roasting pan with boiling water to reach halfway up sides of soufflé dish; increase baking time to 70 to 75 minutes or until an instant-read thermometer inserted in center of custard registers 175 degrees.

The Perfect Flan (from epicurious)

1¾ cups whipping cream
1 cup milk (do not use low-fat or nonfat)
Pinch of salt
½ vanilla bean, split lengthwise

1 cup sugar
1/3 cup water

3 large eggs
2 large yolks
7 tablespoons sugar

Position rack in center of oven and preheat to 350°F. Combine cream, milk and salt in heavy medium saucepan. Scrape seeds from vanilla bean into cream mixture; add bean. Bring to simmer over medium heat. Remove from heat and let steep 30 minutes.

Meanwhile, combine 1 cup sugar and 1/3 cup water in another heavy medium saucepan. Stir over low heat until sugar dissolves. Increase heat to high and cook without stirring until syrup turns deep amber, brushing down sides of pan with wet pastry brush and swirling pan occasionally, about 10 minutes. Quickly pour caramel into six ¾-cup ramekins or custard cups. Using oven mitts as aid, immediately tilt each ramekin to coat sides. Set ramekins into 13x9x2-inch baking pan.

Whisk eggs, egg yolks and 7 tablespoons sugar in medium bowl just until blended. Gradually and gently whisk cream mixture into egg mixture without creating lots of foam. Pour custard through small sieve into prepared ramekins, dividing evenly (mixture will fill ramekins). Pour enough hot water into baking pan to come halfway up sides of ramekins.

Bake until centers of flans are gently set, about 40 minutes. Transfer flans to rack and cool. Chill until cold, about 2 hours. Cover and chill overnight. (Can be made 2 days ahead.)

To serve, run small sharp knife around flan to loosen. Turn over onto plate. Shake gently to release flan. Carefully lift off ramekin allowing caramel syrup to run over flan. Repeat with remaining flans and serve.

copy-of-4.jpg

daring bakers jan 2008: lemon meringue pie

copy-of-dscn2807.jpg

I saw so excited to see that this month’s Daring Baker challenge was lemon meringue pie! Not only do I love lemon, but the one lemon meringue pie I’ve made was several years ago and was only partially successful. It seemed to me like this had to potential to be a fairly difficult challenge – pie crust, lemon curd, meringue. But when Jen of The Canadian Baker revealed this recipe to us, she expressed some concern that it might not be challenging enough for everyone.

She needn’t have worried. As one person after another wrote in to the DB private blog that they had followed the recipe exactly and had lemon meringue soup to show for their efforts, I started to get worried. And it seemed that for every disaster, there was another DBer chiming in that they had followed the recipe exactly and had perfect results. It goes without saying that I was hoping to be in the latter group.

I was not. I, however, cannot claim that I followed the recipe exactly. Because I screwed up.

copy-of-dscn2861.jpg

It was all going swimmingly until I baked the pie at the end. The crust was a bit thicker than I’m used to, and the filling overflowed the crust a bit after I added the meringue, but these are minor qualms. (Ah – I see now that the recipe is developed for a 10-inch pan, and I only have 9-inch pans. That explains it.) The problem arose when I opened the oven to bake the pie and realized that I needed to adjust the racks and add a sheet pan below to catch drips. As I fumbled around with these corrections, I cranked the oven thermometer up to make sure the heater stayed on.

About five minutes after I put the pie in, a smell reminiscent of marshmallows roasting on a campfire reminded me that I hadn’t turned the oven back down. At this point the meringue was a beautiful mix of almost black, tan, and white. Afraid of it turning entirely black, I took the pie out far earlier than the recipe instructed.

And like many DBers, my filling did not set. Is it because I baked the pie at 450 degrees for 5 minutes instead of 375 degrees for 20 minutes? I don’t know. The next day, however, the filling was nice and solid, although the meringue was insufficiently cooked.

copy-of-dscn2868.jpg

I do know that this unsatisfactory pie did not satisfy the desire for lemon meringue pie that I had by now developed. I also knew that I wasn’t taking any chances with the same recipe. Instead, I tried a Cooks Illustrated recipe. Unsurprisingly, it went off without a hitch. Gotta love Cooks Illustrated.

Check to see how the rest of the Daring Bakers pie experiences went!

copy-of-dscn3246.jpg

Lemon Meringue Pie (from Wanda Beaver’s Wanda’s Pie in the Sky)

Makes one 10-inch (25 cm) pie

For the Crust:
¾ cup (180 mL) cold butter; cut into ½-inch (1.2 cm) pieces
2 cups (475 mL) all-purpose flour
¼ cup (60 mL) granulated sugar
¼ tsp (1.2 mL) salt
⅓ cup (80 mL) ice water

For the Filling:
2 cups (475 mL) water
1 cup (240 mL) granulated sugar
½ cup (120 mL) cornstarch

5 egg yolks, beaten
¼ cup (60 mL) butter
¾ cup (180 mL) fresh lemon juice
1 tbsp (15 mL) lemon zest
1 tsp (5 mL) vanilla extract

For the Meringue:
5 egg whites, room temperature
½ tsp (2.5 mL) cream of tartar
¼ tsp (1.2 mL) salt
½ tsp (2.5 mL) vanilla extract
¾ cup (180 mL) granulated sugar

For the Crust: Make sure all ingredients are as cold as possible. Using a food processor or pastry cutter and a large bowl, combine the butter, flour, sugar and salt. Process or cut in until the mixture resembles coarse meal and begins to clump together. Sprinkle with water, let rest 30 seconds and then either process very briefly or cut in with about 15 strokes of the pastry cutter, just until the dough begins to stick together and come away from the sides of the bowl. Turn onto a lightly floured work surface and press together to form a disk. Wrap in plastic and chill for at least 20 minutes.

Allow the dough to warm slightly to room temperature if it is too hard to roll. On a lightly floured board (or countertop) roll the disk to a thickness of ⅛ inch (.3 cm). Cut a circle about 2 inches (5 cm) larger than the pie plate and transfer the pastry into the plate by folding it in half or by rolling it onto the rolling pin. Turn the pastry under, leaving an edge that hangs over the plate about ½ inch (1.2 cm). Flute decoratively. Chill for 30 minutes.

Preheat oven to 350ºF (180ºC). Line the crust with foil and fill with metal pie weights or dried beans. Bake for 20 to 25 minutes. Carefully remove the foil and continue baking for 10 to 15 minutes, until golden. Cool completely before filling.
For the Filling: Bring the water to a boil in a large, heavy saucepan. Remove from the heat and let rest 5 minutes. Whisk the sugar and cornstarch together. Add the mixture gradually to the hot water, whisking until completely incorporated.

Return to the heat and cook over medium heat, whisking constantly until the mixture comes to a boil. The mixture will be very thick. Add about 1 cup (240 mL) of the hot mixture to the beaten egg yolks, whisking until smooth. Whisking vigorously, add the warmed yolks to the pot and continue cooking, stirring constantly, until mixture comes to a boil. Remove from the heat and stir in butter until incorporated. Add the lemon juice, zest and vanilla, stirring until combined. Pour into the prepared crust. Cover with plastic wrap to prevent a skin from forming on the surface, and cool to room temperature.

For the Meringue: Preheat the oven to 375ºF (190ºC). Using an electric mixer beat the egg whites with the cream of tartar, salt and vanilla extract until soft peaks form. Add the sugar gradually, beating until it forms stiff, glossy peaks. Pile onto the cooled pie, bringing the meringue all the way over to the edge of the crust to seal it completely. Bake for 15 to 20 minutes, or until golden. Cool on a rack. Serve within 6 hours to avoid a soggy crust.

The Ultimate Lemon Meringue Pie (from Cooks Illustrated)

Makes one 9-inch pie

Graham Cracker-Coated Pie Shell
1¼ cups unbleached all-purpose flour
½ teaspoon table salt
1 tablespoon granulated sugar
6 tablespoons unsalted butter , chilled and cut into 1/4-inch pieces
4 tablespoons vegetable shortening , chilled
3-4 tablespoons cold water
½ cup graham cracker crumbs

Lemon Filling
1 cup granulated sugar
¼ cup cornstarch
1/8 teaspoon table salt
1½ cups cold water
6 large egg yolks
1 tablespoon lemon zest from 1 lemon
½ cup lemon juice from 2 to 3 lemons
2 tablespoons unsalted butter

Meringue Topping
1 tablespoon cornstarch
¼ teaspoon cream of tartar
½ cup granulated sugar
4 large egg whites
½ teaspoon vanilla extract
1. For the pie shell: Mix flour, salt and sugar in food processor fitted with steel blade. Scatter butter pieces over flour mixture, tossing to coat butter with a little of the flour. Cut butter into flour with five 1 second pulses. Add shortening; continue cutting in until flour is pale yellow and resembles coarse cornmeal with butter bits no larger than a small pea, about four more 1-second pulses. Turn mixture into medium bowl.

2. Sprinkle 3 tablespoons cold water over mixture. Using rubber spatula, fold water into mixture; press down on dough mixture with broad side of spatula until dough sticks together. If dough will not come together, add up to 1 tablespoon more cold water. Shape dough into ball, then flatten into 4-inch-wide disk. Dust lightly with flour, wrap in plastic, and refrigerate for 30 minutes before rolling.

3. Generously sprinkle work area with 2 tablespoons graham cracker crumbs. Place dough on work area. Scatter a few more crumbs over dough. Roll dough from center to edges, turning it into a 9-inch disk, rotating a quarter turn after each stroke and sprinkling additional crumbs underneath and on top as necessary to coat heavily. Flip dough over and continue to roll, but not rotate, to form a 13-inch disk slightly less than 1/8-inch thick.

4. Fold dough into quaarters; place dough point in center of 9-inch Pyrex pie pan. Unfold to cover pan completely, letting excess dough drape over pan lip. To fit dough to pan, lift edge of dough with one hand and press dougn in pan bottom with other hand; repeat process around circumferences of pan to ensure dough fits properly and is not stretched. Trim all around, ½-inch past lip of pan. Tuck ½ inch of overhanging dough under so folded edge is flush with lip of pan; press to seal. Press thumb and index finger about ½-inch apart against outside edge of dough, then use index finger or knuckle of other hand to poke a dent on inside edge of dough through opening created by the other fingers. Repeat to flute around perimeter of pie shell.

5. Refrigerate until firm, about 30 minutes. Use fork to prick shell at ½-inch intervals; press a doubled 12-inch square of aluminum foil into pie shell; prick again and refrigerate at least 30 minutes.

6. Adjust oven rack to lowest position, heat oven to 400 degrees. Bake, checking occasionally for ballooning, until crust is firmly set, about 15 minutes. Reduce oven temperature to 350 degrees, remove foil, and continue to bake until crust is crisp and rich brown in color, about 10 minutes longer.

7. For the filling: Mix sugar, cornstarch, salt, and water in a large, nonreactive saucepan. Bring mixture to simmer over medium heat, whisking occasionally at beginning of the process and more frequently as mixture begins to thicken. When mixture starts to simmer and turn translucent, whisk in egg yolks, two at a time. Whisk in zest, then lemon juice, and finally butter. Bring mixture to a brisk simmer, whisking constantly. Remove from heat, place plastic wrap directly on surface of filling to keep hot and prevent skin from forming.

8. For the meringue: Mix cornstarch with 1/3 cup water in small saucepan; bring to simmer, whisking occasionally at beginning and more frequently as mixture thickens. When mixture starts to simmer and turn translucent, remove from heat. Let cool while beating egg whites.

9. Heat oven to 325 degrees. Mix cream of tartar and sugar together. Beat egg whites and vanilla until frothy. Beat in sugar mixture, 1 tablespoon at a time; until sugar is incorporated and mixture forms soft peaks. Add cornstarch mixture, 1 tablespoon at a time; continue to beat meringue to stiff peaks. Remove plastic from filling and return to very low heat during last minute or so of beating meringue (to ensure filling is hot).

10. Pour filling into pie shell. Using a rubber spatula, immediately distribute meringue evenly around edge then center of pie to keep it from sinking into filling. Make sure meringue attaches to pie crust to prevent shrinking. Use spoon to create peaks all over meringue. Bake pie until meringue is golden brown, about 20 minutes. Transfer to wire rack and cool to room temperature. Serve.

copy-of-dscn3221.jpg

martha martha martha (maple walnut cupcakes)

dscn2685.jpg

For someone who’s been very interested in food and cooking for a large part of her life, I was late catching onto Martha Stewart fanhood. I just didn’t know much about her, for whatever reason. I didn’t watch her show, I didn’t read her magazine, and I hadn’t made any of her recipes. But then last Christmas, my mother-in-law gave me Martha Stewart’s Baking Handbook.

This is a really great book. For one thing, every recipe has a beautiful picture accompanying it. Also, many of the recipes include garnishes. What a relief for someone like me, who is new to caring about garnishes! But more important, of course, are the recipes themselves. There’s a great mix of classics, like chocolate chip cookies and buttermilk biscuits, to more advanced but still familiar recipes, like a wedding cake and croissants, plus a good peppering of more original ideas, like grapefruit cookies and rum-raisin pie. I’m especially excited to make my way through some of the cookie recipes. Whoever heard of grapefruit in cookies? Yum!

I’ve been craving cupcakes for quite some time now, and I wanted something a little bit more…interesting that your standard old chocolate or vanilla. These were perfect! I’m especially happy with the maple buttercream frosting. I had my doubts going in, because I haven’t had the most successful history of working with buttercream. Also, I was only making a third of the recipe. I know buttercream is very temperature sensitive, and this much smaller amount was going to change temperatures a lot faster than the recipe indicates. And, I was worried about the method of combining the maple syrup and the egg yolk. The syrup is heated to 240 degrees (my probe thermometer tops out at 212 degrees, so I guessed and hoped for the best), then drizzled into the egg yolk. 240 degrees is…hot, especially for egg. But, it all seemed to work out! The buttercream did show signs of breaking, but I tried beating it more, and it actually came together very nicely!

The only change I would make to the recipe is to toast the walnuts before mixing them with the batter. Oh, and I wouldn’t spill a quarter of the dry ingredient mixture on the counter and then not notice until the cupcakes were in the oven. All in all, they were really good.  And cute!

dscn2680.jpg

Maple-Walnut Cupcakes (from Martha Stewart’s Baking Handbook)
Makes 2 dozen

2¾ cups (13.75 ounces) unbleached flour
1 tablespoon baking powder
¼ teaspoon salt
1 teaspoon ground cinnamon
16 tablespoons (2 sticks) unsalted butter, room temperature
1 ½ cups (10.5 ounces) granulated sugar
3 large eggs
1 teaspoon vanilla extract
1 cup milk
1½ cups (5.5 ounces) walnuts, toasted, chopped medium-fine
Maple Buttercream

Preheat the oven to 350 degrees. Line two standard 12-up muffin pans with paper liners. Into a large bowl, sift together flour, baking powder, salt, and cinnamon; set aside.

In the bowl of an electric mixer fitted with the paddle attachment, beat the butter and sugar on medium speed until creamy, about 3 minutes. Add the eggs and vanilla, and beat until combined. With the mixer still on medium speed, add the flour mixture in two parts, alternating with the milk and beginning and ended with the flour. Fold in the walnuts.

Divide the batter evenly among he muffin cups, adding about 1/3 cup to each. Bake, rotating the pans halfway through, until cupcakes are golden and a cake tester inserted into the center of a cupcake comes out clean, 18-20 minutes. Transfer the pans to a wire rack to cool slightly. Invert the cupcakes onto the rack; then reinvert and let them cool completely, top sides up. Frost tops with Maple Buttercream. Cupcakes can be refrigerated in an airtight container for up to 3 days.

Maple Buttercream
Makes enough for 2 dozen cupcakes (about 2 cups)

This frosting can be refrigerated in an airtight container for up to three days. Bring to room temperature before using.

3 large eggs yolks
1 cup pure maple syrup
16 tablespoons (2 sticks) unsalted butter, cold, cut into small pieces

In the bowl of an electric mixer fitting with the whisk attachment, beat the egg yolks on high speed until light and fluffy, about 5 minutes; set aside. In a small saucepan set over medium-high heat, bring the maple syrup to a boil, and cook until it registers 240 degrees on a candy thermometer, about 15 minutes. Remove from heat.

With the mixer running, slowly pour syrup down the side of the bowl in a slow, steady stream, until completely incorporated, about 1 minute. Continue beating until bowl is just slightly warm to the touch, 4 to 5 minutes. Add butter, one piece at a time, until thoroughly incorporated and the frosting is fluffy, about 4 minutes more.

dscn2688.jpg

happy birthday to the husband (banana cream pie)

dscn2396.jpg

Dave’s birthday is today! He’s a few years older than me, which can be nice sometimes. It’s not that I think I’m old, or that I get all “I can’t believe I’m [blank] already.” But I can’t deny that when I hit those landmark numbers, those ages when it’s hard not to think “I’m [blank], and this is where I am in life?”, that the impact is lessened a bit by the fact that my husband’s been there for a few years.

Every year on his birthday, Dave requests banana cream pie. I’ve tried a number of recipes, and so far, according to Dave, none of them have lived up to Baker’s Square Restaurant. I’m pretty sure he hasn’t had Baker’s Square pie in quite a few years, and if he were to try it now (after living with me), he’d have a different opinion. But until then, I’ll just make my own favorite recipe.

This recipe starts with a graham cracker crust, which I’m a big fan of, especially for custard pies. The crust has a bit of banana right in it, which is a really great touch.

dscn2339.jpg

The custard is undeniably rich. I have no problems with that! After both the crust and custard have cooled to room temperature, two layers of banana and three layers of custard are filled into the crust. Then the pie is covered and chilled for at least eight hours to set the custard and soften the crust. Yeah right. I wasn’t that organized. We ate it after four hours of chilling.

dscn2360.jpg

It’s so good! It may not live up to Baker’s Square fame, but Dave had a number of complimentary comments to give, including “Scrumdelilicious.”

The original recipe is from epicurious.com, but I’m going to give my own adaptations below. The original is made in a 10-inch pie pan, which seems silly, because most people, including myself, don’t have such a beast. The recipe I’ve given below is adjusted for a standard 9-inch pie pan. I also made a few tweaks to the crust.

Banana Cream Pie (adapted from epicurious.com)

Serves 8

Crust:
9 graham crackers, processed to fine crumbs (about 1 cup)
2 tablespoons sugar
½ banana
2½ tablespoons unsalted butter, melted

Filling
6½ tablespoons (2.8 ounces) sugar
¼ cup (1.1 ounces) cornstarch
1/4 teaspoon salt
1¼ cups whipping cream
1¼ cups whole milk
3 large egg yolks
½ vanilla bean, split lengthwise
1½ tablespoons unsalted butter
¾ teaspoon vanilla extract

4½ ripe bananas, peeled, cut crosswise into 1/4-inch-thick slices

For crust:
Preheat oven to 350 degrees. Process graham cracker crumbs, sugar, and banana until evenly mixed and there are no visible chunks of banana. Add unsalted butter and process to moisten evenly. Press onto bottom and up sides of 9-inch glass pie dish. Chill until firm, about 30 minutes. Bake crust until set and pale golden, about 15 minutes. Cool completely.

For filling:
Whisk sugar, cornstarch, and salt in heavy medium saucepan to blend. Gradually whisk in whipping cream and whole milk, then egg yolks. Scrape in seeds from vanilla bean; add vanilla bean. Whisk over medium-high heat until custard thickens and boils, about 6 minutes. Pour through mesh strainer into medium bowl. Whisk in unsalted butter and vanilla extract. Cool completely, whisking occasionally, about 1 hour. Remove vanilla bean.

Stir custard to loosen, if necessary. Spread ¾ cup custard over bottom of prepared crust. Top with half of sliced bananas, then ¾ cup custard, covering bananas completely. Repeat layering with remaining bananas and remaining custard. Chill banana cream pie until filling is set and crust softens slightly, at least 8 hours and up to 1 day. Cut pie into wedges and serve with sweetened whipped cream, if desired.

dscn2402.jpg

daring bakers dec 2007: yule log

dscn1992.jpg

2007 was probably the busiest year of my life. I got engaged, then married, I moved to a new city, I finished my PhD, and I started a new, very time-consuming job. December was an appropriate finish to such a year – on top of all the holiday craziness and a visit from my parents, Dave and I are moving from Syracuse to Philadelphia at the end of the month. It’ll be a great adventure for both of us, but it means we have to pack up all of our stuff – for the second time this year for me, and the third time for Dave.

I knew all this was coming when I joined the Daring Bakers at the end of November. But I was too impatient and excited to be part of such a great group that I didn’t want to wait another month! I have to admit that I was hoping for a relatively simple first challenge. November’s Tender Potato Bread would have been perfect – one item and not hugely work-intensive.

So you can possibly imagine my trepidation when I saw the December challenge – a Yule Log, or Buche de Noel. Fancy cake, buttercream, meringue (or marzipan) mushrooms, plus the intimidating job of combining all of those components. Oh geez.

Wisely, I divided the baking up over two days. I was bushed at the end of each.

The Filling:
I didn’t want to use the coffee buttercream as the filling. It seemed like it might be, well, too much coffee buttercream. I pondered other filling ideas that would go with coffee and chocolate and decided on this recipe from epicurious.com. I had never worked with marzipan before and it’s always fun to try new ingredients.

This is the weirdest custard thing I have ever made, and I’m no stranger to custards. The heating of the milk and tempering of the egg mixture is standard, but what’s with using flour as the thickener? Also, maybe I’m not a big marzipan fan. Eaten plain, it was somehow too sweet and too bland at the same time. Mixing into the custard unfortunately didn’t help much. Uh-oh. The Yule Log wasn’t off to a great start.

The Buttercream:
Cake is possibly my favorite dessert. I love them all, but if someone cruelly forced me to choose just one, I’d go with cake. Yet I’m not experienced in buttercream. I do remember trying out a Cooks Illustrated buttercream recipe maybe a year ago. It’s hard to mess up a CI recipe, because they give such detailed instructions, but my buttercream curdled, and I threw it out and made my standard powdered sugar-butter-milk-vanilla frosting that I love.

This one didn’t go much better. I only made half the recipe since I wasn’t going to be using it as filling. I’m so spoiled by the precision of Cooks Illustrated recipes that I’m always frustrated when I see something like “whisk until the egg whites are hot.” How hot? “Whip until cooled.” How cooled are we talking about here? Room temperature? Make me use my thermometer!

The real trouble came at “beat in the softened butter.” (How soft?) It doesn’t say anything about gradually, but I figured better safe than sorry and added the butter one tablespoon at a time. It was clear early on in the butter-adding process that things weren’t going well. I tried to convince myself that my butter was just too hard and wasn’t getting beaten into the egg whites, but eventually I had to admit that the buttercream had curdled.

I was not to be discouraged. Apparently I wasn’t the first DBer to have this problem, and I’d heard that there was hope for saving a curdled buttercream. My good friend Google directed me to baking911.com, which had some great advice. Simply melt a portion of the curdled buttercream and beat that back into the mixture. No way! How wonderfully simple!

Apparently I didn’t melt enough of the buttercream the first time, because it didn’t solve the problem. So I tried melting some more, probably half the mixture, and voila! Perfectly smooth buttercream! I packed that away in the fridge until the next day.

Meringue mushrooms:
The mushrooms just seemed impossibly fussy to me at first. But at least I got to make a meringue. I love using the whisk attachment on my mixer. It’s like magic.

But wow, meringue is some sticky stuff. I scooped it into a pastry bag as best I could, but of course it was totally messy. I started piping mushroom stems and caps. Super fun actually, although it took me a bit of time to figure out the technique. “Pipe 48 mushrooms stems and tops.” Forty-eight?! Why do I need forty-eight mushrooms?! Plus, I must have made my mushrooms too big, because I only ended up with 35 or so.

“Reserve remaining meringue.” Uh…remaining meringue? I scraped up some mushrooms from the baking sheet and squished it back into the pastry bag. I put the mushrooms in the oven. “Dust with cocoa.” Doh! I took the mushrooms back out of the oven and dusted with the cocoa. I put them back in the oven.

dscn1964.jpg

Oh my gosh, an hour later, I had the cutest little mushrooms! I love them! Definitely my favorite part of the recipe. Look how much they look like real mushrooms!

dscn2029.jpg

The Cake:
What the hell is genoise? Thank god for wikipedia. And the various dictionary websites that told me how to pronounce it. (Except for this one, which got it totally wrong.) Do I pronounce the “s”? If it’s named after an Italian city, why does it have a French pronunciation? I love the internet.

Anyway, I had my doubts about the cake from the beginning because of the cornstarch. Why not just use all cake flour? I also thought that a chocolate cake would go better with the coffee buttercream, so I looked up Malgieri’s chocolate genoise variation. I also had to increase the recipe proportions because I apparently have only half-sheet pans, not a jelly roll pan. Who knew? (And if that’s the case, then why is my Silpat too big for my baking pans?)

Ah, more of the whisk attachment. So fun. I also enjoy folding, so this was all going well.

Oh, here’s a step I should have paid more attention to. “Scrape the bottom of the bowl to prevent the flour mixture from accumulating there.” I did see that I was supposed to be careful about scraping to the bottom, but I apparently didn’t finish reading the sentence. I assumed that I’d be worried about the egg mixture accumulating. I didn’t see any evidence of that, so I moved onto pouring the batter into the prepared pan.

And…wait for it…yes, a huge accumulation of flour at the bottom of the bowl! Most of the batter was already in the pan, so I desperately tried to mix the clump of dry ingredients into the little amount of available batter and then I just poured that on top of the batter already in the pan and hoped for the best.

I hate when recipes include a DO NOT OVER____ step. Overmix and you’ll end up with tough muffins, overbeat and your whipped cream turns to butter, and now overbake and your genoise will crack when you try to roll it. The genoise was supposed to bake at least 10 minutes, but I anxiously tested it after 8½ and the toothpick came out clean. Oh no. It felt too early to take it out of the oven, so I put it back in until 9 minutes and 15 seconds, all the while worrying about cracked Yule Logs.

The Assembly:
I love how the recipe keeps specifying that the cake be transferred around without any consideration for its completely unwieldy dimensions. I made one transfer – from baking pan to my biggest cutting board. It was pretty clear that something was wrong with my cake. I’m sure the little balls of cooked flour and cocoa weren’t part of Malgieri’s plan when he developed this recipe.

I spread my subpar filling over my subpar cake and followed Malgieri’s unclear instructions on “using the parchment paper to help roll the cake into a tight cylinder.” (Uh…how exactly? Also, from the long or short side?) Of course it cracked. Bake 10-12 minutes, my ass.

Then I took my nice buttercream from the day before and left it out to soften. It wasn’t softened enough when I was ready to use it, so I figured I’d soften it with the paddle attachment of my mixture. And…more broken buttercream. Geez, buttercream is the wussiest emulsion ever. Melt, remix, not enough to solve the problem, melt, remix. (For those interested, I melted the buttercream in the microwave on 30% power for just 30 seconds or so. I was paranoid about accidently cooking the egg whites in it.)

I think it’s funny that the recipe makes sure to remind us to “curve around the protruding stump” when we’re frosting the cake. Like the big stump on top of the cake wasn’t reminder enough.

So, after all of my trials and tribulations, I came out with quite the nice-looking Yule Log, if I do say so myself.

dscn1980.jpg

And how many mushrooms did I use out of the 48 the recipe plans for? Five.

Please check out more of the Daring Bakers Yule Logs here!

Yule Log (from Nick Malgieri, epicurious.com and The Williams-Sonoma Collection – Dessert)
Make 12 servings

Filling: (from epicurious.com)
2/3 cup whole milk
2 large egg yolks
2 tablespoons sugar
3 tablespoons all purpose flour
1/2 cup marzipan, cut into 1/4-inch pieces
6 tablespoons unsalted butter, cut into 6 pieces, room temperature
1 teaspoon vanilla extract
1/4 teaspoon almond extract

Bring milk to boil in medium saucepan over medium heat. Whisk yolks and sugar in small bowl until well blended; whisk in flour. Whisk hot milk into egg mixture. Return to same saucepan. Whisk over medium heat until custard thickens and boils, about 1 1/2 minutes. Transfer to processor; cool to room temperature, about 1 hour. Add marzipan; process until smooth, about 1 minute. Blend in butter 1 piece at a time, then both extracts. Cover and refrigerate filling at least 4 hours or up to 2 days.

Cake:
3 large eggs
3 large egg yolks
Pinch salt
3/4 cup sugar
1/3 cup cake flour
1/3 cup cornstarch
1/4 cup alkalized (Dutch process) cocoa

1 10-by-15-inch to 12-by-18-inch jellyroll pan

1. Set a rack in the middle level of the oven and preheat to 350 degrees.

2. Fill a medium saucepan halfway with water and bring it to a boil over medium heat. Lower the water to a simmer.

3. Whisk the eggs, yolks, salt and sugar in the bowl of a heavy-duty mixer. Place over the pan of simmering water and whisk gently until the mixture is just lukewarm, about 100 degrees. (Use your finger to test it.)

4. Place on mixer with whisk attachment and whip on high, but not highest, speed until the egg mixture is cool (touch the outside of the bowl to tell) and has increased greatly in volume.

5. While the eggs are whipping stir together the flour, cornstarch and cocoa.

6. Take the bowl off the mixer and sift 1/3 of the flour mixture over the beaten eggs. Use a rubber spatula to fold in the flour mixture, making sure to scrape all the way to the bottom of the bowl on every pass through the batter to prevent the flour mixture from accumulating there. Repeat with the next 1/3 of the flour mixture and finally with the remaining flour mixture.

7. Scrape the batter into the prepared pan and smooth the top.

8. Bake the genoise in the preheated oven for 10 to 12 minutes, or until well risen and firm. Do not let the cake bake dry.

9. Use a small paring knife to loosen the cake from the side of the pan. Invert the cake to a rack, then immediately re-invert to another rack so that the cake cools on the paper.

Coffee buttercream (half recipe)
2 egg whites
½ cup (3½ ounces) sugar
12 tablespoons (1½ sticks) unsalted butter, softened
2 tablespoons instant espresso
2 tablespoons rum or brandy

Combine the egg whites and sugar in the bowl of an electric mixer and whisk gently over simmering water until the sugar is dissolved and the egg whites are hot. Whip on medium speed until cold. Beat in softened butter and continue beating until the buttercream is smooth. Combine the instant coffee and liquor and beat into the buttercream.

Meringue mushrooms:
3 large egg whites, at room temperature
¼ teaspoon cream of tartar
½ cup (3½ ounces/105 g) granulated sugar
1/3 cup (1 1/3 ounces/40 g) powdered sugar
Unsweetened cocoa powder for dusting

1. Preheat the oven to 225 degrees F. Line 2 baking sheets with parchment. Have ready a pastry bag fitted with a small (no. 6) plain tip. In a bowl, using a mixer on medium-low speed, beat together the egg whites and cream of tartar until very foamy. Slowly add the granulated sugar while beating. Increase the speed to high and beat until soft peaks form when the beaters are lifted. Continue until the whites hold stiff, shiny peaks. Sift the icing sugar over the whites and, using a rubber spatula, fold in until well blended.

2. Scoop the mixture into the bag. On one baking sheet, pipe 48 stems, each ½ inch (12 mm.) wide at the base and tapering off to a point at the top, ¾ inch (2 cm.) tall, and spaced about ½ inch (12 mm.) apart. On the other sheet, pipe 48 mounds for the tops, each about 1-1/4 inches (3 cm.) wide and ¾ inch (2 cm.) high, also spaced ½ inch (12 mm.) apart. With a damp fingertip, gently smooth any pointy tips. Dust with cocoa. Reserve the remaining meringue.

3. Bake until dry and firm enough to lift off the paper, 50-55 minutes. Set the pans on the counter and turn the mounds flat side up. With the tip of a knife, carefully make a small hole in the flat side of each mound. Pipe small dabs of the remaining meringue into the holes and insert the stems tip first. Return to the oven until completely dry, about 15 minutes longer. Let cool completely on the sheets.

To assemble:
1. Run a sharp knife around the edges of the genoise to loosen it from the pan.

2. Turn the genoise layer over (unmolding it from the sheet pan onto a flat surface) and peel away the paper.

3. Carefully invert your genoise onto a fresh piece of parchment paper.

4. Spread with the filling.

5. Use the parchment paper to help you roll the cake into a tight cylinder.

6. Transfer back to the baking sheet and refrigerate for several hours.

7. Unwrap the cake. Trim the ends on the diagonal, starting the cuts about 2 inches away from each end.

8. Position the larger cut piece on each log about 2/3 across the top.

9. Cover the log with the reserved buttercream, making sure to curve around the protruding stump.

10. Streak the buttercream with a fork or decorating comb to resemble bark.

11. Transfer the log to a platter and decorate with your mushrooms and any other decorations.

dscn1974.jpg