thai grilled-beef salad

thai steak salad 4

My habit is that on weekdays, I eat vegetarian and am healthy, and on weekends, I eat meat and am not healthy. I save alcohol and lately even dessert for weekends. It all evens out in the end so that I’m relatively fit and trim, but I’m starting to wonder – would it be so bad to eat meat and be healthy, all at the same time?

thai steak salad 1

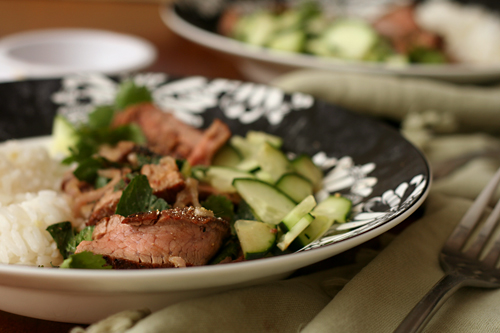
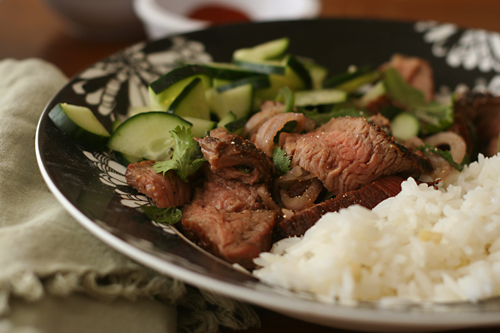
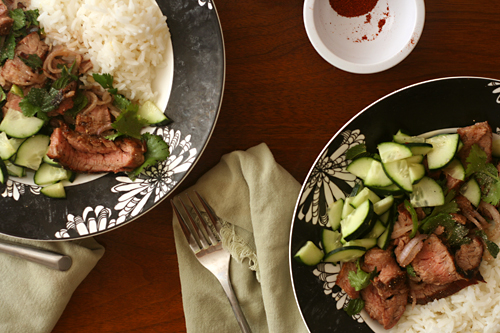
Steak doesn’t have to mean huge T-bones and potatoes. It can mean slivers of beef mixed with herbs and served with cucumbers. This flank steak is seasoned with salt and (white) pepper, grilled and sliced, then dressed with a mixture of lime juice and fish sauce. Toasted white rice powder deepens the flavors while fresh herbs lighten them.

thai steak salad 3

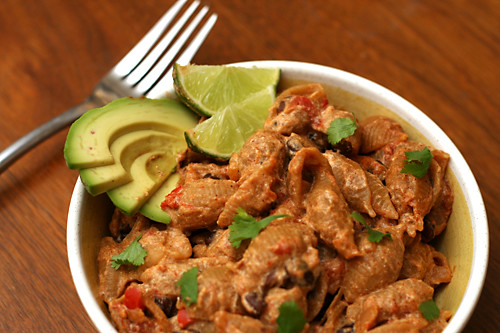
I wonder how many other great meat-topped salads are out there that I’ve been overlooking. Although even if there aren’t any others worth trying, I’d be perfectly happy making this one over and over again. Eating healthy on weekends doesn’t feel like a sacrifice when it tastes so good – and besides, I still get to have a glass of wine on the side.

thai steak salad 5

One year ago: Garlic Mustard Glazed Skewers
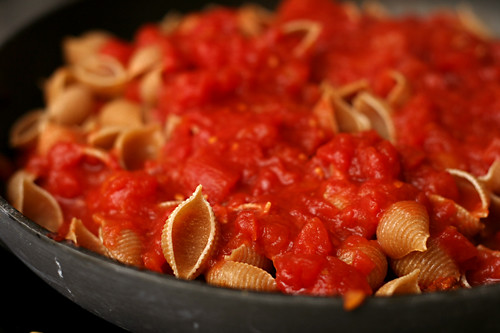
Two years ago: Seafood Lasagna
Three years ago: Vanilla Ice Cream

Printer Friendly Recipe
Thai Grilled-Beef Salad (from Cooks Illustrated)

Serves 4 to 6

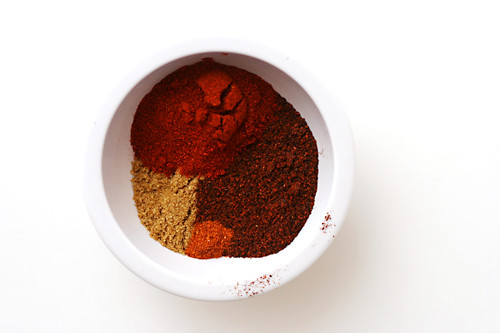
1 teaspoon sweet paprika
1 teaspoon cayenne pepper
1 tablespoon white rice
3 tablespoons lime juice (from 2 limes)
2 tablespoons fish sauce
2 tablespoons water
½ teaspoon sugar
1½ pound flank steak, trimmed
Salt and white pepper, coarsely ground
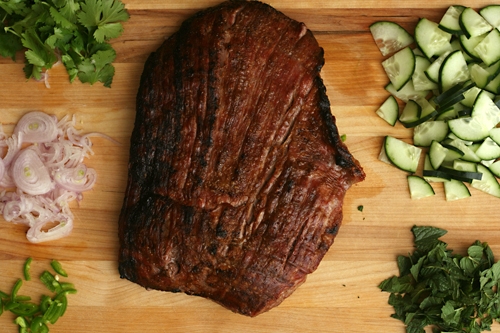
4 shallots, sliced thin
1½ cups fresh mint leaves, torn
1½ cups fresh cilantro leaves
1 Thai chile, stemmed and sliced thin into rounds
1 seedless English cucumber, sliced ¼ inch thick on bias

1. Heat the paprika and cayenne in an 8-inch skillet over medium heat; cook, shaking the pan, until fragrant, about 1 minute. Transfer to a small bowl. Return the now-empty skillet to medium-high heat, add the rice, and toast, stirring frequently, until deep golden brown, about 5 minutes. Transfer to a second small bowl and cool for 5 minutes. Grind the rice with a spice grinder, mini food processor, or mortar and pestle until it resembles fine meal, 10 to 30 seconds (you should have about 1 tablespoon rice powder).

2. Whisk the lime juice, fish sauce, water, sugar, and ¼ teaspoon toasted paprika mixture in a large bowl and set aside.

3. For a Charcoal Grill: Open the bottom vent completely. Light a large chimney starter filled with charcoal briquettes (6 quarts). When the top coals are partially covered with ash, pour the coals evenly over half of the grill. Set the cooking grate in place, cover, and open the lid vent completely. Heat the grill until hot, about 5 minutes.

For a Gas Grill: Turn all burners to high, cover, and heat the grill until hot, about 15 minutes. Leave the primary burner on high and turn off the other burner(s).

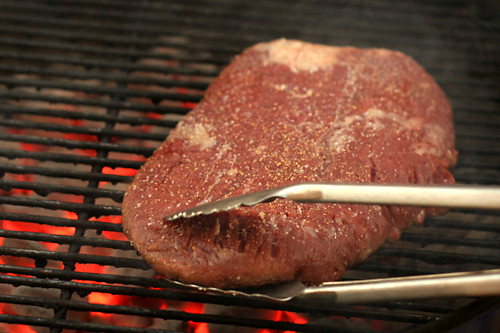
4. Clean and oil the cooking grate. Season the steak with salt and white pepper. Place the steak over the hot part of the grill and cook until it’s beginning to char and beads of moisture appear on the outer edges of the meat, 5 to 6 minutes. Flip the steak and continue to cook on the second side until charred and the center registers 125 degrees, about 5 minutes longer. Transfer to a plate, tent loosely with aluminum foil, and let rest for 5 to 10 minutes (or allow to cool to room temperature, about 1 hour).

5. Slice the meat, against the grain and on the bias, into ¼-inch-thick slices. Transfer the sliced steak to the bowl with the fish sauce mixture. Add the shallots, mint, cilantro, chile, and half of the rice powder; toss to combine. Transfer to a platter lined with cucumber slices. Serve, passing the remaining rice powder and toasted paprika mixture separately.

thai steak salad 6

baked eggs in mushrooms with zucchini ragout

zucchini ragout 5

When Cara asked me to guest post and offered the suggestion of focusing on a vacation that I’m excited about, I jumped at the chance to chatter to a new audience about my upcoming trip to Italy. Italy! Venice! The Cinque Terre! Tuscany! Rome! And then there’s the stuff that I’m really excited about – wine and espresso and cheese and pesto and bread and seafood. Also wine. Check out Cara’s blog to read about the Baked Eggs in Mushrooms with Zucchini Ragout I made, which involves no wine or espresso or pesto or bread or seafood. At least there’s cheese.

creamy taco mac

creamy taco mac 6

I rarely miss eating meat on weekdays. I was never big on “meat and three” types of meals, so vegetarian food suits me just fine. Besides, it’s usually easy to replace meat with a substitute, and by substitute, I don’t mean fake meat (“smeat”, as my friend calls it). I mean beans, especially black beans.

creamy taco mac 1

Making this recipe vegetarian was no problem, but I was also determined to make it all in the same pot. I’ve made Cooks Illustrated’s Skillet Lasagna many times, in which the pasta is cooked right in the simmering sauce, so I adapted the same cooking method for taco mac. The different ratios of pasta to tomatoes complicated finding the right ratio of liquid to pasta, but after a few tries, I landed on the right amount.

creamy taco mac 2

What really gave me fits was how to make the sauce creamy in a healthy way – and if this was going to be a weeknight dish, it needed to be healthy. First, I tried Cara’s method of stirring in pureed cottage cheese. This worked fine, but I knew I was too lazy to puree cottage cheese for such a simple meal. Both unpureed cottage cheese and ricotta cheese looked curdled and barf-like. In the end, the answer, like it so often is, was Greek yogurt. It perfectly mimics the sour cream called for in the original recipe but with dramatically less fat and more protein.

creamy taco mac 3

Finally then, this fills all my qualifications as a great weeknight dish. It’s vegetarian, it’s healthy, it’s nutritionally balanced – all that and the only dishes you need to dirty are a cutting board, knife, and the cooking pot. With meals as good as this, it’s no wonder I don’t crave meat on weekdays.

creamy taco mac 4

One year ago: Pasta with Asparagus and Goat Cheese
Two years ago: Pork Tenderloin with Rhubarb Sauce
Three years ago: Pigs in a Blanket

Update: I changed the recipe to use ½ more water. Two cups might be enough, but it cuts it close. If your sauce is too liquidy at the end, it’s simple to simmer it down for a few minutes.

Printer Friendly Recipe
Creamy Taco Mac
(adapted from Delish via Annie’s Eats and from Cook’s Illustrated’s Skillet Lasagna recipe)

6 servings

1 tablespoon olive oil
1 medium onion, chopped small
1 red pepper, chopped small
Table salt
3 medium cloves garlic, minced or pressed through a garlic press (about 1 tablespoon)
1 tablespoon ground chili powder
1 teaspoon ground cumin
¼ teaspoon ground cayenne
16 ounces dry pasta
1 (28-ounce) can diced tomatoes
2½ cups water
1 (30-ounce) can black beans, drained
1 (7-ounce) container Greek yogurt
2 tablespoons cilantro
1 avocado, diced (optional)

1. Heat the oil in a large nonstick skillet over medium heat until shimmering. Add the onion, pepper, and ½ teaspoon salt and cook until the onion begins to brown, about 5 minutes. Stir in the garlic and spices and cook until fragrant, about 30 seconds.

2. Add the pasta, diced tomatoes with juices, water, and beans. Cover and bring to a simmer. Reduce the heat to medium-low and simmer, stirring occasionally, until the pasta is tender, about 20 minutes.

3. In a small bowl, stir about half of the simmering pasta mixture into the yogurt. Stir this tempered yogurt into the pasta. Cover and simmer over low heat until heated, 2-3 minutes. Sprinkle with cilantro and avocado, if using. Serve.

carrot avocado salad

carrot avocado salad 3

The problem with just about every recipe that contains avocado is that there isn’t enough avocado. The only exception I can think of is guacamole, because it’s almost entirely avocado. My favorite way to eat avocado is on toast with a sprinkling of kosher salt.

carrot avocado salad 2

My usual way of eating it, however, is as an accent in which there’s just enough avocado so that most bites have a tiny portion. And all the bites without avocado are just sad.  And all the bites that do have avocado need more of it.

carrot avocado salad 1

And that is what I love about this salad – avocado is the main event, or at least it shares equal billing with the sweet caramelized carrots. It might sound like an unusual combination, but it works. The radishes add a nice touch as well, crisp and spicy. I’m pretty sure the only way I could like this salad more would be if I left out the carrots, pepper, cumin, olive oil, and radishes. And maybe added in some toast.

carrot avocado salad 4

One year ago: Spinach Artichoke Pizza
Two years ago: Tofu Mu Shu
Three years ago: Crockpot Pulled Pork

Printer Friendly Recipe
Roasted Carrot and Avocado Salad (adapted from Smitten Kitchen)

4 servings

I prefer to use a regular olive oil to roast the carrots and extra virgin olive oil in the dressing.

1 pound carrots, scrubbed or peeled and cut into two-inch segments
Coarse salt and freshly ground black pepper
½ teaspoon ground cumin
3 tablespoons olive oil, divided
3 tablespoons lemon juice
4 radishes, chopped small
1 avocado, pitted and sliced

1. Adjust a rack to the middle position and heat the oven to 400 degrees. On a large baking sheet, toss the carrots with ¼ teaspoon salt, ⅛ teaspoon pepper, cumin, and 2 tablespoons olive oil. Roast for about 20 to 30 minutes, until the carrots are tender and browned.

2. In a small bowl, whisk together the lemon juice and the remaining tablespoon olive oil. In a medium serving bowl, combine the carrots, avocado and radishes. Drizzle the vegetables with the dressing, adding more salt and pepper to taste. Serve immediately.

carrot avocado salad 5

basic coleslaw

Once upon a time, I thought I didn’t like coleslaw. A Cooks Illustrated recipe turned me around, but over time, I found aspects of it that I didn’t love. One is that is really does take about 4 hours of salting the cabbage for it to draw out enough water to avoid a watery dressing. Then you have to rinse the salt off so your slaw isn’t too salty, and then you have to dry the cabbage, because wasn’t the whole point of salting to remove water?

The dressing of that recipe is based on buttermilk, which is a great lowfat option, but is too thin to coat the cabbage strands well. Many slaw dressings are nothing more than flavored mayonnaise, and while I do love mayonnaise, I don’t like to spend so much of my calorie budget on salad. The dressing for my old favorite recipe also requires sour cream, which I never have.

The answer, like I’m finding it is to so many things, is Greek yogurt. It’s everything you want in a slaw dressing – thick, creamy and tangy. Oh, and full of protein instead of just fat. I like to use the same flavorings used in the Cooks Illustrated recipe – cider vinegar, parsley, minced onion, a wee bit of sugar. I also like to mix a spoonful of mayonnaise into the yogurt. It’s amazing how even a small proportion of mayonnaise can make the whole mixture taste like it’s full of the fattening stuff.

With a thicker dressing, it isn’t as necessary to draw water out of the cabbage. If I have time, I still often sprinkle the shredded cabbage with salt and set it aside, but I use only as much salt as I need to include in the salad anyway – so no tedious rinsing and drying is required. Without needing to plan four hours in advance, I can mix up a quick coleslaw while Dave heats the grill for brats. I’m not going to say that I like the coleslaw more than the sausage – but it’s close, and it’s a heck of a lot healthier too.

One year ago: Grilled Artichokes
Two years ago: Basic Lentil Soup
Three years ago: Snickery Squares

Printer Friendly Recipe
Basic Coleslaw (adapted from Cooks Illustrated)

You can see that I now take a very laid back approach to preparing slaw. This is what happens when I start making things for lunch on Saturday; I can’t be bothered with details when it’s 85 degrees and sunny out. Sometimes I combine the first few ingredients earlier in the morning and set them aside until later to lightly pickle to cabbage and onion, but sometimes I make the slaw start to finish right before serving. Either way works great.

Feel free to use any fat level of Greek yogurt.

½ cabbage, sliced thin
¼ cup minced red onion
¼ teaspoon table salt
1 teaspoon cider vinegar
½ teaspoon sugar
½ teaspoon Dijon mustard
1/8 teaspoon ground black pepper
1 carrot, shredded
2 tablespoons minced fresh parsley leaves
1 (7-ounce container) plain Greek yogurt
2 tablespoons mayonnaise

In a large bowl, stir together the cabbage, onion, salt, vinegar, and sugar. Set aside while you prepare the remaining ingredients. Add the rest of the ingredients and stir to combine.

quinoa with salmon, feta, and dill

I imagine that most people have a set of ten, twenty, or maybe even thirty dinners that they regularly make. Some people might try a new recipe every couple of weeks. But for the most part, I suspect that dinner on any given night is something familiar.

Then there are a class of people who have so many recipes they want to try that they know there simply aren’t enough nights in the week, month, year, life. Every time an old favorite is made is an opportunity lost to try something new. Not that I don’t have a rotation; it’s just that meals are considered on the rotation if they’re made only once or twice a year. Something in heavy rotation might be made six or seven times per year.

This was a surprise addition to my rotation. If I didn’t think we’d like it, I wouldn’t have made it, but I didn’t know we’d like it as much as we did. Dave compared it sushi bowls, with the grain base, fish, and cucumbers, but the lemon, dill, and feta take it in a different direction.

Of course, it takes more than good flavor to be added to my rotation – dishes have to be healthy, which means no refined carbs, limited oil and butter, and plenty of protein and vegetables. Recipes also have to be easy if there’s any hope of me making them often, and the limited amount of ingredient prep required here can be accomplished while the quinoa cooks. Not only have I made this three times in the last year, I’ve made it twice in the last month – heavy rotation indeed.

One year ago: Shrimp Burgers
Two years ago: Roasted Baby Artichokes
Three years ago: Double (or Triple) Chocolate Cookies

Printer Friendly Recipe
Quinoa with Salmon, Feta, and Dill (adapted from Apple a Day)

Serves 6

You can use also fresh salmon and cook it either on the stove or in the oven. Kelsey has directions for stovetop cooking. If you use fresh salmon instead of smoked, increase the salt in the quinoa cooking water to ½ teaspoon.

While you can serve this immediately after mixing, it will be better if you give the flavors some time to meld, even just 15 minutes. This is particularly true if you’re using salty smoked salmon.

1 cup quinoa
2 cups water
¼ teaspoon salt
1 lemon, juice and zest
8 ounces smoked salmon, chopped small
1 tablespoon extra virgin olive oil
½ cucumber, quartered lengthwise and sliced ¼-inch thick
½ cup feta cheese, chopped
1 tablespoon fresh dill, minced

1. Place the quinoa in a fine-mesh strainer; rinse until the water no longer foams. In a medium saucepan, bring the water to a boil. Add the quinoa, salt, and the zest of the lemon. Reduce the heat to low, cover, and simmer for 15 minutes. After 15 minutes, turn the heat off; let the quinoa set, still covered, for another 5 minutes. Drain off any unabsorbed water.

2. Squeeze the juice of the lemon over the quinoa, then mix in the salmon and remaining ingredients. Serve immediately or refrigerate overnight.

Oh yeah, I used red quinoa!  Regular quinoa will work every bit as well though.

green pea ravioli in lemon broth

My notes call this Saturday night cooking adventure “Light Italian Meal”. I was experimenting with wet scallops – scallops that have been treated with sodium triphosphate to help them retain moisture. Cooks Illustrated has a recipe designed to make wet scallops palatable, so I gave it a go. I tried to keep the rest of the meal relatively light to compliment the scallops, starting with these ravioli, then moving onto insalata di crudita before serving the seared scallops with almond cream sauce. Pinot grigio and whole wheat ciabatta accompanied every part of the meal.

This was the only recipe I made that night that I was really excited by. The only reason the ciabatta doesn’t qualify is because I didn’t follow much of a recipe, and the salad, although crisp and fresh, was a fairly typical side salad. The scallops were a disaster. Not only was the almond cream sauce too rich, but the scallops themselves didn’t brown until they had overcooked into balls of rubber. What’s worse, while I set them aside to finish the sauce, the cooked scallops released a freaky blue liquid. I choked a down few and filled up on bread.

I wish I had made enough ravioli to fill up on those, rather than teasing myself with a small starter course serving. These pasta pouches with their vibrant filling were the highlight of my meal that night. There aren’t many ingredients in the filling, but each one has something to offer: the peas are both sweet and earthy, the shallots are bright, the parmesan salty. This humble mixture might have not had much to live up to compared to the rest of the meal, but it would have been just as special on its own.

One year ago: Vodka Gimlets
Two years ago: Pasta with Roasted Red Pepper Sauce
Three years ago: Cinnamon Rolls

Printer Friendly Recipe
Green Pea Ravioli with Lemon Broth (adapted from Gourmet via epicurious)

6 servings

I’ve doubled the amount of filling, because I only had enough filling for 9 ravioli, not the 18 the original recipe indicates.

Pasta:
1⅓ cups (6.4 ounces) all-purpose flour
2 eggs, lightly beaten

Filling:
2 cups baby peas, defrosted
1 tablespoon olive oil
2 shallots, minced
Salt
6 tablespoons freshly grated parmesan
6 tablespoons fresh bread crumbs

Broth:
4 cups chicken broth
2 garlic cloves, smashed
1 teaspoon freshly grated lemon zest
Squeeze fresh lemon juice

Garnish: fresh chervil or parsley and cooked peas

1. Combine the flour and eggs until smooth (either by hand, with a food processor, or with a stand mixer). Add more flour if the dough is sticky or more water if it’s crumbly. If you stick a dry finger into the center of the dough, it should come out nearly clean. Wrap the dough in a damp towel and set aside to rest while you prepare the filling.

2. Force the peas through the fine disk of a food mill into a bowl to remove their skins. Heat the oil in a small skillet over medium heat; add the shallot and a pinch of salt; cook until shallot is softened, 3-4 minutes, stirring occasionally. Combine the pea puree, cooked shallot, parmesan, and bread crumbs.

3. Divide the dough into 6 portions. Working with one portion at a time, flatten it and fold in thirds, like a letter. Roll it through the widest setting on a pasta roller. Repeat the folding and rolling 3-4 more times, flouring the dough as needed to prevent sticking. Adjust the pasta roller to the next thinnest setting; roll the pasta sheet through. Continue thinning the pasta until the next-to-thinnest setting. Lay the thinned pasta sheet on a dry dish towel. Repeat with the remaining portions of pasta.

4. Place one rounded teaspoon of filling every 3 inches along the length of a pasta sheet. Using a pasta brush or your fingers, wet the pasta in between the rounds of filling. If the pasta sheet is at least 4 inches wide, fold it lengthwise over the filling. If the pasta sheet is too thin to fold lengthwise, lay a second pasta sheet over the filling. Press around each ball of filling to seal the two layers of pasta together. Use a pizza roller to cut between the filling to form squares of ravioli. Store the ravioli on a dry dish towel (there’s no need to cover it). Repeat with the remaining dough and filling.

5. Combine the broth, garlic, lemon zest, and salt and pepper to taste in a saucepan; bring to a simmer. Lower the heat and cover to keep warm.

6. Bring a large pot of water to a boil; add a tablespoon of salt and lower the heat until the water is at a lively simmer. Cook the ravioli in small batches until al dente, 2 to 3 minutes, using a skimmer or large slotted spoon to remove the ravioli from the boiling water. Divide the cooked ravioli between six soup bowls.

7. Discard the garlic in the broth. Ladle the hot broth over the ravioli. Garnish with herbs and cooked peas, if desired; serve immediately.

protein waffles

I eat almost flawlessly healthfully on weekdays, and then undo all of that hard work on the weekends. Weekdays are full of vegetables, fruit, lean protein, whole grains, water. Weekends are all about butter, white flour, sugar, beef, wine (and/or beer and/or margaritas). While I have no intention of eating perfectly all the time – mostly because cooking with fat is FUN – perhaps a better balance is in order.

Not to jump to the punch line, but if the only compromise I have to make is eating these healthy waffles instead of cinnamon rolls or biscuit sandwiches for breakfast, I’ll take it. There was absolutely nothing weird about these waffles. Made from just eggs, oats, cottage cheese and protein powder, the flavor and texture were exactly what you would expect from any carb-filled, butter-rich variety, and yet they are perfectly healthy.

Not even one unhealthy ingredient. I have to keep saying it, over and over, because I can hardly believe it. Topped with homemade (not by me) jam and Greek yogurt, this is a perfect breakfast in every way. Now someone needs to come up with a no-compromise version of cinnamon rolls. And beer.

Three years ago: Chocolate Cream Pie

Printer Friendly Recipes
Protein Waffles (from Cara’s Cravings)

Substitutions I’ve made that worked: 2 whole eggs plus a dribble of milk for the 4 egg whites; regular oats for the instant oats Cara recommends; ½ tablespoon honey for the sweetener; vanilla ice cream protein powder, which is all that my grocery store sells and is so sweet that I don’t need any additional sugar at all

Substitution I made that didn’t work: Greek yogurt for the cottage cheese

I don’t recommend cooking this batter in a Belgian waffle iron.

4 egg whites
½ cup (4 ounces) low-fat cottage cheese
½ cup (40 grams) oats
1 scoop (25 grams) vanilla protein powder
2 packets of Truvia, or other sweetener to taste
½ teaspoon baking powder

Combine all ingredients in a blender and process until smooth.

Cook in waffle iron according to manufacturer’s directions, to desired crispiness. Spray with nonstick spray between each waffle.


lentil goat cheese burgers

Burgers are just sandwiches with patties in the middle. I don’t care if that patty is beef, bird, or beans. What I do require is that it not be bread.

A carb-filled patty between two ends of a bun doesn’t make nutritional sense, but it does seem like most vegetarian burgers are bound by large amounts of bread crumbs, oatmeal, or other grains. Whether whole or refined, these are still grains where I want there to be protein.

Cara is a great source for high-protein, low-carb ideas like these lentil burgers, which are bound with just a tablespoon of bread crumbs per serving. The protein – and, more importantly, the flavor – is increased even more with the addition of creamy, tangy goat cheese, one of my favorite ingredients.

While certainly healthy enough for a good weeknight dinner, prepping these burgers is not a short process from start to finish. However, the active time is not unreasonable, making these a great option to make ahead of time, leaving just the final searing for dinner time. It’s nice to have a meal as hearty but nutritious as this one stashed in the freezer.

One year ago: Brown Soda Bread
Two years ago: Deli-Style Rye Bread
Three years ago: Rice Pudding

Printer Friendly Recipe
Lentil Goat Cheese Burgers (adapted from Cara’s Cravings)

Make 4 burgers

Don’t be shy with the salt. I always need more than I expect in these.

¾ cup dried lentils
1 bay leaf
salt
1 large carrot, coarsely chopped
2 large shallots, coarsely chopped
2 cloves garlic
1 tablespoon olive oil, divided
1 tablespoon balsamic vinegar
4 ounces goat cheese
¼ cup breadcrumbs (fresh or dried)
¼ teaspoon black pepper
1 egg
for serving: buns, mustard, lettuce, tomato

1. Combine lentils, bay leaf, ½ teaspoon salt and 3 cups water in medium saucepan; bring to a boil over medium-high heat. Reduce the heat and simmer until the lentils are tender, 18-20 minutes. Drain the lentils, discarding the bay leaf.

2. Meanwhile, process the carrot, shallots, and garlic in the food processor until finely chopped but not pureed, about 5 seconds. (Do not clean processor bowl or blade.) Heat 1½ teaspoons olive oil in a medium nonstick skillet over medium heat; sauté the vegetables with a pinch of salt until softened and the shallots just browns around the edges, about 5 minutes. Add the vinegar; cook, stirring occasionally, until it has reduced to a syrupy consistency, 1-2 minutes.

3. Combine the lentils, sautéed vegetables, cheese, bread crumbs, and pepper in the food processor; process until evenly mixed and finely ground. Taste and adjust the seasoning if necessary. Add the egg; pulse until just combined.

4. Divide the dough into four portions; shape each one into a disk about ½-inch tall and 4 inches across (or approximately the diameter of your burger buns). Chill, uncovered, for at least 30 minutes or up to 2 days (cover if longer than 30 minutes).

5. Heat the remaining 1½ teaspoons of oil in a 12-inch nonstick pan over medium to medium-high heat. Using a spatula, carefully lower each patty into the pan; cook without moving for 4 minutes, until the bottom side is browned. Flip the patties and continue cooking for another 6 minutes until the second side is browned. Serve immediately with buns and toppings.

roasted tomato soup

When I was a kid, my friend Katie and I played a game in which we had a restaurant. We wrote up a menu and would let our parents order food from it, and then we’d bring them what they ordered. In other words, our parents paid for their food twice – once at the grocery store, and then a second time to Katie and I after we heated it up in the microwave for them.

Among other delicacies, our menu included nachos (Cheez Whiz and chips) and tomato soup. Tomato soup was probably our specialty. At Katie’s house, the Campbell’s concentrate was mixed with milk, but at my house, we added water. Katie and I were nothing if not accommodating to our customers’ preferences.

This tomato soup is not that tomato soup. It’s brighter, fresher, but still deeply flavored from the roasted tomatoes. The shallots make it just a little sweet, and a pinch of allspice adds warmth. This soup, topped with whole wheat macaroni noodles and served alongside cheese toast, is my favorite meal. It’s even worth ordering in a real restaurant.

One year ago: Masa Pancakes with Chipotle Salsa and Poached Eggs (I’m about halfway through that same bag of masa harina.)
Two years ago: Spinach Bread
Three years ago: Raspberry Bars

Printer Friendly Recipe
Roasted Tomato Soup (adapted from Cooks Illustrated)

6 servings

This recipe is messier without an immersion blender, but I made it that way for years. Use a large slotted spoon to transfer the solids to the blender with a cup or two of liquid and blend to puree. Pour the pureed mixture back into the liquid; stir in the brandy. You can blend everything instead of just the solids, but the soup will turn orange instead of red.

Feel free to add in a few tablespoons of cream (or pureed cottage cheese for a healthier alternative) at the end if you’re like Katie’s family and prefer your tomato soup creamy.

2 (28-ounce) cans whole tomatoes in juice
1½ tablespoons brown sugar
2 tablespoons butter
4 shallots, chopped
1 tablespoon tomato paste
⅛ teaspoon allspice
1¾ cup low-sodium chicken broth
¼ cup brandy

1. Adjust an oven rack to the upper middle position and heat the oven to 450 degrees. Line the bottom and sides of two 8- or 9-inch round pans with aluminum foil. Use a slotted spoon to remove the tomatoes, one by one, from their juice. Open the tomato on the side opposite the stem. Holding the tomato loosely in a fist, gently squeeze the tomato to remove most of its juice. Place the tomato stem-side up on one of the prepared pans. Repeat with the remaining tomatoes. Sprinkle the tomatoes with the brown sugar.  Roast the tomatoes until they are dry and lightly browned, about 45 minutes. Reserve the tomato juice.

2. Melt the butter in a large saucepan over medium-low heat. Add the shallots, tomato paste, and allspice to the pot; stir, then cover the pot and cook, stirring occasionally, until the shallots are soft, about 10 minutes. Add the chicken broth, reserved tomato juice, and roasted tomatoes. Bring to a simmer over medium-high heat, then reduce the heat to low, cover, and simmer 15 minutes. Use an immersion blender to puree the soup. Stir in the brandy and serve.

This recipe is in one of my earliest blog entries, but I have simplified and healthified (but not de-tastified) the soup since then, so I thought it was worth posting an updated version.