whole wheat pasta with greens, beans, tomatoes, and garlic chips

copy-of-dscn4711.jpg

Dave recently told me that he’d prefer to eat less meat. Because I do all of the meal planning and cooking, we generally have an understanding that I get control over what we eat. On the other hand, Dave is so open-minded about what we eat that it’s fair for him to offer up some opinions.

And our meat intake has increased in the last few months. We used to eat meat around 1-3 times per week, and lately we’ve been eating vegetarian around 1-3 times per week. Because I have more free time lately, I’ve been more adventurous with my cooking, and because I don’t have as much experience cooking with meat, it’s more challenging for me. (In other words, I’m not very good at it.)

But Dave’s right, we should eat less meat. For our health, for our budget, for the environment.

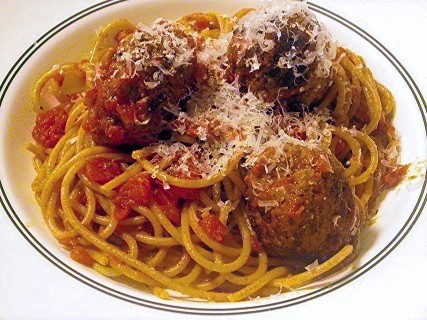
This recipe for whole wheat pasta with greens, beans, tomatoes, and garlic chips is definitely Dave’s type of meal.

copy-of-dscn4709.jpg

This is only a quarter of the kale the recipe calls for, or just under one serving. (I cut the recipe in half, and accidentally only bought half as much kale as I needed.) Hey, he asked for more vegetables…

The pasta, wholesome though it is, is surprisingly flavorful. A dish like this lends itself well to personalization. I left out the olives, because they’re one of Dave’s few food hang-ups. Because I only made half the recipe for the two of us, I’m left with half a can of beans and half a can of tomatoes leftover. I plan on doubling those ingredients in the future so I can use the whole can. I only used half the amount of kale the recipe calls for, which was convenient because it was one bunch. I could see how more would be good, although I don’t know if I’d want twice as much.

The recipe did take longer to prepare than I prefer for a weeknight pasta dish. Using bags of pre-washed spinach would cut down on prep time and cooking time. The garlic chips are a nice addition, but could also be skipped to save time.

All in all, this was a great tasting dish with lots of vegetables and no meat, as per Dave’s request.

copy-of-dscn4716.jpg

Whole Wheat Pasta with Greens, Beans, Tomatoes, and Garlic Chips (from Cooks Illustrated November 2005)

Serves 4 to 6

CI note: If you can’t find a 13.25-ounce package of Ronzoni, the winner of our tasting, use ¾ pound of a whole wheat pasta of your choice. If you like, pass extra-virgin olive oil for drizzling over the finished pasta. For a vegetarian dish, substitute vegetable broth for chicken broth.

Variation: Spinach can be substituted for the greens. Replace kale or collards with two 10-ounce bags of crinkly-leaf spinach, trimmed, chopped into 1-inch pieces, and rinsed, water still clinging to leaves (about 16 cups), and reducing chicken broth to ¾ cup. After adding second half of spinach to pan, cook for 2 minutes, until spinach is completely wilted. Continue with recipe as directed.

3 tablespoons olive oil
8 cloves garlic, 5 cloves sliced thin lengthwise, 3 cloves minced or pressed through garlic press (1 tablespoon)
Table salt
1 medium onion, diced small (about 1 cup)
½ teaspoon hot red pepper flakes
14 cups kale (loosely packed) or collard greens (1 to 1½ pounds), thick stems trimmed, leaves chopped into 1-inch pieces and rinsed, water still clinging to leaves
1½ cups low-sodium chicken broth
1 can (14½ ounces) diced tomatoes, drained
1 can (15 ounces) cannellini beans, drained and rinsed
¾ cup pitted kalamata olives, roughly chopped
13¼ ounces whole wheat spaghetti
2 ounces Parmesan cheese, finely grated (about 1 cup), plus additional for serving
Ground black pepper

1. Heat oil and sliced garlic in 12-inch straight-sided sauté pan over medium-high heat. Cook, stirring and turning frequently, until light golden brown, about 3 minutes. Using slotted spoon, transfer garlic to plate lined with paper towels. Sprinkle lightly with salt.

2. Add onion to pan; cook until starting to brown, about 5 minutes. Add minced garlic and red pepper flakes; cook, stirring constantly, until garlic is fragrant, about 30 seconds.

3. Add half of greens to pan; using tongs, toss occasionally, until starting to wilt, about 2 minutes. Add remaining greens, broth, and ¾ teaspoon salt; cover (pan will be very full); increase heat to high and bring to strong simmer. Reduce heat to medium and cook, covered, tossing occasionally, until greens are tender, about 15 minutes (mixture will be somewhat soupy). Stir in beans and olives.

4. Meanwhile, bring 4 quarts water to boil in Dutch oven over high heat. Add spaghetti and 1 tablespoon salt; cook until pasta is just shy of al dente. Drain pasta and return to pot. Add greens mixture to pasta, set over medium-high heat, and toss to combine. Cook until pasta absorbs most of liquid, about 2 minutes. Stir in 1 cup Parmesan; adjust seasoning with salt and pepper. Serve immediately, passing garlic chips, extra-virgin olive oil, and Parmesan separately.

spaghetti and meatballs

I actually made this dish a couple of months ago, but never got around to putting it in my blog. There’s not much to say about it, other than that spaghetti and meatballs are delicious. What’s not to love about pasta, sauce, and dressed-up meat?

copy-of-img_8364Updated photo 11.08.08

Of course, not all spaghetti and meatballs are created equal. But I’ve had my share of meatballs, and I’ve never had any better than these. This dish is a classic that will always please.

Classic Spaghetti and Meatballs (from Cooks Illustrated January 1998)

Serves 4 to 6

CI note: This streamlined recipe can be on the table in under an hour.

Bridget note: I find that recipes almost always call for more pasta per sauce than I prefer. Therefore, I would serve this with 12 ounces pasta instead of the 1 pound that the recipe calls for.

Meatballs
2 slices white sandwich bread (crusts discarded), torn into small cubes
½ cup buttermilk or 6 tablespoons plain yogurt thinned with 2 tablespoons sweet milk
¾ pound ground beef chuck (or 1 pound if omitting ground pork below)
¼ pound ground pork (to be mixed with ground chuck)
¼ cup grated Parmesan cheese
2 tablespoons minced fresh parsley leaves
1 large egg yolk
1 small clove garlic, minced (1 teaspoon)
¾ teaspoon table salt
Ground black pepper
vegetable oil for pan-frying (about 1¼ cups)

Simple Tomato Sauce
2 tablespoons extra-virgin olive oil
1 teaspoon minced garlic
1 can (28 ounces) crushed tomatoes
1 tablespoon minced fresh basil leaves
Table salt and ground black pepper
1 pound spaghetti
grated Parmesan cheese
1. For the meatballs: Combine bread and buttermilk in small bowl, mashing occasionally with fork, until smooth paste forms, about 10 minutes.

2. Mix all meatball ingredients, including bread mixture and pepper to taste in medium bowl. Lightly form 3 tablespoons of mixture into 1½-inch round meatballs; repeat with remaining mixture to form approximately 14 meatballs. (Compacting them can make the meatballs dense and hard. Can be placed on large plate, covered loosely with plastic wrap, and refrigerated for several hours.)

3. Bring 4 quarts of water to boil in large pot for cooking pasta.

4. Meanwhile, heat ¼-inch vegetable oil over medium-high heat in 10- or 11-inch sauté pan. When edge of meatball dipped in oil sizzles, add meatballs in single layer. Fry, turning several times, until nicely browned on all sides, about 10 minutes, regulating heat as needed to keep oil sizzling but not smoking. Transfer browned meatballs to paper towel–lined plate; set aside. Repeat, if necessary, with remaining meatballs.

5. For the sauce, discard oil in pan, leaving behind any browned bits. Add olive oil along with garlic; sauté, scraping up any browned bits, just until garlic is golden, about 30 seconds. Add tomatoes, bring to boil, and simmer gently until sauce thickens, about 10 minutes. Stir in basil; add salt and pepper to taste. Add meatballs and simmer, turning them occasionally, until heated through, about 5 minutes. Keep warm over low flame.

6. Meanwhile, add 1 tablespoon salt and pasta to boiling water. Cook until al dente, drain, and return to pot. Ladle several large spoonfuls of tomato sauce (without meatballs) over spaghetti and toss until noodles are well coated. Divide pasta among individual bowls and top each with a little more tomato sauce and 2 to 3 meatballs. Serve immediately with grated cheese passed separately.

smitten kitchen recipes

t1.jpg

Smitten Kitchen is my new favorite cookbook. In the past month since discovering Deb’s blog, I’ve made seven of her recipes. When I’m trying to come up with cooking ideas, I just scan through her recipe page. Rather than rehash each dish in detail, I’m combining them into one entry.

bft.jpg

Boozy Baked French Toast

Of all of Deb’s recipes that I’ve made recently, this is my and Dave’s favorite. For one thing, it takes all of 10 minutes to put together, and that can be done the night before. In the morning, just cook it in the oven for half an hour, and voila – a great breakfast. The recipe is supposedly adaptable to whatever flavors you’re in the mood for or you have available, but I’ve only made it one way. I was planning to follow Deb’s recent favorite, with triple sec and orange zest, but I use “planning” loosely, as I didn’t actually bother to get either triple sec or orange zest. Instead, I used Grand Marnier as the alcohol, the zest of one grapefruit, and a splash of vanilla extract. It was fantastic. It was like Creamsicle French Toast. I made it again a week later, exactly the same way. This is why I have a loaf of challah in my freezer right now, and a grapefruit languishing in my crisper drawer, waiting for me to get back from New Mexico and make this great and easy dish for my friends who will be visiting.

copy-of-dscn3652.jpg

Artichoke Ravioli

I love the idea of homemade ravioli. I enjoy working with fresh pasta, and I like the option of customizing my ravioli filling to whatever strikes my interest – mushrooms, squash, seafood, and in this case, artichokes. The problem is, I sort of suck at making it. Both times I’ve tried, the pasta has been too watery after being boiled. This particular recipe is baked after being boiled, which helped dry it out somewhat, but clearly I need to work on my technique. Ravioli is too much tedious work to get anything less than amazing results. I’m not ready to give up yet. This filling was, fortunately, very good. The simple sauce was good too, although I used canned tomatoes instead of fresh, it being February and all.

copy-of-dscn3833.jpg

Creamy Baked Macaroni and Cheese

I already have a macaroni and cheese recipe that I love, but Deb’s photos of a crispy cheesy crust and creamy cheesy sauce had me intrigued to try a new recipe. Did I mention that it’s cheesy? This recipe uses twice as much cheese per pasta as my other favorite recipe. So I made it, and it was delicious, but Dave and I couldn’t decide if it was as good as my other favorite. So I made them side-by-side, which was, well, confusing. Neither recipe is particularly difficult, but I was making half recipes of each sauce, then storing half of that in the fridge so we could have an easy but fresh meal a few days later, which means that each sauce was topping only a quarter recipe of pasta. There was a screw-up here and there, but nothing vital. We weren’t able to pick a favorite. I know they’re both macaroni and cheese, but it felt like comparing apples and oranges. The Cooks Illustrated recipe is creamy and smooth, both in texture and flavor, while the new recipe was far sharper (did I mention that it has twice as much cheese as the other?) and a bit grainy, but oh, that crisp crust was fun. I think I’ll be combining the two in the future. I know Cooks Illustrated uses half cheddar because of its great flavor, and half Monterey jack because of its smooth melting qualities, but I’m going to try using 75% cheddar and 25% Monterey jack next time to get some more of that sharp flavor. I’m also going to skip the bread crumb topping and use more cheese instead, then put that under the broiler to brown the cheese. I think this will combine my favorite aspects of each recipe. (I was also just reminded of a recipe I used to love that uses smoked gouda, so I need to revisit that one. Hey, I love cheesy pasta.)

ribs.jpg

Hoisin and Honey Pork Ribs

When I was a kid, pork ribs were my favorite meal, and I requested them for every birthday. I grew out of that when I decided that ribs were too much effort and mess to eat when there was so little meat. But these ribs were certainly worth the effort. I wanted to make them because I recently tried hoisin sauce for the first time and loved it. This was my first time cooking pork ribs, plus I’m not usually very good with the broiler, but everything worked out great. Because the ribs are boiled first, the broiler is just to crisp them and caramelize the sauce, so it was easy.

ddl2b.jpg

Dulce de Leche Cheesecake Squares

This recipe called to me as soon as Deb posted it. Cheesecake filling, graham cracker crust, chocolate glaze, all mixed up with dulce de leche. I’m not really familiar with dulce de leche, but caramelized milk certainly sounds great. But wow, these were rich. I can usually handle rich foods without a problem, but these were too much even for me. It helped when I thought of them like candy instead of like a bar cookie and started cutting them into the 1-inch squares that the recipe recommends. I did enjoy them, but I don’t think I’ll be making them again.

t3.jpg

Truffles

It sounds like Valentine’s Day is becoming mostly an excuse for couples to enjoy a good meal together, which I think is great. Dave and I weren’t even going to do that (we were having the second day of mac and chz comparison on V-Day), and I was okay with that. I found out on February 13th that Dave wanted to do something extra, so I surprised him by making truffles the next day. I loosely followed the recipe for Robert Linxe’s truffles, except, less fancy. I didn’t use Volrhona chocolate, I didn’t wear gloves, and I didn’t simmer the cream multiple times. It wasn’t worried about details this time. It was my first time making truffles, and I think they came out well. I want to try them again, but comparing a number of different quality chocolates to see how much it really matters.

Pizza Dough

Deb discussed a recipe for pizza dough that replaced some of the water with white wine and added a little honey. I tried it, and while the dough wasn’t sweet and the wine flavor wasn’t obvious, it made a really good pizza crust. Even Dave, who didn’t know that I had changed the recipe, pointed out that it was particularly good. I forgot that this recipe was related to this entry in my blog, so I didn’t think to take a picture, which is unfortunate because the crust was really crisp and light.

Next on the list is Lighter-Than-Air Chocolate Cake. Flourless chocolate cakes are usually dense confections, so I’m interested in this very light version. And then, who knows? World Peace Cookies? Pretzel rolls? Risotto alla Barolo? There’s so many great recipes to choose from, all beautifully photographed and enticingly described.

ddl1.jpg

salmon pesto pasta

opener1.jpg

This is Dave’s most-requested meal, and it’s gotten to the point where I purposefully don’t make it so that it will always be a treat. Yeah, I’m a bad wife. Also, I think making pesto is sort of a pain in this ass. Back in the old days, before I took over the kitchen and we actually cooked together on occasion, Dave would prepare the fish while I worked on the pesto. Over time, I tweaked the recipe here and there without writing it down, and it became easier to just do it myself. And now I complain that Dave doesn’t like to cook with me…

Updated photo 5/27

I’ve found that if I allow my life to be easy and just buy pesto, this recipe is actually a quick weeknight-appropriate meal. We’re picky about pesto, but I’ve found that my grocery store stocks some good stuff in their olive bar. But…this was for Dave’s birthday, so I went all out and made it from scratch.

(Wait a minute…wasn’t Dave’s birthday last month? Yes yes, the problem is, I didn’t like the picture I took of the final dish, so I wanted to make it again and hope for a better picture. I made it again last weekend, but the pictures from that night aren’t any better, so I’m sticking with the original. Sorry the colors are all funky. We eat dinner at night. There’s no natural light at night. My pictures of dinner tend be funky colors.)

I am, of course, a big fan of my homemade pesto. My trick (okay, Cooks Illustrated’s trick that I stole) is to squeeze the maximum amount of flavor out of each ingredient. I toast the pine nuts, I toast the garlic so that it loses that sharpness that raw garlic has, and I bruise the basil leaves. Before I did all this, I would often end up with grassy-smelling pesto, but now I make basily-smelling pesto. Gotta love that.

garlic.jpg pine-nuts.jpg

basil.jpg process.jpg

The salmon, brushed with oil and sprinkled with lemon zest, is broiled. The sauce is made from evaporated milk that’s boiled to reduce it even further. The pasta is mixed with the milk, then the salmon, and finally, off the heat to preserve the basil’s delicate flavor (Marcella Hazan is getting to me), the pesto is stirred in. Top with a little more parmesan, and you’ve got my and Dave’s favorite way to eat salmon. And Dave’s favorite way to eat pesto…and pasta…

raw-salmon.jpg copy-of-cooked-salmon.jpg

Salmon Pesto Pasta (substantially adapted from the Pillsbury Complete Cookbook)

Serves 2

8 ounces pasta
12 ounces salmon
salt and pepper
1 teaspoon grated lemon zest
1 tablespoon olive oil
1 teaspoon lemon juice
5 ounces evaporated milk
½ cup pesto (recipe follows)
grated parmesan, for serving

1. Bring a large pot of water to a boil. When water is boiling, add 1 tablespoon salt and pasta; stir to separate pasta. Cook pasta until al dente; drain. Pour evaporated milk into empty pot and simmer over medium-high heat until reduced to ¼ cup. Add cooked pasta to pot and stir to combine.

2. Adjust oven rack to upper-middle position and heat broiler. Line a baking sheet or pan with aluminum foil. Season skinless side of salmon liberally with salt and pepper, sprinkle with zest, then rub with olive oil. Broil until salmon is no longer translucent and is firm when pressed, about 10 minutes. Remove from broiler and sprinkle with lemon juice. Use fork to flake into bite-sized pieces. Skin will stick to foil and can be discarded.

3. Add salmon to pasta mixture and stir over medium heat until hot. Remove from heat and stir in basil. Top with parmesan.

Pesto (adapted from Cooks Illustrated)

Bridget note: I haven’t found a good way to measure basil leaves by volume. I just add all of the leaves from a hydroponic basil plant or a large herb container from the grocery store.

CI note: Basil usually darkens in homemade pesto, but you can boost the green color a little by adding the optional parsley.

Update 6/18/08 – After flipping through Jamie’s Dinners, I have found a far easier and just as effective method for bruising the basil leaves.  Simply add the unbruised basil leaves to the food processor bowl and process with the plastic dough hook until they’re thoroughly bruised.  Switch back to the blade and continue with the recipe as written.

Makes ½ cup

¼ cup pine nuts, toasted (or substitute almonds or walnuts)
5 medium cloves garlic, unpeeled
2 cups packed fresh basil leaves, rinsed thoroughly
2 tablespoons fresh parsley leaves, Italian (optional)
¼ cup extra-virgin olive oil
Pinch table salt
¼ cup (½ ounce) finely grated Parmesan cheese

1. Toast nuts in small heavy skillet over medium heat, stirring frequently, until just golden and fragrant, 4 to 5 minutes. Transfer the nuts to bowl of food processor fitted with steel blade.

2. Add the unpeeled garlic to empty skillet and toast until, shaking the pan occasionally, until fragrant and the color of the cloves deepens slightly, about 7 minutes. Let the garlic cool, then peel and add to food processor bowl.

3. Place basil and parsley in heavy-duty, quart-size, zipper-lock bag; pound with flat side of meat pounder until all leaves are bruised.

4. Process nuts and garlic until finely chopped. Add remaining ingredients except cheese; process until smooth, stopping as necessary to scrape down bowl with flexible spatula.

5. Transfer mixture to small bowl, stir in cheese(s) and adjust salt. (Can be covered with a sheet of plastic wrap placed directly over the surface or filmed with oil and refrigerated up to 5 days.)

the real deal (marcella hazan’s lasagne bolognese)

dscn2543.jpg

I’ve been kept away from cooking for too long. Between holiday traveling and moving, it’s been at least a month since I did any serious cooking or baking. Every time I have a cooking dry spell like this, I end up thinking of food constantly. I start to make lists of what I want to make. And it seems like the dish that occupies the most of my thoughts is always lasagna.

I love lasagna in all of its forms – meat, mushroom, spinach, artichoke, tomato, béchamel. This time I wanted to make a classic meat lasagna. I keep trying new recipes because I haven’t yet found one that I love. I decided it was high time to try Marcella Hazan’s recipe. I coveted Hazan’s Essentials of Classic Italian Cooking for several years before receiving it as a wedding gift from my sister-in-law. Yay! This is the first recipe I’ve made from it.

I’ve often heard about those lasagna recipes that take all day. Most modern recipes are trying to simplify and shorten the process, but I’ve always been curious about the original. If someone spends all day on a recipe, it must be worth it, right?

I was about to find out. Reading Hazan’s recipe for Baked Green Lasagne with Meat Sauce, Bolognese Style, was like the Choose Your Own Adventure books I read as a kid. Turn to page 129 for pasta made with the machine method, or page 143 for the hand-rolled method. On page 129, I was directed to page 89 for instructions on cooking the spinach. Yeesh. I took the recipe(s) one step at a time, and everything really did go without a hitch.

The recipe involves a lot of patience. Hazan is not much into modern tools that make life easier; she’s all about doing things the hard way. I’ve made béchamel sauce many times, always by melting butter, stirring in flour, whisking in cold milk, stirring until it boils. Hazan instructs this all to be done over low heat, and the milk is pre-heated, then added to the butter-flour mixture 2 tablespoons at a time. Then this mixture is stirred, of course constantly, over low heat until it thickens. Over low heat, it takes a long time to thicken. But once it does, it makes the smoothest béchamel sauce I’ve ever made, albeit one that tastes somewhat of raw flour.

The bolognese sauce is similar in that there’s a lot of “gentle simmering.” Hazan is very specific that the sauce must simmer for at least 3 hours after the tomatoes are added. What she fails to mention is that the recipe takes about an hour even before that point. One cup of milk takes quite some time to completely bubble away at a gentle simmer.

dscn2482.jpg

Of course the pasta dough could not be made in the food processor, it must be done by hand. I was determined to follow the recipe exactly, so I trudged on. And this is what I got…

dscn2499.jpg

Obviously the egg is supposed to stay in the well in the center of the flour, not glop out a breach in the side. Next time I’ll mix the egg and spinach together in a bowl, even add some flour to it before I move to a flat work surface to complete the additions of flour.

dscn2501.jpg

This is the first time I’ve rolled out pasta without wanting to scream! Really, rolling out the pasta just went splendidly, and I’m so glad that I finally learned a good technique for this.

dscn2529.jpg

The two sauces are mixed together and alternately layered with pasta. Hazan specifies that there should be at least 6 layers. I lost count, but I know I had more than that, and I only used probably 2/3 of the pasta sheets before I ran out of sauce.

dscn2542.jpg

All in all, the lasagna took about 7 hours, keeping in mind that I was taking my time. Was the recipe worth all this? Well…the short answer is no. It was good, but not that good. Dave and I agreed that it tasted somewhat meatloaf-ish. The long answer is that I was fairly certain going in that there would be things I’d want to change in the recipe for later editions. For one thing, the only cheese in the entire recipe is 2/3 cup of parmesan. I gather (from wikipedia) that this is the traditional Bolognese method for lasagna. But I’m an all-American girl, and I want mozzarella! I’d also like less carrot and celery to counteract the “meatloafness”, and more onion. I want to try adding some flavorings to the béchamel as well.

So I will be attempting this recipe again, but probably in a less authentic Italian form. I trust that it will go much faster now that I understand the methods involved. If nothing else, I’m grateful to have learned how to roll out homemade pasta to the thinnest setting without any swearing.

I’m typing out the whole recipe for you below, so you can see for yourself the pickiness that is a Marcella Hazan recipe. I followed the recipe just about exactly.

Baked Green Lasagne with Meat Sauce, Bolognese Style

Serves 6

Bolognese Sauce
Béchamel Sauce
Green pasta dough
1 tablespoon salt
2 tablespoons butter, plus more for greasing a 9- by 12-inch bake-and-serve lasagna pan, no less than 2½ inches high
2/3 cup fresh grated parmigiano-reggiano cheese

1. Prepare the meat sauce and set aside.

2. Prepare the béchamel, keeping it rather runny, somewhat like sour cream. When done, keep it warm in the upper half of a double boiler, with the heat turned to very low. If a film should form on top, just stir it when you are ready to use it.

3. Make green pasta dough. Roll it out as thin as it will come. Leave the strips as wide as they come from the rollers, and cut them into 10-inch lengths.

4. Set a bowl of cold water near the range, and lay some clean, dry cloth towels flat on a work counter. Bring 4 quarts of water to a rapid boil, add 1 tablespoon salt, and as the water returns to a boil, slip in 4 or 5 of the cut pasta strips. Cook very briefly, just seconds after the water returns to a boil after you dropped in the pasta. Retrieve the strips with a colander scoop of slotted spatula, and plunge them into the bowl of cold water. Pick up the strips, one at a time, rinse them under cold running water, and rub them delicately, as though you were doing fine hand laundry. Squeeze each strip very gently in your hands, then spread if flat on the towel to dry. When all the pasta is cooked in the manner, 4 or 5 strips at a time, and spread out to dry, pat it dry on top with another towel.

*Explanatory note: The washing, wringing, and drying of pasta for lasagna is something of a nuisance, but it is necessary. You first dip the partly cooked pasta into cold water to stop the cooking instantly. This is important because if lasagna pasta is not kept very firm at this stage it will become horribly mushy later when it is baked. And you must afterward rinse off the moist starch on its surface, or the dough will become glued to the towel on which it is laid out to dry, and tear when you are ready to use it.

5. Preheat the oven to 400 degrees.

6. Thickly smear the bottom of a lasagna pan with butter and about 1 tablespoon of béchamel. Line the bottom of the pan with a single layer of pasta strips, cutting them to fit the pan, edge to edge, allowing no more than ¼ inch for overlapping.

7. Combine the meat sauce and the béchamel and spread a thin coating of it on the pasta. Sprinkle on some grated parmesan, then add another layer of pasta, cutting it to fit as you did before. Repeat the procedure of spreading the sauce and béchamel mixture, then sprinkling with Parmesan. Use the trimmings of pasta dough to fill in gaps, if necessary. Build up to at least 6 layers of pasta. Leave yourself enough sauce to spread very thinly over the topmost layer. Sprinkle with parmesan and dot with butter.

*Ahead-of-time note: The lasagna may be completed up to 2 days in advance up to this point. Refrigerate under tightly sealing plastic wrap.

8. Bake on the uppermost rack of the preheated oven until a light, golden crust formed on top. It should take between 10 and 15 minutes. If after the first few minutes you don’t see any sign of a crust beginning to form, turn up the oven another 50 to 75 degrees. Do not bake longer then 15 minutes altogether.

9. Remove from the oven and allow to settle for about 10 minutes, then serve at table directly from the pan.

Bolognese Sauce:
1 tablespoon oil
3 tablespoon butter
½ cup chopped onion
2/3 cup chopped celery
2/3 cup chopped carrot
3/4 pound ground beef chuck
salt
black pepper, ground fresh from the mill
1 cup whole milk
whole nutmeg
1 cup dry white wine
1½ cup canned imported Italian plum tomatoes, cut up, with their juice

1. Put the oil, butter and onion in the pot, and turn the heat on to medium. Cook and stir the onion until is has become translucent, then add the chopped celery and carrot. Cook for about 2 minutes, stirring the vegetables to coat them well.

2. Add the ground beef, a large pinch of salt, & a few grindings of pepper. Crumble the meat with a fork and cook until beef has lost its raw, red color.

3. Add the milk and let simmer gently, stirring frequently, until it has bubbled away completely. Add a tiny grating – about 1/8 teaspoon – of nutmeg and stir.

4. Add the wine, let simmer until it has evaporated, then add the tomatoes and stir thoroughly to coat all ingredients well. When the tomatoes begin to bubble, turn the heat down so that the sauce cooks at the laziest of simmers, with just an intermittent bubble breaking through the surface. Cook, uncovered, for 3 hours or more, stirring from time to time. While the sauce is stirring, you are likely to find that it begins to dry out and the fat separates from the meat. To keep it from sticking, continue the cooking, adding ½ cup of water whenever necessary. At the end, however, no water at all must be left and the fat must separate from the sauce. Taste and correct for salt.

Béchamel Sauce:
3 cups milk
6 tablespoons butter
4½ tablespoons flour
¼ teaspoon salt

1. Put the milk in a saucepan, turn the heat to medium-low, and bring the milk just to the verge of boiling, to the point when it begins to form a ring of small, pearly bubbles.

2. While heating the milk, put the butter in a heavy-bottomed, 4- to 6-cup saucepan, and turn the heat to low. When the butter has melted completely, add the flour and stirring it with a wooden spoon. Cook, while stirring constantly, for about 2 minutes. Do not allow flour to become colored. Remove from heat.

3. Add the hot milk to the flour-and-butter mixture, no more than 2 tablespoons of it at a time. Stir steadily and thoroughly. As soon as the first 2 tablespoons have been incorporated into the mixture, add 2 more, and continue to stir. Repeat this procedure until you have added ½ cup milk; you can now put in the rest of the milk ½ cup at a time, stirring steadfastly, until all the milk has been smoothly amalgamated with the flour and butter.

4. Place the pot over low heat, add the salt, and cook, stirring without interruption, until the sauce is as dense as thick cream. If you find any lumps forming, dissolve them by beating the sauce rapidly with a whisk.

Pasta:
6 ounces fresh spinach, cooked, or 1/3 package frozen leaf spinach
2 large eggs
1½ cups unbleached flour

Pour the flour onto a work surface, shape it into a mound, and scoop out a deep hollow in its center. Break the eggs and add the chopped spinach into the hollow.

Beat the eggs and spinach lightly with a fork for about 2 minutes as though you were making an omelet. Draw some of the flour over the eggs, mixing it in with the fork a little at a time, until the eggs are no longer runny. Draw the sides of the mound together with your hands, but push some of the flour to one side, keeping it out of the way until you find you absolutely need it. Work the eggs and flour together, using your fingers and the palms of your hands, until you have a smoothly integrated mixture. If it is still moist, work in more flour.

When the mass feels good to you and you think it does not require any more flour, wash your hands, dry them, and run a simple test: Press you thumb deep into center of the mass; if it comes out clean, without any sticky matter on it, no more flour is needed. Put the egg and flour mass to one side, scrape the work surface absolutely clear of any loose or caked bits of flour and of any crumbs, and get ready to knead.

Return to the mass of flour and eggs. Push forward against it using the heel of your palm, keeping your fingers bent. Fold the mass in half, give it a half turn, press hard against it with the heel of your palm again, and repeat the operation. Make sure that you keep turning the ball of dough always in the same direction, either clockwise or counterclockwise, as you prefer. When you have kneaded it thus for 8 full minutes and the dough is as smooth as baby skin, it is ready for the machine.

Cut the ball of dough into 6 equal parts.

Spread clean, dry, cloth dish towels over a work counter near where you’ll be using the machine.

Set the pair of smooth cylinders, the thinning rollers, at the widest opening. Flatten one of the pieces of dough by pummeling it with your palm, and run it through the machine. Fold the dough twice into a third of its length, and feed it by its narrow end through the machine once again. Repeat the operation 2 or 3 times, then lay the flattened strip of pasta over a towel on the counter. Since you are going to have a lot of strips, start at one end of the counter, leaving for for the others.

Take another piece of dough, flatten it with your hand, and urn it through the machine exactly as described above. Lay the strip next to the previously thinned one on the towel, but do not allow them to touch or overlap, because they are still moist enough to stick to each other. Proceed to flatten all the remaining pieces in the same manner.

Close down the opening between the machine’s rollers by one notch. Take the first pasta strip you had flattened and run it once through the rollers, feeding it by its narrow end. Do not fold it, but spread it flat on the cloth towel, and move on to the next pasta strip in the sequence.

When all the pasta strips have gone through the narrower opening once, bring the rollers closer together by another notch, and run the strips of pasta through them once again, following the procedure described above. You will find the strips becoming longer, as they get thinner, and if there is not enough room to spread them out on the counter, you can let them hand over the edge. Continue thinning the strips in sequence, progressively closing down the opening between the rollers one notch at a time. This step-by-step thinning procedure, which commercial makers of fresh pasta greatly abbreviate or skip altogether, is responsible, along with proper kneading, for giving good pasta its body and structure.

dscn2562.jpg

old classics (macaroni and cheese)

dscn1854.jpg

A few years ago, I did some research and then decided to stop eating processed foods. It really hasn’t been difficult, especially after the first couple of months. And I’ve found that most natural products are far tastier than processed. There is one exception, and that is macaroni and cheese. Every single time I walk down that aisle in the grocery store and see all the little blue boxes full of noodles and powdered cheese, my mouth waters.


Photo 10.30.08

Homemade macaroni and cheese is just as good. (Although not really in the same food category – to me, one is a snack and the other is a meal.) This recipe has one optional ingredient that I eschewed the first few times I made the recipe, but eventually decided to try. It’s cayenne powder, and it is such a great addition. It doesn’t make the macaroni and cheese at all spicy, but it does add just a bit of complexity to what can otherwise be a rather one-dimensional dish.

dscn1849.jpg

The recipe is from Cooks Illustrated (if you read my blog regularly, you may be seeing a pattern…). They found that the recipe worked best when the whole thing was cooked on the stove, which just a brief visit under the broiler to brown the buttered bread crumbs. Macaroni and cheese served with broccoli is such a great comforting meal.

dscn1850.jpg

Classic Macaroni and Cheese (from Cooks Illustrated – no changes)
Serves 6-8 as a main dish

Update 05/05/08 – I recently made the following changes to this recipe. I reduced the monterey jack to 7 ounces and increased the cheddar to 9 ounces. I think 6 ounces monterey jack and 10 of cheddar would be even better. I skipped the bread crumb topping and replaced it with an additional 2 ounces (4 would have been better) of cheddar before broiling.

Update 11/17/08 – I tried the changes in the previous update – using 6 ounces monterey jack and 10 ounces cheddar in the sauce, and replacing the bread crumbs with 4 ounces of cheddar.  It was great!  The sauce was still smooth, but it had a stronger cheese flavor.  I replace the bread crumbs just because I prefer my mac and chz without them.

Bread Crumb Topping:
6 slices white sandwich bread (good-quality, about 6 ounces), torn into rough pieces
3 tablespoons unsalted butter (cold), cut into 6 pieces

Pasta and Cheese:
1 pound elbow macaroni
1 tablespoon table salt
5 tablespoons unsalted butter
6 tablespoons all-purpose flour
1½ teaspoons powdered mustard
¼ teaspoon cayenne pepper (optional)
5 cups milk
8 ounces Monterey Jack cheese , shredded (2 cups)
8 ounces sharp cheddar cheese , shredded (2 cups)
1 teaspoon table salt

1. For the bread crumbs: Pulse bread and butter in food processor until crumbs are no larger than 1/8 inch, ten to fifteen 1-second pulses. Set aside.

2. For the pasta and cheese: Adjust oven rack to lower-middle position and heat broiler. Bring 4 quarts water to boil in Dutch oven over high heat. Add macaroni and 1 tablespoon salt; cook until pasta is tender. Drain pasta and set aside in colander.

3. In now-empty Dutch oven, heat butter over medium-high heat until foaming. Add flour, mustard, and cayenne (if using) and whisk well to combine. Continue whisking until mixture becomes fragrant and deepens in color, about 1 minute. Gradually whisk in milk; bring mixture to boil, whisking constantly (mixture must reach full boil to fully thicken). Reduce heat to medium and simmer, whisking occasionally, until thickened to consistency of heavy cream, about 5 minutes. Off heat, whisk in cheeses and 1 teaspoon salt until cheeses are fully melted. Add pasta and cook over medium-low heat, stirring constantly, until mixture is steaming and heated through, about 6 minutes.

4. Transfer mixture to broiler-safe 9 by 13-inch baking dish and sprinkle evenly with bread crumbs. Broil until crumbs are deep golden brown, 3 to 5 minutes, rotating pan if necessary for even browning. Cool about 5 minutes, then serve.

dscn1862.jpg

prepping and chopping and prepping… (pad thai)

dscn2233.jpg

I always seem to fool myself into thinking that pad thai is a good weeknight meal. Then I’ll get home from work and start prepping ingredients, and then I’m prepping and prepping and finally asking Dave to help because I’ve been in the kitchen over half an hour and I haven’t even started cooking yet. Fortunately, once the cooking starts, it only takes 10 minutes or so. That short cooking time is what always tricks me into making this on a weeknight.

One of the most difficult tasks with making pad thai is finding at least some of the authentic ingredients. I love tamarind, and I’m always disappointed when I order pad thai in a restaurant and find that they’ve skipped the tamarind. Tamarind is sold in several forms – the whole pods, the pulp of the pods, and a liquid concentrate. I use the pulp. If you really can’t find any, a mixture of lime juice and water can do in a pinch.

dscn2199.jpg

Pad thai has so many freakin’ ingredients, which is the only reason it takes a while to prepare. Another of my favorites, that might be hard to find, is dried shrimp. Mmm…like shrimp jerkey, so salty and good. I tried salted radish and absolutely hated it. Definitely a textural issue. I’ve seen recipes that called for salted cabbage instead of salted radish, so I want to try that too.

dscn2221.jpg

There are so many ingredients, and the cooking happens so fast, that I have to line up all of the ingredients in the order that they’re cooked, so I don‘t have to look at the recipe at all. Sometimes I have Dave read the recipe to me as I stand over the stove doing the fun part.

dscn2230.jpg

Ah, but pad thai is so worth all the chopping and prep work. It’s so good – and healthy!

Pad Thai (from Cooks Illustrated – no adaptations)
Serves 4 as a main dish

Although pad thai cooks very quickly, the ingredient list is long, and everything must be prepared and within easy reach at the stovetop when you begin cooking. For maximum efficiency, use the time during which the tamarind and noodles soak to prepare the other ingredients. Tofu is a good and common addition to pad thai. If you like, add 4 ounces of extra-firm tofu or pressed tofu (available in Asian markets) cut into ½-inch cubes (about 1 cup) to the noodles along with the bean sprouts.

If you’re using tamarind concentrate instead of pulp, mix 1 tablespoon with 2/3 cup hot water. If you can’t find any tamarind, mix 1/3 cup of water with 1/3 cup of lime juice; replace granulated sugar with brown sugar. Do not serve this version with lime wedges.

2 tablespoons tamarind paste or substitute
¾ cup water (boiling)
3 tablespoons fish sauce
1 tablespoon rice vinegar
3 tablespoons granulated sugar
¾ teaspoon cayenne pepper
4 tablespoons peanut oil or vegetable oil
8 ounces dried rice stick noodles, about 1/8 inch wide (the width of linguine)
2 large eggs
¼ teaspoon table salt
12 ounces medium shrimp (31/35 count), peeled and deveined, if desired
3 cloves garlic, pressed through garlic press or minced (1 tablespoon)
1 medium shallot, minced (about 3 tablespoons)
2 tablespoons dried shrimp, chopped fine (optional)
2 tablespoons Thai salted preserved radish (optional)
6 tablespoons chopped unsalted roasted peanuts
3 cups bean sprouts (6 ounces)
5 medium scallions, green parts only, sliced thin on sharp bias
¼ cup fresh cilantro leaves (optional)
lime wedges

1. Soak tamarind paste in 3/4 cup boiling water for about 10 minutes, then push it through a mesh strainer to remove the seeds and fibers and extract as much pulp as possible. Stir fish sauce, rice vinegar, sugar, cayenne, and 2 tablespoons oil into tamarind liquid and set aside.

2. Cover rice sticks with hot tap water in large bowl; soak until softened, pliable, and limp but not fully tender, about 20 minutes. Drain noodles and set aside. Beat eggs and 1/8 teaspoon salt in small bowl; set aside.

3. Heat 1 tablespoon oil in 12-inch skillet (preferably nonstick) over high heat until just beginning to smoke, about 2 minutes. Add shrimp and sprinkle with remaining 1/8 teaspoon salt; cook, tossing occasionally, until shrimp are opaque and browned about the edges, about 3 minutes. Transfer shrimp to plate and set aside.

4. Off heat, add remaining tablespoon oil to skillet and swirl to coat; add garlic and shallot, set skillet over medium heat and cook, stirring constantly, until light golden brown, about 1 1/2 minutes; add eggs to skillet and stir vigorously with wooden spoon until scrambled and barely moist, about 20 seconds. Add noodles, dried shrimp, and salted radish (if using) to eggs; toss with 2 wooden spoons to combine. Pour fish sauce mixture over noodles, increase heat to high, and cook, tossing constantly, until noodles are evenly coated. Scatter 1/4 cup peanuts, bean sprouts, all but 1/4 cup scallions, and cooked shrimp over noodles; continue to cook, tossing constantly, until noodles are tender, about 2 1/2 minutes (if not yet tender add 2 tablespoons water to skillet and continue to cook until tender).

5. Transfer noodles to serving platter, sprinkle with remaining scallions, 2 tablespoons peanuts, and cilantro; serve immediately, passing lime wedges separately.

dscn2239.jpg

a handful of vagueness (pasta with meyer lemon, creme fraiche, and parmesan)

dscn2150.jpg

My next Meyer lemon experiment was a savory recipe from Amanda Hesser’s Cooking for Mr. Latte. This is the type of recipe that drives me crazy – a handful of this and a few handfuls of that. Seriously? I don’t see anything wrong giving exact measurements – of course everyone adjusts recipes to their own tastes, but you want to at least give your readers a starting point. Especially when you say something like “quickly fold in the ingredients, adding more to taste.” I’m supposed to fold, taste, fold, taste, fold, when I’m in a hurry?

Anyway. Somewhere along the line when I was reading about Meyer lemons, I read that one reason that their availability is often limited is that they aren’t as hardy as regular lemons. Apparently, this is true. I bought the lemons on Saturday and figured I had plenty of time to use them, but by Tuesday, they weren’t looking so hot, so I rushed to use them that day.

dscn2141.jpg

This recipe involved another new ingredient for me – crème fraiche. Pretty good stuff. Kind of like mellow sour cream.

Not only are the ingredient amounts basically useless, but the method for this recipe didn’t really work either. Hesser instructs the reader to grate “a handful” of parmesan cheese into a bowl along with some lemon zest, then add “three handfuls” of arugula. (Grr.) The cooked pasta is added to the bowl, then the crème fraiche and some of the pasta cooking water is stirred in. The problem is that the hot pasta melted the cheese into clumps, and I couldn’t get them to melt into a smooth sauce. The lemon zest clumped with the parmesan clumps, so there really wasn’t an even distribution of flavors.

dscn2145.jpg

All that being said, the recipe has lots of potential. The flavors were good, although I needed more arugula, more parmesan (of course!), and more zest. And, unlike with the lemon bars, I think the Meyer lemons may be important to the recipe. I’m actually hesitant to try it with regular lemons, although it’s probably worth the experiment. It’s a great weeknight meal, because all of the other ingredients can be prepared while the pasta is cooking. Just don’t expect Hesser’s recipe to help you along at all!

Pasta with Meyer lemon, crème fraiche, and parmesan (adapted from Amanda Hesser’s Cooking for Mr. Latte)
Serves 4

The amounts listed for each ingredient are loosely based on Hesser’s recipe. However, it is expected that your personal tastes may vary and you may want to adjust the quantities accordingly.

1 pound pasta (any shape)
salt
3 ounces arugula, chopped
zest from 2 lemons
juice from 2 lemons
½ cup crème fraiche
½ ounce parmesan cheese, grated
ground black pepper

1. Bring 4 quarts of water to a boil. Add 1 tablespoon salt and pasta. Cook until al dente. Drain, reserving ½ cup of the water.

2. Mix hot pasta with remaining ingredients, making sure to add cheese after crème fraiche to avoid clumps. Stir in reserved water if pasta is sticky. Serve in heated pasta bowls.

dscn2151.jpg