Search Results for: 2009/04/04/cooks-illustrateds-perfect-chocolate-chip-cookies

stovetop macaroni and cheese

stovetop mac and cheese 8

There are three things that lead to difficulties with self-control for me – chocolate chip cookie dough, macaroni and cheese, and alcohol. I’ve found a handful of tricks for dealing with the alcohol one (although tiki drinks can be tricky since even one can be strong enough to lower my resistance to more!), but with the other two, the best way I’ve found of controlling them is not to be around them. We normally eat macaroni and cheese maybe once a year, even though it’s one of my favorite foods.

stovetop mac and cheese 3

I’ve told myself for years that when I got pregnant and couldn’t drink alcohol or eat cookie dough, I’d make up the extra calories with macaroni and cheese. It turns out that making up extra calories hasn’t been an issue; since I got that positive test back in May, all I’ve wanted to eat is dessert. Pasta is tasting extra delicious too, and yes, especially when it’s coated in cheese.

stovetop mac and cheese 4

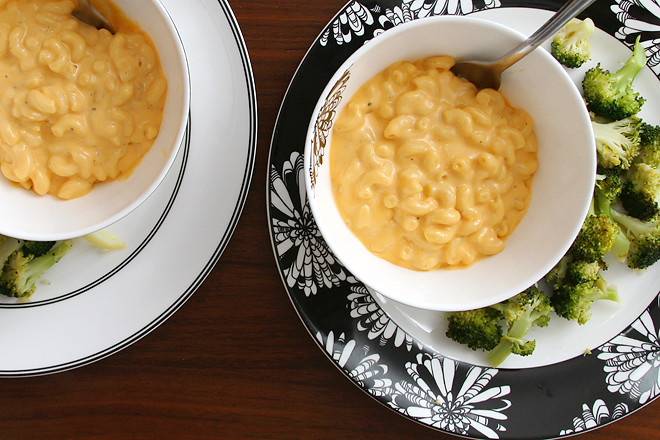
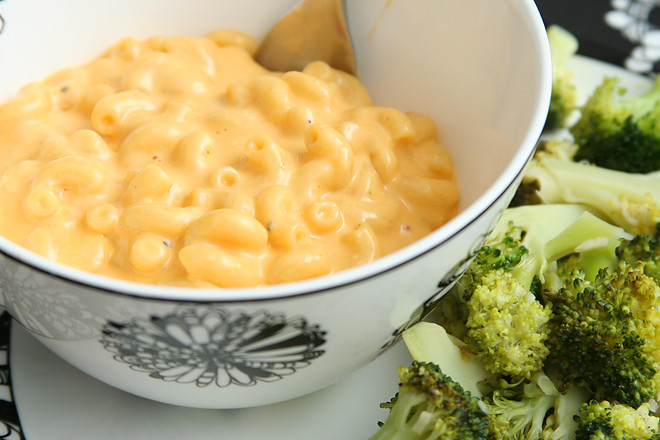
I love the baked recipe I’ve been making for years, but then someone mentioned the blue box mac and cheese, and while I haven’t had severe cravings, maybe I’m more suggestible than I would normally be. I couldn’t stop thinking about that blue box. Unfortunately, the last time I bought it, I distinctly remember being disappointed that it was bland and mushy.

stovetop mac and cheese 5

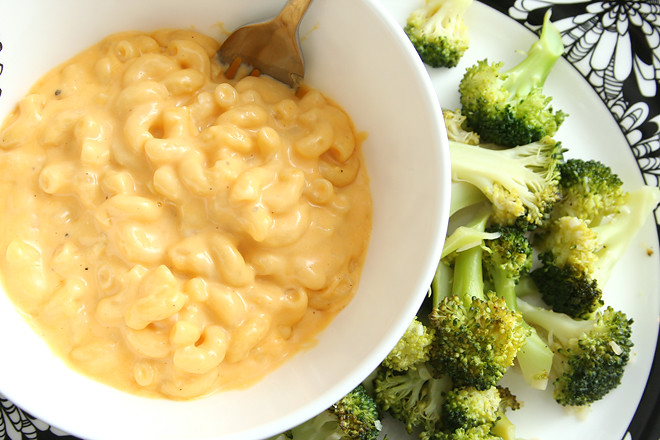
I figured there had to be a way to make a creamy, smooth sauce using real ingredients. It turns out, the most popular recipes for stovetop mac and cheese aren’t so different from the blue box; you still coat the cooked pasta with butter, then add milk and cheese – except in this case, that cheese is real shredded cheddar, not a powder. And it tastes reminiscent of that blue box, in the best possible way. Plus, the pasta doesn’t dissolve in my mouth before I get to chew it! This is so good and so easy that maybe one day, my daughter will be nostalgic for this recipe instead of that blue box.

stovetop mac and cheese 7

Printer Friendly Recipe
Stovetop Macaroni and Cheese (not really adapted from Cook’s Illustrated)

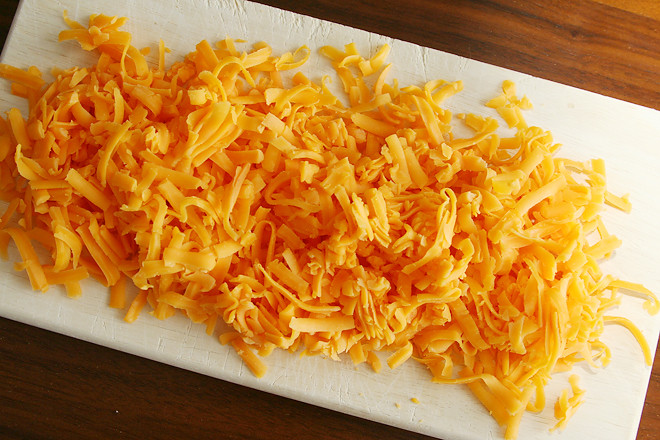
I’ve only made this with all cheddar cheese. Monterey jack could make the sauce smoother, but it won’t be as flavorful. I tried a different recipe that called for a combination of cheddar and American cheese, and, while the sauce was creamier, the flavor of the American cheese dominated, and I prefer cheddar. With just cheddar, the sauce is plenty smooth and creamy for me.

So far, I’ve only made a half recipe (multiple times), using a 5-ounce can of evaporated milk. It seems like plenty of liquid.

2 large eggs
1 (12-ounce) can evaporated milk
¼ teaspoon hot pepper sauce
2 teaspoons table salt
¼ teaspoon ground black pepper
1 teaspoon dry mustard, dissolved in 1 teaspoon water
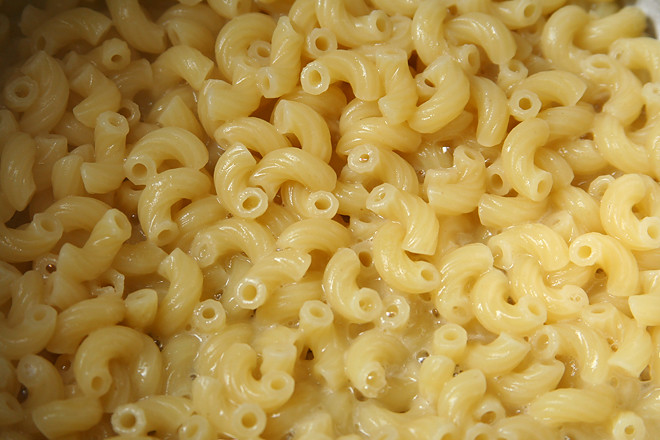
8 ounces elbow macaroni
4 tablespoons unsalted butter
12 ounces sharp cheddar cheese, American cheese, or Monterey Jack cheese, grated (about 3 cups)

1. Meanwhile, heat 2 quarts water to boil in large heavy-bottomed saucepan or Dutch oven. Add 1 1/2 teaspoons of the salt and macaroni; cook until almost tender, but still a little firm to the bite. Drain and return to pan over low heat. Add butter; toss to melt.

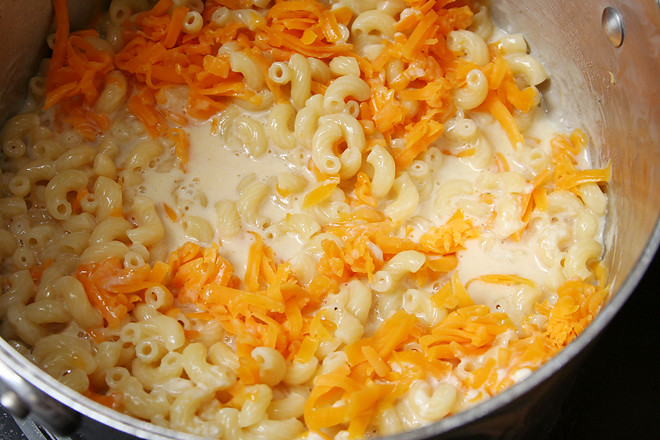
2. Meanwhile, mix eggs, 1 cup of the evaporated milk, pepper sauce, 1/2 teaspoon of the salt, pepper, and mustard mixture in small bowl; set aside.

3. Pour egg mixture over buttered noodles along with three-quarters of the cheese; stir until thoroughly combined and cheese starts to melt. Gradually add remaining milk and cheese, stirring constantly, until mixture is hot and creamy, about 5 minutes. Serve immediately.

stovetop mac and cheese 6

chocolate chip cookie dough cupcakes

chocolate chip cookie dough cupcakes 8

I might have mentioned, once or twice, that I am a fan of cookie dough. Any cookie is good, but chocolate chip is the best. And not any of those new recipes that are based on melted butter, those make greasy dough. I want the classic light and fluffy, pale, grainy dough. For me, the chocolate chips are mostly a distraction, but I figure they’re part of the package.

chocolate chip cookie dough cupcakes 3

But it’s my birthday, and I guess chocolate chip cookie dough is not an appropriate celebratory dessert to share. I figured these were the next best thing. A yellow cake adapted with extra brown sugar and chocolate chips, an eggless cookie dough filling, frosting with brown sugar and even raw flour, all topped off with the most adorable chocolate chip cookies you’ve ever seen. Do you know how many opportunities this was to eat something resembling chocolate chip cookie dough? A lot.

chocolate chip cookie dough cupcakes 5

I have to admit that my favorite part was the filling – pure dough, with none of this cake distraction. The frosting was impressive too, the raw flour and brown sugar really made it resemble cookie dough. It was pretty much the perfect birthday cake for me, especially because there’s extra filling in the fridge for the rest of the weekend.

chocolate chip cookie dough cupcakes 6

Printer Friendly Recipe
Chocolate Chip Cookie Dough Cupcakes
(adapted from Annie’s Eats and Martha Stewart’s Yellow Cake recipe)

Makes 30 cupcakes

I baked the cookies a week early and froze them. I made the filling two days early. I made the cupcakes the night before, then filled, frosted, and garnished them the morning before I served them.

For the cake:
1½ cups (7.2 ounces) all-purpose flour
1½ cups (6 ounces) cake flour
2 teaspoons baking powder
½ teaspoon baking soda
12 tablespoons (1½ sticks) unsalted butter, softened
1¼ cups (8.75 ounces) brown sugar
½ cup (3.5 ounces) granulated sugar
1 teaspoon salt
4 large eggs, at room temperature
¼ cup canola oil
2 teaspoons vanilla extract
1¼ cups buttermilk, room temperature
1 cup (6 ounces) chocolate chips

For the filling:
8 tablespoons (1 stick) unsalted butter
½ teaspoon salt
½ cup (3.5 ounces) brown sugar
¼ cup (1.75 ounces) granulated sugar
2 tablespoons milk
1 teaspoon vanilla extract
1 cup plus 2 tablespoons (5.6 ounces) cups all-purpose flour
½ teaspoon baking soda
1 cup (6 ounces) chocolate chips

For the frosting:
16 tablespoons (2 sticks) unsalted butter, at room temperature
½ teaspoon salt
½ cup (3.5 ounces) light brown sugar, packed
2 cups (8 ounces) confectioners’ sugar
⅔ cup (3.2 ounces) all-purpose flour
2 teaspoons vanilla extract

For the garnish:
mini chocolate chip cookies (optional)
chocolate chips (optional)

1. For the cake: Adjust an oven rack to the middle position; heat the oven to 350 degrees. Line 24 muffin wells with paper cups. In a medium bowl, whisk together the flours, baking powder, and baking soda.

2. In a stand mixer fitted with the paddle attachment (or a large bowl if using a hand-held mixer), beat the butter, sugars, and salt on medium speed until light and fluffy, about 2 minutes, scraping down the sides of the bowl as necessary. Add the eggs one at a time, beating well after each addition, then mix in the oil and vanilla. Reduce the mixer speed to low; add the dry ingredients in three additions, alternating with the buttermilk and ending with the dry ingredients. Beat each addition just until incorporated. Stir in the chocolate chips.

3. Divide the batter between the prepared muffin cups, filling each cup about two-thirds full. Bake for 16-20 minutes, until a toothpick inserted into the center of a cupcake comes out clean. Transfer the pan to a wire rack to cool. Remove the cupcakes from the pan after 5 minutes. Cool completely before filling and frosting.

4. For the filling: In the bowl of a stand mixer fitted with the paddle attachment (or a large bowl if using a stand mixer), beat the butter, salt, and sugars on medium speed until light and fluffy, 1-2 minutes. Add the milk, beating until incorporated, then mix in the vanilla. Reduce the mixer speed to low and gradually add the flour, mixing just until incorporated. Stir in the chocolate chips.

5. For the frosting: In a standing mixer fitted with the whisk attachment, beat the butter at medium-high speed until smooth, about 20 seconds. Add the brown sugar and salt; beat at medium speed until pale and fluffy. Reduce the speed to low and slowly add the confectioners’ sugar and flour; beat at medium-low speed until most of the sugar is moistened, about 45 seconds. Scrape the bowl, add the vanilla, and beat at medium speed until incorporated, about 10 seconds, then increase the speed to medium-high and beat until light and fluffy, about 4 minutes, scraping down the bowl once or twice.

6. To assemble: Use a paring knife to carve a cone out of the center of each cupcake, leaving at least ¼-inch of cake on the bottom of the cupcakes. Fill each divot with filling. Frost the cupcakes, completely covering the filling. Garnish with cookies and additional chocolate chips, if desired.

chocolate chip cookie dough cupcakes 7

chocolate chip cookie comparison 2

chocolate chip comparison 2
The Chewy

I’ve done all these comparisons and experiments with chocolate chip cookies, and yet, I don’t make any of those recipes. Usually, I make chocolate chip cookies to please myself, because I think it’s fun, so I’m more concerned with which recipe I most enjoy baking instead of which recipe has the best result. But maybe this isn’t so bad – maybe my hacked combination of recipes could stand up to the originals.

chocolate chip comparison 1
The Chewy dough

It was time to find out. For a comparison of the best of the best, I chose Alton Brown’s The Chewy recipe, winner of my last comparison; Cook’s Illustrated’s Perfect Chocolate Chip Cookie, a true standout; Kelsey’s Best Ever Chewy Chocolate Chip Cookies (adapted from Anna Olson’s original recipe), which are the most popular post on her blog; and the one I always make when I’m too lazy to follow an actual recipe.

chocolate chip comparison 3
The Chewy

What sets Alton’s recipe apart is the use of bread flour instead of regular and the replacement of an egg white with milk. Cook’s Illustrated Perfect recipe is designed to mimic the effects of the overnight rest of the dough recommended by the New York Times, which it does using melted browned butter. Compared to the traditional Tollhouse recipe, Kelsey’s recipe uses a higher ratio of flour (plus a bit of cornstarch). My recipe has some similar traits to those above, like bread flour instead all-purpose and an overnight chill to enhance the butterscotch flavor.

chocolate chip comparison 4
my recipe dough

Between the four tasters I had, there was no unanimous favorite. Dave’s favorite was CI’s Perfect cookies. My sister and her husband both chose Alton Brown’s The Chewy as their favorite; it was chewier, but, to Dave, it was too greasy. Kelsey’s recipe was drier than the others; compared to the ultra-rich versions it was being compared to, it had less flavor. My hacked together recipe was the most traditional, crispy around the edges and gooey in the middle.

chocolate chip comparison 6
Cook’s Illustrated’s Perfect

As for me, I’ll certainly keep making the version I have been, now that I know that it can hold its own with the big dogs. I love it because I don’t have to look at a recipe and the dough is perfect for snacking. The Chewy tends to come out a little too flat, and I don’t like the dough for CI’s Perfect (which makes it the recipe of choice when self-control is necessary!), plus it simply isn’t as fun to make cookies with a whisk as it is with a mixer. Slight differences aside, these were all standout recipes, but I appreciate the validation to keep being lazy with my hacked together version.

chocolate chip comparison 5
left to right: The Chewy, my recipe, Kelsey’s Best-Ever, Cook’s Illustrated’s Perfect

One year ago: Kofta
Two years ago: Grilled Corn Salad
Three years ago: Espresso Cheesecake Brownies
Four years ago: Chunky Peanut Butter and Oatmeal Chocolate Chipsters

Printer Friendly Recipe
Accidental Variation of The Chewy (adapted from Alton Brown)

As I was writing up this recipe, I realized I did not actually make The Chewy, which I now see is supposed to use melted butter. I used room temperature solid butter. The recipe below is what I did. This means that the only difference between my recipe and The Chewy is a lower ratio of brown sugar to white and the use of an egg white instead of milk.

16 tablespoons (2 sticks) unsalted butter, room temperature
2¼ cups (11.25 ounces) bread flour
1 teaspoon table salt
1 teaspoon baking soda
¼ cup granulated sugar
1¼ cups brown sugar
1 egg
1 egg yolk
2 tablespoons milk
1½ teaspoons vanilla extract
2 cups (12 ounces) semisweet chocolate chips

1. Heat oven to 375 degrees. Sift together the flour, salt, and baking soda and set aside.

2. Add the butter to the mixer’s work bowl with the sugars. Cream the butter and sugars on medium speed. Add the egg, yolk, 2 tablespoons milk, and vanilla extract, and mix until well combined. Slowly incorporate the flour mixture until thoroughly combined. Stir in the chocolate chips.

3. Scoop the dough in heaping tablespoons onto the prepared baking sheets. Bake the cookies, one sheet at a time, until they are browned around the edges and do not look wet on top, 8-12 minutes. Let the cookies cool on the cookie sheets for 5 minutes, then transfer to wire racks to cool completely.

Printer Friendly Recipe
Perfect Chocolate Chip Cookies (from Cook’s Illustrated May/June 2009)

I baked smaller cookies – tablespoon-sized dollops of dough – for about 9 minutes at 375 degrees.

1¾ cups (8¾ ounces) unbleached all-purpose flour
½ teaspoon baking soda
14 tablespoons (1¾ sticks) unsalted butter
½ cup (3½ ounces) granulated sugar
¾ cup (5¼ ounces) packed dark brown sugar
1 teaspoon table salt
2 teaspoons vanilla extract
1 large egg
1 large egg yolk
1¼ cups semisweet chocolate chips or chunks
¾ cup chopped pecans or walnuts, toasted (optional)

1. Adjust oven rack to middle position and heat oven to 375 degrees. Line 2 large baking sheets with parchment paper. Whisk flour and baking soda together in medium bowl; set aside.

2. Heat 10 tablespoons butter in 10-inch skillet over medium-high heat until melted, about 2 minutes. Continue cooking, swirling pan constantly until butter is dark golden brown and has nutty aroma, 1 to 3 minutes. Remove skillet from heat and, using heatproof spatula, transfer browned butter to large heatproof bowl. Stir remaining 4 tablespoons butter into hot butter until completely melted.

3. Add both sugars, salt and vanilla to bowl with butter and whisk until fully incorporated. Add egg and yolk and whisk until mixture is smooth with no sugar lumps remaining, about 30 seconds. Let mixture stand for 3 minutes, then whish for 30 seconds. Repeat process of resting and whisking 2 more times until mixture is thick, smooth and shiny. Using rubber spatula or wooden spoon, stir in flour mixture until just combined, about 1 minute. Stir in chocolate chips and nuts (if using), giving dough final stir to ensure no flour pockets remain.

4. Divide dough into 16 portions, each about 3 tablespoons (or use a #24 cookie scoop). Arrange 2 inches apart on prepared baking sheets, 8 dough balls per sheet.

5. Bake cookies 1 tray at a time until cookies are golden brown and still puffy, and edges have begun to set but centers are still soft, 10-14 minutes, rotating baking sheet halfway through baking. Transfer baking sheet to wire rack; cool cookies completely before serving.

Printer Friendly Recipe
Best-Ever Chocolate Chip Cookies (rewritten but not changed from Kelsey’s Apple a Day, who adapted it from Anna Olson)

2 cups (9.6 ounces) all-purpose flour
2 teaspoons cornstarch
1 teaspoon baking soda
½ teaspoon table salt
12 tablespoons (1½ sticks) unsalted butter, softened
¾ cup (5.25 ounces) brown sugar
¼ cup (1.75 ounces) granulated sugar
1 egg
2 teaspoons vanilla extract
1 cup (6 ounces) bittersweet chocolate chips

1. Heat the oven to 350 degrees. Line two baking sheets with parchment paper or silicone mats. In a medium bowl, mix the flour and baking soda.

2. In the bowl of a stand mixer fitted with the paddle attachment (or a large bowl if using a stand mixer), beat the butter, salt, and sugars on medium speed until light and fluffy, 1-2 minutes. Add the egg, beating until incorporated, then mix in the vanilla. Reduce the mixer speed to low and gradually add the flour, mixing just until incorporated. Stir in the chocolate chips.

3. Scoop the dough in heaping tablespoons onto the prepared baking sheets. Bake the cookies, one sheet at a time, until they are slightly browned around the edges, 8-10 minutes. Let the cookies cool on the cookie sheets for 5 minutes, then transfer to wire racks to cool completely.

Printer Friendly Recipe
Chocolate Chip Cookies (adapted from nearly every single chocolate chip cookie recipe I’ve ever read)

I haven’t found a dependable measurement for the weight of 1 cup of bread flour.  I used to assume 5 ounces for 1 cup of bread flour, but I think this is on the high side, so I’m changing the volume measurement in this recipe from 2¼ cups to 2⅓ cups.  Unfortunately,  it could be as high as 2½ cups, depending on how you measure your flour.  If you can, definitely measure by weight and not volume (food scales are cheap!)!

16 tablespoons (2 sticks) unsalted butter, room temperature
1 teaspoon table salt
1 cup (7 ounces) brown sugar
½ cup (3.5 ounces) white sugar
2 eggs
1 teaspoon vanilla
2¼ cups (11.25 ounces) bread flour
1 teaspoon baking soda
2 cups (12 ounces) semisweet chocolate chips

1. Heat the oven to 375 degrees. Line two baking sheets with parchment paper or silicone mats. In a medium bowl, mix the flour and baking soda.

2. In the bowl of a stand mixer fitted with the paddle attachment (or a large bowl if using a stand mixer), beat the butter, salt, and sugars on medium speed until light and fluffy, 1-2 minutes. Add the eggs, one at a time, beating until incorporated, then mix in the vanilla. Reduce the mixer speed to low and gradually add the flour, mixing just until incorporated. Stir in the chocolate chips.

3. Scoop the dough in heaping tablespoons onto the prepared baking sheets. Bake the cookies, one sheet at a time, until they are browned around the edges and do not look wet on top, 8-12 minutes. Let the cookies cool on the cookie sheets for 5 minutes, then transfer to wire racks to cool completely.

lemon pound cake

lemon pound cake 4

Lemons have been added to the list of ingredients I like to buy in the Big City (which isn’t that big compared to a lot of other cities but is definitely big compared to the town I live in), along with coffee, chocolate, parmesan cheese, and cheap wine from Trader Joe’s. This is because organic lemons aren’t available in my town, and while I have nothing against lemon juice, my favorite part of the lemon by far is the zest. The problem is that lemons have a more limited shelf life than my other Big City buys and the fruit tends to get hard (or worse, soft) after a few weeks in the crisper drawer.

lemon pound cake 2

Around this time is when I start going into lemon mania mode, and a lemon cake soaked with lemon syrup and drizzled with lemon glaze is a fine way to use up some of the lemon excess. In fact, I was so focused on my primary goals of using up lemons and having fun in the kitchen that I pushed another priority aside, that of making the best possible recipe. When combining loads of butter with loads of sugar, I knew it couldn’t end up too bad.

lemon pound cake 3

And so, for no other reason than I think the stand mixer is more fun to use and easier to clean up, I used that instead of the food processor the original recipe calls for, but when the top of my cake came out a little flat, I started thinking that maybe I should have just followed directions. I took the cake to work without tasting it, saving myself a piece for the end of the workday. It was good I set some aside for myself, because this cake disappeared in less than half the time as some of the other treats I’ve brought in. Savoring my much-anticipated slice at the end of the day, I decided that mixer or food processor, it didn’t matter; this cake would be a success either way.

lemon pound cake 7

One year ago: Chocolate Chunk Oatmeal Cookies with Dried Cherries and Pecans
Two years ago: Vodka Gimlet
Three years ago: Cook’s Illustrated’s Perfect Chocolate Chip Cookies
Four years ago: Cinnamon Rolls

Printer Friendly Recipe
Lemon Pound Cake (adapted from Baked: New Frontiers in Baking via the now defunct Dinner and Dessert)

Makes one loaf

I made this with a stand mixer instead of a food process like the original recipe instructs for no reason other than I think the mixer is more fun to use and easier to clean up.

For the cake:
¾ cup (3 ounces) cake flour
¾ cup (3.6 ounces) all-purpose flour
1 teaspoon baking powder
⅛ teaspoon baking soda
¼ cup sour cream, at room temperature
2 tablespoons fresh lemon juice
1 teaspoon pure vanilla extract
16 tablespoons (2 sticks) unsalted butter, room temperature
½ teaspoon salt
1 cup + 2 tablespoons (7.9 ounces) sugar
2 tablespoons grated lemon zest (from about 2 lemons)
4 large eggs, at room temperature

For the syrup:
2½ tablespoons fresh lemon juice
2½ tablespoons sugar

For the glaze:
1 cup (4 ounces) confectioners’ sugar, sifted
2 tablespoons fresh lemon juice

1. Heat the oven to 350 degrees. Spray the sides and bottom of a 9-by-5-by-3-inch loaf pan with nonstick cooking spray. Line the bottom with parchment paper and spray the paper. Sift both flours, baking powder, and baking soda together in a medium bowl. In a small measuring cup, whisk together the sour cream, lemon juice, and vanilla.

2. In the bowl of a stand mixer fitted with the paddle attachment (or a large mixing bowl with a hand-held mixer), beat the sugar and zest together until fragrant. Add the butter and salt; beat on medium speed until the mixture is light and fluffy, 2-3 minutes. With the mixer running, add the eggs one a time. Once the eggs are in, stop and scrape the sides of the bowl, then continue beating for another 2-3 minutes. Reduce the mixture speed to low, add one-third of the flour mixture, then half of the sour cream mixture. Continue alternating additions of dry and wet ingredients, ending with the dry ingredients. Scrape the bowl and mix for another 20-30 seconds, until the flour is thoroughly incorporated.

3. Transfer the batter to the prepared pan, smoothing the top. Bake in the center of the oven for 20 minutes, rotate the pans, reduce the oven temperature to 325 degrees, and bake for another 30 to 35 minutes, or until a toothpick inserted in the center of the loaf comes out clean. Let cool in the pans for 15 minutes.

4. In a small saucepan over medium heat, heat the lemon juice and sugar until the sugar is completely dissolved. Once dissolved, continue to cook for 3 more minutes. Remove from the heat and set aside.

5. Inver the cake onto a cooling rack set over a rimmed pan. Use a toothpick to poke holes in the top and sides of the loaf. Brush the top and sides of the loaves with the lemon syrup. Let the syrup soak into the cake and brush again. Let the cake cool completely, at least 30 minutes. (The soaked but unglazed loaf will keep, wrapped in two layers of plastic wrap and frozen, for up to 6 weeks.)

6. In a small bowl, whisk together the confectioners’ sugar and the lemon juice. Pour the lemon glaze over the top of the loaf and let it drip down the sides. Let the lemon glaze harden, about 15 minutes, before serving. (The glazed loaves will keep for up to 3 days, wrapped tightly in plastic wrap, at room temperature.)

lemon pound cake 5

tomato and four cheese lasagne

four cheese lasagna 5

Lasagna recipes are like chocolate chip cookie recipes for me – I already have several that I love, but I can’t resist a new one. I have no loyalties about béchamel versus ricotta, meaty versus vegetarian, seafood or chicken. I love them all, and I’m a sucker for a new version.

four cheese lasagna 1

A recent article in Fine Cooking, which prompted me to subscribe to the magazine, showcased three recipes – the braised beef and porcini one Josie posted, a butternut squash and goat cheese lasagna I can’t wait to make, and this classic tomato and cheese lasagna. Boring, maybe, but I can never get enough of the basic combination of pasta, cheese, and tomatoes.

four cheese lasagna 3

I always like to make my own lasagna noodles, because I’m all about creating more work for myself. (Also it’s fun.) But this time I went a step further and made my own ricotta. Combined with a lightly spiced tomato sauce and three other favorite Italian cheeses, this lasagna is in the running for my favorite – if I could ever choose a favorite lasagna.

four cheese lasagna 4

One year ago: Shrimp Canapes a la Suede
Two years ago: Mediterranean Pepper Salad
Three years ago: Chocolate Whiskey Cake
Four years ago: Banana Walnut Pancakes

Printer Friendly Recipe
Four Cheese and Tomato Lasagne (slightly adapted from Fine Cooking)

8 servings

To chop the tomatoes, just stick kitchen shears in the can and snip away. Canned tomatoes that are already diced won’t break down into the sauce like whole tomatoes will.

If you make your own ricotta, you’ll need to start with 8 cups of milk (and/or cream).

To boil and rinse the pasta, follow the instructions in this recipe through step 4.

2 tablespoons olive oil
4 medium cloves garlic, smashed and peeled
¼ teaspoon crushed red pepper flakes
2 (28-ounce) cans whole plum tomatoes, chopped (see note)
kosher salt
6 large basil leaves, torn by hand into ½-inch pieces
2 cups (15 ounces) whole-milk ricotta
2½ cups (10 ounces) grated fresh mozzarella
2 cups (8 ounces) grated fontina
1¾ cups (3.5 ounces) finely grated Parmigiano-Reggiano
1½ recipes fresh pasta, boiled and rinsed (see note)

1.Heat the oil, garlic, and red pepper flakes in a 4- to 5-quart pot over medium heat. Cook until the garlic is golden-brown, about 3 minutes. Discard the garlic. Add the tomatoes and 2 teaspoons salt; simmer gently, uncovered, adjusting the heat as needed, until the tomatoes begin to break down, about 45 minutes. Stir in the basil; season to taste with salt if necessary.

2.Position a rack in the center of the oven and heat the oven to 350°F. Set aside 1¼ cups of the sauce and mix the remaining sauce with the ricotta in a medium bowl. Mix the mozzarella, fontina, and 1 cup (2 ounces) of the Parmigiano in another medium bowl.

3. Spread ½ cup of the reserved tomato sauce on the bottom of a 9×13-inch baking dish. Cover the sauce with a slightly overlapping layer of cooked noodles, cutting them as needed to fill any gaps. Evenly spread 1½ cups of the ricotta mixture over the noodles. Sprinkle 1 rounded cup of the grated cheese evenly over the ricotta. Add another layer of noodles, and repeat the layers as instructed above, to make a total of 4 ricotta-and-cheese layers and 5 pasta layers. Spread the remaining ¾ cup plain sauce evenly over the top noodle layer. Sprinkle with the remaining ¾ cup of Parmigiano-Reggiano.

4. Cover the baking dish with foil and bake for 40 minutes. Remove the foil and bake until the top is browned and bubbly, 15 to 20 minutes. Let cool for at least 10 minutes before serving.

four cheese lasagna 6

pasta with tomatoes, swiss chard, and goat cheese

I think people have the wrong impression about meals around here, particularly on weeknights. The assumption seems to be that someone who loves cooking must be hanging out in the kitchen making elaborate meals every single night. If only.

The reality is that my weeknight evenings are so full of other necessary chores that any meal that takes longer than half an hour stresses me out. A delay in dinner puts me behind schedule for the laundry folding and showering and ultimately ends up cutting into my sleep. And the less sleep I get, the more hateful my alarm is in the morning and the slower I get ready for work and the later I get to work and the later I have to stay at work and the less time I have for cooking the next evening.

Pasta dishes that can be made in the time it takes to boil the pasta are a great option for a quick meal that breaks that cycle.  But the original version of this one wasn’t quite working for me.  I loved the idea of roasting the grape tomatoes before combining them with the other ingredients to accentuate their sweetness.  However, that extra step of heating the oven and throwing in the tomatoes apparently put me over the edge, because I felt vaguely flustered every time I made this.

I needed to simplify it somehow, but I didn’t want to lose that step of concentrating the tomatoes’ flavor.  I love roasted tomatoes, but in this case, where they’re roasted quickly instead of low and slow, it seemed like the stovetop could get the effect right in the same pan used to cook the greens.  In fact, the juice released from the tomatoes helped the chard cook.  With only two dishes, one appliance, and half an hour, this was the perfect weeknight-friendly version of the dish.

One year ago: Artichoke Ravioli
Two years ago:  Cooks Illustrated’s Perfect Chocolate Chip Cookies
Three years ago: Spinach Feta Pine Nut Tart

Printer Friendly Recipe
Pasta with Green, Tomatoes and Goat Cheese (adapted from Food and Wine via Savory Spicy Sweet)

1 pound fusilli pasta
Salt
2 teaspoons olive oil
3 garlic cloves, sliced
Pinch of crushed red pepper
1 pint cherry tomatoes, halved
½ pound swiss chard, rinsed and coarsely chopped
½ pound soft goat cheese, thickly sliced
½ cup walnut halves, toasted
¼ cup freshly grated Parmigiano-Reggiano cheese

1. Bring 4 quarts water to rolling boil, covered, in stockpot. Add 1 tablespoon salt and pasta, stir to separate, and cook until al dente. Drain and return to stockpot.

2. In a large nonstick skillet over medium heat, heat the oil, garlic, and pepper flakes until the oil flows like water when the pan is tilted. Add the cherry tomatoes, swiss chard, and ¼ teaspoon salt; cover the pan and simmer, stirring occasionally and smashing the tomatoes, until the chard is tender and the tomatoes are soft.

3. Reserve 1 cup of pasta cooking water; drain pasta. Return the pasta to the cooking pot; stir in the goat cheese and ½ cup of the reserved cooking water. Add the chard and tomato mixture, walnuts, and cheese; stir to combine, adding more pasta water to loosen sauce if necessary.

artichoke ravioli

Spring break was last week. I miss it already.

On the other hand, I’m apparently bad at spring break. I had plans to do all these big things, and then when I didn’t get every single one of them done, to perfection, every day, I got all annoyed. Plus, you know what I did instead of work? Chores. I hate chores, and I like my job, so…forget what I said about missing spring break.

I’m sure it’s a surprise to no one that the one thing I did find time for was cooking. I kept to the mostly-healthy, mostly-vegetarian routine we normally stick to on weekdays instead of going for the all-out, life-is-a-celebration, let’s-eat-meat-and-drink-wine routine we tend toward on the weekends. And I realized that another reason I often stick to vegetarian meals on weekdays is that they’re easier.

Not so with ravioli, of course. Once you mix and knead the pasta dough, roll it out, make your filling, fill the ravioli, cook the ravioli, make your sauce – well, that adds up to a nice project for a day off from work.

Fortunately, the end result of this one is definitely worth avoiding chores over. The artichokes are subtle, but not invisible. The sauce is rich, but not heavy. And the fresh pasta – well, it’s fresh pasta. You can’t go wrong.

It’s meals like this that make me miss spring break.

One year ago: Cooks Illustrated’s Perfect Chocolate Chip Cookies
Two years ago: Spinach Feta Pine Nut Tart

Printer Friendly Recipe
Artichoke Ravioli With Tomatoes
(adapted from Gourmet via Smitten Kitchen)

4 to 6 servings

This is a good time to utilize your food processor if you have one. I think the best order to process the ingredients in (to avoid cleaning the bowl in between uses) is parmesan, onions, artichoke mixture, tomatoes. You could also make the pasta dough in the food processor, although I’ve had better luck using the stand mixer or kneading by hand.

Ravioli take well to freezing.  Just freeze them in a single layer on a flour-dusted baking sheet.  Once they harden on the pan, transfer them to freezer bags.

Pasta:
6 ounces (1¼ cups) all-purpose flour, plus more for dusting the work surface
2 large eggs

Filling:
2 tablespoons unsalted butter, cut into pieces
1 onion, chopped (½ cup)
2 (14-ounce) cans quartered artichoke hearts, drained
2 ounces (1 cup) finely grated Parmigiano-Reggiano
½ cup chopped fresh flat-leaf parsley
1 large egg
½ teaspoon salt
½ teaspoon black pepper
½ teaspoon freshly grated nutmeg

Sauce:
2 tablespoons unsalted butter
1 onion, minced
1 (28-ounce) can diced tomatoes
½ teaspoon salt
¼ teaspoon black pepper
2 ounces (1 cup) finely grated Parmigiano-Reggiano
2 tablespoons heavy cream

1. For the pasta: Add the flour and egg to the bowl of a stand mixer fitted with the paddle attachment. Mix on low speed until thoroughly incorporated. Change to the dough hook and knead for 5-6 minutes, until smooth. Add flour as necessary – the dough shouldn’t be sticky.  Shape the dough into a ball and wrap it in plastic wrap. Let the dough rest for at least 30 minutes. (You can also mix and knead the dough by hand. It’s easiest – less messy – in a large, wide bowl.)

2. For the filling: In a 12-inch skillet over medium heat, melt the butter. When the foam subsides, add the onion and sauté, stirring occasionally, until golden, about 6 minutes. Add the artichoke hearts and continue cooking while stirring occasionally, until they’re tender, 8 to 10 minutes. Transfer the artichoke mixture to the food processor (scraping but not washing the pan), and process in pulses until the artichokes are coarsely chopped. Stir in the parmesan, parsley, yolk, salt, pepper, and nutmeg.

3. Divide the dough into 6 balls. Work with one ball of dough at a time and leave the others covered with a damp dishtowel. Flatten the dough slightly, then roll it through the widest setting on a pasta roller. Fold it in thirds like a piece of paper going into an envelope, then roll it through the pasta roller again, feeding it with one of the open sides first. If at any point the dough is sticky, brush it with flour. Repeat the folding into thirds and rolling a few times. Without folding, run the pasta through the widest setting once more. Adjust the pasta roller to the next-thinner setting and roll the dough through the machine. Continue to gradually thin the dough until the second-to-last setting. Brush it with flour if the dough starts to stick at all. If the strip of dough becomes too long to handle, cut it into two shorter strips and work with each strip separately. Repeat the rolling, folding, and thinning with the remaining balls of dough, laying the sheets of pasta on dishtowels.

4. For the sauce: Melt the butter in the now-empty skillet over medium heat. When the foaming subsides, add the onion and sauté until just golden around the edges, about 5 minutes. Add the tomatoes with their juice and the salt and simmer over low heat until the sauce is thickened, 15-20 minutes. Stir in the pepper, most of the parmesan and the heavy cream. Set aside.

5. The pasta sheets should be approximately 4 inches across. Place small balls of filling (about one rounded teaspoon each) in a line one inch from the bottom of the pasta sheet. Leave one and one-quarter inches between each ball of filling. Fold over the top of the pasta and line it up with the bottom edge. Seal the bottom and the two open sides with your finger. Use a fluted pastry wheel to cut along the two sides and bottom of the sealed pasta sheet. Run pastry wheel between balls of filling to cut out the ravioli.

6. Bring 4 quarts of water to boil in a large stockpot. Add about a tablespoon of salt and half of the pasta. Cook until doubled edges are al dente, 3-4 minutes. With a slotted spoon, remove the ravioli from the pot and transfer them to warmed bowls or plates. Keep warm in a warm oven while the remaining ravioli are boiled. Top the ravioli with sauce and the remaining parmesan; serve immediately.

dorie’s best chocolate chip cookies

Before I joined Tuesdays with Dorie, I baked chocolate chip cookies a couple times a month. They were my standard weeknight dessert; I’d eat dinner early and then by the time I was ready to drink my evening tea, I was hungry for a dessert, and a cookie or two was just the right portion. When I saw Dave on the weekend (before we were married and living together), I’d give him whatever cookies I hadn’t eaten. He’d usually eat the rest of the batch in one evening.

That was before I was experimenting with chocolate chip cookie recipes, so I stuck with the Tollhouse recipe back then. I did find, however, that I liked the cookies better if I added an extra quarter cup of flour to the recipe, which made the cookies taller, drier (less greasy), and more cakey.

Dorie’s favorite chocolate chip cookie recipe goes in the opposite direction, reducing the flour from the Tollhouse recipe. I knew that wasn’t my preference, but I stayed true to the recipe anyway – I’m familiar with the results of the recipe with more flour, but I didn’t know precisely what the cookies would be like with Dorie’s exact recipe.

They were what I expected, but even flatter. I had frozen the balls of dough early in the week and then baked them straight from the freezer, which I thought would reduce the spreading and result in taller cookies, but they were nearly paper thin. I did like their texture – crisp at the edges with soft, slightly chewy centers.

Everyone has their own opinion of what the perfect chocolate chip cookie is. This was good, but it wasn’t quite what I look for in a chocolate chip cookie. If your ideal is closer to Dorie’s than mine is, Kait has the recipe posted.

chocolate chip cookie experimentation

Copy of IMG_6823
clockwise from upper left: #4 (whole wheat) #3 (yeast) #1 (control) #2 (bread)

I’m a scientist. I spent years working in labs, and I kid you not that what I did was combine ingredients and bake them. I did not, however, eat the results of those experiments. My cooking lately has become increasingly similar to my lab work. Notes are laboriously taken, samples are diligently labeled, variables are carefully controlled. But in this case, I do get to eat the results.  It’s a key difference.

This comparison is a little different than ones I’ve done in the past, because I wasn’t looking at different recipes. Instead, I used a master recipe and varied just one component in each batch of cookies. I mixed the dough, flash-froze the dough balls, transferred them to plastic bags, then took them on a 9-hour (make that 10-hour, because we missed a turn) drive. I baked each batch without adjusting the oven temperature in between. I had four tasters (including myself). I did not tell the other tasters what the differences between the cookies were.

Copy of IMG_5967

Batch #1: This was my control recipe. A fairly standard chocolate chip cookie recipe, the only difference between this recipe and Tollhouse is an increase in the ratio of brown sugar to white sugar.

Batch #2: This was the same as Batch #1, except I used bread flour instead of all-purpose flour.

Batch #3: This was the same as Batch #1, except I added 2 teaspoons instant yeast. The idea to use yeast in chocolate chip cookies came from this recipe, which I liked quite a bit. (Thanks to branny for bringing this to my attention.) However, since the recipe differs from traditional chocolate chip cookie recipes in a number of ways – bread flour, browned butter, less butter per flour – I couldn’t be sure what roll the yeast played. This is what spurred this whole comparison.

Batch #4: This was the same as Batch #1, except I used whole wheat pastry flour instead of all-purpose flour.

Copy of IMG_6014

The results:

Batch #1: Frankly, these aren’t my ideal chocolate chip cookies. That’s okay, because the purpose of this experiment was to identify differences, not necessarily find an ideal. (My notes say, simply, “soft.” So much for laborious note-taking!) They tend to be a little too flat, a little greasy, and, yes, very soft.

Batch #2: Alton Brown knows what he’s doing when he uses bread flour to make his cookies chewy. These were the overall favorite, with a nice balance between the greasy side and the cakey side – i.e., chewy.

Batch #3: Yeast apparently makes cookies fluffy. We found this one a little too cakey for our tastes.

Batch #4: I probably should have substituted just half of the all-purpose white flour for whole wheat pastry flour. A complete substitution resulted in cookies that were greasy, flat, and grainy. The flavor was a bit nutty. Kind of what you’d expect from whole wheat cookies, I suppose.

Copy of IMG_6814a

Overall conclusions:

  1. Bread flour makes cookies chewier, taller, and less greasy (or drier).
  2. Yeast makes cookies more cakey.
  3. A 1:1 substitution of whole wheat pastry flour for all-purpose flour in cookies is a bad idea.
  4. I am obsessive, at least when it comes to cookies!

Copy of IMG_6820a
left to right: #4 (whole wheat) #3 (yeast) #2 (bread) #1 (control)

One year ago: Summer Rolls

Chocolate Chip Cookies, previously:
Chocolate Chip Cookies (4 recipes)
Chocolate Chip Cookie (Cook’s Illustrated’s “Perfect”)

Master Recipe for Chocolate Chip Cookie Experiments

Please note that I’m not saying that you can’t make good cookies without bread flour, or that yeast will make all cookies too cakey. These were just the results with this particular recipe. All I’m saying is that yeast makes cookies cakier, and bread flour makes them chewier.

2¼ cups (10.8 ounces) all-purpose flour
1 teaspoon table salt
1 teaspoon baking soda
16 tablespoons (2 sticks) unsalted butter, at room temperature
¼ cup (1.75 ounces) sugar
1¼ cups (8.75 ounces) brown sugar
2 eggs
2 teaspoons vanilla extract
2 cups (12 ounces) semisweet chocolate chips

1. Adjust an oven rack to the middle position. Heat the oven to 375F. Line a baking sheet with parchment paper or a silicone baking mat. In a small bowl, combine the flour, salt, and baking soda.

2. In the bowl of a stand mixer fitted with the paddle attachment (or a hand mixer, or a spoon or whatever), beat the butter until creamy. Add the sugars and beat on medium speed until fluffy. Add the eggs, one a time, mixing for one minute after each addition. Add the vanilla. Reduce the mixer speed to low and add the flour, mixing just until almost combined. Add the chocolate chips and pulse the mixer on low speed until the chips are dispersed and the flour is incorporated.

3. Drop rounded tablespoons of dough onto the lined baking pan, spaced an inch or two apart. Bake the cookies for 7-10 minutes, until slightly browned around the edges and just set in the middle. Cool the cookies for at least 2 minutes on the sheet before transferring to a rack to finish cooling. (If they still seem fragile after 2 minutes of cooling, you can just leave them on the sheet to cool completely.)

chocolate chip cookie comparison

copy-of-copy-of-img_7109

Everyone is always talking about what the best chocolate chip cookie recipe is. Last year, it seemed like everyone was making the Best Big Fat Chewy Chocolate Chip Cookie. A few months ago, Cooks Illustrated’s Thick and Chewy Chocolate Chip Cookie was all the rage. These days, people are testing out the New York Times recommendation to chill the dough for 36 hours before baking.

Until recently, I stayed out of this discussion. I knew that my favorite was unpopular among food bloggers – good ol’ Tollhouse, with just a bit more flour. I’ve made it so often that I don’t bother getting out the recipe anymore. When I lived alone, I made it nearly once a week. I would eat two cookies each night with tea, and then give the rest to Dave when I saw him over the weekend. He’d eat the rest of the batch in one day.

copy-of-img_5775

But eventually, curiosity got the best of me. It was the New York Times recipe that did it. I can never seem to resist making things more complicated – a required 36 hour rest was just up my alley, right? And then once I tried one new recipe, it was like a dam opened, and suddenly I wanted to be part of this quest to find the perfect recipe.

Because, let’s face it, just about all chocolate chip cookies are good (and certainly the ones I was making would be), Dave and I decided we would need to do side-by-side comparisons to discern differences between the recipes. I decided to try four of the most popular recipes – Tollhouse, NY Times, Cooks Illustrated, and Alton Brown’s The Chewy.

copy-of-img_8405

I wanted to publish this entry with conclusive results. I wanted to come to you and say “This recipe is the one you should make. It is the best. The most butterscotchy, the most tender, the best dough, the most fun to bake.” I wanted to let you know unequivocally that the overnight rest was or was not important.

But I just don’t think it’s going to happen. The more cookies I eat, the more indecisive I get. I even made each recipe again, hoping to try again with fresh cookies. (Thank god for BakingGALS.) I had bags and bags of carefully labeled cookies in my freezer. It’s out of control. It’s time to stop the insanity and tell you what I did learn from this.

copy-of-img_7103

Regarding the overnight rest – it certainly doesn’t hurt, and I find it pretty convenient actually. You can bake one cookie sheet of cookies at a time, and you have fresh cookies every night. (You also have dough in the fridge available at all times, and I have no self-control.) Does it make a difference? Maybe. I think it gives cookies a more pronounced butterscotch flavor, and sometimes I think it helps even out the texture. But it’s pretty subtle.

copy-of-img_5082

Of the four recipes, Dave and I had two favorites, and the bake-off between those two was inconclusive.

My favorite was Alton Brown’s The Chewy. I am, sadly, not kidding when I say that I ate ten of these the first time I made them. <blush> Self-control-wise, I’m usually pretty good with cookies once they’re baked. This must have been a bad morning. It had a great butterscotch flavor, and a nice soft texture – tender without being too chewy or crisp. However, Dave had a few complaints about them being greasy, and I see his point, although I’m not bothered by this as much.

copy-of-img_5086

We were also very fond of the New York Times recipe. It was soft, with just a bit of crispness to the edges, which I like. However, they were a little dry and bready, and didn’t have as much flavor as Alton’s. They definitely weren’t greasy though.

I definitely wanted to like Cook Illustrated’s Thick and Chewy recipe. Over and over, I hear people say that it’s their absolute favorite, and usually I love CI. But not this time. These took chewy to the extreme. It was like cookie flavored bubble gum, although the cookie flavor was weak. I made them again, convinced that I must have done something wrong the first time, but I still couldn’t get excited about these cookies.

copy-of-img_8409

Dave wasn’t a fan of the Tollhouse cookies at all – too greasy, he says. I still like their flavor, which is intensely buttery. I also like the crispy edges and tender middles. But they could definitely benefit from some extra flour (which is how I made them for years, but I followed the recipe exactly this time).

This shouldn’t be, but is, an issue to consider as well – the doughs made from melted butter (Alton’s and CI’s) were not nearly as good as those made from softened butter. That’s sad. Tollhouse’s dough is the best, but NY Time’s is nothing to scoff at. The NY Times recipe is the most fun to make – lots of mixer use with that one.

copy-of-img_8417

I wish I could provide a solid answer to the “which is best” chocolate chip cookie question, but I’m not sure it’s that easy. For one thing, every one has their own preferences – I only had two testers and we couldn’t agree! However, keep in mind that chocolate chip cookies are pretty much always good. Any of these recipes will give you something delicious. But if I have to recommend one, it would be Alton Brown’s The Chewy.

copy-of-copy-of-img_5789

Since this original post, I have also made Cooks Illustrated’s Perfect Chocolate Chip Cookies.

The Chewy (from Alton Brown)

2 sticks unsalted butter
2¼ cups bread flour
1 teaspoon kosher salt
1 teaspoon baking soda
¼ cup sugar
1¼ cups brown sugar
1 egg
1 egg yolk
2 tablespoons milk
1½ teaspoons vanilla extract
2 cups (12 ounces) semisweet chocolate chips

Hardware:
Ice cream scooper (#20 disher, to be exact)
Parchment paper
Baking sheets
Mixer

Heat oven to 375F.

Melt the butter in a heavy-bottom medium saucepan over low heat. Sift together the flour, salt, and baking soda and set aside.

Pour the melted butter in the mixer’s work bowl. Add the sugar and brown sugar. Cream the butter and sugars on medium speed. Add the egg, yolk, 2 tablespoons milk and vanilla extract and mix until well combined. Slowly incorporate the flour mixture until thoroughly combined. Stir in the chocolate chips.

Chill the dough, then scoop onto parchment-lined baking sheets, 6 cookies per sheet. Bake for 14 minutes or until golden brown, checking the cookies after 5 minutes. Rotate the baking sheet for even browning. Cool completely and store in an airtight container.

Chocolate Chip Cookies (from the New York Times)

1½ dozen 5-inch cookies.

2 cups minus 2 tablespoons (8½ ounces) cake flour
1⅔ cups (8½ ounces) bread flour
1¼ teaspoons baking soda
1½ teaspoons baking powder
1½ teaspoons coarse salt
2½ sticks (1¼ cups) unsalted butter
1¼ cups (10 ounces) light brown sugar
1 cup plus 2 tablespoons (8 ounces) granulated sugar
2 large eggs
2 teaspoons natural vanilla extract
1¼ pounds bittersweet chocolate disks or fèves, at least 60 percent cacao content
Sea salt

1. Sift flours, baking soda, baking powder and salt into a bowl. Set aside.

2. Using a mixer fitted with paddle attachment, cream butter and sugars together until very light, about 5 minutes. Add eggs, one at a time, mixing well after each addition. Stir in the vanilla. Reduce speed to low, add dry ingredients and mix until just combined, 5 to 10 seconds. Drop chocolate pieces in and incorporate them without breaking them. Press plastic wrap against dough and refrigerate for 24 to 36 hours. Dough may be used in batches, and can be refrigerated for up to 72 hours.

3. When ready to bake, preheat oven to 350 degrees. Line a baking sheet with parchment paper or a nonstick baking mat. Set aside.

4. Scoop 6 3½-ounce mounds of dough (the size of generous golf balls) onto baking sheet, making sure to turn horizontally any chocolate pieces that are poking up; it will make for a more attractive cookie. Sprinkle lightly with sea salt and bake until golden brown but still soft, 18 to 20 minutes. Transfer sheet to a wire rack for 10 minutes, then slip cookies onto another rack to cool a bit more. Repeat with remaining dough, or reserve dough, refrigerated, for baking remaining batches the next day. Eat warm, with a big napkin.

Thick and Chewy Chocolate Chip Cookies (from Cooks Illustrated)

Makes 1½ dozen 3-inch cookies

CI note: These truly chewy chocolate chip cookies are delicious served warm from the oven or cooled. To ensure a chewy texture, leave the cookies on the cookie sheet to cool. You can substitute white, milk chocolate, or peanut butter chips for the semi- or bittersweet chips called for in the recipe. In addition to chips, you can flavor the dough with one cup of nuts, raisins, or shredded coconut.

2⅛ cups bleached all-purpose flour (about 10½ ounces)
½ teaspoon table salt
½ teaspoon baking soda
12 tablespoons unsalted butter (1½ sticks), melted and cooled slightly
1 cup brown sugar (light or dark), 7 ounces
½ cup granulated sugar (3½ ounces)
1 large egg
1 large egg yolk
2 teaspoons vanilla extract
1-2 cups chocolate chips or chunks (semi or bittersweet)

1. Heat oven to 325F. Adjust oven racks to upper- and lower-middle positions. Mix flour, salt, and baking soda together in medium bowl; set aside.

2. Either by hand or with electric mixer, mix butter and sugars until thoroughly blended. Mix in egg, yolk, and vanilla. Add dry ingredients; mix until just combined. Stir in chips.

3. Form scant ¼ cup dough into ball. Holding dough ball using fingertips of both hands, pull into two equal halves. Rotate halves ninety degrees and, with jagged surfaces exposed, join halves together at their base, again forming a single cookie, being careful not to smooth dough’s uneven surface. Place formed dough onto one of two parchment paper-lined 20-by-14-inch lipless cookie sheets, about nine dough balls per sheet. Smaller cookie sheets can be used, but fewer cookies can be baked at one time and baking time may need to be adjusted. (Dough can be refrigerated up to 2 days or frozen up to 1 month – shaped or not.)

4. Bake, reversing cookie sheets’ positions halfway through baking, until cookies are light golden brown and outer edges start to harden yet centers are still soft and puffy, 15 to 18 minutes (start checking at 13 minutes). (Frozen dough requires an extra 1 to 2 minutes baking time.) Cool cookies on cookie sheets. Serve or store in airtight container.

Original Nestle Toll House Chocolate Chip Cookies (slightly adapted)

Makes 60 cookies

2¼ cups all-purpose flour
1 teaspoon baking soda
1 teaspoon salt
1 cup (2 sticks) butter, softened
¾ cup granulated sugar
¾ cup packed brown sugar
1 teaspoon vanilla extract
2 large eggs
2 cups (12-ounces) chocolate chips

Preheat oven to 375° F.

Combine flour, baking soda and salt in small bowl. Beat butter, granulated sugar, brown sugar and vanilla extract in large mixer bowl until creamy. Add eggs, one at a time, beating well after each addition. Gradually beat in flour mixture. Stir in morsels. Drop by rounded tablespoon onto ungreased baking sheets.

Bake for 8 to 11 minutes or until golden brown. Cool on baking sheets for 2 minutes; remove to wire racks to cool completely.