raspberry cream cheese brownies

raspberry cheesecake brownies 4

My mom has a new favorite dessert, and I am not surprised. The two of us have been big fans of the chocolate/cheesecake/raspberry combination since I was in high school and she was a teacher, and we took a day of our spring break to check out the new mall across town. My clearest memory from that day is sharing a slice of chocolate raspberry cheesecake. A few weeks later, I drove back out to that mall to pick up another slice to give her for Mother’s Day. When my mom developed her own chocolate raspberry cheesecake recipe, it became one of my most-requested birthday cakes.

raspberry cheesecake brownies 1

So when I made these brownies, I was sure to save her a piece. It did not occur to me to also save my dad a piece, and since my mom was nice enough to share, she really only got a nibble. Fortunately, that nibble was enough to convince her to make them herself just a few days later.

raspberry cheesecake brownies 2

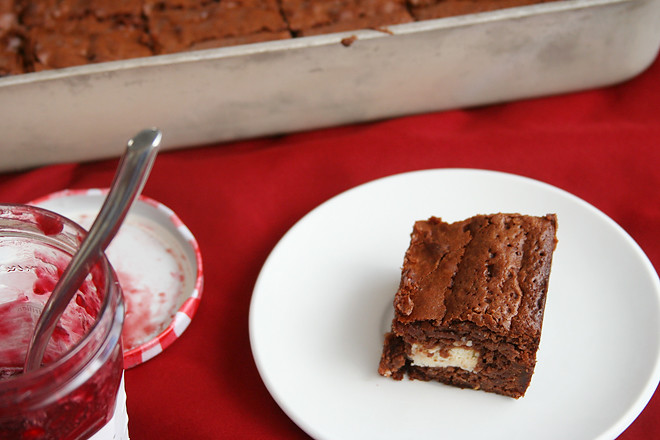
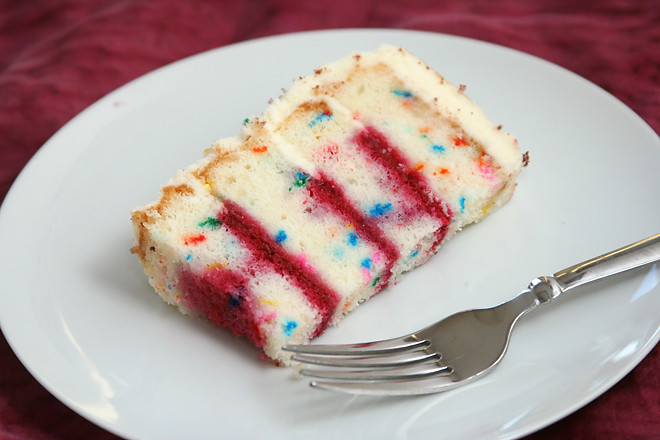
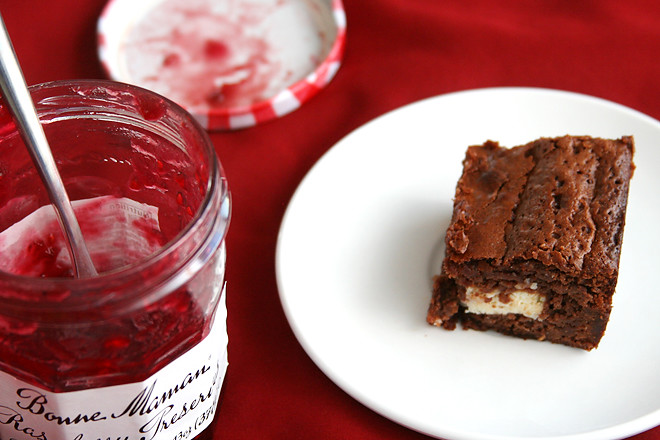
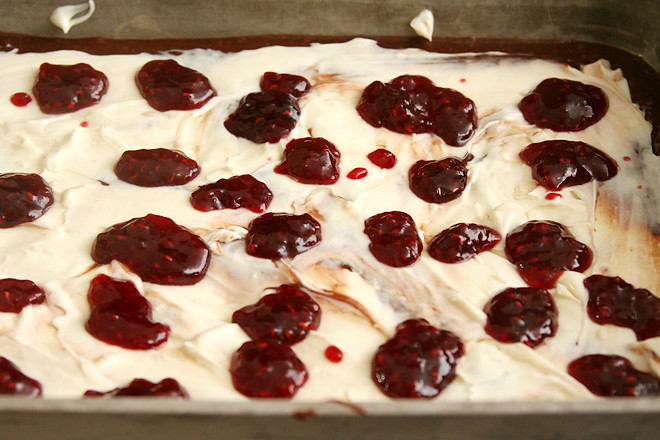
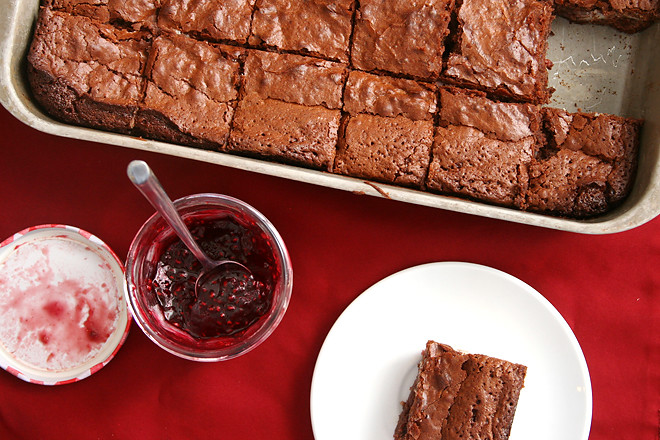
The raspberry jam is both mixed into the chocolate portion and swirled into the cheesecake batter, so it isn’t just a pretty red swirl; the flavor stands out in every bite, vying for attention with the rich chocolate and tangy cheesecake. This is a well-deserved favorite.

raspberry cheesecake brownies 5

Printer Friendly Recipe
Raspberry Cream Cheese Brownies (from Cook’s Illustrated’s Summer Entertaining via Pink Parsley)

Filling:
1 (8-ounce) package cream cheese, softened
¼ cup (1.75 ounces) sugar
1 egg yolk
¾ teaspoon vanilla extract

Brownies:
⅔ cup (3.35 ounces) all-purpose flour
½ teaspoon baking powder
½ teaspoon salt
8 tablespoons (1 stick) unsalted butter, cut into pieces
4 ounces bittersweet chocolate, chopped
½ cup raspberry jam
1¼ cups (8.75 ounces) granulated sugar
3 large eggs
1½ teaspoons vanilla extract

1. Preheat the oven to 350 degrees. Line an 8-inch square baking pan with foil. leaving the excess hanging over the edges. Grease foil. In the bowl of a food processor, combine the cream cheese, sugar, egg yolk, and vanilla. Set aside.

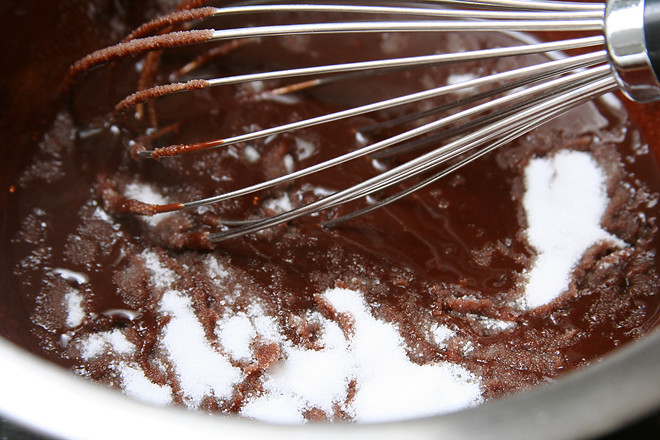
2. Combine the flour, baking powder, and salt in a small bowl. Microwave the chocolate and butter in a large bowl, stirring after every 30 seconds, until melted and smooth. Whisk in ¼ cup jam and allow the mixture to cool slightly. Add sugar, eggs, and vanilla to the chocolate mixture, and stir until combined. Whisk in flour mixture until just incorporated.

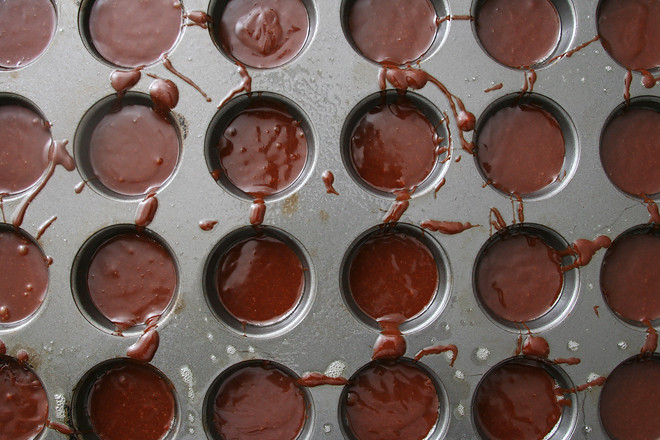
3. Microwave the remaining ¼ cup jam until warm, about 30 seconds, and stir until smooth. Scrape half the brownie batter into the prepared baking dish. Dollop the cream cheese by the spoonful over the batter, and spread into an even layer. Drop spoonfuls of warm jam over the cream cheese, and use the tip of a knife to swirl jam through the filling. Spread the remaining batter evenly over the filling.

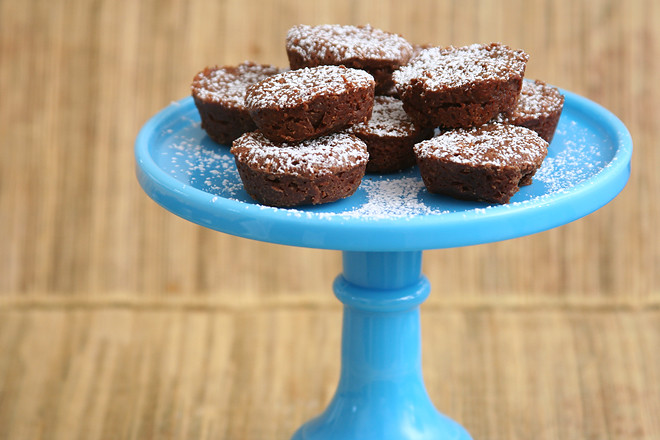
4. Bake until a toothpick inserted into the center comes out with just a few dry crumbs attached, 50 to 60 minutes. Cool in the pan on a wire rack for at least 2 hours. Using the foil overhang, lift the brownies from the pan and cut into squares.

raspberry cheesecake brownies 3

belgian brownie bites

belgian brownie bites 4

I know I titled these tiny brownies ‘bites’, but that doesn’t mean I think they should actually be eaten in one bite. Something this rich and chocolately should be savored, at least to my mind. Dave, however, popped them whole into his mouth.

belgian brownie bites 1

These are so rich that tiny mini-muffin cup servings really are appropriate. With just a smidgen of flour for almost half a pound each of chocolate, butter, and sugar, they’re almost mousse-like.

belgian brownie bites 3

For me, that means I enjoy them slowly, relishing each decadent nibble. I guess for others, one bite is the way to go. Either way, they’re so good that it’ll be hard to resist another.

belgian brownie bites 5

Belgian Brownies Bites (rewritten but not really adapted from Smitten Kitchen)

24 mini muffin-sized bites or 12 regular muffin-sized brownies

7 ounces bittersweet chocolate, roughly chopped
14 tablespoons unsalted butter, cut into ½-inch cubes
1 cup (7 ounces) sugar
¼ teaspoon salt
4 large eggs
2 tablespoons plus 1 teaspoon flour

1. Set a heatproof bowl over a saucepan containing one inch of simmering water. Add the chocolate and butter; stir occasionally until the chocolate is smooth, then remove from the heat. (The chocolate and butter can also be melted on 50% power in the microwave, stopping to stir every thirty seconds or so.) Whisk in the sugar and salt until smooth, then add the eggs one at a time, whisking until incorporated before adding the next. Gently whisk in the flour. Cover and let rest at room temperature for 30 minutes.

2. Heat the oven to 325 degrees. Spray a mini muffin pan (or regular muffin pan) with oil.

3. Divide the batter between 24 mini muffin cups (or 12 regular muffin cups). Bake until a toothpick inserted into the center of a brownies comes out dry or with a few moist crumbs attached, about 16 minutes (26 minutes for regular muffin cups). Transfer to a cooling rack for approximately 5 minutes, then remove brownies from the pan to cool completely on a rack.

belgian brownie bites 6

cheesecake thumbprint cookies

cheesecake thumbprints 5

You’d think that since I’m home all day for a few months, I’d be more likely to get recipes out of my cookbooks instead of the internet. I certainly thought I would, especially considering that I keep making New Year’s resolutions to use my cookbooks more often. However, at home as well as at work, the internet beckons and my cookbook shelf goes mostly ignored.

cheesecake thumbprints 1

But clearly, there is good stuff on that shelf that is being missed. This recipe might have caught my eye online, but I wonder if I would have then looked for something similar but more familiar. With such a small amount of sugar in the cookie portion, this was just a little out of my comfort zone.

cheesecake thumbprints 2

I stuck to the recipe though, and I’m glad I did. While the base was, as expected, not too sweet, it wasn’t too unsweet either. Maybe that helps to highlight the cheesecake portion, which, cheesecake being one of my favorite foods, is my favorite part. This is a great reminder of why I keep telling myself that I should use those cookbooks; maybe this time it will stick.

cheesecake thumbprints 4

Cheesecake Thumbprints (rewritten from Martha Stewart’s Baking Handbook)

Makes about 3 dozen cookies

4 ounces cream cheese, room temperature
½ cup (3.5 ounces) granulated sugar, divided
¼ teaspoon salt, plus a pinch
2 large egg yolks, divided
1½ teaspoons sour cream or greek yogurt
¼ teaspoon vanilla extract
16 tablespoons (2 sticks) unsalted butter, room temperature
2 cups (9.6 ounces) all-purpose flour

1. In a medium bowl, beat the cream cheese until smooth. Add ¼ cup (1.75 ounces) sugar, a pinch of salt, one egg yolk, the sour cream or greek yogurt, and vanilla extract; mix until smooth. Chill for at least 30 minutes.

2. Heat the oven to 350 degrees. Line two baking sheets with parchment paper or silicone mats.

3. In a large bowl, mix the butter, ¼ cup (1.75 ounces) sugar, and ¼ teaspoon salt until smooth. Add the other egg yolk and mix until blended, then add the flour and mix on low speed until just combined.

4. Form the dough into balls approximately 1-inch in diameter and place on the prepared baking sheets. Use the round back of a spoon or your finger (I used a round teaspoon measuring spoon) to press indentations in the middle of each ball of dough.

5. Bake for 10 minutes, then remove the pans from the oven and press down the indentations again (I used a tablespoon measuring spoon this time). Return the pans to the oven and bake until the edges of the cookies begin to brown, 7 to 9 minutes. Transfer the pans to wire racks; let the cookies cool completely.

6. When the cookies are cooled, spoon the cheesecake filling into the indentations. Return the cookies to the oven and bake until the filling is set, 7 to 8 minutes. Transfer the cookies to wire racks to cool completely. Chill the cookies at least 4 hours (or overnight) before serving.

cheesecake thumbprints 6

strawberry and chocolate cupcakes

strawberry chocolate cupcakes 6

There were probably better things I could have been doing with my time instead of making fancy cupcakes. Surely I should be focusing on easier, more straightforward treats right now. Even better, I had planned to get the flower garden ready for spring that Sunday afternoon. Or I could clean my house. Instead, I couldn’t resist the siren call of my mixer, plus butter, sugar, and flour.

strawberry chocolate cupcakes 1

It went about how most things do these days: I thought I’d have enough time to get the batters made and the cupcakes in the oven, but the baby woke up earlier than expected. Once she’d eaten and we gave her a bath and read a few books to her, I hurried back to finish the cupcakes while Dave took a turn trying to get her to sleep. Then he removed the cupcakes from the pan while I took my turn trying to get her to sleep.

strawberry chocolate cupcakes 2

Baking, frosting, and garnishing cupcakes all in one day is nearly impossible right now, at least if I want to do anything else with my time, like dress the baby up in silly outfits and take pictures. I packed the cupcakes away overnight, then got halfway through making the frosting the next morning when the baby woke up earlier than expected. (The baby almost always wakes up earlier than expected, unless she sleeps for hours longer than expected.)

strawberry chocolate cupcakes 3

Fortunately, I was able to finish the toppings when Dave came home for lunch. He took most of the cupcakes to share at work, and I stashed a couple away for a well-deserved treat for myself. I’ll work in the garden next week (unless I find another fun dessert to bake instead).

strawberry chocolate cupcakes 4

Strawberry Chocolate Cupcakes (cake recipes are both adapted from Alyssa Huntsman’s and Peter Wynne’s Sky High: Irresistible Triple Layer Cakes via Smitten Kitchen; chocolate frosting is from Martha Stewart)

Makes 24 cupcakes

I’m years overdue for a thorough chocolate cupcake comparison, but right now, I’m really happy with this recipe. It’s chocolately, tender, and moist.

A friend gave me this fun cupcake batter divider, but I’m sure you can just simultaneously spoon both batters into the cups.

Strawberry cake:
1 cup (4 ounces) cake flour
1 cup (7 ounces) sugar
1¾ teaspoons baking powder
¼ teaspoon salt
1 stick (8 tablespoons) unsalted butter, room temperature
½ cup pureed frozen strawberries (from about 5 ounces of strawberries)
3 egg whites
3½ tablespoons milk
1 drop red food dye, optional

Chocolate cake:
1 cup (4 ounces) cake flour
1 cup (7 ounces) sugar
½ cup (1.5 ounces) unsweetened cocoa powder (not Dutch process)
1 teaspoon baking soda
¼ teaspoon salt
1 stick (8 tablespoons) unsalted butter, room temperature
½ cup buttermilk, room temperature
1 egg
½ cup freshly brewed coffee, cooled to room temperature

Frosting and garnish:
7 ounces bittersweet chocolate, finely chopped
4 ounces cream cheese, room temperature
5 tablespoons unsalted butter, room temperature
1½ cups (6 ounces) confectioners’ sugar
3 tablespoons unsweetened Dutch-process cocoa powder
pinch salt
½ cup sour cream
12 strawberries, halved through the stem

1. To make the cupcakes, adjust an oven rack to the middle position and heat the oven to 350 degrees. Line 24 cupcake wells with paper liners.

2. For the strawberry cake: Put the flour, sugar, baking powder, and salt in a large mixer bowl. With an electric mixer on low speed, blend for 30 seconds. Add the butter and strawberry puree and mix to blend, then raise the speed to medium and beat until light and fluffy, 2 to 3 minutes.

3. In another large bowl, whisk together the egg whites, milk, and red food dye, if using. Add the egg white mixture to the batter in two or three additions, scraping down the sides of the bowl well and mixing only to incorporate after each addition. Set aside.

4. For the chocolate cake: In a large mixer bowl, combine the flour, sugar, cocoa, baking soda, and salt. With an electric mixer on low speed, blend for about 30 seconds. Add the butter and buttermilk and blend on low until moistened. Raise the speed to medium and beat until light and fluffy, 2 to 3 minutes.

5. Whisk the eggs and coffee together, and add to the batter in 3 additions, scraping down the sides of the bowl and beating only until blended after each addition.

6. Simultaneously spoon the two batters into each cupcake well, filling them about two-thirds full. Bake until a toothpick inserted into the center of a cupcake comes out clean, 18-20 minutes. Cool the cupcakes in the pans on a wire rack for 5 minutes, then remove them from the wells and cool completely on the rack.

7. For the frosting: Melt the chocolate in a heat-proof bowl set over a pot of simmering water. Set aside to cool until just barely warm.

8. In a large mixer bowl, beat the cream cheese and butter on medium-high speed until pale and fluffy, about 3-4 minutes. Gradually mix in the confectioners’ sugar, cocoa powder, and salt. Beat in the melted and cooled chocolate and then the sour cream. Continue beating until the mixture is smooth and well blended. Frost cupcakes immediately. Top each cupcake with a strawberry half.

strawberry chocolate cupcakes 5

rhubarb sour cream pound cake

rhubarb pound cake 5

The newborn stage hit all of us hard – including the baby, who apparently found life outside the womb to be unsatisfactory. I was grateful for a freezer full of dinners, although I did manage to do some simple baking – chocolate chip cookies, pound cake. My favorite recipes, made almost more for the comfort of going through the motions, of feeling like me, than to have a delicious dessert to share and enjoy.

rhubarb pound cake 1

I’m hesitant to put this in writing, but things are a little better now. We’ve figured out how to calm the baby’s cries (usually), she smiles and even sometimes coos, and we’ve learned to adapt to a routine where nothing is really routine. For example, I learned the hard way, when a pissed off hungry baby had to wait to eat until the cookies I’d just put in the oven were done baking, that I can’t bake unless Dave is home to take things out of the oven if necessary. Also, it’s best if I divide up the baking as much as possible; for one cake I made recently, I had the measured dry ingredients and the baking pan sitting by the mixer for almost a week until I finally got a chance to mix it all together.

rhubarb pound cake 4

This cake was slightly more impromptu, only because the days before I baked it had gone so fast I couldn’t make time to prepare the ingredients. Fortunately, the baby had a particularly sleepy day on the last day of the weekend, and I was able to mix and bake a cake. She woke up hungry when I was doing the final mixing of the dough, so Dave did his best to soothe her while I rushed to get the cake in the oven. I left myself a bit of batter in the mixing bowl to enjoy after the nursing session. After this last month, I definitely deserve a treat.

rhubarb pound cake 7

Rhubarb Sour Cream Pound Cake (rewritten and slightly adapted from Cook’s Country)

16 servings

The original recipe is for cranberries (fresh or frozen), but I’ve found that rhubarb and cranberries are interchangeable in baked recipes like this. I also doubled the recipe so I could bake it in a bundt pan instead of a loaf pan.

10 large eggs, at room temperature
4 teaspoons vanilla extract
3½ cups (17.5 ounces) all-purpose flour
1½ plus ¼ teaspoons salt, divided
1 teaspoon baking powder
⅔ cup sour cream
½ cup milk
28 tablespoons unsalted butter, room temperature
2½ cups (17.5 ounces) granulated sugar
2 cups (8 ounces) finely diced rhubarb
2 tablespoons powdered sugar

1. Heat the oven to 300 degrees. Grease and flour (or spray with baking spray) a 12-cup bundt pan. In a medium bowl, combine the eggs and vanilla. In a separate bowl, combine the flour, 1½ teaspoons salt, and baking powder. In a small bowl, whisk together the sour cream and milk.

2. In a mixer fitted with the paddle attachment (or in a large bowl with a hand-held mixer), beat the butter on medium speed until smooth. Gradually add the granulated sugar, then increase the mixer speed to medium-high and continue to beat for another 3-4 minutes, scraping the sides of the bowl as necessary, until the mixture is pale and fluffy. Reduce the mixer speed to medium; gradually add the egg mixture. Scrape the sides of the bowl, then continue to mix on medium speed until evenly mixed; the mixture will probably look curdled. Reduce the mixer speed to low and add one-third of the flour mixture, followed by half of the sour cream mixture, another third of the flour, the remaining sour cream, and the remaining flour. Mix until almost combined, with a few streaks of flour remaining.

3. Toss the rhubarb with the powdered sugar and remaining ¼ teaspoon salt. Add the rhubarb to the batter and use a large rubber spatula to fold it in until the rhubarb is evenly incorporated and the batter is thoroughly mixed. Transfer the mixture to the prepared pan.

4. Bake until a toothpick inserted in the center of the cake comes out clean, 1½ to 2 hours. Transfer to a wire rack; cool in the pan for 15 minutes, then invert the cake onto the rack. Cool the cake completely, about two hours, before serving. Tightly wrapped, the cooled cake can be stored for up to three days.

rhubarb pound cake 6

passion fruit meringue tart

passionfruit meringue tart 8

My original goal was to post this before Valentine’s Day – passion fruit, get it? But instead, I had a baby just a few days before that. And despite what everyone had told me about how difficult the newborn stage is, I’m surprised to find the newborn stage is, indeed, difficult. It seems like most of my days are spent bouncing on an exercise ball, as that’s the best way to keep this tiny creature from screaming in my ear.

baby hazel 1 day b

Needless to say, I haven’t been doing much cooking. I’m thankful to JanuaryMe for providing a very well-stocked freezer, not to mention all the other people who have cooked meals for us. Dave and I take turns eating while the other bounces.

passionfruit meringue tart 3

However, today, I baked a cake! A simple cake that I prepped as much as possible yesterday, but I still got to turn butter, sugar, and flour into a sweet treat. It was glorious.

passionfruit meringue tart 4

Still, I think it’s going to be a while before I make a dessert that involves multiple components. This tart is back from my friend’s cancelled party. I took it to work instead, but not before setting aside a slice for myself. It was such a great combination of tart filling and sweet topping, creamy curd and crisp crust. I’m looking forward to stable days of getting back into more elaborate baking, but for now, I’m grateful for any quality time I get to spend with my mixer.

passionfruit meringue tart 5

Passion Fruit Meringue Tart (crust recipe from Dorie Greenspan)

8-12 servings

I get passion fruit concentrate from amazon.

Crust:
1½ cups (7.2 ounces) all-purpose flour
½ cup (2 ounces) confectioners’ sugar
¼ teaspoon salt
9 tablespoons cold unsalted butter, cut into ½-inch cubes
1 large egg yolk

Passion fruit curd:
4 large eggs
3 egg yolks
¾ cup (5.25 ounces) granulated sugar
¾ cup passion fruit concentrate
6 tablespoons cold butter
¼ teaspoon vanilla
⅛ teaspoon salt

Meringue:
4 large egg whites, room temperature
¾ cup (5.25 ounces) granulated sugar
½ teaspoon vanilla extract
pinch salt

1. For the crust: Put the flour, confectioners’ sugar, and salt in a food processor and pulse to combine. Scatter the butter over the dry ingredients and pulse until the butter is coarsely cut, with some pieces the size of oatmeal flakes and some the size of peas. Stir the yolk with a fork and add it a little at a time, pulsing after each addition. Process in long pulses until the dough forms clumps and curds; the sound of the machine working will change. Scrape the sides of the processor bowl to incorporate any unmixed dry ingredients.

2. Grease a 9-inch fluted tart pan with a removable bottom. Press the dough evenly over the bottom and up the sides of the pan. Freeze the crust for at least 30 minutes before baking.

3. Center a rack in the oven and heat the oven to 375 degrees. Spray a piece of aluminum foil with nonstick spray and fit the foil, oiled side down, tightly against the crust. Put the tart pan on a baking sheet and bake the crust for 25 minutes. Carefully remove the foil. If the crust has puffed, press it down gently with the back of a spoon. Bake for about 8 more minutes, or until it is firm and golden brown. Transfer the tart pan to a rack and cool the crust to room temperature before filling.

4. For the curd: Heat the passion fruit juice in a double boiler until hot but not boiling. Whisk the eggs and yolks in a medium nonreactive bowl; gradually whisk in the sugar. Whisking constantly, slowly pour the hot passion fruit juice into the eggs, then return the mixture to the double boiler and cook, stirring constantly with a rubber spatula, until the mixture registers 170 degrees on an instant-read thermometer and is thick enough to cling to a spoon, about 3 minutes. Immediately remove the pan from the heat and stir in the cold butter until it’s incorporated; stir in the vanilla and salt, then pour the curd through a fine-mesh strainer into a medium nonreactive bowl. Spread the curd evenly over the prepared crust.

5. For the meringue: Beat egg whites until frothy. Beat in sugar, 1 tablespoon at a time; until sugar is incorporated and mixture forms soft peaks. Add vanilla and salt; continue to beat meringue to stiff peaks.

6. Pipe the meringue over the curd. Use a kitchen torch to brown the meringue. Serve immediately or chill for up 8 hours.

passionfruit meringue tart 6

confetti cake

confetti cake 2

Because I don’t have enough to keep me busy between a house under construction and lugging around ten pounds of belly, I thought it would be a good idea to make my own baby shower cake too. What can I say? No one in my town can make a cake as delicious as I can.

confetti cake 1

Plus it was fun to choose my own flavors and design. Somehow in the three big cakes I’ve made previously, I’ve never made a chocolate cake, which needed to be remedied. Two of the three other cakes I’ve made had additional frosting in between the layers, and I wanted to use a different filling. All of the cakes, including this one, used cream cheese frosting, because there’s no need to fix what isn’t broken.

EH3A5018
Photo by Lisa Watson

The blackberry cake has been a favorite since I made it for a bridal shower, and then a few weeks later, for my birthday. The confetti cake I first tried right after one of the big baby shower cakes last summer. I found out about my friend/coworker/husband’s boss’s (who was also my baby shower host, who also took a lot of the pictures in this post) birthday just one day beforehand, and it was a big one, so it couldn’t be ignored. Even though I was feeling a little caked out, I loved this cake so much that I had two pieces and have been thinking about it since.

EH3A5020
Photo by Lisa Watson

I assumed baking a tiered cake at 8-months pregnant would be a challenge, so I baked and froze the cake layers in December, in the 2-week window that we were home between drying out the house and when we moved out for construction to begin. It turns out that the big belly was the least of my issues; I did not expect to be working around contractors in a corner of the kitchen uncovered of plastic and washed of paint residue, but with my mom there to help, we actually got the cake finished in time to take Dave out for a birthday lunch before the shower.

EH3A4977
Photo by Lisa Watson

I kept the design simple, but it fit in perfectly with the rustic decorations at my shower, which I loved. As a bonus, I didn’t have to do the worst part, the cutting of the cake. I asked a friend to do that while I gushed over adorable tiny pink clothes. Even better, I got to take home the leftovers – which made a great lunch, snack, and dessert the next day as we continued to coast through this crazy time in our lives as best we can.

confetti cake 3

Printer Friendly Recipe
Confetti Cake (from Cook’s Country)

12-16 servings

Cook’s Country recommends pulsing a portion of the sprinkles in the food processor, but I’ve never bothered. I filled the cake with raspberry filling and topped with cream cheese frosting.

6 large egg whites, room temperature
⅔ cup whole milk, room temperature
2 teaspoons vanilla extract
3 cups (12 ounces) cake flour
1½ (10 ounces) cups sugar
4 teaspoons baking powder
1 teaspoon salt
16 tablespoons unsalted butter, cut into 16 pieces, softened
¾ cup rainbow sprinkles

1. Adjust an oven rack to the middle position and heat the oven to 350 degrees. Butter three 8-inch round cake pans with baking spray (or grease and flour the pans). Line with parchment or waxed paper and grease the paper.

2. Using an electric mixer fitted with a paddle attachment (or in a large bowl if using a handheld mixer), mix together the flour, sugar, baking powder, and salt on low speed for about 30 seconds. With the mixer running, add the butter, one piece at a time, until it is incorporated and the mixture looks like moist crumbs. Add all but ½ cup of the milk mixture to the crumbs and beat at medium speed (or high speed if using handheld mixer) for 1½ minutes. Add the remaining ½ cup of the milk mixture and beat 30 seconds more. Stop the mixer and scrape the sides of bowl. Add the sprinkles, return the mixer to medium speed (or high for a handheld mixer) and beat 20 seconds longer.

3. Divide the batter evenly between the prepared pans. Bake for 21 to 25 minutes, or until a cake tester or wooden toothpick inserted into the center of a cake comes out clean. Allow the layers to cool in the pans for 5 to 10 minutes. Invert and turn out the cakes onto wire racks; peel off the paper liners. Let stand until completely cooled before assembling the cake, at least one hour.

EH3A4954
Photo by Lisa Watson

salted chocolate caramels

chocolate salted caramels 5

It might be silly, but one of the things I was the most upset about when my house got flooded was that I wouldn’t be able to do all of the Christmas baking I’d planned. I didn’t enjoy sharing a hotel room with two cats who take out their anxiety by playing in the litter box in the middle of the night, I don’t like the concrete floors in my house, and I wish my favorite black boots hadn’t been among the many casualties, but it was the baking that I kept coming back to. I started planning my holiday baking in October; I remember trying to order packaging and not being able to find anything but Halloween themes. (I did order packaging in early November, but it unfortunately was another casualty and had to be reordered.)

chocolate salted caramels 1

But a little flood damage can’t hold me back. The weekend we were stuck in a hotel while contractors tore out our carpet and cut the bottom two feet from all the walls, a friend of ours was going out of town and was generous enough to give us the keys to his house. His kitchen didn’t give me much to work with – I was able to carve out just a few square feet of workspace – but when there’s a will, there’s a way. In that tiny kitchen, I baked cranberry-orange bread, mocha biscotti, and lemon spritz wreaths, which actually put me ahead of the schedule I’d originally planned for the month.

chocolate salted caramels 2

We’ve now spent two weeks at home in our torn up house before construction starts, and I was able to make almost everything else I’d planned, including a tiered Christmas tree cake for the office holiday party, which I got the idea for all the way back in the summer. (Fortunately, the cakes were already baked and in the freezer, but decorating it was not trivial.) These caramels were the last treat I needed to make, and I had the recipe picked before I read the very mixed reviews – about half of the reviewers raved, but the other half had massive failures. I had neither the time nor the mental fortitude for a failure.

chocolate salted caramels 3

Fortunately, the recipe came together perfectly. I wasn’t expecting it to take quite so long for the chocolate-caramel mixture to reach the right temperature, but I knew how important that was, since most of the problems people had were with the consistency of the final caramels, which is based on that temperature. Another problem I read about was butter separating from the caramel mixture after it had hardened. I remembered all of the pan sauce recipes that specifically call for cold butter because it emulsifies better and was sure to keep my butter, cut into tiny cubes, in the fridge until I was ready for it. I don’t know if it was that, or if the universe is just cutting me a break after a rough month, but I’m grateful for a recipe that came together easily and flawlessly, so I was able to finish my holiday baking and enjoy the part of the season I was looking forward to the most.

chocolate salted caramels 4

Printer Friendly Recipe
Chocolate Salted Caramels (adapted from Gourmet via Smitten Kitchen)

64-96 candies, depending on how you cut them

Here’s what I’ve changed: reducing the final temperature to 246 degrees, based on many reviews that said their candies were too hard at 255 degrees; keeping the butter cold before adding it; and putting more salt into the mixture and less salt on top.

2 cups heavy cream
10½ ounces bittersweet chocolate, chopped
1¾ cups (12.25 ounces) granulated sugar
½ cup light corn syrup
¼ cup water
1 teaspoon flaky salt, plus more for garnish
2 tablespoons unsalted butter, cut into ¼-inch diced, cold

1. Line the bottom and sides of an 8-by-8-inch square pan with two sheets of crisscrossed parchment paper.

2. In a 1- or 2-quart saucepan over medium-high heat, bring the heavy cream to a simmer. Remove from the heat and add the chocolate. Let set for 1 minute, then stir the cream and chocolate together until evenly mixed.

3. In a 3-quart saucepan over medium-high heat, combine the sugar, corn syrup, water, and 1 teaspoon salt. Bring to a simmer, then reduce the heat the medium. Simmer, occasionally swirling the pan or stirring with a metal spoon, until the mixture is reddish-amber in color. Immediately add the chocolate mixture; the caramel with bubble vigorously. Continue to cook over medium heat, stirring very frequently, until the mixture reads 146-148 degrees on an instant-read thermometer, 10 to 15 minutes. Remove from the heat and stir in the butter.

4. Immediately pour the mixture into the prepared pan. Let set for 10 minutes, then sprinkle with flaky salt. Let cool on a wire rack for at least 2 hours before cutting and serving. Wrapped tightly, the caramels with keep for about 2 weeks.

chocolate salted caramels 6

mocha biscotti

cappuccino biscotti 5

My brother isn’t a coffee drinker, but when he travels with me and Dave, he indulges our desire for fancy coffee every morning. In Oregon last fall, he tried a variety of drinks, from the oversugared coffee slushy to a fancy shakerato. He was just going along with the crowd though; none of the drinks seemed to impress him.

cappuccino biscotti 2

In Iceland this summer, however, he settled on one drink, getting a swiss mocha every day with our morning pastries. I hadn’t tried a mocha since high school, but these were good – the bitter espresso balances the sweet hot cocoa. My favorite has always been a good cappuccino, but I even ordered my own mocha one afternoon.

cappuccino biscotti 3

Coffee is often added to chocolate desserts to enhance the chocolate flavor, but it was the coffee that I wanted to stand out here. With plenty of espresso powder and a shot of Kahlua, I think I succeeded. Even a non-coffee drinker would like these – although my brother can no longer count himself in that crowd, because now he makes mochas a regular treat even when he’s not on vacation.

cappuccino biscotti 4

Printer Friendly Recipe
Mocha Biscotti

Makes about 40 biscotti

3¼ cups (15.6 ounces) all-purpose flour
1 tablespoon baking powder
3 large eggs
8 tablespoons (1 stick) unsalted butter, melted
1¼ cups (8.75 ounces) sugar
½ teaspoon salt
1 tablespoon vanilla extract
1 tablespoon Kahlua or coffee liqueur
4 teaspoons espresso powder
6 ounces (about 1 cup) bittersweet chocolate chips or chopped chocolate
3 ounces (about ⅔ cup) slivered almonds

1. Adjust a rack to the middle position and heat the oven to 325 degrees. Line a baking sheet with parchment paper or a silicone mat. In a medium bowl, combine the flour and baking powder. Break the eggs into a small bowl or measuring cup, but do not whisk them together.

2. In a large pot over medium-low heat, heat the butter until it’s just melted. Remove the pot from the heat and stir in the sugar, then the salt, vanilla, Kahlua, and espresso powder. Stir in the egg yolks, then the egg whites, reserving about 1 tablespoon of egg white to use for an egg wash. Stir in the flour mixture until almost combined, then add the chocolate and almonds, folding until evenly combined and there are no pockets of dry flour.

3. Divide the dough into two portions and shape each into a log that is 2-inches wide and as long as your baking sheet. The dough is very sticky; it’s easiest to use a spatula and butter knife to push the dough into position instead of trying to use your hands.

4. Transfer the baking sheet to the oven and bake until just golden, 30-35 minutes. Transfer the pan to a cooling rack and let the loaves cool on the baking sheet for about 5 minutes, then use two spatulas to transfer the loaves from the pan to the cooling rack. Cool completely, about 30 minutes.

5. Place an oven-proof cooling rack on a rimmed baking sheet. Use a sharp knife to cut the loaves into ½-inch slices, on the diagonal if desired. Transfer half of the biscotti to the cooling rack in the pan, spaced about ¼-inch apart. Transfer the pan to the oven and bake for 15 minutes, until the edges just start to brown. (This baking step is to crisp the biscotti, but they’ll still feel somewhat soft when they’re hot.) Repeat with the remaining biscotti. (You can bake all of the biscotti at once if two pans fit on one level in your oven or if you have cooling racks that stack.) Let the biscotti cool completely on the rack before serving.

cappuccino biscotti 7

maple nutmeg cookies

maple nutmeg cookies 3

There are more practical things I could be doing with my time, but none of them are as fun as baking cookies. This is why I have three types of Christmas cookie dough and a Christmas cake in my freezer. Plus I’ll be 8 months pregnant at Christmas, and I never know when my body is going to cry uncle and let me know that I can’t keep up my normal level of activity indefinitely.

maple nutmeg cookies 1

I have five more holiday treats planned (plus decorating that cake in the freezer), which seemed ambitious until I talked to someone who makes at least twenty types of cookies every December. Still, the only way I can get it all done and still enjoy my life is by spacing it out, and I have so many plans this year that my holiday baking spilled over into November. This is not a hardship, as I’m not sad about having more excuses to play with butter and sugar, even if it does mean using red and green food coloring before Thanksgiving.

maple nutmeg cookies 2

With no food coloring here, these cookies work for either holiday. They’re simple but not plain, as the maple flavor really is evident. Cutting them into fall leaves makes them seem more appropriate for Thanksgiving, but they’re going in my Christmas care packages anyway – along with at least five other treats.

maple nutmeg cookies 5

Printer Friendly Recipe
Nutmeg Maple Cookies (adapted from Gourmet via Smitten Kitchen)

Yield depends on size of cutters used; I made at least a hundred 1-inch cookies (which took forever)

I can’t find Grade B maple syrup where I live, but I do have maple sugar in the pantry, so I substituted 2 tablespoons of that for an equal amount of granulated sugar. The original recipe suggests adding a few drops of maple extract, if you’re more likely to have that around than maple sugar. I also considered starting with a couple extra tablespoons of Grade A maple syrup and simmering it down to ½ cup; if you do this, be sure to let it cool to room temperature before adding it to the dough.

I substituted some brown sugar for white sugar and added vanilla to the original recipe, because I thought both would help bring out the maple flavor.

I know it’s annoying to chill the dough and then have to wait for it to soften up again after chilling, but it’s so soft at room temperature that there’s no way you’d be able to transfer the cut shapes to a baking sheet. You could, however, roll it out immediately after mixing (you’d need a pretty big area) and refrigerate it until it hardens enough to cut and transfer, which would only take 15 minutes or so. I often do this with the scraps.

I tried baking the cookies for 8 minutes and for 10 minutes. The cookies baked for 8 minutes were just a bit chewy. The cookies baked for 10 minutes were crunchy, which isn’t usually my preference but was nice here. If you want your cookies softer, increase the brown sugar to ½ cup and decrease the granulated sugar to ½ cup and bake for 8-10 minutes, until the tops looks dry but the edges aren’t browned.

3 cups (14.4 ounces) all-purpose flour
½ teaspoon freshly grated nutmeg or ¼ teaspoon ground nutmeg
2 sticks (16 tablespoons) unsalted butter, at room temperature
1 teaspoon table salt
¾ cup (5.25 ounces) granulated sugar
¼ cup (1.75 ounces) light brown sugar
1 large egg yolk
½ cup Grade B maple syrup
½ teaspoon vanilla extract

1. In a small bowl, combine the flour and nutmeg. Place the butter in the bowl of a stand mixer fitted with the paddle attachment (or a large mixing bowl if you’re using a hand-held mixer) and beat on medium-low speed until it’s smooth. Add the salt and both sugars and continue beating on medium-low until the mixture is light and fluffy, about 2 minutes, scraping the sides of the bowl as needed. Add the egg yolk and mix until fully incorporated, then, with the mixer running, gradually add the maple syrup and vanilla extract. Reduce the mixer speed to low and gradually add the flour mixture, mixing just until evenly combined. Wrap the dough in plastic wrap and chill for 2 hours or up to two days.

2. Adjust a rack to the middle position and heat the oven to 350 degrees. Line two baking sheets with parchment paper or silicone mats.

3. If chilled for longer than 2 hours, let the dough sit at room temperature until it’s just soft enough to roll out. On a lightly floured surface, roll the dough to a thickness of ⅛-inch. Use floured cookie cutters to cut shapes; transfer the shapes to the prepared pans. Re-roll and cut shapes from the scraps, using as little flour as possible.

4. Bake the cookies until the just golden around the edges, 10 to 12 minutes. Let the cookies cool on the pan for about 2 minutes, then transfer to a wire rack cool completely.

maple nutmeg cookies 6