cranberry sauce with port and dried figs

port cranberries 3

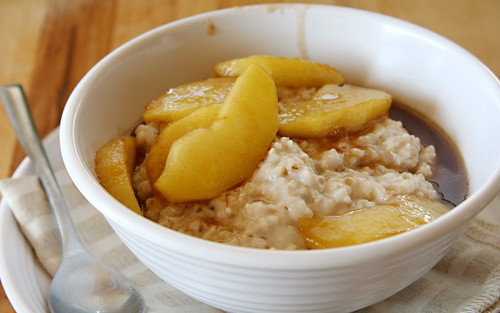
Have you ever looked at the ingredients of canned jellied cranberries? They’re exactly the same as homemade cranberry sauce: cranberries, sugar, water. The first time I made homemade cranberry sauce, I eagerly took my first bite and then…huh. It tastes exactly like the canned kind. Don’t bother making cranberry sauce from scratch if it’s because you’re expecting it to taste better than it is from the can.

port cranberries 4

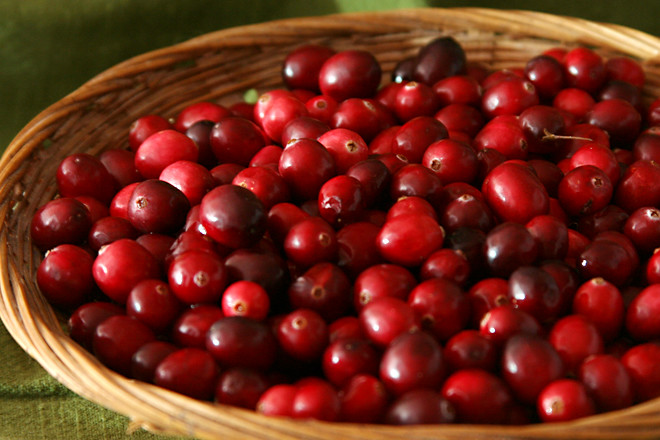
But there are other reasons to make it from scratch. The first is that it’s fun. Raw cranberries are neat, pucker-inducing and hard and dry. Then when you cook them, they pop. It only takes 15 minutes and can be done up to a week in advance, so why not spend a few minutes playing with your food?

The other reason is that you can play around with flavors, personalizing the sauce. Orange is the most common addition and after doing that for several years, I was ready for more experimentation. Sweet port wine and balsamic vinegar seemed like they would complement the tart cranberries perfectly.

port cranberries 1

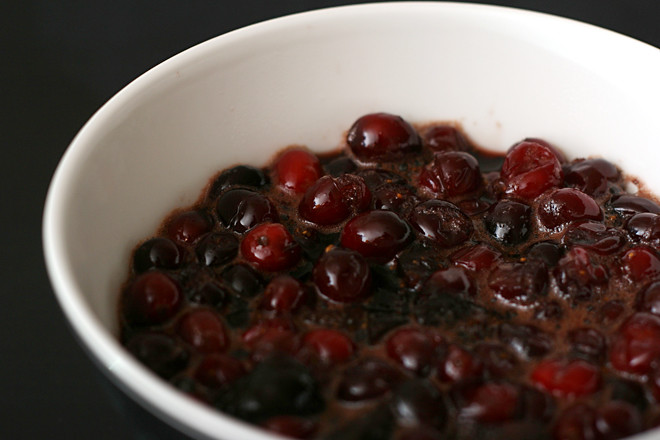
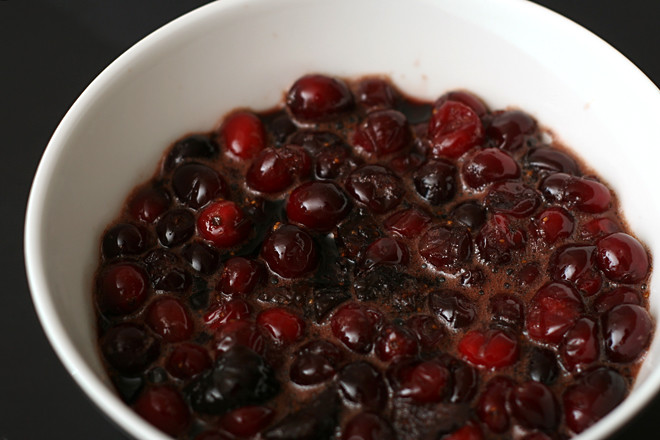
Even with all of the extra flavors in this – port, balsamic vinegar, figs, rosemary, black pepper, cinnamon – it didn’t taste so different from the stuff in the can. It had a warmer tone to it, and I liked the crunch of the fig seeds. But everyone would have been just fine with the canned stuff too. And that’s okay, because the few minutes I spent making this cranberry sauce were well spent just for the fun of it.

port cranberries 2

Two years ago: African Pineapple Peanut Stew
Three years ago: Pumpkin Goat Cheese Ravioli

Printer Friendly Recipe
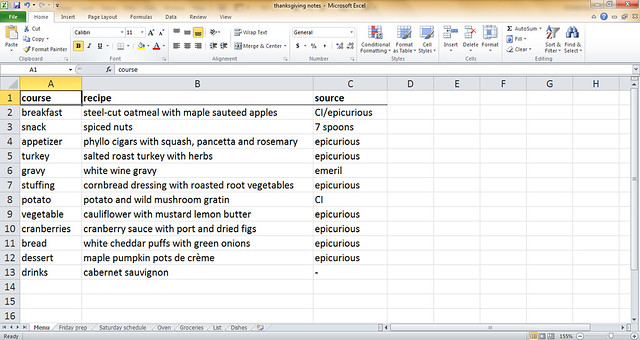
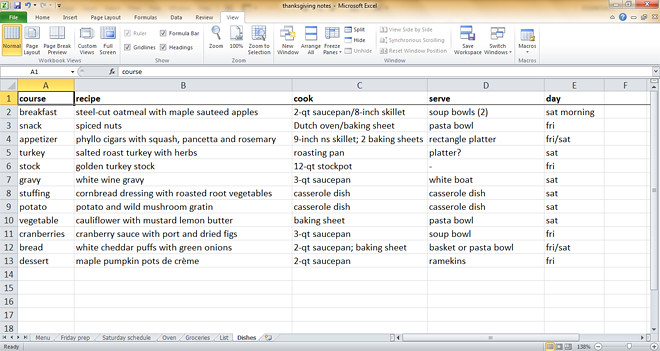
Cranberry Sauce with Port and Dried Figs (adapted from Bon Appétit via epicurious)

At first, I served this as you see it here, but for the leftovers, I put the sauce through a food mill to separate the skins, and I much prefer the smoother version.
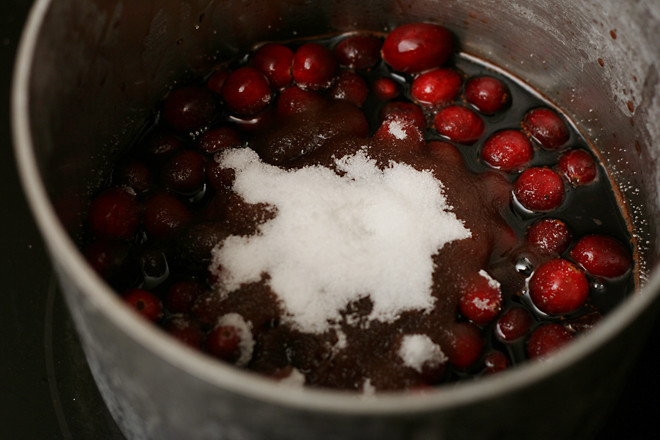
1½ cups ruby Port
¼ cup balsamic vinegar
¼ cup (1.75 ounces) packed brown sugar
8 dried black Mission figs, stemmed, chopped
1 6-inch-long sprig fresh rosemary
1 3-inch cinnamon stick
¼ teaspoon ground black pepper
1 12-ounce bag fresh cranberries
¾ cup (5.25 ounces) granulated sugar

Combine the port, vinegar, brown sugar, figs, rosemary, cinnamon, and pepper in a medium saucepan. Bring to a boil over medium-high heat, stirring until the sugar dissolves. Reduce the heat to low and simmer 10 minutes. Discard the rosemary and cinnamon. Mix in the cranberries and granulated sugar. Cook over medium heat until the liquid is slightly reduced and the berries burst, stirring occasionally, about 6 minutes. Transfer the sauce to a bowl; chill until cold. (Cranberry sauce can be prepared 1 week ahead. Cover and keep refrigerated.)

yukon gold and sweet potato gratin

sweet potato gratin 5

This is not the potato dish I made for my big Thanksgiving meal last year. Last year, I made a potato and wild mushroom gratin, which followed my goal of including more vegetables in the meal. This gratin doesn’t fit that theme.

sweet potato gratin 2

Here’s the thing though: I cannot remember anything about that dish. I don’t remember it being bad, at least, but I don’t remember how good it was. Maybe there were too many mushrooms? I don’t know.

sweet potato gratin 3

I only made this Yukon gold and sweet potato gratin last week, but even if it had been last year, I know I would remember it. Potatoes baked in herby cream sauce and topped with nutty cheese are usually a hit, but adding sweet potatoes to the mixture makes it even better. I can’t guarantee the same thing for adding wild mushrooms to potato gratin.

sweet potato gratin 4

One year ago: Green Chile Mayonnaise
Two years ago: Wheat Berries with Caramelized Onions, Feta, and Lentils
Three years ago: Bacon-Wrapped Pork Tenderloin Medallions

Printer Friendly Recipe
Yukon Gold and Sweet Potato Gratin (adapted from Bon Appétit via epicurious)

8 servings

1½ pounds medium Yukon Gold potatoes, peeled, sliced ⅛-inch thick
1½ pounds medium red-skinned sweet potatoes (yams), peeled, sliced ⅛-inch thick
1 cup heavy cream
1 cup whole milk
2 tablespoons butter
2 garlic cloves, minced
2 tablespoons minced fresh thyme
1½ teaspoons salt
¾ teaspoon black pepper
1¼ cups (5 ounces) coarsely grated Gruyére cheese

2. Heat the oven to 400 degrees. In a small saucepan, combine the cream, milk, butter, and garlic; bring to simmer. Remove from the heat.

2. Butter a 13x9x2-inch glass baking dish. Evenly spread half of the potatoes on the bottom of the dish. Top with half of the thyme, salt, pepper, and cheese. Repeat the layering with the remaining potatoes, salt, pepper, and cheese. Pour the cream mixture over the gratin, pressing lightly to submerge the potato mixture as much as possible. (Can be made 6 hours ahead. Cover with plastic wrap and chill. Remove plastic wrap before baking.)

3. Cover the gratin tightly with foil. Bake 30 minutes. Uncover and continue baking until the top of the gratin is golden and most of the liquid is absorbed, about 25 minutes longer. Let stand 10 minutes before serving.

sweet potato gratin 6

roasted root vegetable stuffing

root vegetable stuffing 6

When I was creating my Thanksgiving menu last year, it occurred to me that most of the traditional Thanksgiving courses are based on carbs – stuffing, potatoes, rolls. The only traditional non-carb sides are the green bean casserole that nobody likes and the sugar-laden cranberries. I have nothing against carbs, and I know all about splurging for a holiday, but I actually like vegetables. Plus, if you include lower calorie food in the menu, you can eat more before filling up!

root vegetable stuffing 1

I would go so far as to almost call this healthy, although it depends on the cornbread you use. It’s mostly vegetables – vegetables whose natural sugars are intensified through roasting. The sweet earthy root vegetables meld perfectly with similarly flavored cornbread.

root vegetable stuffing 2

Beyond the parsnips and rutabaga, it’s a typical dressing recipe with eggs and broth binding the ingredients together before the mixture is baked until it’s crisp on top (but maybe not dry and burned like mine). The result is a dressing that’s almost too good to be topped with white wine gravy.

root vegetable stuffing 4

Two years ago: Glazed Lemon Cookies
Three years ago: Wheatmeal Shortbread Cookies

Printer Friendly Recipe
Cornbread Dressing with Roasted Root Vegetables (adapted from Bon Appétit via epicurious)

Serves 6

6 ounces shallots, peeled, halved if small, quartered if large
8 ounces carrots, sliced ¼-inch thick on the diagonal
8 ounces parsnips, sliced ¼-inch thick on diagonal
8 ounces rutabaga, cut into ½-inch cubes
salt and pepper
olive oil
4 large garlic cloves, unpeeled
1 tablespoon fresh thyme
1 tablespoon chopped fresh rosemary
2 teaspoons minced fresh sage
2 cups ½-inch cubes of cornbread
2 large eggs, lightly beaten
2 tablespoons unsalted butter, melted
1 cup low-salt chicken broth (or Golden Turkey Stock)

1. Preheat the oven to 425 degrees. Spread the shallots, carrots, parsnips, and rutabaga in a single layer on a rimmed baking sheet. Season with a generous sprinkling of salt and pepper and drizzle with just enough olive oil to coat. Roast for about 45 minutes, stirring every 15 minutes, until the vegetables are soft and browned around the edges. Add the garlic during last 15 minutes. Set the roasted garlic aside; transfer the other vegetables to a large bowl.

2. Spread the cornbread cubes over the now-empty baking sheet. Bake until dry, 10-15 minutes, stirring about halfway through the cooking time.

3. Spray a baking dish with nonstick spray. Mince the garlic; add it to the vegetables along with the herbs and cornbread cubes. In a medium bowl, whisk the eggs, then whisk in the broth and butter; pour the egg mixture over the vegetable mixture and gently fold to combine.

4. Transfer the mixture to the prepared baking dish. Cover the pan with foil; bake until heated through, about 30 minutes. Uncover and bake until browned and crisp, about 15 minutes longer.

root vegetable stuffing 5

butternut squash pie

squash pie 7

The winter squashes are a multifaceted group. Pumpkin is obviously perfect with sweet flavors and can be used in custards, pies, cakes, quick breads, cookiesthe whole dessert (or breakfast!) spectrum. Pumpkin does take well to savory dishes, but it’s more common that you’ll see butternut squash used in dinner instead – despite their very similar flavor.

squash pie 3

Furthermore, pumpkin in desserts is nearly always pureed. Squash in dinner is often diced, sometimes pureed. This pie, with its diced butternut squash, did not follow the rules.

squash pie 4

My brain had some trouble deciding if this was dessert or dinner, is what I’m saying. The pears and raisins were obviously sweet, but the big chunks of squash had a strong earthy tone. I think with more sugar and smaller chunks of squash, they would blend into the other pie ingredients, and the whole thing would seem more dessert-like. It isn’t bad as it is, but, perhaps, a little confusing.

squash pie 9

Valerie chose this for Tuesdays with Dorie, and she has the recipe posted. Instead of steaming the squash, I roasted all of the filling ingredients except the orange juice in the oven until the squash was softened, mostly because my oven was already on but also to potentially get some delicious caramelization.  Because roasting drove off some liquid, I didn’t feel I needed to add the breadcrumbs to the filling.

Two years ago: Buffalo Chicken Pizza
Three years ago: Gallitos (Costa Rican Breakfast Tacos)

squash pie 6

white wine gravy

white wine gravy 8

Here’s why this gravy is so good:

First, homemade turkey stock. I know, I go overboard, and while you aren’t wrong, keep in mind that this is not a difficult step. You throw turkey wings – they’re not expensive – in the oven, caramelize vegetables in a stockpot, and then mix the two with water and leave it alone for a few hours while it simmers away. Oh, and deglaze the roasting pan the turkey wings were in. That’s where the good stuff is.

white wine gravy 1

Second, a medium-dark roux. You aren’t just cooking the raw flavor out of the flour here, you want the flour itself to contribute a nutty flavor. It loses some of its thickening power when you do this, but you didn’t want gloppy gravy anyway, did you?

white wine gravy 2

Third, wine. You might be doing this already, but if not, what the heck? Deglaze that roasting pan after your turkey roasts with wine. If you want flavor, and why wouldn’t you, water isn’t enough.

white wine gravy 3

The first time I made gravy like this, I poured it over everything on the plate, and that’s the thing about gravy – it affects the turkey, the stuffing, and the potatoes. That’s half the Thanksgiving plate, which means that gravy shouldn’t be an afterthought. This gravy was so good I ate the leftovers with a spoon. The method isn’t so different from any other gravy, so why not follow these simple tricks for such a payoff?

white wine gravy 6

One year ago: Prosciutto-Wrapped Neufchatel-Stuffed Jalapenos
Two years ago: Pumpkin Scones
Three years ago: Gratin Dauphinois (Potatoes au Gratin)

Printer Friendly Recipe
White Wine Gravy (adapted from Emeril and Cook’s Illustrated)

4 cups Golden Turkey Stock (recipe below)
4 tablespoons unsalted butter
¼ cup all-purpose flour
1 cup dry white wine
Salt and freshly ground black pepper

1. In a small saucepan, bring the turkey broth to a simmer. Reduce the heat to low; cover to keep warm.

2. In a large heavy saucepan, melt the butter over medium-high heat. Stir in the flour and cook, whisking constantly, until the flour just starts to smell nutty and become caramel-colored, 6-8 minutes. Add the broth and bring to a simmer, whisking often. Turn off the heat and cover.

3. After the turkey has roasted, strain the pan juices through a fine-mesh strainer into a glass-measuring cup; skim or pour off the fat from the strained liquid. Discard the solids in the strainer.

4. Place the roasting pan on 2 stovetop burners over medium heat; add the wine and defatted pan juices to the pan, bring to a simmer, and scrape to loosen any brown bits from the bottom of the pan.

5. Add the liquids from the deglazed roasting pan to the broth mixture. Bring to a simmer over medium-high heat, then reduce the heat to low and simmer for 10 minutes, whisking occasionally. Adjust the seasonings with salt and pepper if necessary.

white wine gravy 4

Golden Turkey Stock (from Bon Appétit via epicurious)

Makes about 7 cups

If you’re roasting a salted or brined turkey, don’t add salt to the broth, because the gravy might end up too salty.

4½ pounds turkey wings, cut in half
1 large onion, chopped coarse
1 large carrot, chopped coarse
1 large celery stalk, chopped coarse
6 fresh Italian parsley sprigs
1 bay leaf
½ teaspoon dried thyme
¼ teaspoon whole black peppercorns

1. Heat the oven to 400 degrees. Arrange the turkey wings in a large roasting pan; roast until deep brown, turning once, about 2 hours total.

2. Transfer the wings to a large bowl. Spoon about 3 tablespoons of the turkey fat from the roasting pan into a large pot (reserve roasting pan). Add the onion, carrot, and celery to the pot. Sauté over medium-high heat until the vegetables are golden, about 20 minutes.

3. Meanwhile, add 2 cups of water to the roasting pan; place the pan over 2 burners and bring to a boil, scraping up the browned bits. Add the liquid from the roasting pan to the pot with the sautéed vegetables. Add the turkey wings, herbs, and enough cold water to cover the wings by 1 inch.

4. Bring the water to a boil. Reduce the heat to medium-low; simmer uncovered until the stock is very flavorful and reduced to 7½ to 8 cups, about 2½ hours. Strain the stock into a large bowl. Cool 1 hour, then refrigerate until cold, about 3 hours. (Can be made 3 days ahead. Cover and keep chilled. Can also be made and frozen 2 weeks ahead.) Spoon off the fat from the surface before using.

white wine gravy 7

salted herbed roast turkey

salt roast turkey 5

I don’t like brining turkey. The first time I tried it, I disinfected a cooler, carefully monitored the ice quantity throughout the soaking period, then disinfected the cooler again after removing the turkey. The second time, I stuck the turkey and brine in a stockpot, but couldn’t quite fit the lid on the pot, plus there was no way I could fit that in my fridge, so I stuck it outside overnight and hoped it was cold enough out there to prevent my turkey from turning into bacteria food. Brining turkey sucks.

salt roast turkey 3

Salting turkey isn’t a picnic, but it’s a heck of a lot more straightforward than brining. Just mix up some salt and herbs and sprinkle it inside the turkey’s cavities, over the skin, and under the skin. The salt draws moisture out of the turkey at first, where the liquid mixes with the salt and then flows back into the turkey, now with flavor. While you’re not actually adding moisture like you are with brining, you’re adding flavor and helping the turkey hold onto its natural moisture. And you don’t have to disinfect a cooler or buy a separate fridge.

salt roast turkey 4

And, more importantly, this was the best turkey I’ve ever eaten. It wasn’t bloated like brined turkey can be, but it was juicy throughout. It also had crisper skin than brined birds do. You can’t argue with a method that is not only easier, but produces even better results.

salt roast turkey 6

Two years ago: Buttermilk Scones
Three year ago: Brown Sugar Apple Cheesecake

Printer Friendly Recipe
Salted Roast Turkey with Herbs (adapted from Bon Appétit via epicurious and from Cook’s Illustrated’s Roast Salted Turkey)

Cook’s Illustrated explains that there are two main brands of kosher salt; Morton’s is denser than Diamond. Use the larger amount of salt called for in the recipe if you’re using Diamond Crystal; if you’re using Morton’s, use only 4 tablespoons of salt.

Don’t salt a kosher or self-basting turkey (like a frozen Butterball)!  Those are already salted and will end up way too salty if you add any additional salt.

8-12 servings

Herbed Salt:
6 tablespoons coarse kosher salt (4 tablespoons if finer-grained kosher salt)
1 tablespoon fresh rosemary, minced
1 tablespoon fresh sage, minced
1 tablespoon fresh thyme leaves
3 small bay leaves, coarsely torn
1 teaspoon black peppercorns, crushed
1 teaspoon finely grated lemon peel

Turkey:
1 14- to 16-pound turkey (neck, heart, and gizzard removed)
1 large onion, coarsely chopped
1 large celery stalk, coarsely chopped
1 whole lemon, coarsely chopped
1 tablespoon fresh rosemary
1 tablespoon fresh sage
1 tablespoon fresh thyme
½ cup (1 stick) unsalted butter, at room temperature
2 cups (or more) unsalted chicken broth or Golden Turkey Stock

1. For the herbed salt: Combine the salt, herbs, and pepper. (Can be made 1 week ahead; cover and refrigerate.) Stir in the lemon peel just before using.

2. For the turkey: Rinse the turkey inside and out (do not pat dry). Pull any fat pads from the main cavity and the neck cavity. Rub about half of the salt mixture over the outside of the turkey. Rub half of the remaining salt mixture in the cavities. Use your fingers to loosen the skin over the breasts and thighs. Rub the last portion of herbed salt under the skin. Transfer the turkey to a large bowl or plate, cover tightly, and refrigerate at least 24 hours or up to 48 hours.

3. Adjust an oven rack to the lowest position; heat the oven to 425 degrees. Rinse the turkey inside and out; pat very dry. Combine the chopped onion, celery, lemon, and herbs; divide the onion mixture between the main and neck cavities. Fold the neck skin under and secure with a skewer. Use kitchen twine to loosely tie the legs together. Place the turkey, breast-side down, on a roasting rack set in a large roasting pan. Spread the butter all over the turkey. Pour two cups of stock or broth into the bottom of the roasting pan.

4. Roast the turkey for 45 minutes. Remove the turkey from the oven; lower the oven temperature to 325 degrees. Using wads of paper towels, turn the turkey breast-side up. Continue to roast until the thickest part of the thigh registers 165 to 170 degrees, 1½ to 2 hours longer.

5. Transfer the turkey, still on the roasting rack, to a rimmed baking sheet. Tent loosely with foil and let rest 30 to 45 minutes before carving and serving.

glazed pecans

glazed pecans 4

One of the hardest parts of making a full Thanksgiving dinner for two is dealing with the ridiculous amounts of food. Probably I could have made a course or two less than what people make for a huge group, right? But that would be too easy. I have to go the other direction and make every single course I would make for a crowd.

glazed pecans 1

If family and friends were coming over, I would want casual snacks set out to munch on while people sip their wine and wait for the appetizers to cool. With only the two of us, these little pecans were supposed to hold us over between breakfast and the big eating part of the day, but instead they became irresistible little nibbles whenever the pecan bowl was in sight.

glazed pecans 2

I was surprised by just how much I enjoyed these, because pecans aren’t one of my favorite nuts. I think of them as bitter, but once they were coated in a sweet herby glaze, the nut itself seemed almost meaty. Now I know that sharing them with a crowd is actually a bad idea – because I want them all for myself.

glazed pecans 3

Two years ago: Cranberry Orange Scones
Three years ago: Chickpea and Butternut Squash Salad

Printer Friendly Recipe
Rosemary and Thyme Candied Pecans (adapted from Seven Spoons)

Makes 8 servings

I bought demerara sugar just for this recipe and have found other uses for it, but if you don’t want to buy it, I’m sure brown sugar would work just fine.

2 tablespoons unsalted butter
¼ cup maple syrup
2 tablespoons demerara sugar
¾ teaspoon finely minced fresh thyme
½ teaspoon finely minced fresh rosemary
¼ teaspoon cayenne
Scant ⅛ teaspoon ground cinnamon
1 teaspoon coarse salt
1 pound pecan halves

1. Heat the oven to 375 degrees. Line a baking sheet with parchment paper or a silicone mat.

2. In a large saucepan over medium heat, melt the butter, then add the maple syrup and the sugar. Remove the pan from the heat and stir in the herbs, spices, and salt. Add the pecans to the butter mixture; stir to coat. Spread the nuts in a single layer on the prepared pan.

3. Bake, turning occasionally, until the nuts are glazed, shiny, and deep golden, around 15 minutes.
Cool completely, then store in an airtight container.

glazed pecans 5

steel cut oatmeal with maple sauteed apples

oatmeal maple sauteed apples 6

On a holiday, who wants cold cereal and milk for breakfast? No, something special is in order for the morning of Thanksgiving, but with a day of feasting ahead, it’s nice to get a somewhat healthy start. And with a day of cooking ahead, breakfast can’t be too complicated.

oatmeal maple sauteed apples 1

Steel-cut oatmeal fits the bill perfectly. Because steel-cut oats take the better part of an hour to cook, you’re probably saving it for weekends already. The oatmeal itself is healthy, but the caramelized apples make it a treat without overdoing the decadence first thing in the morning.

oatmeal maple sauteed apples 2

Steel-cut oatmeal isn’t mushy like oatmeal made from rolled oats is. The larger chunks of groats never completely soften, so it’s almost like eating tapioca pudding for breakfast – if tapioca pudding was packed full of fiber. It tastes nutty and slightly sweet on its own, especially after being toasted, but slices of browned apples make this oatmeal just right for a holiday – without being so decadent that it can’t be enjoyed any weekend.

oatmeal maple sauteed apples 4

One year ago: Shredded Beef Tacos
Two years ago: Pumpkin Mushroom Soup
Three years ago: Decorated Sugar Cookies

Printer Friendly Recipe
Steel-Cut Oatmeal (from Cooks Illustrated)

Serves 4

3 cups water
1 cup whole milk
1 tablespoon unsalted butter
1 cup steel-cut oats
¼ teaspoon table salt

1. Bring the water and milk to a simmer in a large saucepan over medium heat. Meanwhile, heat the butter in a medium skillet over medium heat until just beginning to foam; add the oats and toast, stirring constantly with a wooden spoon, until golden and fragrant with a butterscotch-like aroma, 1½ to 2 minutes.

2. Stir the toasted oats into the simmering liquid, reduce the heat to medium-low; simmer gently, until the mixture thickens and resembles gravy, about 20 minutes. Add the salt and stir lightly with the spoon handle. Continue simmering, stirring occasionally with a wooden spoon handle, until the oats absorb almost all of the liquid and the oatmeal is thick and creamy, with a pudding-like consistency, about 7 to 10 minutes. Off the heat, let the oatmeal stand uncovered for 5 minutes. Serve immediately with maple sautéed apples.

Maple Sautéed Apples (slightly adapted from Bon Appétit via epicurious)

2 tablespoons (¼ stick) unsalted butter
3 large firm apples (about 1½ pounds), peeled, cored, cut into ½-inch-thick slices
1 tablespoon plus ½ cup pure maple syrup
½ teaspoon ground cinnamon

Melt the butter in a large nonstick skillet over medium-high heat. Add the apples and 1 tablespoon maple syrup; sauté until the apples are tender, about 5 minutes. Mix in the remaining ½ cup maple syrup and cinnamon; simmer until slightly reduced, about 1 minute.

oatmeal maple sauteed apples 5

notes on planning a thanksgiving feast

salt roast turkey 1

I am a list maker. When I got it in my head to make a big turkey dinner just for me and Dave last year, I had just as much fun planning it as I did cooking it. Eating it was nice too, but that’s just the bonus.

menu

The first step, and possibly my favorite, was to look for recipes. Because I knew I’d get a traditional turkey dinner on the real holiday, I had fun choosing new recipes. I edited each one for precisely how I was going to make it, not just adapting them for my tastes, but writing the directions for the number of servings I’d be making. I knew I’d have a lot to do when it came time to cook, so I wanted to do all of my thinking in advance.

prep schedule

Once my recipes were set, I could write a schedule for myself. I noted everything that I could do in advance and figured out when I would do it. I was fortunate that I had the day off from work the day before my big dinner, so I spent that whole day doing all of my prep. I made myself a detailed schedule for that day – which I was perpetually behind on, but that was okay because there were no deadline for that day; it was just prep.

cooking schedule

Then I made a detailed schedule for the day of my dinner. I started with my dinner time and counted back from there. Basing my cooking schedule on the oven requirements helped me plan. Again, the idea here is to do all of the thinking beforehand, so that when you’re trying to greet guests, serve them drinks, and do inevitable troubleshooting, you know exactly what needs to be done. In your schedule, don’t forget to account for the time it takes transfer the food from the cooking part of the kitchen to the eating part of the kitchen. With as many courses as Thanksgiving feasts include, this is no small task.

grocery list

I find it convenient to make my grocery list for a big meal by recipe, and then put it all together (and arrange by the route I take through the store; I’m hardcore). Finally, I note which pans and serving dishes I’ll need for each recipe; again, the idea is to make all decisions before Go Time so I’m not scrambling to wash my favorite saucepan at the last minute.

dishes big

Of course, even the most careful planning can’t take into account your husband accidentally turning the oven off right as the turkey goes in. A positive attitude is an advantage too.

The attached Excel file has all of my plans in it. Feel free to use it as a template if you think it will help you plan. Over the next two weeks, I’ll blog each of the recipes I made.

salt roast turkey 2

Here’s the complete menu:
Breakfast: Steel-Cut Oatmeal with Maple Sautéed Apples
Snack: Glazed Pecans
Appetizer: Phyllo Cigars with Squash, Pancetta and Rosemary
Turkey: Salted Roast Turkey with Herbs
Gravy: White Wine Gravy
Stuffing: Cornbread Dressing with Roasted Root Vegetables
Potato: Yukon Gold and Sweet Potato Gratin
Vegetable: Cauliflower with Mustard Lemon Butter
Cranberries: Cranberry Sauce with Port and Dried Figs
Bread: Cheddar Puffs with Green Onions
Dessert: Maple Pumpkin Pots de Crème

Two years ago: Pork Chops Loco Moco
Three years ago: Pumpkin Pancakes

fall collage

apple brandy hand pies

apple brandy hand pies 8

Adding ‘brandy’ to the title of this recipe is probably an exaggeration, because I suspect most of the brandy gets left behind in the sugary liquid given off by the apples. Plus, with two teaspoons of brandy in over a dozen hand pies, that’s approximately one drop per pie. On the other hand, how much more fun do apple brandy hand pies sound than apple hand pies? A lot more fun, that’s how much.

apple brandy hand pies 2

And these are fun. To eat, that is; to make, they’re a lot of nitpicky chilling steps. You measure the ingredients and chill them; make the dough and chill it; roll it out and chill it; cut circles and chill them; fill the hand pies and chill them.

apple brandy hand pies 3

It isn’t too bad though; you don’t have to actually do anything during those chilling steps, so it’s really just an issue of starting early. The reward at the end is crust so flaky it’s almost like puff pastry dough, not to mention a sweet and spicy apple filling – whether it’s actually spiked with brandy or not.

apple brandy hand pies 5

One year ago: Coconut Cream Tart/Pie
Two years ago: Sun-Dried Tomato Jam
Three years ago: Peter Reinhart’s Pizza

Printer Friendly Recipe
Apple Brandy Hand Pies (adapted from Smitten Kitchen and from Cooks Illustrated’s apple pie recipe in The New Best Recipe)

Makes about 14 pies

Dough:
1¼ cups (6 ounces) all-purpose flour
¼ teaspoon salt
½ tablespoon sugar
8 tablespoons (1 stick) unsalted butter, cut into pieces
¼ cup Greek yogurt or sour cream
2 teaspoons fresh lemon juice
¼ cup ice water

Filling:
2 large apples, peeled, cored, diced into ¼-inch cubes
1 teaspoon lemon juice
1 teaspoon apple (or regular) brandy
¼ teaspoon lemon zest
¼ cups (1.75 ounces) sugar
2 teaspoons all-purpose flour
⅛ teaspoon salt
½ teaspoon cinnamon
⅛ teaspoon ground nutmeg
⅛ teaspoon ground allspice

1. To make the pastry, in a bowl, combine the flour, sugar and salt. Place the butter in another bowl. Place both bowls in the freezer for 1 hour. Remove the bowls from the freezer and make a well in the center of the flour. Add the butter to the well and, using a pastry blender, cut it in until the mixture resembles coarse meal. Make another well in the center. In a small bowl, whisk together the sour cream, lemon juice and water and add half of this mixture to the well. With your fingertips, mix in the liquid until large lumps form. Remove the large lumps and repeat with the remaining liquid and flour-butter mixture. Pat the lumps into a ball; do not overwork the dough. Cover with plastic wrap and refrigerate for 1 hour. If preparing ahead of time, the dough can be stored at this point for up to one month in the freezer.

2. On a lightly floured work surface, roll out one half of the dough to ⅛-inch thickness. Using a 4-inch-round biscuit cutter, cut seven circles out of the rolled dough. Transfer the circles to a parchment-lined baking sheet, and place in the refrigerator to chill for about 30 minutes.

3. Toss the apples with the lemon juice and zest. In a medium bowl, mix the sugar, flour, salt and spices. Toss the dry ingredients with the apples.

4. Remove the chilled dough from the refrigerator, and let stand at room temperature until just pliable, 2 to 3 minutes. Spoon about 1 tablespoon of filling onto one half of each circle of dough. Quickly brush cold water around the circumference of the dough, and fold it in half so the other side comes down over the filling, creating a semicircle. Seal the hand pie, and make a decorative edge by pressing the edges of the dough together with the back of a fork. Repeat the process with remaining dough and filling. Place the hand pies back on the parchment-lined baking sheet, and return to the refrigerator to chill for another 30 minutes.

5. Heat the oven to 375 degrees. Remove the chilled hand pies from the refrigerator, cut 3 small slits in each and lightly brush with the egg yolk wash. Sprinkle sanding sugar generously over the pies. Bake until the hand pies are golden brown and just slightly cracked, about 20 minutes. Remove the pies from the oven; let cool slightly before serving.

apple brandy hand pies 7