lemon lamb meatballs

lamb meatballs 3

It’s only been the last year or so that meatballs as appetizers have been on my radar, but I’m glad they are. It seems like there’s always at least one meatball option at the many appetizer-themed potlucks around the holidays, and it doesn’t matter how easy the recipe is, they’re one of the most popular options on the table. Mix up a few ingredients in the crockpot, find some toothpicks, and you’ve got yourself a great appetizer that stays warm for hours – and one that doesn’t involve cheese or carbs, which is a miracle!

lamb meatballs 2

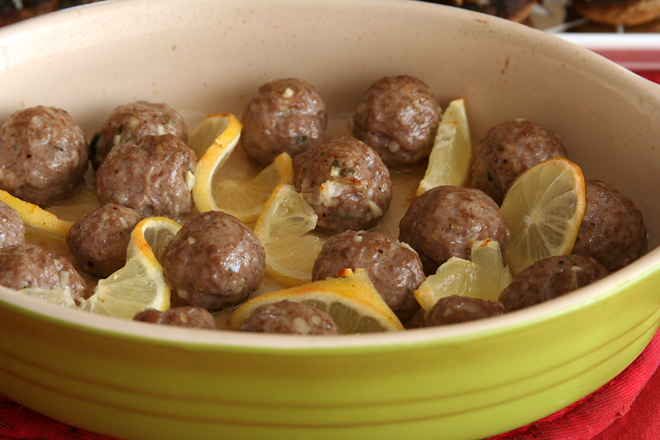
I didn’t need the flexibility of a crockpot since I was entertaining at home, so I went with a baked option. Simple and sauceless is best for lamb anyway, so the flavor of the meat itself comes through.  The garlic, thyme, and lemon are just enhancements to what I really want to taste, which is the lamb.

lamb meatballs 1

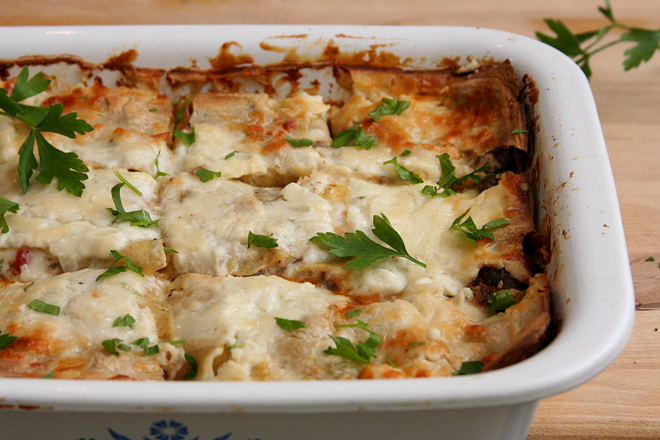
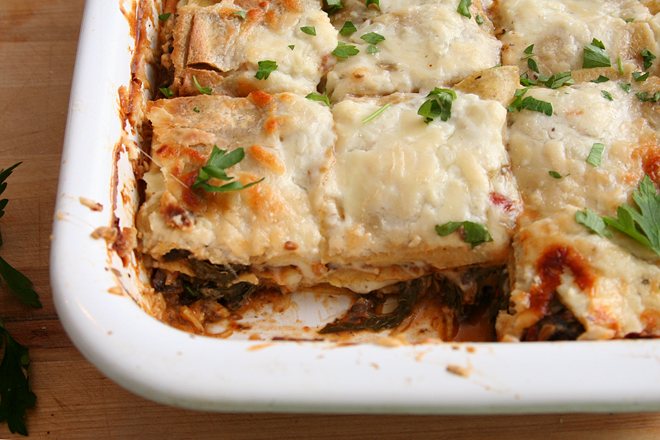
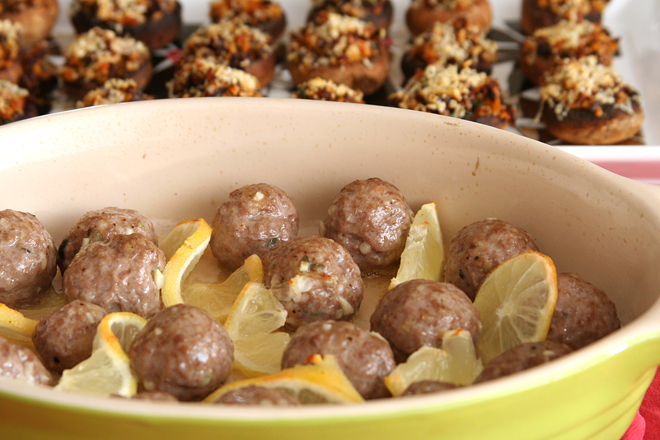
I served the meatballs, along with stuffed mushrooms, before a meal of salad and lasagna finished off with a tart. Again, the carbless starter was a great choice, not just because of the pasta, but because we started out the evening with three loaves of rustic breads; that’s right, a comparison post is forthcoming. In the meantime, here’s a great addition to my new favorite category of appetizers.

lamb meatballs 5

Printer Friendly Recipe
Lemon Lamb Meatballs (slightly adapted from Primal Palate)

Makes 36 meatballs

1 pound ground lamb
2 cloves garlic, minced or pressed through a garlic press
1 tablespoon fresh thyme
1 teaspoon salt
½ teaspoon black pepper
1 tablespoon lemon zest
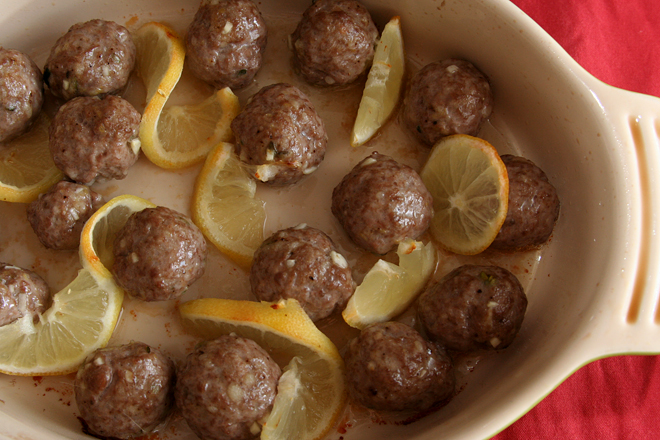
1 lemon, unpeeled, thinly sliced

1. Heat the oven to 375 degrees.

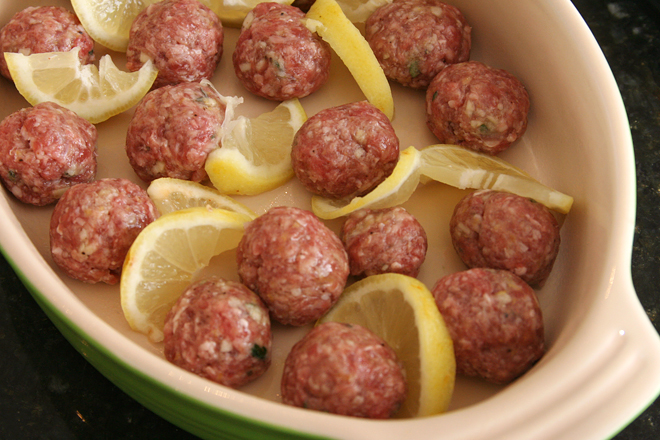
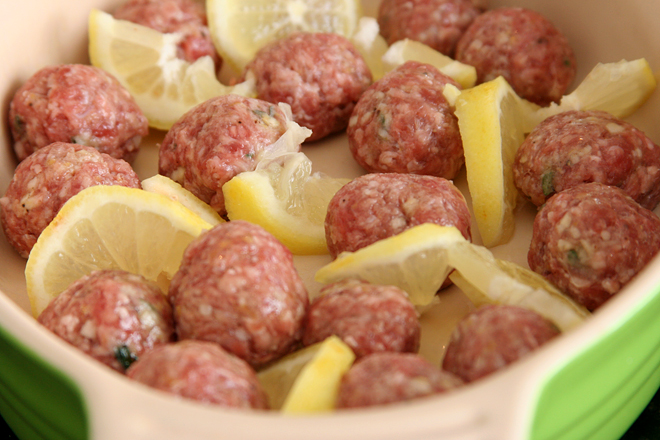
2. Using your hands, mix the lamb, garlic, thyme, salt, pepper, and lemon zest until thoroughly combined. Form the mixture into 36 1-inch balls. Transfer to a 9-by-13-inch baking dish, arranging the lemon slices around and in between the meatballs.

3. Bake until lightly browned and no pink is evident after cutting into a meatball, about 20 minutes. Serve immediately.

lamb meatballs 4

swiss chard mushroom sausage lasagna

swiss chard lasagna 4

I have this weird thing with lasagna, in that I love it, and I love making it, but I have a hard time bringing myself to repeat recipes. I’m always searching for the next new lasagna recipe, but the truth is, my favorite lasagnas involve tomatoes and cheese and probably bechamel and something that tastes meaty (which could be mushrooms and not meat). And there’s only so many ways to combine those ingredients and still call it in a new recipe.

swiss chard lasagna 2

This one, however, I did make twice, because the first time wasn’t quite right. I was thinking that because I enjoy both bechamel and ricotta in lasagna, that I would enjoy having them both there. It turns out, though, that it was overkill, so I nixed the ricotta. Also, the original recipe didn’t include tomatoes or sausage, but they both mix in so well with béchamel and cheese and greens that I couldn’t resist adding them.

swiss chard lasagna 1

I can’t call this my favorite lasagna. With my compulsion to keep trying new recipes, I can’t claim any favorite. But this is certainly worth adding to the list of great recipes. It’s almost like a classic lasagna with some extra vegetables, and those vegetables fit in perfectly with the cheese and tomatoes and meat. It’s so good I might even make it again someday. But in the meantime, tell me: what’s your favorite lasagna recipe?

swiss chard lasagna 3

Printer Friendly Recipe
Swiss Chard Mushroom Sausage Lasagna (adapted from Bon Appetit via epicurious)

For instructions on boiling and rinsing the noodles, see step 4 of this recipe.  You’ll only need half of a recipe of fresh pasta.

Béchamel sauce:
3 tablespoons (½ stick) unsalted butter
¼ large onion, chopped fine
3 cloves garlic, minced
3 tablespoons all-purpose flour
3 cups milk
1 bay leaf
pinch nutmeg
½ teaspoon salt
¼ cup (½ ounce) grated parmesan cheese

Swiss chard and mushroom layer:
8 ounces Italian sausage, removed from casing
1 tablespoon olive oil
¾ large onion, diced
1 pound crimini mushrooms, sliced
salt
4 large garlic cloves, minced
¼ teaspoon dried crushed red pepper
1 (15-ounce) can diced tomatoes with juice
1 pound Swiss chard, center rib and stem cut from each leaf
pepper

Lasagna:
1 pound fresh lasagna noodles or 12 7-by-3-inch lasagna noodles, boiled and rinsed
4 ounces (1 cup) provolone, shredded
4 ounces (1 cup) mozzarella, shredded
2 ounces (1 cup) finely grated Parmesan cheese
2 tablespoons minced parsley

1. For the béchamel sauce: In a medium saucepan over medium heat, melt the butter. When the foaming subsides, add the onion and the garlic. Cook, stirring often, until the onions are softened and translucent, about 5 minutes. Add the flour and cook, stirring constantly, for 1 minute. Whisking constantly, slowly add the milk. Add the bay leaf, increase the heat to medium-high, and bring to a simmer, whisking constantly. When the mixture simmers, reduce the heat to medium-low, add the nutmeg and salt, and simmer 5 minutes. Remove the bay leaf and stir in the parmesan. Cover and set aside.

2. For the swiss chard and mushroom layer: Heat the oil in medium skillet over medium-high heat. Add the onion; sauté until the onion is tender, 3 to 4 minutes. Add the mushrooms and ½ teaspoon salt; cook, stirring occasionally, until the mushrooms release their liquid and then brown, about 8 minutes. Add the garlic and crushed red pepper; cook, stirring constantly, until fragrant, about 30 seconds. Add the tomatoes; simmer until slightly reduced, about 10 minutes. Mix in the chard; cook, stirring frequently, until wilted, about 5 minutes. Stir the sausage back into the sauce; season to taste with salt and ground black pepper.

3. Heat the oven to 350 degrees. Spread a thin layer of the béchamel sauce on the bottom of a 9×13-inch baking dish. Cover the sauce with a slightly overlapping layer of boiled noodles, cutting them as needed to fill any gaps. Evenly spread ¾ cup of the sauce over the noodles. Top with one-third of the sausage-mushroom mixture and one-fourth of the cheeses.  Repeat the layers twice more. Layer a final layer of noodles, then cover with the remaining béchamel and cheeses.  Cover the pan with aluminum foil.

4. Bake, covered, for 30 minutes. Remove the foil and continue to bake until the lasagna is bubbling around the edges and golden on top, 20 to 30 minutes longer. Let stand at room temperature for 10 to 15 minutes. Sprinkle evenly with parsley and serve.

swiss chard lasagna 6

mango cream puffs

mango cream puffs 5

For the first Friday happy hour get-together we threw, I had about 24 hours notice, which works out to just a few hours in which I was both awake and at home. I got home from work fifteen minutes before our friends showed up. And yet, it went off without a hitch. I reminded Dave approximately five hundred times that night that I can clearly keep things simple when I need to.

mango cream puffs 1

The second happy hour was a different story. I had that Friday off of work, and I took advantage of it by spending just about all day cooking – and cleaning and emptying the dishwasher.

mango cream puffs 2

Dave has gotten into making rum cocktails lately, so I went with a Caribbean theme for the food – empanadas, bacon-wrapped stuffed dates, fried yucca root, shrimp ceviche, and cream puffs filled with mango curd. We also had an assortment of Mexican beers available for anyone who fancied themselves too manly for a cocktail.

mango cream puffs 3

It was another success, although not quite as smooth as the first. A good portion of the people we invited didn’t show, even a few who had RSVPed, and there was a ton of food leftover. Plus, apparently when you supply your guests with cocktails that taste like juice (I’ll share the recipe later; trust me that Dave has perfected it), they’ll stick around longer than the two hours we’d all joked was the limit.

mango cream puffs 4

Still, it was a great time, and I can’t wait to throw another one of these little parties. And I was not unhappy about leftovers. The empadanas were great for lunch, and the cream puffs were a perfect pre-breakfast snack the next day – after I finally got all the dishes done. There are some advantages to simpler entertaining, but to be honest, I love both.

mango cream puffs 6

Printer Friendly Recipe
Mango Cream Puffs (from Cook’s Illustrated’s Baking Illustrated via Annie’s Eats)

Makes 24-30 small cream puffs

My food processor was dirty when I made this, so I used the mixer fitted with the whisk to mix the dough. It worked well.

Dough:
2 large eggs plus 1 large egg white
5 tablespoons unsalted butter, cut into 10 pieces
2 tablespoons whole milk
6 tablespoons water
1½ teaspoons sugar
¼ teaspoon salt
½ cup (2½ ounces) all-purpose flour
Mango curd (recipe follows)

1. Whisk the eggs and egg white in a liquid measuring cup. You should have ½ cup (discard the excess). Set aside. Combine the butter, milk, water, sugar, and salt in a small saucepan. Heat over medium heat and bring to a boil, stirring once or twice. When it reaches a full boil and the butter is fully melted, remove from the heat and stir in the flour until incorporated and the mixture clears the sides of the pan. Return the saucepan to low heat and cook, stirring constantly, using a smearing motion, until the mixture is slightly shiny, looks like wet sand and tiny beads of fat appear on the bottom of the pan (the mixture should register 175-180 degrees on an instant-read thermometer).

2. Immediately transfer the mixture to a food processor and process with the feed tube open to cool slightly, 10 seconds. With the machine running, gradually add the reserved eggs in a steady stream. When they have been added, scrape down the sides of the bowl, then process 30 seconds more until a smooth, thick, sticky paste forms.

3. Place an oven rack in the middle position and preheat the oven to 425 degrees. Line a baking sheet with parchment paper. Fill a pastry bag fitted with a ½-inch plain tip with the dough. Pipe the paste into 1½-inch mounds on the prepared baking sheet, spacing them about 1 to 1¼ inches apart (you should be able to fit 24 mounds on the baking sheet). Use the back of a teaspoon dipped in water to even out the shape and smooth the surface of the piped mounds.

4. Bake for 15 minutes (do not open the oven door during baking). Reduce the oven temperature to 375 degrees and continue to bake until golden brown and fairly firm, 8-10 minutes longer. Remove the baking sheet from the oven. Use a paring knife, cut a ¾-inch slit into the side of each puff to release steam; return the puffs to the oven, turn the oven off, and prop open the oven door with the handle of a wooden spoon. Dry the puffs in the turned-off oven until the centers are just moist (not wet) and the puffs are crisp, about 45 minutes. Transfer the puffs to a wire rack to cool completely.

5. To fill the puffs, use the tip of a paring knife to make a small cut perpendicular to the first, creating an X in the side of each puff. Fill a pastry bag fitted with a ¼-inch plain tip with the pastry cream. Pipe some of the pastry cream through the X into the side of each puff until it starts to ooze back out. Repeat to fill all the puffs. Dust with powdered sugar and serve within several hours.

Mango Curd (from Bon Appetit via Smitten Kitchen)

Makes 1 to 1½ cups

1 15-ounce ripe mango, peeled, pitted, cut into ½-inch pieces
⅓ cup (2.33 ounces) sugar
½ teaspoon cornstarch
3 tablespoons fresh lime juice
Pinch of salt
4 large egg yolks
4 tablespoons (½ stick) unsalted butter, cut into small pieces

1. Puree the mango, sugar, lime juice, and salt in a food processor or blender, scraping down the sides of the work bowl as necessary. Add the yolks; puree 15 seconds longer. Strain through a sieve set over a large metal bowl, pressing on the solids with the back of a spatula to release as much puree as possible. Discard the solids in the sieve.

2. Set the metal bowl over a saucepan that contains 1 inch of simmering water (do not allow bottom of the bowl to touch the water); whisk the puree until it is thickened and a thermometer registers 170 degrees, about 10 minutes. Remove from the heat. Whisk in butter one piece at a time. Cover and refrigerate for at least 4 hours.

mango cream puffs 7

salted brown butter rice crispy treats

browned butter rice crispy treats 7

Dave and I threw a couple Friday afternoon happy hour parties a while ago. The idea was that they would be really casual – just come over, hang out a bit, and then go on with your weekend. Dave joked that he was kicking everyone out after two hours.

browned butter rice crispy treats 2

It worked out perfectly. Everyone we invited showed up and they really did leave after two hours, so we had the kitchen cleaned and were sitting down to relax with the last of the sangria by 8pm. I don’t know what everyone else did afterward, but…well, our friends are in their 30s and 40s, probably nothing exciting.

browned butter rice crispy treats 3

We planned the first get-together on Thursday and it was happening Friday right after work, so this didn’t leave me much prep time. Everything I made was simple – bread with cheeses, salami, and sun-dried tomato jam, olives and marinated artichokes, popcorn with truffle salt, cayenne-spiced brittled peanuts, and these rice crispy treats. Thursday after work, Dave pretty much followed after me and cleaned up as I cooked.

browned butter rice crispy treats 4

We came home from work on Friday, spent fifteen minutes setting out food and sangria, two hours chatting and eating with our friends, then fifteen minutes cleaning while congratulating ourselves on a party well thrown. People kept telling me that these were the best rice krispy treats they’d ever had, and I managed not to tell them that while a big pinch of salt and nutty browned butter helps, the real secret is almost three times the butter as the traditional recipe. A clean kitchen by 8pm and not telling your guests how much butter is in the food? That’s entertaining success.

browned butter rice crispy treats 5

Printer Friendly Recipe
Salted Browned Butter Rice Crispy Treats (adapted from Deb Perelman’s Smitten Kitchen Cookbook)

8 tablespoons (1 stick) unsalted butter (wrapper reserved)
¼ teaspoon table salt
1 (10-ounce) bag miniature marshmallows
6 cups puffed-rice cereal (about half of a 12-ounce box)

1. Butter (or coat with nonstick spray) a 9-by-13-inch baking dish.

2. In a large pot over medium-low heat, cook the butter until it melts, then turns brown and smells nutty, stirring frequently. Remove from the heat; stir in the salt, then the marshmallows, stirring constantly until the mixture is smooth. Fold in the cereal.

3. Transfer the mixture to the prepared pan. Use the reserved butter wrapper to press the mixture into the pan. Cool completely. When cool, invert the mixture onto a cutting board and cut into 24 squares. Serve.

browned butter rice crispy treats 6

pumpkin pie

pumpkin pie 6

Let me be frank: The recipe on the back of the can of pumpkin makes a perfectly good pumpkin pie. I have no beef with this pie. It’s the one I ate growing up, and I’ll still certainly grab a slice if it’s available. But at some point, it occurred to me that pumpkin pie is a custard pie, and it should be more custardy – smoother, richer, creamier. It still needs to be firm enough to form straight-sided slices, not puddles, but it shouldn’t be solid.

pumpkin pie 1

I blame the evaporated milk. I like evaporated milk in my salmon pesto pasta recipe as a healthier alternative to cream, but we’re talking now about a dessert that’s eaten after one of the most decadent meals of the year. Is this really the time to cut calories? Stick with heavy cream for dessert.

pumpkin pie 2

But there’s another requirement I have for pumpkin pie, and that is that it be easy. If the filling requires steps beyond mixing everything in the blender, I’m not interested. Not because a great dessert isn’t worth some effort, but because I’ve found that for pumpkin pie, extra effort just isn’t necessary. You can make yourself a perfect pumpkin pie – silky and rich, firm enough to form slices but still soft and smooth – with no more effort than it takes to make the recipe on the back of the pumpkin can.

pumpkin pie 4

Printer Friendly Recipe
Pumpkin Pie (adapted from Bon Appetit’s Spiced Pumpkin Pie and Cook’s Illustrated’s Silky Pumpkin Pie)

1 unbaked pie crust, rolled, transferred to pan, chilled (recipe below)
1 (15-ounce) can pumpkin puree
¾ cup (5.25 ounces) granulated sugar
3 large eggs plus 1 large egg yolk
1 teaspoon vanilla extract
½ teaspoon salt
1 teaspoon ground cinnamon
½ teaspoon ground ginger
⅛ teaspoon ground allspice
⅛ teaspoon ground cloves
1 cup heavy cream

1. Adjust a rack to the middle position and heat the oven to 400 degrees.

2. Remove the pie crust from refrigerator; line the crust with foil and fill it with pie weights. Bake on a rimmed baking sheet for 15 minutes. Remove the foil and the weights; bake 5 to 10 more minutes, until the crust is golden brown and crisp. Remove the crust and baking sheet from oven. Retain the oven temperature.

3. Combine all of the ingredients except the cream in the food processor or blender. Add the cream; pulse. Pour the mixture into the crust.

4. Return the pie plate with the baking sheet to the oven and bake the pie for 10 minutes. Reduce the heat to 300 degrees. Continue baking until the edges are set (an instant-read thermometer inserted in the center should register 175 degrees), 20 to 35 minutes longer. Transfer the pie to a wire rack and cool to room temperature, 2 to 3 hours.

Pie Crust (rewritten from Smitten Kitchen)

1 single-crusted 9-inch pie

1¼ cups (6 ounces) all-purpose flour
½ tablespoon sugar
½ teaspoon table salt
8 tablespoons (1 stick) unsalted butter, very cold
⅓ to ½ cup ice water

1. Mix the flour, sugar, and salt in a food processor. Cut the butter into ¼-inch cubes; add to the food processor and pulse until the largest pieces are pea-sized. Transfer the mixture to a bowl; stir in the water. Wrap in plastic wrap; chill at least 1 hour or up to 1 day. If chilled longer than an hour, leave the dough at room temperature for at least 30 minutes to soften before rolling.

2. Roll out the dough on a generously floured work surface to make a 12-inch circle about ⅛-inch thick. Roll the dough loosely around a rolling pin and unroll into a pie plate, leaving at least a 1-inch overhang all around the pie plate.

3. Working around the circumference, ease the dough into the pans by gently lifting the edge of the dough with one hand while pressing into the plate bottom with other hand. Trim overhang to ½-inch beyond lip of pie plate. Fold overhang under itself; edge should be flush with edge of pie plate. Using thumb and forefinger, flute edge of dough. Refrigerate dough-lined plate until firm, about 15 minutes.

pumpkin pie 3

mulled wine cranberry sauce

mulled wine cranberry sauce 2

This, finally, is the cranberry sauce I’ve been looking for – the one that is worth making not just because making cranberry sauce is fun, but because this is better than anything you could buy. And it’s no more effort than any other cranberry sauce; the only difference between this and the most basic recipe is that wine is used to simmer the cranberries instead of water, and there are a handful of warm winter spices thrown in.

mulled wine cranberry sauce 4

With so much wine, you might think that the sauce ends up tasting like wine, but that isn’t the case. It tastes like something much more than the in-your-face tart and sweet of regular cranberry sauce, but it isn’t particularly boozy. It’s just deeper, more complex, with a little buzz on your tongue.

mulled wine cranberry sauce 5

Unfortunately, with half a bottle of wine stirred into one bag of cranberries, there’s no chance of claiming that all the alcohol cooks off, so this isn’t the best cranberry sauce for kids. That’s why my friend offered to bring a can of jellied cranberry sauce for her kids when I invited them over for a big turkey feast.

mulled wine cranberry sauce 6

When she forgot, we figured what the heck, what harm could a few tablespoons of winey cranberries do? Not much at all, it turns out, as her son took one spoonful of sauce, noted that there was wine in it, and pushed it aside in favor of the stuffing. So maybe it’s not for everyone, but it’s definitely my new favorite.

mulled wine cranberry sauce 7
(turkey cranberry green chile sandwich on a crescent roll)

Printer Friendly Recipe
Mulled Wine Cranberry Sauce (adapted from Bon Appetit via epicurious)

I pressed the sauce through a food mill right after simmering, because I like my cranberry sauce smooth.

zest from 1 orange
1½ cups red wine
½ cup (3.5 ounces) packed brown sugar
½ cup finely chopped crystallized ginger
½ teaspoon ground cinnamon
¼ teaspoon ground cloves
¼ teaspoon ground nutmeg
12 ounces fresh cranberries

Combine all of the ingredients in a medium saucepan. Bring to a boil over medium-high heat, stirring until the sugar dissolves. Reduce the heat to low and simmer uncovered until the berries burst and the mixture thickens, about 20 minutes. Transfer sauce to bowl; chill until cold. (Can be prepared 1 week ahead. Cover and keep refrigerated.)

mulled wine cranberry sauce 3

chicken tikka masala

chicken tikka masala 8

Chicken tikka masala sounds so good in theory. It’s everything I love about Italian food – carbs and meat and tomato sauce mixed together – but it’s Indian food, which I also love. Except, the first time I made it, the similarity was too strong. I felt like I was eating spaghetti sauce with weird spices over rice when it should have been pasta.

chicken tikka masala 3

It took a couple years, but I finally got around to trying a new recipe. Maybe it’s the lemon juice in this recipe that makes all the difference, but there was no spaghetti confusion here. Marinara doesn’t usually have chili spices, ginger, and yogurt either.

chicken tikka masala 5

There’s one thing about this recipe that will seem strange and might make you uncomfortable, and that is that the chicken is not cooked all the way through on the grill. A trip to the grill (or the broiler) is important to really brown, even char, the meat, but then it’s chopped so it can finish cooking in the sauce. This gives it time to soak up some flavor from the sauce without drying out.

chicken tikka masala 6

It may be an unusual technique, but it works, because this is the best chicken tikka masala I’ve ever eaten. Of course, the only other chicken tikka masala I’ve eaten was the spaghetti one, so my basis for comparison is not large. Still, I know good when I taste it, and this is very good.

chicken tikka masala 10

Printer Friendly Recipe
Chicken Tikka Masala (slightly adapted from The Food Lab)

6-8 servings

3 tablespoons ground cumin
3 tablespoons paprika
2 tablespoon ground coriander
2 teaspoon ground turmeric
1 teaspoon cayenne pepper
12 cloves garlic, 8 smashed and 4 minced
3 tablespoons minced or grated fresh ginger, divided
2 cups yogurt
¾ cup fresh juice from 4 to 6 lemons, divided
salt
5 pounds bone-in chicken pieces (breasts, legs, or a mix), skin removed
2 tablespoons butter
1 large onion, thinly sliced
1 (28-ounce) can whole peeled tomatoes, roughly chopped
½ cup roughly chopped cilantro leaves and tender stems
1 cup heavy cream

1. Heat a small not-nonstick skillet over medium heat. Add the cumin, paprika, coriander, turmeric, and cayenne; toast, stirring constantly, until the spices begin to smoke. Immediately remove them from the pan so they don’t burn.

2. Combine 6 tablespoons of the spice mixture, 8 cloves smashed garlic, 2 tablespoons ginger, the yogurt, ½ cup lemon juice, and ¼ cup salt in a large bowl. Score the chicken at 1-inch intervals and immerse in the yogurt mixture; cover and refrigerate for at least 4 hours or up to 8 hours, turning occasionally.

3. When the chicken has marinated, heat the butter in a large Dutch oven over medium-high heat until the foaming subsides. Add the onions, 4 cloves minced garlic, and the remaining 2 tablespoons ginger. Cooking, stirring occasionally, until the onions start to brown at the edges, about 8 minutes. Add the remaining spice mixture and cook, stirring constantly, until fragrant, about 30 seconds. Add the tomatoes, scraping up the browned bits from the bottom of the pot. Simmer, uncovered, for 15 minutes. Puree, either with an immersion blender or in batches with a regular blender. Stir in the cream and the remaining ¼ cup lemon juice. Season with salt if necessary; set aside.

4. Heat a grill to high heat. Grill the chicken without moving until charred, 5-7 minutes. Flip the chicken and char the second side. Transfer the chicken to a cutting board and allow to rest for 10 minutes. The chicken should not be cooked through. (The chicken can also be broiled instead of grilled.)

5. Cut the chicken into bite-sized pieces; transfer it to the sauce. Bring the sauce to a simmer over medium heat and cook, stirring frequently, until the chicken is just cooked through, about 10 minutes. Serve immediately with rice or naan, topping with the remaining cilantro.

chicken tikka masala 9

butternut squash soup with spiced creme fraiche

butternut squash soup 6

I made this pumpkin mushroom soup a couple days ago using butternut squash instead of pumpkin, and it occurred to me that what was a pumpkin phase four years ago is now a butternut squash phase. I’ve been buying about two a week, and I’ve made all sorts of good stuff, like ravioli, chili, and lentil goat cheese salad. I was going to make squash kale pizza tonight, but some friends are getting together for dinner instead. I’m contributing butternut squash and green chile gratin. I thought about bringing this salad, but I already had it on the menu for next week anyway, so I know I’ll get to eat it soon.

butternut squash soup 2

Butternut squash soup has kind of been on my radar to make, but I tried a recipe a few years ago that was good but nothing special, so I hadn’t gone back to the idea since. I ended up making this for a Saturday night dinner that I wanted to be as fall-y as possible. It was the perfect idea for a first course before roast chicken with potatoes and pan-roasted Brussels sprouts and carrots. Even better, a friend of mine was hosting a fall-themed dinner later that week and didn’t have time to test out a soup recipe, so I was able to help her out.

butternut squash soup 4

I loved the soup, Dave loved the soup, my friend loved the soup, and then later that week, the rest of our group of friends said they loved the soup, several asking for the recipe. It’s kind of a subtle set of flavors, with nothing jumping out individually, but everything works well together. The star anise is interesting; if you think about it when you’re eating, it’s evident, but it and the cinnamon and nutmeg are balanced by the savory bay and thyme. The tart garnish (I made crème fraiche for the party but used Greek yogurt at home) was a nice complement since the soup is on the sweet side. I’m so glad I have a great butternut squash soup recipe after all these years – and it makes perfect sense that I would find it in the middle of a butternut squash phase.

butternut squash soup 5

Printer Friendly Recipe
Butternut Squash Soup with Spiced Creme Fraiche (slightly adapted from Allison Vines-Rushing and Slade Rushing’s Southern Comfort via epicurious)

The original recipe calls for the big spices to be tied up in a cheesecloth bundle before being added to the soup. I’m sure they’re easier to remove before blending this way, but fishing out a few spices from a pot of soup seemed easier to me than digging out the cheesecloth from the pantry.

1 large butternut squash, peeled, seeded, and cubed
1 tablespoon olive oil
Salt and pepper
2 tablespoons unsalted butter
4 large shallots, sliced
8 garlic cloves, peeled and smashed
½ teaspoon ground white pepper
1 bay leaf
1 thyme sprig
1 star anise
4 whole peppercorns
½ cup white wine
8 cups chicken or vegetable broth
½ cup heavy cream
1 tablespoon sugar
1 teaspoon salt
¼ teaspoon ground cinnamon
¼ teaspoon freshly grated nutmeg
Spiced Crème Fraîche, for accompaniment

1. Place a rimmed baking sheet in the oven; heat the oven to 425 degrees. When it’s hot, remove the pan from the oven and spread the olive oil evenly over the surface. Transfer the squash and a generous sprinkling of salt and pepper to the hot baking sheet; stir to coat. Roast the squash until browned on at least one side, about 25 minutes, stirring once.

2. Meanwhile, heat the oil in a large pot over medium heat. Add the shallots and cook, stirring occasionally, until the edges start to brown, 6-8 minutes. Add the garlic, pepper, bay, thyme, star anise, and peppercorns; cook, stirring constantly, until fragrant, about 1 minute. Add the wine and cook, scraping the bottom of the pot, until reduced by half. Add the roasted squash, broth, cream, sugar, salt, cinnamon, and nutmeg. Increase the heat to medium-high and bring to a simmer, then reduce the heat to medium-low; cover and simmer for 20 minutes.

3. Remove and discard the bay, thyme, star anise, and peppercorns. Puree the soup, either with an immersion blender or by transferring it in batches to a standup blender. Taste for seasoning and serve immediately, topped with Spiced Crème Fraîche. (Soup can be chilled for several days and reheated.)

Spiced Crème Fraîche

I actually don’t know how much of a difference the spices make, but I did like the tart dairy with the soup. Greek yogurt, sour creme, and crème fraîche will all work just fine.

1 cup crème fraîche
¼ teaspoon salt
¼ teaspoon freshly ground black pepper
¼ teaspoon freshly grated nutmeg
¼ teaspoon ground ginger

Mix all ingredients.

butternut squash soup 7

almond lemon cream cheese coffee cake

cream cheese coffee cake 5

I’ve gotten in the habit of eating just crumbs of each treat I bake. This sounds stingier than it is. While the goal really is to limit my indulging, what inevitably happens is that I “accidentally” create crumbs. Maybe one square of a bar cookie is too rectangular compared to the rest; I better shave a sliver off. Or maybe, in the work kitchen, someone only ate half a cookie (always the same person, and she usually comes back for the other half soon enough); that doesn’t look appetizing, so I’d better eat the other half. Oops, while I was cutting slices of cake, a whole chunk fell off this one; there’s no size limit on crumb, so it counts and I get to eat it.

cream cheese coffee cake 1

The result is that I eat more and enjoy it less. Instead, I’ve started cutting myself a serving and setting it aside until I get home from work, so I can sit down and truly savor it. That’s exactly what I did with this cake, and I was so excited to get home at eat my slice. Especially once my coworkers started coming by my office to rave about how good the cake was. This went faster than anything I’ve ever brought in!

Which, unfortunately, means it was gone by the time I found out that Dave had eaten my piece – in addition to the piece he’d already grabbed from the office kitchen. Oh, I know, it sounds terrible, but as much as I wanted to give him the guilt trip to end all guilt trips, the fact is that it wasn’t exactly his fault. I’d cut my slice and then set it on the counter too close to where he was laying out his lunch. He thought I put it there for him. Still, I was very, very sad.

cream cheese coffee cake 2

This did not stop the stream of coworkers telling me how good the cake was. Obviously I needed to make it again, so I did, less than a week later (I would have made it that very night if I’d had time!), and this time I hid my slice so there’d be no confusion. And it was as good as they said – Buttery and sweet, lemon-scented, some crunchy bites with almonds, and of course my favorite was the streak of cheesecake through the middle. It all worked out in the end, but I definitely learned a lesson.

cream cheese coffee cake 6

Printer Friendly Recipe
Lemon Almond Cream Cheese Coffee Cake (from Cook’s Illustrated)

I made almost no changes to the original recipe. I did substitute ¼ cup Greek yogurt for ¼ cup of the sour cream. Also, my tube pan has a detachable bottom, so I removed the sides, and then the cake was kind of stuck on the bottom portion with the center tube. The cake was too delicate to lift off of the bottom. I ended up chilling the cake overnight and removing the cake from the base in the morning, when it was firm. Then I let it warm up before serving.

Lemon sugar-almond topping:
¼ cup (1.75 ounces) sugar
1½ teaspoons finely grated zest from 1 lemon
½ cup sliced almonds

Cake:
2¼ cups (11¼ ounces) unbleached all-purpose flour
1⅛ teaspoons baking powder
1⅛ teaspoons baking soda
1 teaspoon table salt
10 tablespoons (1 stick plus 2 tablespoons) unsalted butter, softened but still cool
1 cup plus 7 tablespoons sugar
1 tablespoon finely grated zest plus 4 teaspoons juice from 1 to 2 lemons
4 large eggs
5 teaspoons vanilla extract
1¼ cups sour cream
8 ounces cream cheese, softened

1. For the topping: Adjust an oven rack to the middle position and heat the oven to 350 degrees. Stir together the sugar and lemon zest in a small bowl until combined and the sugar is moistened. Stir in the almonds; set aside.

2. For the cake: Spray a 10-inch tube pan with nonstick cooking spray. Whisk the flour, baking powder, baking soda, and salt together in a medium bowl; set aside. In a stand mixer fitted with the paddle attachment, beat the butter, 1 cup plus 2 tablespoons sugar (7.875 ounces), and the lemon zest at medium speed until light and fluffy, about 3 minutes, scraping down the sides and bottom of the bowl with a rubber spatula. Add the eggs 1 at a time, beating well after each addition, about 20 seconds, and scraping down the beater and sides of bowl as necessary. Add 4 teaspoons vanilla and mix to combine. Reduce the speed to low and add one-third of the flour mixture, followed by half of the sour cream, mixing until incorporated after each addition, 5 to 10 seconds. Repeat, using half of the remaining flour mixture and all of the remaining sour cream. Scrape the bowl and add the remaining flour mixture; mix at low speed until the batter is thoroughly combined, about 10 seconds. Remove the bowl from the mixer and fold the batter once or twice with a rubber spatula to incorporate any remaining flour.

3. Reserve 1¼ cups batter and set aside. Spoon the remaining batter into the prepared pan and smooth the top. Return the now-empty bowl to the mixer and beat the cream cheese, remaining 5 tablespoons sugar, lemon juice, and remaining teaspoon vanilla on medium speed until smooth and slightly lightened, about 1 minute. Add ¼ cup of the reserved batter and mix until incorporated. Spoon the cheese filling mixture evenly over the batter, keeping the filling about 1 inch from the edges of the pan; smooth the top. Spread the remaining cup of reserved batter over the filling and smooth the top. With a butter knife or offset spatula, gently swirl the filling into the batter using a figure-8 motion, being careful to not drag the filling to the bottom or edges of pan. Firmly tap the pan on the counter 2 or 3 times to dislodge any bubbles. Sprinkle the lemon sugar-almond topping evenly over the batter and gently press into batter to adhere.

4. Bake until the top is golden and just firm, and a long skewer inserted into cake comes out clean (skewer will be wet if inserted into cheese filling), 45 to 50 minutes. Remove the pan from the oven and firmly tap on counter 2 or 3 times (the top of the cake may sink slightly). Cool the cake in the pan on a wire rack for 1 hour. Gently invert the cake onto a rimmed baking sheet (the cake will be topping-side down); remove the tube pan, place a wire rack on top of the cake, and invert the cake sugar-side up. Cool to room temperature, about 1½ hours. Cut into slices and serve.

cream cheese coffee cake 4

shrimp and andouille over green chile cheese grits

shrimp and grits 4

For breakfast on Saturday, we had waffles and a fantastic sausage we picked up on a recent Texas wine-tasting trip. We had dinner at a friend’s cookout, and there were so many great side dishes there that I really didn’t need any grilled meat, but there were homegrown tomatoes and green chile for toppings, so I grabbed a hot dog anyway. For breakfast Sunday, migas with chorizo. For lunch, BLT salads. For dinner, andouille and shrimp over green chile cheese grits. We like our cured pork products.

shrimp and grits 1

I’ve ordered shrimp and grits several times in restaurants, but it was never so good as this. These grits are enriched with butter and cheese, and if your andouille isn’t spicy enough, a jalapeno is added to the grits (I used Hatch green chiles). The shrimp is browned in butter and andouille drippings, then cooked through in beer and broth. As if there isn’t enough going on, the whole thing is topped with a fried egg.

shrimp and grits 3

For as rich as it tastes and as full as I was afterward, it isn’t quite as bad as it sounds. For two servings plus some leftover grits, I used 1 tablespoon of butter, 2 ounces of cheese, no cream (I was out), and…okay, significantly more andouille than the recipe calls for. It was worth every greasy calorie, like cured meats always are.

shrimp and grits 6

Printer Friendly Recipe
Shrimp and Andouille over Green Chile Cheese Grits (adapted from Bon Appétit via epicurious)

Serves 4 generously

I replaced the jalapeno with about ½ cup of roasted, peeled, seeded, and diced Hatch green chiles. Anaheim or poblano would be a good substitute, but I’m sure the jalapeno is good too. I used smaller shrimp (60-70 per pound) and skipped the tarragon.

Grits:
4 cups water
salt
1 cup yellow grits (not instant)
1 cup (4 ounces) grated sharp white cheddar
1 tablespoon unsalted butter
1 jalapeño, seeded, diced
¼ cup heavy cream or milk
freshly ground pepper

Shrimp:
8 ounces andouille sausage
3 garlic cloves, minced
1 pound shrimp, peeled and deveined
¼ cup beer
¼ cup low-sodium chicken broth
1 tablespoon butter
4 large eggs
salt
1 tablespoon chopped fresh tarragon

1. In a medium saucepan over medium-high heat, bring the water and 1 teaspoon salt to a boil. While continuously stirring, add the grits. Reduce to the heat to low to maintain a very slow simmer. Cook, stirring occasionally in the beginning and more frequently as the mixture thickens, for about 30 minutes, until the grits are softened. Stir in the butter, jalapenos, cheese, heavy cream or milk, and pepper. Cover and set aside.

2. In a large skillet over medium heat, cook the sausage, stirring occasionally, until cooked through and lightly browned, about 8 minutes. Add the garlic; cook and stir until fragrant, about 1 minute. Add the shrimp, beer, and stock; cook, stirring frequently, until the shrimp are cooked through, about 5 minutes.

3. Meanwhile, melt the butter in a large nonstick skillet over medium heat. Add the eggs and season with salt. Cover the pan, reduce the heat to low, and cook until the whites are set and the yolks are soft, about 5 minutes.

4. Serve the shrimp mixture over the grits, topped with an egg and sprinkled with tarragon.

shrimp and grits 5