Archives for October 2012

quinoa patties

quinoa cakes 5

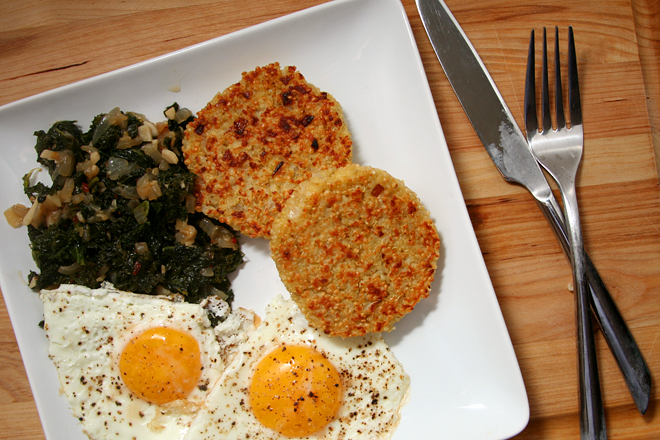
Probably the most random comment I’ve ever left on someone’s site was when Cara made Moroccan quinoa cakes and I compared them to oolitic limestone. Oolitic limestone, if you don’t happen to have ever taken a stratigraphy class, is a rock formed in the ocean near the shore when waves roll grains of sediment back and forth, and the grains precipitate calcium carbonate in concentric layers. It is made up of perfectly spherical grains, about quinoa-sized, that are glued together by more calcium carbonate.

quinoa cakes 1

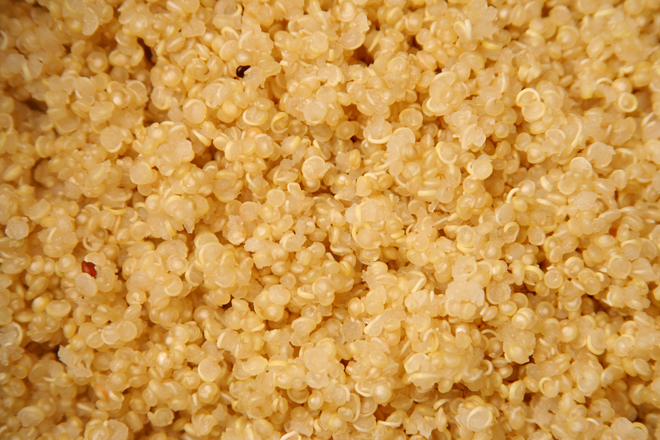
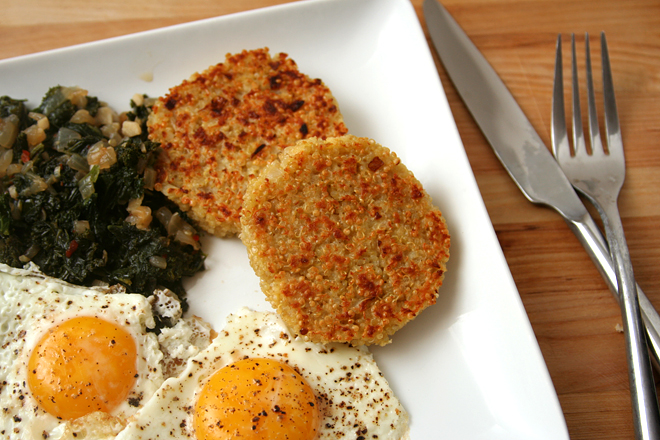
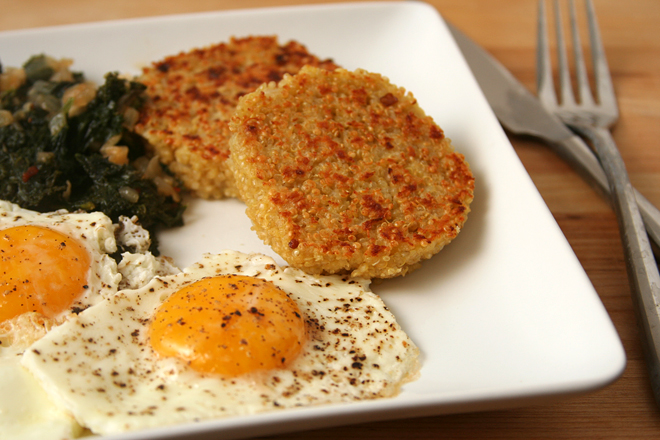
In quinoa patties, the spherical grains (okay fine, seeds) are glued together by eggs and maybe bread crumbs. I made the popular recipe from Heidi Swanson’s Super Natural Every Day, but with all those bread crumbs diluting the quinoa, it didn’t look nearly so oolitic. It still tasted good, flavored with onion and parmesan with crisply browned sides.

quinoa cakes 3

But now I want to go back to that quinoa patty that originally caught my eye. Mostly because I love Moroccan flavors and because it doesn’t have bread crumbs, so the quinoa takes a more central role, but it doesn’t hurt that it looks more like oolite either.

quinoa cakes 4

One year ago: Apple Brandy Hand Pies
Two years ago: Coconut Cream Tart
Three years ago: Sweet Potato Hash
Four years ago: Peter Reinhart’s Pizza

Printer Friendly Recipe
Quinoa Cakes (adapted from Heidi Swanson’s Super Natural Every Day)

Makes 12 patties

1 teaspoon plus 1 tablespoon olive oil
2 large shallots, finely chopped
3 cloves garlic, finely chopped
1 cup uncooked quinoa, rinsed
½ teaspoon salt
1 cup (3.5 ounces) bread crumbs
¼ cup (½ ounce) grated parmesan cheese
4 large eggs, beaten

1. In a medium saucepan, heat 1 teaspoon of oil over medium heat. Add the shallots and cook, stirring occasionally, until just starting to brown around the edges, about 5 minutes. Add the garlic and cook, stirring constantly, until fragrant, about 30 seconds. Add 1¼ cups water; increase the heat to medium-high and bring to a boil. Add the quinoa and ½ teaspoon salt. Cover, reduce the heat to low, and cook for 15 minutes, until the quinoa is tender. Once the quinoa is cooked, drain it if necessary.

2. Transfer the quinoa to a large bowl and stir in the bread crumbs and ¼ teaspoon salt, then the parmesan cheese and eggs. Divide the mixture into 12 equal portions, shaping each into a patty ¾-inch thick and about 3 inches in diameter.

3. Heat the remaining 1 tablespoon of oil in a large skillet over medium heat. Add half of the patties to the skillet, cover, and cook for 7 to 10 minutes, until the bottom is browned. Flip the patties and continue cooking for 7 more minutes, until the second side is golden brown. Transfer the patties to a wire rack to cool slightly, then repeat with the remaining patties, adding more oil if necessary.

quinoa cakes 6

cinnamon macarons with apple buttercream

apple cinnamon macarons 4

Macarons have been all the rage recently, and yet, I’ve had no real desire to make them myself. This, even though they’re known to be finicky, and I do love making my life unnecessarily complicated. But while I do love a challenge, I don’t particularly love meringue cookies.

apple cinnamon macarons 1

This is probably because I’ve never gotten them quite right, as they always seem to be chewy in the center instead of crisp the whole way through. Maybe the precise directions included with many macaron recipes could help me avoid this pitfall. If not, at least they’d be filled with swiss meringue buttercream.

apple cinnamon macarons 2

One of the hallmarks of good macarons is the foamy feet around the bottom edge, which show that your macarons rose up in the oven instead of spreading out. When I started to see those feet form, I made Dave come over to look through the oven window with me and give me a high-five. I was also happy with the smooth tops of the cookies, and it goes without saying that I was happy with the apple buttercream, which was noticeably and pleasantly appley.

apple cinnamon macarons 3

The only problem? A chewy center. I guess practice makes perfect. Fortunately, I think it’s safe to say that meringues are good enough to make again.

apple cinnamon macarons 6

One year ago: Butternut Squash Risotto
Two years ago: Pomegranate Glazed Salmon
Three years ago: Sun-Dried Tomato Jam
Four years ago: Sushi Bowls

Printer Friendly Recipe
Cinnamon Macarons with Apple Buttercream (adapted from Tartelette)

Makes about 20 sandwich cookies

For a lot of meringue-making tips, read Tartelette’s article.

Meringues:
110 grams blanched almonds or almond meal
200 grams powdered sugar
½ teaspoon cinnamon
100 grams egg whites (from about 3 large eggs), aged overnight
25 grams sugar
Pinch salt

Apple buttercream:
4 egg whites
1¼ cups (8.75 ounces) granulated sugar
Pinch salt
24 tablespoons (3 sticks) unsalted butter, softened
⅓ cup apple butter
1 teaspoon vanilla extract

1. In a food processor, process the almonds and powdered sugar until the nuts are finely ground. In a stand mixer fitted with the whisk attachment (or a large bowl with a handheld mixer), beat the egg whites, sugar, and salt on medium-high speed (high speed if using a stand mixer) until soft peaks form. Use a large rubber spatula to fold the nut mixture into the egg mixture. After about 50 folds, the batter should be evenly mixed, with no streaks of egg white.

2. Line 2 baking sheets with parchment paper or silicone mats. Spray the lined sheets lightly with cooking spray. Transfer the batter to a piping bag fitted with a wide (about ½-inch) round tip. Pipe quarter-sized rounds onto the prepared pans, leaving about an inch between rounds. Gently rap the baking sheet against the counter to pop any large bubbles. Set the piped dough aside for 1 hour.

3. Adjust a rack to the middle position and heat the oven to 300 degrees. Bake one sheet at a time until the cookies are lightly browned around the bottom edges, about 15 minutes. Transfer the baking sheet to a wire rack; cool for about 5 minutes, then use a thin spatula to transfer the cookies from the pan to the wire rack. Cool completely before filling.

4. In the bowl of a stand mixer (or a large bowl if using a hand-held mixer), combine the egg whites, sugar, and salt. Set the bowl over a pot of simmering water, making sure the bottom of the bowl does not touch the water. Whisk constantly until the mixture reaches 160 degrees.

5. Fit the mixer with the whisk attachment; beat the egg white mixture on medium-high speed until stiff peaks form and it has cooled to room temperature, about 8 minutes. Reduce the mixer speed to medium and add the butter 2 tablespoons at a time, adding more once each addition has been incorporated. Increase the mixer speed to medium-high and beat until the buttercream is thick and smooth, 3-5 minutes. Add apple butter and vanilla; mix until incorporated.

6. Pipe the buttercream onto the flat sides of half of the cookies.  Top with the remaining cookies.  Serve immediately or cover and store overnight in the refrigerator (bring to cool room temperature before serving).

apple cinnamon macarons 5

candy corn cheesecake

candy corn cheesecake 10

I don’t know what it is about candy corn that makes some people eat it until they’re sick, but for the people who love it, they can’t seem to resist.  My sister is one of those people.  She also considers cheesecake one of her favorite desserts, so obviously a cheesecake baked to look like candy corn was the perfect dessert for her.

candy corn cheesecake 6

It’s just a regular cheesecake with colored batter poured into divided rings. The dividers are carefully removed before baking. However, I refused to buy a special cake batter divider tool, so I looked around my kitchen for alternatives. A 6-inch springform pan would work for the outer ring, and I went really low-tech for the inner ring – a Dixie cup with the bottom cut off. There was some leakage of each color below the dividers, but I think that would be hard to avoid with nearly any set up.

candy corn cheesecake collage

As for which cheesecake recipe to use, that was easy. It was a cake for my sister, so I made her favorite. It worked perfectly – the batter was thin enough that it didn’t stick to the dividers when I removed them, but thick enough not to mix once the dividers were removed.  My sister loved it just as much as I knew she would – and she even managed to restrain herself from eating it until she felt sick.

candy corn cheesecake 8

One year ago: Butternut Squash Risotto
Two years ago: Pomegranate-Glazed Salmon
Three years ago: Sun-Dried Tomato Jam
Four years ago: Sushi Bowls

Printer Friendly Recipe
Candy Corn Cheesecake (adapted from Dorie Greenspan’s Tall and Creamy Cheesecake)

Makes 16 servings

I didn’t want the cheesecake to be too tall, because I wanted slices to have the approximate dimensions of one piece of candy corn, so I cut the recipe down by a fourth, but I think it was too short then. I’ve increased the ingredient amounts back to those in the original recipe, so your cheesecake will be taller than mine.

For the crust:
4 ounces graham crackers (about 8 full crackers)
2 tablespoons sugar
⅛ teaspoon salt
4 tablespoons unsalted butter, melted

For the cheesecake:
4 (8-ounce packages) cream cheese, at room temperature
1⅓ cup (9.33 ounces) sugar
½ teaspoon salt
2 teaspoons pure vanilla extract
4 large eggs, at room temperature
1⅓ cups sour cream

1. For the crust: Grease a 9-inch springform pan and wrap the bottom of the pan in aluminum foil. Heat the oven to 350 degrees.

2. In the food processor, process the graham crackers until finely ground; add the sugar and salt and pulse to combine. Pour the melted butter over the crumbs; pulse until evenly coated. Press the mixture evenly onto the bottom of the prepared pan. Bake until fragrant and beginning to brown around the edges, 10 to 12 minutes. Cool on a wire rack while preparing the filling. Reduce the oven temperature to 325°F.

3. For the cheesecake: Working in a stand mixer, preferably fitted with a paddle attachment, or with a hand mixer in a large bowl, beat the cream cheese at medium speed until it is soft and creamy, about 4 minutes. With the mixer running, add the sugar and salt and continue to beat another 2 minutes, until the cream cheese is light. Beat in the vanilla. Add the eggs one at a time, beating until each is thoroughly combined. Reduce the mixer speed to low and stir in the sour cream.

4. Bring 2 quarts of water to a boil. Place the foil-wrapped springform pan in a larger baking dish.

5. Arrange molds of 2-inch diameter and 6-inch diameter in the springform pan. Pour uncolored batter into the smallest mold in the middle, to a height about 1-inch below the top of the pan. Color the remaining batter yellow and fill the outermost ring. Use a small amount of red food coloring to color the remaining batter orange and pour the rest of the batter into the second ring. Carefully remove the molds by lifting them straight up out of the batter.

6. Pour the boiling water into the baking dish around the springform pan. Transfer to the oven and bake for 1 hour and 30 minutes, until the center jiggles like jello when lightly shook and a thermometer inserted into the center of the cheesecake reads 150 degrees. Turn the oven off, prop open the oven door, and leave the cheesecake in the oven for another hour.

7. Remove the cheesecake from the oven and the water bath. Cool on a wire rack until it reaches room temperature, then transfer to the refrigerator and chill for at least 4 hours or up to a week.

candy corn cheesecake 9

pizza with ricotta, caramelized onions, and prosciutto

ricotta prosciutto pizza 5

My pizza making goes in phases. I’ll go through long stretches where, every other Friday, I’m arranging turkey pepperoni over green chile-spiked tomato sauce. If I want to get fancy, I’ll add sliced mushrooms.

ricotta prosciutto pizza 2

And then that will turn around, and each pizza for months will be different from last. Rarely do these varied pizzas have tomato sauce and mozzarella; it seems that if I’m choosing anything resembling a traditional pizza, it’s going to be topped with that pepperoni and green chile. In fact, of the last few pizzas I’ve made, this is the only one that even uses predominately Italian ingredients.

ricotta prosciutto pizza 3

But those ingredients make it a safe bet, because you can never go wrong with creamy fresh ricotta, salty prosciutto, and sweet onions. The original recipe made the onions into a marmalade with sugar and balsamic vinegar, but I think caramelized onions are plenty sweet on their own. I chose to add the prosciutto after removing the pizza from the oven, instead of before baking, because I find the baked prosciutto turns into little more than crisp bits of salt. Letting the heat of the pizza soften the bite-sized pieces of ham leaves their meaty flavor. Altogether, it makes for a worthy departure from pepperoni and green chile.

ricotta prosciutto pizza 4

One year ago: Turkey Ricotta Meatloaf
Two years ago: Red Kidney Bean Curry
Three years ago: Brown Rice with Black Beans
Four years ago: Mulled Cider

Printer Friendly Recipe
Pizza with Ricotta, Caramelized Onions, and Prosciutto (adapted from The New York Times via Smitten Kitchen)

1 tablespoon olive oil
1 large onion, halved and sliced
salt
pinch crushed red pepper flakes
2 ounces prosciutto, cut or torn into approximately 1-inch pieces
1 cup ricotta cheese (made from 4 cups milk, if homemade)
1 pound pizza dough, fully risen and at room temperature (⅓ of this recipe)

1. Place a pizza stone on the bottom rack of the oven and heat the oven to 500 degrees.

2. Heat the oil in a medium skillet over medium heat until shimmering; stir in the onions and a pinch of salt, and cook, stirring frequently, until the onions just begin to brown, about 8 minutes. Reduce the heat to medium-low, add the crushed red pepper flakes, and cook, stirring frequently, until the onions have softened and are medium golden brown, about 15 minutes longer.

3. Meanwhile, shape the dough into a ball. Set it aside for 10 to 30 minutes, loosely covered, to allow the gluten to relax.

4. Working on a lightly floured surface or a damp cloth, flatten the dough, then pick it up and gently stretch it out, trying to keep it as circular as possible. Curl your fingers and let the dough hang on your knuckles, moving and rotating the dough so it stretches evenly. If it tears, piece it together. If the dough stretches too much, put it down and gently tug on the thick spots. Transfer the round of dough to a large square of parchment paper; slide the parchment with the dough onto a pizza peel.

5. Spread the ricotta evenly over the dough, then evenly disperse the onions over the ricotta. Slide the pizza with the parchment onto the hot baking stone. Bake for 8-10 minutes, until the crust is browned around the edges. Transfer the pizza to a cooling rack without the parchment. Top with the prosciutto. Let the pizza rest for 5 minutes before serving.

ricotta prosciutto pizza 6

flatbreads with honey, sea salt, and thyme

honey flatbread 6

On our very last day in Italy, almost exactly one year ago, we took it easy. One last order of “due cappuccini”, one last walking tour, one last cathedral, one last gelato, one last lunch. That lunch was one of many memorable meals on that trip. We ate on the street on a warm day. We ordered pecorino and honey to go with the ubiquitous bread. It was the first time I’d paired honey with cheese, and I was impressed at how well they went together.

honey flatbread 1

It was all downhill from there. Two weeks of restaurant meals, dehydration, and poor sleep had caught up to Dave, and he wanted nothing more than a nap and proximity to a box of Kleenex. We ate dinner in the apartment – bread, cheese, sausage, a basket of cherry tomatoes I’d bought from a farmer’s market, a bottle of wine. Then we set our alarms for 4:30 the next morning and said our goodbyes to Italy.

honey flatbread 3

I’ve been hooked on bread with cheese and honey since that day, and this might be the perfect way to combine the ingredients – just a thin crisp of bread topped with shavings of nutty cheese and generous spoonfuls of honey. The sea salt is absolutely necessary to balance all the sweet honey, and the crunch of the snowflake-sized flakes is a nice touch. It’s not the same as the first time I paired cheese with honey, but it isn’t bad. It isn’t bad at all.

honey flatbread 4

One year ago: Chewy Brownies
Two years ago: Palmiers
Three years ago: Applesauce Snack Cake
Four years ago: Pain Ordinaire

Printer Friendly Recipe
Flatbread with Honey, Thyme, and Sea Salt (adapted from Smitten Kitchen)

I used a firm Gruyere, which was really delicious.  Deb used a Mahon, which I’ve never even heard of and certainly can’t find where I live.  Parmigiano-Reggiano would be great as well.

⅓ to ½ cup honey
1¾ cups (7.75 ounces) all-purpose flour
1 teaspoon baking powder
¾ teaspoon table salt
½ cup water
⅓ cup olive oil
¾ cup (1.5 ounces) grated gruyere cheese
1 tablespoon fresh thyme
Flaky sea salt such as Maldon

1. Place a baking stone on the middle rack of the oven and heat the oven to 450 degrees. In a small saucepan, heat the honey over low heat.

2. In a medium bowl, combine the flour, baking powder, and salt. Make a well in the center of the dry ingredients; pour the water and oil into the well. Stir the liquids into the flour until a dough forms, then knead the dough about five times, until it forms a smooth ball.

3. Divide the dough into four equal portions. On a sheet of parchment paper, roll one portion into an oval approximately 12 inches long by 6 inches wide.

4. Transfer the parchment paper with the dough to the heated baking stone. Bake for 5 minutes, until lightly golden. Remove the dough from the oven and evenly distribute a quarter of the grated cheese over the surface. Return the dough to the oven until it’s browned at the edges, 3-4 additional minutes. Immediately drizzle 1-2 tablespoons of honey over the surface of the bread, then sprinkle with a quarter of the thyme and a generous pinch of sea salt. Cut the bread into pieces; serve warm. Repeat with the remaining portions of dough.

honey flatbread 5

black bean-roasted zucchini-goat cheese enchiladas

zucchini goat cheese enchiladas 7

I had a tough week last week. One day I woke up to little ants crawling all over the kitchen. One afternoon I went to the dentist feeling smug about how often I’ve been flossing and left with an appointment to get three cavities filled. One morning I noticed blisters on my waist that were suspiciously familiar – because they’re exactly like the case of shingles* I had just a few weeks ago. The list goes on from there.

zucchini goat cheese enchiladas 3

I also learned that I definitely do not have time to make enchiladas on a weeknight, even if the sauce is made in advance. Mixing the filling, heating tortillas, rolling and baking is too much to fit in on top of the daily dose of exercise, laundry, and spraying the kitchen with Raid.

zucchini goat cheese enchiladas 5

I guess if all’s well that ends well, you could say I had a great week. After a series of challenging days, nothing could have been more relieving than a night spent sipping wine with friends – even if it’s for a wine appreciation class, we’re all furiously scribbling notes, and technically we’re not supposed to be swallowing the wine. And when I got home from class, a delicious dinner was ready, because I’d skipped a workout the day before to fill and roll and all Dave had to do was transfer the enchiladas to the oven while I was out drinking wine. Maybe last week wasn’t so bad after all.

zucchini goat cheese enchiladas 6

(*Getting shingles isn’t fun, but I’m extremely lucky that I only get mild cases.)

One year ago: Fried Eggs with Garlic Yogurt Sauce
Two years ago: Steak Sandwiches
Three years ago: Pumpkin Cupcakes (comparison of 3 recipes)
Four years ago: Pain Ordinaire

Printer Friendly Recipe
Black Bean-Roasted Zucchini-Goat Cheese Enchiladas (filling adapted from Sprouted Kitchen; sauce from America’s Test Kitchen’s Healthy Family Cookbook via Prevention RD)

I roasted the zucchini on a baking sheet immediately after dicing them, but because zucchini is so wet, I think they would benefit from being sprinkled with about a teaspoon of salt, then allowed to drain for half an hour or so before roasting. If you have one, spinning them dry in a salad spinner would also help them pick up more roasted brown color in the oven. On the other hand, the enchiladas were delicious without this extra step.

Serves 4

Enchiladas:
3 large zucchini, cut into ¼-inch dice
1 small onion, coarsely chopped
1 tablespoon extra virgin olive oil, divided
zest from 1 lemon
1 teaspoon kosher salt
1 (15-ounce) can black beans, rinsed and drained
5 ounces goat cheese, divided
12 corn tortillas

Sauce:
1 teaspoon canola oil
½ small onion, finely chopped
2 cloves garlic, minced
1½ tablespoons chili powder
½ tablespoon ground cumin
1 teaspoon sugar
¼ cup water
1 (8-ounce) can tomato sauce
black pepper, to taste

For serving:
2 avocados, diced
½ cup minced cilantro
lime wedges

1. Heat the oven to 450 degrees. On a large rimmed baking sheet, combine the zucchini, onion, oil, lemon zest, and salt. Roast, stirring occasionally, until the zucchini is softened and maybe slightly browned, about 30 minutes. Transfer to a large bowl; stir in the black beans and 4 ounces of goat cheese. Reduce the oven temperature to 350 degrees.

2. While the zucchini roasts, heat 1 teaspoon of canola oil in a medium saucepan over medium heat. Add the onion and cook until translucent and slightly browned around the edges, stirring occasionally, about 8 minutes. Add the garlic, chili powder, cumin, and sugar; cook, stirring constantly, until fragrant, about 1 minute. Add the water and tomato sauce. Increase the heat to medium-high, bring to a simmer, then reduce the heat to medium-low. Maintain a low simmer until slightly thickened, 5 to 10 minutes, stirring occasionally.

3. To soften the tortillas, brush or spray them with a light layer of oil. Arrange 6 tortillas in a single layer on a baking sheet; transfer to the oven and cook for about 3 minutes; flip the tortillas and continue baking for 2 more minutes, until the tortillas are pliable. Repeat with the remaining tortillas.

4. Spread a thin layer of sauce over the bottom of a 9-by-13-inch baking dish. Divide the filling evenly between the tortillas. Roll the tortillas over the filling, arranging the filled tortillas seam-side down in the baking dish. Cover the rolled tortillas with the remaining enchilada sauce. Sprinkle the remaining 1 ounce of goat cheese over the top of the sauce. Bake uncovered for 25-30 minutes, until the enchiladas are evenly heated. Let set for 5 minutes before serving with chopped avocado, cilantro, and lime.

zucchini goat cheese enchiladas 10

chicken parmesan

chicken parmesan 7

I wasn’t excited about this chicken when I planned it. All I really wanted was the pasta, because I’d just made a big batch of sauce from fresh homegrown (not by me) tomatoes. I only added the chicken for protein.

chicken parmesan 3

Maybe this isn’t saying much, since obviously my expectations were low, but the chicken exceeded my expectations. It exceeded my expectations by being perfect. Seasoned and not a bit dry, with a crisp coating, topped with just enough melty cheese, it almost stole the show from my precious tomato sauce.

chicken parmesan 2

But now that tomato season is over, I can tell you which one I’ll be making again sooner. Chicken this good doesn’t need summer tomatoes to turn it into a great meal.

chicken parmesan 8

One year ago: Flip-Over Cherry Cake (Tuesdays with Dorie)
Two years ago: Whiskey Compound Butter
Three years ago: Goat Cheese, Pesto, and Sun-Dried Tomato Terrine
Four years ago: Lavash Crackers (Daring Bakers)

Printer Friendly Recipe
Chicken Parmesan (rewritten but not changed from Cook’s Illustrated’s The New Best Recipe)

Serves 4

I didn’t use this sauce, although I’m sure it’s good.

I hate pounding meat. My chicken breasts were already pretty thin, so I didn’t bother, but I’m more likely to cut breasts in half to form two flatter cutlets than I am to pound them thinner.

Breaded chicken cutlets:
4 boneless, skinless chicken breasts (5 to 6 ounces each)
¼ cup table salt
Ground black pepper
1½ cup fresh bread crumbs
¾ cup all-purpose flour
2 large eggs
1 tablespoon olive oil, plus more for frying

Tomato sauce:
2 cloves garlic, minced
¼ cup extra virgin olive oil
1 (28-ounce) can crushed tomatoes
½ teaspoon dried basil
½ teaspoon dried oregano
¼ teaspoon sugar
Salt and ground black pepper

To finish:
8 ounces spaghetti or linguine
3 ounces (¾ cup) shredded mozzarella cheese
¼ cup (0.5 ounces) grated Parmesan cheese

1. Pound the chicken breasts to an even ½-inch thickness. In a medium mixing bowl, dissolve the salt in 4 cups of cold water; immerse the chicken in the water and refrigerate for 30 minutes. Drain and pat dry. Set the chicken aside for 10 minutes to allow it to continue drying; season with pepper.

2. For the sauce: Heat the garlic and oil together in a large saucepan over medium-high heat until the garlic starts to sizzle. Stir in the tomatoes, basil, oregano, sugar, a pinch of salt, and 2 grinds of pepper and bring to a simmer. Continue to simmer until the sauce thickens a bit and the flavors meld, 10-12 minutes. Taste the sauce, adjusting the salt if necessary. Cover and keep warm.

3. Bring 3 quarts of water to a boil in a large pot. Adjust an oven rack to the top position and heat the broiler.

4. Meanwhile, transfer the bread crumbs to a shallow bowl. Place the flour in a separate shallow bowl. In a third bowl, beat the eggs with 1 tablespoon of oil. Coat the chicken thoroughly in the flour, shaking off the excess, then dip in the egg mixture. Dip both sides of each chicken cutlets in the bread crumbs, pressing to form an even coating. Transfer the breaded chicken cutlets to a wire rack set over a rimmed baking sheet. Allow the coating to dry for 5 minutes.

5. Add 1 tablespoon of salt and the pasta to the boiling water. Cook according to the package instructions; drain and return to the pot.

6. Meanwhile, heat ¼-inch of olive oil in a 10-inch nonstick skillet over medium-high heat. Transfer two cutlets to the pan and cook, without moving, until golden brown and crisp, about 2½ minutes. Flip the cutlets, reduce the heat to medium, and continue cooking until the second side is thoroughly browned, 2½ to 3 minutes. Transfer the cooked cutlets to a (clean) wire rack. Repeat with the remaining cutlets, using new oil. (Otherwise the breading bits from the first batch of oil will burn.)

7. Top each cutlet with 3 tablespoons of mozzarella and 1 tablespoon of parmesan. Place the baking sheet with the chicken under the broil; cook until the cheeses melt and are spotty brown, about 3 minutes.

8. Spoon 1 tablespoon of sauce over each cutlet. Toss the remaining sauce with the pasta. Serve immediately.

chicken parmesan 6