Archives for September 2014

noir bars

noir bars 7

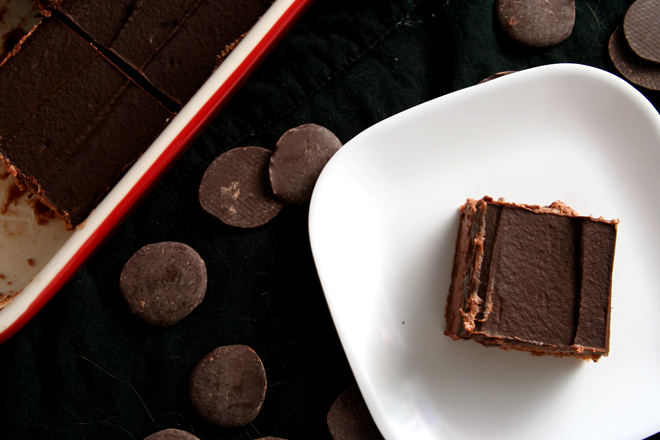
When I made this, I had eight types of chocolate in my pantry, plus cocoa nibs, plus two types of cocoa. I’m a chocolate hoarder.

noir bars 3

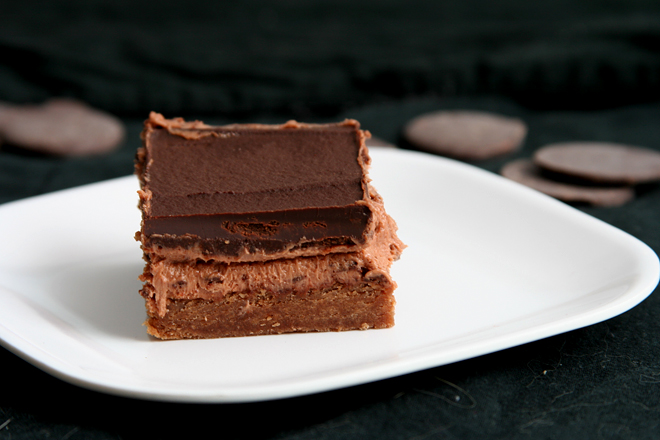
A chocolate cookie topped with chocolate cheesecake filling and finished with chocolate ganache will make a dent in that. The cookie base only has a couple ounces of melted chocolate in it, and I considered replacing some of the flour with cocoa, because, if you’re making a chocolate dessert, it should be as chocolatey as possible, right? No. The other pound of chocolate in the pan is quite enough.

noir bars 4

The middle layer may call itself a cheesecake filling, but it’s made from cream cheese, melted chocolate, powdered sugar, and vanilla extract – so it’s really chocolate cream cheese frosting. Okay, so these were rich. But they were also delicious. And after making chocolate frosting the next day, I’m down to six types of chocolate. Time to start stocking up again.

noir bars 6

Printer Friendly Recipe
Noir Bars (slightly adapted from Sugarcrafter)

The only significant change I’ve made to the original recipe is to increase the cream in the ganache topping. I used the original, lower amount, but when the dessert was chilled, it was too solid – each bite squished out the filling instead of cutting through the topping.

I used a mix of 60% cacao chocolate and 80% cacao chocolate in the topping. Unless you like your chocolate really bitter, I recommend sticking to something closer to 60%.

My favorite way to melt chocolate is in a fake double boiler: Put about 1 inch of water in a saucepan and bring it to a simmer over medium-high heat. Reduce the heat to medium and place a small heatproof bowl (preferably stainless steel, but glass will work; it just takes longer in glass) over the saucepan, making sure the bottom of the bowl doesn’t touch the water. Add the chocolate and stir occasionally with a rubber spatula until the chocolate is completely melted, about 5 minutes.

Chocolate cookie base:
1¾ cup (8.4 ounces) all-purpose flour
½ teaspoon baking soda
8 tablespoons (1 stick) unsalted butter, softened
1 cup (7 ounces) granulated sugar
½ teaspoon salt
1 egg
1 teaspoon vanilla
2 ounces semisweet chocolate, chopped (⅓ cup), melted

Chocolate cheesecake filling:
2 (8-ounce) packages cream cheese, softened
8 tablespoons (1 stick) butter, softened
pinch salt
6 ounces (1½ cups) powdered sugar
4 ounces semisweet chocolate, chopped (⅔ cup), melted
1 teaspoon vanilla

Ganache:
12 ounces semisweet chocolate, chopped (2 cups), melted
1 cup heavy whipping cream

1. Adjust a rack to the middle position and heat the oven to 375 degrees. Spray a 9-by-13-inch pan with nonstick spray. In a medium-sized bowl, combine the flour and baking soda.

2. For the cookie base: Place the butter in the bowl of a stand mixer fitted with the paddle attachment (or a large mixing bowl if you’re using a hand-held mixer). Beat the butter on medium-low speed until it’s smooth, then add the sugar and salt. Continue beating on medium speed until the mixture is light and fluffy, about 2 minutes, scraping the sides of the bowl as needed. With the mixer running, add the egg, then the vanilla and melted chocolate. Reduce the mixer speed to low and gradually add the flour mixture, mixing just until evenly combined.

3. Spread the mixture evenly in the prepared pan. Bake until set, 10-12 minutes. Transfer to a cooling rack and allow to cool to room temperature.

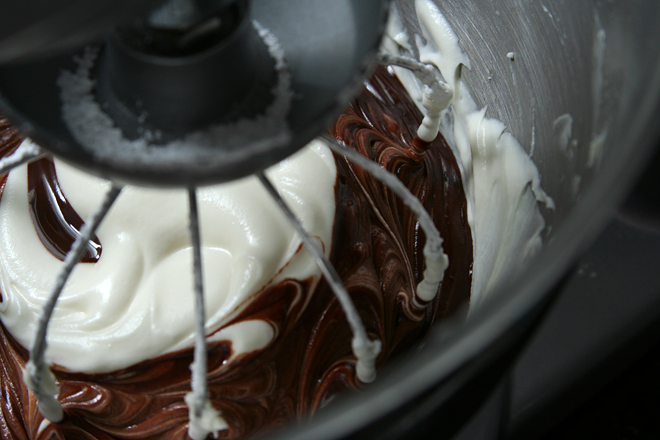
4. For the cheesecake filling: Place the cream cheese, butter, and salt in the bowl of a stand mixer fitted with the paddle attachment. Beat on medium-low speed until smooth. Reduce the speed to low and add the powdered sugar. When the sugar is incorporated, increase the speed to medium-high (high on a hand-held mixer) and beat until smooth and lighter, 2-3 minutes. Add the melted chocolate and vanilla. Spread the mixture over the crust. Chill until set, about 2 hours.

5. For the ganache: Stir together the chocolate and cream. Spread over the filling. Chill until set, about 1 hour.

noir bars 9

peach raspberry galette

peach raspberry galette 10

I know this is crazy, but I’ve already started on my New Year’s resolutions for 2015. Resolution-haters are always saying that they don’t need to make resolutions at the new year, because if they see changes they want to make, they just make them, regardless of the date. And I get their point, but I also think that right after the busy, indulgent holiday season when things slow down to a more manageable pace is a great time to think about personal changes. While I am expecting the next four months to be rushed, I was worried I would lose momentum by the new year, so I’m dipping my toe in now.

peach raspberry galette 2

My goals are mostly cooking-related, as usual:

1) Use more cookbooks. It’s not the first time I’ve made this resolution, but I didn’t do a great job before. This time, I’m going to make myself a schedule to stick to, and hopefully that will lead to a routine. Because I love cookbooks so much, but if I don’t use them, I feel guilty for having them.

peach raspberry galette 3

2) Cook a wider variety of cuisines. There is delicious food out there that isn’t Italian, and maybe I should try some of that once in while. I’m particularly interested in Asian food. I’m intimidated by the ingredient availability issue, but if I’m cooking more of it, I should be able to use up ingredients before they get lost in the back of the refrigerator or pantry.

peach raspberry galette 4

3) Read Harold McGee’s On Food and Cooking. Also not the first time I’ve made this resolution. I started it but got bogged down.

4) Bake more pastries. I’ve gotten into a bit of a bar cookie rut, partly because almost everything I bake is brought to work to share, and it’s easier for coworkers to grab a fruit crisp bar than a slice of pie. But after four years of almost weekly treats, my coworkers seem happy with anything I bring in.

peach raspberry galette 5

So far, I’m doing good with my not-New Year resolutions. I’ve been going to bed a little earlier almost every night to read On Food and Cooking. I recently made kung pao tofu, and last night, we had summer rolls for dinner. And I made these galettes from Tartine, perhaps my favorite baking book. Since they’re sort of pastries, so I killed two birds with one stone.

peach raspberry galette 6

My coworkers, as expected, did not mind cutting themselves a slice of galette, transferring it to a plate, and spooning a dollop of whipped cream on top. And I had fun tackling a more ambitious baking project than usual, even on a weeknight. Maybe I need to join the New Year’s resolution haters and create my own not-New Year’s resolution tradition.

peach raspberry galette 7

Printer Friendly Recipe
Raspberry Peach Galette (adapted from Elisabeth Prueitt and Chad Robertson’s Tartine)

Makes two 10-inch galettes, serving about 16

Galettes are often lauded as the lazy man’s pie, with only one crust and no crimping. This recipe belies that description. In order to maximize the flakiness of the crust, the butter is rolled into the flour several times, then the dough is rolled several more times after the water is added. I was pleasantly surprised that this process only took half an hour.

I didn’t use quite enough fruit, mostly because I was too lazy to peel and slice a fifth peach and too cheap to buy a second container of raspberries. However, I am recommending that you use the extra fruit, as my crust to fruit ratio was slightly high, even as delicious as this crust is. Tartine recommends substantially more crust, but the reduced amounts listed here (which are what I used) were perfect for two galettes (or it would be, with a little more fruit than I used).

24 tablespoons (3 sticks) unsalted butter
18 ounces (3¾ cups) unbleached flour
2 teaspoons sugar
1¼ teaspoons salt
¾ cup ice water
4 cups peaches (4-5 large peaches), peeled and pitted, sliced ⅛-inch thick
2 (6-ounce) containers raspberries
¼ to ½ cup (1.75 to 3.5 ounces) sugar, plus more for sprinkling
1 small egg, whisked with a pinch of salt

1. Cut the butter into ½-inch cubes; freeze for 10 minutes. In a medium bowl, mix the flour, sugar, and salt.

2. Transfer the dry ingredients to a pastry cloth or clean work surface; spread out to ⅓-inch thickness. Scatter the butter pieces over the flour, tossing them to coat with flour. Use a rolling pin to flatten the butter pieces into the flour. When the flour/butter mix has been rolled to the edge of your work surface, shape it back together to a ⅓-inch thickness. Repeat the rolling and reshaping three more times, until the mixture resembles large flakes.

3. Form the mixture into a pile and clear a well in the middle of the pile. Pour in the water, then use a bench scraper to mix the dough into the water with a cutting motion. Use a well-floured rolling pin to roll the dough into a rectangle about 10 by 14 inches. Fold it into thirds, then in half the opposite direction. Repeat the rolling and folding three more times. Roll the dough into a 14-inch by 7-inch rectangle. Cut the dough in half to form two 7-by 7-inch squares. Wrap the dough tightly and refrigerate for at least an hour or overnight.

4. Adjust an oven rack to the middle position and heat the oven to 375 degrees. Line two baking sheets with parchment paper or silicone mats. Roll each square of dough into a 14-inch round. Transfer the rounds to the prepared baking sheets; chill 10 minutes.

5. Divide the peaches evenly between the two dough rounds, leaving a 2-inch border. Top with the raspberries, then sprinkle 2-4 tablespoons of sugar (depending on how ripe and sweet your fruit is) over each pile of fruit. Fold the sides of dough over the fruit, pleating as necessary. Brush the dough with the egg wash, then sprinkle with sugar.

6. Bake until the fruit is bubbling and the crust is browned, 45-55 minutes. Remove from the oven and let cool on the pan. Serve warm or at room temperature.

peach raspberry galette 8

summer vegetable gratin

summer vegetable gratin 6

Can I talk about my garden some more? I’m sorry, I’m just really excited about it. I’m finding that I get nearly the same enjoyment from my vegetable garden as I do from cooking lately. I can’t stop myself from wandering between the beds, just looking at the plants; looking for new fruit growing, checking on whether anything is ripening, plucking weeds, crushing stinkbugs.

summer vegetable gratin 1

I’m so proud that I grew half of the vegetables in this dish. Despite my hit or miss success with gardening, the tomatoes, zucchini, thyme, and basil in this dish all came from the backyard (or the basil would have if I’d remembered to use it).

summer vegetable gratin 5

It’s one of those dishes that toes the line between being healthy and feeling indulgent. I brought it to a comfort food-themed potluck where I knew there would be a lot of (really delicious) cheesy baked pasta, hoping that a second helping of vegetable gratin would keep me from a third helping of macaroni and cheese. It didn’t work – I had both a second helping of gratin and a third helping of mac and cheese – but at least only my healthy-ish gratin leftovers came home with me. My favorite part of gardening is the part that involves eating, and this combination of summer vegetables and herbs is exactly why that is.

summer vegetable gratin 10

Printer Friendly Recipe
Summer Vegetable Gratin (from Cook’s Illustrated)

6-8 servings

I didn’t use this much oil. I sprayed the pan with cooking spray instead of using a tablespoon of oil, and then I used less with the garlic, maybe just 1 tablespoon instead of three.

6 tablespoons extra-virgin olive oil
1 pound zucchini, ends trimmed and sliced crosswise into ¼-inch-thick slices
1 pound summer squash (yellow), ends trimmed and sliced crosswise into ¼-inch-thick slices
2 teaspoons table salt
1½ pounds ripe tomatoes (3 to 4 large), sliced ¼-inch thick
2 medium onions, halved lengthwise and sliced thin pole to pole (about 3 cups)
¾ teaspoon ground black pepper
2 medium garlic cloves, minced or pressed through garlic press (about 2 teaspoons)
1 tablespoon minced fresh thyme leaves
1 large slice white sandwich bread, torn into quarters
2 ounces Parmesan cheese, grated (about 1 cup)
2 medium shallots, minced (about ¼ cup)
¼ cup chopped fresh basil leaves

1. Adjust an oven rack to the upper-middle position and heat the oven to 400 degrees. Brush a 13- by 9-inch baking dish with 1 tablespoon oil; set aside.

2. Toss the zucchini and summer squash slices with 1 teaspoon salt in a large bowl; transfer to a colander set over a bowl. Let stand until the zucchini and squash release at least 3 tablespoons of liquid, about 45 minutes. Arrange the slices on a triple layer of paper towels; cover with another triple layer of paper towels. Firmly press each slice to remove as much liquid as possible.

3. Place the tomato slices in a single layer on a double layer of paper towels and sprinkle evenly with ½ teaspoon salt; let stand 30 minutes. Place a second double layer of paper towels on top of the tomatoes and press firmly to dry the tomatoes.

4. Meanwhile, heat 1 tablespoon of oil in a 12-inch nonstick skillet over medium heat until shimmering. Add the onions, remaining ½ teaspoon salt, and ¼ teaspoon pepper; cook, stirring occasionally, until the onions are softened and dark golden brown, 20 to 25 minutes. Set the onions aside.

5. Combine the garlic, 3 tablespoons oil, remaining ½ teaspoon pepper, and thyme in a small bowl. In a large bowl, toss the zucchini and summer squash in half of the oil mixture, then arrange in the greased baking dish. Arrange the caramelized onions in an even layer over the squash. Slightly overlap the tomato slices in a single layer on top of the onions. Spoon the remaining garlic-oil mixture evenly over the tomatoes. Bake until the vegetables are tender and the tomatoes are starting to brown on the edges, 40 to 45 minutes.

6. Meanwhile, process the bread in a food processor until finely ground, about 10 seconds. (You should have about 1 cup crumbs.) Combine the bread crumbs, remaining tablespoon oil, Parmesan, and shallots in a medium bowl. Remove the baking dish from the oven and increase the heat to 450 degrees. Sprinkle the bread-crumb mixture evenly on top of the tomatoes. Bake the gratin until bubbling and the cheese is lightly browned, 5 to 10 minutes. Sprinkle with the basil and let sit at room temperature for 10 minutes before serving.

summer vegetable gratin 8