snickerdoodles

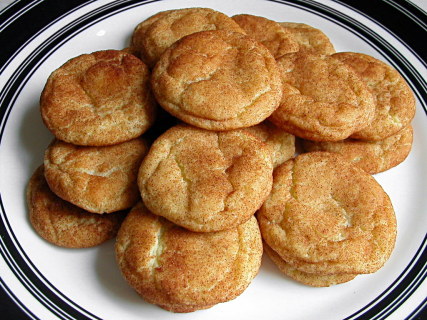
Snickerdoodles are so underrated. They’re Dave’s favorite cookie, and I think my dad’s as well. You probably won’t be surprised that Dave’s and my dad’s favorite ice cream flavors are strawberry and vanilla, respectively. Plain flavors, not too rich, but certainly still a delicious treat. As for me, I have to admit I usually make snickerdoodles when I’m out of chocolate chips.

But these are so good! We’re all missing out with our disdain of the humble snickerdoodle. Buttery, soft, coated in cinnamon sugar – these may not feel as rich as chocolate chip cookies, but they certainly have their place.

There are a lot of recipes for snickerdoodles, but they’re almost identical. I just take Betty Crocker’s basic recipe and tweak it to my liking. The most important change is replacing the shortening with more butter. Shortening in a cookie? Seriously? Blech. I also double the salt. The original recipe calls for a quarter of the salt most chocolate chip cookie recipes use. I find cookies with that little salt too bland. The next change I make is replacing one tablespoon of the granulated sugar with brown sugar. This is a trick I picked up from Cooks Illustrated’s sugar cookie recipe, which is designed to add a bit of complexity to the cookie with a hit of butterscotch flavor. The final tweak I make is to increase the cinnamon to sugar ratio in the coating. The original recipe has only 2 teaspoons cinnamon to a quarter cup sugar – a ratio of 1 part cinnamon to 6 parts sugar.  I like a ratio of 1 part cinnamon to 2 parts sugar. Sometimes, when I want to make Dave really happy, I also grate some nutmeg into the cinnamon sugar mixture.

Next time you’re in the mood to bake, don’t forget about snickerdoodles! And not just because they don’t require any ingredients besides staples, but because they’re delicious!

Snickerdoodles (adapted from Betty Crocker’s Big Red Cookbook)

Makes about 4 dozen 2-inch cookies

2¾ cups (13.75 ounces) unbleached flour
2 teaspoons cream of tartar
1 teaspoon baking soda
½ teaspoons salt
1½ cups granulated sugar minus 1 tablespoon (10.35 ounces total)
1 tablespoon light brown sugar
16 tablespoons (2 sticks) unsalted butter, softened
2 large eggs
¼ cup (1.75 ounces) granulated sugar (for rolling)
2 tablespoons cinnamon

1. Adjust oven rack to middle position and heat oven to 375 degrees. Whisk the flour, salt and baking soda in a medium bowl; set aside.

2. Beat butter and sugars (except the ¼ cup granulated sugar for rolling) until creamy; add eggs and beat until combined. Add flour mixture and mix until just combined.

3. Mix ¼ cup sugar and the cinnamon in a shallow bowl. Roll approximately a tablespoon of dough into a 1-inch ball; roll ball in cinnamon sugar mixture. Repeat with remaining dough, placing balls 2 inches apart on ungreased baking sheet.

4. Bake until cookies are just set and turning golden brown at edges, 8-9 minutes. Cool cookies on baking sheet for 2 minutes; then, using a wide metal spatula, transfer cookies to a wire rack and cool to room temperature.

caesar salad

I almost never make salads. Not because I don’t like them, but because I don’t like them as a side dish. To me, salad doesn’t coordinate well with other dinner items. I do like when it’s served before a meal, or as a meal.

I went the route of serving Caesar salad as a meal the day that I made the peanut butter torte. I figured that if I was going to eat peanut butter and cream cheese and oreos and chocolate and whipped cream for dessert, something was going to have to give.

In one of Alton Brown’s first Good Eats episodes (um, before the show was very good), he discussed the original Caesar salad recipe, which was built tableside at a restaurant by chef Cesar Cardini. The recipe starts with a thin coating of oil on the lettuce, then salt, pepper, more oil, lemon juice, and a coddled egg. I’m not all about this method. I like to at least attempt to emulsify my salad dressing ingredients, and I also think that putting oil directly on the leaves keeps the other ingredients from flavoring the lettuce. Instead, I whisked the dressing ingredients thoroughly, then dressed the leaves with the mixture.

The only ingredient in this recipe that struck me as unusual was the coddled egg. Coddled eggs are cooked in boiling water for about one minute, so, yeah, they’re still mostly raw. I didn’t tell Dave about the raw-ish egg in the salad, and I tried not to think about it myself. I’m not worried about salmonella, I’m just grossed out by eating raw egg white. But I really don’t think the salad would have been as good without it. The egg gives the dressing not only smoothness and body, but a pleasant rich, but not overwhelmingly eggy, flavor.

Alton’s croutons are really exceptional. I had my doubts that grinding the garlic into the oil and then straining the oil to toast the bread in would add enough garlic flavor, but they were extremely garlicky and delicious.

Because I’m a flake, and I forgot while planning this meal that one of the key parts of Caesar salad is the croutons, I made Deb’s pizza bianca to go with the salad. I used my pizza dough recipe instead of the one she gives (although they’re very similar) and followed the directions in the recipe for forming the dough. (Keep in mind that Deb rolled her dough out much thinner.) Also, because Peter Reinhart’s constant reminders that a slow rise is better for artisan breads has stuck with me, I made the dough the day before (with less yeast) and let it rise in the refrigerator overnight. The next day I took it out and let it come to room temperature, then shaped it and put it back in the fridge until I wanted to bake it. It was very good. The only thing I’ll change next time is to use less olive oil on the top, because “Oh my god, there’s a fire in the oven!” aren’t words Dave likes to hear from me when I’m cooking.

Hail Caesar Salad (from Alton Brown’s Good Eats)

Bridget note: I made a few changes to the recipe. I dried the bread as slices instead of cut up into bite-size pieces, because they were easier to cut once they were dried. I didn’t use kosher salt. I found 2 cups of water to be far too little to be able to cover the eggs. I probably used a bit more Worcestershire sauce and Parmesan cheese.

1 loaf day old Italian bread
3 garlic cloves, mashed
9 tablespoons extra virgin olive oil
¼ teaspoon plus 1 pinch kosher salt
2 eggs
2 heads romaine lettuce, inner leaves only
7 grinds black pepper
1 lemon, juiced
6 drops Worcestershire sauce
¼ cup grated Parmesan cheese

Heat oven to 350 degrees.

Cut ½ to ¾-inch croutons from the loaf of bread and place on a baking sheet and put into the oven until dry but not browned.

Use a mortar and pestle to mash the garlic with 4 tablespoons of oil and 1/4 teaspoon kosher salt. Strain the oil into a skillet over medium heat. Add the dried croutons and fry, tossing constantly until all of the oil is absorbed and the croutons turn gold. Set aside.

Bring 2 cups water to a boil in a small saucepan. Add the eggs and cook for 1 minute. Chill in ice water to halt cooking. Set aside.

In a very large bowl, tear lettuce and toss with 3 tablespoons of olive oil. Sprinkle with the remaining kosher salt and the black pepper. Add the remaining olive oil. Toss well. Add the lemon juice and Worcestershire sauce. Break in the eggs. Toss until a creamy dressing forms. Toss in Parmesan cheese and serve with croutons.

peanut butter torte (twd)

I’m spending the first week of June on a beach. And since I spent February overeating and April underexercising, I can’t spend May eating super rich desserts. Unless…it’s peanut butter cream cheese mousse on an oreo cookie crust covered with a layer of ganache and sprinkled with peanuts, which is what Elizabeth chose for this week’s TWD recipe. Even if each slice, according to Dorie’s serving size recommendation, has 1250-1650 calories. I think it’s safe to say that Dorie’s serving sizes are wacko.

Because Dave and I can only eat so much crazy-rich peanut butter torte, I made a quarter of the recipe in a 4-inch pan. A springform pan is really necessary for neat slices, but I don’t have a tiny one that will fit a quarter of the recipe and wasn’t willing to buy one.

For the first week since I joined TWD, no one had any real problems with this recipe. The crust ended up being too thin and most people had to grind up a few more oreos. (Based on everyone’s reviews, it sounds like you’ll need 32-40 oreos for a full recipe, depending on how thick you like your crust.) The peanut butter mousse involves nothing more than beating softened cream cheese and peanut butter together, then folding in some flavorings and whipped cream. There were some complaints that the mousse was too salty, as Dorie calls for chopped salted peanuts to be mixed in. I used half salted and half unsalted and had no problems, although I prefer my mousses to be totally smooth, uninterrupted by bits of peanut and chocolate. The ganache is a classic mixture of chocolate and hot cream. It’s a relatively small amount of work for an impressive dessert, especially if the people you’re serving it to don’t realize that basically every ingredient in it is primarily fat.

Actually, Dave and I got eight servings just out of our mini torte – so 32 servings for a whole recipe. It was a nice, and necessary, compromise between treating ourselves and controlling ourselves.

Peanut Butter Torte (from Dorie Greenspan’s Baking: From My Home to Yours)

1¼ cup finely chopped salted peanuts (for the filling, crunch and topping)
2 teaspoons sugar
½ teaspoon instant espresso powder (or finely ground instant coffee)
¼ teaspoon ground cinnamon
Pinch of freshly grated nutmeg
½ cup mini chocolate chips (or finely chopped semi sweet chocolate)
24 Oreo cookies, finely crumbed or ground in a food processor or blender
½ stick (4 tablespoons) unsalted butter, melted and cooled
Small pinch of salt
2½ cup heavy cream
1¼ cup confectioners’ sugar, sifted
12 ounces cream cheese, at room temperature
1½ cup salted peanut butter – crunchy or smooth (not natural; I use Skippy)
2 tablespoons whole milk
4 ounces bittersweet chocolate, finely chopped
Getting ready: center a rack in the oven and preheat the oven to 350°F. Butter a 9-inch Springform pan and place it on a baking sheet lined with parchment or a silicone mat.

Toss ½ cup of the chopped peanuts, the sugar, espresso powder, cinnamon, nutmeg and chocolate chops together in a small bowl. Set aside.

Put the Oreo crumbs, melted butter and salt in another small bowl and stir with a fork just until crumbs are moistened. Press the crumbs evenly over the bottom and up the sides of the spring form pan (they should go up about 2 inches on the sides). Freeze the crust for 10 minutes.

Bake the crust for 10 minutes, then transfer it to a rack and let it cool completely before filling.

Working with a stand mixer fitted with the whisk attachment or with a hand mixer in a large bowl, whip 2 cups of the cream until it holds medium peaks. Beat in ¼ cup of the confectioners’ sugar and whip until the cream holds medium-firm peaks. Scrape the cream into a bowl and refrigerate until needed.

Wipe out (do not wash) the bowl, fit the stand mixer with the paddle attachment if you have one, or continue with the hand mixer, and beat the cream cheese with the remaining 1 cup confectioners’ sugar on medium speed until the cream cheese is satiny smooth. Beat in the peanut butter, ¼ cup of the chopped peanuts and the milk.

Using a large rubber spatula, gently stir in about one quarter of the whipped cream, just to lighten the mousse. Still working with the spatula, stir in the crunchy peanut mixture, then gingerly fold in the remaining whipped cream.

Scrape the mouse into the crust, mounding and smoothing the top. Refrigerate for at least 4 hours, or overnight; cover with plastic wrap as soon as the mousse firms.

To Finish The Torte: Put the chopped chocolate in a heatproof bowl and set the bowl over a saucepan of simmering water. Leave the bowl over the water just until the chocolate softens and starts to melt, about 3 minutes; remove the bowl from the saucepan.

Bring the remaining ½ cup cream to a full boil. Pour the cream over the chocolate and, working with a a rubber spatula, very gently stir together until the ganache is completely blended and glossy.

Pour the ganache over the torte, smoothing it with a metal icing spatula. Scatter the remaining ½ cup peanuts over the top and chill to set the topping, about 20 minutes.

When the ganache is firm, remove the sides of the springform pan; it’s easiest to warm the pan with a hairdryer, and then remove the sides, but you can also wrap a kitchen towel damped with hot water around the pan and leave it there for 10 seconds. Refrigerate until ready to serve.

double (or triple) chocolate cookies

I made these cookies quite a while ago, but I’ve been putting off posting the entry. Because I think they look like poop in the pictures. Poop!

Now that your appetite is whetted, let me assure you that they’re good. Really good, I swear! My absolute favorite cookie when I’m in the mood for something super chocolately.

They’re about as chocolately as you can get in a cookie. The addition of both cocoa and a whole pound of semisweet chocolate gives them a depth of flavor that using only one type of chocolate can’t provide. I’ve never added the optional chocolate chips, but I think next time I will, just to give them a little textural contrast.

They’re soft and fudgy throughout, and really not appropriate unless you love chocolate. And if you do love chocolate, they’re absolutely perfect.

Thick and Chewy Double Chocolate Cookies (from Cooks Illustrated September 1999)

Makes about 3½ dozen cookies

To melt the chocolate in a microwave, heat at 50 percent power for 2 minutes, stir, then continue heating at 50 percent power for 1 more minute. If not completely melted, heat an additional 30 to 45 seconds at 50 percent power. Semisweet chocolate chips (12 ounces) may be added for a bigger chocolate punch; if used, they will slightly increase the yield on the cookies. We recommend using a spring-loaded ice cream scoop to scoop the dough. Resist the urge to bake the cookies longer than indicated; they may appear underbaked at first but will firm up as they cool.

2 cups unbleached all-purpose flour
½ cup Dutch-processed cocoa powder
2 teaspoons baking powder
1 teaspoon table salt
16 ounces semisweet chocolate, chopped
4 large eggs
2 teaspoons vanilla extract
2 teaspoons instant coffee or espresso powder
10 tablespoons unsalted butter (1¼ sticks), softened but still firm
1½ cups light brown sugar
½ cup granulated sugar

1. Sift together flour, cocoa, baking powder, and salt in medium bowl; set aside. Melt chocolate in medium heatproof bowl set over pan of almost-simmering water, stirring once or twice, until smooth; remove from heat. Beat eggs and vanilla lightly with fork, sprinkle coffee powder over to dissolve, and set aside.

2. In bowl of standing mixer fitted with paddle attachment (or with hand mixer), beat butter at medium speed until smooth and creamy, about 5 seconds (15 seconds with hand mixer). Beat in sugars until combined, about 45 seconds (1½ minutes with hand mixer); mixture will look granular. Reduce speed to low and gradually beat in egg mixture until incorporated, about 45 seconds (1½ minutes with hand mixer). Add chocolate in steady stream and beat until combined, about 40 seconds (1 minute with hand mixer). Scrape bottom and sides of bowl with rubber spatula. With mixer at low speed, add flour mixture and mix until combined, about 40 seconds (1 minute with hand mixer). Do not overbeat. Cover with plastic wrap and let stand at room temperature until consistency is scoopable and fudgelike, about 30 minutes.

3. Meanwhile, adjust oven racks to upper- and lower-middle positions and heat oven to 350 degrees. Line 2 cookie sheets with parchment paper. Leaving about 1½-inches between each ball, scoop dough onto parchment-lined cookie sheets with 1 ¾-inch diameter ice cream scoop.

4. Bake cookies until edges have just begun to set but centers are still very soft, about 10 minutes, turning cookie sheets from front to back and switching from top to bottom racks halfway through baking.

5. Cool cookies on sheets about 10 minutes, slide parchment with cookies onto wire rack and cool to room temperature; remove with wide metal spatula.

rice and beans

I love beans. This is a recent revelation, as the only beans I remember eating as a kid were refried or mixed with hot dogs. (And just like that, pork and beans has been added to my “To Cook” list.) I’m not sure if it’s the beans that are so good, or the type of recipes that beans tend to be in – mishmashes of various flavors and textures blended together so each bite is just a little bit different from the last, but equally delicious.

Rice and beans is beans at their simplest. I have a Puerto Rican friend who makes fantastic rice and beans, and I’m kicking myself for not getting the recipe from him before I moved away. However, I’m finding that rice and beans is completely adaptable to personal tastes and availability of ingredients. The first time I made it, I used a recipe, but I don’t find myself following it very closely these days.

The original recipe uses sausage, onions, garlic, beans, chicken broth, and some seasoning. It’s a great recipe, but the beauty of rice and beans is that you can ignore the recipe and still get something fantastic. This time I used a bit of celery, a chipotle chile, and as many tomatoes as beans. Last time I used red pepper and less tomatoes. Any number of additions would be great – green pepper, squash, maybe even sweet potatoes. The only requirement is beans, although I admit that I wouldn’t make it without onions, and now I’m loving the tomatoes. I also love the sausage, even though I prefer not to use meat in my staple weeknight meals. If you can think of a great substitute, let me know!

I’ve linked to the original recipe above, and I’ll provide a recipe for what the pictures show, but keep in mind that this is a fun meal to adapt to your own preferences.

Rice and Beans

Serves 4

8 ounces cooked sausage, such as kielbasa (I used salami this time)
1 medium onion, diced small
1 stalk celery, minced (red pepper would be great too)
4 garlic cloves, minced
1 teaspoon cumin (I’ve also used Old Bay)
2 (15-ounce) cans red kidney beans, rinsed and drained
1 (15-ounce) can diced tomatoes (I used 2 cans, but it was admittedly very tomatoey)
1 cup chicken broth (I didn’t use this, but I should have)

6 cups cooked long-grain white rice (from 1 cup uncooked rice)

In a 3- or 4-quart saucepan over medium heat, cook the sausage until it begins to brown and fat begins to render. Add the onions and celery/pepper/whatever and cook, stirring occasionally, until softened and just beginning to brown. Add the garlic and spice(s) and cook, stirring constantly, until fragrant, about 30 seconds. Add the beans, tomatoes, and broth. Bring to a simmer over medium-high heat, then cover and reduce the heat to low. Simmer, stirring occasionally, until the mixture is thick and the flavors have blended, about 45 minutes (or as long as you want actually – I’m not sure I’ve ever cooked it for the full 45 minutes). Serve over rice.

fluted polenta and ricotta cake (twd)

When Caitlin announced her choice for this week’s TWD recipe, a few of the group members said they were put off by the unusual mix of ingredients, especially for a dessert. But I was excited – I think it’s recipes like this where Dorie’s book really shines. She has a lot of interesting and creative recipes that I’m excited to make. This cake in particular is worth making for no other reason than to find out what a ricotta polenta cake tastes like.

A few bakers who made their cake early in the week thought it was too sweet, so I reduced the sugar by 33%. There were also a lot of questions about the possibility of substituting a different fruit for the figs that the recipe called for. I was halving the recipe and baking it in tartlet pans, so I used a different fruit (figs, dates, dried cherries, and fresh strawberries) for each pan.

To me, ricotta polenta cake tastes like sweet cornbread. I wish I hadn’t reduced the sugar because I think the extra sugar would have made it seem more like a dessert. Dave and I both liked the strawberry cake the best, although it was a little too moist and delicate since strawberries are so much more wet than dried fruit. I also really enjoyed the dried cherries. The figs were okay too, but I didn’t think the dates contributed much flavor. I would have liked more fruit in the cakes as well.

I have to admit that this wasn’t my favorite dessert, but it was certainly an interesting recipe to try.

Fluted Polenta and Ricotta Cake (from Dorie Greenspan’s Baking: From my Home to Yours)

About 16 moist, plump dried Mission or Kadota figs, stemmed
1 cup medium-grain polenta or yellow cornmeal
½ cup all-purpose flour
1 teaspoon baking powder
1 cup ricotta
1/3 cup tepid water
¾ cup sugar
¾ cup honey (if you’re a real honey lover, use a full-flavored honey such as chestnut, pine, or buckwheat)
Grated zest of 1 lemon
2 large eggs
8 tablespoons butter, melted and cooled, plus 1 tablespoon, cut into bits and chilled

Getting Ready: Center a rack in the oven and preheat the oven to 325 degrees F. Butter a 10½-inch fluted tart pan with a removable bottom and put it on a baking sheet lined with parchment or a silicone mat.

Check that the figs are, indeed, moist and plump. If they are the least bit hard, toss them into a small pan of boiling water and steep for a minute, then drain and pat dry. If the figs are large (bigger than a bite), snip them in half.

Whisk the polenta, flour, baking powder, and salt together.

Working with a stand mixer fitted with the whisk attachment or with a hand mixer in a large bowl, beat the ricotta and water together on low speed until very smooth. With the mixer at medium speed, add the sugar, honey, and lemon zest and beat until light. Beat in the melted butter, then add the eggs one at a time, beating until the mixture is smooth. Reduce the mixer speed to low and add the dry ingredients, mixing only until they are fully incorporated. You’ll have a sleek, smooth, pourable batter.

Pour about one third of the batter into the pan and scatter over the figs. Pour in the rest of the batter, smooth the top with a rubber spatula, if necessary, and dot the batter evenly with the chilled bits of butter.

Bake for 35 to 40 minutes, or until a thin knife inserted into the center of the cake comes out clean. The cake should be honey brown and pulling away just a little from the sides of the pan, and the butter will have left light-colored circles in the top. Transfer the cake to a rack and remove the sides of the pan after about 5 minutes. Cool to warm, or cool completely.

cheesecake pops (daring bakers april 2008)

My first impression when I saw Elle and Deborah’s choice for this month’s Daring Bakers challenge was that it was going to be a pain in the ass. Then I convinced myself that it wouldn’t be so bad. I figured it would be a valuable recipe to have in my arsenal. It’s transportable, perfectly portioned, visually impressive, okay to sit at room temperature for a few hours, and well-liked. And how hard could it be? Scoop out some cheesecake, poke a stick in it, dunk it in melted chocolate. Easy cheesy.

Uh-huh.

Mixing up the cheesecake batter was as easy as I expected. The flour is an unusual ingredient in cheesecake which I’m assuming is there to stabilize the cake enough to form balls. I ate a lot of batter during this part. I like batter.

But after the batter-eating, things got dicey. I made half the recipe in a pan exactly half the area of the pan the recipe called for. I baked it far longer than the recipe stated and took it out when a normal cheesecake would be done – when an instant read thermometer read 150 degrees and it was a bit jiggly in the center. I let it chill overnight.

The next day, the center was far too liquidy to be formed into balls, although the outer half of the pan was more solid. I found out later that others had this problem as well. They came up with creative solutions such as piping the batter instead of rolling it and keeping the batter frozen. I just ate the too-soft middle portion with a spoon. Yum.

The rolling process was still a mess. It seemed like there was cheesecake everywhere. The dipping went similarly. Far messier than I had planned for.

But the real problem was that the balls weren’t stable outside of the freezer. Because the cake was so soft, the balls would fall right off the stick. Not good.

Tasty though. It’s hard to go wrong with cheesecake.

Cheesecake Pops

Makes 30-40 pops

5 8-oz. packages cream cheese at room temperature
2 cups (14 ounces) sugar
¼ cup (1.25 ounces) all-purpose flour
¼ teaspoon salt
5 large eggs
2 egg yolks
2 teaspoons pure vanilla extract
¼ cup heavy cream

Boiling water as needed

Thirty to forty 8-inch lollipop sticks

1 pound chocolate, finely chopped – you can use all one kind or half and half of dark,
milk, or white (Alternately, you can use 1 pound of flavored coatings, also known
as summer coating, confectionary coating or wafer chocolate – candy supply
stores carry colors, as well as the three kinds of chocolate.)
2 tablespoons vegetable shortening

(Note: White chocolate is harder to use this way, but not impossible)

Assorted decorations such as chopped nuts, colored jimmies, crushed peppermints, mini chocolate chips, sanding sugars, dragees) – Optional

Position oven rack in the middle of the oven and preheat to 325 degrees F. Set some water to boil.

In a large bowl, beat together the cream cheese, sugar, flour, and salt until smooth. If using a mixer, mix on low speed. Add the whole eggs and the egg yolks, one at a time, beating well (but still at low speed) after each addition. Beat in the vanilla and cream.

Grease a 10-inch cake pan (not a springform pan), and pour the batter into the cake pan. Place the pan in a larger roasting pan. Fill the roasting pan with the boiling water until it reaches halfway up the sides of the cake pan. Bake until the cheesecake is firm and slightly golden on top, 35 to 45 minutes.

Remove the cheesecake from the water bath and cool to room temperature. Cover the cheesecake with plastic wrap and refrigerate until very cold, at least 3 hours or up to overnight.

When the cheesecake is cold and very firm, scoop the cheesecake into 2-ounce balls and place on a parchment paper-lined baking sheet. Carefully insert a lollipop stick into each cheesecake ball. Freeze the cheesecake pops, uncovered, until very hard, at least 1 – 2 hours.

When the cheesecake pops are frozen and ready for dipping, prepare the chocolate. In the top of a double boiler, set over simmering water, or in a heatproof bowl set over a pot of simmering water, heat half the chocolate and half the shortening, stirring often, until chocolate is melted and chocolate and shortening are combined. Stir until completely smooth. Do not heat the chocolate too much or your chocolate will lose it’s shine after it has dried. Save the rest of the chocolate and shortening for later dipping, or use another type of chocolate for variety.

Alternately, you can microwave the same amount of chocolate coating pieces on high at 30 second intervals, stirring until smooth.

Quickly dip a frozen cheesecake pop in the melted chocolate, swirling quickly to coat it completely. Shake off any excess into the melted chocolate. If you like, you can now roll the pops quickly in optional decorations. You can also drizzle them with a contrasting color of melted chocolate (dark chocolate drizzled over milk chocolate or white chocolate over dark chocolate, etc.) Place the pop on a clean parchment paper-lined baking sheet to set. Repeat with remaining pops, melting more chocolate and shortening (or confectionary chocolate pieces) as needed.

Refrigerate the pops for up to 24 hours, until ready to serve.

carrot cake (twd)

I don’t really get carrot cake. I don’t hate it. But what’s the appeal? Vegetables in cake – it just ain’t right. Wouldn’t you rather have a more logical flavoring for cake – chocolate or vanilla or strawberries or butter? If it’s the spices you love, pair them with apples. If it’s the cream cheese frosting, spread it on chocolate cake. But don’t put vegetables in my dessert. It just ain’t right.

So I can’t say I was ecstatic to see Amanda’s choice for this week’s TWD recipe. Plus, while I usually enjoy the creativity that comes from having someone else choose a recipe for me, it’s a problem when I already have a similar recipe picked out to try. I’ve had my eye on Cooks Illustrated’s carrot cake recipe for years, I guess with the idea that if anyone could make me love carrot cake, it would be CI.

I thought I could kill two birds with one stone – I’d make Dorie’s recipe and CI’s, and that way I could compare them. My mom has a recipe she loves, so I threw that into the mix as well. They each call for four eggs, so it would be easy to quarter each recipe. Then I decided that that would still be too much carrot cake, so I got all OCD and decided to use one egg total, but still make all three recipes, so I made one twelfth of each recipe. It was a pain in the ass even with good math skills and a digital scale. I skipped all of the chunky ingredients (coconut, raisins, nuts) in Dorie’s recipe so that the recipes would be more equivalent and comparable.

The three recipes weren’t drastically different in their ingredient lists, although the mixing method varied. After baking, Dorie’s and CI’s carrot cakes look very similar, but my mom’s recipe, which was the only one that didn’t call for baking powder, didn’t rise nearly as much. (CI’s is the bottom layer, then my mom’s recipe, then Dorie’s.)

Unfortunately, I can’t give a good comparison of the three cakes. I’ve only had one slice, and the cream cheese frosting pleasantly dominated the taste of the cake. I’ll try harder next time, scraping off the frosting and eating the cake plain. And then finishing dessert off with a spoonful of pure, unadulterated sugary cream cheese frosting.

Update/Comparison: I really didn’t eat much of this cake, so I can’t give a very good comparison.  That being said, I think Dorie’s recipe was my favorite.  My mom’s needs baking powder so it will rise higher.  Cooks Illustrated uses both brown and granulated sugar, and I think using all granulated sugar gave the cake more flavor.  I do like CI’s mixing method though.  Because most of the ingredients are similar, in the future, I’ll probably use CI’s recipe with all granulated sugar.

Bill’s Big Carrot Cake (from Dorie Greenspan’s Baking: From My Home to Yours)

10 servings

For the cake:
2 cups all purpose flour
2 teaspoons baking powder
2 teaspoons baking soda
2 teaspoons ground cinnamon
¾ teaspoon salt
3 cups grated carrots (about 9 carrots, you can grate them in food processor fitted w/ a shredding a blade or use a box grater)
1 cup coarsely chopped walnuts or pecans
1 cup shredded coconut (sweetened or unsweetened)
½ cup moist, plump raisins (dark or golden) or dried cranberries
2 cups sugar
1 cup canola oil
4 large eggs

For the frosting:
8 ounces cream cheese, room temperature
8 tablespoons (1 stick) unsalted butter, at room temperature
1 pound (16 ounces) confectioners’ sugar
1 tablespoon fresh lemon juice or ½ teaspoon pure lemon extract
½ cup shredded coconut (optional)

Finely chopped toasted nuts and/or toasted shredded coconut (optional)

Getting ready: Position the racks to divide the oven into thirds and preheat the oven to 325 degrees Fahrenheit. Butter three 9- by 2-inch round cake pans, flour the insides, and tap out the excess. Put the two pans on one baking sheet and one on another.

To make the cake:
Whisk the flour, baking powder, baking soda, cinnamon and salt. In another bowl, stir together the carrots, chopped nuts, coconut, and raisins.

Working with a stand mixer, preferably fitted with a paddle attachment, or with a hand mixer in a large bowl, beat the sugar and oil together on a medium speed until smooth. Add the eggs one by one and continue to beat until the batter is even smoother. Reduce the speed to low and add the flour mixture, mixing only until the dry ingredients disappear. Gently mix the chunky ingredients. Divide the batter among the baking pans.

Bake for 40-50 minutes, rotating the pans from top to bottom and front to back at the midway point, until a thin knife inserted into the centers comes out clean. The cakes will have just started to come away from the sides of the pans. Transfer the cakes to cooling racks and cool for about 5 minutes, then run a knife around the sides of the cakes and unmold them. Invert and cool to room temperature right side up.

The cakes can be wrapped airtight and kept at room temperature overnight or frozen for up to 2 months.

To make the frosting:
Working with a stand mixer, preferably fitted with a paddle attachment or with a hand mixer in a large bowl, beat the cream cheese and butter together until smooth and creamy. Gradually add the sugar and continue to beat until the frosting is velvety smooth. Beat in the lemon juice or extract.

If you’d like coconut in the filling, scoop about half of the frosting and stir the coconut into this position.

To assemble the cake:
Put one layer top side up on a cardboard cake round or a cake plate protected by strips of wax or parchment paper. If you added the coconut to the frosting, use half of the coconut frosting to generously cover the first layer (or generously cover with plain frosting). Use an offset spatula or a spoon to smooth the frosting all the way to the edges of the layer. Top with the second layer, this time placing the cake stop side down, and frost with the remainder of the coconut frosting or plain frosting. Top with the last layer, right side up, and frost the top- and the sides- of the cake. Finish the top with swirls of frosting. If you want to top the cake with toasted nuts or coconut, sprinkle them on now while the frosting is soft.

Refrigerate the cake for 30 minutes, just to set the frosting before serving.

Serving: This cake can be served as soon as the frosting is set. It can also wait, at room temperature and covered with a cake keeper overnight. The cake is best served in thick slices at room temperature and while it’s good plain, it’s even better with vanilla ice cream or some lemon curd.

Storing: The cake will keep at room temperature for 2 to 3 days. It can also be frozen. Freeze it uncovered, then when it’s firm, wrap airtight and freeze for up to 2 months. Defrost, still wrapped, overnight in the refrigerator.

Simple Carrot Cake with Cream Cheese Frosting (from Cooks Illustrated’s The New Best Recipe)

2½ cups unbleached all-purpose flour
1¼ teaspoons baking powder
1 teaspoon baking soda
1¼ teaspoons ground cinnamon
½ teaspoon ground nutmeg
1/8 teaspoon gound cloves
½ teaspoon salt
1 pound (6-7 medium) carrots, peeled
1½ cups granulated sugar
½ cup packed light brown sugar
4 large eggs
1½ cups safflower, canola or vegetable oil

Cream cheese frosting

8 ounces cream cheese, softened but still cool
5 tablespoons unsalted butter, softened but still cool
1 tablespoon sour cream
½ teaspoon vanilla extract
1¼ cups confectioners’ sugar

For the cake:

1. Adjust an oven rack to the middle position and heat the oven to 350 degrees. Spray a 13 by 9-inch baking pan with nonstick cooking spray. Line the bottom of the pan with parchment and spray the parchment.

2. Whisk together the flour, baking powder, baking soda, cinnamon, nutmeg, cloves and salt in a large bowl; set aside.

3. In a food processor fitted with a large shredding disk, shred the carrots (you should have about 3 cups); transfer the carrots to a bowl and set aside. Wipe out the food processor workbowl and fit with the metal blade. Process the granulated and brown sugars and eggs until frothy and thoroughly combined, about 20 seconds. With the machine running, add the oil through the feed tube in a steady stream. Process until the mixture is light in color and well emulsified, about 20 seconds longer. Scrape the mixture into a medium bowl. Stir in the carrots and the dry ingredients until incorporated and no streaks of flour remain. If you like nuts in your cake, stir 1½ cups toasted chopped pecans or walnuts into the batter along with the carrots. Raisins are also a good addition; 1 cup can be added along with the carrots. If you add both nuts and raisins, the cake will need and additional 10 to 12 minutes in the oven. Pour into the prepared pan and bake until a toothpick or skewer inserted into the center of the cake comes out clean, 35 to 40 minutes, rotating the pan halfway through the baking time. cool the cake to room temperature in the pan on a wire rack, about 2 hours.

For the frosting
1. When the cake is cool, process the cream cheese, butter, sour cream, and vanilla in a clean food processor workbowl until combined, about 5 seconds, scraping down the bowl with a rubber spatula as needed. Add the confectioners’ sugar and process until smooth, about 10 seconds.

2. Run a paring knife around the edge of the cake to loosen from the pan. Invert the cake onto a wire rack, peel off the parchment, then invert again onto a serving platter. Using an icing spatula, spread the frosting evenly over the surface of the cake. Cut into squares and serve.

Carrot Cake (from my mom, and I don’t know where she got the recipe)

1½ (10.5 ounces) cup sugar
2 cups (10 ounces) flour
2 teaspoons baking soda
1 teaspoon salt (scant)
2 teaspoons cinnamon
1 cup cooking oil
3 cups (16 ounces) finely grated carrots (raw)
4 whole eggs

Sift dry ingredients into a large mixing bowl making sure they are thoroughly mixed. Add cooking oil and blend. Add eggs ONE at a time and mix (by hand). Stir in carrots. Bake in two deep cake pans sprayed with Pam. Bake at 350 for 30 to 40 minutes until cakes spring back in center or toothpick comes clean. Cool 10-15 minutes. Remove from pans and frost while warm.

Cream cheese frosting:
1 8 ounce package cream cheese (regular, not low or non-fat)
8 tablespoons (1 stick) butter
4½ cups (16 ounces) powdered sugar
1 teaspoons vanilla
1 cup chopped pecans (optional)

Let cheese and butter sit at room temperature for half an hour, then mix thoroughly. Add powdered sugar slowly, alternating with vanilla. Stir in nuts last. Frost and enjoy.

creamy buttermilk coleslaw

It seems that creamy coleslaw has fallen out of favor. I think that if you only like vinegar-based coleslaw, then you’re eating the wrong creamy coleslaws. I didn’t like it before this recipe either. It was always too sweet or too watery or too heavy or too mushy. This recipe is none of that.

One key technique in this recipe is salting the cabbage and letting it set for an hour or so before mixing it with the dressing ingredients. The salt sucks water out of the cabbage so there’s less water to leach into the dressing. The cabbage has to be rinsed after being salted, which seems counterintuitive, but it’s easy to dry off the moisture outside of the cabbage shreds – there’s still less water in the cabbage, which is what will keep you from making a watery slaw.

Large shreds of cabbage keep this looking and feeling like a salad while eliminating any worries of mushiness. For those who think that creamy coleslaws tend to be too heavy, look at the ingredient list below – two thirds of the dressing base is low-fat buttermilk, with just a bit of mayonnaise and sour cream added for body and complexity of flavor.

I never liked creamy coleslaw growing up, and I still don’t usually like it at restaurants. But this recipe, with its creamy but not rich dressing, slight sweetness from the carrots and just half teaspoon of sugar, slight bite from the shallot, and overall balance of flavors is worth trying.

Especially if it’s an opportunity to use a fancy schmany monkey vegetable peeler. How cute is this guy? A friend got it for me, because, one could say, I have a bit of a thing for monkeys. (Or at least one.) And even better – it’s sharp. I love it.

Creamy Buttermilk Coleslaw (from Cooks Illustrated July 2002)

Serves 4

CI note: If you are planning to serve the coleslaw immediately, rinse the salted cabbage in a large bowl of ice water, drain it in a colander, pick out any ice cubes, then pat the cabbage dry before dressing.

Bridget note: The recipe says to salt the cabbage for 1-4 hours, but I’ve had better results when I err on the long side of that range.

1 pound cabbage (about ½ medium head), red or green, shredded fine (6 cups)
table salt
1 medium carrot, shredded on box grater
½ cup buttermilk
2 tablespoons mayonnaise
2 tablespoons sour cream
1 small shallot, minced (about 2 tablespoons)
2 tablespoons minced fresh parsley leaves
½ teaspoon cider vinegar
½ teaspoon granulated sugar
¼ teaspoon Dijon mustard
1/8 teaspoon ground black pepper
1. Toss shredded cabbage and 1 teaspoon salt in colander or large mesh strainer set over medium bowl. Let stand until cabbage wilts, at least 1 hour or up to 4 hours. Rinse cabbage under cold running water. Press, but do not squeeze, to drain; pat dry with paper towels. Place wilted cabbage and carrot in large bowl.

2. Stir buttermilk, mayonnaise, sour cream, shallot, parsley, vinegar, sugar, mustard, ¼ teaspoon salt, and pepper together in small bowl. Pour dressing over cabbage and toss to combine; refrigerate until chilled, about 30 minutes. (Coleslaw can be refrigerated for up to 3 days.)

breakfast strata with sausage, mushrooms, and monterey jack

I hear a lot of requests for breakfast casserole recipes. They’re popular for good reason. Waking up to a tasty and filling breakfast that needs nothing more than to be thrown into a hot oven is a great way to start the weekend. I’ve made and loved Deb’s Boozy Baked French Toast, but it’s missing some sort of fruit to round out the nutrition. This sausage and mushroom strata has it all – protein, starch, and vegetables.

I’ve eaten a lot of different breakfast casseroles, and I’ve found that there are some tricks to making a good one. One is to use hearty bread and to dry it out so you don’t have a soggy casserole. You want to replace the moisture that’s naturally in the bread with your own flavored liquids. Also, don’t use so many eggs that they can’t be evenly mixed in and absorbed. I have a recipe for a breakfast casserole that I love the flavors of, but the original recipe calls for so many eggs that I once got a bite of nothing but unmixed egg white while eating it. Finally, of course you need to use a combination of flavors that you love, and adding lots of cheese never hurts.

Casseroles like this are perfect when you have a long day ahead of you and don’t have time to prepare a good breakfast in the morning. I’ve eaten them before skiing, hiking, and moving. They also make a great addition to a brunch menu.

Breakfast Strata with Sausage, Mushrooms, and Monterey Jack (from Cooks Illustrated November 2001)

Makes one 8 by 8-inch strata, serving 6

CI note: To weigh down the assembled strata, we found that two 1-pound boxes of brown or powdered sugar, laid side by side over the plastic-covered surface, make ideal weights. A gallon-sized zipper-lock bag filled with about 2 pounds of sugar or rice also works. This recipe doubles easily; use a 9 by 13-inch baking dish greased with only 1½ tablespoons butter and increase the baking time as directed in step 4. Feel free to substitute any good melting cheese, such as Havarti, sharp cheddar, or colby.

Bridget note: This time when I made this recipe, it ended up a bit too salty. I’m guessing the necessary salt will vary based on the sausage, so start low and add more if necessary. Pictures show a half recipe made in a loaf pan.

8-10 slices supermarket French bread (½-inch thick) or Italian bread (6 – 7 ounces)
3 tablespoons unsalted butter, softened
8 ounces bulk breakfast sausage, crumbled
3 medium shallots, minced (about 1/3 cup)
8 ounces white button mushrooms, cleaned and quartered
Table salt and ground black pepper
½ cup medium-dry white wine, such as Sauvignon Blanc
6 ounces Monterey Jack cheese, grated (about 1½ cups)
6 large eggs
1¾ cups half-and-half
2 tablespoons minced fresh parsley leaves
1. Adjust oven rack to middle position and heat oven to 225 degrees. Arrange bread in single layer on large baking sheet and bake until dry and crisp, about 40 minutes, turning slices over halfway through drying time. (Alternatively, leave slices out overnight to dry.) When cooled, butter slices on one side with 2 tablespoons butter; set aside.

2. Fry sausage in medium nonstick skillet over medium heat, breaking sausage apart with wooden spoon, until sausage has lost raw color and begins to brown, about 4 minutes; add shallots and cook, stirring frequently, until softened and translucent, about 1 minute longer. Add mushrooms to skillet, and cook until mushrooms no longer release liquid, about 6 minutes; transfer mixture to medium bowl and season to taste with salt and pepper. Add wine to skillet, increase heat to medium-high, and simmer until reduced to ¼ cup, 2 to 3 minutes; set aside.

3. Butter 8-inch square baking dish with remaining 1 tablespoon butter; arrange half the buttered bread slices, buttered-side up, in single layer in dish. Sprinkle half of sausage mixture, then ½ cup grated cheese evenly over bread slices. Arrange remaining bread slices in single layer over cheese; sprinkle remaining sausage mixture and another ½ cup cheese evenly over bread. Whisk eggs and parsley in medium bowl until combined; whisk in reduced wine, half-and-half, 1 teaspoon salt, and pepper to taste. Pour egg mixture evenly over bread layers; cover surface flush with plastic wrap, weigh down (see note, above), and refrigerate at least 1 hour or up to overnight.

4. Remove dish from refrigerator and let stand at room temperature 20 minutes. Meanwhile, adjust oven rack to middle position and heat oven to 325 degrees. Uncover strata and sprinkle remaining ½ cup cheese evenly over surface; bake until both edges and center are puffed and edges have pulled away slightly from sides of dish, 50 to 55 minutes (or about 80 minutes for doubled recipe). Cool on wire rack 5 minutes; serve.