pizza bianca with goat cheese and greens

kale goat cheese pizza 4

When it comes to grilled pizza, I’m a slow learner. We’ve made crusts so burned that we had to chip flakes of blackened bread off before we could eat it. We’ve also made pizza with doughy undercooked crusts and with unmelted cheese and raw toppings. About the only problem we haven’t had is the dough sticking to the grate, so at least there’s that.

kale goat cheese pizza 1

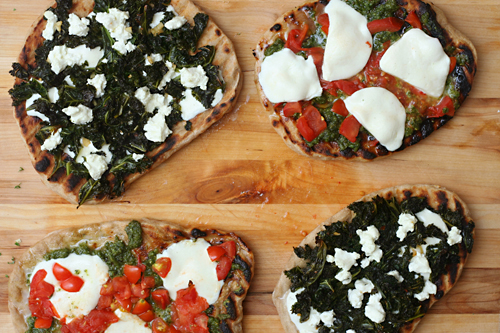
This was my most successful attempt at grilling pizza so far, but even so, it’ll be a while before there’s any kind of grilled pizza tutorial from me. Instead, I will provide my standard foolproof oven method for a very non-standard pizza. My ears perk up whenever anyone mentions goat cheese, which is no surprise since it’s so creamy and tangy. But I like kale almost as much, which is maybe more surprising.

kale goat cheese pizza 2

This is the first time I’ve eaten them together, but it’s a combination that makes good sense, because the tart goat cheese will balance the earthy kale. With crushed red pepper spicing things up and mozzarella holding everything together, this was one different and delicious pizza – with charcoal flavor or not. It was almost as good as the pizza margherita we made to go with it, and that’s really saying something.

kale goat cheese pizza 3

One year ago: Vanilla Bean Cupcakes
Two years ago: Sourdough Bagels
Three years ago: Salmon Clubs with Avocado Butter

Printer Friendly Recipe
Pizza Bianca with Goat Cheese and Greens (adapted from Love and Olive Oil)

1 pound pizza dough (½ of this recipe), fully risen and at room temperature
2 teaspoons olive oil
3 cloves garlic, minced
¼ teaspoon crushed red pepper
1 bunch kale, washed, stems removed
salt
4 ounces (½ cup) part-skim mozzarella, shredded
4 ounces goat cheese, crumbled

1. Place a pizza stone on the bottom rack of the oven and preheat the oven to 500ºF. Divide the dough in two and shape each portion into a ball. Set the balls of dough aside, loosely covered, to allow the gluten to relax.

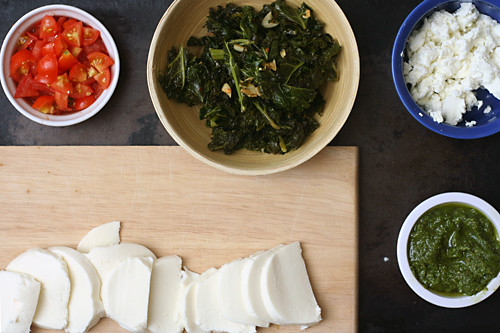
2. Heat the oil, garlic, and crushed red pepper in a Dutch oven over medium heat until the garlic sizzles. Add the kale, ¼ teaspoon salt, and 2 tablespoons of water; cover and cook, stirring occasionally, until the kale wilts, about 5 minutes. Remove the lid and continue cooking and stirring until the water evaporates, about 1 minute.

3. Work with one ball of dough at a time on a lightly floured surface or a damp cloth. Flatten the dough, then pick it up and gently stretch it out, trying to keep it as circular as possible. Curl your fingers and let the dough hang on your knuckles, moving and rotating the dough so it stretches evenly. If it tears, piece it together. If the dough stretches too much, put it down and gently tug on the thick spots. Transfer the round of dough to a large square of parchment paper; slide onto a pizza peel.

4. Top one round of dough with half of each of the kale mixture and cheeses. Slide the pizza with the parchment onto the hot baking stone. Bake for 8-10 minutes, until the crust is browned around the edges. Transfer the pizza to a cooling rack without the parchment. Let the pizza rest for 5 minutes before serving. Repeat with the remaining ingredients.

kale goat cheese pizza 5

pizza with caramelized onions and fennel

After a year and a half living in a small town, I still haven’t fully adjusted to the grocery store situation. I don’t think I’ve walked out of the store here once without thinking wistfully of Wegman’s. My new store isn’t a bad place; I’m just spoiled. They do occasionally stock random items, and I’ve learned to jump on those opportunities and worry about finding recipes later.

Sometimes I buy the item just to encourage the store to keep it up. In the last few months, we’ve eaten haricot vert, Copper River salmon, yellow carrots, and now fennel. Since I moved here, I’ve bitterly overlooked fennel recipes, thinking my fennel days were over, and then once I found fennel, I could only remember one of those recipes.

It’s a memorable recipe because it has a lot going for it. For one thing, it’s pizza, which is always good, but it’s even better since I’ve started playing with a new crust recipe recently (which will be the next blog entry). For another, the onions and fennel are caramelized, and who doesn’t like turning vegetables into candy?

Lindsay laments that this pizza was pale and homely, so I added some color in the form of black forest ham (ideally prosciutto, but my store was out of it) and a sprinkle of parsley. Not only is the splatter of pink and scattering of green welcome, but the salty bites of ham and bitter bits of parsley complimented the sweet onions and the licorice of the fennel. It’s too bad I don’t know when the next time I’ll find fennel is, because I’d love to make this one again.

One year ago: Quinoa Tabbouleh
Two years ago: Croissants
Three years ago: Franks and Beans

Printer Friendly Recipe
Pizza with Caramelized Onions, Fennel, and Fresh Mozzarella (adapted from Love and Olive Oil)

Serves 6

I cooked the onions and fennel separately (not because I love doing dishes and wanted to use more than necessary; I had leftover caramelized onions to be used), and I found that the fennel didn’t caramelize, it just browned slightly. It may behave differently if onions are around.

1 pound pizza dough, fully risen and at room temperature (½ of this recipe)
1 tablespoon olive oil
1 large onion, thinly sliced
1 large fennel bulb, cored and thinly sliced
Salt
8 ounces whole-milk fresh mozzarella cheese, coarsely grated
4 ounces prosciutto, cut into slivers
freshly shaved Parmesan cheese
sprinkling parsley

1. Place a pizza stone on the bottom rack of the oven and preheat the oven to 500ºF. Divide the dough in two and shape each portion into a ball. Set the balls of dough aside, loosely covered, to allow the gluten to relax.

2. Heat the oil in a medium nonstick skillet over medium heat. Add the onions, fennel, and ¼ teaspoon salt; cook, stirring occasionally, until the onions start to brown, about 5 minutes. Reduce the heat to medium-low and continue cooking and occasionally stirring until the onions are golden brown, about 15 minutes.

3. Work with one ball of dough at a time on a lightly floured surface or a damp cloth. Flatten the dough, then pick it up and gently stretch it out, trying to keep it as circular as possible. Curl your fingers and let the dough hang on your knuckles, moving and rotating the dough so it stretches evenly. If it tears, piece it together. If the dough stretches too much, put it down and gently tug on the thick spots. Transfer the round of dough to a large square of parchment paper; slide onto a pizza peel.

4. Top the dough with half of each of the caramelized vegetables, cheese, and prosciutto. Slide the pizza with the parchment onto the hot baking stone. Bake for 8-10 minutes, until the crust is browned around the edges. Transfer the pizza to a cooling rack without the parchment; top with parmesan slivers and a sprinkle of parsley. Let the pizza rest for 5 minutes before serving. Repeat with the remaining ingredients.

stromboli

If you roll your dough and toppings into a spiral instead of keeping them flat, it’s a whole new recipe and totally different from the normal Friday night pizza routine!

Friday evenings are pretty much my favorite part of the week. It’s one of the only times I just STOP. I don’t worry about chores, or exercise, or even hobbies. I just hang out in the kitchen with a beer, rolling out dough, shredding cheese, slicing toppings.

I’m not too interested in varying from this routine. I’m occasionally willing to get takeout sushi instead of make pizza, and, sometimes, I might really get wild and change the shape of the pizza. Usually that means calzones and this time it was stromboli, but let’s face it, it’s all basically the same thing.

You can certainly roll anything you want up in pizza dough, but sometimes I like to let other people do the thinking for me, so I follow a specific recipe. Emeril’s stromboli has three kinds of pork, green peppers (gross!), and jalapenos, so I was pretty sure I could get away with some paring down of ingredients. With only two kinds of meat and one type of pepper, plus three types of cheese, there were still plenty of flavors for me. Oh Friday. How I love your carbs, cheese, and freedom.

One year ago: Maple Oatmeal Scones
Two years ago: Twice-Baked Potatoes with Broccoli, Cheddar, and Scallions
Three years ago: Country Crust Bread

Printer Friendly Recipe
Stromboli (adapted from Emeril)

Serves 6

Based on the pictures, it appears I sautéed some sliced mushrooms with the peppers. Yum!

1 recipe pizza dough
1 tablespoon milk
⅛ teaspoon salt
¼ teaspoon sugar
8 ounces hot Italian sausage, removed from casings and crumbled
8 ounces ham, diced
1 large red onion, chopped fine
1 red pepper, diced small
4 cloves garlic, minced
8 ounces (2 cups) provolone, shredded
8 ounces (2 cups) mozzarella, shredded
2 ounce (1 cup) finely grated Parmesan

1. Preheat the oven to 375 degrees F. Line two large baking sheets with parchment paper or silicone mats. In a small bowl, mix the milk, salt, and sugar; set aside.

2. In a large skillet, cook the sausage over medium-high heat until it’s browned and the fat is rendered, about 5 minutes. Remove with a slotted spoon. Discard all but 1 tablespoon of fat from the pan. Add the ham, onions, and bell peppers; cook, stirring occasionally, until very soft and slightly browned, 5 to 8 minutes. Add the garlic and cook, stirring constantly, for 1 minute. Remove from the heat and cool.

3. Divide the dough in half. On the prepared baking sheet, stretch out one half of the dough to a large rectangle, about 10 by 14 inches. (If it becomes too elastic, let it rest for a few minutes, lightly covered.) Spread half of the cooled sausage mixture across the dough, leaving a 1-inch border. Top with half of each of the mozzarella and provolone. Using a pastry brush, paint the border of a long edge with the milk mixture. Starting at the other long end, roll up the dough into a cylinder, pinching the edges to seal. Repeat with the remaining ingredients. Let the dough rise for 20 to 30 minutes.

4. Brush the top of each stromboli with the milk mixture. Bake, one at a time, until nearly completely golden brown and starting to crisp, about 20 minutes. Sprinkle the stromboli with parmesan cheese and return to the oven until the cheese is melted and the dough is golden brown, about 5 minutes.

5. Remove from the oven and let stand 10 minutes. Slice thickly and serve with your favorite sauce.

spinach artichoke pizza

I learned a fun fact at work the other day. The word bikini comes from Bikini Atoll, where a nuclear test bomb had recently been dropped. The designer of the bikini expected his new fashion to be “explosive”, and nuclear anything was all the rage back then. Yes, only sixty years ago, bikinis were nonexistent.

Now that they are available, I have a few, and they’re cute, and I want to wear them. So spinach artichoke dip, always tempting me from restaurant menus, generally has to be avoided. Dipping bread into a bubbling pot of cream cheese, mayonnaise and mozzarella will have me exploding right out of my bikini.

The flavors, however, are a natural for pizza. Keep the bread, but make it whole wheat with my favorite whole wheat adaptation trick. Replace the cream cheese and mayonnaise with a thick béchamel, and the rest of the ingredients – spinach, artichoke, mozzarella, parmesan – are reasonably healthy and adapt perfectly for pizza.

Okay, so here’s the problem with my “make healthier food –> wear bikini” philosophy. If the healthy food is this good, I’m going to end up eating more of it than I should! I mean, bread topped with cheese, artichokes and spinach? Of course that was irresistible. Of course I’m going to need several slices to be satisfied, and of course I’ll still look longingly at the leftovers. Okay, so maybe I’ll end up looking longingly at my bikinis this summer, but at least I’ll be satisfied with my one-pieces suits.

One year ago: Potato Galette
Two years ago: Orange Vanilla Opera Cake

Printer Friendly Recipe
Spinach Artichoke Pizza

Makes 2 12-inch pizzas or about 6 servings

You can use frozen artichokes instead (they’re not available in my town), although I’ve never been sure if those need pre-cooking before they’re added to pizza. If you used canned artichokes, I recommend rinsing them, because they’re canned in citric acid, and the acidity was a little distracting.

Of course you can make pizza without a pizza stone. Just use a baking sheet (possibly preheated). However, if you make pizza or rustic breads often, a pizza stone is a small investment for a large increase in perfectly crisp crusts.

2 tablespoons butter
2 cloves garlic, minced
½ teaspoon crushed red pepper flakes
2 tablespoons flour
1½ cup milk (any fat content)
¼ teaspoon salt
½ ounce (¼ cup) parmesan plus 1 ounce (½ cup)
7 ounces fresh spinach, washed and roughly chopped
½ recipe (whole wheat, if you want) pizza dough or 1 pound of your favorite pizza dough
6 ounces (1½ cup) shredded mozzarella (skim works great)
1 (14-ounce) can artichokes, drained, rinsed and dried, quartered

1. Place a pizza stone on the bottom rack of the oven and preheat the oven to 525ºF.

2. In a medium heavy-bottomed saucepan, melt the butter over medium heat. When the foaming subsides, add the garlic and red pepper flakes; cook, stirring constantly, until fragrant, 30 to 60 seconds. Add the flour; continue cooking and stirring for 2 minutes. Gradually whisk in the milk. Bring the mixture to a simmer over medium-high heat, stirring frequently, then reduce the heat to medium-low. Continue to simmer, stirring occasionally for about 5 minutes. Stir in the salt and ¼ cup (½ ounce) of the parmesan.

3. Meanwhile, add the spinach (if the spinach isn’t damp from being washed, also add a couple tablespoons of water) to a medium saucepan set over medium-high heat. Cook and stir until the spinach just wilts, about 1 minute. Remove the spinach from the pan and place it in a clean kitchen towel. Squeeze the spinach as dry as possible, then add it to the béchamel from step 1.

4. Divide the dough and shape each portion into a ball. Let the balls of dough relax for 10-30 minutes. Work with one ball of dough at a time on a lightly floured surface. Flatten the dough, then pick it up and gently stretch it out, trying to keep it as circular as possible. Curl your fingers and let the dough hang on your knuckles, moving and rotating the dough so it stretches evenly. If it tears, just piece it together. If the dough stretches too much, put it down and gently tug on the thick spots.

5. Dust a pizza peel (or the back of a large baking sheet) generously with cornmeal and transfer the round of dough to the peel. Rearrange the dough to something reasonably circular; stab it several times with a fork. Spread ½ of the spinach mixture over the dough, then top with half of the mozzarella, half the artichokes, and half of the remaining parmesan.

6. Transfer the pizza to the hot baking stone, and bake for about 6-10 minutes, until the cheese is bubbling and the crust is spotty brown. Let the pizza cool on the peel for about 5 minutes before slicing and serving. Repeat with the remaining ingredients.

pizza with figs, prosciutto, gorgonzola, balsamic, and arugula

I went to dinner at a fancy pizza place with my parents and Dave a few months ago, and my dad ordered a pizza that seemed appropriate for him – cheeseburger.  Because the more meat, the better!  Hold the vegetables please, is generally his motto.  Oh, I laughed and laughed when his pizza arrived covered in lettuce.  He scraped it right off.

Not that I’ve been much better about the idea of salad on pizza.  It’s a pretty popular concept, but so far I’ve wanted to keep my bread and cheese unadulterated by large amounts of greenery.

I guess when you’re already putting figs on pizza (oh, how I’d love to see my dad’s face if there were figs on his pizza!), arugula doesn’t seem so weird by comparison.  It turns out that the figs and arugula work really well together.  The figs add sweetness, the prosciutto saltiness, the arugula freshness, and the blue cheese…um…stinky-feetiness?  But in a good way.  In a very, very good way, in fact.

One year ago: Brandied Berry Crepes
Two years ago: Breakfast Strata with Sausage, Mushrooms, and Monterey Jack

Printer Friendly Recipe
Pizza with Figs, Prosciutto, Gorgonzola, Balsamic, and Arugula (adapted from Bon Appetit via epicurious)

The original recipe calls for fresh figs; since I used dried, I soaked them in port for a while to plump them.  However, I’m not sure this is necessary.

Makes 1 12-inch pizza, serving about 3 people

6 small fresh figs, cut into thin slices
2 tablespoons balsamic vinegar, divided
cornmeal (for sprinkling)
12 ounces (¾ pound) pizza dough (⅓ of this recipe), after its first rise
1 cup crumbled Gorgonzola cheese (about 4 ounces)
3 ounces thinly sliced prosciutto, cut into strips
2 teaspoons extra-virgin olive oil
3 ounces stemmed arugula

1. Place a pizza stone on the bottom rack of the oven and preheat the oven to 500ºF. Put the figs in a medium bowl and drizzle 1 tablespoon of the vinegar over them. Set aside.

2. Gently flatten the dough, then pick it up and stretch it out, keeping it as circular as possible. Curl your fingers and let the dough hang on your knuckles, moving and rotating the dough so it stretches evenly. If it tears, piece it together. If the dough stretches too much, put it down and gently tug on the thick spots.

3. Dust a pizza peel with cornmeal and transfer the round of dough to the peel. Rearrange the dough to something reasonably circular; stab it several times with a fork. Top the pizza with the cheese, figs, and prosciutto.

4. Transfer the pizza from the peel to the hot stone. Bake for 8-10 minutes, until the crust is spotty brown. Let the pizza cool on the peel for about 5 minutes.

5. Meanwhile, whisk the remaining 1 tablespoon vinegar with the oil and a pinch of salt and pepper; toss the arugula with the dressing. Spread the salad evenly over the pizza. Slice and serve.

traditional pizza

Copy of IMG_0966

When it comes to cooking, I definitely have weaknesses. I’ve never cooked a perfect roast chicken. I can’t cook a steak with any sort of precision in doneness; if it’s somewhere between ‘moo’ and black, I consider it a success. And grilling? I’ve really never done it. Clearly there are holes in my culinary knowledge.

But pizza? Pizza, I know.

Copy of IMG_7570

I make pizza almost every week. I’ve tried all sorts of crusts, sauces, cheeses, and toppings. I’ve taken notes. And now, finally, I can make my perfect pizza. I’m not saying that my favorite will be your favorite; but it might give you somewhere to start and something new to try.

Copy of IMG_4671

Toppings – I’m going to attack this from top to bottom, which has the advantage of progressing from the simplest decisions to the more complicated. I’m going to focus on traditional pizza – tomato sauce, Italian cheeses, toppings. Most any topping will work here. Use whatever toppings you want in whatever quantities you prefer. I vary it quite a bit, with my favorite combinations being ham and mushroom, as well as ham and pineapple.

Copy of IMG_3544

Cheeses – I like a ratio of 5 parts mozzarella to 1 part parmesan. If you have other cheeses around, cheddar or gouda or fontina, it can be fun to replace a portion of the mozzarella with those. I actually prefer part-skim mozzarella on pizza; it seems to melt more smoothly and it tastes just as good as whole milk cheese.

Copy of IMG_3676

Sauce – My sauce is very (very very) simple, but you have to trust me that it’s just right. All I do is puree a drained can of diced tomatoes, strain them until they’re thick, then stir in salt and pepper. It’s easier than cooking a sauce, and I love the fresh flavor. It does complicate the addition of garlic and spices, but I get around that by adding the garlic as a topping and the herbs to the crust. (I don’t like raw garlic, so I toast the whole unpeeled cloves on the hot pizza stone for a few minutes.)

Copy of IMG_3554

Crust – I want a crust that is light and tender and flavorful, but, even more importantly, easy to work with. No one wants to fight with their pizza dough. This crust started with Cooks Illustrated’s popular pizza dough recipe, and then I started substituting white wine for a portion of the water, and after I made Peter Reinhart’s pizza dough, I became more committed to a cold overnight rise.

Copy of IMG_3550

Another important aspect of pizza crust is how you work with it. Be gentle with your dough. I need to stress that you really don’t want to use a rolling pin. Pull and stretch the dough. Pick it up, hanging the edges on your knuckles, and let gravity do the work. If it’s tearing or thinning unevenly, put it back down and just pull at the thicker parts. If it’s fighting you, walk away for five minutes to let it relax. (I use this technique when I fight with Dave too – ha!)

Copy of IMG_8407

I’m sorry to be so braggy, but this pizza really is just great. Most of it comes down to the crust, which is thin, crisp, and light. I love the sauce too, because it tastes exactly like what it is – tomatoes. The combination of cheeses provides just the right amount of richness and flavor. I start out nearly every weekend by making this pizza, and I can’t think of a better way.

Copy of IMG_5293

Update 3/16/10: I’ve successfully used this method to make this pizza crust whole wheat.  I made the pre-dough out of 11 ounces whole wheat flour, ¾ teaspoon salt, and 1 cup water .  After letting that sit overnight, I mixed it with the rest of the ingredients – 2 tablespoons olive oil, ½ teaspoon dried oregano, 11 ounces white bread flour, 1 teaspoon salt, 2 teaspoons instant yeast, 1 teaspoon granulated sugar, ¼ cup white wine, and ½ cup water.

Printer Friendly Recipe
Traditional Pizza

You can substitute up to 7 ounces (about 1½ cups) of whole wheat flour for the white bread flour, but expect longer rising times and a more stubborn dough. But if you’re patient during shaping, your crust will be just as light and crisp as dough made completely with white flour.

Dough:
2 tablespoons olive oil
½ teaspoon dried oregano
22 ounces (4 cups) bread flour
1¾ teaspoons salt
1 teaspoon sugar
2 teaspoons instant yeast
1/4 cup white wine
1½ cups water
cornmeal for dusting

Sauce:
1 (28-ounce) can diced tomatoes, drained
salt and pepper

Assembly:
3 cloves garlic, unpeeled
10 ounces (2½ cups) part-skim mozzarella, shredded
2 ounces (1 cup) parmesan, grated
toppings of your choice

1. For the dough: Heat the oil and oregano in a small saucepan until fragrant. Mix in the water and wine.

2. In the bowl of a stand mixer fitted with the dough hook, mix the flour, salt, sugar, and yeast. With the mixer on low speed, pour in the liquid mixture. Continue mixing on medium-low speed until the dough comes together, and then knead on medium-low speed for 8 minutes, until the dough is smooth and elastic. Add more flour or water as necessary to form a dough that is sticky but does not cling to the sides of the bowl. When the mixer is running on medium-low speed, the dough should not stick to the bottom of the bowl.

3. Spray a large bowl with nonstick spray. Rub your hands on the sprayed bowl to coat them with oil, then quickly form the dough into a ball. Place the ball of dough in the bowl and cover with plastic wrap.

4. Either set the dough aside to rise at room temperature, which will take 1½ to 2 hours, or refrigerate it until the next day. If it’s chilled overnight, it will take about 5 hours at room temperature to warm and finish rising. You can also reduce the yeast to ½ teaspoon and let the dough rise on the counter for about 8 hours after it has been chilled overnight.

5. For the sauce: Pulse the tomatoes in a food processor 10-12 times, until they’re pureed. Transfer them to a fine-mesh strainer set over a large bowl and let them drain, stirring occasionally for at least 10 minutes. (You can get away with less time if you actively stir and press the tomatoes through the strainer; if you wait longer, you can stir less.) Then discard the liquid in the bowl, transfer the tomatoes from the strainer to the now-empty bowl, and stir in a pinch of pepper and 1/8 teaspoon of salt.

6. Place a pizza stone on the bottom rack of the oven and preheat the oven to 500ºF. Place the garlic on the hot pizza stone for 3-4 minutes or until fragrant.

7. Divide the dough and shape each portion into a ball. You have a few options of how to divide it. It makes enough dough for three 12-inch pizzas. However, I always cut it in half and freeze half. Then I divide the remaining dough into two more parts, one twice the size of the other. I make the larger one into pizza and the smaller into cheese bread (no sauce or toppings). Let the balls of dough relax for 10-30 minutes.

8. Using tongs, remove the garlic from the oven and let it cool for a few minutes. Mince.

9. Work with one ball of dough at a time on a lightly floured surface. Flatten the dough, then pick it up and gently stretch it out, trying to keep it as circular as possible. Curl your fingers and let the dough hang on your knuckles, moving and rotating the dough so it stretches evenly. If it tears, just piece it together. If the dough stretches too much, put it down and gently tug on the thick spots.

10. Dust a pizza peel lightly with cornmeal and transfer the round of dough to the peel. Rearrange the dough to something reasonably circular; stab it several times with a fork. Add 1/3 of each of the garlic, sauce, and cheese, followed by toppings of your preference, then transfer the pizza to a hot pizza stone. Bake for 8-10 minutes, until the cheese is bubbling and the crust is spotty brown. Let the pizza cool on the peel for about 5 minutes before slicing and serving. Repeat with the remaining ingredients.

Copy of Copy of IMG_0960

buffalo chicken pizza

Copy of IMG_0390

I’m not experienced in the ways of the buffalo wing. I generally find them…well, let’s just say that the ratio of meat to gross animal parts isn’t high enough for my liking, what with the skin and bones and weird tendony whatever bits. The sauce is good though!

IMG_0365

A quick internet search indicated that there are several directions you can go with buffalo chicken pizza. Options for the pizza’s sauce include regular tomato sauce, blue cheese (or ranch) dressing, buffalo sauce, and skipping a sauce altogether. Some recipes use mozzarella and some skip it or use cheddar. I didn’t know what to do. I’ve never even eaten buffalo chicken pizza before.

Copy of IMG_0368

I eventually decided to use ranch dressing as the sauce, but I made my own and kept it pretty light. I just mixed up a bit of buttermilk (or plain yogurt) with mayonnaise and added some basic seasonings. It added a welcome tartness, plus the soothing dairy balances the spicy chicken.

Copy of IMG_0377

On top of the sauce, I layered the buffalo sauce-coated shredded chicken, a skimpy amount of mozzarella, enough blue cheese to taste without it being overpowering, and some red onions, which caramelized in the oven and contributed sweetness.

Copy of IMG_0384

This is most definitely the best buffalo chicken pizza I’ve ever had! And I’m pretty sure that isn’t just because it’s the only one I’ve had. Everything is in such a nice balance – the spice heat, sweet onions, tangy dressing, stinky blue cheese. And you know what’s thankfully missing? Bones and skin and weird tendony whatever bits. Score!

Copy of IMG_0394

One year ago: Gallitos (Costa Rican Breakfast Tacos)

Printer Friendly Recipe
Buffalo Chicken Pizza

Serves 3-4

You can really make the shredded chicken however you want. If you just want to poach a boneless skinless chicken breast, that’s probably easier, and if you have leftover rotisserie chicken or something, that will work too. This is just how I like it. Also feel free to skip the brining; I don’t think it makes a huge difference here since there are so many other flavors, but it was easy and I had time, so I did it.

If you’d like more spice, stir some hot sauce (hotter than Frank’s, like Tabasco) or a small pinch of cayenne into the buffalo sauce.

1 large bone-in skin-on chicken breast (about 12 ounces)
salt
1 teaspoon oil
1 tablespoon butter
¼ cup Frank’s hot sauce
½ teaspoon packed brown sugar
1 teaspoon apple cider vinegar
1 tablespoon buttermilk or plain yogurt
1 tablespoon mayonnaise
pinch of sugar
pinch of garlic powder
2 ounces (½ cup) mozzarella, shredded
1 ounce (¼ cup) blue cheese, crumbled
¼ cup red onion or scallions, diced very fine
12-16 ounces pizza dough (one third of a recipe calling for about 4 cups of flour), stretched out to 9-12 inches

1. For the chicken: Stir 2 tablespoons salt into 2 cups cold water until it dissolves. Add the chicken; refrigerate for 30 minutes, then remove the chicken from the brine and pat it dry. Adjust an oven rack to the middle-low position and heat the oven to 450ºF. Heat a small oven-safe skillet over medium-high heat. Add the oil and swirl to coat the bottom of the pan; place the chicken breast in the pan skin-side down. Cook without moving until well-browned, about 5 minutes. Turn the chicken over and move the pan to the oven. Roast until an instant-read thermometer inserted into the thickest part of the chicken measures 160ºF or the juices run clear when small cut is made in the chicken. Remove the pan from the oven and set aside. When the chicken has cooled enough to handle, remove and discard the skin (or eat it, because it’s crisp and delicious!) and shred the meat with your fingers or two forks. (If you’ve used good chicken, brined it, and pan-roasted it like this, I dare you not to resist stealing bites of the shredded chicken. It’s delicious.) Increase the oven temperature to 500ºF.

2. For the buffalo sauce: Melt the butter in a small saucepan. Add the brown sugar, hot sauce, and vinegar. Mix the sauce with the shredded chicken.

3. For the white sauce: In a small bowl, stir together the buttermilk or yogurt, mayonnaise, sugar, garlic powder, and a pinch each of salt and pepper.

4. Assemble the pizza: Place the pizza dough on a wooden paddle that’s been liberally coated with cornmeal. (Or use parchment paper instead of the cornmeal, or the back of a baking sheet instead of the paddle.) Spread the white sauce evenly on the pizza dough; top with the chicken, then the cheeses, and finally the onions.

5. Bake the pizza for 8-10 minutes, until the cheese is melted and bubbling and the crust is browned. Let the pizza rest about 5 minutes before cutting and serving.

Copy of IMG_0389

quick baking powder pizza crust

Copy of IMG_7780

I’m not exactly Ms. Spontaneous.  I like a Plan. I like following the Plan. I do not like when the Plan is disrupted.

Dave was supposed to stop at the farm stand after work one day to pick up some corn on the cob for black bean and corn quesadillas, but the farm stand was closed. A quick juggle of my meal Plan for the week left me with the option of making Smitten Kitchen’s squash and goat cheese pizza that night instead, except that I didn’t have time to make regular pizza dough, and I certainly didn’t have time to defrost the dough I already had in the freezer, as per the original Plan.

Copy of IMG_7772

Instead, I mixed up this quick-bread version of pizza dough that I’ve always been curious about. It’s basically a biscuit, so the dry ingredients are mixed, then butter (less butter than in most biscuit recipes) is cut in, and milk is stirred into the mixture to bind it.

After that, you can treat it like regular pizza dough, by rolling it out and baking it on a pizza stone. At least that’s what I did, but I do wonder if, in this case, a lower oven temperature and a regular baking sheet might work better. Then again, biscuits are usually baked a really high temperature too…

Copy of IMG_7775

I’m probably trying to fix something that isn’t broken, because I thought the pizza crust was good the way I made it. It doesn’t have much in common with regular yeasted pizza crust, but its thinner, crisper, almost cracker-like texture was a great base for this lighter non-traditional pizza. For a sauce-drenched, cheese-laden, meat-topped pizza, yes, I’d want something more substantial. But for just a bit of goat cheese and some fresh summer squash, it was perfect, even preferable. Not to mention, quick, so no Plan is needed.

Copy of IMG_7788

One year ago: Banana Nutella Crepes

Quick Baking Powder Pizza Dough (from Jeanne Lemlin’s Vegetarian Classics)

For 4 (8-inch) pizzas

I believe I made half the recipe into a 12-inch pizza.

Tip from Lemlin: If you want to make the dough in advance, just roll it out and place it on a baking sheet, then pop it in the freezer until you are ready for dinner. Let it thaw at room temperature for 30 minutes or so before covering it with your toppings.

2½ cups (12 ounces) unbleached flour, plus extra for dusting
1½ teaspoons baking powder
½ teaspoon salt
4 tablespoons unsalted butter, chilled and cut into pieces
1 cup low-fat milk
olive oil for greasing or cornmeal for sprinkling

1. Place the flour, baking powder, and salt in a large bowl. Add the butter and toss to coat. Rub the butter into the flour with your fingertips until the mixture resembles coarse meal. You can do this in a food processor, if desired. Add the milk slowly and mix just until the dough is evenly moistened.

2. Turn the dough onto a lightly floured surface and knead 2 or 3 times, or just until it is pliable. Divide the dough into 4 balls.

3. Lightly oil a large baking sheet, or if you will be using a pizza stone, sprinkle some cornmeal on a pizza peel. Using a lightly floured rolling pin, roll out each ball into an 8-inch circle. Place 2 on a baking sheet or 1 on the pizza peel. Proceed with your pizza recipe.

Copy of IMG_7778

chicken artichoke pesto calzones

copy-of-img_2248

I hardly ever cook large roasts of meat, but when I do, I find like I like the leftovers even more than the original meal. I had lots of fun after Thanksgiving, and found that pot roast makes an amazing soup and sandwich. And roast chicken, to be honest, hardly ever impresses me served plain with dinner, but once it’s cooled and mixed with mayonnaise for some chicken salad, I am one happy camper.

copy-of-copy-of-img_2225

This time, though, I forwent the mayonnaise for something more interesting. I happened to come across a recipe for chicken artichoke pizza when I had shredded roast chicken, artichokes, and pizza dough in the freezer. I was practically forced to make it. Plus it sounded delicious.

copy-of-img_2230

I made calzones instead of pizza mostly just because I hadn’t made them in a while, but I do think that the sizable chunks of shredded chicken that I wanted to use would be more appropriate in a calzone. Calzones, though, are undoubtedly more work than pizza. Instead of rolling out one round of dough for every 2-3 people, you’re rolling out one per person, and once the ingredients are added, the edges need to be crimped.

The extra work was worth it for me, because I really enjoyed these calzones. Pesto, chicken, and artichokes are a great combination, and it can only get better with cheese.

copy-of-img_2253

One year ago: (Almost) No-Knead Bread

Chicken Artichoke Pesto Calzones (ingredients adapted from Stefany’s pizza, which is adapted from allrecipes; calzone method adapted from Cooks Illustrated)

Serves 8

I used mozzarella because I had it, but I think fontina would be even better.

2½ pounds pizza dough (a full recipe of this one would be perfect)
1 cup pesto
1 cup frozen artichokes, defrosted and roughly chopped
2 cups shredded cooked chicken
2 cups (8 ounces) shredded mozzarella or fontina cheese
olive oil for brushing

1. Adjust the oven rack to the lowest position, set a pizza stone on the oven rack, and heat the oven to 500 °F (260°C) for at least 30 minutes. Turn the risen dough out onto an unfloured work surface. Divide the dough into eight equal pieces. Gently reshape each piece of dough into a ball. Cover with plastic wrap or a damp kitchen towel, and let the dough rest at least 15 minutes but no more than 30 minutes.

2. Working with one piece of dough at a time and keeping the other pieces covered, stretch and pull the dough into a 7- to 8-inch round. (I don’t like to roll pizza dough, but I suppose you could if you prefer.) Set it aside while you stretch out the remaining rounds of dough. You’ll want to form and fill just four at a time, and then work on the other four while the first set bakes. (Cooks Illustrated stacks the rounds with squares of parchment paper in between; I like to use a kitchen towel.)

3. Spread 2 tablespoons pesto onto each round of dough, leaving about a 1-inch border around the edge. Divide the toppings evenly between the eight dough rounds, forming a pile in the center of the bottom half of each dough round and leaving a 1-inch border uncovered.

copy-of-img_2236

4. Fold the top half of the dough over the filling-covered bottom half, leaving ½-inch border uncovered. (The photo above shows how the dough doesn’t overlap all the way. Look at the left half of the photo, where the dough isn’t crimped yet.) With your fingertips, lightly press around the silhouette of the filling and out to the edge to lightly seal the dough shut.

5. Beginning at one end of the seam, place your index finger diagonally across the edge and gently pull the bottom layer of the dough over the tip of your index finger; press into the dough to seal. (Hopefully the same picture  helps illustrate this.) Repeat the process until the calzone is fully sealed.

6. With a pastry brush, brush the tops and sides of the calzones with olive oil. Carefully transfer the calzones to parchment paper; slide the calzones on the parchment onto a pizza peel or rimless baking sheet, then slide the calzones with parchment onto the hot pizza stone, spacing them evenly apart. Bake until the calzones are golden brown, about 11 minutes; use a pizza peel or rimless baking sheet to remove the calzones with the parchment to a wire rack. Remove the calzones from the parchment, cool 5 minutes, and serve. While the first batch of calzones bakes, form the second batch and bake them after removing the first batch from the oven.

copy-of-img_2245

peter reinhart’s pizza

This makes two Daring Baker recipes in a row that were already on my mental to-do list. It’s perfect because otherwise who knows when I actually would have gotten around to making them. I would have been making my standard pizza recipe, too lazy to try this new one which I’ve heard great things about, and wondering if mine is as good as it gets.

I’ve been using Cooks Illustrated’s crust recipe for years, which has the same ingredients as Peter Reinhart’s in only slightly different proportions. I started adding some sugar and white wine to it after Deb discussed it, and I found that my crust was a little more light, crisp and bubbly, which I liked.

But the CI recipe hasn’t always been perfect for me. Lately when I try to stretch it out, it has a tendency to rip, even when the dough is warm enough and risen completely. It’s not an elasticity issue either – it’s not like the dough is bouncing back on itself when I try to stretch it out.

One of the keys to Reinhart’s recipe is that he uses very cold water in the dough, then refrigerates the dough immediately after kneading, similar to his pain a l’ancienne. To be honest, I usually do this – albeit somewhat half-assed – with CI’s recipe, just because it’s more convenient for me to make the dough the night before I want it for dinner.

The biggest difference between the two recipes is that Reinhart mixes and kneads his dough with a stand mixer, while CI uses a food processor.  Despite the similarity between CI’s and Reinhart’s recipes, their outcomes were relatively distinct. Reinhart’s dough did not rip – it seemed capable of stretching to infinite lengths. Rosa, this month’s host, requested that we take a photo of the dough being tossed and spun, but this dough was so floppy, there’s no way I was going to chance throwing it around the kitchen.

Baked, the pizza wasn’t very different from my normal recipe. In fact, Dave didn’t notice that I had changed it. However, it wasn’t quite as crispy, and it wasn’t substantial enough to hold up my toppings, even though I don’t think I overloaded it. I think I might have gone overboard in making it thin.

I think in the future, I’ll stick with the ingredient proportions from CI’s recipe, adding the the sugar and white wine. However, I’ll use Reinhart’s method of preparing the dough with the stand mixer and using refrigerated ingredients. Hopefully this way I’ll get the best of both worlds. It’ll be a while before I have a chance to try it though, because right now, I have a half recipe of both doughs in my freezer.

Update: At some point I’ll get around to posting my method for making pizza (exact crust instructions, sauce, etc.), but I want to do some refining first.  In the meantime, you can find blog entries on Cooks Illustrated’s basic recipe here, here and here.

Basic Pizza Dough (adapted from The Bread Baker’s Apprentice by Peter Reinhart)

Makes 6 pizza crusts, about 9-12 inches/23-30 cm in diameter.

4½ cups flour (bread, high-gluten, or all-purpose), chilled
1¾ teaspoons salt
1 teaspoon instant yeast
¼ cup olive oil or vegetable oil (both optional, but it’s better with)
1¾ cups water, ice cold (40 degrees)
1 tablespoon sugar
cornmeal for dusting

1. Mix together the flour, salt and instant yeast in a big bowl or stand mixer. Add the oil, sugar and cold water and mix well (spoon or paddle attachment) to form a sticky ball of dough. On a clean surface, knead for about 5-7 minutes, until the dough is smooth. If it is too wet, add a little flour and if it is too dry add 1 or 2 teaspoons extra water. If you are using an electric mixer, switch to the dough hook and mix on medium speed for the same amount of time. The dough should clear the sides of the bowl but stick to the bottom of the bowl. If the dough is too wet, sprinkle in a little more flour. If it clears the bottom of the bowl, dribble in a teaspoon or two of cold water. The finished dough should be springy, elastic, and sticky, not just tacky, and register 50°-55° F/10°-13° C.

2. Flour a work surface or counter. Line a jelly pan with baking paper/parchment. Lightly oil the paper. Cut the dough into 4-6 equal pieces. Sprinkle some flour over the dough. Make sure your hands are dry and then flour them. Gently round each piece into a ball. Transfer the dough balls to the lined jelly pan and mist them generously with spray oil and cover with plastic wrap.

3. Put the pan into the refrigerator and let the dough rest overnight or for up to thee days. NOTE: You can store the dough balls in a freezer bag if you want to save some of the dough for any future baking. In that case, pour some oil (a few tablespooons only) in a medium bowl and dip each dough ball into the oil, so that it is completely covered in oil. Then put each ball into a separate bag. Store the bags in the freezer for no longer than 3 months. The day before you plan to make pizza, remember to transfer the dough balls from the freezer to the refrigerator.

4. On the day you plan to eat pizza, exactly 2 hours before you make it, remove the desired number of dough balls from the refrigerator. Dust the counter with flour and spray lightly with oil. Press the dough into disks about 1/2 inch/1.3 cm thick and 5 inches/12.7 cm in diameter. Sprinkle with flour and mist with oil. Loosely cover the dough rounds with plastic wrap and then allow to rest for 2 hours.

5. At least 45 minutes before making the pizza, place a baking stone on the lower third of the oven. Preheat the oven as hot as possible (500° F/260° C). If you do not have a baking stone, then use the back of a jelly pan. Do not preheat the pan.

6. Generously sprinkle the back of a jelly pan with semolina/durum flour or cornmeal. Take 1 piece and lay the dough across your fists in a very delicate way and carefully stretch it by bouncing it in a circular motion on your hands, and by giving it a little stretch with each bounce. Once the dough has expanded outward, move to a full toss. Make only one pizza at a time. During the tossing process, if the dough tends to stick to your hands, lay it down on the floured counter and reflour your hands, then continue the tossing and shaping. In case you would be having trouble tossing the dough or if the dough never wants to expand and always springs back, let it rest for approximately 5-20 minutes in order for the gluten to relax fully,then try again.You can also resort to using a rolling pin.

7. When the dough has the shape you want, place it on the back of the jelly pan, making sure there is enough semolina/durum flour or cornmeal to allow it to slide and not stick to the pan. Lightly top it with sweet or savory toppings of your choice.

8. Slide the garnished pizza onto the stone in the oven or bake directly on the jelly pan. Close the door and bake for about 5-8 minutes.