mai tai

mai tai 6

So you’ve got a nice batch of rich, aromatic orgeat, but what do you do with it? It’s time for a mai tai. I used to think mai tais were fruity over-the-top frou frou drinks. Like daiquiris, maybe that’s true in some cases, but a true mai tai, like a true daiquiri, is relatively simple. The original mai tai contains only lime juice, sugar, orgeat, orange liqueur, and two types of rum.

mai tai 1

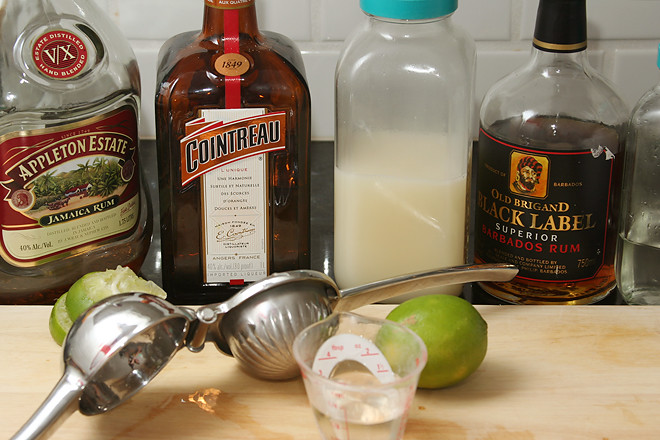
With all that alcohol, it’s a strong drink, and I’ve found that I’m particularly picky about the alcohol quality in a mai tai. I’ve already told you about my favorite light (or silver) rum, Shellback, which fortunately is relatively easy to find. Amber and dark rums, the types used in mai tais, aren’t quite as available, but if you have a favorite liquor store, you should be able to find what you need.

mai tai 2

Technically, a mai tai calls for an amber rum from the island of Martinique. Clement VSOP is the most widely available, but even it’s hard to find. Dave and I usually stick to a Jamaican amber rum; Appleton Estate Signature Blend (recently renamed from Appleton Estate V/X) is our favorite, because it’s really good and readily available. My brother likes Denizen’s Merchant Reserve, although I’ve never seen that one for sale where I live.

mai tai 4

There are a number of dark rums out there, although quality varies. My favorite is Appleton Estate Rare Blend 12 Year Old (just renamed from Appleton Estate Extra 12 Year Old), but my favorite liquor store doesn’t sell it. We use Old Brigand Black Label when we can’t get the dark Appleton, which isn’t Jamaican, but beggars can’t be choosers when it comes to dark rum. The most common dark Jamaican rum is Myer’s, which I haven’t tried in years. I remember it being harsh, but it should work in a pinch.

mai tai 5

You might have different options available to you, and they’re worth trying. Trying new rums is part of the fun of tiki, although I understand that not everyone wants a liquor cabinet that’s overflowing with rum bottles like ours is. Fortunately, a mai tai is a very enjoyable way to test out a new rum.

mai tai 9

Printer Friendly Recipe
Mai Tai (rewritten from Rum Dood)

Makes 1 drink

If you can find it, our favorite orange liqueur is Clemont Creole Shrubb. It’s rum-based, instead of brandy-based like most other orange liqueurs.

Dave prefers this without the sugar syrup, but for my taste, that seemed off-balance. Ideal level of sweetness is a personal preference, but this is a good starting point. The sugar syrup we use is an equal volume of sugar and water, heated until the sugar dissolves.

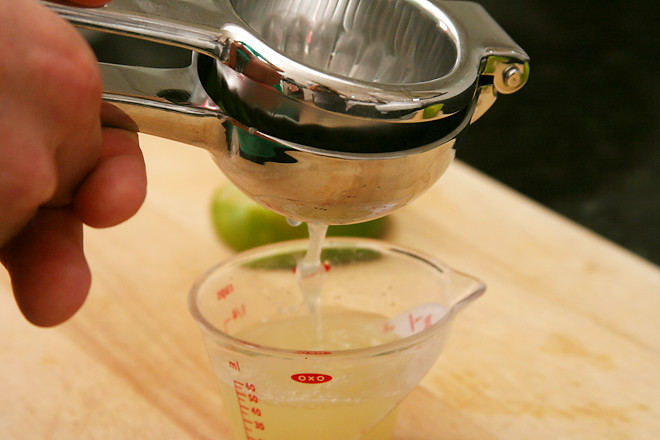
¾ ounce (1½ tablespoons) lime juice
½ ounce (1 tablespoon) orgeat
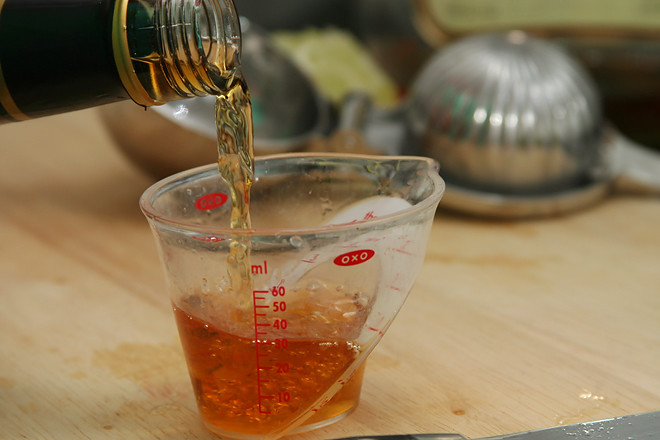
¼ ounce (1½ teaspoons) simple syrup
1 ounce (2 tablespoons) Martinique or Jamaican amber rum
1 ounce (2 tablespoons) Jamaican (or other) dark rum
½ ounce (1 tablespoon) triple sec, such as Cointreau
mint sprig (optional)

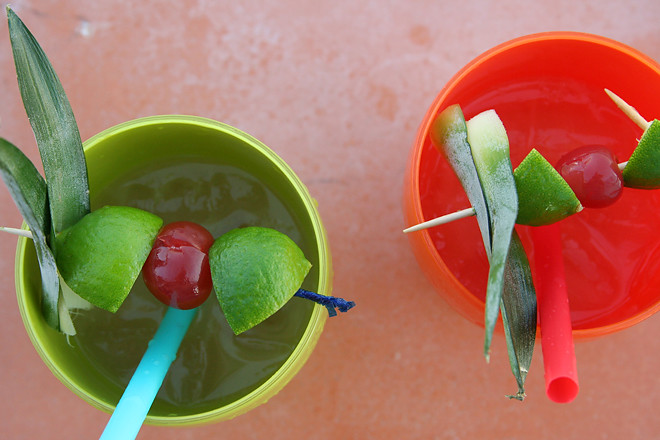
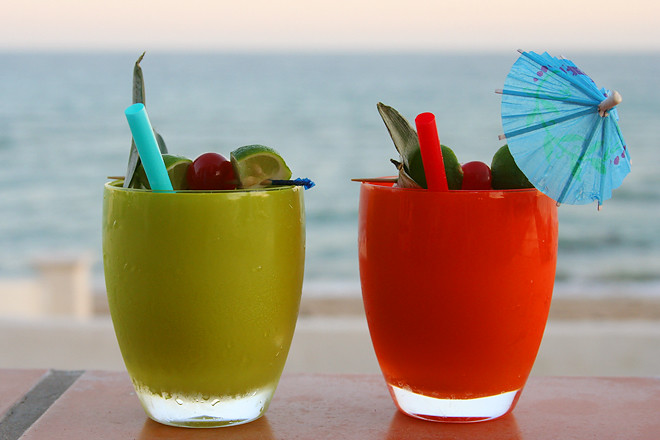
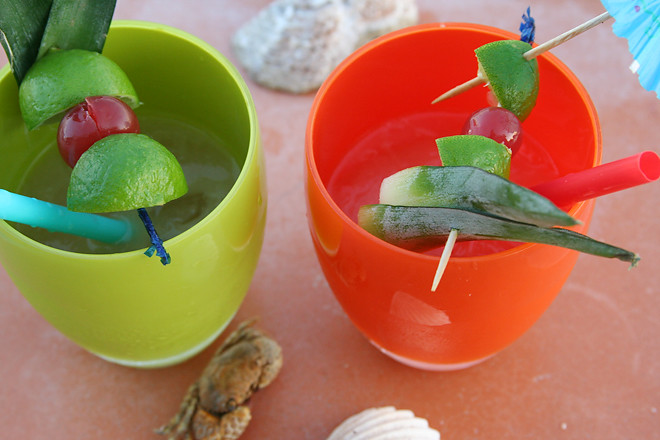
Put all ingredients into a cocktail shaker. Add 1½ cups crushed ice; cover and shake until the shaker is frosted over. Pour unstrained into a glass. Garnish with a mint sprig (or lime wedges, maraschino cherries, pineapple leaves, and cocktail umbrellas, as my brother did here), if desired.

mai tai 7

brown butter peach shortbread

peach shortbread 5

I’m in fruity dessert mode lately. Blueberries, blackberries, plums. The peaches came from my coworker, which is always fun – people bring me fruit at work, and I bring it back to them a few days later, mixed with butter and sugar.

peach shortbread 1

I have another coworker with an apple tree, and that’s a little easier on me since apples have a long shelf-life. The peaches I was given were already very ripe, so I needed something simple that I could bake when I already had dinner to make and mountains of post-vacation laundry to do. Unfortunately, I’d just used up my ace-in-the-hole tart dough on store-bought peaches.

peach shortbread 2

Fortunately, I found a simple but delicious recipe. This shortbread has the extra step of browning and chilling the butter before cutting it into the dry ingredients, which doesn’t take long and adds a little extra specialness to the dessert. The peaches were small and impossible to remove from the pit, so I skipped peeling, pitting, and slicing in favor of cutting chunks directly from the seed.

peach shortbread 3

It might have been easy to put together, but the flavor didn’t reflect that. With just a few basic ingredients and plenty of peaches, it tastes like the best of summer fruit. That’s exactly what I’m in the mood for right now.

peach shortbread 4

Printer Friendly Recipe
Brown Butter Peach Shortbread (rewritten but not changed from Smitten Kitchen)

Makes 24 2-inch squares

The only part of this recipe I thought was annoying was chipping the hardened browned butter out of the bowl. I might line a bowl with wax paper next time so I can just lift the butter out and scrape it off the paper into the food processor.

The peaches my coworker gave me were very small, and I used eight or nine of them, not two. I did not peel them, which was not a problem in the final dish.

16 tablespoons (2 sticks) cold unsalted butter
1 cup (7 ounces) granulated sugar
1 teaspoon baking powder
2¾ cups plus 2 tablespoons (12.6 ounces) all-purpose flour
¼ teaspoon cinnamon
¼ teaspoon salt
1 large egg
2 peaches, pitted and thinly sliced (between ⅛- and ¼-inch thick)

1. In a medium not-nonstick skillet over medium heat, melt the butter. Continue to cook the butter, swirling the pan occasionally, until the milk solids brown and sink and the butter smells slightly nutty. Immediately remove it from the heat and pour the butter into a heatproof bowl. Refrigerate until firm, about 30 minutes.

2. Add the flour, sugar, baking powder, salt, and cinnamon to the bowl of a food processor; process until the ingredients are mixed, a few pulses. Add the browned butter and process until the largest butter pieces are the size of peas. Add the egg; process until the dough just comes together into a crumbly ball.

3. Spray a 9-by-13-inch pan with nonstick spray. Press three-quarters of the dough into the bottom of the pan. Evenly spread the peaches over the dough, then scatter the remaining dough crumbs over the fruit.

4. Transfer the pan to the oven and bake until the crust is lightly browned, about 30 minutes. Transfer to a wire rack to cool to room temperature before serving.

peach shortbread 6

lavender almond peach tart

lavender almond peach tart 3I shouldn’t complain about too many good things happening at once, but there were moments when it all seemed just a little overwhelming. Within a month, there were two big international vacations, trips for work, nephews’ birthdays to bake for, and another tiered baby shower cake to deliver. I probably didn’t have to keep up with my normal routine of baking something for my coworkers once a week, but I figured if I planned ahead, I could handle it. lavender almond peach tart 1

So I prepped this tart dough and put it in the freezer, waiting for rhubarb to appear at the store, when I would mix up the simple filling for a quick dessert. Unfortunately, I never saw any rhubarb this year. It was peach season and a vacation later before I gave up on it.

lavender almond peach tart 2Life hadn’t slowed down by then, so it was lucky I had something partly prepped. It was easy enough to press the dough into a tart pan and make a simple peach jam. With nothing but tart dough and peaches, I thought the tart might be plain, but I loved the peaches with the floral lavender. As a bonus, it’s fun to bring a fairly fancy dessert to work and pretend my life is so effortless, when really I’m barely keeping up. lavender almond peach tart 5

Printer Friendly Recipe
Lavender Almond Peach Tart (adapted from Desserts for Breakfast; jam recipe rewritten from Cook’s Illustrated)

Serves 8

I started with ground almond meal instead of almonds.

I sliced the reserved dough and layered it over the jam, which was easy, but I don’t think it made for the prettiest presentation.

¾ cup (5.25 ounces) sugar
zest of 1 lemon
¾ cup (3.75 ounces) almonds
1 cup (4.8 ounces) all-purpose flour
½ tablespoon dried lavender buds
¼ teaspoon table salt
¼ teaspoon ground cardamom
11 tablespoons cold unsalted butter, cut into ½-inch cubes
1 large egg yolk
¼ teaspoon almond extract
1 cup peach jam, recipe follows
powdered sugar

1. Add the sugar and lemon zest to the bowl of a food processor; process until fragrant, about 10 seconds. Add the almonds, flour, lavender, salt, and cardamom; process until the ingredients are mixed and the almonds are finely ground. Add the butter and process until the largest butter pieces are the size of peas. Add the egg yolk and almond extract; process until the dough just comes together into a crumbly ball.

2. Press three-quarters of the dough into a 9-inch round or 14-by-4-inch rectangular tart pan. Freeze the lined pan for at least 30 minutes. Cover the remaining dough and store in the refrigerator. (Both the dough in the pan and the reserved dough can be stored in the freezer, covered tightly, for up to a month.)

3. Adjust a rack to the middle position and heat the oven to 350 degrees. Spread the cooled jam over the dough in the pan. Break the remaining dough into ½- to 1-inch pieces and scatter over the jam. Transfer to the oven and bake until the crust is browned and the filling is bubbling, 40-45 minutes. If the tart browns too quickly, loosely cover it with foil after 30 minutes. Transfer to a wire rack and cool to room temperature. Serve, dusted with powdered sugar, or loosely cover and store for up to 24 hours before serving.

Simple Peach Jam (rewritten from Cook’s Illustrated)

Makes about 1 cup

This jam cannot be canned. It probably makes a little more than 1 cup; I used it all in the tart.

8 ounces peaches, pitted, sliced, peeled if desired
½ cup plus 2 tablespoons (4.4 ounces) granulated sugar
1 tablespoon lemon juice

Combine the peaches, sugar, and lemon juice in a medium saucepan; bring to a simmer over medium-high heat, stirring occasionally. Reduce the heat to medium-low and simmer, stirring occasionally, until thickened and syrupy, 10 to 15 minutes. Cool to room temperature before using in the tart.

lavender almond peach tart 4

barbecue turkey meatballs with cheddar-corn quinoa

bbq meatballs quinoa 6

This recipe might work better cooked inside, but it includes corn and barbecue sauce – that means summer, and summer means grilling. Meatballs, unfortunately, are tricky on the grill. You’d think putting them on skewers would work fine, but they tend to slide right off. You could, instead, grill barbecue turkey burgers to serve over quinoa, but then you’re just eating bunless burgers, and that doesn’t sound nearly as delicious as meatballs.

bbq meatballs quinoa 2

So I’ve compromised on something a little bigger and a lot flatter than a meatball, but smaller than anything you’d put on a bun. The best name I can come up for these is, unfortunately, “patties”, which doesn’t sound nearly as tasty as meatballs. But it’s the same tasty ingredients; in this case, scallions, cilantro, and mustard add some interest to the meat mixture. The best part is the barbecue sauce slathered over the patties at the end of grilling.

bbq meatballs quinoa 4

The quinoa has plenty going on with smoky grilled corn and chunks of cheddar cheese, but the flavors don’t compete with the meatballs. The whole thing goes together really well, and it ends up feeling like a treat despite how healthy it is. It’s become one of my favorite summer meals.

bbq meatballs quinoa 7

Printer Friendly Recipe
Barbecue Turkey Meatballs with Cheddar-Corn Quinoa (adapted a bit from Pink Parsley)

Serves 4

I’m keeping ‘meatballs’ in the title because it sounds a lot more delicious than ‘patties’. We’ll just say these are flat meatballs.

Shredding cheese is faster, but I like to dice little cubes so I get bites of intense cheesiness.

I’ve been using this barbecue sauce, which has a strong molasses flavor. I’m not sure I’d like it for everything, but it’s great with this meal.

I was using part of an onion I’d already cut a chunk out of, so rings weren’t possible. Skewering works too, it’s just a little more work.

Meatballs:
¼ cup panko bread crumbs
1 large egg yolk
1 pound ground turkey
1 scallion, minced
1 tablespoon minced fresh cilantro
1 teaspoon dry mustard
¾ teaspoon salt
¼ cup barbecue sauce

Quinoa:
1 cup quinoa, rinsed and drained
1½ cups water
½ teaspoon salt
2 ears corn, shucked and rinsed
½ medium red onion, sliced into thin rings
1 tablespoon apple cider vinegar
3 tablespoons chopped fresh cilantro
1 scallion, sliced
1 cup (4 ounces) cubed or shredded sharp cheddar cheese
1 tablespoon olive oil
black pepper

1. Prepare a medium-hot grill. In a medium saucepan, combine the quinoa, water, and salt. Bring to a boil over high heat, then reduce the heat to low, cover, and simmer for 15 minutes. Remove the pot from the heat and let the quinoa sit for 10 additional minutes, still covered.

2. In a large bowl, combine the panko and egg yolk. Set aside for about 5 minutes, then stir to form a paste. Add the turkey, scallion, cilantro, mustard, and salt; mix to combine. Form into 12 small patties.

3. Place the corn directly over the coals and grill for about 10 minutes, turning occasionally, until tender and caramelized in places. Grill the onions until browned and tender. Grill the turkey patties until browned and cooked through, about 4 minutes per side. Generously brush the top of the patties with barbecue sauce, flip the patties, and brush the second side with the remaining barbecue sauce. Let cook for one additional minute.

4. Transfer the quinoa to a large bowl and stir in the apple cider vinegar, then the cilantro, scallion, cheese, olive oil, and black pepper. Cut the corn off the cob and add it to the bowl with the quinoa. Dice the grilled onions and stir them into the quinoa. Serve the turkey patties over the quinoa.

bbq meatballs quinoa 5

pan-seared shrimp with tomatoes and avocado

shrimp tomatoes avocado 2

I hate to be a cliche, but it’s January and I’d like to eat a little healthier for a while. That is, a little healthier than normal, and a whole lot healthier than I did over the holidays. I have no regrets; it was a delicious holiday break, full of cookies, holiday meals, restaurants, and fun new beers. But I’m happy to be back to eating the occasional green thing now.

shrimp tomatoes avocado 5

A book with Light and Healthy in the title was the obvious choice for choosing cookbook recipes in early January. It’s simply shrimp, cooked in just a bit of oil, then topped with barely softened vegetables. A bit of brown rice helps soak up any extra sauce.

shrimp tomatoes avocado 4

As much as I crave healthy foods when I’m eating feasts every night, sometimes when I’m trying to get back into eating lots of vegetables, I find myself missing sugar and fried food and cheese and all those delicious treats. Light, vegetably dishes as good as this one help ease the transition – especially since each serving has plenty of fatty, buttery, creamy avocado.

shrimp tomatoes avocado 1

Printer Friendly Recipe
Pan-Seared Shrimp with Tomatoes and Avocado
(from America’s Test Kitchen Light and Healthy 2011)

Serves 4

I used cherry tomatoes since they tend to be better in the winter than bigger varieties. I also substituted about ¼ cup minced roasted and peeled Hatch green chile for the chipotle.

1 pound tomatoes (2 to 3), cored, seeded, and cut into ½-inch pieces
6 scallions, white and green parts separated and sliced thin
¼ cup minced fresh cilantro
3 garlic cloves, minced
1 tablespoon fresh lime juice
1 teaspoon minced canned chipotle chile in adobo sauce
salt and pepper
1½ pounds extra-large shrimp (21 to 25 per pound), peeled and deveined
⅛ teaspoon sugar
4 teaspoon canola oil
1 avocado, peeled, seeded and cut into ½-inch pieces
lime wedges

1. Combine the tomatoes, scallion whites, cilantro, garlic, lime juice, chipotle, and ¼ teaspoon salt in bowl.

2. Pat the shrimp dry with paper towels and season with the sugar, salt, and pepper. Heat 2 teaspoons oil in a 12-inch nonstick skillet over high heat until just smoking. Add half of the shrimp and cook until curled and lightly browned, about 2 minutes.

3. Transfer the shrimp to a bowl and cover with aluminum foil. Repeat with the remaining 2 teaspoons oil and shrimp; transfer to the bowl.

4. Return the skillet to high heat, add the tomato mixture, and cook until the tomatoes soften slightly, about 1 minute. Off the heat, return the shrimp to the skillet and toss to coat. Transfer the shrimp and tomatoes to a platter, season with salt and pepper to taste, and sprinkle with the scallion greens and avocado. Serve with lime wedges.

shrimp tomatoes avocado 3

peach raspberry galette

peach raspberry galette 10

I know this is crazy, but I’ve already started on my New Year’s resolutions for 2015. Resolution-haters are always saying that they don’t need to make resolutions at the new year, because if they see changes they want to make, they just make them, regardless of the date. And I get their point, but I also think that right after the busy, indulgent holiday season when things slow down to a more manageable pace is a great time to think about personal changes. While I am expecting the next four months to be rushed, I was worried I would lose momentum by the new year, so I’m dipping my toe in now.

peach raspberry galette 2

My goals are mostly cooking-related, as usual:

1) Use more cookbooks. It’s not the first time I’ve made this resolution, but I didn’t do a great job before. This time, I’m going to make myself a schedule to stick to, and hopefully that will lead to a routine. Because I love cookbooks so much, but if I don’t use them, I feel guilty for having them.

peach raspberry galette 3

2) Cook a wider variety of cuisines. There is delicious food out there that isn’t Italian, and maybe I should try some of that once in while. I’m particularly interested in Asian food. I’m intimidated by the ingredient availability issue, but if I’m cooking more of it, I should be able to use up ingredients before they get lost in the back of the refrigerator or pantry.

peach raspberry galette 4

3) Read Harold McGee’s On Food and Cooking. Also not the first time I’ve made this resolution. I started it but got bogged down.

4) Bake more pastries. I’ve gotten into a bit of a bar cookie rut, partly because almost everything I bake is brought to work to share, and it’s easier for coworkers to grab a fruit crisp bar than a slice of pie. But after four years of almost weekly treats, my coworkers seem happy with anything I bring in.

peach raspberry galette 5

So far, I’m doing good with my not-New Year resolutions. I’ve been going to bed a little earlier almost every night to read On Food and Cooking. I recently made kung pao tofu, and last night, we had summer rolls for dinner. And I made these galettes from Tartine, perhaps my favorite baking book. Since they’re sort of pastries, so I killed two birds with one stone.

peach raspberry galette 6

My coworkers, as expected, did not mind cutting themselves a slice of galette, transferring it to a plate, and spooning a dollop of whipped cream on top. And I had fun tackling a more ambitious baking project than usual, even on a weeknight. Maybe I need to join the New Year’s resolution haters and create my own not-New Year’s resolution tradition.

peach raspberry galette 7

Printer Friendly Recipe
Raspberry Peach Galette (adapted from Elisabeth Prueitt and Chad Robertson’s Tartine)

Makes two 10-inch galettes, serving about 16

Galettes are often lauded as the lazy man’s pie, with only one crust and no crimping. This recipe belies that description. In order to maximize the flakiness of the crust, the butter is rolled into the flour several times, then the dough is rolled several more times after the water is added. I was pleasantly surprised that this process only took half an hour.

I didn’t use quite enough fruit, mostly because I was too lazy to peel and slice a fifth peach and too cheap to buy a second container of raspberries. However, I am recommending that you use the extra fruit, as my crust to fruit ratio was slightly high, even as delicious as this crust is. Tartine recommends substantially more crust, but the reduced amounts listed here (which are what I used) were perfect for two galettes (or it would be, with a little more fruit than I used).

24 tablespoons (3 sticks) unsalted butter
18 ounces (3¾ cups) unbleached flour
2 teaspoons sugar
1¼ teaspoons salt
¾ cup ice water
4 cups peaches (4-5 large peaches), peeled and pitted, sliced ⅛-inch thick
2 (6-ounce) containers raspberries
¼ to ½ cup (1.75 to 3.5 ounces) sugar, plus more for sprinkling
1 small egg, whisked with a pinch of salt

1. Cut the butter into ½-inch cubes; freeze for 10 minutes. In a medium bowl, mix the flour, sugar, and salt.

2. Transfer the dry ingredients to a pastry cloth or clean work surface; spread out to ⅓-inch thickness. Scatter the butter pieces over the flour, tossing them to coat with flour. Use a rolling pin to flatten the butter pieces into the flour. When the flour/butter mix has been rolled to the edge of your work surface, shape it back together to a ⅓-inch thickness. Repeat the rolling and reshaping three more times, until the mixture resembles large flakes.

3. Form the mixture into a pile and clear a well in the middle of the pile. Pour in the water, then use a bench scraper to mix the dough into the water with a cutting motion. Use a well-floured rolling pin to roll the dough into a rectangle about 10 by 14 inches. Fold it into thirds, then in half the opposite direction. Repeat the rolling and folding three more times. Roll the dough into a 14-inch by 7-inch rectangle. Cut the dough in half to form two 7-by 7-inch squares. Wrap the dough tightly and refrigerate for at least an hour or overnight.

4. Adjust an oven rack to the middle position and heat the oven to 375 degrees. Line two baking sheets with parchment paper or silicone mats. Roll each square of dough into a 14-inch round. Transfer the rounds to the prepared baking sheets; chill 10 minutes.

5. Divide the peaches evenly between the two dough rounds, leaving a 2-inch border. Top with the raspberries, then sprinkle 2-4 tablespoons of sugar (depending on how ripe and sweet your fruit is) over each pile of fruit. Fold the sides of dough over the fruit, pleating as necessary. Brush the dough with the egg wash, then sprinkle with sugar.

6. Bake until the fruit is bubbling and the crust is browned, 45-55 minutes. Remove from the oven and let cool on the pan. Serve warm or at room temperature.

peach raspberry galette 8

summer vegetable gratin

summer vegetable gratin 6

Can I talk about my garden some more? I’m sorry, I’m just really excited about it. I’m finding that I get nearly the same enjoyment from my vegetable garden as I do from cooking lately. I can’t stop myself from wandering between the beds, just looking at the plants; looking for new fruit growing, checking on whether anything is ripening, plucking weeds, crushing stinkbugs.

summer vegetable gratin 1

I’m so proud that I grew half of the vegetables in this dish. Despite my hit or miss success with gardening, the tomatoes, zucchini, thyme, and basil in this dish all came from the backyard (or the basil would have if I’d remembered to use it).

summer vegetable gratin 5

It’s one of those dishes that toes the line between being healthy and feeling indulgent. I brought it to a comfort food-themed potluck where I knew there would be a lot of (really delicious) cheesy baked pasta, hoping that a second helping of vegetable gratin would keep me from a third helping of macaroni and cheese. It didn’t work – I had both a second helping of gratin and a third helping of mac and cheese – but at least only my healthy-ish gratin leftovers came home with me. My favorite part of gardening is the part that involves eating, and this combination of summer vegetables and herbs is exactly why that is.

summer vegetable gratin 10

Printer Friendly Recipe
Summer Vegetable Gratin (from Cook’s Illustrated)

6-8 servings

I didn’t use this much oil. I sprayed the pan with cooking spray instead of using a tablespoon of oil, and then I used less with the garlic, maybe just 1 tablespoon instead of three.

6 tablespoons extra-virgin olive oil
1 pound zucchini, ends trimmed and sliced crosswise into ¼-inch-thick slices
1 pound summer squash (yellow), ends trimmed and sliced crosswise into ¼-inch-thick slices
2 teaspoons table salt
1½ pounds ripe tomatoes (3 to 4 large), sliced ¼-inch thick
2 medium onions, halved lengthwise and sliced thin pole to pole (about 3 cups)
¾ teaspoon ground black pepper
2 medium garlic cloves, minced or pressed through garlic press (about 2 teaspoons)
1 tablespoon minced fresh thyme leaves
1 large slice white sandwich bread, torn into quarters
2 ounces Parmesan cheese, grated (about 1 cup)
2 medium shallots, minced (about ¼ cup)
¼ cup chopped fresh basil leaves

1. Adjust an oven rack to the upper-middle position and heat the oven to 400 degrees. Brush a 13- by 9-inch baking dish with 1 tablespoon oil; set aside.

2. Toss the zucchini and summer squash slices with 1 teaspoon salt in a large bowl; transfer to a colander set over a bowl. Let stand until the zucchini and squash release at least 3 tablespoons of liquid, about 45 minutes. Arrange the slices on a triple layer of paper towels; cover with another triple layer of paper towels. Firmly press each slice to remove as much liquid as possible.

3. Place the tomato slices in a single layer on a double layer of paper towels and sprinkle evenly with ½ teaspoon salt; let stand 30 minutes. Place a second double layer of paper towels on top of the tomatoes and press firmly to dry the tomatoes.

4. Meanwhile, heat 1 tablespoon of oil in a 12-inch nonstick skillet over medium heat until shimmering. Add the onions, remaining ½ teaspoon salt, and ¼ teaspoon pepper; cook, stirring occasionally, until the onions are softened and dark golden brown, 20 to 25 minutes. Set the onions aside.

5. Combine the garlic, 3 tablespoons oil, remaining ½ teaspoon pepper, and thyme in a small bowl. In a large bowl, toss the zucchini and summer squash in half of the oil mixture, then arrange in the greased baking dish. Arrange the caramelized onions in an even layer over the squash. Slightly overlap the tomato slices in a single layer on top of the onions. Spoon the remaining garlic-oil mixture evenly over the tomatoes. Bake until the vegetables are tender and the tomatoes are starting to brown on the edges, 40 to 45 minutes.

6. Meanwhile, process the bread in a food processor until finely ground, about 10 seconds. (You should have about 1 cup crumbs.) Combine the bread crumbs, remaining tablespoon oil, Parmesan, and shallots in a medium bowl. Remove the baking dish from the oven and increase the heat to 450 degrees. Sprinkle the bread-crumb mixture evenly on top of the tomatoes. Bake the gratin until bubbling and the cheese is lightly browned, 5 to 10 minutes. Sprinkle with the basil and let sit at room temperature for 10 minutes before serving.

summer vegetable gratin 8

meatball-stuffed zucchini

meatball zucchini 8

I joke about not being good at gardening, but the truth is, it’s no joke. I am not good at it. Every year, at least half of what I plant is a failure. This year, in fact, in one raised bed, it’s exactly half, with two tomato plants and one pepper plant doing quite well, and two tomato plants and one pepper plant not doing much of anything at all.

meatball zucchini 2

This year, I’m having more success with my zucchini plant than ever before. (Keeping with the theme, the beans in the same bed aren’t producing at all.) Maybe the disgusting and destructive squash bugs will move in eventually, but so far, so good. I get about three zucchinis each week, which has been just right for making old favorites like these enchiladas and this pasta, while also providing an opportunity to try a new favorite.

meatball zucchini 3

This has become my go-to zucchini recipe this summer. I like it as a first course, maybe with a pasta dish served afterward, but it would work well as a main dish too. If things keep going well with my zucchini plant – and in my garden, that’s not a guarantee – I might just make this once a week until the season is over.

meatball zucchini 4

Printer Friendly Recipe
Meatball-Stuffed Zucchini (adapted from Domenica Cooks and Cook’s Illustrated)

Makes 4-6 first course servings or 2 main course servings

I’ve used ground lamb for these (which is what the pictures show) because we love it, and I’ve used ground venison because someone gave us a bunch that we need to use up.

1 tablespoon olive oil
2 cloves garlic, minced, divided
1 (14-ounce) can whole tomatoes, chopped with scissors in the can
salt
1 slice white sandwich bread (crusts discarded), torn into small cubes
¼ cup buttermilk or 3 tablespoons plain yogurt thinned with 1 tablespoon milk
2 tablespoons grated Parmesan cheese, plus more for topping
1 tablespoon minced fresh parsley leaves
1 large egg yolk
pinch ground black pepper
½ pound ground beef or lamb
2 large or 3 small zucchini or summer squash, halved lengthwise, seeds scraped out and discarded

1. Heat the oven to 400 degrees. Add the oil and 1 clove of garlic to an 8-by-8-inch (or equivalent size) baking dish; transfer to the oven until the garlic is sizzling, 5-8 minutes. Stir the tomatoes and a pinch of salt into the oil; set aside.

2. In a medium bowl, combine the bread and buttermilk or yogurt and milk; set aside for 10 minutes for the bread to soften. Stir in the cheese, parsley, egg yolk, remaining garlic, ¼ teaspoon salt, and pepper. Using your hands, evenly mix in the ground meat.

3. Divide the meat mixture evenly between the halved and cored zucchini. Arrange the stuffed zucchini in the baking dish. Transfer the dish to the oven and bake until the zucchini is softened and the meat is cooked through, 30-40 minutes. Let rest for 5-10 minutes. To serve, spoon the tomato sauce over the zucchini and top with parmesan cheese.

meatball zucchini 7

blackberry cake with raspberry filling

blackberry cake 9

I require a weekend for my birthday. Not a week, certainly not a month, just two days and one evening to do as many as my favorite things as possible and as few of my least favorite things. So wine and a new novel are in; laundry is most definitely out.

blackberry cake 4

Baking and eating my birthday cake is in, but I was really on top of things this year and did all the steps I don’t like so much beforehand. That includes digging around in the messy, nearly unreachable cabinet for pans, lining the pans, and pureeing and straining the fruit. All that was left to do on my actual birthday was add things to the mixer and nibble on frosting while assembling the cake.

blackberry cake 2

I’d originally made this cake for a friend’s bridal shower, but there were two issues: 1) I only got one piece, and 2) I didn’t save any for Dave. He’s pretty adamant about not being a dessert guy and even less so a cake guy, but our friends had such good things to say about the cake after the party that he was sorry he missed it.

blackberry cake 6

So choosing this year’s birthday cake wasn’t a hard decision. Making the cake wasn’t hard either, since I’d left only my favorite parts of baking for my birthday itself. I made a small cake, but I had just enough to last for my entire birthday weekend. Cake everyday is definitely on the list for an awesome birthday.

blackberry cake 10

Printer Friendly Recipe
Blackberry Cake with Raspberry Filling and Cream Cheese Frosting (cake adapted from Cook’s Illustrated White Cake recipe; filling is just barely adapted from Cook’s Illustrated Raspberry Coulis)

The bride’s wedding colors are Tiffany blue and red, so I originally made a blackberry cake hoping that it would turn out blue, like Elly’s, with raspberry filling as the red. I ended up with a purple cake with pink filling, but no one complained. However, you could mix this up with other berries – blackberries, raspberries, blueberries, or strawberries can be used in both the cake and the filling. Fresh or frozen and thawed berries can be used.

I made a three-layer cake for my birthday, and a four-layer cake for the shower, which I preferred. I love the raspberry filling, so an extra layer of it is very welcome.

For heavy decorations like the roses, increase the frosting recipe by 50% (using 12 tablespoons butter, 12 ounces cream cheese, and 6 cups powdered sugar).

Cake:
¾ cup pureed and strained blackberries (from 8 ounces of blackberries)
⅓ cup milk, at room temperature
1 teaspoon vanilla extract
2¼ (9 ounces) cups cake flour
3 teaspoons baking powder
12 tablespoons unsalted butter, at room temperature
1½ cups (10.5 ounces) sugar
¾ teaspoon salt
4 egg whites, at room temperature

Raspberry Filling:
6 ounces fresh raspberries (or thawed if frozen)
2½ to 3½ tablespoons granulated sugar
pinch table salt
1 teaspoon lemon juice

Cream Cheese Frosting:
8 tablespoons (1 stick) butter, at room temperature
8 ounces cream cheese, at room temperature
pinch salt
2 teaspoons vanilla extract
4 cups powdered sugar

1. For the cake: Heat the oven to 350F. Spray two 8-inch round cake pans with baking spray (or grease and flour the pans). Line with parchment or waxed paper and grease the paper.

2. Using a blender, puree the blackberries. Transfer them to a fine-mesh strainer set over a small bowl; use a spoon or rubber spatula to press the liquid through the strainer, discarding the seeds. Measure ¾ cup of puree. Stir the milk and vanilla extract into the blackberry puree. In a separate small bowl, combine the flour and baking powder.

3. Place the butter, sugar, and salt in the bowl of an electric mixer fitted with the paddle attachment (or a large bowl if using a hand mixer). Beat on medium speed for 2 minutes, until light and fluffy. Add the egg whites one at a time, beating well after each addition. Reduce the mixer speed to low and add one-third of the flour mixture, followed immediately by half of the blackberry mixture, mixing just until incorporated. Repeat with another third of the flour and the rest of the blackberry puree, then the last of the flour. Scrape down the sides of the bowl and mix on medium-low speed for 15 seconds longer.

4. Divide the cake between the prepared pans. Bake for 22 to 28 minutes, or until a cake tester or wooden toothpick inserted into the center comes out clean. Allow the layers to cool in the pans for 5 to 10 minutes. Invert and turn out onto wire racks and peel off the paper liners. Let stand until completely cooled before assembling the cake, at least one hour.

5. For the filling: In a medium saucepan, bring the raspberries, 1 teaspoon water, 2½ tablespoons sugar, and salt to bare simmer over medium heat, stirring occasionally; cook until the sugar is dissolved and the berries are heated through, about 1 minute longer. Transfer the mixture to the blender; puree until smooth, about 20 seconds. Strain through a fine-mesh strainer into a small bowl, pressing and stirring the puree with a rubber spatula to extract as much seedless puree as possible. (there’s no need to wash either the blender or the strainer between the blackberries and the raspberries.) Stir in the lemon juice and additional sugar, if desired. Cover with plastic wrap and refrigerate until cold, at least 1 hour. Stir to recombine before serving. Can be refrigerated in airtight container for up to 4 days.

6. For the frosting: Place the butter, cream cheese, and salt in the (clean) bowl of an electric mixer fitted with the paddle attachment; beat on medium speed until smooth. Switch to the whisk attachment; on low speed, gradually add the powdered sugar, beating until it’s just incorporated. Increase the speed to high and beat for 5 minutes, scraping down the sides of the bowl as necessary.

7. To assemble: To make the cakes easier to handle, wrap each tightly in plastic wrap and chill for at least an hour or up to overnight. Working with one cake at a time, unwrap it and use a serrated bread knife to cut the cakes horizontally in half. If you’re using a cake board, put a small spoonful of frosting in the center of it to glue the cake to the board; if you’re not using a cake board, line the perimeter of your serving dish with strips of wax paper, then put a small spoonful of frosting in the center of the serving dish. Center a layer of cake over the frosting, cut side down. Spread a thin layer of cream cheese frosting over the cake layer. Spoon 3 tablespoons of raspberry filling over the frosting, spreading it to within about an inch of the edge. Center another cake layer over the filling, cut side-down. Repeat the layering of frosting, filling, and cake twice more. Spread a thin layer of frosting evenly over the top and sides of the cake to seal in crumbs. If the layers slide around while you’re spreading the frosting, push wooden skewers from the top to the bottom of the cake in three places to secure the layers. Chill the cake, uncovered, for 30 minutes to 2 hours to set the frosting. Remove the skewers if necessary, then spread the remaining cream cheese frosting evenly over the top and sides of the cake, decorating as desired. Either transfer the cake on the cake board to a serving platter, or carefully remove the strips of wax paper to leave a clean serving platter around the sides of the cake.

blackberry cake 8

pan-seared halibut in white wine sauce with green beans and tomato-scallion relish

halibut green beans 5

I have found the perfect single-person dinner. Not because it’s easy, although that’s nice. Not because it only uses one pan to cook, although I’m not complaining about less dishes to wash. Not because it tastes good, because of course it tastes good or why would I be talking about it?

halibut green beans 0

No, the key for bachelor(ette) meals is that they don’t leave you with half a can of tomatoes or beans, or half a cucumber or pepper, or the vast majority of a roast leftover. If you’re cooking for one, this recipe uses one fish filet, one tomato, one scallion, and a handful of green beans.

halibut green beans 1

Because I have been cooking for one a lot lately, while Dave travels for work, I’ve been making this dish often. The original recipe instructs that the green beans be steamed in a separate pot, but that seemed like a lot of hassle and dishes just for me, so I saute them quickly in a skillet, then add just a bit of water to cook them through. Any remnant green bean bits are scraped up with a glug of wine. I like to transfer the green beans to a pasta bowl and cover them with a big plate while the fish cooks in the same skillet. The fish gets laid over the green beans, the pan is deglazed with wine again, then a simple relish is heated briefly in the pan before it’s time to eat.

halibut green beans 3

I don’t know if fish served over green beans (although you could put yours on the side if that’s more your thing) sounds weird. The relish really brings everything together, since it’s so bright and flavorful, mixing perfectly with both the beans and the fish. It’s an easy, healthy, one-pan, delicious meal that won’t leave you with a bunch of half-used ingredients, and one of my newest favorites.

halibut green beans 6

Printer Friendly Recipe
Pan-Seared Halibut in White Wine Sauce with Haricots Verts and Tomato-Scallion Relish (adapted from Alfred Portale’s The Twelve Seasons Cookbook via epicurious)

4 servings

Regular green beans work just as well as haricots verts in this recipe. I’ve also successfully made it with both halibut and mahi-mahi. The pictures show mahi-mahi.

It’s easy to adapt for one person; just divide all of the ingredients by four and use a small skillet.

2 tablespoons olive oil, divided
16 ounces haricots verts or green beans
Coarse salt and freshly ground pepper to taste
¼ cup water
6 tablespoons white wine, divided
4 halibut or mahi-mahi fillets, each approximately 1 inch thick
2 tablespoons fresh lemon juice
2 tablespoons unsalted butter
4 scallions, finely sliced
2 tablespoons capers, drained
4 small roma tomatoes, diced fine

1. In a large nonstick skillet, heat 2 teaspoons oil over medium to medium-high heat. Add the beans, 1 teaspoon salt, and a pinch of pepper; cook, stirring occasionally, until the beans are spotty brown, 4 minutes. Add the water, cover, and cook until the beans are bright green and still crisp, about 2 minutes. Remove the cover, increase the heat to high, and cook until the water evaporates, 30 to 60 seconds. Divide the beans between four plates or shallow bowls. Add 2 tablespoons of wine to the pan, swirling it around and scraping the pan with a rubber spatula to dissolve any stickiness on the bottom of the skillet. Transfer to liquid to the dishes with the green beans; cover set aside.

2. Season the halibut on both sides with salt and pepper. In the same skillet, heat the remaining 4 teaspoons of oil over medium-high heat. Cook the fish for about 3 minutes, until lightly browned. Flip the fish, reduce the heat to medium, and cook about 4 minutes longer, until the fish is opaque in the center and browned on both sides. Put the fish over the green beans in the bowl; cover again.

3. Remove the pan from the heat and add the remaining 4 tablespoons wine and the lemon juice to the pan. Deglaze the pan by scraping up any browned bits with a rubber spatula. Stir in the butter. Add the scallions, capers, and tomatoes. Season with salt and pepper if necessary, and pour over the fish in the bowls. Serve immediately.

halibut green beans 4