Archives for June 2012

barbecued spareribs

barbecued ribs 9

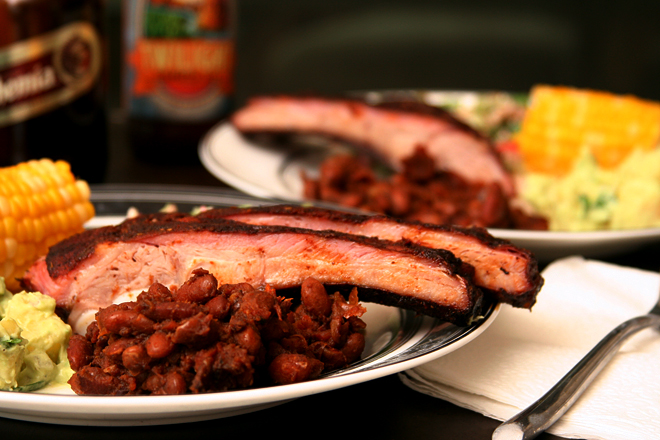
Last year’s barbecued pulled pork went so well that I assumed slow-cooking other meats on the grill would be just as easy, but ribs has proved me wrong. I tried baby backs first, mostly because they’re more famous, but also because they’re what I remember eating as a kid. Since they’re smaller than spareribs, I assumed they’d cook faster, and that didn’t hurt either.

barbecued ribs 5

A week after the baby back ribs spent 2 hours on the grill becoming jerky, I bought spareribs and, comparing Cooks Illustrated’s recipes for the two ribs, saw that they recommend nearly the same cooking time for the two very different types of ribs. Leaner, smaller baby backs supposedly need 2 hours on the grill with 4½ quarts of briquettes plus a second wave of fresh coals halfway through, while larger, fattier spareribs spend 2-3 hours on the grill with only 2½ quarts of charcoal and no refresher. That doesn’t sound right.

barbecued ribs 6

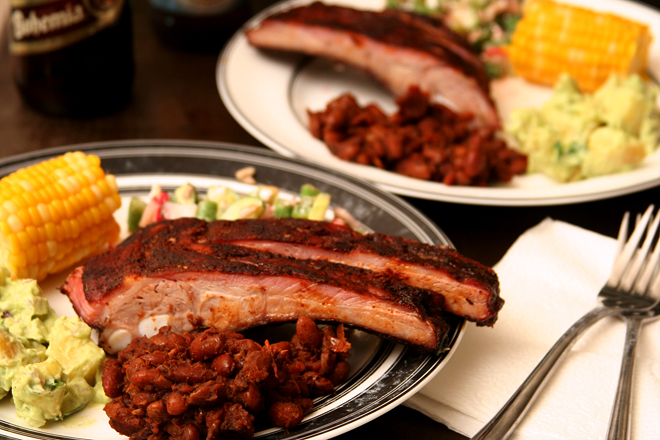
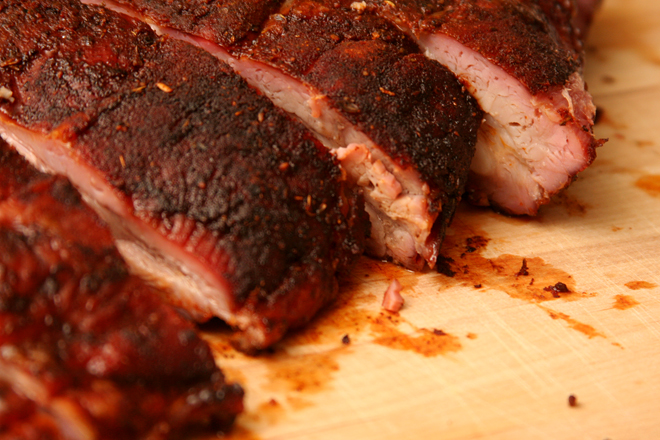
It certainly didn’t work right, as the poor baby backs were desiccated at the end of their two hours. The spareribs, however, fared much better, juicy and smoky and tender, just like ribs should be. In fact, this method – less charcoal, basically – worked so well that I want to try the same thing with baby back ribs now – although I won’t cook the smaller ribs as long as I did the larger ones, which seems like it should be obvious.

barbecued ribs 7

One year ago: Sour Cream Chocolate Cake Cookies
Two years ago: Rum-Drenched Vanilla Cake
Three years ago: Coconut Roasted-Pineapple Dacquoise
Four years ago: Kung Pao Shrimp

Printer Friendly Recipe
Barbecued Spareribs (from Cooks Illustrated’s The New Best Recipe)

Serves 4 (according to CI, but this would serve at least 6 people with my appetite)

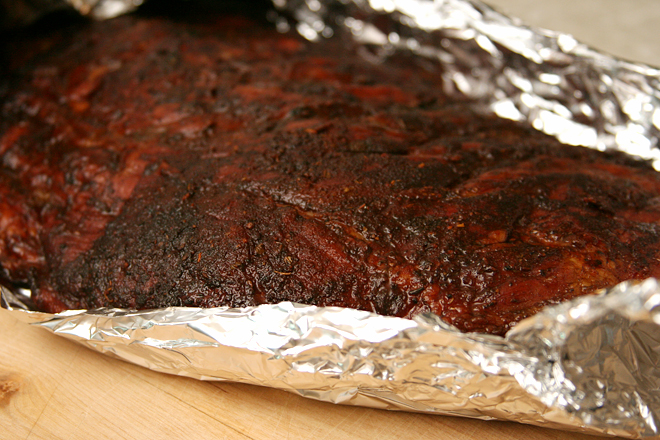
At the end of about 2 hours, the coals were completely extinguished. Fortunately, the meat seemed cooked and tender by then. I didn’t bother with barbecue sauce; the dry rub contributes plenty of flavor.

Dry rub:
3 tablespoons paprika
1½ tablespoons chili powder
1½ tablespoons ground cumin
1½ tablespoons dark brown sugar
1½ tablespoons salt
2¼ teaspoons dried oregano
2¼ teaspoons sugar
2¼ teaspoons ground black pepper
2¼ teaspoons ground white pepper
¾-1½ teaspoon cayenne pepper

2 full racks spareribs (about 6 pounds total)
2 (3-inch) wood chunks or 2 cups wood chips
2 cups barbecue sauce (optional)

1. Rub both sides of the rib with the dry rub and let stand at room temperature for 1 hour. (For stronger flavor, wrap the rubbed ribs in a double layer of plastic wrap and refrigerate for up to 1 day.)

2. Soak the wood chunks in cold water to cover for 1 hour and drain, or place the wood chips on an 18-inch square of aluminum foil, seal to make a packet, and use a fork to create about 6 holes to allow smoke to escape.

3. Meanwhile, light a large chimney starter filled a bit less than halfway with charcoal briquettes (about 2½ quarts, or 40 coals) and allow to burn until covered with a thin layer of gray ash. Empty the coals into one side of the grill, piling them up in a mound 2 or 3 briquettes high. Keep the bottom vents completely open. Place the wood chunks or the packet with the chips on top of the charcoal. Put the cooking grate in place, open the grill lid vents completely, and cover, turning the lid so that the vents are opposite the wood chunks or chips to draw smoke through the grill. Let the grate heat for 5 minutes and clean it with a wire brush.

4. Position the ribs over the cool part of the grill. Barbecue, turning the ribs every 30 minutes, until the meat starts to pull away from the bones and has a rosy glow on the exterior, 2 to 3 hours. (The initial temperature inside the grill will be about 350 degrees; it will drop to 250 degrees after 2 hours.)

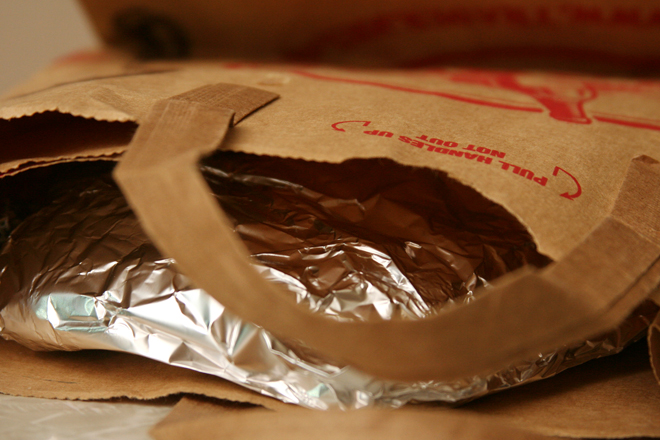
5. Remove the ribs from the grill and wrap each slab completely in aluminum foil. Put the foil-wrapped slabs in a brown paper bag and crimp the top of the bag to seal tightly. Allow to rest at room temperature for 1 hour.

6. Unwrap the ribs and brush with the barbecue sauce, if desired. Cut the ribs between the bones and serve immediately.

barbecued ribs 8

coffee gelato

coffee gelato 4

I knew before going to Italy last fall that gelato was A Thing there, but because ice cream isn’t A Thing with me, I figured I would try some to say I did and that would be that. It turns out, though, that I vastly misjudged my penchant for gelato. By the end of the trip, in my obsessive travel journal, in which I recorded everything we did (“sat in the square some more” sums up most of my memories from Siena) and every meal we ate, I was adding notes on what flavor of gelato I ate each day.

coffee gelato 1

I miss a lot of things about that trip to Italy; daily gelato is just one of many, in addition to cappuccino every morning, wine at lunch and dinner, and a couple breathtaking sites per day. Daily gelato isn’t a good idea in real life anyway, but I wondered if I could even replicate it at home. What, exactly, is the difference between Italian gelato and American ice cream?

coffee gelato 3

It turns out that gelato has less air churned into it, which means that it can be made with less fat and still feel creamy. It also means that it’s easy to make something similar at home, simply by churning it in your ice cream mixer for less time. I can’t say it was as good as what we had in Italy, but then, I might feel differently if I had eaten it while sitting in the square some more.

coffee gelato 5

One year ago: Summer Berry Pie
Two years ago: Triple Chocolate Espresso Brownies
Three years ago: Mushroom Salad
Four years ago: Mixed Berry Cobbler

Printer Friendly Recipe
Coffee Gelato (adapted from David Lebovitz’s The Perfect Scoop)

Makes about 1 pint

I accidentally used twice this amount (so ½ cup) of coffee beans. It seemed to work, and I didn’t think the coffee flavor was overpowering, but I’m sure ¼ cup will get the job done just fine too.

2 cups whole milk
¾ cup (5.25 ounces) sugar
¼ cup coffee beans, coarsely ground
1 vanilla bean, halved lengthwise, seeds scraped out
pinch of salt
1 cup heavy cream, divided
5 egg yolks
1 teaspoon vanilla

1. In a medium saucepan over medium heat, warm the milk, sugar, coffee beans, vanilla pod and seeds, salt, and ½ cup cream until steaming but not boiling. Remove the pot from the heat, cover, and steep for 1 hour at room temperature.

2. Fill a large bowl one-third full of ice water. Set a medium bowl in the larger bowl and set a fine-mesh strainer in the medium bowl.

3. Reheat the milk mixture over medium heat until steaming. Meanwhile, in a small bowl, whisk the egg yolks. When the milk it hot, very slowly pour it into the yolks, whisking constantly. Once about half the milk is mixed into the yolks, pour the egg mixture into the remaining milk in the pot. Heat over medium heat, whisking constantly, until the mixture thickens enough to coat the back of a spoon, 5-6 minutes.

4. Pour the custard through the fine-mesh strainer into the medium bowl set over ice. Add the remaining ½ cup heavy cream and the vanilla. Let the custard cool to room temperature, stirring occasionally. Cover and refrigerate until cold.

5. Freeze the ice cream custard in your ice cream maker according to the manufacturer’s instructions. Once frozen to the consistency of a thick custard (not as thick as the soft serve consistency you’d look for in American ice cream), transfer the ice cream to a chilled bowl and freeze until firm.

coffee gelato 6

shrimp and crab avocado salad

shrimp avocado salad 4

It never fails that I plan lettuce-based salads for dinner on nights when I want something light and quick, forgetting, every time, that the time-consuming part of cooking isn’t waiting for onions to sauté or sauces to simmer, it’s preparing your ingredients. And the process of making salad is almost entirely chopping. And if you’re like me and you like your main dish salads with a lot of components, the time it takes to prepare each one can really add up.

shrimp avocado salad 1

This salad required slicing shrimp in half lengthwise (I’m not sure why I bothered with this and I don’t recommend that you do), dicing avocado, picking crab out of its shell, and mixing up the dressing. And then cooking bacon at the last minute because I forgot about it earlier (I don’t recommend you do this either). It doesn’t sound like much when I say it that way, but it sure felt like a lot after an early morning run, a full workday, and a big grocery shopping trip.

shrimp avocado salad 2

You must already know that it was worth the effort or I wouldn’t tell you about it. Truly, I loved this salad and will certainly make it again – but only when I have plenty of time, or at least energy, to spare.

shrimp avocado salad 5

One year ago: Creamy Taco Mac
Two years ago: Pasta with Goat Cheese and Asparagus
Three years ago: Honey Peach Ice Cream
Four years ago: Croque Madame

Printer Friendly Recipe
Shrimp and Crab Avocado Salad (adapted from Maggiano’s)

Serves 2

Dressing:
2 tablespoons lemon juice
1 teaspoon mayonnaise
½ teaspoon mustard
¼ teaspoon salt
pinch pepper
2-3 tablespoons extra virgin olive oil

Salad:
2 slices bacon
½ pound cooked, peeled shrimp
1 cooked king crab leg, shelled
1 avocado, peeled and diced
4 cups lettuce (about 8 ounces), torn into bite-size pieces

1. In a small bowl, whisk the lemon juice, mayonnaise, mustard, salt, and pepper. Slowly pour in 2 tablespoons of olive oil, whisking continuously. Taste the dressing by dipping a bite-size piece of lettuce into it, then add more oil to taste, if desired.

2. In a small skillet, cook the bacon over medium heat until crisp. Remove from the pan and break into small pieces.

3. Combine the shrimp, crab, and avocado in a medium bowl. Add 1 tablespoon of the dressing; toss to coat. Transfer the lettuce to a separate large bowl (or in individual serving bowls); mix with the remaining dressing. Top the lettuce with the shrimp mixture and distribute the bacon over the salad. Serve immediately.

shrimp avocado salad 6

coconut cream pie (tom douglas)

coconut cream pie 5

My rules of thumb for ordering food in restaurants – get the restaurant’s specialty, if it has one, and don’t get anything I could easily make at home – failed me when I went out for dessert with Brady, Nicole, Joelen, Jessica, and another friend we met at BlogHer Food. (Hillary – get yourself a blog, would you?) I considered the coconut cream pie, but passed it over because I had no idea that it was A Thing at that restaurant. The rhubarb rose sorbet sounded great too, but I went with the lemongrass frozen yogurt. It sounded interesting, but it wasn’t. It tasted like sweetened frozen milk and was nice; not thrilling, but nice.

coconut cream pie 1

The bites I stole of Brady and Joelen’s coconut cream pie, however, were thrilling. Silky custard, mounds of whipped cream, crisp crust. How was something so basic as coconut cream pie knocking my socks off? We were all excited later when we found the recipe online. We could create this perfection ourselves!

coconut cream pie 3

But, the pie I made was not the pie I kept stealing bites from at the restaurant. The crust might have been the same, and the simple whipped cream certainly was, but my pastry cream seemed off. For one thing, I don’t remember shreds of coconut within the pastry cream at the restaurant. For another, I have my doubts about using flour as the thickener in pastry cream instead of cornstarch. I tried it because I was curious, but in the end, I prefer the silkiness of cornstarch compared to the pastiness of flour used in pastry cream.

coconut cream pie 2

The fully assembled pie was a thing of beauty, with its golden crust and mounds of whipped cream. But when I removed a slice, the sloshy unset filling flowed in to fill the gap, so that if it weren’t for the missing rim of crust, you’d never know there was a slice missing. This pie, good as it was, seemed different from the one we had at the restaurant. Or maybe it’s just that nothing can come close to the memory of sharing desserts with five friends in Seattle.

coconut cream pie 9

One year ago: Date Nut Loaf
Two years ago: Dressy Chocolate Cake
Three years ago: Strawberries and Cream Pie
Four years ago: Pigs in a Blanket

Printer Friendly Recipe
Triple Coconut Cream Pie (adapted from Tom Douglas)

Makes one 9-inch pie

Shredded coconut in the crust was an interesting idea that I enjoyed, but for the filling, I prefer this recipe.

Crust:
1 cup plus 2 tablespoons (5.4 ounces) all-purpose flour
½ cup (2.1 ounces) sweetened shredded coconut
2 teaspoons sugar
¼ teaspoon salt
½ cup (1 stick) cold unsalted butter, cut into ½-inch cubes
⅓ cup ice water, or more as needed

Pastry cream:
½ cup heavy cream
1½ cups whole milk
2 cups sweetened shredded coconut
1 vanilla bean, halved lengthwise, seeds scraped out and reserved
¼ teaspoon salt
2 large eggs
½ cup plus 2 tablespoons (4.4 ounces) sugar
3 tablespoons all-purpose flour
¼ cup (½ stick) unsalted butter, softened

Assembly:
2 cups heavy whipping cream, chilled
¼ cup (1.75 ounces) sugar
1 teaspoon pure vanilla extract
2 ounces unsweetened “chip” or large-shred coconut
Chunks of white chocolate (4 to 6 ounces, to make 2 ounces of curls)

1. For the crust: In a food processor, pulse to combine the flour, coconut, sugar, and salt until combined. Add the diced butter; pulse until the butter is broken into pea-sized bits, 6-8 one-second pulses. Stop the machine and pour in about half of the water; pulse twice, then add the remaining water. Pulse 3-4 more times, then test the dough by gently pressing it between your fingers; it should just hold together; if it doesn’t, add a couple teaspoons water and pulse to combine again. Line a wide, shallow bowl with a large sheet of plastic wrap; transfer the dough to lined bowl. Pull the plastic wrap around the dough, then flatten it to a round about 1-inch high. Chill for 30 minutes to an hour before rolling. (The dough can be prepared a day in advance, and stored, wrapped tightly, in the refrigerator.)

2. Unwrap the round of dough and place it on a lightly floured work surface. Dust the dough lightly with flour, then cover with a sheet of plastic wrap. Roll the dough into a 12- to 13-inch circle about ⅛-inch thick, adding more flour if it begins to stick. Transfer the rolled dough onto a 9-inch pie pan. Trim any excess to a 1- to 1½-inch overhang. Turn the dough under along the rim of the pie pan and use your fingers to flute the edge. Cover with plastic wrap and chill the unbaked pie crust at least an hour before baking.

3. Heat the oven to 400°F. Place a sheet of aluminum foil or parchment paper in the pie crust and fill the cavity with dried beans or pie weights. Bake the crust until the edge is just golden, 20 to 25 minutes. Remove the pan from the oven, lift off the foil and weights, and return the crust to the oven. Bake until the bottom of the crust shows golden-brown patches, 10 to 12 minutes more. Transfer the crust to a cooling rack and cool completely before filling.

4. For the pastry cream: In a medium saucepan, combine the heavy cream, milk, coconut, vanilla seeds and pod, and salt. Place the saucepan over medium-high heat and stir the mixture occasionally until it begins to steam and tiny bubbles start to form around the pan’s edges. (But don’t let it come to a boil.) Remove the pan from the heat.

5. In a medium bowl, whisk together the eggs, sugar, and flour until well combined. Whisking continually, slowly add about one-third of the scalded milk into the egg mixture. Pour the warmed egg mixture to the milk and coconut mixture in the saucepan. Place the pan over medium-high heat and whisk until the mixture thickens and begins to bubble. Keep whisking until the pastry cream is very thick, 4 to 5 minutes more. Remove the saucepan from the heat. Add the butter and whisk until it melts. Remove and discard the vanilla pod. Transfer the pastry cream to a bowl, then place it over another bowl filled with ice water. Stir occasionally until it is cool. Place a piece of plastic wrap directly on the surface of the pastry cream to prevent a crust from forming, and refrigerate until cold, about an hour. The cream will thicken as it cools.

6. To finish the pie: Heat the oven to 350°F. Spread the coconut chips over a baking sheet. Bake the chips, stirring once or twice, until lightly browned, 7 to 8 minutes. Meanwhile, use a vegetable peeler to shave about 2 ounces of the white chocolate into curls.

7. Pour the chilled pastry cream over the prebaked pie crust, smoothing the surface with a spatula.
In an electric mixer fitted with whisk attachment, beat the heavy cream with the sugar and vanilla on medium speed. Gradually increase the speed to high, and whip to peaks that are firm enough to hold their shape. Spread the whipped cream over the surface of the pie. Just before serving, decorate the pie with the toasted coconut and white chocolate curls.

coconut cream pie 6

simple post processing

handouttop – before; bottom – after

For as much as I like to look at pretty pictures of food – perfectly composed, artfully styled, brightly lit – I don’t like to spend much time taking them myself. I like to get in and get out, then get on with the eating. Sometimes this means my photos aren’t perfect; the white balance could be off, or there’s an ugly sauce drip in the shot, or my chosen background doesn’t quite fill the frame. I could spend another few minutes fussing with the styling, or I could eat my dinner and fix the photo later with software.

ravioli
top – before; bottom – after

Years ago, when I was poor and unemployed, I started out using the free post processing software GIMP. I started using Photoshop a couple years ago when I got it as a gift, but if I edit photos on my lunch hour at work, I’ll use web-based programs, either Pixlr or PicMonkey, which are also free. The free programs are more than adequate for the simple post processing that I do. Still, each has their strengths and weaknesses, which was the subject of the talk Brady and I gave at BlogHer Food in Seattle. Brady has the downlow on the various programs, and I’ll tell you what basic steps I use to edit a photo using any of those programs.  (Click on any of the photo sets to see a larger version.)

intro salad
top – before; bottom – after

1) The first thing I always do is save a copy of the photo. You don’t want to go making a bunch of changes to a photo only to realize later that it looks like crap, but you can’t go back and start over because you didn’t save the original.

2) Then, if the photo is a little crooked, I rotate it slightly until it’s straight. Every program has a different method for straightening, but the best ones (and all that Brady describes in her post on free photo editing software programs) let you base the rotation on what should be a straight line in the photo.

straighten
top – before; bottom – after

3) You’ll always need to crop a photo after it’s been rotated, to square off the edges. Some programs do this automatically, but I prefer to choose my own crop after straightening a photo. I also often need to crop photos that are taken from above, because sometimes I don’t bother to look through the viewfinder for those; I just hold the camera above the subject and snap away until I capture everything I want in the frame. I almost always keep my photos the same dimensions as the original, although this is just a personal preference.

crop
top – before; bottom – after

4) Once you have the photo framed how you want it, resize it for your blog. Photos that are being posted online don’t need resolution as high as those that are being printed, so there’s no advantage to uploading a large photo that your blog host will automatically resize. In fact, this will slow down your site. Even worse, your hosting site doesn’t have a sophisticated method of resizing and might make your photo look dull and out of focus.

resize
left – resized incorrectly; bottom – resized correctly (photos taken by Brady)

5) Cloning lets you stamp part of a photo over another part that you want to erase. You probably won’t use this often, but it’s a handy tool to have (especially if you realize later – much later, like after you post it on your blog and a commenter points it out – that your photo has a fly in it, not that I personally had this happen or anything…).

clone
top – before; middle – process; bottom – after

6) Smudge lets you smear a portion of the photo into another part of the photo, like fingerpainting. I use this occasionally to fill in corners when my background doesn’t entirely fill the frame.

smudge
top – before; middle – process; bottom – after

7) Curves and levels are two ways of doing the same thing, adjusting the exposure of your photo. In both, most programs will show you a histogram, which represents how dark or light your photo is; the left edge of the histogram represents black pixels, the right edge white pixels. If you grab the top right end of the diagonal line and drag it toward the center of the histogram, the photo becomes brighter; but if you go too far, you risk blowing out light parts of the photo. You can also drag the bottom left end of the line to make the darks darker, and you can add as many points as you’d like in between the two ends of the line to drag up or down to adjust the brightness and contrast however you like.

curves
top – unadjusted histogram; bottom – adjusted histogram

8 ) Levels is largely the same – same histogram, same method of adjusting the whites and the blacks. The difference is that, in levels, you can only adjust one mid-point instead of however many points as you want to add, like you can in curves.

curves 2
top – before; bottom – after

9) Color balance, or white balance, corrects slight tints in the color of the photo. Even when I set the white balance in my camera, it still tends to tint the photo just slightly blue, or cool. The final version of this poached egg with yogurt hollandaise is much closer to the true colors.

color balance
top – before; bottom – after

10) I don’t adjust saturation of food photos often, but if a photo has a lot of bright colors in it, a slight increase in the saturation can bring those out. You have to be careful though, because it’s easy to go overboard. I’m actually not sure what happened with the photo of the strawberry ice cream tarts to make them look so drab, but increasing the saturation was an easy solution to make them look natural again.

saturation
top – before; bottom – after

11) The last thing you should do with your photo is sharpen it up a bit. And the first thing you should know about sharpening is that it doesn’t fix unfocused photos. This photo of muffins, in which the fiber of the placemat is in focus and not the coconut garnish, cannot be fixed.

sharpen not

What sharpening can do is make focused photos a little more crisp. All digital photos are less sharp than film photos, because they’re based on a limited number of pixels. Sharpening corrects for this.

sharpen
top – before; bottom – after

Almost certainly, you won’t use all of these steps for every photo. You might find that some of these steps aren’t useful for you at all. But, surely, every photo will need to be opened in a post processing program and changed in some way, even if it’s just resizing it for your blog. If you’re looking for free photo editing software and don’t know which is the best program for you, check out Brady’s post to help you choose.

fresca
top – before; bottom – after

One year ago: Bourbon Ice Cream
Two years ago: Rice and Peas
Three years ago: Pork Tenderloin with Rhubarb Sauce
Four years ago: Cappuccino Cream Puff Rings

PS – If you download the GIMP and find yourself overwhelmed, email me and I’ll send you some detailed instructions I wrote out a few years ago.

strawberry rhubarb pie

strawberry rhubarb pie 9

My parents have a cabin in the mountains in Colorado, where they have a neighbor who is officially a Mountain Man, with a long scraggly beard, horses running around on his property, and the requisite amount of woman trouble. One day the Mountain Man and I got to talking about pie. He declared that pie is simple – it’s a mixture of fruit, flour, and sugar baked in a crust. I don’t recall whether we discussed his crust recipe, but I have to believe it comes from a vacuum-packed tube.

strawberry rhubarb pie 10

While I can agree that fruit pies are, at their most basic, a mixture of fruit, sugar, and thickener, I would disagree that that makes them simple. In fact, it makes them particularly tricky. First, the best thickener for each fruit varies – is it flour, cornstarch, tapioca, or something impossible to find in the average grocery store? Second, and worse, is that the perfect amount of thickener will vary depending on how ripe the fruit is. Exceptionally juicy peaches will need more thickener (and less sugar) than just barely ripe peaches.

strawberry rhubarb pie 1

I’ve gotten strawberry rhubarb pie wrong at least as often as I’ve gotten it right. Cook’s Illustrated has a recipe for it that starts with sautéing the rhubarb with sugar to get rid of some of the excess liquid. I did make an awesome pie with this recipe, but it resulted in the worst burn I’ve ever had when a chunk of super hot sugar-coated rhubarb landed on my foot. Plus it’s a hassle – who wants to deal with pre-cooking the filling in addition to rolling out dough and chopping filling ingredients?

strawberry rhubarb pie 3

I tried Deb’s recipe last year, which calls for tapioca as the thickener, but didn’t like the bits of gelatinous tapioca mixed with the fruit filling. I thought the answer was grinding the tapioca to a powder with a spice grinder (aka repurposed coffee grinder) until I saw Cook’s Illustrated comment (in The New Best Recipe) that tapioca and rhubarb don’t make a great pair. I happen to have arrowroot powder in the cabinet, so I used that instead.

strawberry rhubarb pie 5

And what I got was a perfect strawberry rhubarb pie. When the first slice was removed, the filling didn’t flow in to fill the void, but it wasn’t dry. It was just sweet enough. I didn’t use flour in the filling, but I still think that even Mountain Man would approve.

strawberry rhubarb pie 6

One year ago: Whole Wheat Almond Bread
Two years ago: Jamaican Jerk Chicken
Three years ago: Strawberry Tartlets
Four years ago: Deep Dark Chocolate Cookies

Printer Friendly Recipe
Strawberry Rhubarb Pie (adapted from Smitten Kitchen)

I used Deb’s recipe for pie crust.

If you can’t find arrowroot powder, use ¼ cup of tapioca, ground in a spice grinder.

Baking the pie on a baking sheet catches any drips; preheating the baking sheet helps the bottom crust become crisp and flaky instead of soggy.

dough for a double-crust pie, rolled into two 13-inch circles and refrigerated
½ cup + 2 tablespoons (4.4 ounces) granulated sugar
¼ cup (1.75 ounces) light brown sugar
¼ cup arrowroot powder
¼ teaspoon salt
24 ounces (about 3½ cups) rhubarb, sliced ½-inch thick
16 ounces (about 3½ cups) strawberries, hulled and sliced if big, halved if small
1 tablespoon lemon juice
1 tablespoon unsalted butter, cut into small pieces
1 egg beaten to blend with ¼ teaspoon salt (for glaze)

1. Place a rimmed baking sheet on the middle rack of the oven; heat the oven to 400 degrees.

2. In a large bowl, mix the sugars, arrowroot powder, and salt. Add the rhubarb, strawberries, and lemon juice; stir to combine well.

3. Line a 9-inch pie plate with one round of dough. Transfer the filling to the lined pan. Scatter pieces of butter over the fruit. Top with the second round of dough, sealing and fluting the edges. Cut 8 slits in the top crust and brush with the egg wash.

4. Transfer the pie to the hot baking sheet. Bake for 20 minutes, then reduce the oven temperature to 350 degrees; bake for an additional 25 to 30 minutes, or until the top crust is golden brown and the filling is bubbly.

5. Transfer the pie to a wire rack and cool at least 4 hours before serving.

strawberry rhubarb pie 8

blogher food 2012

market sign

When Brady approached me about collaborating on a proposal to speak at the BlogHer Food conference in Seattle, I didn’t think twice – because I didn’t think there was a chance in hell that two small-time bloggers like us would ever be chosen to speak. When I got the much-exclamation-pointed text message from her that we’d been accepted, it became a whole new ballgame, one requiring booking flights, splitting hotel rooms, and using precious vacation time, not to mention hours spent preparing for our session. I was interested to attend the conference, but not quite as excited as I felt I should be.

clams

What I felt instead was anxious. Even now, I can’t pinpoint why. Of course public speaking is nerve-wracking, but I’ve done it loads before and was confident in myself. Traveling alone is extra hassle but not entirely unpleasant. I think, if I had to choose one thing that was stressing me out, it would be three days of constant socializing. From rooms full of strangers to sharing a hotel room with someone I’d met in person only once before, it sounded exhausting.

crab

And it was. It was also the most fun I’ve had in ages. It was nonstop talk about food and photography and websites, nonstop exchanging of business cards, nonstop twitter updates, nonstop sightings of people you’d previously only seen on a computer screen. It was learning and teaching and eating, and yes, constant socializing.

storytelling session

I solidified some friendships and began others. “Internet friends” became “IRL friends”. I met representatives from some of my favorite companies. I discovered new blogs and found people I’d like to work with in the future. I kissed a fish.

fishthanks, Brady, for letting me use this picture!

I picked up some food styling tricks and was reminded that I need to get a backup set up for my blog (asap!). I realized that shooting a video will take a lot more equipment than I have now. I was encouraged to think more about what I write compared to what I like to read. I discovered that Brady and I make a great team well beyond planning and delivering a session on the post processing of food photos. And most importantly, I left feeling like a socializing superstar, confident and happy and eager to apply all of the lessons of the weekend. But exhausted nonetheless.

before closing party
brady on the left, me on the right being bossy – it’s what I do best

One year ago: Chicken Gyros
Two years ago: Raisin Swirl Bread
Three years ago: Strawberry Cake (comparison of two recipes)
Four years ago: Poached Eggs over Arugula with Polenta Fingers

roasted rhubarb jam

rhubarb jam 7

One of the things I’m trying to do with my rhubarb surplus this year is not mix it with strawberries. (Please disregard this statement when my next post is strawberry rhubarb pie.) It isn’t that I have anything against strawberries and rhubarb together. Those two are often paired up for reasons beyond their aligned seasons. Sweet strawberries are a natural match for sour rhubarb.

rhubarb jam 3

But now that I’m starting to realize how much I enjoy rhubarb for its own merit, I want to use it more often by itself. Mixing it into batter for muffins was a good start, but a simple mostly-hands-off jam is an even more direct way to enjoy rhubarb. All it takes is cutting it up, mixing it with sugar, and giving it a few stirs while the oven softens and sweetens the stalks.

rhubarb jam 4

I used a spatula to mash up the roasted rhubarb, but if you wanted something smoother, you could puree it in a food processor or press it through a food mill. The chunky version would go wonderfully with tart plain yogurt, especially with some crunchy granola on top. And I can guarantee that it makes the perfect topping for brown rice pudding – along with some sliced strawberries, of course.

rhubarb jam 9

One year ago: Grapefruit Honey Yogurt Scones
Two years ago: Croissants (Martha Stewart’s recipe)
Three years ago: Rhubarb Scones
Four years ago: La Palette’s Strawberry Tart

Printer Friendly Recipe
Roasted Rhubarb Jam (from hogwash)

2 pounds rhubarb, cut into 1-inch pieces
½ cup (3.5 ounces) sugar
Pinch salt

Adjust a rack to the middle position and heat the oven to 400 degrees. In a 9-by-13-inch dish, mix the ingredients. Bake them, uncovered and stirring occasionally, until the rhubarb is soft enough to mash into a spread, about 1½ hours.

rhubarb jam 8

brown rice pudding

brown rice pudding 5

I’ve taken to eating pudding for breakfast. It was Deb’s idea, and it’s a very good one. After all, if we regularly heat one whole grain with milk to make oatmeal, why not do the same with rice? Somehow, oatmeal feels like winter food. Rice pudding seems lighter, more appropriate for warm temperatures and topping with strawberries.

brown rice pudding 1

This might seem obvious at first – you usually eat oatmeal warm and pudding cold. Except so far, I’ve been eating the rice pudding warm, so it’s more like rice porridge I suppose. But if I was organized enough, I think making it the night before and chilling it would not only save time in the morning, but make a great cool breakfast for the 100+ degree days we’ve been having around here.

brown rice pudding 2

Eating dessert for breakfast isn’t anything new – who hasn’t indulged in a slice of leftover cake with their morning coffee? But that isn’t what this is about. By using brown rice instead of white and reducing the sugar, rice pudding is actually full of fiber and protein instead of empty calories. Rice pudding has never been my favorite dessert, but it’s starting to become one of my favorite breakfasts.

brown rice pudding 3

One year ago: Brown Sugar Blueberry Plain Cake
Two years ago: Tender Shortcakes
Three years ago: Cappuccino Muffins
Four years ago: Baba Ghanoush, Falafel, and Hummus

Printer Friendly Recipe
Brown Rice Pudding
(adapted from Joy the Baker)

Serves 4 to 6

This is a basic recipe that you can add all sorts of goodies to, from dried fruit and nuts to spices or a swirl of jam.

If you plan to serve this for dessert instead of breakfast, double both the sugar and the honey.

1 cup brown rice, rinsed
½ teaspoon salt
4 cups whole milk
1 tablespoon sugar
1 tablespoon honey
½ vanilla bean, split open (or 1 teaspoon vanilla extract)

1. Bring 4 cups of water to a boil over high heat. Add the rice and salt; reduce the heat to medium and simmer, partially covered, for 30 minutes. Drain the rice in a strainer and return it to the pot, off the heat. Cover tightly and let set for 10 minutes.

2. Add the milk, sugar, honey, and vanilla bean to the pot with the rice. (If you’re using vanilla extract, add it just before serving.) Bring the mixture to a simmer over medium-high heat, then reduce the heat to medium-low. Simmer until the milk is reduced and the rice is creamy, about 30 minutes. If you’re using vanilla extract, stir it in now. If you’re planning to eat the pudding warm, serve it now. If you’re planning to eat it cold, transfer it to serving dishes to chill.

brown rice pudding 4

rhubarb muffins

rhubarb muffins 4

Year after year, rhubarb shows up at the grocery store, and I take note to come up with a recipe so I have a reason to buy it next time I’m at the store. And then I forget, and I see it at the store, and I swear that next time I’ll remember – and so it goes on, until rhubarb season is over. Not this year. This year, I am buying rhubarb every time I see it at the store and figuring out what to do with it later. And since I go there at least twice a week, that’s a lot of rhubarb.

rhubarb muffins 1

Now that rhubarb is a basically a staple around here, I’m free to try all sorts of recipes with it, from coffee cake to jam to pie to muffins. The coffee cake and the muffins were too similar to share both, and while my coworkers certainly seemed to appreciate the cake, I think the muffins were even better. Best of all, at least when you really want to soak up your brief opportunity for rhubarb, it’s a simple muffin with no distractions. It’s moist but craggy, like a muffin – not a cake – should be. The Greek yogurt (or sour cream) adds a zip of tang, just the right complement to the tart pockets of rhubarb.

rhubarb muffins 2

As good as the muffins are though, I can guarantee I won’t be making them again this year, not when I’ve already found several other tempting rhubarb recipes. Plus I still need to make my favorite rhubarb scones. Fortunately, with as much rhubarb as I’m buying this year, I might actually get to all the recipes I want to make.

rhubarb muffins 8

One year ago: Caramel Pots de Crème
Two years ago: Eggs in Tomato Sauce
Three years ago: Anadama Bread
Four years ago: French Chocolate Brownies

Printer Friendly Recipe
Rhubarb Muffins (slightly adapted from Fine Cooking)

Healthy tricks I almost always use with quick breads: Replace half of the white flour with whole wheat pastry flour. Replace sour cream with Greek yogurt. Replace 4 tablespoons of the butter with 2 tablespoons of oil, which keeps the bread moist (but leaving 4 tablespoons of butter in the recipe keeps it tasting great).

Usually I assume 4.8 ounces (by weight) per cup of flour, but the original recipe included weight measurements with flour at 4.5 ounces per cup. As always, if you can measure by weight, do it.

9 ounces (2 cups) all-purpose flour
2½ teaspoons baking powder
½ teaspoon baking soda
½ teaspoon table salt
½ teaspoon cinnamon
2 large eggs
¾ cup (5.25 ounces) granulated sugar
1 cup sour cream
8 tablespoons (1 stick) unsalted butter, melted and cooled slightly
1 teaspoon pure vanilla extract
1½ cups (7.25 ounces) ¼-inch-diced rhubarb

1. Position a rack in the center of the oven and heat the oven to 400 degrees. Line a 12-cup muffin tin with paper or foil baking cups.

2. In a large mixing bowl, combine the flour, baking powder, baking soda, cinnamon, and salt and whisk to blend. In a medium bowl, whisk together the eggs, sugar, sour cream, melted butter, and vanilla until smooth. Lightly stir the sour cream mixture into the dry ingredients with a spatula until the batter just comes together; do not overmix. Gently stir in the diced rhubarb. The batter will be thick.

3. Divide the batter among the muffin cups, using the back of a spoon or a small spatula to settle the batter into the cups. The batter should mound a bit higher than the tops of the cups.

4. Bake the muffins until they’re golden brown, spring back most of the way when gently pressed, and a pick inserted in the center comes out clean, 18 to 22 minutes. Transfer to a rack and let the muffins cool in the pan for 5 to 10 minutes. Carefully lift the muffins out of the pan—if necessary, loosen them with the tip of a paring knife—and let them cool somewhat. Serve warm.

rhubarb muffins 5