Archives for August 2012

orange vanilla creamsicle whoopie pies

creamsicle whoopie pies 5

I brought pumpkin whoopie pies to a company picnic a couple years ago, and my coworkers got quite a kick over the name. So you’ll forgive me if the post-it next to these in the office kitchen said “orange vanilla creamsicle sandwich cookies”, with no mention of whoopie. I didn’t need the giggles today.

creamsicle whoopie pies 2

I’m not sure if these are more whoopie pie or more sandwich cookie anyway. The cookie part ended up on the chewy side, not as tender and fluffy as the traditional cakey whoopie pie. At least it seemed that way to me fresh out of the oven.

creamsicle whoopie pies 4

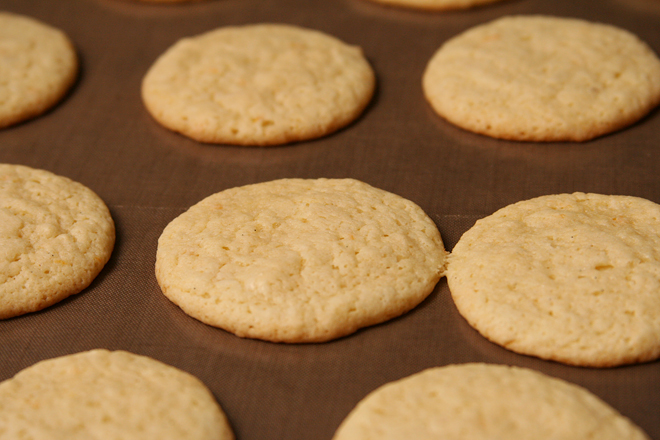
Sandwiched with cream cheese frosting and left overnight in the fridge, they seem to have become more cakey, because the several coworkers I quizzed about whether these seemed more cookie-like or more cake-like guessed cake. (They didn’t seem excited about the pop quiz, but they passed with flying colors.) More importantly, they raved, so whoopie pies or sandwich cookies, it doesn’t matter; all that matters is how good they are.

creamsicle whoopie pies 6

One year ago: Blueberry Barbecue Salmon
Two years ago: Rhubarb Crumb Coffee Cake
Three years ago: Quick Baking Powder Pizza Crust
Four years ago: Mashed Potatoes with Kale

Printer Friendly Recipe
Orange Vanilla Creamsicle Whoopie Pies (adapted from Culinary Concoctions by Peabody)

Makes about 3 dozen sandwiches

If you have vanilla sugar, use that!

I am a food blogger failure and used cream cheese frosting that I’ve had in my freezer for months, doctored up with vanilla seeds.

Cookies:
3½ cups (16.8 ounces) all-purpose flour
1¼ teaspoon baking soda
1¼ teaspoon baking powder 2 cups (14 ounces) sugar
zest from 2 oranges
12 tablespoons unsalted butter, room temperature
½ teaspoon salt
1 vanilla bean, seeds scraped
½ cup sour cream
2 eggs, room temperature

Filling:
3 ounces cream cheese
3 tablespoons unsalted butter
1 vanilla bean, seeds scraped
pinch salt
1½ cups (6 ounces) powdered sugar
1 teaspoon vanilla extract

1. For the cookies: Adjust an oven rack to the middle position; preheat the oven to 350 degrees. Line two baking sheets with parchment paper or silicone mats. In a medium bowl, whisk together the flour, baking soda, and baking powder.

2. In a stand mixer fitted with the paddle attachment (or a large mixing bowl with a hand mixer), beat the sugar and orange zest on medium speed until fragrant, about a minute. Add the butter, salt, and vanilla seeds; continue beating until fluffy, about 2 minutes. Beat in the sour cream. Add the eggs, one at a time, beating to incorporate each addition. Reduce the mixer speed to low, and gradually add the flour mixture, beating just until combined.

3. Spoon (or pipe) the batter in 1 tablespoon rounds on the prepared baking sheets, leaving 2 inches between rounds.

4. Bake until the tops of the cookies don’t look wet and the bottoms just begin to brown, 8-12 minutes. Cool for 2 minutes on the cookie sheet before transferring the cookies to a wire rack to cool completely.

5. For the filling: Add the cream cheese, butter, vanilla seeds, and salt to a clean mixer bowl and beat until smooth. Gradually add the powdered sugar, beating until smooth. Beat in the vanilla extract.

6. To fill, dollop (or pipe) the filling onto the flat sides of half of the cookies. Top with the remaining cookies, flat sides down. Serve immediately, or cover tightly and store in the refrigerator for up to 2 days, bringing to cool room temperature before serving.

creamsicle whoopie pies 8

barbecue cowboy beans

cowboy beans 7

I feel like I should wait and do a comparison post with this recipe, because I have a friend who makes some seriously good cowboy beans. Hers are full of meat with a dominant sweet flavor. They’re always one of my favorite dishes on the potluck table.

cowboy beans 2

For my own version though, I wanted something lighter to serve as a side dish to barbecued ribs. When you’re spending hours cooking big slabs of meat, you don’t really need ground beef in your side dish. A few slices of bacon provide plenty of meaty depth, combined with sweet-bitter molasses and a slew of acidic ingredients like ketchup and beer.

cowboy beans 3

To be honest, I’m not sure what makes a pot of beans “cowboy” instead of just “baked.” A lot of recipes contain ground meat, but not all of them. This is the only one with spicy chiles. But honestly, I don’t much care. What matters most is that these are perfect along barbecued meat, and if I want a chile-less, meatier version, I can have that too.

cowboy beans 4

One year ago: Grilled Pita Breads
Two years ago: Whole Wheat Bagels
Three years ago: Amaretto Cheesecake
Four years ago: Blackberry Swirl Ice Cream

Printer Friendly Recipe
Barbecue Cowboy Beans (adapted from Something Edible)

Serves 6

If you don’t want to buy two kinds of beans, feel free to choose one or the other.

I didn’t use the liquid smoke because I didn’t have any, so I can’t attest to how it affects the beans. I doubt adding smoky flavor would be a bad thing though.

6 ounces (about 1 cup) dry pinto beans, rinsed and sorted
2 ounces (about ⅓ cup) dry kidney beans
salt
6 slices (about 6 ounces) bacon, chopped
½ medium onion, chopped
2 cloves garlic, minced
1 teaspoon allspice ground
½ teaspoon ground coriander
½ teaspoon ground black pepper
1 teaspoon dry mustard
¼ cup beer
1 (10-ounce) can diced tomatoes with chiles
¼ cup ketchup
¼ cup molasses
1 tablespoon cider vinegar
1 teaspoon hickory liquid smoke (optional)

1. Heat the oven to 300 degrees. Place the beans and 1 teaspoon salt in a 5-quart Dutch oven; add enough water to cover the beans by 1½ inches. Bring the water to a boil over medium-high heat, then cover the pot and transfer it to the oven. Cook for 75 minutes, until the beans are tender. Drain the beans. Increase the oven temperature to 400 degrees.

2. Add the bacon to the now-empty Dutch oven. Cook over medium heat until fat begins to render, 3-4 minutes. Add the onion and cook, stirring occasionally, until softened and translucent, 5-6 minutes. Add the garlic, allspice, coriander, black pepper, and mustard; cook, stirring constantly, until fragrant, about 1 minute. Add the beer and scrape the bottom of the pot to release the browned bits. Add the tomatoes and chiles with their juice, the ketchup, molasses, cider vinegar, liquid smoke (if using), and 1 teaspoon salt. Bring to a simmer over medium-high heat.

3. Cover and transfer the beans to the oven. Bake for 4 hours. Serve.

cowboy beans 5

grilled shrimp and tomatillo enchilada casserole

shrimp enchiladas 7

I made this at the end of one of those days that felt like I’d spent entirely too much time in the kitchen creating messes and then cleaning them up. The last thing I wanted was yet another project that would lead to yet another load of dishes. I needed to simplify.

shrimp enchiladas 1

And so I did. As long as I was already grilling the tomatillos for the sauce, I went ahead and grilled…everything. The shrimp and onions that were intended to be sautéed on the stove, the tortillas that would have needed steaming (or frying) to roll. And forget rolling – I gave up on rolling tortillas for enchiladas years ago when I got lazy. Now I just create layers of filling and tortillas, like a chile-filled corny lasagna.

shrimp enchiladas 4

I don’t know if it was despite the shortcuts or because of them, but this is one of the favorite meals I’ve made lately. I was surprised that no single ingredient stood out – the dish didn’t taste particularly shrimpy or oniony or cheesy. I thought for a second that this meant I should have added more shrimp (or onions or cheese), but then I realized that it would be hard to improve on what I had. Especially considering that it hardly dirtied more dishes than the baking pan.

shrimp enchiladas 10

One year ago: Sweet Corn Hash
Two years ago: Penne alla Vodka
Three years ago: Pasta with No-Cook Tomato Sauce and Fresh Mozzarella
Four years ago: Country Egg Scramble

Printer Friendly Recipe
Grilled Shrimp and Tomatillo Enchilada Casserole (adapted from Bon Appétit via Confections of a Foodie Bride)

Serves 6

I used 2 ounces of roasted, peeled, and seeded Hatch green chiles in place of the jalapeno.

You could probably skip the scallions if you didn’t want to buy them.

½ teaspoon cumin
½ teaspoon chile powder
1 tablespoon olive oil
20 ounces shrimp, peeled and deveined
1 onion, cut into 1-inch cubes
18 corn tortillas
12 ounces (about 8) tomatillos, husks removed
1 jalapeno
2 cloves garlic, unpeeled
2 scallions
½ lime
¼ cup cilantro leaves
salt
12 ounces queso fresco, crumbled

1. Heat the oven to 350 degrees. Spray a 9-by-13-inch pan with nonstick spray. Prepare a grill with a medium-hot side and a cooler side.

2. In a large bowl, combine the cumin, chile powder, and olive oil. Add the shrimp; toss to coat. Thread the shrimp onto skewers. Thread the cubed onions onto skewers. Spray or lightly brush the onions and the tortillas with oil.

3. Grill the skewered onions over the cooler side of the grill until slightly softened and browned on the edges, about 10 minutes. Carefully place the garlic over the cooler side of the grill; heat until softened, about 4 minutes. (If the grill grates are too wide to hold the garlic cloves, skewer them with the onions.) Grill the tortillas over the hotter side of the grill until they begin to brown, about 30 seconds per side. Grill the shrimp on the hotter side until they begin to brown, 1-2 minutes per side. Grill the jalapeno over the hotter side of the grill until it’s blistered and mostly blackened, about 5 minutes, rotating occasionally; when cool enough to handle, remove the stem and seeds. Grill the lime, cut-side down, over the hotter side of the grill until it begins to brown, 2-3 minutes. Grill the scallions, with the white sides over the hotter side of the grill and the green sides over the cool side, until lightly browned, about 1 minute.

4. Remove the shrimp and onions from the skewers and transfer to the bowl of a food processor; process until coarsely chopped; transfer to a bowl. Add the tomatillos, jalapeno, garlic, scallions, juice from the lime, cilantro, and ½ teaspoon salt to the food processor; process until smooth.

5. Spread a thin layer of the tomatillo sauce over the bottom of the prepared pan. Distribute 6 tortillas evenly over the sauce. Top with one-third of the remaining sauce, then half of the shrimp mixture and one-third of the cheese. Repeat the layering of tortillas, sauce, shrimp, and cheese. Distribute the remaining tortillas over the cheese, then the remaining sauce and remaining cheese.

6. Bake, uncovered, until the cheese is browned and the casserole is bubbling around the edges, 30-40 minutes. Let rest 10 minutes before serving.

shrimp enchiladas 9

quinoa black bean burrito bowls

quinoa burrito bowls 5

I know there’s nothing groundbreaking about this combination. Topping black beans and starch with lettuce, tomatoes, and cheese is always going to be good. Still, it’s worth talking about, just because it’s such a tasty meal, not to mention it has all of my other favorite dinner characteristics – it’s healthy, easy, and flexible.

quinoa burrito bowls 1

When I made this, I prepared the quinoa and black bean mixture over the weekend. The next night, when I knew I’d be getting home late, all I had to do was heat up the base and chop the toppings. Not that the first step takes long on its own, as it’s just sauteing onions with garlic and spices, adding liquid and quinoa to simmer, and stirring in black beans. But it’s nice to have meals that aren’t any worse for being made ahead and reheated.

quinoa burrito bowls 2

I’ve put these same toppings in tortillas with meat and beans, as well as over rice instead of quinoa, and it never fails to turn into a meal I love. Adding the fresh vegetables provides a bright, fresh contrast to the warm spicy beans and carbs. Classic flavors, combined in a slightly new way – it isn’t groundbreaking, but it’s one of my favorite new weeknight meals anyway.

quinoa burrito bowls 3

One year ago: Chocolate Friands
Two years ago: Baked French Toast
Three years ago: Potato Tomato Tart
Four years ago: Banana Nutella Crepes

Printer Friendly Recipe
Quinoa Black Bean Burrito Bowls (adapted from Shiksa in the Kitchen via Prevention RD)

Serves 4

I also added about 4 ounces of Hatch green chiles, roasted, peeled, seeded, and diced, when I stirred in the lime juice.

1 tablespoon olive oil
1 onion, diced
¼ teaspoon salt
2 garlic cloves, minced
2 teaspoons chili powder
1 cup water
1 cup quinoa, rinsed and drained
2 (15-ounce) cans black beans, rinsed and drained
juice of ½ lime
toppings – shredded lettuce, diced tomatoes, cilantro, cheddar cheese or queso fresco, diced avocado, salsa, sour cream or Greek yogurt, black olives

In a medium saucepan over medium heat, heat the oil until it flows like water when the pan is tilted. Add the onion and salt; cook, stirring occasionally, until the onion is just browned at the edges, 6-8 minutes. Add the garlic and chili powder and cook, stirring constantly, until fragrant, about 1 minute. Add the water, quinoa, and black beans; bring to a simmer, then cover the pot and reduce the heat to low. Simmer 15 minutes; without removing the lid, let the quinoa sit off the heat for an additional 10 minutes, until tender. Remove the lid, add the lime juice, and fluff the quinoa with a fork. Serve with your desired toppings.

quinoa burrito bowls 4

key lime cheesecake

key lime cheesecake 6

This was the last of my three birthday cakes. That’s right, I got three birthday cakes. The first was the blackberry oreo cake while on vacation with my family, and then I brought funfetti cupcakes to work, and then I made this one for myself to enjoy over my birthday weekend. Making three birthday cakes really takes the pressure off of making the perfect choice. You can have the dramatic, the fun, and the rich. (Okay, I confess that they’re all rich.)

key lime cheesecake 2

Although cheesecake might not seem like a traditional celebration cake, this one, with its four separate layers, is certainly involved enough to qualify. The graham cracker crust and zest-infused cream cheese might be expected, but it’s the layer of curd under the cream cheese that delivers most of the lime pucker. I had some reservations about the sour cream topping, but the sweet-tart coating complimented and balanced the lime and sugar in the other layers.

key lime cheesecake 3

It probably isn’t right to choose favorites, is it? Something went wrong with the funfetti cupcakes, so they don’t stand a chance anyway.  The blackberry oreo cake was tall and colorful and had dark chocolate and bright berries, so there’s no complaints there. But…cheesecake always wins.  If I’m ever confronted with a one-cake birthday again, remind me: cheesecake.

key lime cheesecake 7

One year ago: Spice-Rubbed Picnic Chicken
Two years ago: Whole Wheat Challah
Three years ago: Vegetable Curry
Four years ago: Fruit Bruschetta

Key Lime Cheesecake
Key Lime Cheesecake (from Bon Appétit via epicurious)

I used Key limes, but you can certainly use regular (Persian) limes instead.

The recipe calls for an 8- or 8½-inch round springform pan, but if you only have the more common 9-inch springform pan, you can certainly use that. I made a half recipe, split between a 5-inch round pan and a 3.5-inch round pan.

Crust:
12 whole graham crackers
¼ cup (1.75 ounces) sugar
¼ teaspoon table salt
½ cup (1 stick) unsalted butter, melted

Lime custard:
6 large egg yolks
¾ cup (5.25 ounces) sugar
6 tablespoons fresh Key lime juice
1 teaspoon grated Key lime zest

Filling:
2 (8-ounce) packages cream cheese, room temperature
⅔ cup (4.67 ounces) sugar
¼ teaspoon table salt
2 large eggs, room temperature
3 tablespoons fresh Key lime juice
1 tablespoon grated Key lime zest

Topping:
1 (16-ounce container) sour cream
3 tablespoons sugar

1. For the crust: Preheat the oven to 350 degrees. Spray an 8- to 8½-inch springform pan with nonstick spray. Wrap a layer of foil around the outside of the pan. Place the springform pan in a large baking pan with at least 2-inch sides. Bring 6 cups of water to a simmer; cover to keep warm.

2. In a food processor, process the graham crackers, sugar, and salt until evenly ground. Add the butter and pulse to combine, scraping the sides of the bowl as needed. Press the crumb mixture onto the bottom of the prepared pan. Bake until fragrant and browning slightly around the edges, about 10 minutes. Set aside to cool, maintaining the oven temperature.

3. For the lime custard: In the top of a double boiler or a heatproof bowl set over a saucepan of simmering water, whisk together the egg yolks, sugar, lime juice and zest. Cook, whisking frequently, until thick enough to coat the back of a spoon, about 8 minutes.

4. For the filling: In the bowl of a stand mixer fitted with the paddle attachment (or in a medium mixing bowl with a hand mixer), beat the cream cheese until smooth, about 1 minute. Add the sugar, salt, and lime zest; beat until light, about 2 minutes. Add the eggs one at a time, beating just until each addition is incorporated. Add the lime juice, blending well.

5. Scrape the lime custard over the crust, spreading it into an even layer. Spoon the cream cheese filling over the custard. Add enough of the hot water to the larger baking pan to come 1 inch up the sides of the cheesecake pan. Bake until the middle of the cheesecake is almost set, but not puffed and center moves slightly when pan is gently shaken, about 45 minutes.

6. For the topping: Stir the sour cream and remaining 3 tablespoons sugar in a medium bowl to blend.

7. Remove the hot cheesecake from the oven, leaving it in the baking pan. Carefully spoon the sour cream mixture over the hot cheesecake; let it set a few seconds to soften, then smooth it into an even layer. Bake the cheesecake for 10 more minutes. Transfer it to a wire rack to cool completely, then cover and refrigerate overnight. (Can be made 2 days ahead.) Release the pan sides from cheesecake; serve.

key lime cheesecake 4

chocolate oreo blackberry cake

blackberry oreo cake 6

I know there are bakers out there who are sad when their birthday rolls around and none of their friends offer to bake them a cake, because their friends are all used to the baker making the cakes. Or maybe their friends don’t feel like their cake could ever live up to one of the baker’s cakes. But even if the baker is the one known for their delicious and beautiful birthday cakes, a birthday cake is more than dessert, it’s a gift, so I understand why people are disappointed when no one makes them one.

blackberry oreo cake 8

But I am not one of those bakers. Without family or a large group of friends nearby, my opportunities to make dramatic layer cakes are few and far between. My birthday is one of those rare chances, and I soak it up for all its worth. For me, letting me bake my own cake is the gift.

blackberry oreo cake 9

This year, I did have someone to share that cake with, when my family celebrated my birthday on vacation last week on the beach in Mexico. Vacation baking holds its own challenges, but I can adapt. I did as much as possible at home – mixing up the dry ingredients, measuring and crushing the oreos, and making and freezing the buttercream. The cake itself is an easy one to mix up, no mixer required, but the swiss meringue buttercream needed to be re-whipped after defrosting to restore its smooth and airy texture. My original intention was to smooth the buttercream over the top and sides of the cake and coat the cake with a glossy and dramatic chocolate glaze, but with the scalloped edges of the disposable pans I baked the cakes in, that seemed like a messy prospect. Fortunately, I love the look of an open-sided cake like this.

blackberry oreo cake 11

With eight people to share it with, this cake went fast! It probably doesn’t hurt that chocolate and berries are such a great flavor combination, not to mention that everyone loves moist cake and fluffy frosting. And the best part is that, since my family celebrated early and this cake was gone by my actual birthday, I get to make another cake just for me!

blackberry oreo cake 5

One year ago: Pesto
Two years ago: Banana Peanut Butter Muffins
Three years ago: Lemon Meringue Cake
Four years ago: Black (and Pink) and White Chocolate Cake

Printer Friendly Recipe
Chocolate Oreo Blackberry Cake (cake adapted from Dessert for Breakfast; buttercream adapted from Martha Stewart)

Makes one three-layer 8-inch cake

Note that the 8 ounces of blackberries is before straining. You should end up with about ¾ cup (which is 6 ounces both by weight and volume) of puree.

Cake:
2 cups (8 ounces) cake flour
2 cups (14 ounces) sugar
1 cup (4 ounces) Dutch-processed cocoa powder
1 teaspoon table salt
1 teaspoon baking powder
1 teaspoon baking soda
2 eggs, room temperature
½ cup vegetable oil
1 cup milk, room temperature
1 cup hot coffee

Buttercream:
8 ounces (by weight; about 1¼ cups) blackberries, pureed and strained
3 egg whites
1 cup (7 ounces) sugar
pinch salt
18 tablespoons (2¼ sticks) unsalted butter, at room temperature

For assembly:
18 Oreos, coarsely chopped or crumbled

1. For the cake: Adjust a rack to the middle position and heat the oven to 350 degrees. Grease and flour three 8-inch round pans.

2. In a large bowl, mix the flour, sugar, cocoa, salt, and baking powder, and baking soda. In a separate bowl, mix the eggs, oil, and milk. Pour the wet ingredients into the dry ingredients and whisk until evenly distributed. Pour in the coffee and mix until smooth.

3. Divide the batter evenly between the prepared pans. Bake for 25 to 35 minutes, until a toothpick inserted into the center of a cake comes out clean. Transfer to a wire rack and let the cakes cool for 10 minutes. Use a knife to loosen the sides of the cakes from the pans, then invert the cakes onto the wire rack and remove the pans. Cool completely before frosting.

4. For the buttercream: Combine the egg whites, sugar, and salt in a heatproof mixer bowl set over a pot of simmering water. Whisk until the sugar dissolves and the mixture registers 160 degrees on an instant-read thermometer. Remove the bowl from heat and attach it to a mixer fitted with the whisk attachment. Beat on medium-high speed until stiff peaks form and the mixture has cooled to room temperature, about 8 minutes. Reduce the speed to medium and add the butter, 2 tablespoons at a time, beating after each addition. With the mixer on low, add the strained blackberry puree, mixing just until incorporated. Use immediately, or cover and refrigerate for up to 3 days. (Bring to room temperature, and beat on low speed until smooth before using.)

5. To assemble the cake: If necessary, trim the top of each layer to make a flat, even surface. Transfer one layer to a cake plate or large platter. Spread one-third of the buttercream over the cake, then distribute one-third of the crushed cookies evenly over the buttercream. Repeat the layering of cake, buttercream, and oreos twice more. Serve immediately or loosely cover for up to 8 hours.

blackberry oreo cake 7

mushroom prosciutto lasagna

mushroom prosciutto lasagna 10

So much lies in a name. If you offer me mushroom lasagna, I’ll gladly take a square of earthy dairy-rich pasta. But if you instead are giving away mushroom prosciutto lasagna, I’ll snatch it out of your hand. Roasted portobello prosciutto lasagna? Even better, and I don’t even love portobellos – but something about that more precise label makes it sound even more appetizing.

mushroom prosciutto lasagna 4

That’s how I ended up making a lasagna recipe that isn’t, once you get down to it, all that original. It’s sautéed mushrooms with béchamel, swiss cheese, and pasta, which certainly sounds delicious but, except for possibly the Gruyère, is a fairly standard lasagna filling. The prosciutto, however, is a key factor, because I love that salty, meaty, spiced ham.

mushroom prosciutto lasagna 6

Of course, it was good. How could it not be, with such a track record? It’s not just a name either – roasting the mushrooms (I used cremini instead of portobellos) concentrates their flavor, and the prosciutto adds a great dimension to a lasagna that could have easily ended up bland or overly earthy without it. This lasagna certainly lived up to its enticing title.

mushroom prosciutto lasagna 11

One year ago: Peanut Butter and Jelly Muffins
Two years ago: Yogurt-Marinated Lamb Kebabs
Three years ago: Tortellini Soup with Carrots, Peas, and Leeks
Four years ago: Summer Rolls

Printer Friendly Recipe
Roasted Cremini and Prosciutto Lasagna (adapted from Bon Appetit via epicurious)

Serves 6

While I sautéed the prosciutto with some shallots, I think you could save a dish and roast them with the mushrooms instead.

To boil and rinse the pasta, follow the instructions in step 4 of this recipe.

1 tablespoon olive oil
1 pound cremini mushrooms, sliced
Salt
Ground black pepper
6 ounces prosciutto, chopped (about 1 cup)
3 large shallots, diced
1 teaspoon chopped fresh rosemary
1 teaspoon chopped fresh thyme
4 tablespoons (½ stick) unsalted butter
4 cloves garlic, minced
5 tablespoons all-purpose flour
4 cups milk
1 bay leaf
¼ teaspoon freshly grated nutmeg
8 ounces (about 2 cups) Gruyère cheese, shredded
½ cup (1 ounces) grated parmesan cheese, divided
1 pound fresh lasagna noodles, boiled and rinsed

1. Adjust an oven rack to the middle position; heat to 400 degrees. On a rimmed baking sheet, combine the oil, mushrooms, ½ teaspoon salt, and ¼ teaspoon pepper. Roast, stirring twice, until browned, 30-40 minutes. Remove from the oven; set aside. Reduce the oven temperature to 350 degrees.

2. In a small skillet over medium heat, sauté the prosciutto, stirring occasionally, until fat begins to render, 4-5 minutes. Add two of the shallots and the herbs; continue to cook, stirring occasionally, until the shallots are softened and lightly browned, about 8 minutes.

3. In a medium saucepan over medium heat, melt the butter. When the foaming subsides, add the remaining shallots, the garlic, and a pinch of salt. Cook, stirring often, until the shallots are softened and translucent. Add the flour and cook, stirring constantly, for 1 minute. Whisking constantly, slowly add the milk. Add the bay leaf, increase the heat to medium-high, and bring to a simmer, whisking constantly. Reduce the heat to medium-low, add the nutmeg and ½ teaspoon salt, and simmer 5 minutes. Stir in ¼ cup parmesan.

4. Spread ½ cup of the sauce on the bottom of a 9×13-inch baking dish. Cover the sauce with a slightly overlapping layer of boiled noodles, cutting them as needed to fill any gaps. Evenly spread 1 cup of the sauce over the noodles. Top with half of the mushrooms, then half of the prosciutto mixture and half of the Gruyère cheese. Cover with another layer of noodles, then repeat the layering of 1 cup sauce, the remaining mushrooms, and the remaining Gruyère. Layer a final layer of noodles, then cover with the remaining sauce and the remaining ¼ cup parmesan.

5. Cover the baking dish with foil and bake for 40 minutes. Remove the foil and bake until the top is browned and bubbly, 15 to 20 minutes. Let cool for at least 10 minutes before serving.

mushroom prosciutto lasagna 9