Archives for September 2012

raspberry-swirled cheesecake cupcakes

raspberry swirl cheesecake cupcakes 6

I did a lot of things I’m proud of this weekend. I didn’t have to work Friday, so I kicked off the three-day weekend with the second-longest run I’ve ever done, and the longest run that wasn’t part of a big race. Then I made Dave give me hourly high-fives for the rest of the day.

raspberry swirl cheesecake cupcakes 1

The next day, I had my first-ever paid baking order. A coworker hired me to make a dozen each of two different types of cupcakes for her daughter’s wedding. Two dozen isn’t a lot of cupcakes, but I wanted to get them just right, with great taste and beautiful garnishes.

raspberry swirl cheesecake cupcakes 2

Less than an hour after I dropped those off, we had a bunch of people over to watch football – the first time Dave and I have entertained more than a couple friends at a time since we’ve been married. By keeping things casual (or at least, my version of casual), enlisting a lot of help from Dave, and being creative with what I already had around, I managed to entertain the way I like to – with a lot of food, of course – but without a lot of stress.

raspberry swirl cheesecake cupcakes 3

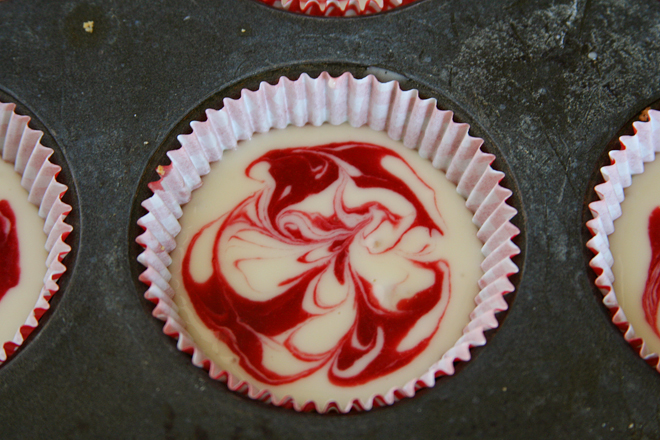
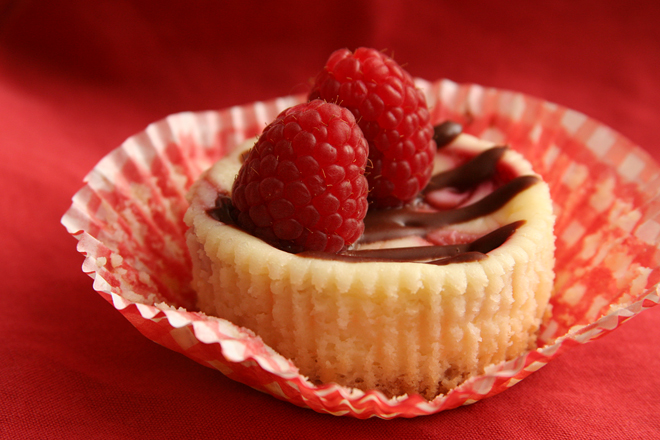
One of the ways I made the most of what I had available was to make extras of these cupcakes. The wedding’s colors were black, ivory, and red, so the bride chose these raspberry-swirled cheesecake cupcakes drizzled with chocolate and topped with raspberry truffles, as well as chocolate cupcakes with champagne frosting topped with chocolate-covered strawberries. While I was at it, I went ahead and made extra chocolate-covered strawberries and raspberry truffles for my friends too.

raspberry swirl cheesecake cupcakes 4

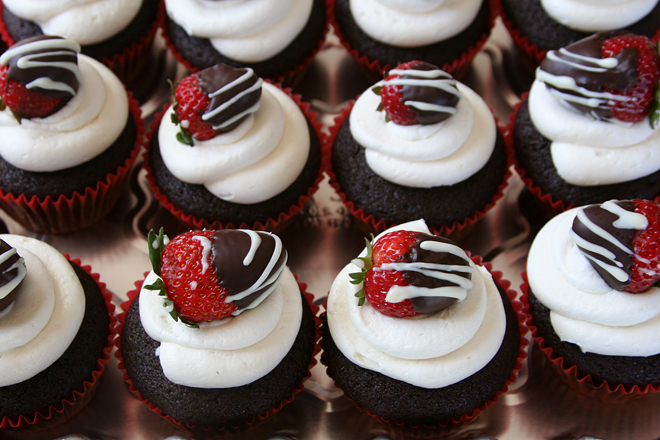
Both sets of cupcakes turned out every bit as good as I’d hoped, and that never happens! The swirls on the cheesecake were pretty and not sloppy, the drizzle didn’t cover up as much as the swirls as I was worried about, the fresh raspberries fit nicely onto the tops. The chocolate cupcakes rose into a perfect mound, and the swirls of frosting didn’t look too amateurish. My first time making chocolate-covered strawberries went just fine, even the stressful part that involved melting white chocolate. I dropped the cupcakes off and then entertained guests all evening, only spitting half-chewed chips on someone once! This is about as successful as my life gets.

raspberry swirl cheesecake cupcakes 7

One year ago: Croissants (Tartine Bread)
Two years ago: Coffee Break Muffins
Three years ago: Green Chile Huevos Rancheros
Four years ago: Pan-Seared Steak with Red Wine Pan Sauce

Printer Friendly Recipe
Raspberry-Swirled Cheesecake Cupcakes (adapted from Martha Stewart’s Cupcakes via Annie’s Eats)

Makes 32 cupcakes

The truffles and drizzle make for a nice presentation, but the swirled cupcakes are plenty tasty and pretty on their own.
For the crust:
1½ cups (about 8 full crackers) graham cracker crumbs
4 tablespoons unsalted butter, melted
3 tablespoons sugar

For the raspberry swirl:
6 ounces (¾ cup) frozen or fresh raspberries
2 tablespoons sugar
1 teaspoon cornstarch

For the filling:
4 (8-ounce) cream cheese, at room temperature
1½ cups (10.5 ounces) sugar
Pinch of salt
1 teaspoon vanilla extract
4 large eggs, at room temperature

1. Preheat the oven to 300 degrees. Line 32 muffin wells with paper liners.

2. For the crust: In a food processor, process the graham crackers and sugar until evenly ground. Add the butter and pulse to combine, scraping the sides of the bowl as needed. Press 1 tablespoon of the crumb mixture onto the bottom of each liner. Bake until fragrant, about 10 minutes. Cool on a wire rack, maintaining the oven temperature.

3. For the raspberry swirl: Combine the raspberries, sugar, and cornstarch in a blender or food processor. Process until smooth, then pour through a fine mesh sieve to remove the seeds. (Or press the raspberries through a food mill, stirring the cornstarch and sugar into the puree.)

4. For the filling: Beat the cream cheese on medium speed in the bowl of an electric mixer until smooth. Gradually add the sugar and salt, then the vanilla. Beat in the eggs one at a time, mixing well after each addition.

5. To assemble, spoon 3 tablespoons of the cheesecake batter over the crust in each cupcake liner. Dot ½ teaspoon of the raspberry puree in a few dots over the cheesecake filling. Use a toothpick or a wooden skewer to lightly swirl the puree.

6. Bake until the filling is set, about 30 minutes, rotating the pans halfway through baking. Transfer to a wire cooling rack and let cool to room temperature. Transfer to the refrigerator and let chill for at least 2 hours before serving.

Raspberry Truffles (seen on Annie’s Eats, but I didn’t use the same recipe)

6 ounces fresh raspberries
2 ounces bittersweet chocolate, finely chopped
2½ tablespoons heavy cream

1. Gently wash and dry the raspberries.

2. In a small heavy saucepan, bring the cream to a simmer over medium-high heat. (Do not rapidly boil.) Pour the cream over the chocolate. With a fork, gently stir, starting in the center and working toward the edge, until the ganache is smooth.

3. Let the mixture stand at room temperature until it’s thick enough to hold a shape, about 45 minutes, then, using a pastry bag with a small opening, pipe into the stemmed opening on the raspberries.

Chocolate Drizzle (adapted from Tartine’s Chocolate Friands)

I didn’t make this separately, I just stirred in more cream to the ganache leftover from the raspberry truffles. I’m offering it here separately as a good chocolate drizzle recipe.

2 ounces bittersweet chocolate, finely chopped
⅓ cup heavy cream

In a small heavy saucepan, bring the cream to a simmer over medium-high heat. (Do not rapidly boil.) Pour the cream over the chocolate. With a fork, gently stir, starting in the center and working toward the edge, until the ganache is smooth.

raspberry swirl cheesecake cupcakes 5

For the chocolate cupcakes, I used this recipe for the cupcake portion; this champagne buttercream for the frosting; and this method for the chocolate-covered strawberries.

strawberry poptarts

poptarts 9

I like to keep track of things. This is why I have a website showcasing new recipes. But I also have calendars (printed out and filled in with pencil, old school) logging all the workouts I’ve done for years, a list updated daily of which projects I spend time on at work, and a color-coded Google Calendar that I check and update several times a day.

poptarts 4

This apparently wasn’t enough for me, so I’ve recently started tracking some new things – indulgences. Desserts, alcohol, restaurant meals, snacking on ingredients while making dinner – those are the biggies for me. I set goals for the month, and they are generous, and I don’t get bent out of shape if I miss them (and I always go over on both alcohol and desserts), but having it laid out in front of me in a spreadsheet does help my self-control sometimes. Is munching on this cucumber, even if it’s dipped in dressing, really worth having to log a day of ingredient snacking?

poptarts 3

There are loopholes though. Shortcake, obviously that’s dessert. But scones are breakfast, so I don’t need to record those, even if they do contain just as much butter and sugar as shortcake. Cupcakes, dessert; muffins, breakfast. Poptarts are breakfast, right?

poptarts 6

That might be a stretch, even by my standards. Yes, there is jam involved, but a spoonful of jam is squeezed between two sheets of buttery delicious pie crust. And that’s all there is to it, unless you add icing. But once you add icing, any hope of calling this anything but a treat of the most indulgent manner is lost. It went on the list as dessert, and it was worth every mark on the spreadsheet.

poptarts 10

One year ago: Banh Mi (I absolutely love this recipe)
Two years ago: Taco Pasta Salad
Three years ago: Twice Baked Potato Cups
Four years ago: Banana and Peanut Butter Stuffed French Toast

Printer Friendly Recipe
Strawberry Pop-Tarts (adapted from King Arthur Flour via Smitten Kitchen)

Makes 9 (although I made 10 out of a half recipe)

My dough was too crumbly with just one egg, so I also used part of the egg used for the egg wash.

I used the icing because I wanted my tarts to be as traditional as possible, but, it turns out, royal icing on pie just isn’t that good. It’s pretty, but I don’t recommend it for the best flavor.

I replaced a quarter of the flour with whole wheat pastry flour.

Pastry:
2 cups (8½ ounces) all-purpose flour
1 tablespoon sugar
1 teaspoon salt
2 sticks (16 tablespoons) unsalted butter, diced
1 large egg, lightly beaten
2 tablespoons milk

Filling:
1 tablespoon cornstarch
1 tablespoon water
¾ cup (8 ounces) strawberry jam

Egg wash:
1 large egg
salt

Icing:
½ cup (2 ounces) powdered sugar
1 teaspoon meringue powder
1 tablespoon water

1. For the dough: Combine the flour, sugar, and salt in a food processor. Add the butter and pulse until it is cut into pea-sized pieces. Add the egg and milk and pulse until the dough looks crumbly but stays together when pinched. Turn the dough out onto a work surface or shallow bowl, forming it into a ball and kneading a few times. Divide the dough in half and shape each half into a rectangle, about 3 by 5 inches. Wrap the dough tightly in plastic wrap; chill for at least 30 minutes or up to 2 days.

2. Meanwhile, make the filling: In a small saucepan, stir together the cornstarch and water. Mix in the jam. Bring the mixture to a simmer over medium heat; simmer for 2 minutes. Remove from the heat; cool completely before using.

3. On a lightly floured work surface, roll one portion of the dough to ⅛-inch thick, slightly larger than a 9 by 12-inch rectangle. Repeat with the second piece of dough. Trim each portion of dough into a 9 by 12-inch rectangle. Cut each piece of dough into thirds both lengthwise and crosswise, forming a total of 18 3 by 4-inch rectangles.

4. Beat the additional egg with a pinch of salt and brush it over the entire surface of half of the dough. Place a heaping tablespoon of filling into the center of each egg-brushed rectangle, keeping a bare ½-inch perimeter around the jam. Place a second rectangle of dough on top of the jam, using your fingertips to press firmly around the pocket of filling, sealing the dough well on all sides. Press the tines of a fork all around the edge of the rectangle. Repeat with remaining rectangles of dough to form 9 tarts.

5. Transfer the tarts to a baking sheet lined with parchment paper or a silicone mat. Prick the top of each tart multiple times with a fork to allow steam to escape. Refrigerate the tarts (they don’t need to be covered) for 30 minutes (or freeze for 15 minutes), while you heat your oven to 350 degrees.

6. Bake the tarts for 20 to 25 minutes, until they’re light golden brown. Transfer them to a wire rack to cool for at least 10 minutes before icing.

7. In a small bowl, beat the powdered sugar, meringue powder, and water with a hand mixer until soft peaks form. Dribble over the tarts. Let set at least 20 minutes for the icing to set.

poptarts 8

mediterranean chopped salad

mediterranean chopped salad 4

I made this salad for the first time the very day that I posted about how I hate making salads because it always takes so dang long. (And indeed, tonight I made a salad for dinner that included no less than 16 ingredients.) This salad, however, breaks the pattern.

mediterranean chopped salad 1

It helps that the chickpeas can be dumped out of a can. Sometimes I buy pre-crumbled feta, and that’s one less ingredient that needs chopped. While I don’t love seeding and chopping olives, my handy dandy cherry pitter (that has never been used on cherries) speeds up that process.

mediterranean chopped salad 3

There are still a good handful of ingredients that must be prepped, to be sure, but it is among the quicker dinner salad recipes I make. And it’s such a great combination; chickpeas, olives, feta, and cucumbers are a classic, to be sure, but for good reason. For as good as this tastes and as quick as is to make, it’s one of the best salad values for your time. And that makes it my new favorite.

mediterranean chopped salad 5

One year ago: Cook’s Illustrated’s Ultimate Banana Bread
Two years ago: Cheesecake (comparison of 3 recipes)
Three years ago: Risotto with Swiss Chard
Four years ago: Gazpacho

Printer Friendly Recipe
Mediterranean Chopped Salad (from Cook’s Illustrated)

Serves 4 as a main dish

I have never added the parsley; nothing against it, I just didn’t notice it in the ingredient list. Also, I like my salads on the vinegary side, so I usually cut the olive oil short.

1 medium cucumber, peeled, halved lengthwise, seeded, and cut into ½-inch dice (about 1¼ cups)
1 pint grape tomatoes, quartered (about 1½ cups)
Table salt
3 tablespoons extra virgin olive oil
3 tablespoons red wine vinegar
1 medium garlic clove, minced or pressed through garlic press (about 1 teaspoon)
1 (14-ounce) can chickpeas, drained and rinsed
½ cup chopped pitted kalamata olives
½ small minced red onion (about ¼ cup)
½ cup roughly chopped fresh parsley
1 romaine heart, cut into ½ inch pieces (about 3 cups)
4 ounces feta cheese, crumbled (about 1 cup)
Ground black pepper

1. Combine cucumber, tomatoes, and 1 teaspoon salt in colander set over bowl and let stand 15 minutes.

2. Whisk oil, vinegar, and garlic together in large bowl. Add drained cucumber and tomatoes, chickpeas, olives, onion, and parsley; toss and let stand at room temperature to blend flavors, 5 minutes.

3. Add romaine and feta; toss to combine. Season with salt and pepper and serve.

mediterranean chopped salad 6

tomato mozzarella tart with basil crust

tomato basil tart 5

I planted tomatoes in my garden this year with high hopes and low expectations. Last year I lost all of my precious tomato plants to fusarium wilt, and even though I didn’t do anything to rid the soil of the fungus, I couldn’t resist planting a few tomato plants this year too. They started strong but succumbed to the disease before setting fruit. At that point, I settled in for a tomato-less summer.

tomato basil tart 1

Instead, I’ve had what’s nearly been a landmark year! After describing my tomato woes to a coworker, she started bringing me some tomatoes from her garden. At first it was a trickle, just enough so I could make each of my favorite tomato dishes once. She also bought me a handful of zebra tomatoes while traveling. And then I bought myself a pound or so of tomatoes from our town’s little farmer’s market. And then the bonanza from my coworker – nearly ten pounds of beefsteak, romas, and cherries. This was enough to make all of my favorites again, plus try some new recipes.

tomato basil tart 2

This was first on my list. It has all the ingredients of pizza, but rearranged and with a whole lot of butter added. How can that be bad?

tomato basil tart 3

The basil crust is fragrant, tender but sturdy enough to hold up the toppings. The mozzarella holds the toppings on. And the real star is those thin but deeply flavorful slices of tomatoes. There is nothing I like more than a landmark year for tomatoes. But next year, I’m determined to successfully plant my own – but maybe I’ll still take some off my coworker’s hands.

tomato basil tart 4

One year ago: Fresh Pasta
Two years ago: Pappa al Pomodoro
Three years ago: 100% Whole Wheat Sandwich Bread
Four years ago: Lemon Pancakes with Blueberry Syrup

Printer Friendly Recipe
Tomato Mozzarella Tart with Basil Crust (adapted from Jack Bishop’s The Complete Italian Vegetarian Cookbook via Ezra Pound Cake; crust adapted from Dorie Greenspan’s Sweet Tart Dough)

I used fresh mozzarella (as seen on Annie’s Eats) both times I made this, but when I removed the tart from the oven, I noticed a puddle of liquid skimming across the baked cheese. Once cooked, I don’t think fresh mozzarella seems so different from the firmer type, which isn’t as moist and won’t release liquid onto the surface of the tart, so in the future, I’ll use regular mozzarella instead of fresh. (Fortunately, the crust didn’t seem to get soggy from the extra liquid.)

The original crust recipe was for a flaky pie type of crust, which used ice water. It shrunk when I baked it, plus I wanted something sturdier, so I adapted a traditional tart crust to include basil. This is a tart after all!

Crust:
½ cup loosely packed basil leaves
1 clove garlic, peeled
1¾ cups (8.4 ounces) all-purpose flour
1 tablespoon cornstarch
½ teaspoon salt
8 tablespoons unsalted butter, cold, cut into ½-inch cubes
1 egg, lightly beaten

Tart:
8 ounces mozzarella, sliced
2 medium tomatoes, thinly sliced
salt
black pepper
parmesan
3-4 basil leaves, slivered

1. In a food processor fitted with the metal blade, process the basil and garlic until finely chopped. Add the flour, cornstarch, and salt; pulse to combine. Add the butter; process in 1-second pulses until the largest pieces of butter are the size of peas. Add about half the egg, pulse, then add the remaining egg. Process continuously until the dough forms clumps and curds. The sound of the food processor will change when it gets to this point.

2. Evenly press the dough onto the sides and bottom of a 9-inch tart pan with a removable bottom. Spray a 12-inch square of aluminum foil with cooking spray and press it, sprayed-side down, onto the tart crust. Freeze for at least 30 minutes.

3. Adjust a rack to the middle position and heat the oven to 375 degrees. Remove the tart crust from the freezer and spread pie weights over the bottom. Transfer the tart pan to a baking sheet and bake for 20 minutes. Remove the foil and bake another 5 minutes, until the crust is just starting to brown. Remove from the oven, maintaining the oven temperature.

4. Line the crust evenly with slices of mozzarella, overlapping if necesary. Top the mozzarella with slices of tomatoes (do not overlap the tomatoes). Season with salt and pepper. Grate a generous layer of parmesan cheese over the tomatoes.

5. Bake the tart for 25-30 minutes, until the crust is brown and the cheese is melted and just starting to brown. Transfer to a cooling rack. Evenly distribute the slivered basil over the top of the tart. Let cool 5 minutes before serving.

tomato basil tart 6

pepper-crusted salmon with wasabi dipping sauce

wasabi salmon 4

This is one of the best new meals I’ve made recently. The salmon was perfectly browned on top but still juicy in the middle. The Old Bay and lemon were interesting matches with the wasabi and ginger, but it definitely worked. The watercress and avocado salad I served the salmon with was the perfect bright balance to the umami-rich fish and soy sauce dip. The meal had a few of my favorite sushi components, with the fish, wasabi, and avocado, but it went a different direction with the salad and Old Bay.

wasabi salmon 1

It was an unusually light weekend dinner for us. Usually those tend to include a lot more carbs and red meat. It isn’t rare that they also require a serious investment of time in the kitchen, and this recipe differs from that routine as well.

wasabi salmon 2

In fact, there is absolutely no reason this wouldn’t fit right in with our weekday routine of healthy and quick meals. And that’s good news, because there are more weeknights than weekends, and that means more opportunities to make this dish.

wasabi salmon 5

One year ago: Dulce de Leche Cupcakes
Two years ago: Beer-Marinated Flank Steak
Three years ago: Zucchini Bread
Four years ago: Chocolate Whopper Malted Drops

Printer Friendly Recipe
Pepper-Crusted Salmon with Wasabi-Lemon Dipping Sauce (adapted from Steven Raichlen’s Planet Barbecue! via epicurious and from Cook’s Illustrated’s Glazed Salmon recipe)

Serves 4

I served this with Avocado and Watercress Salad (without the apple), and it was absolutely perfect.

For the sauce:
1 tablespoon wasabi powder
1 tablespoon water
1 tablespoon grated fresh ginger
juice of 1 lemon
½ cup soy sauce
1 scallion, white and green parts, minced

For the salmon:
2 tablespoons Old Bay seasoning
½ teaspoon kosher salt
1 teaspoon sugar
¼ teaspoon cornstarch
4 (8-ounce) salmon fillets
coarsely ground black pepper
1 tablespoon canola oil

1. Heat the oven to 300 degrees. In a small bowl, mix the wasabi powder and water until smooth. Set aside for 10 minutes to enhance the wasabi flavors, then add the remaining sauce ingredients.

2. In a small bowl, combine the Old Bay, salt, sugar, and cornstarch. Rub into the flesh (not the skin) of the salmon. Season with a generous layer of coarsely ground black pepper, pressing the pepper into the salmon.

3. Heat the oil in a nonstick 12-inch oven-proof skillet over medium-high heat. Transfer the salmon to the pan, flesh-side down. Cook without moving for 1 minute, then flip and cook for another minute. Transfer the skillet to the oven; cook 8-10 minutes, or until the thickest part of the salmon reaches an internal temperature of 125 degrees. Serve immediately.

wasabi salmon 3

chocolate chip cookie comparison 2

chocolate chip comparison 2
The Chewy

I’ve done all these comparisons and experiments with chocolate chip cookies, and yet, I don’t make any of those recipes. Usually, I make chocolate chip cookies to please myself, because I think it’s fun, so I’m more concerned with which recipe I most enjoy baking instead of which recipe has the best result. But maybe this isn’t so bad – maybe my hacked combination of recipes could stand up to the originals.

chocolate chip comparison 1
The Chewy dough

It was time to find out. For a comparison of the best of the best, I chose Alton Brown’s The Chewy recipe, winner of my last comparison; Cook’s Illustrated’s Perfect Chocolate Chip Cookie, a true standout; Kelsey’s Best Ever Chewy Chocolate Chip Cookies (adapted from Anna Olson’s original recipe), which are the most popular post on her blog; and the one I always make when I’m too lazy to follow an actual recipe.

chocolate chip comparison 3
The Chewy

What sets Alton’s recipe apart is the use of bread flour instead of regular and the replacement of an egg white with milk. Cook’s Illustrated Perfect recipe is designed to mimic the effects of the overnight rest of the dough recommended by the New York Times, which it does using melted browned butter. Compared to the traditional Tollhouse recipe, Kelsey’s recipe uses a higher ratio of flour (plus a bit of cornstarch). My recipe has some similar traits to those above, like bread flour instead all-purpose and an overnight chill to enhance the butterscotch flavor.

chocolate chip comparison 4
my recipe dough

Between the four tasters I had, there was no unanimous favorite. Dave’s favorite was CI’s Perfect cookies. My sister and her husband both chose Alton Brown’s The Chewy as their favorite; it was chewier, but, to Dave, it was too greasy. Kelsey’s recipe was drier than the others; compared to the ultra-rich versions it was being compared to, it had less flavor. My hacked together recipe was the most traditional, crispy around the edges and gooey in the middle.

chocolate chip comparison 6
Cook’s Illustrated’s Perfect

As for me, I’ll certainly keep making the version I have been, now that I know that it can hold its own with the big dogs. I love it because I don’t have to look at a recipe and the dough is perfect for snacking. The Chewy tends to come out a little too flat, and I don’t like the dough for CI’s Perfect (which makes it the recipe of choice when self-control is necessary!), plus it simply isn’t as fun to make cookies with a whisk as it is with a mixer. Slight differences aside, these were all standout recipes, but I appreciate the validation to keep being lazy with my hacked together version.

chocolate chip comparison 5
left to right: The Chewy, my recipe, Kelsey’s Best-Ever, Cook’s Illustrated’s Perfect

One year ago: Kofta
Two years ago: Grilled Corn Salad
Three years ago: Espresso Cheesecake Brownies
Four years ago: Chunky Peanut Butter and Oatmeal Chocolate Chipsters

Printer Friendly Recipe
Accidental Variation of The Chewy (adapted from Alton Brown)

As I was writing up this recipe, I realized I did not actually make The Chewy, which I now see is supposed to use melted butter. I used room temperature solid butter. The recipe below is what I did. This means that the only difference between my recipe and The Chewy is a lower ratio of brown sugar to white and the use of an egg white instead of milk.

16 tablespoons (2 sticks) unsalted butter, room temperature
2¼ cups (11.25 ounces) bread flour
1 teaspoon table salt
1 teaspoon baking soda
¼ cup granulated sugar
1¼ cups brown sugar
1 egg
1 egg yolk
2 tablespoons milk
1½ teaspoons vanilla extract
2 cups (12 ounces) semisweet chocolate chips

1. Heat oven to 375 degrees. Sift together the flour, salt, and baking soda and set aside.

2. Add the butter to the mixer’s work bowl with the sugars. Cream the butter and sugars on medium speed. Add the egg, yolk, 2 tablespoons milk, and vanilla extract, and mix until well combined. Slowly incorporate the flour mixture until thoroughly combined. Stir in the chocolate chips.

3. Scoop the dough in heaping tablespoons onto the prepared baking sheets. Bake the cookies, one sheet at a time, until they are browned around the edges and do not look wet on top, 8-12 minutes. Let the cookies cool on the cookie sheets for 5 minutes, then transfer to wire racks to cool completely.

Printer Friendly Recipe
Perfect Chocolate Chip Cookies (from Cook’s Illustrated May/June 2009)

I baked smaller cookies – tablespoon-sized dollops of dough – for about 9 minutes at 375 degrees.

1¾ cups (8¾ ounces) unbleached all-purpose flour
½ teaspoon baking soda
14 tablespoons (1¾ sticks) unsalted butter
½ cup (3½ ounces) granulated sugar
¾ cup (5¼ ounces) packed dark brown sugar
1 teaspoon table salt
2 teaspoons vanilla extract
1 large egg
1 large egg yolk
1¼ cups semisweet chocolate chips or chunks
¾ cup chopped pecans or walnuts, toasted (optional)

1. Adjust oven rack to middle position and heat oven to 375 degrees. Line 2 large baking sheets with parchment paper. Whisk flour and baking soda together in medium bowl; set aside.

2. Heat 10 tablespoons butter in 10-inch skillet over medium-high heat until melted, about 2 minutes. Continue cooking, swirling pan constantly until butter is dark golden brown and has nutty aroma, 1 to 3 minutes. Remove skillet from heat and, using heatproof spatula, transfer browned butter to large heatproof bowl. Stir remaining 4 tablespoons butter into hot butter until completely melted.

3. Add both sugars, salt and vanilla to bowl with butter and whisk until fully incorporated. Add egg and yolk and whisk until mixture is smooth with no sugar lumps remaining, about 30 seconds. Let mixture stand for 3 minutes, then whish for 30 seconds. Repeat process of resting and whisking 2 more times until mixture is thick, smooth and shiny. Using rubber spatula or wooden spoon, stir in flour mixture until just combined, about 1 minute. Stir in chocolate chips and nuts (if using), giving dough final stir to ensure no flour pockets remain.

4. Divide dough into 16 portions, each about 3 tablespoons (or use a #24 cookie scoop). Arrange 2 inches apart on prepared baking sheets, 8 dough balls per sheet.

5. Bake cookies 1 tray at a time until cookies are golden brown and still puffy, and edges have begun to set but centers are still soft, 10-14 minutes, rotating baking sheet halfway through baking. Transfer baking sheet to wire rack; cool cookies completely before serving.

Printer Friendly Recipe
Best-Ever Chocolate Chip Cookies (rewritten but not changed from Kelsey’s Apple a Day, who adapted it from Anna Olson)

2 cups (9.6 ounces) all-purpose flour
2 teaspoons cornstarch
1 teaspoon baking soda
½ teaspoon table salt
12 tablespoons (1½ sticks) unsalted butter, softened
¾ cup (5.25 ounces) brown sugar
¼ cup (1.75 ounces) granulated sugar
1 egg
2 teaspoons vanilla extract
1 cup (6 ounces) bittersweet chocolate chips

1. Heat the oven to 350 degrees. Line two baking sheets with parchment paper or silicone mats. In a medium bowl, mix the flour and baking soda.

2. In the bowl of a stand mixer fitted with the paddle attachment (or a large bowl if using a stand mixer), beat the butter, salt, and sugars on medium speed until light and fluffy, 1-2 minutes. Add the egg, beating until incorporated, then mix in the vanilla. Reduce the mixer speed to low and gradually add the flour, mixing just until incorporated. Stir in the chocolate chips.

3. Scoop the dough in heaping tablespoons onto the prepared baking sheets. Bake the cookies, one sheet at a time, until they are slightly browned around the edges, 8-10 minutes. Let the cookies cool on the cookie sheets for 5 minutes, then transfer to wire racks to cool completely.

Printer Friendly Recipe
Chocolate Chip Cookies (adapted from nearly every single chocolate chip cookie recipe I’ve ever read)

I haven’t found a dependable measurement for the weight of 1 cup of bread flour.  I used to assume 5 ounces for 1 cup of bread flour, but I think this is on the high side, so I’m changing the volume measurement in this recipe from 2¼ cups to 2⅓ cups.  Unfortunately,  it could be as high as 2½ cups, depending on how you measure your flour.  If you can, definitely measure by weight and not volume (food scales are cheap!)!

16 tablespoons (2 sticks) unsalted butter, room temperature
1 teaspoon table salt
1 cup (7 ounces) brown sugar
½ cup (3.5 ounces) white sugar
2 eggs
1 teaspoon vanilla
2¼ cups (11.25 ounces) bread flour
1 teaspoon baking soda
2 cups (12 ounces) semisweet chocolate chips

1. Heat the oven to 375 degrees. Line two baking sheets with parchment paper or silicone mats. In a medium bowl, mix the flour and baking soda.

2. In the bowl of a stand mixer fitted with the paddle attachment (or a large bowl if using a stand mixer), beat the butter, salt, and sugars on medium speed until light and fluffy, 1-2 minutes. Add the eggs, one at a time, beating until incorporated, then mix in the vanilla. Reduce the mixer speed to low and gradually add the flour, mixing just until incorporated. Stir in the chocolate chips.

3. Scoop the dough in heaping tablespoons onto the prepared baking sheets. Bake the cookies, one sheet at a time, until they are browned around the edges and do not look wet on top, 8-12 minutes. Let the cookies cool on the cookie sheets for 5 minutes, then transfer to wire racks to cool completely.

general tso’s chicken

general tso's chicken 4

I’ve never understood fried foods that are coated in sauce, like General Tso’s chicken and buffalo wings. For me, the best part of fried food is the crisp browned coating. Once you mix that with sauce and it loses its crunch, what’s the point?

general tso's chicken 2

So I knew from the beginning that I wouldn’t be deep-frying for my version of General Tso’s chicken. Pan-frying sounded a lot easier, as least as far as clean up goes, and it seems like it should be lighter than dumping the entire piece of meat in oil, right?

general tso's chicken 3

The chicken did end up good – like tender chicken nuggets – but I still have to wonder if using shredded roast chicken instead of breaded pieces would really be so bad. The rough texture of shredded chicken would soak up sauce just as well as the crags of breading. It would certainly be easier. I think the difference it would make on the final dish would be minimal, and it would without a doubt be worth avoiding the calories and mess of frying.

general tso's chicken 5

One year ago: Prosecco Raspberry Gelée
Two years ago: Espresso Chocolate Shortbread
Three years ago: Pickled Coleslaw
Four years ago: Eclairs (Daring Bakers)

Printer Friendly Recipe
General Tso’s Chicken (adapted from America’s Test Kitchen Feed and Food and Wine)

Serves 4

A couple of the commenters on the ATK recipe noted that the sauce lacked something, and I’d say what it’s lacking is balance. It was very sweet and dominated by hoisin, although this might depend largely on the brand of hoisin you use. (I used Sun Luck, the only one available in my town.)

½ cup hoisin
¼ tablespoons white vinegar
3 tablespoons soy sauce
3 tablespoons sugar
2 tablespoons cornstarch
1½ cup water
4 boneless, skinless chicken breasts, cut into 1-inch chunks
2 teaspoons oil
4 cloves garlic, minced
2 tablespoons grated ginger
½ teaspoon red pepper flakes
1½ cup cornstarch
½ cup flour
½ teaspoon baking soda
3 egg whites
oil for pan-frying
4 scallions, white and green parts, chopped

1. In a medium bowl, mix the hoisin, white vinegar, soy sauce, sugar, 2 tablespoons cornstarch, and water. Transfer 6 tablespoons of this mixture into a bowl with the chicken; stir to combine and refrigerate for 30 minutes.

2. In a medium skillet, heat the oil over medium heat. Add the garlic, ginger, and red pepper flakes; cook, stirring constantly, until fragrant, about 1 minute. Add 2 cups of the hoisin mixture; increase the high to medium-high and bring to a simmer. Simmer for 2 minutes, then remove from the heat and cover.

3. Add the cornstarch, flour, and baking soda to the bowl with the remaining hoisin mixture. Stir with a fork until the mixture resembles coarse meal. In a separate bowl, whip the egg whites until frothy.

4. Heat an ⅛-inch of oil in a large nonstick skillet over medium-high heat. Dip half of the chicken pieces in the egg whites, then the cornstarch mixture. Transfer to the hot skillet; cook, without moving, for 3-4 minutes, until the bottom is browned. Flip and brown the second side. Transfer to a plate. Repeat with the remaining chicken.

5. Reheat the sauce over the medium heat. Add the chicken and toss to coat. Serve over rice, topping with the scallions.

general tso's chicken 6