Archives for December 2012

2012 favorites

I didn’t post as much in 2012 as I have in previous years (only 3 posts in the entire month of November!), but I did find some great new recipes.

rice noodle peanut butter salad 5

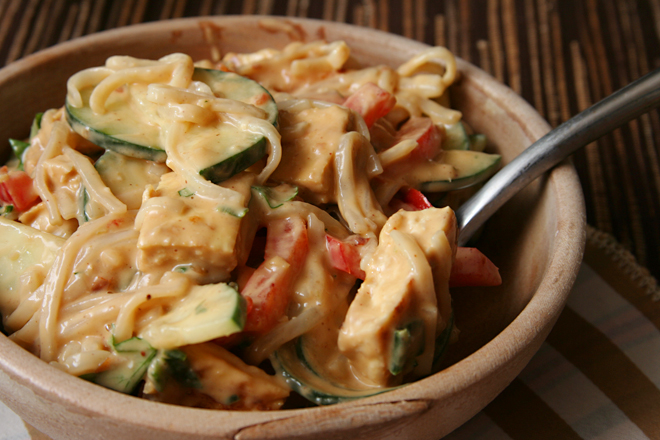
Rice noodle salad with peanut dressing has all of my favorite characteristics of a weeknight dinner – it’s healthy, easy, tastes great, and makes great leftovers.

ricotta 12

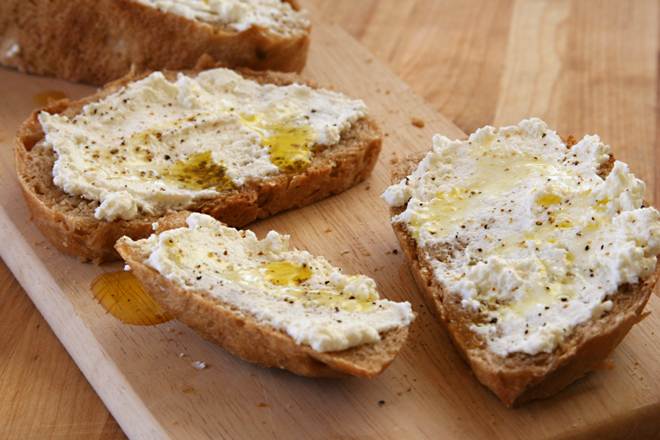
I haven’t bought ricotta since I started making my own. It’s so much smoother and tastier than the stuff in the plastic container from the grocery store, not to mention that it only takes ten minutes to make and provides me a way to use up almost-expired containers of milk.

grapefruit margarita 5

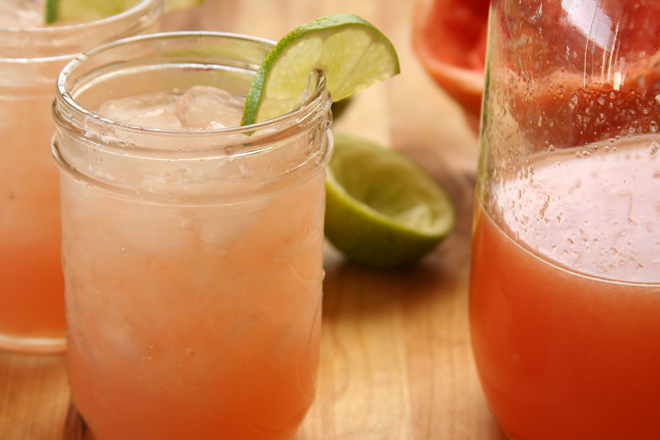
Grapefruit margaritas are back on the menu, now that it’s winter and grapefruit is back in season. So delicious! So dangerous!

tiny meatball sauce 12

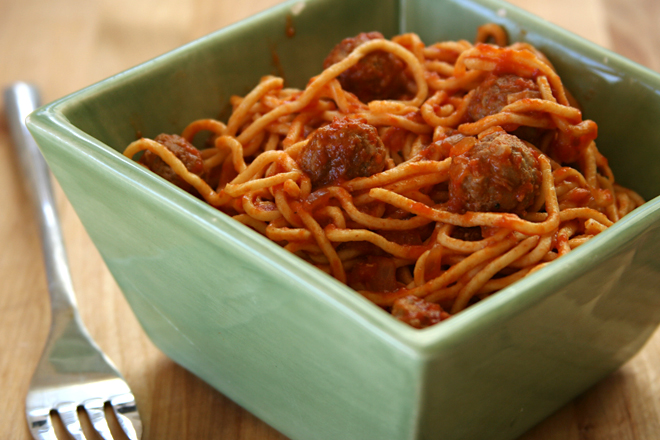
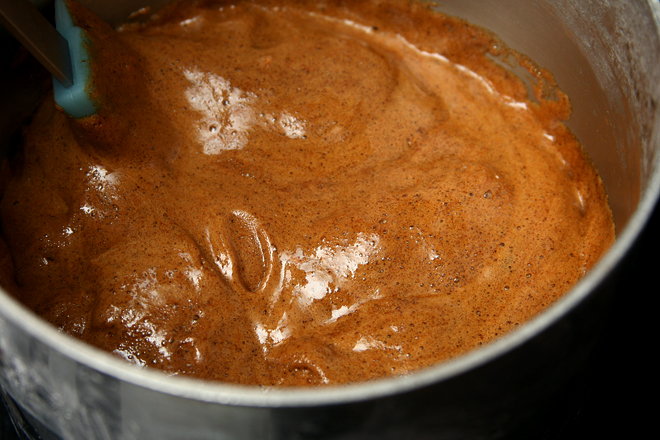
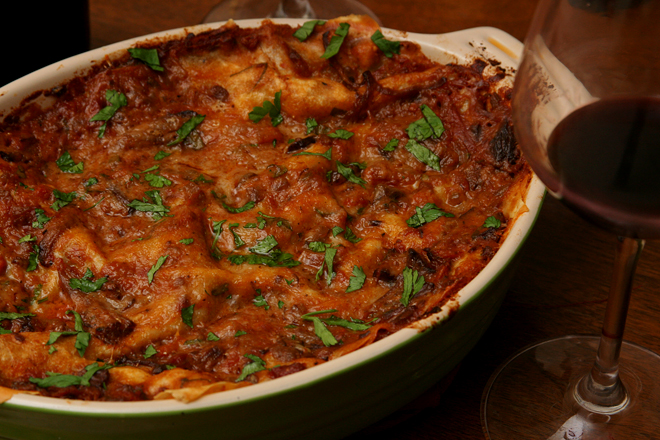
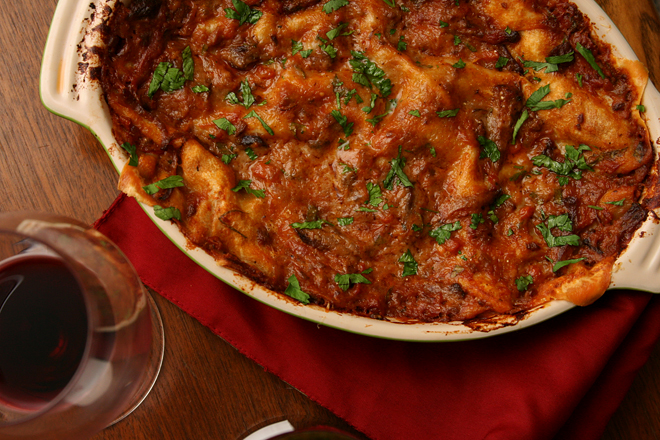
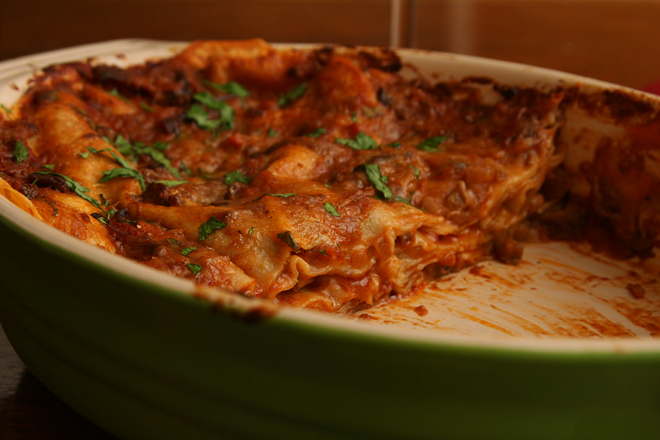
I know this pasta with tiny meatball sauce looks like mushy Spaghettios, but it isn’t similar at all – it’s tomato sauce simmered for hours with three different types of meat, served over fresh pasta, topped with bite-sized meatballs. It’s amazing stuff.

marinated roasted tofu 10

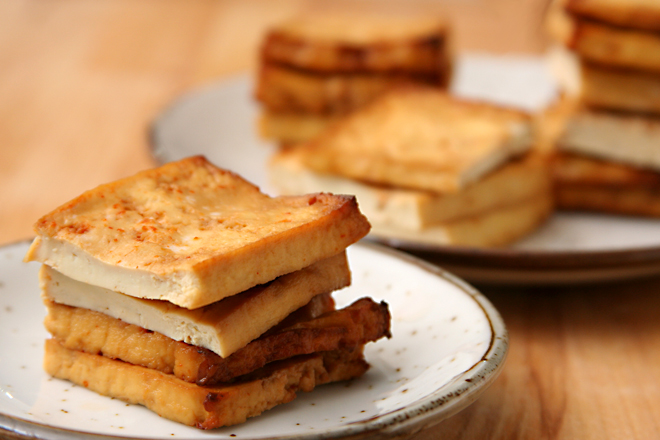
It’s always a treat when I make marinated roasted tofu to snack on at work instead of my normal hard-boiled eggs.

black bean quinoa 6

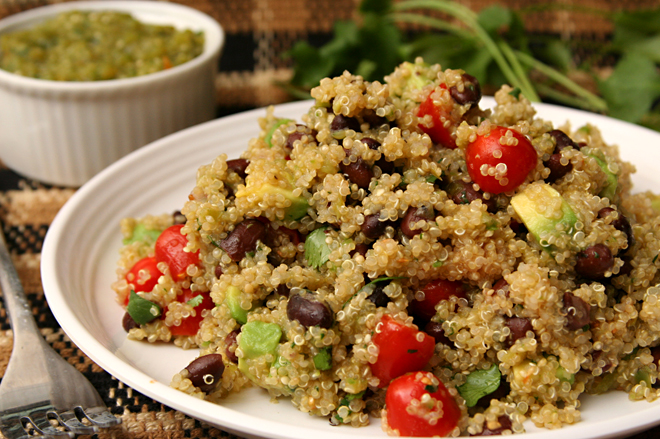
Black bean quinoa salad with tomatillo salsa is the perfect complement to the rice noodle salad for weeknight meals. One busy week last year, I just made big batches of these two recipes so we could have tasty healthy meals all week with very little time required from me.

sushi burgers 7

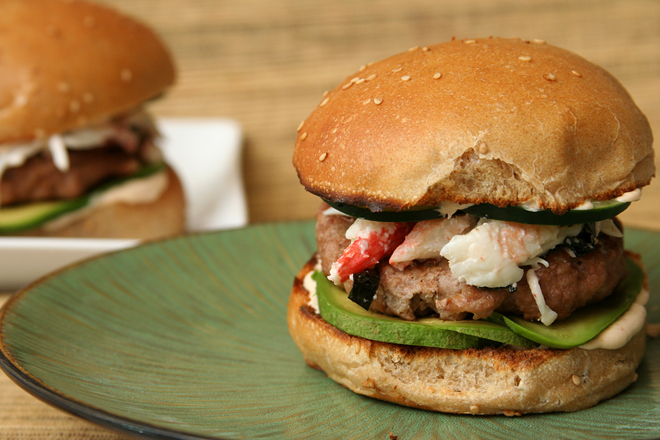
California roll burgers have such a great balance of bright, light sushi ingredients and rich beef. They’re my new favorite hamburger for sure.

watermelon agua fresca 8

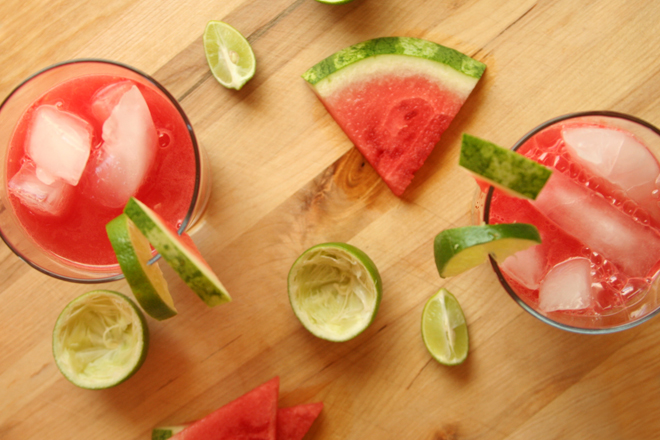
Watermelon agua fresca – a delicious refreshing drink with no alcohol?! It’s a miracle!

migas 9

Over the past six months, we’ve probably eaten more migas than any other dish. I make it, in some variation or another, just about every weekend.

mussels fra diavolo 5

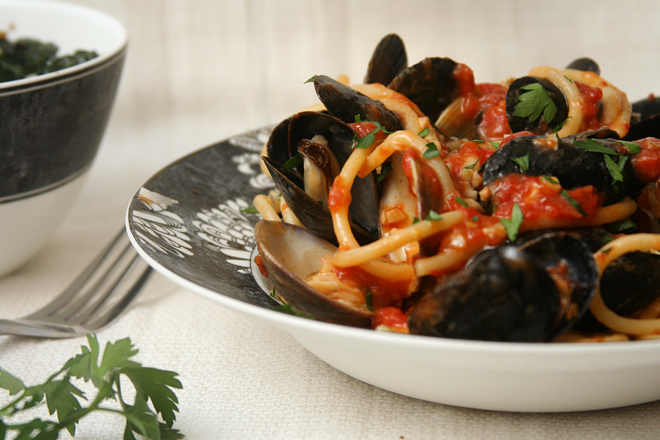
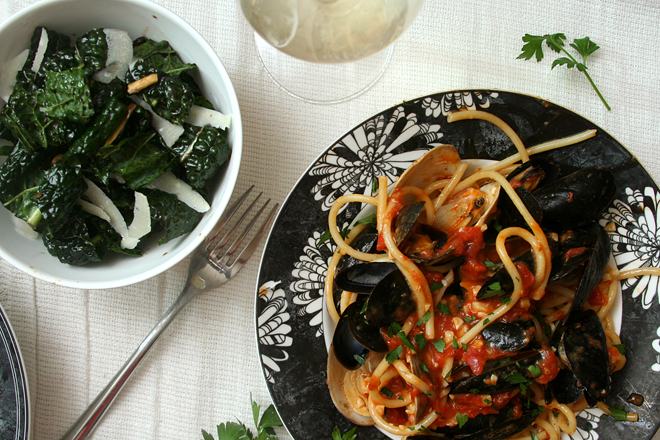
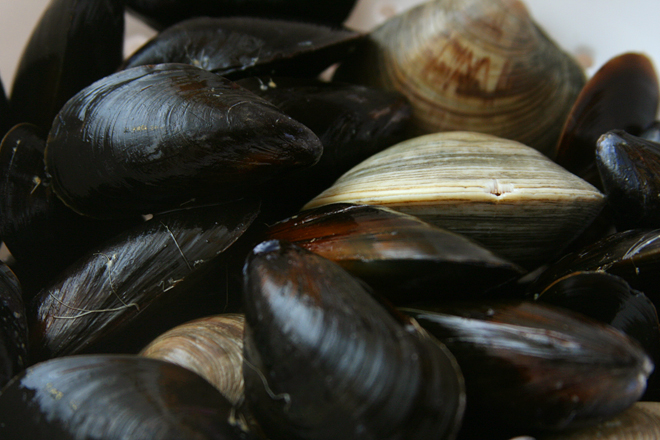
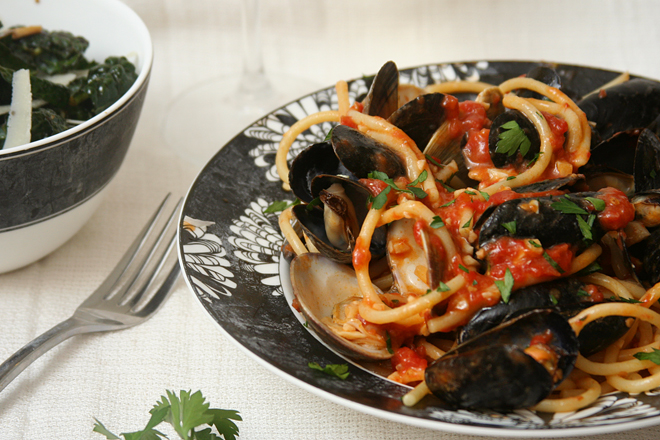
Mussels fra diavolo might be outpacing salmon pesto pasta as Dave’s favorite meal. But my favorite part is that he’s always the one who cooks it.

My single New Year’s resolution is to get more use out of my cookbooks, but I’m not quantifying it or making myself accountable on the blog in any way. I just need to use the ones I have so I can justify buying more!

Happy New Year!

One year ago: 2011 favorites
Two years ago: 2010 favorites
Three years ago: 2009 favorites
Four years ago: 2008 favorites

christmas star wars cookies

christmas all 1

I’m exceptionally proud of these cookies. Not necessarily for how they came out in the end, although I’m pleased with that too. But mostly for coming up with the idea completely on my own.

christmas vader

This is rare for me – I’m a good idea copier, and a proficient idea alterer, but a poor idea generator. I don’t even remember how I came up with the idea of Star Wars Christmas cookies, except that I wanted to send my in-laws cookies for Christmas and didn’t know how I could possibly live up to the original Star Wars cookies I sent them last spring. And, okay, maybe the picture of Darth Maul in a Santa suit on the front of the Star Wars Lego advent calendar we got our nephews for an early Christmas present helped.

christmas stormtrooper

But my creativity didn’t end with just coming up with the idea. Googling “Christmas Darth Vader”, “Christmas Yoda”, and “Christmas Stormtrooper” just showed me a few pictures of each character wearing a Santa hat. That wasn’t going to cut it, because I wanted the characters to be different.

christmas yoda

Combining the ultimate Star Wars bad guy and the ultimate Christmas good guy to make Vader Santas was a given, and the white stormtroopers would work well for snowmen. Yoda’s wide earspan would make good antlers, and hopefully the red nose would make the Rudolph idea obvious. That left Boba Fett…my least favorite of the character shapes got left with the leftover idea, and he just ended up with an elf hat.

christmas boba

It seems to have worked out, because we gave the cookies to a 4-year-old, and he identified the Star Wars/Christmas connection of each cookie immediately…except for Boba, and that’s no surprise. He’s got a red and green hat, that’s Christmassy enough. And hey, if that’s the best I can come up with, at least it was my own idea. And Rudolph Yoda’s red nose makes up for any weaknesses in the vaguely elf-like Boba.

One year ago: Herb-Roasted Pork Loin
Two years ago: Pumpkin Cinnamon Rolls
Three years ago: Twice-Baked Potatoes
Four years ago: Pumpkin Seed Brittle

christmas all 2

hot chocolate mix

hot chocolate mix 2

I’m not usually much of a Christmas baker, but I got this grand idea last month that I should send my in-laws packages of cookies for Christmas. I sort of had a bad feeling about it, like it was probably going to end up stressing me out, but once I get a hold of an idea that sounds fun, I have a hard time letting go. And so it was that a week and a half before Thanksgiving, I was mixing, forming, and freezing dough for Christmas cookies.

hot chocolate mix 5

I didn’t have much of a plan from the beginning. I love this bourbon pound cake recipe and thought it would ship well. I knew I wanted something fruity and something chocolately. Hazelnut dried cherry biscotti covered the fruit requirement, but the decorated sugar cookies I couldn’t resist adding wouldn’t help with the chocolate. And then I remembered this hot chocolate mix recipe, which I first made several years ago.

hot chocolate mix 6

It’s the perfect thing to ship off to northeastern Ohio in December, sure to be appreciated through the upcoming snowy months. There’s no worry about breaking in transit, a relief after individually wrapping 28 treat bags containing sugar cookies in bubble wrap. And it’s easy, a relief after spending the greater part of a weekend decorating elaborate sugar cookies (that had better not break in transit). I think it’s safe to say that my cookie packages were a great success – assuming those 28 bubble-wrapped sugar cookies arrive safely, at least.

hot chocolate mix 4

One year ago: Mushroom Farro Soup
Two years ago: Gingerbread Cake
Three years ago: Brussels Sprouts Braised in Cream
Four years ago: Candied Orange Peel

Printer Friendly Recipe
Hot Chocolate Mix

Makes about 36 servings

To make vanilla sugar, mix a vanilla bean into the sugar and let it set for a few days.

I used 2 cups of sugar, but the mix was two sweet for me, so I’ve reduced it in the recipe.  It might depend on how sweet your chocolate is too; mine was 72% cocao.

The amount of espresso powder you add might depend on who you plan to serve the hot chocolate to: more adds complexity and cuts the sweetness, but less is more appropriate for kids.

20 ounces bittersweet chocolate, coarsely chopped
1½ cups (10.5 ounces) vanilla sugar
2¼ cups unsweetened Dutch-processed cocoa powder
½ teaspoon salt
1-3 teaspoons instant espresso powder

Grind chocolate in a food processor until finely chopped. Add the remaining ingredients and process until mixed. Transfer to an airtight container. To serve, mix 3-4 tablespoons into 8 ounces of hot milk.

hot chocolate mix 3

gingerbread cookies

gingerbread cookies 1

I have what I admit is a random prejudice against crisp, crunchy cookies. I want soft, I want tender, I want chewy. I think most people, or at least most people of my generation, agree with me, but I doubt it was always this way. Surely there was a time when crisp cookies were at least as popular as soft ones. How else would we have gingersnaps?

gingerbread cookies 8

Obviously when I went looking for a gingerbread cookie recipe, “snap” wasn’t going to be part of the title. I wanted chewy and sweet but not too sweet and spicy but not too spicy.

gingerbread cookies 6

What I got was just about the perfect cookie – by my soft cookie standards. It puffed quite a bit in the oven, but not enough to lose its shape. It could use some more spice, but that’s easy to fix next time. More importantly, it was just the right level of sweetness, and even better, perfectly chewy. At least I thought so; Dave said he prefers his ginger cookies crunchier. Unfortunately for him, the only way he’ll get snappier gingerbread cookies is to make them himself, because this recipe was too perfect for me to try another.

gingerbread cookies 2

One year ago: Pizza with Butternut Squash and Kale
Two years ago: Red Pepper Risotto
Three years ago: Steak au Poivre
Four years ago: Sausage Apple Hash

Printer Friendly Recipe
Gingerbread Cookies
(slightly adapted from Gourmet via epicurious)

Makes about 3 dozen, depending on the size of your cookie cutters

I chilled my cut cookies on the baking sheets, before baking, for about 10 minutes before transferring to the oven. This tends to help cut-out cookie retain their shape during baking, but these still puffed quite a bit.

I didn’t use the icing recipe linked here. I decorated my cookies with cream cheese frosting because it seemed easier and tastier. It was, but the cookies had to be stored in a single layer to avoid messing up the frosting.

The spices in the original recipe here were pretty mild; next time I’ll double them.

⅔ cup molasses (not robust)
⅔ cup (4.67 ounces) packed dark brown sugar
1 tablespoon ground ginger
1½ teaspoons ground cinnamon
½ teaspoon ground allspice
½ teaspoon ground cloves
2 teaspoons baking soda
16 tablespoons (2 sticks) unsalted butter, cut into tablespoon pieces
1 large egg, lightly beaten
3¾ cups (18 ounces) all-purpose flour, plus more for kneading and dusting
½ teaspoon salt

1. Bring the molasses, brown sugar, and spices to a boil in a 4- to 5-quart heavy saucepan over moderate heat, stirring occasionally; remove from heat. Stir in the baking soda (mixture will foam up), then stir in the butter 3 pieces at a time, letting each addition melt before adding next, until all of the butter is melted. Add the egg and stir until combined, then stir in the flour and salt.

2. Arrange a rack in the middle position and heat oven to 350°F. Line baking sheets with parchment paper or a silicone mat.

3. Transfer the dough to a lightly floured surface and knead, dusting with flour as needed to prevent sticking, until soft and easy to handle, 30 seconds to 1 minute. Halve the dough, wrapping one half in plastic wrap; keep at room temperature.

4. Roll out the remaining dough into a 14-inch round (⅛-inch thick) on a lightly floured surface. Cut out as many cookies as possible with cutters and carefully transfer them to the prepared baking sheets, arranging them about 1 inch apart.

5. Bake the cookies, one sheet a time, until edges are slightly darker, 8 to 10 minutes. Let the cookies cool for a couple minutes on the pan before transferring them to racks to cool completely. Make more cookies with remaining dough and scraps. Decorate cooled cookies as desired with decorating icing.

gingerbread cookies 3

short rib and dried porcini lasagne

short rib lasagne 6

I am in the mood to braise. It must be like the leaves changing in the fall; it’s based on the length of the day, not the temperature, because our temperatures here have been getting up to the high 70s. But I don’t care; I want to run the oven for three hours anyway, if the result is tender rich meat in a savory sauce.

short rib lasagne 2

Now this recipe – it’s an endeavor. Because that three hours of oven time? It’s after 10 minutes of browning meat and 20 minutes of chopping vegetables and before, oh, about 2 hours of meat shredding, béchamel whisking, pasta rolling and cutting and boiling and rinsing, and lasagna layering. Then there’s an hour of baking while you clean up after the tornado that seemingly passed through your kitchen.

short rib lasagne 4

It’s a different sort of lasagna than you might be used to, with tomatoes and cheese just playing backup roles to the meat. There isn’t a large volume of meat left after shredding the non-fatty portions of the short ribs after braising, but because the sauce spends three hours soaking up flavor from the ribs, the whole lasagna is deeply beefy. It’s just perfect. Maybe more so if you can justify four hours of oven use to warm your house, but even if you hadn’t had to turn the heater on yet, this dish is a treat.

short rib lasagne 5

One year ago: Berry Chocolate Ice Cream
Two years ago: Beef in Barolo
Three years ago: English Muffins
Four years ago: Buttery Jam Cookies

Printer Friendly Recipe
Short Rib and Dried Porcini Lasagne (adapted slightly from Fine Cooking)

Serves 6

Complete instructions on how to prepare fresh pasta for lasagna can be found in this recipe.

¾ ounce (1 cup) dried porcini mushrooms
2 pounds beef short ribs
Kosher salt and freshly ground black pepper
2 teaspoons olive oil
1 yellow onion, finely chopped
1 carrot, finely chopped
1 celery stalk, finely chopped
1 tablespoon tomato paste
1 bay leaf
½ cup dry red wine
2 cups canned crushed tomatoes
¼ cup minced parsley, plus more for garnish
3 tablespoons unsalted butter
3 tablespoons all-purpose flour
2 cups whole milk
Pinch nutmeg
¾ cup finely grated Parmigiano-Reggiano (about 1½ ounces)
1 batch fresh pasta, rolled, cut, boiled, and rinsed

1. Adjust a rack to the middle position and heat the oven to 300 degrees. In a small bowl, soak the porcini in 1½ cups warm water until softened, about 10 minutes. Drain, reserving 1 cup of the soaking liquid. (There will probably be some grit settled to the bottom of the soaking liquid. Be careful to leave this behind.) Coarsely chop the mushrooms; set aside.

2. Season the short ribs with 1 teaspoon salt and ¼ teaspoon pepper. In a 5-quart Dutch oven, heat the oil over medium-high heat until shimmering. Add the short ribs, in batches if necessary, and brown all over, 2 to 3 minutes per side. Transfer to a plate. Pour off and discard all but a thin layer of fat.

3. Reduce the heat to medium and add the onion, carrot, celery, and a pinch of salt and cook until the vegetables are tender, 4 to 5 minutes. Add the tomato paste and bay leaf and cook, stirring, until the tomato paste darkens, 1 to 2 minutes. Add the red wine and simmer, stirring and scraping up any browned bits with a wooden spoon, until syrupy, 2 to 3 minutes. Add the reserved mushroom liquid and the tomatoes and bring to a simmer. Add the porcini and the short ribs with any accumulated juices; cover, transfer the pot to the oven, and cook until the meat is fall-off-the-bone tender, 2½ to 3 hours.

4. Transfer the ribs to a plate to cool. Pour the sauce into a heatproof bowl and discard the bay leaf. When the fat rises to the surface, skim it off and discard. (If you have the time, refrigerate the sauce at this point so you can just pick off the hardened fat from the surface.) Mix in the parsley; season to taste with salt and pepper. When the meat is cool enough to handle, remove and discard the bones and any fat or cartilage. Shred the meat; set aside. Increase the oven temperature to 350 degrees.

5. Melt the butter in a 2-quart saucepan over medium heat. Add the flour and whisk constantly until light golden, about 2 minutes. Gradually whisk in the milk and cook at a gentle simmer, stirring often, until the mixture thickens, about 10 minutes. Season with 1 teaspoon salt and the nutmeg. Stir in ½ cup (1 ounce) of the parmesan. Mix this béchamel sauce into the short rib sauce.

6. Spread about ¾ cup of the sauce on the bottom of a 9×13-inch baking dish. Mix the shredded meat into the remaining sauce. Cover the sauce in the dish with a layer of cooked noodles, cutting them as needed to fill any gaps. Alternate layers of pasta and sauce until you run out of sauce, ending with a layer of sauce. Sprinkle with the remaining ¼ cup (0.5 ounce) of parmesan.

7. Cover the baking dish with foil and bake for 40 minutes. Remove the foil and bake until the top is browned and bubbly, 15 to 20 minutes. Sprinkle additional minced parsley over the top of the lasagna. Cool for at least 10 minutes before serving.

short rib lasagne 7

egg sandwiches with goat cheese, scallions, and prosciutto

goat cheese egg sandwiches 3

Egg sandwiches are my favorite breakfast. Yes, I’m making such a bold statement. And it’s generally not something I need much creativity in. A slice of salty ham, some bracingly sharp cheddar, and tender eggs on pretty much any kind of bread is just right for me.

goat cheese egg sandwiches 1

But this weekend I was in the mood for something brighter. Remembering the perfection of the combination of goat cheese, chives, and scrambled eggs in this (handy) scrambled egg tutorial, I mixed up goat cheese with the scallions I had in the fridge. The hint of funk in prosciutto would complement the tangy cheese.

whole wheat flour

And for a sandwich I had such high hopes for, only just the right bread would do; the sweet honey-glazed rolls in the freezer were not the right choice. This meant mixing up two quick pre-doughs the night before I wanted my sandwiches, one whole wheat with salt to soften the whole grains, and the other white bread flour with yeast for complexity of flavor. It meant putting the pre-doughs in the mixer with more salt, yeast, and flour first thing in the morning while I waited for my tea to steep.

goat cheese egg sandwiches 2

It meant waiting well over two hours for breakfast to be ready while the dough rose (in the turned off oven with the light on and a mug of steaming water) and baked. But it was worth it, oh it was. The rolls were perfect, light and tender but sturdy enough to hold up a thick layer of creamy cheese with slivers of ham and a perfectly cooked layer of egg. The scallions added just the right amount of green flavor to the sandwich. They were even better on the second day in a row that we ate these, when the bread was already made, so breakfast took 15 minutes to make and not two hours.

goat cheese egg sandwiches 4

One year ago: Puffed Poached Pear Tart
Two years ago: Oreo Cheesecake Cookies
Three years ago: Bourbon Pound Cake
Four years ago: Red Velvet Whoopie Pies

Printer Friendly Recipe
Egg Sandwiches with Goat Cheese, Scallions, and Prosciutto

4 medium (about hamburger bun-sized) sandwiches

4 ounces goat cheese, softened
4 scallions, white and green parts, minced
4 eggs
½ teaspoon salt
1 tablespoon milk
2 teaspoons olive oil
4 medium rustic rolls (like ciabatta), halved crosswise
4 ounces sliced prosciutto

1. In a medium bowl, combined the goat cheese and scallions; set aside. In a separate medium bowl, whisk the eggs, salt, and milk until a few large bubbles form.

2. Heat the oil in a 12-inch nonstick skillet over medium heat. Add the egg mixture and lower the heat to medium-low. After about a minute, gently stir the eggs. After about another minute, they should be starting to set; use a large spatula to flip sections of egg so the other side can set as well. Turn off the heat but don’t move the pan. Residual heat from the pan will finish cooking the eggs without drying the out while you build the sandwiches.

3. Spread the cut sides of both halves of each roll with the goat cheese mixture. Top the bottom half with a layer of eggs, then sliced prosciutto. Top with the other half of the roll. Serve immediately.

goat cheese egg sandwiches 5

eggnog cupcakes

eggnog cupcakes 5

Eggnog is sort of ridiculously bad for you. I think of it as a Christmasy milkshake. I enjoy it, but moderation is key. Dave, on the other hand, learned a hard lesson about moderation recently, as he poured himself a big glass of the nog and topped it off with a generous pour of Bailey’s Irish Cream. Declaring it delicious, he went ahead and poured himself another big glass, while I attempted to point out without being too terribly annoying that that there is a whole lot of eggnog. An hour later, lying on the floor clutching his stomach, he agreed.

eggnog cupcakes 1

Perhaps iced tea glasses are not the best way to enjoy eggnog, and cupcakes, instead, are. The ingredients are similar anyway – eggs, sugar, dairy – and because eggnog is so thick, you can add a decent amount to cake batter without hurting the texture of the cake. I started with this recipe, but it’s clearly based on a vegan source, with its lack of eggs and butter. That’s fine, but I like the structure eggs give to batters, and I thought butter would be a good match with the dairy-flavored cake. I’ve always had good results with this vanilla bean cupcake recipe, which is a pretty standard cake batter, so I combined the two. For the frosting, I used an easy American-style buttercream, with just a couple ounces of cream cheese added to enhance the pudding flavor of the eggnog.

eggnog cupcakes 2

The batter, with just 2 tablespoons of bourbon, was like a sweet cocktail, with alcohol fumes dominating the flavor. Of course most of that burns off in the oven, resulting in tender, moist cupcakes with just a hint of bourbon. The frosting was particularly dangerous, and I had to be careful that I didn’t eat so much that I had to join Dave in stomach-clutching. Powdered sugar-based American buttercream can be one-dimensionally sweet, but the cream cheese, eggnog, and bourbon give this one plenty of extra flavor. A generous grating of nutmeg brings home the Christmasy overtones. This is definitely the right way to enjoy eggnog, although I wouldn’t be opposed to a small glass of the stuff with a shot of Bailey’s either. I’m not sure Dave is recovered enough to join me.

eggnog cupcakes 4

One year ago: Spelt Crackers
Two years ago: Bolognese Sauce (comparison of 3 recipes)
Three years ago: Thai-Style Chicken Soup (Tom Kha Gai)
Four years ago: Cranberry Orange Muffins

Printer Friendly Recipe
Eggnog Cupcakes (adapted from Annie’s Eats and these Vanilla Bean Cupcakes)

Makes about 15 cupcakes

I included butter for flavor and a couple tablespoons of oil because it does a better job making cakes tender and moist than butter does.

1¼ cups (5 ounces) cake flour
2 teaspoons baking powder
½ cup eggnog, at room temperature
2 tablespoons vegetable oil
2 teaspoons vanilla extract
2 tablespoons bourbon or dark rum
5 tablespoons unsalted butter, at room temperature
½ teaspoon salt
¾ cup (5.75 ounces) sugar
3 large eggs, at room temperature

For the frosting:
16 tablespoons unsalted butter, at room temperature
2 ounces cream cheese, softened
Pinch of salt
2½ cups (10 ounces) confectioners’ sugar, sifted
Pinch of freshly grated nutmeg
2 tablespoons eggnog
1 teaspoon vanilla
2 teaspoons bourbon

1. Heat the oven to 350°F. Line two cupcake pans with paper liners. In a medium bowl, combine the cake flour and baking powder. In a 2-cup measuring cup, whisk together the eggnog, oil, vanilla, and bourbon.

2. Place the butter and salt in the bowl of an electric mixer fitted with the paddle attachment. Beat on medium-high speed for 3 minutes, until light and creamy in color. Gradually add the sugar to the butter mixture. Mix in the eggs one at a time, until incorporated. With the mixer on low speed, add one-third of the flour mixture, followed immediately by half of the eggnog mixture, mixing just until incorporated. Repeat with another third of the flour and the rest of the eggnog, then the last of the flour. Scrape down the sides of the bowl and mix for 15 seconds longer.

3. Divide the batter between the prepared paper liners, filling each about ⅔ of the way full. Bake for 18-22 minutes, or until a toothpick inserted in the center comes out clean. Allow to cool in the pans for 5-10 minutes, then transfer to a cooling rack to cool completely.

4. To make the frosting: Place the butter, cream cheese, and a pinch of salt in the bowl of an electric mixer fitted with the whisk attachment. Beat on medium-high speed until creamy, about 1 minute. Gradually add the powdered sugar and nutmeg, and mix on medium-high speed until smooth, about 2 minutes, scraping the sides of the bowl as necessary. Add the eggnog and whip on medium-high speed until light and fluffy, 4 minutes. With the mixer on medium-low speed, blend in the bourbon and vanilla. Frost the cupcakes as desired.

eggnog cupcakes 3

meatier meatloaf

meatloaf 7

The first time I made meatloaf, Dave swore up and down that he didn’t like meatloaf – and then, of course, he was pleasantly surprised by how good it was. The second time I made it (years later), he was still pretty sure he didn’t like meatloaf, but then, of course, enjoyed it. This time when I asked him beforehand whether he liked meatloaf, he said he wasn’t sure. We’re making progress.

meatloaf 1

I understand that the idea of meatloaf can be unappetizing. “Meat” and “loaf” are words that shouldn’t necessarily be used together unless you’re getting out a loaf of bread to make sandwiches. But, really, meatloaf is little more than seasoned ground meat, with some sort of starch added to help the mixture hold on to moisture while it cooks.

meatloaf 2

Generally, adding bread (or oatmeal, etc.) to meat, while improving the texture, will dilute the flavor. In this case, meaty flavor is added back in with nearly every trick in the book – mushrooms, soy sauce, tomato paste.  The result is a sliceable loaf of meat that tastes plenty beefy without being tough.  Hopefully the third time is a charm, and Dave will remember how good this was next time I make meatloaf.

meatloaf 4

One year ago: Lentil Marinara
Two years ago: Pasta with Brussels Sprouts and Pine Nuts
Three years ago: Brioche Raisin Snails
Four years ago: Pumpkin Ginger Muffins

Printer Friendly Recipe
Meatier Meatloaf (from Cooks Illustrated)

I only made a half recipe.

There’s no salt in this recipe, and I think it would be better with about ½ teaspoon (for a whole recipe).

Meatloaf:
2 tablespoons unsalted butter
1 onion, chopped fine
6 ounces white mushrooms sliced and trimmed
1 tablespoon tomato paste
3 tablespoons plus ½ cup chicken broth
2 garlic cloves, minced
2 large eggs
2 tablespoons soy sauce
1 tablespoon unflavored gelatin
½ slice hearty white bread, torn into 1-inch pieces
⅓ cup minced fresh parsley
2 teaspoons Dijon mustard
¾ teaspoon peppers
½ teaspoon dried thyme
1 pound ground pork
1 pound 85 percent lean ground beef

Glaze:
½ cup ketchup
¼ cup cider vinegar
3 tablespoons packed brown sugar
1 teaspoon hot sauce
½ teaspoon ground coriander

1. Adjust oven rack to middle position and heat oven to 350 degrees. Fold heavy-duty aluminum foil to form 9 by 5 inch rectangle. Center foil on wire rack set in rimmed baking sheet. Poke holes in foil with skewer (about ½ inch apart). Spray foil with vegetable oil spray.

2. Melt butter in 12-inch skillet over medium heat. Add onion and mushrooms; cook, stirring occasionally, until beginning to brown, 10 to 12 minutes. Add tomato paste and cook, stirring constantly, until browned, about 3 minutes. Reduce heat to low; add 3 tablespoons broth and garlic; cook, scraping bottom of pan to loosen any browned bits, until thickened, about 1 minute. Transfer mushroom mixture to a large bowl to cool.

3. Whisk eggs, remaining ½ cup broth, and soy sauce together in bowl. Sprinkle gelatin over egg mixture and let sit until gelatin softens, about 5 minutes.

4. Pulse bread in food processor until finely ground, 5 to 10 pulses. Add gelatin mixture, cooled mushroom mixture, parsley, mustard, pepper, and thyme to bread crumbs and pulse until mushrooms are finely ground, about 10 pulses, scraping down bowl as needed. Transfer bread-crumb mixture to large bowl. Add pork and beef and mix with hands to thoroughly combine.

5. Transfer meat mixture to foil rectangle and shape into 9 by 5-inch loaf using wet hands. Bake meatloaf until it registers 155 to 160 degrees, 75 to 90 minutes. Remove from oven and turn on broiler.

6. While meatloaf cooks, bring all the ingredients for the glaze to simmer in a small saucepan over medium heat. Cook, stirring occasionally, until thick and syrupy, about 5 minutes.

7. Spread half of glaze evenly over cooked meatloaf; place under broiler and cook until glaze bubbles and begins to brown at edges, about 2 minutes. Remove meatloaf from oven and spread evenly with remaining glaze; return to broiler and cook until glaze is again bubbling and beginning to brown, about 2 minutes longer. Let meatloaf cool for 20 minutes before slicing and serving.

meatloaf 5

mussels fra diavolo

mussels fra diavolo 7

Dave took to mussels before I did. They, along with all the other bivalves, weren’t even on my radar when he came home from a dinner with coworkers raving about them. It was one of the first foods he’d tried before I had.

mussels fra diavolo 1

Not long after, we went to a Belgian mussels and beer restaurant, and after that I was hooked. It took me a few bites to get past the slightly boogery texture, but I was sold when I tasted the liquid they were served with. It was buttery and winey and briney, and the housemade ketchup didn’t hold a candle to it as a dip for the crisp French fries served alongside.

mussels fra diavolo 3

We’ve eaten mussels many, many times since then, but this is our favorite way. It’s garlicky and spicy, and the pasta is the perfect vehicle to mix with the sauce the mussels cook in. And the best part? Dave likes it so much, he’s willing to make dinner. This makes me love mussels at least as much as he does.

mussels fra diavolo 5

One year ago: Normandy Apple Tart
Two years ago: Pumpkin Oatmeal Cookies
Three years ago: Herbed Lamb Chops with Pinot Noir Sauce
Four years ago: Truffles (chocolate brand comparison)

Printer Friendly Recipe
Mussels fra Diavolo (adapted from Cook’s Illustrated’s Shrimp fra Diavolo and Gourmet)

Serves 4

4 tablespoons extra-virgin olive oil, divided
12 cloves garlic, minced or pressed through a garlic press (about ¼ cup), divided
1 (28-ounce) can diced tomatoes, drained
1 cup medium-dry white wine, such as Sauvignon Blanc
salt
¾ to 1 teaspoon red pepper flakes
½ teaspoon sugar
1 pound linguine
3 pounds mussels, cleaned and debearded
¼ cup minced fresh parsley

1. Bring a large pot of water to boil.

2. Heat a 5-quart Dutch oven over medium-low heat. Add 3 tablespoons of the oil and 9 cloves of garlic. Cook, stirring frequently, until the garlic is sticky and light golden and begins to foam, about 7-10 minutes. Mix in the tomatoes, wine, 1 teaspoon salt, the red pepper flakes, and sugar. Increase the heat to medium-high and simmer until thickened and fragrant, about 8 minutes.

3. While the sauce is simmering, add 1 tablespoon salt and the linguine to the boiling water and cook according to the package directions until al dente. Drain; return the pasta to the now empty pot and add about ½ cup of the sauce. Toss well to coat.

4. Add the mussels to the remaining sauce and cook, covered, until they just open wide, checking frequently after 3 minutes and transferring to a bowl. Discard any mussels that remain unopened after 6 minutes.

5. Stir the remaining garlic and the parsley into the sauce. Stir in the remaining 1 tablespoon oil. Divide the pasta among warmed serving bowls, topping with the mussels and sauce. Serve immediately.

mussels fra diavolo 6