Archives for May 2014

strawberry rhubarb crisp bars

strawberry rhubarb crisp bars 4

I never make pies anymore. Most of what I bake is meant to be easily shared by a large crowd, either at work or at a party. That’s fine, but pies are fine too.

strawberry rhubarb crisp bars 1

This was part of my annual frenzy to use rhubarb as much as possible during its short season. When the grocery store has it, I buy it, whether I have a plan for it or not. That’s easy when you have a bunch of coworkers who will eat anything – preferably anything handheld, easy to grab along with a cup of coffee.

strawberry rhubarb crisp bars 2

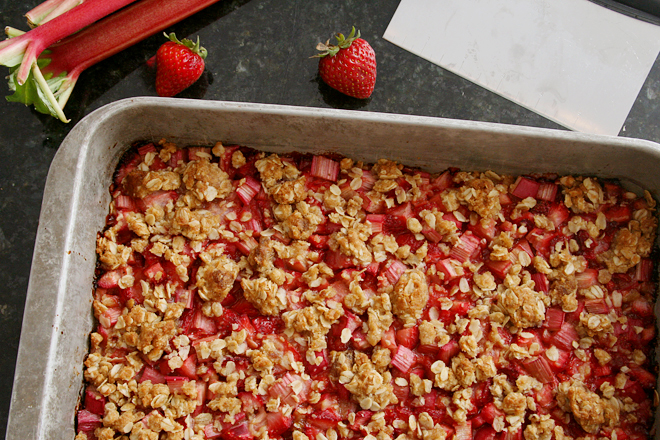
Until I find a small gathering – with plates and even forks – to make a pie for, these bars are a good stand in. The balance of tart, juicy fruit to buttery flour is spot on, and although the crispness isn’t like a flaky pie crust, the oaty crunch is a good stand-in. Best of all, I actually had an opportunity to share them, unlike a silverware-demanding pie.

strawberry rhubarb crisp bars 3

Printer Friendly Recipe
Strawberry Rhubarb Crisp Bars (adapted from Yvonne Rupert’s One Bowl Baking via Smitten Kitchen)

Makes 9 to 16 bars

I un-one bowled this. I’m spoiled by my dishwasher and would rather mix things conveniently than use less dishes.

1 cup (80 grams) rolled oats
¾ cup (95 grams) all-purpose flour
½ cup (95 grams) light brown sugar
¼ teaspoon table salt
6 tablespoons unsalted butter, melted
1 cup (125 grams) small-diced rhubarb (from about 1½ medium stalks)
1 cup (155 grams) small-diced strawberries
1 tablespoon granulated sugar, divided
1 tablespoon lemon juice
1 teaspoon cornstarch
Powdered sugar, for decoration, if desired

1. Heat oven to 375 degrees. Spray an 8-by-8 inch square pan with cooking spray.

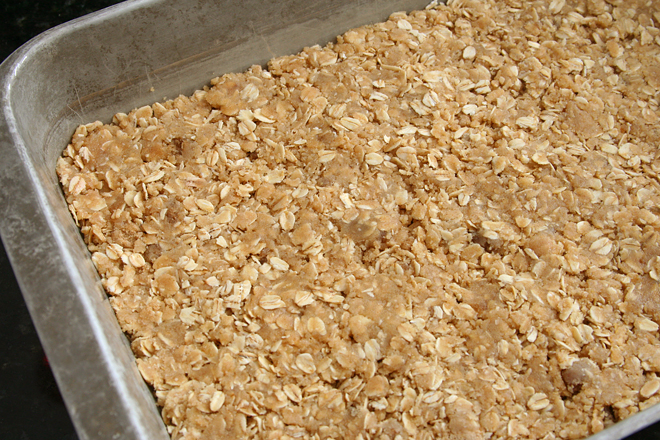
2. In a medium bowl, mix the oats, flour, brown sugar, and salt. Add the butter and stir until clumps form. Set aside ½ cup of the crumble mixture and press the rest of the crumb mixture evenly in the bottom of the prepared pan.

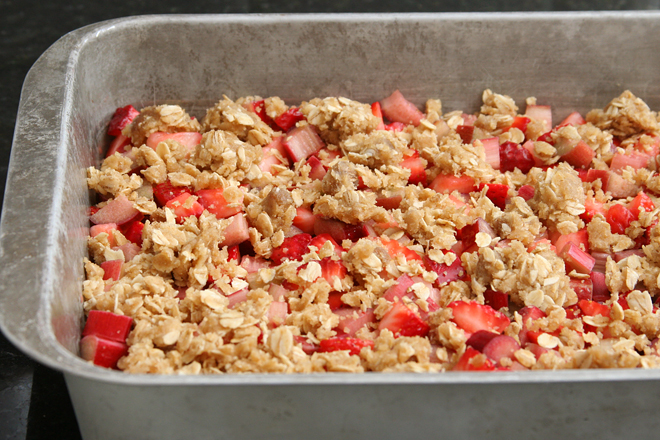
3. In a medium bowl (you could even use the same bowl; see, one less dish to wash!), combine the rhubarb, strawberries, granulated sugar, lemon juice, and cornstarch. Evenly distribute the fruit over the crust, then scatter the reserved crumbs over the fruit.

4. Bake the bars until the fruit is bubbling and the crisp portion is golden, 30 to 40 minutes. Cool completely before serving.

strawberry rhubarb crisp bars 5

rustic bread (comparison of 3 recipes)

rustic bread 23
baguette: PR; slices: CI; round loaf: T

I love bread so much. I always have – who doesn’t? – but I’ve been having even more fun with it lately. Besides hot dog and burger buns, my focus has almost exclusively been on rustic breads for the last couple years. If we spend Saturday night at home, I’ll often make a really nice meal, and wine seems like a natural accompaniment (to be honest, often the meal is planned around the wine), and bread and wine are so good together.

rustic bread 1
CI biga

With all these opportunities to experiment, I started working on this comparison years ago. I slowly narrowed down recipes until I had three that were so good that the comparison would undoubtedly be a reflection of personal taste and not quality of the recipe, thus defeating the purpose of doing a tasting at all. But at least I (and my friends) got to eat a lot of good bread along the way.

rustic bread 2
CI dough

The recipes that made the cut were Cook’s Illustrated’s Italian Bread recipe (CI), Peter Reinhart’s Pain a l’Ancienne (PR), and Tartine’s Country Bread (T). I’d previously made all three of these recipes many times and loved them all. I’d need to taste them side-by-side to choose a favorite.

rustic bread 3
CI dough mid-turn

CI – This bread starts with a biga, a mixture of flour, water, and yeast that’s stirred together, left at room temperature for a few hours to ferment, then transferred to the refrigerator overnight. A second mixture of flour, water, and yeast is later mixed and allowed to set for just 20 minutes before the biga and salt is added and the dough is kneaded.

rustic bread 5
CI dough completed turn

The dough goes through a long rise at room temperature with several “turns” in the middle – basically folding the dough over itself a couple times. It’s supposed to lead to the final loaf rising up and not out, and it’s a trick I like enough that I incorporate it in other bread recipes. After shaping, the dough goes through a second rise and is baked on a stone at 500 degrees for 10 minutes and then 400 degrees. The dough is sprayed with water before baking, but no other steam is added.

rustic bread 8
CI risen dough

PR – This is the easiest bread in this lineup. Flour, yeast, salt, and ice water are mixed and kneaded, then chilled overnight. The next day, after it warms up and rises a bit, the very sticky dough is cut into smaller portions, which are pulled and pushed into something vaguely baguette-like. These are baked soon after shaping. Reinhart calls for a few shots of water to be sprayed on the sides of the oven, plus a pan of hot water in the oven with the bread to create steam during baking.

rustic bread 9
CI ready to bake

T – This dough requires a lot of babysitting and a lot of patience, although not necessarily a lot of work. The flour and water are mixed with sourdough starter and allowed to rest for a bit, then salt is mixed in. The dough isn’t kneaded, it’s just turned, as described above, every half an hour or so for about four hours. After being shaped into rounds, it’s chilled overnight in the refrigerator. It’s kept covered in a heavy Dutch oven for the first part of baking to trap steam, then the lid is removed so the crust can brown.

rustic bread 10
CI

In retrospect, the breads are pretty different. The Italian bread (CI) has an even, relatively tight structure, while the pain a l’ancienne (PR) is open and airy. Tartine’s country bread (T) has a slight but unignorable sourdough flavor.

rustic bread 11
CI

CI – Described as denser and drier. The chewy crust got compliments. While one friend thought it was sweeter than the other breads, to me, it didn’t have as much flavor. This might be because I eat so many whole grains lately that a bread made with all white flour seems plain.

PR – Tasters thought the bread might be buttery or eggy, despite a lack of both of those ingredients in the recipe. They also thought it was chewy and moist and liked the crust.

T – The sourdough flavor was picked out immediately. It was also described as yeastier and more floury.

rustic bread 12
CI

With five people comparing the breads, no clear winner emerged. A friend who grew up eating sourdough pancakes preferred Tartine’s country bread. An Italian friend loved CI’s Italian bread, as did a friend who liked the sweeter flavor. PR’s pain a l’ancienne was Dave’s favorite and no one’s least favorite. Those who favored Tartine country bread said CI’s Italian bread was their least favorite and vice versa, although everyone liked all of the breads. I was just happy because I got to eat — and bake — so much bread.

rustic bread 25
clockwise from top: PR, T, CI

Tartine Country Bread

Pain a l’ancienne

Printer Friendly Recipe
Italian Bread (from Cook’s Illustrated’s The New Best Recipe)

This recipe requires a standing mixer to make the dough, a spray-bottle filled with water for spritzing, a rectangular baking stone, and an instant-read thermometer for gauging doneness. It also requires a bit of patience — the biga, which gives the bread flavor, must be made 11 to 27 hours before the dough is made.

This recipe makes a gigantic loaf of bread.  I always divide the dough into two portions and make smaller loaves.

I really didn’t intend for all of the pictures in this post to be of this recipe.  Fortunately, there are separate entries dedicated to the other two recipes.

Biga:
11 ounces bread flour (2 cups)
¼ teaspoon instant yeast
8 ounces water (1 cup), room temperature

Dough:
16½ ounces bread flour (3 cups), plus extra for dusting hands and work surface
1 teaspoon instant yeast
10.7 ounces water (1⅓ cups), room temperature
2 teaspoons table salt

1. For the biga: Combine flour, yeast, and water in bowl of standing mixer fitted with dough hook. Knead on lowest speed (stir on KitchenAid) until it forms a shaggy dough, 2 to 3 minutes. Transfer biga to medium bowl, cover tightly with plastic wrap, and let stand at room temperature until beginning to bubble and rise, about 3 hours. Refrigerate biga at least 8 hours or up to 24 hours.

2. For the dough: Remove biga from refrigerator and let stand at room temperature while making dough. Combine flour, yeast, and water in bowl of standing mixer fitted with dough hook; knead on lowest speed until rough dough is formed, about 3 minutes. Turn mixer off and, without removing dough hook or bowl from mixer, cover bowl loosely with plastic wrap; let dough rest 20 minutes.

3. Remove plastic wrap, add biga and salt to bowl, and continue to knead on lowest speed until ingredients are incorporated and dough is formed (dough should clear sides of bowl but stick to very bottom), about 4 minutes. Increase mixer speed to low (speed 2 on KitchenAid) and continue to knead until dough forms a more cohesive ball, about 1 minute. Transfer dough to large bowl (at least 3 times dough’s size) and cover tightly with plastic wrap. Let dough rise in cool, draft-free spot away from direct sunlight, until slightly risen and puffy, about 1 hour.

4. Remove plastic wrap and turn the dough by sliding a plastic bench scraper under one side of the dough; gently lift and fold one third of the dough toward the center. Fold the opposite side of the dough toward the center. Finally, fold the dough in half, perpendicular to first folds. Dough shape should be a rough square. Replace plastic wrap; let dough rise 1 hour. Turn dough again, replace plastic wrap, and let dough rise 1 hour longer.

5. To shape the dough: Dust work surface liberally with flour. Gently scrape and invert dough out of bowl onto work surface (side of dough that was against bowl should now be facing up). Dust dough and hands liberally with flour and, using minimal pressure, push dough into rough 8- to 10-inch square. Fold the top left corner diagonally to the middle; repeat step 2 with top right corner. Gently roll dough from top to bottom until it forms a rough log. Roll the dough into its seam, and, sliding hands underneath each end, transfer the dough to parchment paper. Gently shape dough into 16-inch football shape by tucking bottom edges underneath. Dust loaf liberally with flour and cover loosely with plastic wrap; let loaf rise until doubled in size, about 1 hour. Meanwhile, adjust oven rack to lower-middle position, place baking stone on rack, and heat oven to 500 degrees.

6. To bake: Using a lame, single-edged razor blade, or sharp chef’s knife, cut slit ½ inch deep lengthwise along top of loaf, starting and stopping about 1½ inches from ends; spray loaf lightly with water. Slide parchment sheet with loaf onto baker’s peel or upside-down baking sheet, then slide parchment with loaf onto hot baking stone in oven. Bake 10 minutes, then reduce oven temperature to 400 degrees and quickly spin loaf around using edges of parchment; continue to bake until deep golden brown and instant-read thermometer inserted into center of loaf registers 210 degrees, about 35 minutes longer. Transfer to wire rack, discard parchment, and cool loaf to room temperature, about 2 hours.

rustic bread 24

braised artichokes with creamy dipping sauce

braised artichokes 8

My sister’s kids aren’t particularly picky, but sometimes I push their limits without meaning to. Like the time I thought they’d get a kick out of eggs cooked in bacon toast cups, but instead they were like, Hey, now where does the jelly go? And at least that wasn’t a vegetable.

braised artichokes 2

I don’t even remember why I thought artichokes would be a good idea in the first place, but then when I started thinking about it, I got worried. They tend to turn a military shade of green once they’re cooked. I tried to get the kids excited about saying “okey dokey artichokey”, but I was pulling at strings and knew it.

braised artichokes 4

And then, oddly, they loved the artichokes. I think it was the number one rule of feeding children that worked in my favor – opportunities to dip. Plus, maybe, just maybe, I was right, and the fun of pulling off leaves and scraping the “meat” off with your teeth was more important than the brownish green shade of the vegetables. It certainly is for me, as this is one of my absolute favorite foods.

braised artichokes 7

Printer Friendly Recipe
Braised Artichokes with Creamy Dipping Sauce

Serves 3 to 6 as a first course, depending on how big your artichokes are and how big your appetite is

Trimming artichokes isn’t hard, but you might want to watch a youtube video or two if you’re not familiar with the process.

99% of artichoke recipes call for transferring the trimmed ‘chokes to a bowl of water with a lemon squeezed into it to keep them from browning. Not only does it not work, but they look and taste the same after cooking, so I’ve skipped this step. (But a recent issue of Cook’s Illustrated tested it and found it the lemon water worthwhile.)

If your artichokes are really big, you might need to use a 12-inch sauté pan instead of a Dutch oven to fit them in a single layer.

If you’re mayonnaise-adverse, crème fraiche would be a great substitute. Greek yogurt or sour cream would work if you stir it in off the heat so the dairy doesn’t curdle.

3 medium artichokes
1 tablespoon olive oil
3 cloves garlic, minced
¾ cup water
½ cup white wine
¼ teaspoon black pepper
½ teaspoon salt
2 tablespoons mayonnaise
1 tablespoon parsley leaves, minced

1. Working with one artichoke at a time, cut off the top 2 inches of the artichoke. Working around the artichoke, use scissors to cut off the sharp tips of the leaves. Trim the base of the stem, then trim off the outside millimeter or so of the stem. Cut the artichoke in half from top to bottom and use a paring knife to cut out the sharp purple leaves and fuzzy choke from the center. Rinse the artichoke under running water to remove any remaining fuzz.

2. Heat the olive oil in a 5- or 6-quart Dutch oven over medium heat. Add the garlic and cook, stirring constantly, until fragrant, about 30 seconds. Arrange the artichokes cut-side down in the pot, overlapping the stems in the middle. Add the water, wine, pepper, and salt. Cover the pot, reduce the heat to medium-low, and braise artichokes until tender when pierced with a knife, about 30 minutes for small artichokes and 40 minutes for very large artichokes. (If you’re not ready to serve the artichokes right away, remove the pot from the heat and leave the cover on; the ‘chokes will stay hot for up to 30 minutes.)

3. Transfer artichoke halves to a serving platter or plates. There should about ⅓ cup liquid remaining in the pot; if there’s less, add water until there’s a total of ⅓ cup liquid; if there’s more, simmer the liquid to reduce it slightly. Add the mayonnaise and parsley to the liquid; whisk to combine and pour into individual dipping containers.

braised artichokes 10

strawberry shortcake cupcakes

strawberry shortcake cupcakes 10

I’ve had these cupcake wrappers for at least a year, maybe close to two years. But because they’re tulips, I was determined that I could only use them in the spring, and sometimes, a whole month or two can go by where I don’t think about cupcake wrappers. If that month is April and May, then it’s too late for tulips. Having actually remembered this year, I wanted to make the most springy cupcake I could.

strawberry shortcake cupcakes 1

Strawberries are the obvious choice. And what dessert is more springy than strawberry shortcake?

strawberry shortcake cupcakes 2

This isn’t too different than a cupcake adaptation of this strawberry cream cake, but the cake portion of that recipe is meant to be dense enough to stand up to layers of strawberries and whipped cream. I wanted something fluffier, so I started with my favorite basic vanilla cake. The filling in that strawberry cream cake would be perfect for adding to the middle of cupcakes, because the strawberries are minced and juicy, just right for maximizing the flavor they can contribute in just a small hole in the middle of each cupcake.

strawberry shortcake cupcakes 4

The topping is perfect as well, since the cream cheese stabilizes the whipped cream enough to mound on top of each cupcake. With a slice of strawberry over the hole filled with strawberries to even out the top of the cupcake, plus more fresh strawberries on top, there were plenty of berries to balance the cake and rich cream topping. It was a perfect combination.  Tulips and strawberries, what’s better than that for spring?

strawberry shortcake cupcakes 12

Strawberry Shortcake Cupcakes (cake adapted from Confections of a Foodie Bride; filling and topping adapted from Cook’s Illustrated’s Strawberry Cream Cake)

24 cupcakes

Vanilla cupcakes:
3 cups (12 ounces) cake flour
1 tablespoon baking powder
1 teaspoon salt
16 tablespoons (2 sticks) unsalted butter, at room temperature
2 cups (14 ounces) sugar
4 large eggs, at room temperature
1¼ cups buttermilk, at room temperature
1 tablespoon vanilla extract

Strawberry filling:
8 ounces fresh strawberries (about ½ quart), washed, dried, and stemmed
1 tablespoon sugar
½ tablespoon Kirsch or port
Pinch table salt

Whipped cream topping:
8 ounces cream cheese, room temperature
½ cup (3.5 ounces) sugar
1 teaspoon vanilla extract
pinch table salt
2 cups heavy cream

6-8 strawberries, sliced crosswise into rounds
additional strawberries for garnish

1. For the cupcakes: Preheat the oven to 350°F. Line two cupcake pans with paper liners. In a medium bowl, combine the cake flour and baking powder.

2. Place the butter and salt in the bowl of an electric mixer fitted with the paddle attachment (or a large bowl if using a hand mixer). Beat on medium-high speed for 3 minutes, until light and creamy in color, scraping the sides of the bowl as necessary.

3. Gradually add the sugar to the butter mixture, beating until fluffy. Add the eggs one at a time, beating until incorporated. Combine the buttermilk and the vanilla extract in a liquid measuring cup. With the mixer on low speed, add one-third of the flour mixture, followed immediately by half of the buttermilk, mixing just until incorporated. Repeat with another third of the flour and the rest of the buttermilk, then the last of the flour. Mix for 15 seconds longer.

4. Divide the batter between the prepared paper liners, filling each about two-thirds of the way full. Bake 18-22 minutes, or until a toothpick inserted in the center comes out clean. Allow to cool in the pans for 5 minutes, then transfer to a cooling rack to cool completely.

5. For the filling: Quarter the berries; toss with sugar in a medium bowl and let sit 1 hour, stirring occasionally. Strain the juices from the berries and reserve (you should have about ¼ cup). In the workbowl of a food processor fitted with the metal blade, give the macerated berries five 1-second pulses (you should have about ¾ cup). In a small saucepan over medium-high heat, simmer the reserved juices and Kirsch until the mixture is syrupy and reduced to about 1½ tablespoons, 3 to 5 minutes. Pour the reduced syrup over the macerated berries, add a pinch of salt, and toss to combine.

6. For the topping: When the cake has cooled, place the cream cheese, sugar, vanilla, and salt in the bowl of a standing mixer fitted with the whisk attachment. Whisk at medium-high speed until light and fluffy, 1 to 2 minutes, scraping down the bowl with a rubber spatula as needed. Reduce the speed to low and add the heavy cream in a slow, steady stream; when it’s almost fully combined, increase the speed to medium-high and beat until the mixture holds stiff peaks, 2 to 2½ minutes more, scraping the bowl as needed (you should have about 4½ cups).

7. To assemble: With a paring knife, carve a cone out of the center of each cupcake. Use a slotted spoon to transfer some strawberry filling to the cavity; top each hole with a round slice of strawberry. Frost the cupcakes; garnish with additional strawberries. If not serving within about an hour, refrigerate for up to 8 hours. Let stand at room temperature for at least 30 minutes or up to an hour before serving (otherwise, the cake will seem hard and stale).

strawberry shortcake cupcakes 9