pizza with prosciutto, goat cheese, and roasted tomatoes

prosciutto goat cheese pizza 6

I wrote out a formula for pizza. And I realize that for some people, that takes the fun out of developing recipes, but I’m a scientist, so what do you expect from me? And here’s what I decided:

prosciutto goat cheese pizza 4

Many of my favorite foods have a balance of the five basic flavors – sweet, salty, sour, bitter, umami, and then I’m going to add heat or spice to this as well. A traditional pizza incorporates most of these; tomato sauce is acidic and rich in umani, the crust is often just a bit sweet, the cheese is salty, and a sprinkling of red chile flakes adds heat. Beyond the flavors, I like pizza best when there’s some sort of sauce (like tomato sauce, obviously), a glue (this would be the mozzarella in a traditional pizza), and toppings.

prosciutto goat cheese pizza 1

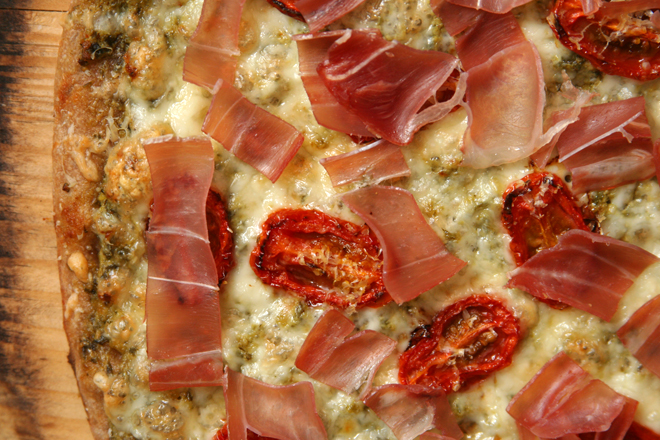
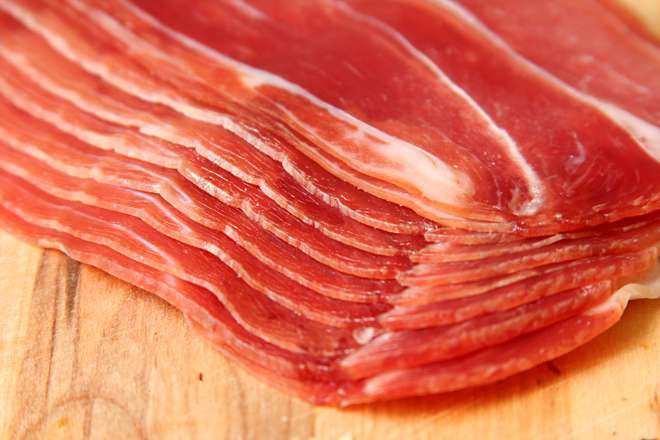
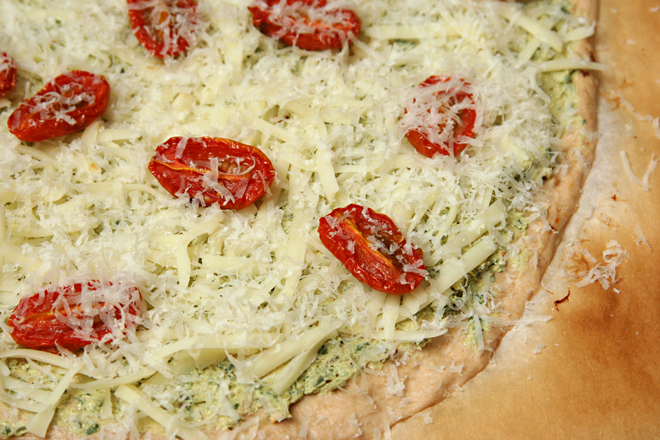
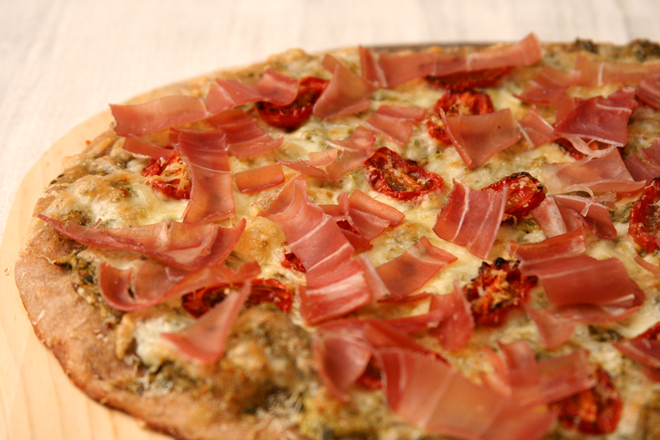
For this pizza, I started with goat cheese, because I hadn’t had it in a while and I love it. Goat cheese is tart, or sour, so that takes care of that flavor, but unlike many other cheeses, it doesn’t make a very good glue, so it would be incorporated as either the sauce or a topping. I wanted something sweet, and caramelized onions would be great, but slow-roasted tomatoes could work as well. Tomatoes have umami, but I thought meaty prosciutto would also go particularly well with the goat cheese. And I liked prosciutto better with tomatoes than onions. Prosciutto is salty, as was the dusting of parmesan I couldn’t resist sprinkling on top.

prosciutto goat cheese pizza 2

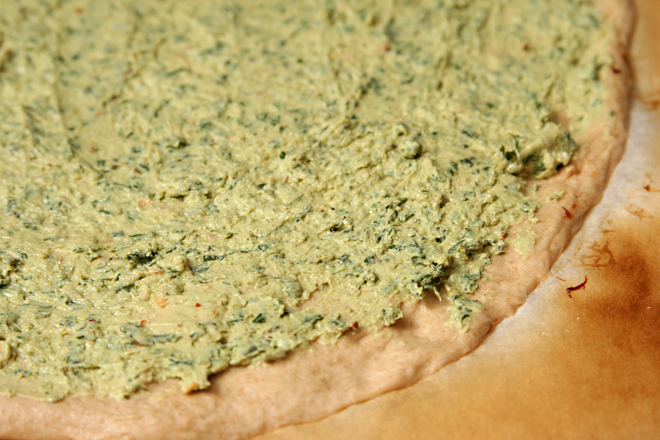
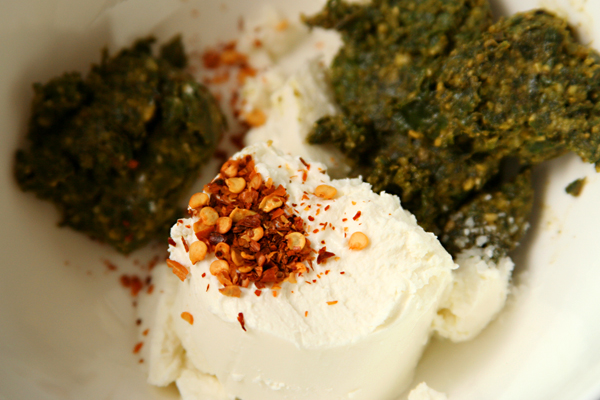
That gave me a bunch of toppings, and I could make the goat cheese into a sauce, but I still needed glue. I decided to stick to good ol’ mozzarella. You can never go wrong with putting mozzarella on pizza. And I still felt like the pizza might be missing something, especially something with light, fresh flavors, so I mixed pesto into the goat cheese, which also made it into a more spreadable sauce-like consistency. Red pepper flakes, common on pizza, added spicy heat.

prosciutto goat cheese pizza 3

And then after all my pizza math, I realized that I had hardly varied from traditional pizza, with tomatoes, mozzarella, and cured meat. All I did was change the order of layering – that, and develop an infallible formula for an infinite number of future pizza recipes. I’ll call that a success on all counts.

prosciutto goat cheese pizza 5

One year ago: Protein Waffles
Two years ago: Cherry Tomato Salad
Three years ago: Coconut Butter Thins
Four years ago: Perfect Party Cake

Printer Friendly Recipe
Pizza with Prosciutto, Goat Cheese, and Roasted Tomatoes

Makes one 12-inch pizza, serving about 3 people

1 cup grape tomatoes, halved
salt
cooking spray
1 pound pizza dough (⅓ of this recipe)
2 ounces goat cheese, room temperature
2 tablespoons pesto
¼ teaspoon red pepper flakes
4 ounces (1 cup) shredded mozzarella cheese
¼ cup (½ ounce) freshly grated parmesan
2 ounces prosciutto, sliced

1. Place a pizza stone on the bottom rack of the oven and preheat the oven to 300 degrees. Adjust another rack to the middle oven position. Line a baking sheet with parchment paper or a silicone mat. Arrange the tomatoes, cut-side up, on the baking sheet. Sprinkle lightly with salt and spray with cooking spray. Bake for 30 minutes, until shriveled.  Remove the tomatoes from the oven, set aside, and increase the oven temperature to 500 degrees.

2. Shape the dough into a ball. Set it aside for 10 to 30 minutes, loosely covered, to allow the gluten to relax. In a small bowl, combine the goat cheese, pesto, and red pepper flakes.

3. Working on a lightly floured surface or a damp cloth, flatten the dough, then pick it up and gently stretch it out, trying to keep it as circular as possible. Curl your fingers and let the dough hang on your knuckles, moving and rotating the dough so it stretches evenly. If it tears, piece it together. If the dough stretches too much, put it down and gently tug on the thick spots. Transfer the round of dough to a large square of parchment paper; slide onto a pizza peel.

4. Spread the goat cheese mixture over the dough, then evenly disperse the mozzarella, tomatoes, and parmesan over the goat cheese. Slide the pizza with the parchment onto the hot baking stone. Bake for 8-10 minutes, until the crust is browned around the edges. Transfer the pizza to a cooling rack without the parchment. Top with the prosciutto. Let the pizza rest for 5 minutes before serving.

prosciutto goat cheese pizza 8

raspberry ricotta scones

raspberry ricotta scones 7

I’ve largely gotten out of my scone phase from a few years ago. Back then, I was making a new scone recipe almost once a month. One batch of scones, frozen before baking, would last a couple weekends, which made for some wonderfully relaxed weekend mornings, with nothing to do but turn the oven on, transfer the frozen scones to a baking sheet, and boil water for the French press. Twenty minutes later, I’d sit down with a scone, a mug, and a food magazine.

raspberry ricotta scones 2

The problem with this scenario is that there’s very little nutrition in a scone. I’m not against a little butter for breakfast, but as we’ve become more active lately, we require breakfasts that fill us up and provide energy. I don’t want to imagine Dave on one of his weekly racquetball marathons with nothing but butter, flour, and sugar for fuel.

raspberry ricotta scones 3

On quiet mornings when we don’t have a busy day ahead though, scones hit the spot. And this one is even better, because it does have some extra health benefits from protein-rich ricotta and fiber-rich whole grains. Moreover, this is one of the best scones I’ve ever made.

raspberry ricotta scones 4

I’ve admittedly become more and more enamored with whole grains and the nutty depth of flavor they add to baked goods, and this was a perfect example of how a portion of whole wheat flour isn’t a sacrifice to be made for health reasons, but an improvement in flavor. I think this recipe has me headed toward another scone phase.

raspberry ricotta scones 5

One year ago: Corniest Corn Muffins
Two years ago: How to adapt any bread to be whole wheat
Three years ago: Lemon Cup Custard
Four years ago: Spaghetti and Meatballs

Printer Friendly Recipe
Raspberry Ricotta Scones (slightly adapted from Smitten Kitchen)

Makes 9

Baked scones are best fresh out the oven. If you want to make these in advance, form and cut the scones, then transfer the unbaked scones to a ziploc bag to freeze. There’s no need to defrost before baking, but you will need to add a few extra minutes to the baking time.

I used whole wheat pastry flour, which I prefer in quick breads. But if you only have regular whole wheat flour, I’m sure it will be fine.

¾ cup (6.5 ounces) whole milk ricotta
⅓ cup heavy cream
1 cup (4.8 ounces) whole wheat flour
1 cup (4.8 ounces) all-purpose flour
1 tablespoon baking powder
¼ cup (1.75 ounces) granulated sugar
½ teaspoon table salt
6 tablespoons (¾ stick) cold unsalted butter, cubed
1 cup (4.75 ounces) raspberries, fresh or frozen

1. Adjust a rack to the middle position and heat the oven to 425 degrees. Line a baking sheet with parchment paper or a silicone mat. In a large measuring cup, combine the ricotta and heavy cream.

2. Combine the flours, baking powder, sugar, and salt in the food processor. Add the butter and pulse until the butter is cut into pea-sized pieces. Add the raspberries and pulse a few times to break them down. Add the ricotta mixture; pulse just until the dough is evenly moistened but still looks crumbly.

3. Transfer the dough to a work surface and pat into a ball. Knead the dough a few times, then pat it out into a 7-inch square that is about 1-inch thick. Cut the dough into 9 squares.

4. Transfer the scones to the prepared baking sheet. Bake until golden brown around the bottom edges, 16-20 minutes. Transfer the scones to a wire rack and cool about 10 minutes before serving.

raspberry ricotta scones 8

parmesan bacon shortbread

bacon parmesan crackers 9

There’s a fine art to choosing a dish to bring to a potluck. If people are milling around, there’s a definite advantage to a handheld, plate-optional snack. On the other hand, if it’s mostly sit-down, dips and spreads don’t work well because people have to guess at the right ratio of dip to dipper to scoop onto their plate, not to mention the issue of whether to put the dip next to the dippers, taking up valuable plate space, or on top, risking getting dip on your fingers while you try to eat the dippers.

bacon parmesan crackers 2

Last year, I brought goat cheese, sundried tomato, pesto terrine with a thinly sliced baguette to the company potluck. It did not go over well. For one thing, it’s a dip and the potluck turned out to be a sit-down kind of deal. For another, a few of my coworkers were unfamiliar with and unwilling to try goat cheese. (Their loss!)

bacon parmesan crackers 10

This year I went to the other end of the spectrum and chose easily grabbable finger food. I included bacon to guarantee there would be no complaints about scary new ingredients. It seems to have worked; these got a lot more love than last year’s goat cheese spread. And no wonder, with so many salty rich ingredients encased in a tender cookie. I can’t think of many situations in which these little treats wouldn’t work perfectly.

bacon parmesan crackers 4

One year ago: Roasted Tomato Soup
Two years ago: Orange Berry Muffins
Three years ago: Thumbprints for Us Big Guys
Four years ago: Cooks Illustrated’s Classic Pound Cake

Printer Friendly Recipe
Bacon Parmesan Shortbread (adapted from The New York Times via Use Real Butter)

Makes about 18 cookies (more if you cut them thinner)

I used pancetta instead of bacon, which complimented the parmesan nicely.

The original recipe titles these crackers and shows a picture of thin and flaky squares. These must have been rolled paper thin before baking. However, the recipe instructs the dough to be rolled out (or cut, the way I did it) ½-inch thick. I compromised and went with ¼-inch thick, which gave a texture more like shortbread than crackers. I’m sure they’re good both ways, but if you do roll them thinner, you’ll need to adjust the cooking time.

1 cup (4.8 ounces) all-purpose flour
½ teaspoon salt
½ cup (1 ounce) finely grated fresh Parmesan cheese
4 tablespoons (½ stick) unsalted butter
¼ cup cream or half-and-half, more as needed
4 ounces (about 4 slices) bacon, cooked and crumbled

1. Put the flour, salt, cheese and butter in the bowl of a food processor. Pulse until the flour and butter are combined. Add about ¼ cup cream or half-and-half and let machine run for a bit; continue to add liquid a teaspoon at a time, until the mixture holds together but is not sticky. Add the bacon and pulse a few times to incorporate.

2. Transfer the dough to a large square of parchment or wax paper. Shape the dough into a long rectangle with a 1-inch square cross-section. Wrap tightly in the paper and freeze for at least 3 hours.

3. Heat the oven to 400 degrees. Line a baking sheet with parchment paper or a silicone mat.

4. Slice the dough ¼-inch thick, arranging the cookies ½-inch apart on the baking sheet. Bake until lightly browned, about 10 minutes. Cool on a rack; serve warm or at room temperature or store in a tin for a few days.

bacon parmesan crackers 3

tomato and four cheese lasagne

four cheese lasagna 5

Lasagna recipes are like chocolate chip cookie recipes for me – I already have several that I love, but I can’t resist a new one. I have no loyalties about béchamel versus ricotta, meaty versus vegetarian, seafood or chicken. I love them all, and I’m a sucker for a new version.

four cheese lasagna 1

A recent article in Fine Cooking, which prompted me to subscribe to the magazine, showcased three recipes – the braised beef and porcini one Josie posted, a butternut squash and goat cheese lasagna I can’t wait to make, and this classic tomato and cheese lasagna. Boring, maybe, but I can never get enough of the basic combination of pasta, cheese, and tomatoes.

four cheese lasagna 3

I always like to make my own lasagna noodles, because I’m all about creating more work for myself. (Also it’s fun.) But this time I went a step further and made my own ricotta. Combined with a lightly spiced tomato sauce and three other favorite Italian cheeses, this lasagna is in the running for my favorite – if I could ever choose a favorite lasagna.

four cheese lasagna 4

One year ago: Shrimp Canapes a la Suede
Two years ago: Mediterranean Pepper Salad
Three years ago: Chocolate Whiskey Cake
Four years ago: Banana Walnut Pancakes

Printer Friendly Recipe
Four Cheese and Tomato Lasagne (slightly adapted from Fine Cooking)

8 servings

To chop the tomatoes, just stick kitchen shears in the can and snip away. Canned tomatoes that are already diced won’t break down into the sauce like whole tomatoes will.

If you make your own ricotta, you’ll need to start with 8 cups of milk (and/or cream).

To boil and rinse the pasta, follow the instructions in this recipe through step 4.

2 tablespoons olive oil
4 medium cloves garlic, smashed and peeled
¼ teaspoon crushed red pepper flakes
2 (28-ounce) cans whole plum tomatoes, chopped (see note)
kosher salt
6 large basil leaves, torn by hand into ½-inch pieces
2 cups (15 ounces) whole-milk ricotta
2½ cups (10 ounces) grated fresh mozzarella
2 cups (8 ounces) grated fontina
1¾ cups (3.5 ounces) finely grated Parmigiano-Reggiano
1½ recipes fresh pasta, boiled and rinsed (see note)

1.Heat the oil, garlic, and red pepper flakes in a 4- to 5-quart pot over medium heat. Cook until the garlic is golden-brown, about 3 minutes. Discard the garlic. Add the tomatoes and 2 teaspoons salt; simmer gently, uncovered, adjusting the heat as needed, until the tomatoes begin to break down, about 45 minutes. Stir in the basil; season to taste with salt if necessary.

2.Position a rack in the center of the oven and heat the oven to 350°F. Set aside 1¼ cups of the sauce and mix the remaining sauce with the ricotta in a medium bowl. Mix the mozzarella, fontina, and 1 cup (2 ounces) of the Parmigiano in another medium bowl.

3. Spread ½ cup of the reserved tomato sauce on the bottom of a 9×13-inch baking dish. Cover the sauce with a slightly overlapping layer of cooked noodles, cutting them as needed to fill any gaps. Evenly spread 1½ cups of the ricotta mixture over the noodles. Sprinkle 1 rounded cup of the grated cheese evenly over the ricotta. Add another layer of noodles, and repeat the layers as instructed above, to make a total of 4 ricotta-and-cheese layers and 5 pasta layers. Spread the remaining ¾ cup plain sauce evenly over the top noodle layer. Sprinkle with the remaining ¾ cup of Parmigiano-Reggiano.

4. Cover the baking dish with foil and bake for 40 minutes. Remove the foil and bake until the top is browned and bubbly, 15 to 20 minutes. Let cool for at least 10 minutes before serving.

four cheese lasagna 6

pear almond danishes and lemon ricotta danishes

danish 14

I went through a baking drought early this year that lasted a few weeks, maybe a month. I couldn’t explain it, but I just wasn’t interested in baking for the first time in years. I was kind of worried – how long would this last? When would my drive to bake come back?

danish 1

Oh it’s back. It crept back in, but it’s in full force now. The last few weeks, in particular, I’ve taken on some ambitious projects. It started with these danishes, made for a brunch potluck that was in the evening after work. The very next day, I stayed up until midnight flooding sugar cookies with royal icing. A week after that, I made two batches of fancy cupcakes for a bridal shower. I breathed a sigh of relief when that was over, but mixed up another batch of sugar cookie dough just one day later. I’ll decorate those sugar cookies this week, plus make a double batch of tiramisu for my friend’s rehearsal dinner on Friday.

danish 5

Baking projects that are for an event in the evening after work are particularly complicated, especially if the event is toward the end of the week instead of shortly after the weekend. It requires careful balancing of chilling time, lunch hours, and evening schedules. Of course it’s worth it when you’re sitting around with your friends, drinking bellinis and eating eggs Benedict and buttery, flaky danishes on Thursday evening after work. Not just worth it, but so enjoyable that I did it again a week later with cupcakes, and a week after that I’m sure it will be something else. My baking obsession is back.

danish 12

One year ago: Chocolate Pots de Creme
Two years ago: Toasted Coconut Custard Tart
Three years ago: Lemon Cream Cheese Bars
Four years ago: Raspberry Bars

Printer Friendly Recipe
Danishes (adapted from Martha Stewart’s Baking Handbook)

I made 18 danishes from this batch of dough, and they were about 3-inches on a side after baking. Bigger danishes are probably easier to work with; many of mine unfolded when the dough expanded during baking, particularly the square shape with the corners folding in.

½ cup warm milk
2 teaspoons instant yeast
10 ounces (about 2 cups) all-purpose flour
3 tablespoons sugar
1 teaspoon table salt
2 sticks butter, room temperature
1 large egg
1 batch of filling (recipes follow)
egg wash (1 egg mixed with ⅛ teaspoon salt and 1 teaspoon water)

1. In a small measuring cup, stir the yeast into the milk. In the bowl of a stand mixer fitted with the paddle attachment, combine the flour, sugar, and salt. Add 2 tablespoons of butter; mix until evenly combined. Pour in the yeast and milk; mix until the dough starts to look shaggy. Switch to the dough hook; add the egg and knead until the dough just starts to look smooth, 2-3 minutes. Wrap the dough in plastic wrap and refrigerate for at least 2 hours or overnight.

2. On a lightly floured surface, roll the dough out to a 12-inch by 8-inch rectangle, about ¼ inch thick. Distribute the softened butter over two-thirds of the dough, leaving a short end free of butter. Fold the non-buttered third over the middle, then fold the last third over the middle, like folding a letter. Pinch the edges to seal. Roll the dough out to a 12-by-8-inch rectangle again, then fold it in thirds again. Rewrap the dough in plastic wrap; chill 1 hour.

danish 3
(see here for an explanation of the creases on the dough)

3. After the dough has chilled, roll it out and fold it in thirds twice more, then chill another hour, and roll and fold twice more. Wrap tightly and refrigerate for at least four hours or overnight. (This is a good point to freeze the dough too; thaw in the refrigerator overnight.)

4. Roll the dough out to a 12-by-18-inch rectangle about ⅛-inch thick. If the dough becomes too elastic and springs back, cover it and place it in the refrigerator for at least ten minutes, then try rolling again. Be patient; the rolling and chilling could take up to an hour. Cut 12 to 18 squares (see note).

5. For pinwheels: Cut from each corner halfway to the center of each square. Dab about ¼ teaspoon of filling into the center of each square, then fold every other corner toward the center, pressing to seal. Top with one (for smaller danishes) to two (for the larger size) tablespoons of filling.

danish 8

For squares with folded corners: Spoon one (for smaller danishes) to two (for the larger size) tablespoons of filling into the center of each square. Fold each corner to the middle of the dough; press to seal.

danish 9

6. Transfer the danishes to a baking sheet lined with parchment paper or a silicone mat. Cover and either chill overnight or set aside to rise. Heat the oven to 400 degrees. When the danish dough is about doubled in height and is starting to look puffy, brush the danishes with the egg wash. Bake one baking sheet at a time until the danishes are golden brown, 20-25 minutes. Transfer the pan to a wire rack; let the danishes cool on the pan for a few minutes before transferring them to cooling racks to cool to room temperature. Serve within a day.

danish 10

Cheese Danish Filling

Makes enough for 1 batch of danishes

1 cup ricotta cheese
6 tablespoons (2.6 ounces) sugar
⅛ teaspoon salt
1 tablespoon lemon zest
1 large egg
2 teaspoons vanilla
2 tablespoons unsalted butter, melted and cooled

Combine all ingredients. Chill.

danish 11

Pear Almond Danish Filling (rewritten from Martha Stewart’s Baking Handbook)

Makes enough for 1 batch of danishes

⅔ cup slivered almonds, toasted and cooled completely
2 tablespoons flour
½ cup (3.5 ounces) sugar, plus 1 tablespoon
¼ teaspoon salt
2 tablespoons butter
1 large egg
2 pears, peeled, cored, diced finely
¼ cup lemon juice

1. In a food processor, grind the almonds, flour, ½ cup sugar, and salt; add the butter and egg; chill.

2. Heat the pears, lemon juice, and 1 tablespoon sugar in a medium nonstick skillet over medium heat, stirring occasionally, until the pears caramelize, 8-10 minutes. Chill.

danish 15

pasta with salmon in pesto cream sauce

salmon pesto pasta 3

I never know what to do about Valentine’s Day. On the one hand, I’m not interested in the traditional stuff; I don’t want gifts or chocolate or a heart-covered card with a canned message. I’ll never say no to flowers, although I don’t love the responsibility of keeping the cat from eating them. On the other hand, Valentine’s Day is hard to ignore, because the rest of the world is definitely into it. I’m not one to scoff at something because it’s mainstream; I’d rather join in on the fun.

salmon pesto pasta 1

I thought that, at the very least, I’d make a nice meal. But Valentine’s Day is on a Tuesday this year, so I couldn’t get too ambitious. Dave’s favorite meal, salmon pesto pasta, would have fit the bill perfectly. It hardly takes longer to cook than it takes pasta to boil, assuming that your pesto is already prepared.  For all that it’s so easy, the finished dish is deserving of being Dave’s all-time favorite dinner, with generous bites of salmon held to pasta by a sauce that’s creamy but not too heavy, since it’s made from evaporated milk instead of heavy cream.

salmon pesto pasta 2

But, we’ve been having salmon pesto pasta a lot lately, trying to use up last year’s surplus of pesto before this year’s basil starts growing. I decided it wasn’t special enough for Valentine’s Day, even my lazy attitude toward the holiday, so instead we’re having prosciutto-wrapped salmon, farro risotto, and roasted Brussels sprouts. Dave will be so disappointed, but it will be short-lived, because salmon pesto pasta is so easy that we can just have it next week for a non-holiday.

salmon pesto pasta 5

One year ago: Chocolate Oatmeal Drops
Two years ago: Jalapeno Baked Fish with Roasted Tomatoes and Potatoes
Three years ago: Pot Roast
Four years ago: Apple Galette

Printer Friendly Recipe
Pasta and Salmon with Pesto Cream Sauce

Serves 4

I usually make half of this recipe to serve two people, and the smaller 5-ounce can of evaporated milk is perfect.  I tried using more, so that the full recipe would use a whole 15-ounce can of evaporated milk, but all the dairy blunted the other flavors.

12 ounces pasta, preferably a short shape (rotini, penne, farfalle, orechiette)
salt
2 (6 to 8 ounce) salmon filets
10 ounces evaporated milk
½ lemon
½ cup pesto
parmesan, for serving

1. Adjust a rack to the upper position and heat the broiler. Line a baking sheet with foil.

2. Bring about 4 quarts of water to a boil over high heat. Once the water boils, add the pasta and 1 tablespoon of salt. Cook the pasta until it is slightly undercooked, about 1 minute less than the package indicates the pasta will be done. Drain.

3. Meanwhile, place the salmon, skin-side down, on the prepared baking sheet. Season it liberally with salt. Broil until the salmon is lightly browned on top and flakes easily with a fork, 6-10 minutes. Set aside to cool slightly.

4. Return the empty pasta-cooking pot to medium-high heat. Add the evaporated milk and ¼ teaspoon salt. Simmer, scraping the bottom of the pot often to prevent sticking, until the milk is reduced to about ⅓ cup, about 5 minutes. Add the pasta to the milk, and cook, stirring constantly, for about one more minute, until the pasta is al dente.

5. Use two spoons to break up the salmon into bite-sized pieces. Squeeze the lemon juice over the flaked salmon. Add the salmon and pesto to the pasta; stir gently to combine and serve immediately, topping with parmesan.

salmon pesto pasta 4

This is an update from a earlier blog entry. For a meal we love as much as this one, I thought a new entry was worthwhile.

sausage and spinach stuffed shells

stuffed shells 8

When I was a kid and cooked dinner for my family once or twice a week, stuffed shells from a freezer bag topped with jarred spaghetti sauce was one of my staples. It took 5 minutes to arrange the shells in a baking dish and dump the sauce over them, and another five minutes to make a salad from iceberg lettuce and mealy out-of-season tomatoes. My mom hated when I made this meal, but not as much as she hated the prospect of cooking dinner for a family of five every day after work. Who can blame her – for wanting a break and for not enjoying my pre-teen culinary prowess?

stuffed shells 2

These shells took longer to prepare than my standby meal as a kid, but at least by adding spinach to the filling and making my own (less-processed) tomato sauce, I figured I could skip the bland side salad. But I wasn’t just trying to add fiber to my meal, I wanted more flavor than the shells of my youth, which were stuffed with nothing but plain ricotta cheese.

stuffed shells 3

First, Italian sausage contributes more than just savory meatiness, but a range of spices. Spinach would provide earthiness (plus I had a bunch to use up). The ricotta would be richer and smoother – and, okay, fine, you can use regular store-bought ricotta too, if you haven’t become spoiled by the homemade stuff like others of us. The tomato sauce on top would be fresher and sweetened just slightly with nothing but lightly caramelized onions.

stuffed shells 4

This is a far cry from those pasta shells I made as a kid. For old time’s sake, though, I still ate them the same way I did back then, trimming off one corner of each shell for the first bite, then the next corner, then dividing the remaining square of pasta and filling into four equal bites. The biggest difference is that this filling is packed full of flavor – plus it took me almost an hour to make dinner instead of ten minutes.

stuffed shells 6

One year ago: Bourbon Bread Pudding for Tuesdays with Dorie
Two years ago: Toasted Vegetable Subs
Three years ago: Floating Islands for Tuesdays with Dorie
Four years ago: Comparison of 4 Vanilla Frosting recipes

Printer Friendly Recipe
Sausage and Spinach Stuffed Shells

Serves 6

You probably won’t use the whole box of shells, but a lot of them might be broken or could rip after being boiled, so it’s nice to have some extra.

Feel free to use whatever your favorite tomato sauce is. I’ve provided the recipe I used  below, which is a simple sauce I like for serving over rich pastas with a lot of their own flavors, like these shells.

1 (12-ounce) box jumbo pasta shells
salt
16 ounces Italian sausage
1 onion, diced
3 cloves garlic, minced
¼ teaspoon red pepper flakes
5 ounces spinach leaves, washed, coarsely chopped
1 (15-ounce) container ricotta (or 2 cups homemade ricotta)
8 ounces (2 cups) provolone, shredded
1 ounce (½ cup) parmesan, grated
2 eggs
Simple Tomato Sauce (recipe below, or 4 cups of your own sauce)

1. Adjust a rack to the middle position and heat the oven to 350 degrees.

2. Bring a large pot with at least 4 quarts of water to a boil. Add 1 tablespoon salt and the pasta shells; cook according to the package instructions. When the pasta is tender, use a large slotted spoon to transfer the shells to a dish towel.

3. Meanwhile, in a large skillet over medium-high heat, cook the sausage, breaking up large pieces, until it is no longer pink and has rendered some fat. Add the onion and ½ teaspoon salt; continue to cook, stirring occasionally, until the sausage is browned and the onion is softened. Add the garlic and red pepper flakes, stirring constantly for about 30 seconds, until fragrant. Remove the pan from the heat and stir in the spinach leaves, letting the residual heat wilt the leaves. Transfer the mixture to a large bowl; stir in the ricotta, provolone, parmesan, and eggs.

4. Lightly coat the bottom of a 9 by 13-inch baking dish with tomato sauce. Fill each shell with 3 to 4 tablespoons of filling. Transfer the filled shells to the baking dish. After all of the shells are filled, evenly distribute the remaining sauce over the shells. Cover the dish with aluminum foil.

5. Bake for 20 minutes; remove the foil and bake for about 10 minutes longer, until bubbling around the edges. Let rest 5 minutes before serving.

Simple Tomato Sauce

Makes about 4 cups

Chop the tomatoes right in the can using kitchen shears. You can use diced tomatoes instead, but they won’t break down as the sauce simmers.

2 teaspoons olive oil
½ small onion or 1 large shallot, diced fine
¼ teaspoon salt
2 cloves garlic, minced
¼ cup red or white wine
2 (28-ounce) cans whole tomatoes, undrained, chopped
1 tablespoon minced basil and/or parsley

In a large saucepan over medium heat, heat the oil until it flows like water when the pan is tilted. Add the onion and salt and cook, stirring occasionally, until the onion just starts to brown around the edges, about 8 minutes. Add the garlic and red pepper flakes and cook, stirring constantly, until fragrant, about 30 seconds. Add the wine, scraping up any browned residue on the bottom of the pan. Increase the heat to medium-high and add the tomatoes with their juice. Bring to a simmer, then reduce the heat to medium-low and simmer, stirring occasionally, about 15-20 minutes, until the sauce is thickened. Stir in the basil or parsley.

stuffed shells 9

lentil salad with squash and goat cheese

lentil squash salad 4

The Great Cookie Craze that is December perplexes me. I understand that with various holiday-related celebrations, there are more opportunities for feasts and drinks than at other times of the year, but the cookie mania goes beyond parties. People send dozens of treats out to families and friends, most of whom are making their own dozens of cookies. The number of cookies in the world exponentially increases for a month.

lentil squash salad 2

The tide turns in January, which, without any significant celebration of its own, becomes the Undo the Holidays month. Poor January, but really, it isn’t such a bad thing. After all, healthy food tastes good too, particularly healthy food that includes goat cheese.

lentil squash salad 3

Tart goat cheese mixed with sweet winter squash is becoming one of my favorite flavor combinations, and kale, with its bitter notes, and lentils, with its meatiness, make it even better. Or, if kale isn’t your thing, arugula adds some freshness to the plate. Nothing about this salad feels like punishment for the past month’s excesses.  But have a cookie afterward anyway; December shouldn’t get to have all the fun.

lentil squash salad 5

One year ago: Nutty Chocolately Swirly Sour Cream Bundt Cake
Two years ago: Chocolate Oatmeal Almost Candy Bars
Three years ago: Herbed Lima Bean Hummus
Four years ago: Pissaladiere

Printer Friendly Recipe
Lentil Salad with Squash and Goat Cheese (adapted from Bon Appétit via Smitten Kitchen)

Serves 4

The original recipe calls for arugula, which I used the first time I made this. (Actually, the pictures seem to indicate I used mixed greens.) The second time, I used kale, which I like even more. I wrote the directions for kale into the recipe; if you use arugula instead, simply add it to the salad at the end. You can also use a smaller pot to cook the lentils if you’re not adding the kale.

¾ cup green lentils
salt
1 butternut squash, peeled and cut into ½-inch cubes, seeds reserved
1 tablespoon plus 1 teaspoon olive oil, divided
1 teaspoon ground cumin
1 teaspoon paprika
1 bunch kale, ribs removed, leaves coarsely chopped
4 ounces goat cheese, crumbled
1 tablespoon red wine vinegar, plus additional to taste

1. Place the butternut squash on a sheet pan. Add 1 tablespoon of the olive oil, the spices, and ½ teaspoon salt; toss to coat. Roast the squash for 25 minutes, turning once. In a small bowl, mix the cleaned squash seeds with the remaining 1 teaspoon oil and a pinch of salt. Add the seeds to the baking sheet with the squash and continue to roast until the squash is tender and the seeds are browned.

2. Combine the lentils, ½ teaspoon salt, and 3 cups of water in a 3- to 4-quart saucepan; bring to a boil over medium-high heat. Reduce the heat, cover, and simmer until the lentils are tender, 18-20 minutes. Add the kale to the pot during the last 2-3 minutes of simmering. (The kale will overwhelm the size of the pot at first but will quickly wilt.)

3. Combine the lentils, squash, kale, goat cheese, and vinegar. Season with salt, pepper, and extra vinegar, if desired. Serve.

lentil squash salad 6

ricotta

ricotta 12

Here are some things you need to know about making ricotta at home:

1) It really is as easy as they say. The process involves nothing more than heating milk and salt, stirring in lemon juice or vinegar, and straining the mixture.

2) It requires a lot of milk for a relatively small amount of cheese – you’ll start with about four times more volume of milk than you’ll end up with of cheese.

ricotta 3
right after adding the acids

3) About that milk – you can use the regular ol’ stuff from the grocery store, ultrapasteurization and all. That’s all I have access to, and I’ve made some nice ricotta with it.

4) If you’re feeling decadent, you can substitute some of the milk with cream. I started out using about seven times more milk than cream, but in the pictures you see here, I was almost out of cream and used about twenty times more milk than cream. I like this batch just as much as the others.

ricotta 4
right before straining

5) You can use either regular white vinegar or lemon juice. I read here that using all lemon juice gives the cheese a lemony flavor and vinegar is more neutral. However, I was worried about my cheese tasting like vinegar, which would be gross, so I always use a mixture of the two.

ricotta 5
after 5 minutes of straining with no cheesecloth or paper towel liner

6) The pH of the acid you add to curdle the milk matters. That’s one reason vinegar is more dependable than lemon juice; the acidity of lemons varies. It also means you can’t substitute other vinegars, because they might not be as acidic as white vinegar. I learned this the hard way when I realized I was out of regular vinegar and tried to use white wine vinegar instead; the milk didn’t form many curds.

ricotta 6
after 15 minutes of straining with no cheesecloth or paper towel liner

7) You don’t need cheesecloth. The first two times I made this cheese, I strained the mixture in my fine-mesh strainer. Worried that I was losing too much of good stuff, I tried using a double layer of paper towels, but it was draining too slowly and I got impatient and went back to just the strainer. That being said, I really am trying to remember to buy cheesecloth.

ricotta 7
after 15 minutes of straining with no liner, stirred

8 ) You’ll feel wasteful throwing all that whey down the drain, but the bit of internet research I did indicated that it isn’t good for bread dough, because the acid breaks the gluten molecules, weakening the dough’s structure.

9) It isn’t technically ricotta, which is made from the whey leftover from making other cheeses. (The word ricotta, in Italian, means re-cooked.) When I first heard this, I wondered why anyone would call it ricotta, since it isn’t made the same way. Then I made it myself and realized that it looks and tastes just like real ricotta.

ricotta 8
after 2 hours of straining with no liner

10) Homemade ricotta is better than the stabilizer-filled tubs you’ll find in most grocery stores. However, if you do happen to have access to real fresh ricotta, it’s probably cheaper to buy that rather than using half a gallon of milk to make 2 cups of cheese. As for which is better, the last time I bought fresh ricotta from an Italian market was a couple years ago, too long to remember the details of how good it was. I know it was really good, but I know this is really good too.

ricotta 10
finally bought cheesecloth; after 1 hour of straining with double layer of cheesecloth; smoother, creamier cheese

One year ago: Beef Short Ribs Braised in Tomato Sauce
Two years ago: Maple Oatmeal Scones
Three years ago: Chopped Salad
Four years ago: Country Crust Bread

Printer Friendly Recipe
Ricotta (adapted from Smitten Kitchen and Serious Eats)

Makes about 1 cup

You can adjust the amount of cream down (to 4 cups milk and no cream) or up (to 3 cups milk and 1 cup cream), depending on how rich you want the ricotta to be.

3½ cups whole milk
½ cup heavy cream
½ teaspoon salt
2 tablespoons white vinegar
1 tablespoon lemon juice

1. In a 2-quart saucepan over medium-high heat, heat the milk, cream, and salt to 190 degrees. Remove the pot from the heat, add the vinegar and lemon juice, stir once, and set aside for 5 minutes.

2. Place a fine-mesh strainer over a large bowl. Line the strainer with a double layer of cheesecloth or a single layer of paper towels. Pour the curdled milk mixture into the strainer. Set aside for about an hour. It will get thicker the longer it sits to drain.

ricotta 11

smoked salmon kale carbonara

salmon kale carbonara 7

When we were in Italy, we tried to eat whatever the local specialty was. That means that in the first few days when we were on the Mediterranean coast, and then the next couple of days on the Adriatic coast, we ate a lot of spaghetti ai frutti di mare – pasta with a bunch of different types of seafood, basically. We ate it three days in a row, and on one of those days, we also had risotto ai frutti di mare.

salmon kale carbonara 3

In Tuscany, we ate more red meat, and in Rome, every dinner included some version of pasta with fatty pork, whether carbonara, amatriciana, or gricia, the difference between them being whether the sauce includes eggs, onions and tomatoes, or nothing but meat and cheese, respectively. I remember enjoying the gricia and amatriciana, but the carbonara I got was overly sauced in a rich cream and wasn’t at all what I thought it should be.

salmon kale carbonara 4

Of course, I had no other traditional carbonara experiences to compare it to, and I still don’t. While I can’t guarantee that the creamy carbonara I had in Rome wasn’t authentic, I know for sure that this one isn’t. Instead of smoky pork, this recipe includes smoky fish, which, if you’re going to be unauthentic, is kind of a perfect way to do it. And while we’re at it, why not throw in some bitter greens? I probably shouldn’t say this out loud, but this carbonara was better than any of the similar pastas I had in Italy.

salmon kale carbonara 5

One year ago: Roasted Chicken Thighs with Root Vegetables
Two years ago: Lamb Stew
Three years ago: German Apple Pancake
Four years ago: Banana Cream Pie

Printer Friendly Recipe
Smoked Salmon Kale Carbonara (adapted from Cara’s Cravings and Gilt Taste)

Serves 4

12 ounces dried pasta
salt
1 tablespoon olive oil
½ small red onion, minced
2 clove of garlic, minced
¼ teaspoon crushed red pepper
2 large bunches of kale (about 12 ounces), thick stems removed, leaves cut into 1-2 inch pieces
2 eggs
2 ounces (1 cup) grated parmesan cheese
freshly ground black pepper
6 ounces smoked salmon, torn into small pieces
1 tablespoon lemon juice

1. Bring 4 quarts of water to a boil; add about 1 tablespoon of salt and the pasta. Cook, according to the package instructions, until just tender. Drain the pasta, reserving 1 cup of the cooking water.

2. Meanwhile, heat the oil in a large skillet over medium heat. Add the onion and a pinch of salt; cook, stirring occasionally, until it just starts to brown around the edges, about 5 minutes. Add the garlic and red pepper; cook, stirring constantly, until fragrant, about 30 seconds. Add the kale; cover the pan and cook until tender, 3-5 minutes, stirring about once a minute. Set aside.

3. Beat together the eggs, cheese, ¼ teaspoon salt, and a pinch of black pepper.

4. Transfer the cooked pasta back to the cooking pot; stir in the kale mixture and salmon. Stirring vigorously, add the egg mixture, then the lemon juice. Serve immediately.

salmon kale carbonara 6