kofta

kofta 5

A lot of people in my town hunt. I think they expect me to be against hunting, due to my hippie stance on other issues, like recycling and reducing waste. (The blue recycle bin is right next to the trash can, so what possible reason could you have for not recycling paper? And what’s with drinking your daily coffee out of Styrofoam cups?) But, assuming it’s carefully controlled, and in my area it is, I’m pro-hunting. I’d rather eat animals that lived their lives outside doing animal things than stuffing themselves in a feedlot.

kofta 1

That being said, I don’t want to do it myself. There is the issue of whether I could actually bring myself to kill a beautiful creature, and I really don’t know how that would go. But moreover, I have plenty of hobbies as it is and don’t need to take up another. But if someone wanted to bring me venison, that would be okay.

kofta 7

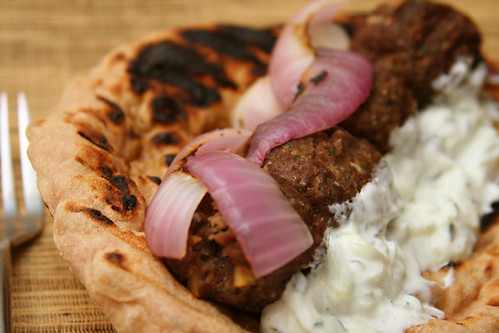
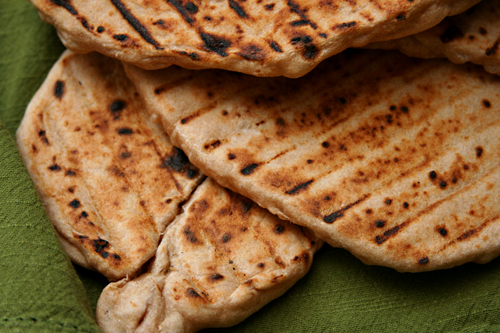
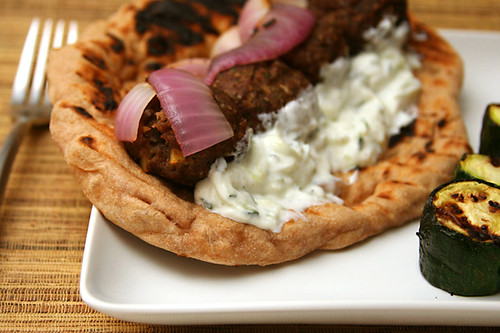
And someone has! Twice, my coworker has brought me ground venison. We made burgers with the first pound, and for the second pound, I took his suggestion to make kofta. I’d never had it before, but it was so obviously something I’d like, with the mix of meat, savory seasonings, and warm spices, not to mention tzatziki and grilled pita. (Incidentally, I brought my coworker two pounds of Tartine country bread dough to thank him for the meat – and encourage him to give me more!)

kofta 2

Lean venison is perfect in kofta because the addition of bread helps the meatballs hold onto moisture. Plus, lamb is the traditional main ingredient, and both meats are often considered gamey. Dave and I love that gamey flavor, and it just gets better when it’s liberally seasoned with herbs and spices. And everything is better with grilled pita and tzatziki. I suspect I’ll be making this meal with lamb in the future, because my desire for kofta will surely outrun my uncertain supply of venison.

kofta 3

One year ago: Rhubarb Crumb Coffee Cake
Two years ago: Pickled Coleslaw
Three years ago: Sausage and Red Pepper Hash

Printer Friendly Recipe
Kofta (adapted from Gourmet via Smitten Kitchen)

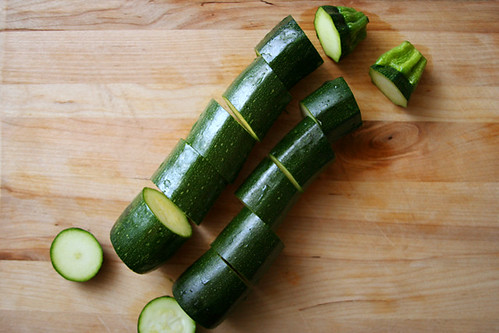
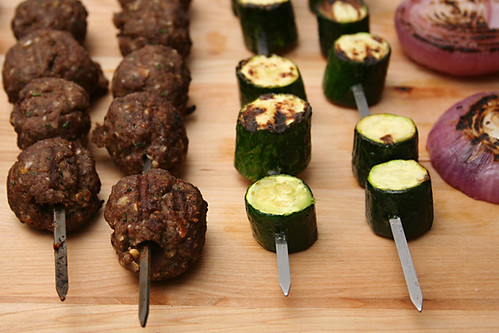
The original recipe includes grilled chunks of marinated zucchini, but I didn’t think they added anything special to this.

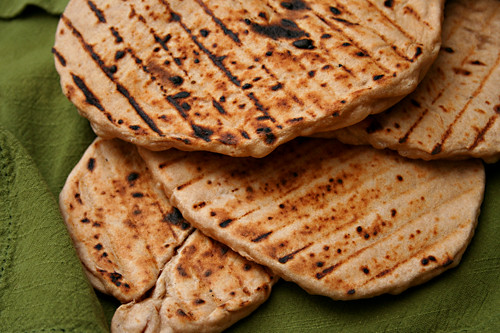
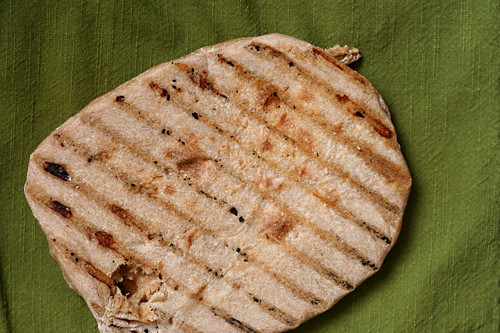
Grilling meatballs on skewers is a hair-raising experience, but they turned out great and we only lost one on the grill. Just be careful and try not to move them around much.

I grilled some onions to add to the sandwiches, because you can’t go wrong with grilled onions.

2 slices firm sandwich bread, torn into small pieces
1 small onion, finely chopped (about 1 cup)
¼ cup loosely packed fresh parsley leaves
¼ cup loosely packed fresh cilantro leaves
16 ounces ground lamb
1 teaspoon salt
½ teaspoon ground allspice
½ teaspoon cayenne
¼ teaspoon cinnamon
¼ teaspoon black pepper
⅓ cup pine nuts, toasted and finely chopped
tzatziki

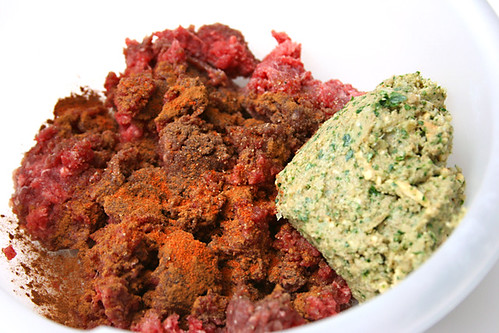
1. Pulse the bread, onion, and herbs in a food processor until finely chopped. The juice from the onion should start to soak into the bread, and the mixture will form a paste. Transfer the mixture to a large bowl and mix with all of the remaining ingredients except the tzatziki. With your hands, mix until well blended. Form one tablespoon of the mixture into a ball; repeat with the remaining mixture to make about 24 meatballs.

2. Prepare a medium-hot grill. Thread meatballs onto skewers, leaving about ¼-inch between each. Generously oil the grill rack. Grill lamb, turning over once, until golden and just cooked through, about 6 minutes. Serve warm with tzatziki and grilled pitas.

kofta 6

grilled pita

pita 4

It’s news to no one that homemade pita is a hundred times better than storebought pita. But it might be news to some that grilled homemade pita is a hundred times better than baked homemade pita. True story.

pita 7

Pita dough and pizza dough are so similar that I keep batches in the freezer (actually lately I’ve been using Tartine’s country bread dough) and use them interchangeably. Both are rounds of dough that are stretched out thin, and when cooked, are expected to be spotty browned but still tender. So if grilled pizza is so popular lately, why not grilled pita?

pita 6

Grilling pita is particularly convenient for me because all of my favorite pita fillings are grilled. So once the chicken comes off the grill and is resting, I plop a round of dough on the hot coals, wait a minute until it bubbles and browns, then flip it. Your pita breads likely won’t be perfectly round, because transferring sticky stretchy dough to hot hot coals isn’t a trivial process. But what they might lack in symmetry, they make up for in grill lines – not to mention crisp edges, soft middles, and that touch of smoke that only the grill can provide.

pita 1

One year ago: Baked French Toast
Two years ago: Pasta with No-Cook Tomato Sauce and Fresh Mozzarella
Three years ago: Blackberry Swirl Ice Cream

Printer Friendly Recipe
Grilled Pocketless Pitas

12 pitas

2½ pounds pizza dough, fully risen
nonstick spray or olive oil

1. Working on a damp towel, cut the dough into 12 pieces. Shape each into a ball by gently pulling the edges toward one side and pinching the seam to seal it. Roll the ball of dough on the towel to smooth and even the shape. Let the dough rest for 15-30 minutes. Meanwhile, heat the grill to medium-high heat.

2. Pick up one ball of dough by an edge; stretch and pull it into a 5- to 6-inch round. If it becomes too elastic to shape, set it aside, loosely covered, for 5 minutes before trying again. Spray the tops of the shaped rounds with nonstick spray or brush with olive oil.

3. Carefully lay the pita rounds, oiled side down, directly on the grill. When the pita bubbles and the bottom is spottily browned, after 1-2 minutes, use tongs to flip the pita. Continue cooking until the second side begins to brown, about 1 minutes. Serve immediately or wrap in a kitchen towel for up to 30 minutes.

pita 3

fig-glazed burgers with onion jam

We’ve gotten into a loose routine with our weekend meals. Friday is usually some sort of pizza, unless we get takeout sushi; Saturday with its meat-carb-vegetable makeup is the only day of the week I bother with side dishes; and Sunday is something sandwich-like. I’m not going to say that sandwich night is my favorite, but there’s something undeniably happy-making (or maybe that’s the Sunday champagne habit) about carbs and their fillings, whether its tacos, gyros, burgers, or whatever else.

We’re pretty attached to our backyard these days, so Sunday sandwiches are usually cooked on the grill. Not that I’m bored of green chile cheeseburgers (or that I won’t put green chile on a fig-glazed burger), but there are so many great burger ideas out there, it would be a shame to stick to one favorite. This is just the first on a long list of great options.

It’s odd that I chose the sweet plus meat burger off of that list, since it isn’t a combination I often crave. Or it wasn’t. It might be now. It doesn’t hurt that it’s also mixed with vinegary onion jam and melty cheese. Our Sunday dinner sandwich habit might turn into a Sunday fig-glazed burgers habit.

One year ago: Pizza with Figs, Prosciutto, Gorgonzola, Balsamic, and Arugula (oddly similar flavors)
Two years ago: Pasta with Cauliflower, Walnuts, and Ricotta Salata
Three years ago: Creamy Buttermilk Coleslaw (This is no longer my favorite classic coleslaw. I’ll post the new recipe soon.)

Printer Friendly Recipe
Fig-Glazed Burgers with Red Onion Jam (adapted from Southern Living via Pink Parsley)

Makes 4 burgers

I like my burgers a little smaller, so I made six out of this amount of meat mixture instead of four.

Red onion jam:
1 teaspoon olive oil
1 large red onion, sliced thin
Pinch salt
2 tablespoons brown sugar
¼ cup balsamic vinegar
¾ teaspoon chopped fresh thyme

Cheeseburgers:
1½ pounds ground chuck
2 tablespoons chopped fresh oregano
1 teaspoon kosher salt
1 tablespoon Dijon mustard
¼ teaspoon garlic powder
½ teaspoon ground black pepper
3 tablespoons fig preserves
4 (½-oz) Muenster cheese slices
4 hamburger buns, split and toasted

1. In a large skillet, heat the oil over medium-high heat until it flows like water when you tilt the pan. Add the onions and salt; cook, stirring often, for 5 minutes, until the onions are just golden around the edges. Reduce the heat to medium-low; add the sugar, vinegar, and thyme; cover and cook 10 minutes, until the onion is tender and most of the liquid is absorbed.

2. Gently mix the beef, oregano, salt, mustard, garlic powder, and black pepper. Divide the mixture into four portions and shape each one into a ½-inch thick patty. Form a divot in the center of each patty.

3. Prepare a medium-hot grill. Using a paper towel, grease the grates with vegetable oil. Grill the patties for 5 minutes; flip, and continue grilling another 5 minutes. Brush each patty with fig preserves and top with a slice of cheese. Grill an additional 2 minutes, or until the beef is cooked and the cheese is melted. Serve on buns with onion jam.

lentil goat cheese burgers

Burgers are just sandwiches with patties in the middle. I don’t care if that patty is beef, bird, or beans. What I do require is that it not be bread.

A carb-filled patty between two ends of a bun doesn’t make nutritional sense, but it does seem like most vegetarian burgers are bound by large amounts of bread crumbs, oatmeal, or other grains. Whether whole or refined, these are still grains where I want there to be protein.

Cara is a great source for high-protein, low-carb ideas like these lentil burgers, which are bound with just a tablespoon of bread crumbs per serving. The protein – and, more importantly, the flavor – is increased even more with the addition of creamy, tangy goat cheese, one of my favorite ingredients.

While certainly healthy enough for a good weeknight dinner, prepping these burgers is not a short process from start to finish. However, the active time is not unreasonable, making these a great option to make ahead of time, leaving just the final searing for dinner time. It’s nice to have a meal as hearty but nutritious as this one stashed in the freezer.

One year ago: Brown Soda Bread
Two years ago: Deli-Style Rye Bread
Three years ago: Rice Pudding

Printer Friendly Recipe
Lentil Goat Cheese Burgers (adapted from Cara’s Cravings)

Make 4 burgers

Don’t be shy with the salt. I always need more than I expect in these.

¾ cup dried lentils
1 bay leaf
salt
1 large carrot, coarsely chopped
2 large shallots, coarsely chopped
2 cloves garlic
1 tablespoon olive oil, divided
1 tablespoon balsamic vinegar
4 ounces goat cheese
¼ cup breadcrumbs (fresh or dried)
¼ teaspoon black pepper
1 egg
for serving: buns, mustard, lettuce, tomato

1. Combine lentils, bay leaf, ½ teaspoon salt and 3 cups water in medium saucepan; bring to a boil over medium-high heat. Reduce the heat and simmer until the lentils are tender, 18-20 minutes. Drain the lentils, discarding the bay leaf.

2. Meanwhile, process the carrot, shallots, and garlic in the food processor until finely chopped but not pureed, about 5 seconds. (Do not clean processor bowl or blade.) Heat 1½ teaspoons olive oil in a medium nonstick skillet over medium heat; sauté the vegetables with a pinch of salt until softened and the shallots just browns around the edges, about 5 minutes. Add the vinegar; cook, stirring occasionally, until it has reduced to a syrupy consistency, 1-2 minutes.

3. Combine the lentils, sautéed vegetables, cheese, bread crumbs, and pepper in the food processor; process until evenly mixed and finely ground. Taste and adjust the seasoning if necessary. Add the egg; pulse until just combined.

4. Divide the dough into four portions; shape each one into a disk about ½-inch tall and 4 inches across (or approximately the diameter of your burger buns). Chill, uncovered, for at least 30 minutes or up to 2 days (cover if longer than 30 minutes).

5. Heat the remaining 1½ teaspoons of oil in a 12-inch nonstick pan over medium to medium-high heat. Using a spatula, carefully lower each patty into the pan; cook without moving for 4 minutes, until the bottom side is browned. Flip the patties and continue cooking for another 6 minutes until the second side is browned. Serve immediately with buns and toppings.

shrimp canapes a la suede

I don’t live the kind of lifestyle that includes a lot of canapés. Maybe that’s because canapés went out of style fifty years ago. Or maybe I need to start labeling any “toasts topped with stuff” as canapés, because I’ve eaten plenty of those. More precisely, canapés are “toasts fussily topped with stuff”. And since when do I not appreciate fussy?

These particular canapés include the unbeatable combination of bread, salted butter, shrimp, dill, mayonnaise and lemon. While there’s no cooking (assuming you buy pre-cooked shrimp), the assembly may take a while, because remember, fussiness is an essential aspect of making canapés.

Since I apparently don’t go to enough events where canapés are served, I will make them for a virtual event – a bridal shower for my fellow desert blogger (although her Sonoran desert trumps my Chihuahuan desert), Kelsey, who’s getting married next week. Kelsey is one of the most kind and beautiful women I know, and I wish every happiness upon her. I would love to shower her with well wishes in real life, but this virtual bridal shower will have to do.  The advantage of a virtual party, of course, is that I got to eat all the canapés myself. The disadvantage is that I didn’t get to eat everyone else’s contributions.

One year ago: Roll-out Sugar comparison
Two years ago: Roasted Kale
Three years ago: Green Chile Chicken Enchiladas

Printer Friendly Format
Shrimp Canapés à la Suede (tweaked from Amanda Hesser’s The Essential New York Times Cookbook)

The slivers of lemon tucked under each canapé are very cute, but not entirely practical. The brightness of lemon was important part of this flavor combination, however, so it might make more sense to forget the wedges and simply squeeze some lemon over the shrimp before adding the mayonnaise and dill.

Makes 12 appetizers

12 (2-inch) rounds of bread, sliced ¼-inch thick
Salted butter, softened
12 medium shrimp, cooked and sliced lengthwise (to make two symmetrical spirals)
Mayonnaise
12 small dill sprigs
Freshly ground black pepper
12 small lemon wedges

Toast the bread until lightly browned; let cool. Butter the toast rounds and top each with two shrimp halves. Garnish the canapés with mayonnaise stars pressed from a pastry bag (or just dollop a scant ½ teaspoon on each). Top with the dill springs and season with pepper. Serve with lemon wedges.

sandwich thins

Ah, carbs. They’re the best, aren’t they? They don’t even need to be combined with carb’s best friend, butter, to be a treat. A hunk of airy-crumbed, chewy-crusted bread with a glass of dry red wine is a pleasure all on its own. A few slivers of cheese balance and enhance the flavors of each, but it isn’t necessary. All I need is the carbs.

Remember when the base of the food pyramid was carbs? Those were the good ol’ days. I’ve reversed my own personal food pyramid to be mostly fruits and vegetables, a goodly amount of protein, and a smattering of carbs (on weekdays; all bets are off on Saturday). A giant Kaiser roll, sadly, is more than a smattering.

Sandwich thins, however, are the perfect compromise between wanting carbs and not wanting to overdo it. But just because there’s less bread per sandwich doesn’t mean the bread can be less good. You still want it to be soft and tender, but also sturdy, and if it could be all that and still be whole grain, that would be no bad thing.

I hear you can buy these in the store or some such thing, but I’m not acquainted with the bread aisle at the grocery store, and anyway, what’s the fun in that? Buying things that we could spend hours of our busy schedules making from scratch is not what this blog is about.

One year ago: Mediterranean Pepper Salad
Two years ago: Lemon Cream Cheese Bars
Three years ago: Salmon Cakes, Flaky Biscuits, Hashed Brussels Sprouts

Printer Friendly Recipe
Sandwich Thins (adapted from food.com via Confections of a Foodie Bride)

Makes 16

I meant to follow the directions when I made this, but I didn’t actually read them before starting. So I mixed it like a regular bread dough, and it worked just fine.

I doubt wheat bran and vital wheat gluten are crucial to this recipe. If you don’t have vital wheat gluten, just use more white flour (or better yet, substitute bread flour, if you have it, for the all-purpose flour). If you don’t have wheat bran, substitute more whole wheat flour. Bread is forgiving.

1 egg
1¼ cups warm water
2 tablespoons olive oil
2 cups (10 ounces) whole wheat flour
1 cup (4.8 ounces) all-purpose flour
½ cup wheat bran
2 tablespoons vital wheat gluten
2 teaspoons instant yeast
¼ cup (1.75 ounces) sugar
1 teaspoons salt
2 tablespoons rolled oats

1. Stand mixer: In a large measuring cup, lightly beat the egg; whisk in the water and oil. In the bowl of a stand mixer fitted with the dough hook, mix the flours, bran, gluten, yeast, sugar, and salt. With the mixer on low speed, gradually add the liquid ingredients. Continue mixing on medium-low until the dough is elastic and supple, about 8 minutes. You may need to add a little more flour or water to get the correct consistency – soft but not sticky.

By hand: In a large measuring cup, lightly beat the egg; whisk in the water and oil. Mix the flours, bran, gluten, yeast, sugar, and salt in a large bowl. Make a well in the middle of the dry ingredients and pour in the liquid ingredients. Stir the mixture until the dough comes together. Transfer the dough to a floured board or countertop and knead, incorporating as little flour as possible, for about 10 minutes, until the dough is elastic and supple. You may need to add a little more flour or water to get the correct consistency – soft but not sticky.

2. Transfer the dough to an oiled bowl and cover with plastic wrap or a damp dishtowel. Set the dough aside to rise until it has doubled in volume, about 1½ hours.

3. Line 2 baking sheets with parchment paper or silicone mats. Divide the dough into 16 equal portions. Roll each portion into a ball; then flatten it between your palms. Place it on the baking sheet and press down, working the dough into a thin 5-inch round. Brush the tops with water; sprinkle with rolled oats. Cover with damp kitchen towels and let rise until slightly risen, about 45 minutes.

4. Preheat the oven to 350 degrees. Use the blunt end of a wooden skewer to poke 9 holes in each roll. Bake 12-15 minutes, until puffed and dry on top. Cool completely before slicing.

steak sandwiches

This is a perfect example of how I eat very differently on weekends than during the week. First, we rarely eat meat on weekdays, especially beef. I love it, but I save it for days that I splurge. Second, mayonnaise. I love it; I save it for days when I splurge. Third: alcohol. I love it. I save it.

This was originally a Sunday dinner plan, until we opted to spend several hours peeling, seeding, dicing, and storing a year’s worth of Hatch green chile on Sunday night instead. I ended up making it the next night, which made for a Monday night treat, although baking bread, caramelizing onions, mixing sauce, cooking steaks, and building sandwiches after working all day and before preparing an exam to give the next day was not such a treat.

Best saved for a weekend, perhaps, but the combination of richly browned steak, spicy horseradish, sweet onions, and tangy mayonnaise was a welcome indulgence for a Monday night. If only every weeknight could be as decadent.

One year ago: Goat Cheese, Pesto and Sun-Dried Tomato Terrine
Two years ago: Lavash Crackers

Printer Friendly Recipe
Steak Sandwiches (adapted from Ina Garten)

I forgot to buy them this time, but sautéed sliced mushrooms are so good on this sandwich too. We also added some of those freshly prepared Hatch green chiles to our sandwiches, which was a great compliment.

I can’t get good arugula at the stores here so I used shredded leaf lettuce (not recommended; spinach would have been better, or leaving the greens off entirely), and I can’t find strip steaks so decided that boneless ribeye would be a good substitute.

The alcohol mentioned above came into play because after removing the cooked steaks from the pan, I poured in some whiskey and scraped up all the browned bits left behind from the steaks. I transferred the reduced liquor to the onion mixture. (And actually, while I don’t drink alcohol on weekdays – because I need those calories for dessert – I have no rules against cooking with it.)

olive oil
2 yellow onions, halved from pole and pole and sliced ¼-inch thick
kosher salt
½ teaspoon fresh (or a pinch of dry) thyme leaves
1 (12-ounce) 1-inch thick New York strip boneless beef top loin steak
freshly ground black pepper
1 recipe Mustard Mayo, recipe follows
2 sandwich rolls
½ cup baby arugula

1. Heat 1 tablespoon oil in a medium nonstick skillet over medium-high heat. Add the onions and a pinch of salt and cook, stirring very frequently, until the onions just start to brown, 4-5 minutes. Reduce the heat to low and continue cooking, stirring occasionally, until the onions are soft and golden brown, 15-20 minutes. Stir in the thyme in the last few minutes.

2. Meanwhile, heat a medium not-nonstick skillet over medium-high heat for 5 minutes. Season the steak generously with salt and pepper; place it in the skillet. Cook without moving for 6 minutes. Flip and continue cooking for 3-5 minutes (depends on whether you want a rare or medium steak). Remove from the pan, tent with foil, and let rest for 5 minutes. Slice thinly across the grain.

3. Assemble the sandwiches by layering Mustard Mayo, steak, onions, and arugula onto the sliced rolls.

Mustard Mayo

I used a lot less mayonnaise and Greek yogurt instead of sour cream. I also stirred in quite a bit of horseradish.

¾ cup good mayonnaise
1 tablespoon Dijon mustard
1 tablespoon whole-grain mustard
2 tablespoons sour cream
⅛ teaspoon kosher salt

Whisk the ingredients together in a small bowl.

yogurt-marinated lamb kebabs

I actually made this back in February, but I figured most of the world was covered in snow in February and thus, not doing much grilling. Haha, suckers, grilling season lasts year round in the desert!

Well, year round unless there’s an extra dose of heat in the summer, in which case you’re huddled inside cozied up with your air conditioner. The spring isn’t so good either, because you have to dodge the shingles that the wind blows off the neighbor’s roof. And when it does rain in the summer, it tends to be right at dinner time. So maybe the desert isn’t any better for grilling than anywhere else.

But the heat, rain, and wind are worth it, because you get meals like this. You just can’t do this with a broiler. The lamb is so tender and flavorful, tzatziki makes everything better, and pita cooked right on the grill is becoming one of my favorite things ever. Forget perfect grilling weather – this meal is worth grilling in the snow for.

One year ago: Experiments with chocolate chip cookies
Two years ago: Comparison of three white cake recipes

Printer Friendly Recipe
Yogurt-Marinated Lamb Kebabs (from Ina Garten via Smitten Kitchen)

1 pound plain yogurt (regular or lowfat)
¼ cup olive oil, plus more for brushing grill
1 teaspoon lemon zest
¼ cup freshly squeezed lemon juice (2 lemons)
5 tablespoons fresh whole rosemary leaves, chopped
1 teaspoon kosher salt
½ teaspoon freshly ground black pepper
2 pounds top round lamb
1 red onion

1. Combine the yogurt, olive oil, lemon zest and juice, rosemary, salt, and pepper in a large, non-reactive bowl. Cut the lamb in 1½-inch cubes and add it to the yogurt, making sure it is covered with the marinade. Cover the mixture with plastic wrap and refrigerate overnight or for up to two days.

2. Prepare a medium-hot grill. Cut the red onion into 8 pieces and separate each piece into three or four sections. Loosely thread three or four pieces of lamb onto skewers alternately with sections of onion. Sprinkle both sides of the lamb cubes with salt and pepper. Place the skewers on the hot grill and cook for 10 to 15 minutes, turning two or three times, until the lamb is medium-rare. Serve with grilled pitas and tzatziki.

Tzatziki (adapted more liberally from Ina Garten and Smitten Kitchen)

1 hothouse cucumber, unpeeled, seeded, shredded
1 teaspoon kosher salt
14 ounces Greek yogurt
2 tablespoons freshly squeezed lemon juice
1 tablespoon white wine vinegar
1 tablespoon minced fresh dill
1½ teaspoons minced garlic
½ teaspoon freshly ground black pepper

1. Place the cucumber in a strainer set over a medium bowl and add the salt. Set aside for at least 15 minutes to drain. Transfer the cucumber to a clean kitchen towel and squeeze dry.

2. Combine the cucumber, yogurt, lemon juice, vinegar, dill, garlic, and pepper.

turkey burgers

Working full-time sure is…time-consuming, isn’t it? I haven’t figured out yet what has to give. (First choice – chores!) Cooking, blogging, photography, gardening, exercising…sleeping. It’s hard to balance everything. It’s possible that I should cut down on meals that require grinding your own meat, huh?

Well, I would consider that, except that these burgers were so perfect. I made beef burgers a week later (also with home-ground meat – stop the insanity!), and I enjoyed the turkey burgers so much more. And I love beef, so it wasn’t a prejudice.

But once you add good buns and your various toppings, the turkey burgers don’t taste significantly different from beef burgers. These have about half the fat of good beef burgers, so that’s another advantage, although what I mostly care about is that I thought their texture was smoother and more cohesive, and their taste was at least as good.

Grinding your own meat isn’t as hard as it might sound, and you almost definitely have the equipment. All you have to do is cut your meat into chunks, freeze it until it’s firm, and process it in the food processor. Then you mix in a few tasty additions, sear them up in a pan and enjoy a perfect burger. Make some extra to freeze, just in case Future You has a rough day at work and needs an easy meal.

One year ago: Croissants (Tartine)
Two years ago: Franks and Beans

Printer Friendly Recipe
Turkey Burgers (not really adapted from Cooks Illustrated)

Cooks Illustrated recommends 6 ounce burgers; I prefer mine significantly smaller. If you do too, don’t forget to reduce the cooking time.

2 pounds skin-on, bone-in turkey thighs or 1½ pounds skinless, boneless thighs
½ teaspoon salt
½ teaspoon black pepper
2 teaspoons Worcestershire sauce
2 teaspoons Dijon mustard
1 tablespoon vegetable or canola oil

1. If using skin-on, bone-in turkey thighs, remove the meat from from the skin and bones. Cut the thighs into 1-inch chunks and arrange in a single layer on a baking sheet. Freeze until somewhat firm, about 30 minutes.

2. Working in 3 batches, place the semifrozen turkey chunks in a food processor fitted with the steel blade; pulse until the largest pieces are no bigger than 1/8-inch, twelve to fourteen 1-second pulses.

3. Transfer the ground meat to a medium bowl. Stir in the salt, pepper, Worcestershire sauce, and mustard until blended and divide the meat into 4 portions. Lightly toss one portion from hand to hand to form a ball, then lightly flatten the ball with your fingertips into a 1-inch-thick patty. Repeat with the remaining portions.

4. Heat a large, heavy skillet (preferably cast iron or stainless steel with an aluminum core) over medium heat until very hot, 4 to 5 minutes. Swirl the oil in the pan to coat the bottom. Add the burgers and cook over medium heat without moving them until the bottom of each is dark brown and crusted, about 5 minutes. Turn the burgers over; continue to cook until the bottom is light brown but not yet crusted, 4 to 5 minutes longer. Reduce the heat to low, position the cover slightly ajar on the pan to allow steam to escape, and continue to cook 5 to 6 minutes longer, or until the center is completely opaque yet still juicy or an instant-read thermometer inserted from the side of the burger into the center registers 160 degrees. Remove from the pan and serve immediately. (Alternatively, grill the burgers over a medium-low fire (you can hold your hand about 5 inches above the grill surface for 5 seconds) until dark spotty brown on the bottom, 7 to 9 minutes. Turn the burgers over; continue grilling 7 to 9 minutes longer.)

shrimp burgers

In retrospect, this probably wasn’t the best weeknight meal ever. The thing is, I eat very differently on weekdays and weekends. On weekdays, it’s all about the vegetables and the fruit and the light bean dips and all this healthy stuff, and that’s all very well and good, but by the weekend, I do not want to see a banana or a raw carrot. Also, I would like some meat. But seafood gets a pass for weekdays.

Mayonnaise, not so much. I think I’d forgotten how much mayonnaise this meal includes when I planned it. I’d kept in mind that the slaw had a mayonnaise-based dressing, but I cringed when I added more mayonnaise to the burgers – cringed, but did it anyway. I’d been looking forward to this meal all week and wasn’t taking any chances on messing it up.

As Rebecca said, shrimp burgers are pretty much just like crab cakes, but cheaper and on a bun. Coarsely chopped shrimp, aromatics, binders to hold everything together, all pan-fried until browned and crisp on the outside – I can’t think of too many things tastier than that, especially when it’s topped with tangy, briny slaw tartare. No way was I going to let a bit of mayonnaise get in my way of enjoying this meal.

One year ago: Brownie comparison
Two years ago: Cheesecake Pops (for the Daring Bakers and ohmy was this ever a mess)

Printer Friendly Recipe
Shrimp Burgers
(adapted from Ezra Pound Cake who adapted it from Matt Lee and Ted Lee’s The Lee Brothers’ Southern Cookbook who adapted it from the Hominy Grill’s recipe; I think my version most resembles the original, as I’ve left out the ginger and corn that the Lee Brothers added)

Makes 4 burgers

I didn’t have fresh bread crumbs, so I used panko instead, moistened with a teaspoon or so of the shrimp cooking liquid.

2 quarts water
2 tablespoons Old Bay seasoning
1 pound headless large shrimp (26-30 per pound), shells on
2 tablespoons chopped scallions
2 tablespoons chopped fresh flat-leaf parsley
1½ teaspoons lemon zest
3 tablespoons mayonnaise
1 cup bread crumbs, preferably fresh (from about 2 slices bread)
kosher salt to taste
freshly ground black pepper to taste
1 egg, beaten
1½ tablespoons canola oil

1. In a 3-quart saucepan, bring the water and Old Bay seasoning just to a boil over high heat. Turn off the heat, add the shrimp, and let stand until the shrimp are pink, about 2 minutes. Drain; peel and devein the shrimp, then chop it coarsely.

2. In a large bowl, mix the shrimp, scallions, parsley, and lemon zest. Stir in the mayonnaise and bread crumbs (see note), and season with salt and pepper. Gently fold the egg into the mixture.

3. Shape the mixture into 4 patties. Wrap the patties in plastic wrap, and refrigerate them for at least 30 minutes.

4. Heat the oil in a 12-inch skillet over medium-high heat. Remove the burgers from the refrigerator, unwrap them, and gently lay them in the pan. Cook until both sides are browned, about 3 minutes per side. Drain on a plate lined with a paper towel.

5. Serve on toasted hamburger buns with lettuce, thinly sliced Vidalia onion and tartar sauce (or combine all of those flavors into one delicious slaw).