blueberry pie

blueberry pie 5

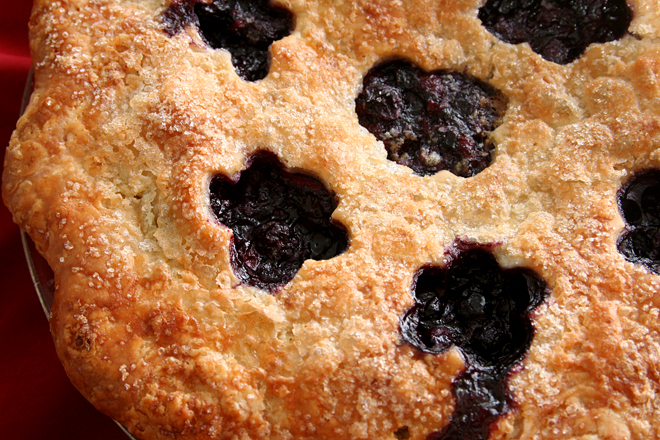
The two weeks a year when blueberries are reasonably priced are almost a tease. Blink and you miss it! Down here in the desert, some years it doesn’t happen at all (or maybe I blinked). They went on sale recently, and I loaded up my cart. I didn’t know what I was going to make for dessert that weekend, but I knew it would have lots of blueberries in it.

blueberry pie 1

Pie. Pie is so classic, and like I recently said, I don’t get many opportunities to make it. While pies aren’t the easiest desserts to make, at least blueberries don’t require any tedious prep like most other fruits – that is, unless you choose a high-maintenance Cook’s Illustrated recipe for blueberry pie.

blueberry pie 3

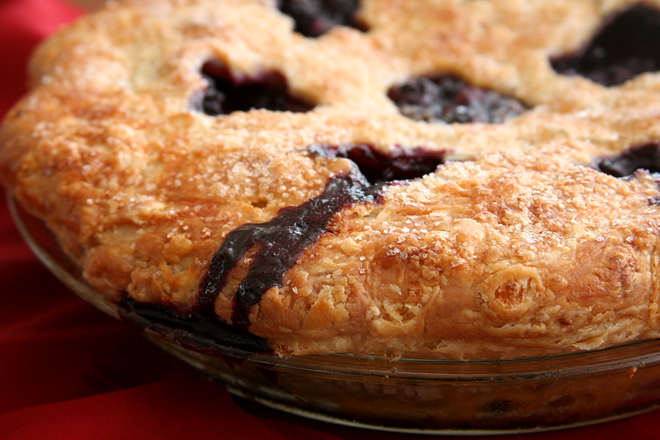
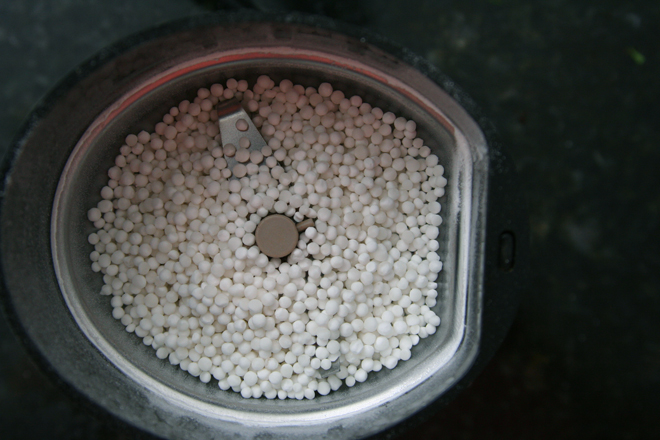
I did, because I hate soupy pies enough to pre-cook the filling and peel and grate an apple into the mix. And clean out the coffee grinder to powder the tapioca when the grinder I keep in the kitchen for non-coffee things broke. All the cleaning, dough-rolling, pre-cooking, and apple-shredding was worth it when I was rewarded with a flaky crust over a juicy but not soupy filling of my favorite summer fruit.

blueberry pie 4

Printer Friendly Recipe
Blueberry Pie (pretty much straight from Cook’s Illustrated, except for I don’t use their crust)

CI notes: This recipe was developed using fresh blueberries, but unthawed frozen blueberries (our favorite brands are Wyman’s and Cascadian Farm) will work as well. In step 4, cook half the frozen berries over medium-high heat, without mashing, until reduced to 1¼ cups, 12 to 15 minutes. Grind the tapioca to a powder in a spice grinder or mini food processor. If using pearl tapioca, reduce the amount to 5 teaspoons.

dough for double-crust pie (I always make this one)
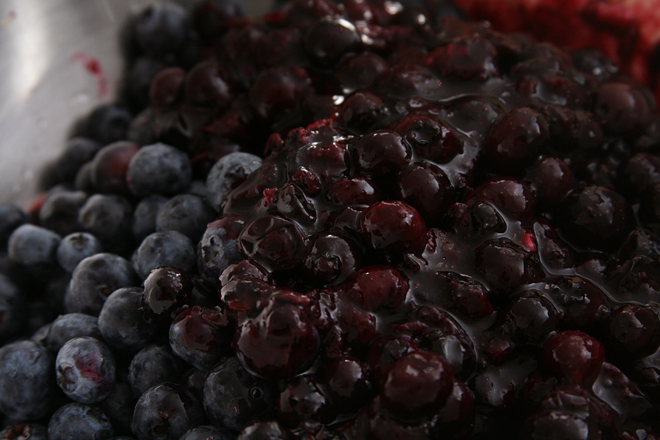
6 cups fresh blueberries (about 30 ounces) (see note)
1 Granny Smith apple, peeled and grated on large holes of box grater
2 teaspoons grated zest and 2 teaspoons juice from 1 lemon
¾ cup sugar (5¼ ounces)
2 tablespoons quick-cooking tapioca, ground (see note)
pinch table salt
2 tablespoons unsalted butter, cut into ¼-inch pieces
1 large egg, lightly beaten with 1 teaspoon water

1. Adjust oven rack to lowest position, place rimmed baking sheet on oven rack, and heat oven to 400 degrees. Place 3 cups berries in medium saucepan and set over medium heat. Using potato masher, mash berries several times to release juices. Continue to cook, stirring frequently and mashing occasionally, until about half of berries have broken down and mixture is thickened and reduced to 1 ½ cups, about 8 minutes. Let cool slightly.

2. Place grated apple in clean kitchen towel and wring dry. Transfer apple to large bowl. Add cooked berries, remaining 3 cups uncooked berries, lemon zest, juice, sugar, tapioca, and salt; toss to combine. Transfer mixture to dough-lined pie plate and scatter butter pieces over filling.

3. Roll out second disk of dough on generously floured (up to ¼ cup) work surface to 11-inch circle, about ⅛ inch thick. Using 1¼-inch round biscuit cutter, cut round from center of dough. Cut another 6 rounds from dough, 1½ inches from edge of center hole and equally spaced around center hole. Roll dough loosely around rolling pin and unroll over pie, leaving at least ½-inch overhang on each side.

4. Using kitchen shears, trim bottom layer of overhanging dough, leaving ½-inch overhang. Fold dough under itself so that edge of fold is flush with outer rim of pie plate. Flute edges using thumb and forefinger or press with tines of fork to seal. Brush top and edges of pie with egg mixture. If dough is very soft, chill in freezer for 10 minutes.

5. Place pie on heated baking sheet and bake 30 minutes. Reduce oven temperature to 350 degrees and continue to bake until juices bubble and crust is deep golden brown, 30 to 40 minutes longer. Transfer pie to wire rack; cool to room temperature, at least 4 hours. Cut into wedges and serve.

blueberry pie 6

crab towers with gazpacho and avocado salsas

crab towers 6

I once made twenty of these in one night. I also made twenty tiny caramelized onion gruyere tarts, six baguettes, three types of sorbet, and smoked popcorn with bacon. (Not totally true: The baguettes and sorbet were made in advance, just served that night. Thank god.) My friend made Thai chicken slaw, twenty tiny shepherd’s pies, braised venison over mashed potatoes, and chocolate pudding cake. Each dish had its own wine paired with it. It was an epic party. (And the next day was an epic hangover.)

crab towers 8

It was, as you can probably imagine, a lot of work. Building twenty tiny stacks of three different mixtures actually went pretty fast; no, the truly tedious part is creating teeny tiny squares of vegetables. But making your food into confetti is so pretty, sometimes it’s worth it.

crab towers 9

And it isn’t all about looks. It’s about combining my favorite foods into one elegant salad – avocadoes and crab and gazpacho, neatly layered and colorful. And if you aren’t making twenty of them, as well as twenty each of several other small dishes, the mincing isn’t too bad.  You might not have an epic party in that case, but you’ll still have a dish worthy of one.

crab towers 11

Printer Friendly Recipe
Crab Towers with Avocado and Gazpacho Salsas (adapted from Cook’s Illustrated’s Restaurant Favorites at Home)

Even when I’m making these for just a few people at home, I use Dixie cups with the bottoms cut off for the molds. You can make the gazpacho salsa a day in advance.

Makes 8

Gazpacho salsa:
1 cup grape tomatoes, minced
½ yellow pepper, minced
1 Persian or ½ regular cucumber, minced
1 small shallot, minced
¼ teaspoon salt
pinch black pepper
2 teaspoons sherry vinegar
2 teaspoons olive oil

Crab salad:
1 pound crabmeat, shredded
1 tablespoon white wine vinegar
1 tablespoon mayonnaise

Avocado salsa:
2 large avocados, peeled, pitted, minced
¼ teaspoon salt
1 tablespoon lemon juice

1. In a medium bowl, combine the tomatoes, pepper, cucumbers, shallot, salt, pepper, sherry vinegar, and olive oil. In a separate medium bowl, combine the crab, vinegar, and mayonnaise. In a small bowl, combine the avocado, salt, and lemon juice, mashing very lightly so the mixture holds together.

2. Divide the avocado mixture between eight 2-inch molds. Divide the crab salad between the molds on top of the avocados, pressing lightly again. Top with the gazpacho salsa. Serve immediately.

crab towers 7

margarita cupcakes

margarita cupcakes 5

I haven’t really been drinking margaritas lately, since we’ve moved from daiquiris into experiments with all sorts of tiki drinks, but eating them is another thing. I hosted a taco bar party recently, where I supplied corn tortillas and beef barbacoa and everyone else brought sides or toppings. I thought about serving margaritas, but I wasn’t excited about squeezing a hundred limes; sangria for a crowd is a whole lot easier.

margarita cupcakes 2

But a taco party without margaritas in any form just isn’t right, so we’d have them for dessert instead. This is a white cupcake flavored with lime zest, then brushed very liberally with a mixture of tequila and orange liqueur. The buttercream, light and airy swiss meringue, is flavored with more lime juice and more tequila.

margarita cupcakes 3

I’ve found it’s nearly impossible to get the flavor of liquor in the batter to come across after a dessert is baked (bourbon pound cake seems to be an exception), so I don’t even attempt that here, just brushing – and then brushing some more, and then more – the baked cakes with liquor. The cupcakes aren’t so strong that you’ll gag on the fumes, but they do have a hint of bite to them, just like the best margaritas. And I had way more fun making cupcakes and frosting than I would have had squeezing lime after lime after lime.

margarita cupcakes 4

Printer Friendly Recipe
Margarita Cupcakes (adapted from Dorie Greenspan’s Perfect Party Cake from Baking: From my Home to Yours)

Makes 24 cupcakes

It seems like a lot of liquor to brush into the cupcakes, but trust me that you will use it all, and the cupcakes won’t be soggy.

Cupcakes:
3¼ cups plus 2 tablespoons (13.5 ounces) cake flour
1½ teaspoons baking powder
¼ teaspoon baking soda
1 teaspoon salt
1 cup plain yogurt
6 large egg whites
2¼ cups (15.75 ounces) granulated sugar
1 tablespoon grated lime zest
12 tablespoons (1½ stick) unsalted butter, at room temperature
2 tablespoons lime juice
6 tablespoons tequila
3 tablespoons orange liqueur

Buttercream:
1 cup (7 ounces) granulated sugar
4 large egg whites
pinch salt
24 tablespoons (3 sticks) unsalted butter, at room temperature
4 tablespoons fresh lime juice (from 2 limes)
2 tablespoons tequila

1. For the cupcakes: Center a rack in the oven and preheat the oven to 350 degrees F. Line 24 cupcake cups with liners. Sift together the flour, baking powder and salt. Whisk together the buttermilk and egg whites in a medium bowl.

2. Put the sugar and lime zest in a mixer bowl mix with paddle attachment until the sugar is moist and fragrant. Add the butter and beat at medium speed for a full 3 minutes, until the butter and sugar are very light. Beat in the lime juice, then add one third of the flour mixture, still beating on medium speed. Beat in half of the milk-egg mixture, then beat in half of the remaining dry ingredients until incorporated. Add the rest of the milk and eggs, beating until the batter is homogeneous, then add the last of the dry ingredients. Finally, give the batter a good 2-minute beating to ensure that it is thoroughly mixed and well aerated.

3. Divide batter among cupcake liners, filling them ⅔ to ¾ of the way. Bake until a toothpick inserted into the center of a cupcake comes out clean, 18-24 minutes, rotating the pans once front to back if your oven bakes unevenly. Transfer the pans to wire racks; cool about 5 minutes, them remove the cupcakes. Cool cupcakes completely on a rack before frosting.

4. Combine the tequila and orange liqueur in a small dish. Using a toothpick or skewer, poke about 10 holes in the top of each cupcake, almost to the base. Brush with the alcohol mixture. Keep brushing the cupcakes until all the alcohol has been used.

5. For the buttercream: Combine the egg whites, sugar, and salt in a metal mixing bowl set over a pot of simmering water. Heat, whisking frequently, until the mixture reaches 160 degrees and the sugar has dissolved. Using the whisk attachment, beat on medium-high speed until stiff peaks form and the mixture has cooled to room temperature, about 6 minutes. Reduce the speed to medium and add the butter, 2 tablespoons at a time, adding more once each addition has been incorporated. If the frosting looks soupy or curdled, continue to beat on medium-high speed until thick and smooth again, about 3-5 minutes more. Stir in the lime juice and tequila; mix just until incorporated. Use a wide star tip to pipe frosting onto the cupcakes, garnishing with tiny lime wedges and lime zest.

margarita cupcakes 6

black bean burgers

black bean patties 4

I actually don’t have any need for a black bean burger. Because Dave and I eat either vegetarian or fish during the week, I’m always ready for some meat by the weekend. And I don’t eat much bread on weekdays either (other than my daily bagel at work – best part of the workday!), so I wouldn’t pair vegetarian burgers with buns. But on top of slaw, now that works.

black bean patties 1

This recipe doesn’t have (much of) my other issue with most vegetarian burgers, which is that they’re usually bound with large amounts of breadcrumbs or other grains, so you’re, in essence, putting carbs on a bun. This mix does have some bread crumbs, but it’s also bulked up with extra protein from cheese and nuts. They’re not there for your health though – they provide a nice variation in texture, so the burgers aren’t uniform, and they’re certainly not mushy, thanks to some time the beans spend in the oven getting dehydrated.

black bean patties 3

The mix itself was so good that I couldn’t stop eating it. Formed into patties and browned, it was that much better. What isn’t better with crisp, caramelized sides? I’m sure they’re great on a bun with your favorite burger toppings, but I loved them on a simple lime-cilantro slaw. I have finally found a place for black bean burgers in my life, and I have found the black bean burger to take that place.

black bean patties 6

Printer Friendly Recipe
Black Bean Burgers
(rewritten but hardly adapted from The Food Lab)

Makes 8 to 12 burgers (the patties in the pictures are each one-tenth of the recipe)

If your cashews aren’t toasted already, put them in the oven before the beans. Don’t do what I did and combine the two on one baking sheet; they’re treated separately in the food processor.

The recipe makes a lot. I formed the mixture into patties and froze most of them. They defrost and cook up perfectly.

According to the original recipe, you can grill these as well as pan-fry them, but I didn’t try it. You’d want to brush the sides with oil before grilling.

2 (15-ounce) cans black beans, rinsed and drained
3 tablespoons vegetable oil, divided
1 medium onion, finely chopped
1 large poblano pepper, finely chopped
3 medium cloves garlic, minced
1 chipotle chile in adobo sauce, finely chopped, plus 1 teaspoon sauce
¾ cup toasted cashews
½ cup finely crumbled feta or cotija cheese
¾ cup panko bread crumbs
2 tablespoons mayonnaise
1 large egg
Kosher salt and freshly ground black pepper

1. Heat the oven to 350 degrees. Spread the black beans evenly on a rimmed baking sheet; bake until the edges are splitting, about 20 minutes.

2. Meanwhile, heat 1 tablespoon oil in a large saucepan over medium heat. Add the onion, poblano, and a pinch of salt, and cook, stirring occasionally, until the onion is just beginning to brown at the edges, about 8 minutes. Add the garlic; cook, stirring constantly, until fragrant, about 1 minute. Remove from the heat and stir in the chipotle chile and sauce. Transfer the mixture to a large mixing bowl.

3. In a food process, pulse the cashews until the largest pieces are about ¼-inch. Transfer to the bowl with the vegetables. Transfer the dried black beans and cheese to the food processor and pulse until the largest pieces are about ¼-inch. Transfer to the bowl with the cashews. Add the bread crumbs, mayonnaise, egg, 1 teaspoon salt, and ½ teaspoon pepper to the mixing bowl. Stir until evenly combined.

4. Form the mixture into patties ¾-inch thick. You can make them any size you want; I made about ten patties from this recipe, and they were each about 4 inches in diameter.

5. In a large nonstick skillet, heat 1 tablespoon oil over medium heat. Add half of the patties and cook, without moving, until crisp and browned on the bottom, about 5 minutes. Flip the patties and continue cooking until the second side is browned, another 5 minutes. Repeat with the remaining patties.

Lime-Cilantro Slaw

½ cabbage, sliced thinly
¼ cup lime juice
½ cup Greek yogurt
4 green onions (or half of a small red onion), minced
¼ teaspoon salt
1 large or 2 small carrots, shredded
2 tablespoons finely chopped cilantro

Combine all ingredients.

black bean patties 5

strawberry rhubarb crisp bars

strawberry rhubarb crisp bars 4

I never make pies anymore. Most of what I bake is meant to be easily shared by a large crowd, either at work or at a party. That’s fine, but pies are fine too.

strawberry rhubarb crisp bars 1

This was part of my annual frenzy to use rhubarb as much as possible during its short season. When the grocery store has it, I buy it, whether I have a plan for it or not. That’s easy when you have a bunch of coworkers who will eat anything – preferably anything handheld, easy to grab along with a cup of coffee.

strawberry rhubarb crisp bars 2

Until I find a small gathering – with plates and even forks – to make a pie for, these bars are a good stand in. The balance of tart, juicy fruit to buttery flour is spot on, and although the crispness isn’t like a flaky pie crust, the oaty crunch is a good stand-in. Best of all, I actually had an opportunity to share them, unlike a silverware-demanding pie.

strawberry rhubarb crisp bars 3

Printer Friendly Recipe
Strawberry Rhubarb Crisp Bars (adapted from Yvonne Rupert’s One Bowl Baking via Smitten Kitchen)

Makes 9 to 16 bars

I un-one bowled this. I’m spoiled by my dishwasher and would rather mix things conveniently than use less dishes.

1 cup (80 grams) rolled oats
¾ cup (95 grams) all-purpose flour
½ cup (95 grams) light brown sugar
¼ teaspoon table salt
6 tablespoons unsalted butter, melted
1 cup (125 grams) small-diced rhubarb (from about 1½ medium stalks)
1 cup (155 grams) small-diced strawberries
1 tablespoon granulated sugar, divided
1 tablespoon lemon juice
1 teaspoon cornstarch
Powdered sugar, for decoration, if desired

1. Heat oven to 375 degrees. Spray an 8-by-8 inch square pan with cooking spray.

2. In a medium bowl, mix the oats, flour, brown sugar, and salt. Add the butter and stir until clumps form. Set aside ½ cup of the crumble mixture and press the rest of the crumb mixture evenly in the bottom of the prepared pan.

3. In a medium bowl (you could even use the same bowl; see, one less dish to wash!), combine the rhubarb, strawberries, granulated sugar, lemon juice, and cornstarch. Evenly distribute the fruit over the crust, then scatter the reserved crumbs over the fruit.

4. Bake the bars until the fruit is bubbling and the crisp portion is golden, 30 to 40 minutes. Cool completely before serving.

strawberry rhubarb crisp bars 5

rustic bread (comparison of 3 recipes)

rustic bread 23
baguette: PR; slices: CI; round loaf: T

I love bread so much. I always have – who doesn’t? – but I’ve been having even more fun with it lately. Besides hot dog and burger buns, my focus has almost exclusively been on rustic breads for the last couple years. If we spend Saturday night at home, I’ll often make a really nice meal, and wine seems like a natural accompaniment (to be honest, often the meal is planned around the wine), and bread and wine are so good together.

rustic bread 1
CI biga

With all these opportunities to experiment, I started working on this comparison years ago. I slowly narrowed down recipes until I had three that were so good that the comparison would undoubtedly be a reflection of personal taste and not quality of the recipe, thus defeating the purpose of doing a tasting at all. But at least I (and my friends) got to eat a lot of good bread along the way.

rustic bread 2
CI dough

The recipes that made the cut were Cook’s Illustrated’s Italian Bread recipe (CI), Peter Reinhart’s Pain a l’Ancienne (PR), and Tartine’s Country Bread (T). I’d previously made all three of these recipes many times and loved them all. I’d need to taste them side-by-side to choose a favorite.

rustic bread 3
CI dough mid-turn

CI – This bread starts with a biga, a mixture of flour, water, and yeast that’s stirred together, left at room temperature for a few hours to ferment, then transferred to the refrigerator overnight. A second mixture of flour, water, and yeast is later mixed and allowed to set for just 20 minutes before the biga and salt is added and the dough is kneaded.

rustic bread 5
CI dough completed turn

The dough goes through a long rise at room temperature with several “turns” in the middle – basically folding the dough over itself a couple times. It’s supposed to lead to the final loaf rising up and not out, and it’s a trick I like enough that I incorporate it in other bread recipes. After shaping, the dough goes through a second rise and is baked on a stone at 500 degrees for 10 minutes and then 400 degrees. The dough is sprayed with water before baking, but no other steam is added.

rustic bread 8
CI risen dough

PR – This is the easiest bread in this lineup. Flour, yeast, salt, and ice water are mixed and kneaded, then chilled overnight. The next day, after it warms up and rises a bit, the very sticky dough is cut into smaller portions, which are pulled and pushed into something vaguely baguette-like. These are baked soon after shaping. Reinhart calls for a few shots of water to be sprayed on the sides of the oven, plus a pan of hot water in the oven with the bread to create steam during baking.

rustic bread 9
CI ready to bake

T – This dough requires a lot of babysitting and a lot of patience, although not necessarily a lot of work. The flour and water are mixed with sourdough starter and allowed to rest for a bit, then salt is mixed in. The dough isn’t kneaded, it’s just turned, as described above, every half an hour or so for about four hours. After being shaped into rounds, it’s chilled overnight in the refrigerator. It’s kept covered in a heavy Dutch oven for the first part of baking to trap steam, then the lid is removed so the crust can brown.

rustic bread 10
CI

In retrospect, the breads are pretty different. The Italian bread (CI) has an even, relatively tight structure, while the pain a l’ancienne (PR) is open and airy. Tartine’s country bread (T) has a slight but unignorable sourdough flavor.

rustic bread 11
CI

CI – Described as denser and drier. The chewy crust got compliments. While one friend thought it was sweeter than the other breads, to me, it didn’t have as much flavor. This might be because I eat so many whole grains lately that a bread made with all white flour seems plain.

PR – Tasters thought the bread might be buttery or eggy, despite a lack of both of those ingredients in the recipe. They also thought it was chewy and moist and liked the crust.

T – The sourdough flavor was picked out immediately. It was also described as yeastier and more floury.

rustic bread 12
CI

With five people comparing the breads, no clear winner emerged. A friend who grew up eating sourdough pancakes preferred Tartine’s country bread. An Italian friend loved CI’s Italian bread, as did a friend who liked the sweeter flavor. PR’s pain a l’ancienne was Dave’s favorite and no one’s least favorite. Those who favored Tartine country bread said CI’s Italian bread was their least favorite and vice versa, although everyone liked all of the breads. I was just happy because I got to eat — and bake — so much bread.

rustic bread 25
clockwise from top: PR, T, CI

Tartine Country Bread

Pain a l’ancienne

Printer Friendly Recipe
Italian Bread (from Cook’s Illustrated’s The New Best Recipe)

This recipe requires a standing mixer to make the dough, a spray-bottle filled with water for spritzing, a rectangular baking stone, and an instant-read thermometer for gauging doneness. It also requires a bit of patience — the biga, which gives the bread flavor, must be made 11 to 27 hours before the dough is made.

This recipe makes a gigantic loaf of bread.  I always divide the dough into two portions and make smaller loaves.

I really didn’t intend for all of the pictures in this post to be of this recipe.  Fortunately, there are separate entries dedicated to the other two recipes.

Biga:
11 ounces bread flour (2 cups)
¼ teaspoon instant yeast
8 ounces water (1 cup), room temperature

Dough:
16½ ounces bread flour (3 cups), plus extra for dusting hands and work surface
1 teaspoon instant yeast
10.7 ounces water (1⅓ cups), room temperature
2 teaspoons table salt

1. For the biga: Combine flour, yeast, and water in bowl of standing mixer fitted with dough hook. Knead on lowest speed (stir on KitchenAid) until it forms a shaggy dough, 2 to 3 minutes. Transfer biga to medium bowl, cover tightly with plastic wrap, and let stand at room temperature until beginning to bubble and rise, about 3 hours. Refrigerate biga at least 8 hours or up to 24 hours.

2. For the dough: Remove biga from refrigerator and let stand at room temperature while making dough. Combine flour, yeast, and water in bowl of standing mixer fitted with dough hook; knead on lowest speed until rough dough is formed, about 3 minutes. Turn mixer off and, without removing dough hook or bowl from mixer, cover bowl loosely with plastic wrap; let dough rest 20 minutes.

3. Remove plastic wrap, add biga and salt to bowl, and continue to knead on lowest speed until ingredients are incorporated and dough is formed (dough should clear sides of bowl but stick to very bottom), about 4 minutes. Increase mixer speed to low (speed 2 on KitchenAid) and continue to knead until dough forms a more cohesive ball, about 1 minute. Transfer dough to large bowl (at least 3 times dough’s size) and cover tightly with plastic wrap. Let dough rise in cool, draft-free spot away from direct sunlight, until slightly risen and puffy, about 1 hour.

4. Remove plastic wrap and turn the dough by sliding a plastic bench scraper under one side of the dough; gently lift and fold one third of the dough toward the center. Fold the opposite side of the dough toward the center. Finally, fold the dough in half, perpendicular to first folds. Dough shape should be a rough square. Replace plastic wrap; let dough rise 1 hour. Turn dough again, replace plastic wrap, and let dough rise 1 hour longer.

5. To shape the dough: Dust work surface liberally with flour. Gently scrape and invert dough out of bowl onto work surface (side of dough that was against bowl should now be facing up). Dust dough and hands liberally with flour and, using minimal pressure, push dough into rough 8- to 10-inch square. Fold the top left corner diagonally to the middle; repeat step 2 with top right corner. Gently roll dough from top to bottom until it forms a rough log. Roll the dough into its seam, and, sliding hands underneath each end, transfer the dough to parchment paper. Gently shape dough into 16-inch football shape by tucking bottom edges underneath. Dust loaf liberally with flour and cover loosely with plastic wrap; let loaf rise until doubled in size, about 1 hour. Meanwhile, adjust oven rack to lower-middle position, place baking stone on rack, and heat oven to 500 degrees.

6. To bake: Using a lame, single-edged razor blade, or sharp chef’s knife, cut slit ½ inch deep lengthwise along top of loaf, starting and stopping about 1½ inches from ends; spray loaf lightly with water. Slide parchment sheet with loaf onto baker’s peel or upside-down baking sheet, then slide parchment with loaf onto hot baking stone in oven. Bake 10 minutes, then reduce oven temperature to 400 degrees and quickly spin loaf around using edges of parchment; continue to bake until deep golden brown and instant-read thermometer inserted into center of loaf registers 210 degrees, about 35 minutes longer. Transfer to wire rack, discard parchment, and cool loaf to room temperature, about 2 hours.

rustic bread 24

braised artichokes with creamy dipping sauce

braised artichokes 8

My sister’s kids aren’t particularly picky, but sometimes I push their limits without meaning to. Like the time I thought they’d get a kick out of eggs cooked in bacon toast cups, but instead they were like, Hey, now where does the jelly go? And at least that wasn’t a vegetable.

braised artichokes 2

I don’t even remember why I thought artichokes would be a good idea in the first place, but then when I started thinking about it, I got worried. They tend to turn a military shade of green once they’re cooked. I tried to get the kids excited about saying “okey dokey artichokey”, but I was pulling at strings and knew it.

braised artichokes 4

And then, oddly, they loved the artichokes. I think it was the number one rule of feeding children that worked in my favor – opportunities to dip. Plus, maybe, just maybe, I was right, and the fun of pulling off leaves and scraping the “meat” off with your teeth was more important than the brownish green shade of the vegetables. It certainly is for me, as this is one of my absolute favorite foods.

braised artichokes 7

Printer Friendly Recipe
Braised Artichokes with Creamy Dipping Sauce

Serves 3 to 6 as a first course, depending on how big your artichokes are and how big your appetite is

Trimming artichokes isn’t hard, but you might want to watch a youtube video or two if you’re not familiar with the process.

99% of artichoke recipes call for transferring the trimmed ‘chokes to a bowl of water with a lemon squeezed into it to keep them from browning. Not only does it not work, but they look and taste the same after cooking, so I’ve skipped this step. (But a recent issue of Cook’s Illustrated tested it and found it the lemon water worthwhile.)

If your artichokes are really big, you might need to use a 12-inch sauté pan instead of a Dutch oven to fit them in a single layer.

If you’re mayonnaise-adverse, crème fraiche would be a great substitute. Greek yogurt or sour cream would work if you stir it in off the heat so the dairy doesn’t curdle.

3 medium artichokes
1 tablespoon olive oil
3 cloves garlic, minced
¾ cup water
½ cup white wine
¼ teaspoon black pepper
½ teaspoon salt
2 tablespoons mayonnaise
1 tablespoon parsley leaves, minced

1. Working with one artichoke at a time, cut off the top 2 inches of the artichoke. Working around the artichoke, use scissors to cut off the sharp tips of the leaves. Trim the base of the stem, then trim off the outside millimeter or so of the stem. Cut the artichoke in half from top to bottom and use a paring knife to cut out the sharp purple leaves and fuzzy choke from the center. Rinse the artichoke under running water to remove any remaining fuzz.

2. Heat the olive oil in a 5- or 6-quart Dutch oven over medium heat. Add the garlic and cook, stirring constantly, until fragrant, about 30 seconds. Arrange the artichokes cut-side down in the pot, overlapping the stems in the middle. Add the water, wine, pepper, and salt. Cover the pot, reduce the heat to medium-low, and braise artichokes until tender when pierced with a knife, about 30 minutes for small artichokes and 40 minutes for very large artichokes. (If you’re not ready to serve the artichokes right away, remove the pot from the heat and leave the cover on; the ‘chokes will stay hot for up to 30 minutes.)

3. Transfer artichoke halves to a serving platter or plates. There should about ⅓ cup liquid remaining in the pot; if there’s less, add water until there’s a total of ⅓ cup liquid; if there’s more, simmer the liquid to reduce it slightly. Add the mayonnaise and parsley to the liquid; whisk to combine and pour into individual dipping containers.

braised artichokes 10

strawberry shortcake cupcakes

strawberry shortcake cupcakes 10

I’ve had these cupcake wrappers for at least a year, maybe close to two years. But because they’re tulips, I was determined that I could only use them in the spring, and sometimes, a whole month or two can go by where I don’t think about cupcake wrappers. If that month is April and May, then it’s too late for tulips. Having actually remembered this year, I wanted to make the most springy cupcake I could.

strawberry shortcake cupcakes 1

Strawberries are the obvious choice. And what dessert is more springy than strawberry shortcake?

strawberry shortcake cupcakes 2

This isn’t too different than a cupcake adaptation of this strawberry cream cake, but the cake portion of that recipe is meant to be dense enough to stand up to layers of strawberries and whipped cream. I wanted something fluffier, so I started with my favorite basic vanilla cake. The filling in that strawberry cream cake would be perfect for adding to the middle of cupcakes, because the strawberries are minced and juicy, just right for maximizing the flavor they can contribute in just a small hole in the middle of each cupcake.

strawberry shortcake cupcakes 4

The topping is perfect as well, since the cream cheese stabilizes the whipped cream enough to mound on top of each cupcake. With a slice of strawberry over the hole filled with strawberries to even out the top of the cupcake, plus more fresh strawberries on top, there were plenty of berries to balance the cake and rich cream topping. It was a perfect combination.  Tulips and strawberries, what’s better than that for spring?

strawberry shortcake cupcakes 12

Strawberry Shortcake Cupcakes (cake adapted from Confections of a Foodie Bride; filling and topping adapted from Cook’s Illustrated’s Strawberry Cream Cake)

24 cupcakes

Vanilla cupcakes:
3 cups (12 ounces) cake flour
1 tablespoon baking powder
1 teaspoon salt
16 tablespoons (2 sticks) unsalted butter, at room temperature
2 cups (14 ounces) sugar
4 large eggs, at room temperature
1¼ cups buttermilk, at room temperature
1 tablespoon vanilla extract

Strawberry filling:
8 ounces fresh strawberries (about ½ quart), washed, dried, and stemmed
1 tablespoon sugar
½ tablespoon Kirsch or port
Pinch table salt

Whipped cream topping:
8 ounces cream cheese, room temperature
½ cup (3.5 ounces) sugar
1 teaspoon vanilla extract
pinch table salt
2 cups heavy cream

6-8 strawberries, sliced crosswise into rounds
additional strawberries for garnish

1. For the cupcakes: Preheat the oven to 350°F. Line two cupcake pans with paper liners. In a medium bowl, combine the cake flour and baking powder.

2. Place the butter and salt in the bowl of an electric mixer fitted with the paddle attachment (or a large bowl if using a hand mixer). Beat on medium-high speed for 3 minutes, until light and creamy in color, scraping the sides of the bowl as necessary.

3. Gradually add the sugar to the butter mixture, beating until fluffy. Add the eggs one at a time, beating until incorporated. Combine the buttermilk and the vanilla extract in a liquid measuring cup. With the mixer on low speed, add one-third of the flour mixture, followed immediately by half of the buttermilk, mixing just until incorporated. Repeat with another third of the flour and the rest of the buttermilk, then the last of the flour. Mix for 15 seconds longer.

4. Divide the batter between the prepared paper liners, filling each about two-thirds of the way full. Bake 18-22 minutes, or until a toothpick inserted in the center comes out clean. Allow to cool in the pans for 5 minutes, then transfer to a cooling rack to cool completely.

5. For the filling: Quarter the berries; toss with sugar in a medium bowl and let sit 1 hour, stirring occasionally. Strain the juices from the berries and reserve (you should have about ¼ cup). In the workbowl of a food processor fitted with the metal blade, give the macerated berries five 1-second pulses (you should have about ¾ cup). In a small saucepan over medium-high heat, simmer the reserved juices and Kirsch until the mixture is syrupy and reduced to about 1½ tablespoons, 3 to 5 minutes. Pour the reduced syrup over the macerated berries, add a pinch of salt, and toss to combine.

6. For the topping: When the cake has cooled, place the cream cheese, sugar, vanilla, and salt in the bowl of a standing mixer fitted with the whisk attachment. Whisk at medium-high speed until light and fluffy, 1 to 2 minutes, scraping down the bowl with a rubber spatula as needed. Reduce the speed to low and add the heavy cream in a slow, steady stream; when it’s almost fully combined, increase the speed to medium-high and beat until the mixture holds stiff peaks, 2 to 2½ minutes more, scraping the bowl as needed (you should have about 4½ cups).

7. To assemble: With a paring knife, carve a cone out of the center of each cupcake. Use a slotted spoon to transfer some strawberry filling to the cavity; top each hole with a round slice of strawberry. Frost the cupcakes; garnish with additional strawberries. If not serving within about an hour, refrigerate for up to 8 hours. Let stand at room temperature for at least 30 minutes or up to an hour before serving (otherwise, the cake will seem hard and stale).

strawberry shortcake cupcakes 9

spicy mexican beans and rice

mexican rice and beans 6

It’s been a long road since I shared something vaguely similar to this recipe, well over six years ago. At the time, I said that I had a goal to make more crockpot recipes. Since then, I have made exactly three crockpot recipes worth sharing, and one of those I’ve never made again. In general, I’m more into low-and-slow oven cooking than crockpotting. Heck, I recently even made “crockpot” pulled “pork” (it was venison; still delicious) in the oven.

mexican rice and beans 1

The long road of not-crockpotting has led me to adapt my old favorite crockpot recipe for the stove. The way the original recipe is written, with bone-in chicken thighs, the crockpot is a good choice. However, I always make this as an easy, healthy, vegetarian weeknight meal, leaving the chicken out. Why spend 10 hours, the whole day when I’m away for work, slow-cooking canned beans with some seasonings?

mexican rice and beans 3

So instead of adapting stovetop or oven recipes for the crockpot like most people do, I’ve adapted a crockpot recipe for the stove. I replaced the chicken soup mix with aromatics and spices, the chicken with a greater variety of beans, and the fresh tomatoes with canned tomatoes (in season year round!). It really isn’t any harder than the crockpot recipe was, and it tastes just as good.  With this new crockpot-less recipe, it might be time to retire my crockpot entirely.  Surely I can think of another fun new kitchen tool that I don’t really need to take up that cabinet space, right?

mexican rice and beans 5

Printer Friendly Recipe
Spicy Mexican Beans and Rice

8 servings

2 tablespoons vegetable or olive oil
1 large or 2 small to medium onions, diced
salt
4 cloves garlic, minced
2 teaspoons chili powder
1 teaspoon cumin
½ teaspoon oregano
½ cup green chile, roasted, peeled, and diced
2 chipotle chiles, minced
2 (15-ounce) cans black beans, drained and rinsed
1 (15-ounce) can kidney beans, drained and rinsed
1 (15-ounce) can pinto beans, drained and rinsed
1 (14-ounce) diced tomatoes
1 cup chicken broth
juice from 1 lime
6 cups cooked rice from 2 cups uncooked rice
cilantro, minced
optional toppings: queso fresco or cheddar cheese, diced avocado, Greek yogurt or sour cream

Heat the oil in a large saucepan over medium heat. Add the onion and a pinch of salt and cook, stirring occasionally, until just beginning to brown at the edges, about 8 minutes. Add the garlic, chili powder, cumin, and oregano; cook, stirring constantly, until fragrant, about 30 seconds. Add the green chile, chipotle chiles, beans, tomatoes, and broth; cover, bring to a simmer, then reduce the heat to low and lightly simmer until the flavors are blended, at least 20 minutes or up to an hour if you aren’t in a hurry. If the mixture is too liquidy, remove the cover, increase the heat to medium, and simmer until the desired thickness is reached. Taste and add salt if necessary. Stir in the lime juice. Serve over rice, topped with cilantro and other toppings as desired.

mexican rice and beans 8

green chile chicken tacos

chicken tacos 3

Okay, so all my taco recipes are almost the same – I want avocado, and salty cheese, and fresh lime juice, cilantro, maybe some pickled onions, all mixed up in a fresh corn tortilla. Even with just those fixings and no meat, I’d probably be perfectly happy. But, I’ve been spoiled by barbacoa. Tacos are held to a higher standard now.

chicken tacos 1

My first couple attempts at chicken tacos weren’t up to par. I thought grilling sounded promising, but afterward, the chicken just tasted like chicken, with nothing more interesting to contribute. Plus it’s so easy for chicken to dry out on the grill.

chicken tacos 2

This recipe solves any problem of dry, bland chicken by braising chicken thighs directly in a sauce made from blistered tomatillos, onions, and green chiles. The chicken turns out tender and juicy, already tasting like it’s meant for tacos, and then the game is upped even more when the braising liquid is reduced to a sauce. I feel like I should say something about how this filling is so good that I don’t need all those tasty fixings, but no filling is good enough to pass up a slice of avocado in a corn tortilla.  Still, this is the next best thing to barbacoa.

chicken tacos 4

Printer Friendly Recipe
Green Chile Chicken Tacos (almost directly from Kenji Alt-Lopez at Serious Eats)

Serves 4 to 6

2 green chiles, preferably Hatch or Anaheim
2 medium tomatillos, husks removed, split in half
1 small yellow onion, peeled and split in half
3 cloves garlic, unpeeled
2 tablespoons vegetable oil, divided
1 cup fresh cilantro leaves, roughly chopped, divided
Kosher salt and freshly ground black pepper
4 limes
2 pounds chicken thighs (bone-in and skin-on)
1 small white onion, minced
16 to 24 warm corn tortillas
1 batch pickled red onions
½ cup grated queso cotija or jack cheese
1 avocado, sliced

1. Preheat the broiler to high and adjust the broiler rack to 5 to 6 inches below the heating element. Toss the peppers, tomatillos, yellow onion, and garlic in a medium bowl with 1 tablespoon of the olive oil. Place on a foil-lined rimmed baking sheet and broil until the vegetables are completely tender and charred on all sides, turning occasionally, about 20 minutes total. When cool enough to handle, peel the peppers and remove the stems and seeds. Transfer the vegetables to a food processor or blender with half of the cilantro and ½ teaspoon of salt; process on high speed until smooth. Add 2 tablespoons of lime juice from about 2 of the limes, season to taste with salt, and set aside.

2. While the vegetables broil, heat the remaining oil in a Dutch oven over high heat until shimmering. Add the chicken pieces skin side-down and cook, without moving, until well browned, about 6 minutes. Flip and brown the second side, about 3 minutes longer. Transfer to a plate. Pour off the excess fat and deglaze the Dutch oven with 1 cup of water, scraping up the browned bits from the bottom of the pot.

3. Transfer the vegetable puree to the Dutch oven and stir with the deglazing water to combine. Nestle the chicken pieces into the sauce. Bring to a boil, reduce to a bare simmer, cover, and cook until the chicken is completely tender, about 30 minutes. Remove the chicken from sauce and place on a plate to cool.

4. When the chicken is cool enough to handle, discard the skin and bones and shred meat into bite-sized pieces. Return the meat to the sauce and bring to a simmer. Cook until thick and saucy, then season to taste with salt and pepper if desired.

5. Combine the white onion and remaining cilantro in a bowl. Serve chicken with warm tortillas, onion and cilantro mixture, pickled onions, cheese, and avocado.

chicken tacos 5