Archives for May 2011

caramel pots de creme

caramel pots de creme 4

Despite a few bumps in the road, caramel and I have always been on good terms. I’ve had a good, safe method that I’m comfortable with: add sugar and water to a pot, be careful not to get any crystals on the sides of the pot, stir in some corn syrup for safety, bring to a simmer, be careful to brush down any crystals on the sides of the pot, watch carefully while it darkens, be careful to swirl the pan instead of stir with anything that might have sugar crystals on it. It worked…as long as I was careful.

caramel pots de creme 1

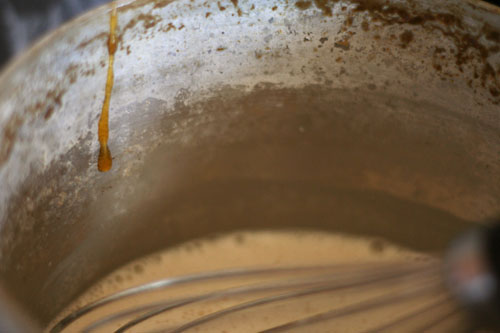
I knew there was this no-water method, in which sugar is melted directly, instead of dissolved in water first. But it seemed so much safer to add water and dissolve the sugar first, despite all the being careful that that method entailed. I assumed I’d try the other method eventually, but, for years, I was nervous.

I finally took the plunge this weekend, and, friends? Dive right in, because the water is just fine.

caramel pots de creme 2

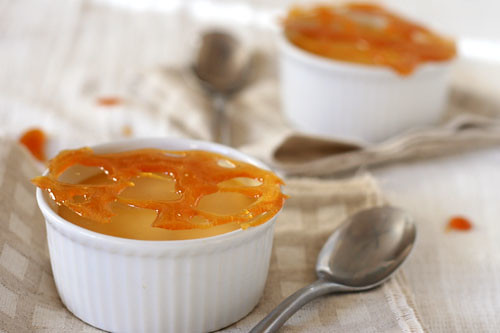
Directly melting the sugar is so much easier! Why does anyone bother with that troublesome water method? It takes twice as long, and there’s all this being careful to be careful about. Just put the sugar in a pot, turn the heat on, stir when it starts to melt and keep stirring as it darkens, which takes just a few minutes. And then if you want a real treat, mix in some heavy cream and eggs for a smooth, creamy, thick custard that has a hint of burnt sugar – a hint you hardly had to work for.

Peggy chose this recipe for Tuesdays with Dorie, and she has the recipe posted. I added a hefty pinch of salt to balance all that sugar.

One year ago: White Chocolate Brownies
Two years ago: Cappuccino Muffins
Three years ago: French Chocolate Brownies

caramel pots de creme 3

tartine country bread

Sometimes I’ll be reading a recipe, and it’ll say “we simplified this horribly long complicated process with very little effect on the outcome!” and I always think, “nooo! I want to know the horribly long complicated process!” That’s why I made traditional lasagne Bolognese and barbecued a pork shoulder on the grill. And that is why I have now made bread without any commercial yeast – just the wild stuff.

That means that this bread takes at least a week from start to finish, probably a few days longer. Is it worth it? Oh, who knows. I’ve made some pretty fantastic bread using Peter Reinhart’s recipes too. But this isn’t about one loaf of bread. It’s about having a mixture of old fermented flour and wild fungus in your refrigerator, available to add just a little extra oomph to any bread you make.

I’ve jotted down the outline of Tartine’s Country Bread recipe below, but the beauty of this method goes far beyond this one loaf of bread, extraordinary though it may be. Because this isn’t about making sourdough bread. Tartine’s country bread isn’t sour, but it has a layer of complexity to it, a sweet savory-ness that makes it really special, not to mention the beautiful burnt red crust.

Chad Robertson has pages and pages of information in his book (and Martha Stewart has a tutorial on her site); my version here is merely the cliff notes. But the key here isn’t the nitpicky mixing, turning, rising, shaping directions. The key is that magical stinky starter you created. And with the starter mixture in your fridge, you have the power to add some of that complexity to every bread recipe you make. When I mix up a whole wheat pre-dough that uses yeast, I mix in some of this starter instead of instant yeast, which has resulted in some exceptional bagels recently. I’ve also started using the country bread dough for pizza, which makes for a bubbly crust with the bottom so crisp it’s almost crackly. This is why I like to know the whole horribly long complicated process – not only is the outcome often truly special, but it gives me the confidence to take the method and adapt it for my own needs.

One year ago: Turkey Burgers
Two years ago: Potato Galette
Three years ago: Orange Vanilla Opera Cake

Printer Friendly Recipe
Tartine’s Basic Country Bread (rewritten from Tartine Bread)

Makes 2 large loaves

The only ingredients in this bread are flour, water and some salt at the end. However, they’re mixed at so many different stages in the process that I’ve chosen not to include an ingredient list. Instead, the ingredients are bolded in the directions.

For pizza, I like to add a squeeze of honey (or a spoonful of sugar) to the dough to help it brown in the oven. The bread doesn’t get the same beautiful burnished color as the loaf because it isn’t covered while it bakes.

Make the starter:

I’ve provided precise measurements here, but it isn’t necessary to follow them exactly as long as your starter always has the consistency of a thick batter.

1. Mix ½ cup room temperature filtered water with ½ cup white bread flour and ½ cup whole wheat flour. Cover the bowl with a kitchen towel and set aside in a cool, shaded spot for two days.

2. Check the culture to see if any bubbles have formed around the sides and on the surface. If not, let it sit for another day. The culture is ready when it smells like stinky cheese and tastes very acidic. It’s okay if a dark crust has formed on top.

3. Discard three-quarters of the culture. To the remaining culture, add ¾ cup water, 6 tablespoons white bread flour and 6 tablespoons whole wheat flour. Stir vigorously until there are no lumps. Repeat this step once a day until…

4. Your starter is finished when it behaves in a predictable pattern after each feeding, from stinky and sharply acidic before feeding and sweet and milky just after feeding. The volume should increase for several hours after feeding, then begin to collapse.

To store and keep your starter: Lightly covered, the starter can be kept indefinitely in the refrigerator. (My mom keeps hers in a covered pitcher; I keep mine in a canning jar with a paper towel screwed on instead of the lid. A bowl with a cover would work fine.) To keep it active and healthy, feed it every week or two by following the directions below to make leaven for bread (step 1 of the bread part of the recipe).

Make the bread:

1. To make the leaven: Discard all but 1 tablespoon of the starter. Feed the remaining starter with 200 grams of warm water, 100 grams of whole wheat flour, and 100 grams of bread flour. Let the mixture rise overnight at room temperature. When it’s ready, the leaven should have risen slightly, float in room temperature water (test a small piece; you can still use this piece in the final dough), and smell like overripe fruit.

2. In a large (huge, actually) bowl, mix 700 grams of water and 200 grams of the leaven. (The remainder of the leaven is the starter that you’ll store and feed regularly.) Add 800 grams of bread flour and 200 grams of whole wheat flour; stir until the flour is evenly moistened. The dough won’t be smooth. Let it rest for 25 to 40 minutes while the gluten starts forming, the flour starts hydrating, and the flavor starts developing.

3. Add 20 grams of salt and 50 grams of water to the dough, and squeeze the dough to mix them in. This dough isn’t kneaded; instead, fold it a few times by using a dough scraper to scoop up one side of the dough and drape it over the rest of the dough.


before turning

4. Allow the dough to ferment for 3 to 4 hours and give it another few turns every 30 minutes. This takes the place of kneading. Be more gentle with the turning toward the end of the rising time. The dough is ready when it’s slightly increased in volume and is full of air bubbles (which will be visible on the sides if you’ve used a clear container).


after one turn


after two turns


ready to shape

5. Turn the dough out onto floured surface or a damp kitchen towel. Divide it into two portions. To shape each one into a round, cup your hands over the top of the dough and rotate the dough around on the counter. Cover the rounds with a damp towel and set them aside to rest for 20 to 30 minutes.

6. To increase the surface tension of the dough, ensuring that the bread rises up and not out in the oven, perform a series of folds. Working with one ball of dough at a time, stretch it out and fold it over several times, eventually ending up with a neat square. Cup your hands around the dough and rotate it on the counter to smooth the surface again.


one large loaf and several smaller portions instead of two equal portions

7. Transfer each round to a floured towel-lined bowl or basket with the seam facing up. (Actually, I prefer to use an oiled bowl, covered with a damp towel. If you want to freeze the dough, transfer it to a ziptop bag sprayed with nonstick spray and store in the freezer. Let it defrost overnight in the refrigerator before continuing with the recipe.) Let rise for 2-4 hours at room temperature or, for maximum flavor, overnight in refrigerator.

8. Half an hour before you’re ready to bake the bread, remove the dough from the refrigerator. Place a Dutch oven and its lid on the middle rack in the oven and heat the oven to 500 degrees. When the oven is hot, turn the dough out of its bowl onto a floured work surface or a damp kitchen towel so that the seam is down. Use a very sharp or serrated knife to cut four intersecting ½-inch deep slashes in the dough, forming a square of cuts. Carefully place the dough into the heated Dutch oven; cover the pot with its lid and transfer it to the oven. Immediately reduce the oven temperature to 450 degrees. Bake 20 minutes, then remove the lid and bake 20-25 minutes longer, until the bread is deep golden brown and an instant read thermometer inserted into the center of the loaf reads about 205 degrees. Remove the bread from the pan and cool on a wire rack for an hour before serving.

pizza with caramelized onions and fennel

After a year and a half living in a small town, I still haven’t fully adjusted to the grocery store situation. I don’t think I’ve walked out of the store here once without thinking wistfully of Wegman’s. My new store isn’t a bad place; I’m just spoiled. They do occasionally stock random items, and I’ve learned to jump on those opportunities and worry about finding recipes later.

Sometimes I buy the item just to encourage the store to keep it up. In the last few months, we’ve eaten haricot vert, Copper River salmon, yellow carrots, and now fennel. Since I moved here, I’ve bitterly overlooked fennel recipes, thinking my fennel days were over, and then once I found fennel, I could only remember one of those recipes.

It’s a memorable recipe because it has a lot going for it. For one thing, it’s pizza, which is always good, but it’s even better since I’ve started playing with a new crust recipe recently (which will be the next blog entry). For another, the onions and fennel are caramelized, and who doesn’t like turning vegetables into candy?

Lindsay laments that this pizza was pale and homely, so I added some color in the form of black forest ham (ideally prosciutto, but my store was out of it) and a sprinkle of parsley. Not only is the splatter of pink and scattering of green welcome, but the salty bites of ham and bitter bits of parsley complimented the sweet onions and the licorice of the fennel. It’s too bad I don’t know when the next time I’ll find fennel is, because I’d love to make this one again.

One year ago: Quinoa Tabbouleh
Two years ago: Croissants
Three years ago: Franks and Beans

Printer Friendly Recipe
Pizza with Caramelized Onions, Fennel, and Fresh Mozzarella (adapted from Love and Olive Oil)

Serves 6

I cooked the onions and fennel separately (not because I love doing dishes and wanted to use more than necessary; I had leftover caramelized onions to be used), and I found that the fennel didn’t caramelize, it just browned slightly. It may behave differently if onions are around.

1 pound pizza dough, fully risen and at room temperature (½ of this recipe)
1 tablespoon olive oil
1 large onion, thinly sliced
1 large fennel bulb, cored and thinly sliced
Salt
8 ounces whole-milk fresh mozzarella cheese, coarsely grated
4 ounces prosciutto, cut into slivers
freshly shaved Parmesan cheese
sprinkling parsley

1. Place a pizza stone on the bottom rack of the oven and preheat the oven to 500ºF. Divide the dough in two and shape each portion into a ball. Set the balls of dough aside, loosely covered, to allow the gluten to relax.

2. Heat the oil in a medium nonstick skillet over medium heat. Add the onions, fennel, and ¼ teaspoon salt; cook, stirring occasionally, until the onions start to brown, about 5 minutes. Reduce the heat to medium-low and continue cooking and occasionally stirring until the onions are golden brown, about 15 minutes.

3. Work with one ball of dough at a time on a lightly floured surface or a damp cloth. Flatten the dough, then pick it up and gently stretch it out, trying to keep it as circular as possible. Curl your fingers and let the dough hang on your knuckles, moving and rotating the dough so it stretches evenly. If it tears, piece it together. If the dough stretches too much, put it down and gently tug on the thick spots. Transfer the round of dough to a large square of parchment paper; slide onto a pizza peel.

4. Top the dough with half of each of the caramelized vegetables, cheese, and prosciutto. Slide the pizza with the parchment onto the hot baking stone. Bake for 8-10 minutes, until the crust is browned around the edges. Transfer the pizza to a cooling rack without the parchment; top with parmesan slivers and a sprinkle of parsley. Let the pizza rest for 5 minutes before serving. Repeat with the remaining ingredients.

oatmeal nutmeg scones

For most of my life, I didn’t think much of nutmeg. It was just one member of the pumpkin pie consortium, of which only cinnamon could stand on its own, as far as I knew. The rest were generically fall-flavored. It wasn’t until I met Dave, professed nutmeg lover, that I started considering nutmeg as its own entity.

Now I think of nutmeg as warm, cozy, complex. (Or maybe the association I have between nutmeg and Dave has caused me to describe my husband instead of the seasoning?) Its spice adds richness to any dish, sweet or savory, and has become one of my favorite flavors.

Oatmeal reminds me of Dave too, as it was his staple breakfast – no sugar, no salt – when he lived alone. (It was bland, mushy, gross, but these aren’t words I associate with my husband.) I may not need complex, cozy scents to make me warm out here the desert, but I certainly won’t turn down a nutmeg oatmeal scone. You can bet Dave wouldn’t either.

Patricia chose these for Tuesdays for Dorie, and she will have the recipe posted. I didn’t make any changes.

One year ago: Strawberry Chocolate Ice Cream Pie
Two years ago: Chipster-Topped Brownies
Three years ago: Pecan Honey Sticky Buns

strawberry cream cake

Strawberries, cream cheese, and cake – is there any better combination? Strawberry shortcake is the iconic strawberries and cream dessert, and for good reason, but for me, this cake is a step above. Mostly because of the cream cheese, but I’m also partial to soft and tender cake over a craggy biscuit. And you can’t beat the wow factor of a beautiful layer cake with the innards exposed. Cake innards are my favorite.

Of course there’s a price to pay for alternating layers of sunny cake, swirled cream, and ruby strawberries, and that is in fussiness. And who doesn’t love fussiness? Not I.

Because this is a Cooks Illustrated recipe, there are a handful of tricks that make it work. The cream cheese stabilizes and thickens the whipped cream, not to mention it tastes so darn good. Half of the strawberries are halved for maximum visual impact, and the remainder is macerated to remove liquid. The extracted juice, full of strawberry flavor and not to be wasted, is cooked down to a syrup that won’t make your cake soggy.

Three parts that must be separately prepared and then alternately layered to make a tall, striped, impressive dessert.  A dessert which, when sliced, will collapse into a jumble of fruit, cream, and cake that shows a remarkable resemblance to strawberry shortcake.  But it was worth the trouble of all that layering, because fussing is fun, right?


One year ago: Cream Cheese Spritz
Two years ago: Strawberry Lemon Sorbet
Three years ago: Ricotta Spinach Tofu Ravioli

Printer Friendly Recipe
Strawberry Cream Cake (from Cook’s Illustrated)

12 servings

I hate splitting cakes. I baked my cake batter in three separate cake pans instead of one pan which would later need to be split.

I made a half recipe in 6-inch pans.  6-inch round pans are slightly smaller than half of a 9-inch pan, so my layers are taller than the original recipe will result in.

Cake:
1¼ cups (5 ounces) cake flour
1½ teaspoons baking powder
¼ teaspoon table salt
1 cup (7 ounces) sugar
5 large eggs (2 whole and 3 separated), room temperature
6 tablespoons unsalted butter, melted and cooled slightly
2 tablespoons water
2 teaspoons vanilla extract

Strawberry Filling:
2 pounds fresh strawberries (medium or large, about 2 quarts), washed, dried, and stemmed
4–6 tablespoons sugar
2 tablespoons Kirsch
Pinch table salt

Whipped Cream:
8 ounces cream cheese, room temperature
½ cup (3½ ounces) sugar
1 teaspoon vanilla extract
⅛ teaspoon table salt
2 cups heavy cream

1. FOR THE CAKE: Adjust an oven rack to the lower-middle position and heat the oven to 325 degrees. Grease and flour a round 9 by 2-inch cake pan or 9-inch springform pan and line with parchment paper. Whisk flour, baking powder, salt, and all but 3 tablespoons sugar in a mixing bowl. Whisk in 2 whole eggs and 3 yolks (reserving whites), butter, water, and vanilla; whisk until smooth.

2. In a clean bowl of a standing mixer fitted with the whisk attachment, beat the remaining 3 egg whites at medium-low speed until frothy, 1 to 2 minutes. With the machine running, gradually add the remaining 3 tablespoons sugar, increase the speed to medium-high, and beat until soft peaks form, 60 to 90 seconds. Stir one-third of the whites into the batter to lighten; add the remaining whites and gently fold into the batter until no white streaks remain. Pour the batter into a prepared pan and bake until a toothpick or wooden skewer inserted into the center of the cake comes out clean, 30 to 40 minutes. Cool in the pan 10 minutes, then invert the cake onto a greased wire rack; peel off and discard the parchment. Invert the cake again; cool completely, about 2 hours.

3. FOR THE STRAWBERRY FILLING: Halve 24 of the best-looking berries and reserve. Quarter the remaining berries; toss with 4 to 6 tablespoons sugar (depending on the sweetness of the berries) in a medium bowl and let sit 1 hour, stirring occasionally. Strain the juices from the berries and reserve (you should have about ½ cup). In the workbowl of a food processor fitted with the metal blade, give the macerated berries five 1-second pulses (you should have about 1½ cups). In a small saucepan over medium-high heat, simmer the reserved juices and Kirsch until the mixture is syrupy and reduced to about 3 tablespoons, 3 to 5 minutes. Pour the reduced syrup over the macerated berries, add a pinch of salt, and toss to combine. Set aside until the cake is cooled.

4. FOR THE WHIPPED CREAM: When the cake has cooled, place the cream cheese, sugar, vanilla, and salt in the bowl of a standing mixer fitted with the whisk attachment. Whisk at medium-high speed until light and fluffy, 1 to 2 minutes, scraping down the bowl with a rubber spatula as needed. Reduce the speed to low and add heavy cream in a slow, steady stream; when it’s almost fully combined, increase the speed to medium-high and beat until the mixture holds stiff peaks, 2 to 2½ minutes more, scraping the bowl as needed (you should have about 4½ cups).

5. TO ASSEMBLE THE CAKE: Using a large serrated knife, slice the cake into three even layers. Place the bottom layer on a cardboard round or cake plate and arrange a ring of 20 strawberry halves, cut sides down and stem ends facing out, around the perimeter of the cake layer. Pour one half of the pureed berry mixture (about ¾ cup) in the center, then spread to cover any exposed cake. Gently spread about one-third of the whipped cream (about 1½ cups) over the berry layer, leaving a ½-inch border from the edge. Place the middle cake layer on top and press down gently (the whipped cream layer should become flush with cake edge). Repeat with 20 additional strawberry halves, the remaining berry mixture, and half of the remaining whipped cream; gently press the last cake layer on top. Spread the remaining whipped cream over the top; decorate with the remaining cut strawberries. Serve, or chill for up to 4 hours.

basic coleslaw

Once upon a time, I thought I didn’t like coleslaw. A Cooks Illustrated recipe turned me around, but over time, I found aspects of it that I didn’t love. One is that is really does take about 4 hours of salting the cabbage for it to draw out enough water to avoid a watery dressing. Then you have to rinse the salt off so your slaw isn’t too salty, and then you have to dry the cabbage, because wasn’t the whole point of salting to remove water?

The dressing of that recipe is based on buttermilk, which is a great lowfat option, but is too thin to coat the cabbage strands well. Many slaw dressings are nothing more than flavored mayonnaise, and while I do love mayonnaise, I don’t like to spend so much of my calorie budget on salad. The dressing for my old favorite recipe also requires sour cream, which I never have.

The answer, like I’m finding it is to so many things, is Greek yogurt. It’s everything you want in a slaw dressing – thick, creamy and tangy. Oh, and full of protein instead of just fat. I like to use the same flavorings used in the Cooks Illustrated recipe – cider vinegar, parsley, minced onion, a wee bit of sugar. I also like to mix a spoonful of mayonnaise into the yogurt. It’s amazing how even a small proportion of mayonnaise can make the whole mixture taste like it’s full of the fattening stuff.

With a thicker dressing, it isn’t as necessary to draw water out of the cabbage. If I have time, I still often sprinkle the shredded cabbage with salt and set it aside, but I use only as much salt as I need to include in the salad anyway – so no tedious rinsing and drying is required. Without needing to plan four hours in advance, I can mix up a quick coleslaw while Dave heats the grill for brats. I’m not going to say that I like the coleslaw more than the sausage – but it’s close, and it’s a heck of a lot healthier too.

One year ago: Grilled Artichokes
Two years ago: Basic Lentil Soup
Three years ago: Snickery Squares

Printer Friendly Recipe
Basic Coleslaw (adapted from Cooks Illustrated)

You can see that I now take a very laid back approach to preparing slaw. This is what happens when I start making things for lunch on Saturday; I can’t be bothered with details when it’s 85 degrees and sunny out. Sometimes I combine the first few ingredients earlier in the morning and set them aside until later to lightly pickle to cabbage and onion, but sometimes I make the slaw start to finish right before serving. Either way works great.

Feel free to use any fat level of Greek yogurt.

½ cabbage, sliced thin
¼ cup minced red onion
¼ teaspoon table salt
1 teaspoon cider vinegar
½ teaspoon sugar
½ teaspoon Dijon mustard
1/8 teaspoon ground black pepper
1 carrot, shredded
2 tablespoons minced fresh parsley leaves
1 (7-ounce container) plain Greek yogurt
2 tablespoons mayonnaise

In a large bowl, stir together the cabbage, onion, salt, vinegar, and sugar. Set aside while you prepare the remaining ingredients. Add the rest of the ingredients and stir to combine.

maple cornmeal biscuits

These are not Italian in any way. Dave and I booked a trip to Italy last week and thought we’d have an Italy day on Saturday, where we’d have espresso, eat Italian food, drink Italian wine, and plan out our adventure. Little of that happened. We ate maple cornmeal biscuits because I needed to make them for Tuesdays with Dorie.  At least we had them alongside frittata with swiss chard. We never got to the espresso, and it wasn’t until Sunday that we sat down to map out our vacation plans. The grilled lamb and asparagus we had for dinner could have been any cuisine, although the Barbera that accompanied dinner was wonderful.

I’m always jumping ahead to the wine. Let’s talk more about breakfast. Even though maple cornmeal biscuits are not Italian and we had them on (what was supposed to be) Italy day, they were very delicious – sweet and gritty. I suspect we’ll have many more Italy planning days between now and when we leave in September, and I just might start them all out with maple cornmeal biscuits, Italian or not.

Lindsay has the full recipe posted. I made no changes.

One year ago: Cherry-Cherry Bread Pudding
Two years ago: Fresh Mango Bread
Three years ago: Traditional Madeleines

lemon bar comparison

front to back: Cooks Illustrated, Lebovitz

I don’t make lemon bars often, despite how much I love them. They feel so light and refreshing that I can’t convince my brain that these are, in fact, full of butter. So I end up eating a lot of them.  But if I don’t get to make them often, when I do get a chance to, they need to be perfect. I need the best recipe. And how do I know which is best without a side-by-side comparison?

I started with Cooks Illustrated as a trustworthy source of straightforward results. I chose Tartine’s lemon bars on brown butter shortbread because it was one of the first recipes in the book that caught my eye and is typical of their talent for taking a classic recipe up a notch. I also made David Lebovitz’s lemon bar recipe, which uses the whole lemon, pith and all.

Cooks Illustrated: As promised, this is a typical lemon bar recipe with no tricks up its sleeve. The crust is a combination of flour, powdered sugar, cornstarch, salt, and butter, which is combined in the food processor, pressed into a pan, and chilled before baking. The topping is eggs, sugar, flour, milk, salt, and lemon zest and juice. The topping is poured onto the hot crust and baked until firm.

Tartine: The browned butter shortbread in this recipe’s title is a misnomer, as it turns out that the crust is mixed like any other lemon bar crust, with no browning of the butter beforehand. Instead, the crust just browned in the oven, making it more of a butter crust that is browned instead of a crust that includes browned butter.  The filling is similar to Cooks Illustrated’s, except it contains no milk.

Lebovitz: David Lebovitz’s crust uses granulated instead of powdered sugar and melted butter instead of solid. Like the other recipes, this topping is based on sugar, eggs, and lemon, but instead of a small amount of flour, it incorporates cornstarch, as well as melted butter, which is not present in the other recipes. And most importantly, this recipe includes the entire lemon, pith in addition to juice and zest.

Comparing the lemon bars made me realize how important the crust is. I’d always focused on the filling before, wanting it as lemony and sour as I could stand, and I thought the crust was nothing more than a vehicle to hold up the filling. Now the crust seems like an important contrast to the tart filling. In fact, in many ways, the crust was the deciding factor in choosing preferences. The fillings were similar, but the crusts varied widely.

Cooks Illustrated: The all-important crust factor was the downfall of this recipe. The crust was dry and didn’t brown. I’m blaming this on the cornstarch. It’s probably important for structure, but it didn’t do the flavor any favors. The filling, on the other hand, was creamy and tart and wonderful. The top photo spotlights the CI bars in front, and you can clearly see their pale crust and luscious filling.

Tartine: This crust was substantial enough to hold up the filling and had just a bit of snap to it. It did, indeed, brown well, which gave it a nice flavor. The filling was lemony and smooth, although it  cratered when it was removed from the oven, resulting in a sunken middle.  I surprised myself by wanting a higher ratio of crust to filling.

Lebovitz: The granulated sugar lent this crust a great flavor, but it was crumbly and sometimes broke under the weight of the filling. The filling itself contained far too many chunks of lemon, although this might be a result of using a food processor instead of a blender to puree the lemon.  The topping was pockmarked like the moon (scroll down to see a picture of the tops of the three recipes).

I enjoyed the lemon squares from all three recipes, but I believe the one perfect bar would be made from Tartine’s crust and Cooks Illustrated’s filling.


left to right: Lebovitz, Tartine, Cooks Illustrated

One year ago: Stuffed Butterflied Leg of Lamb
Two years ago: Fresh Strawberry Scones
Three years ago: Asparagus and Arugula Salad with Cannellini Beans and Balsamic Vinegar

Printer Friendly Recipe
Lemon Bars on Brown Butter Shortbread (from Tartine)

For the crust:
½ cup (2 ounces) confectioners’ sugar
1½ cups (7.5 ounces) all-purpose flour
12 tablespoons (1½ sticks) unsalted butter, at room temperature
½ cup (2 ounces) pine nuts (optional)

For the filling:
½ cup (2½ ounces) all-purpose flour
2¼ cups (16 ounces) sugar
1 cup plus 2 tablespoons lemon juice
lemon zest, grated from 1 small lemon
6 large whole eggs
1 large egg yolk
pinch salt
confectioners’ sugar for topping (optional)

1. Preheat the oven to 350 degrees and butter a 9-by-13-inch baking pan.

2. To make the crust: Sift the confectioners’ sugar into the bowl of a stand mixer fitted with the paddle attachment. Stir in the flour. Add the butter and pine nuts (if using) and beat on low speed just until a smooth dough forms.

3. Press the dough evenly into the pan and allow it to come up about a ½ inch up the sides of the pan. Line the crust with parchment paper and fill with pie weights. Bake the crust until it is a deep golden brown, about 25-35 minutes.

4. To make the filling: While the crust is baking, sift the flour into a mixing bowl and whisk in the sugar until blended. Add the lemon juice and zest and stir to dissolve the sugar. In a separate mixing bowl, whisk the whole eggs and egg yolk with the salt. Add the eggs to the lemon juice mixture and whisk until well mixed.

5. Once the crust is ready, pour the filling directly into the pan. Reduce the oven temperature to 300 degrees and bake just until the center of the custard is set, about 30 to 40 minutes.

6. Let cool completely on a wire rock, then cover and chill well before cutting. Cut into squares and dust the top with confectioners’ sugar, if desired. They will keep in an airtight container or well covered in the baking dish in the refrigerator for up to 4 days.

Printer Friendly Recipe
Perfect Lemon Bars (from Cooks Illustrated)

For the crust
1¾ cups (8.75 ounces) unbleached all-purpose flour
⅔ cup confectioners’ sugar, plus extra to decorate finished bars
¼ cup cornstarch
¾ teaspoon table salt
12 tablespoons unsalted butter (1 ½ sticks), at very cool room temperature, cut into 1-inch pieces

Lemon filling
4 large eggs, beaten lightly
1⅓ cups (9.33 ounces) granulated sugar
3 tablespoons unbleached all-purpose flour
2 teaspoons grated lemon zest from 2 large lemons
⅔ cup lemon juice from 3 to 4 large lemons, strained
⅓ cup whole milk
⅛ teaspoon table salt

1. For the crust: Adjust an oven rack to middle position and heat the oven to 350 degrees. Lightly oil a 13-by-9-inch baking dish and line with one sheet parchment or wax paper. Dot the paper with butter, then lay a second sheet crosswise over it.

2. Pulse the flour, confectioners’ sugar, cornstarch, and salt in the food processor workbowl fitted with the steel blade. Add the butter and process to blend, 8 to 10 seconds, then pulse until the mixture is pale yellow and resembles coarse meal, about three 1-second bursts. (To do this by hand, mix flour, confectioners’ sugar, cornstarch, and salt in medium bowl. Freeze the butter and grate it on the large holes of a box grater into the flour mixture. Toss the butter pieces to coat. Rub pieces between your fingers for a minute, until the flour turns pale yellow and coarse.) Sprinkle the mixture into the lined pan and press firmly with fingers into an even, ¼-inch layer over the entire pan bottom and about ½-inch up the sides. Refrigerate for 30 minutes, then bake until the crust is golden brown, about 20 minutes.

3. For the filling: Meanwhile, whisk the eggs, sugar, and flour in a medium bowl, then stir in the lemon zest, juice, milk, and salt to blend well.

4. To finish the bars: Reduce the oven temperature to 325 degrees. Stir the filling mixture to reblend; pour into the warm crust. Bake until the filling feels firm when touched lightly, about 20 minutes. Transfer the pan to a wire rack; cool to near room temperature, at least 30 minutes. Transfer to a cutting board, fold the paper down, and cut into serving-size bars, wiping knife or pizza cutter clean between cuts, as necessary. Sieve confectioners’ sugar over bars, if desired.

Printer Friendly Recipe
Whole Lemon Bars (reformatted slightly but not actually changed from David Lebovitz)

I needed 2 lemons to make 6 ounces of lemon. I trim off the knobby ends when making whole lemon desserts.

Crust:
1 cup (4.8 ounces) all-purpose flour
¼ cup (1.75 ounces) sugar
¼ teaspoon salt
8 tablespoons (1 stick) melted unsalted butter
½ teaspoon vanilla extract

Lemon topping:
1 lemon (about 6 ounces), organic or unsprayed
1 cup (7 ounces) sugar
3 tablespoons freshly squeezed lemon juice
3 large eggs, room temperature
4 teaspoons cornstarch
¼ teaspoon salt
3 tablespoons melted unsalted butter
Optional: powdered sugar, for serving

1. Preheat the oven to 350ºF (180ºC). Line an 8-inch square with foil.

2. For the crust: In a medium bowl, mix the flour, sugar, salt, melted butter, and vanilla, stirring just until smooth. Press the batter into the bottom of the pan, using your hands or a small offset spatula to get it as level as possible. Bake the crust for 25 minutes, or until it’s deep-golden brown.

3. For the topping: While the crust is cooking, cut the lemon in half, remove the seeds, and cut it into chunks. Put the chunks of lemon in a food processor or blender along with the sugar and lemon juice, and let it run until the lemon is completely broken up. Add the eggs, cornstarch, melted butter, and blend until almost smooth. (A few tiny bits of lemon pieces are normal and encouraged.)

4. When the crust comes out of the oven, reduce the oven temperature to 300ºF (150ºC). Pour the lemon filling over the hot crust and bake for 25 minutes or just until the filling stops jiggling and is barely set.

5. Remove from the oven and let cool completely. Once cool, carefully lift out the bars grasping the foil. Cut the bars into squares or rectangles. Sift powdered sugar over the top just before serving, if desired.

Storage: The bars will keep in an airtight container at room temperature up to three days. You can freeze the lemon bars as well for up to one month, letting them come to room temperature before serving.

left to right: Cooks Illustrated, Tartine, Lebovitz

barbecued pulled pork

The best part of barbecuing a whole pork shoulder on the grill is that you are forced to spend all day outside tending the grill. I can’t think of many better ways to spend a Saturday. We started the grill before breakfast, then spent the rest of the day in the backyard.  First we drank coffee, then some water because you have to to survive, even on weekends, and then it was time for afternoon margaritas, and then we capped it off with beer, because what else are you going to drink with pulled pork?

The truth is that while you do need to keep a constant-ish eye on the grill, you don’t need to spend much time actually doing anything with it. Once the pork is cooking, it takes just a couple of seconds every hour or so to add a handful of fresh coals. A thermometer is key to monitor the temperature, although a cheap oven thermometer – which is what I used – will work just fine.  And if you do find the temperature varying widely, it won’t ruin your pork; just let it slowly come down to the right temperature range or add more coals to bring it up and continue cooking. Cooking a whole pork shoulder on the grill is a simple and forgiving process, even if it does take a long time.

I know the question everyone is asking: Is it really better than crockpot pulled pork? Well, of course it is. Crockpot pulled pork, especially using the same spice rub, is incredible – flavorful, tender, and easy easy easy. Barbecued pulled pork isn’t as moist and as a result, its flavor seems more concentrated. It’s still easy to pull, but it has more chew than crockpot pulled pork, which can get mushy if you’re not careful. The biggest difference were the outside bits of the roast, which were deeply browned and crisp. (This is not the same thing as the blackened top in the photo below, which is a thick layer of fat that I discarded.) Dave and I filled up on those while I was still shredding the roast. But the best part of making pulled pork on the grill as opposed to in the crockpot is that while one method frees you up to do chores and run errands all day, the other keeps you in the backyard with a book and a beer.

One year ago: Home Corned Beef and Corned Beef Hash
Two years ago: Orange Oatmeal Currant Cookies
Three years ago: Hash Browns with Sauteed Vegetables and Poached Eggs

Printer Friendly Recipe
Barbecued Pulled Pork (spice rub from Cooks Illustrated)

Serves a lot

The least messy way I’ve found to add the spices to the meat is to line a rimmed baking sheet with a large piece of plastic wrap. Set the pork on the plastic wrap; add the spice rub, rotating the meat to rub all sides. Wrap the plastic wrap around the meat, then wrap another layer of plastic around in the opposite direction.

I use all of the spice rub on one roast, but if you think it’ll be too much, save half for another use. It’ll keep in the pantry for months.

Spice Rub:
1 tablespoon ground black pepper
1-2 teaspoons cayenne pepper
2 tablespoons chili powder
2 tablespoons ground cumin
2 tablespoons dark brown sugar
1 tablespoon dried oregano
4 tablespoons paprika
2 tablespoons table salt
1 tablespoon granulated sugar
1 tablespoon ground white pepper

1 (6-8 pound) bone-in pork shoulder

1. Combine all of the ingredients in the spice rub. At least one day, and up to three days, before cooking the pork, rub the spice rub onto all sides of the pork (see note). Wrap the pork in a double layer of plastic wrap. Refrigerate overnight or up to three days.

2. About 10 hours before you plan to serve the pork, remove it from the refrigerator; let it set at room temperature for 1 hour. Meanwhile, soak 4 wood chunks (or 4 cups of wood chips) in water for an hour.

3. About 20 minutes before you’re ready to grill, light about 30 charcoal briquettes (half a chimney starter). Once the coals are covered with a layer of ash, dump them into a pile on one side of the grill, then top with ¼ of the wood chunks or chips. Open the bottom vents completely. Place the meat, fat side up, on a double layer of aluminum foil with the edges folded up or in a 9×13-inch disposable aluminum baking pan. Place the meat on the side of the grill opposite the coals. Put the lid on the grill with the vents opposite the coals; adjust vents to be ¾ open.

4. Use a grill or oven thermometer to monitor the temperature of the grill, which should remain between 200 and 250 degrees. Add fresh coals, about 8 every hour, when the temperature drops. Add more wood chips an hour after you start cooking, then again at the 2- and 3-hour mark. (Don’t worry if the top of the meat blackens; you’ll discard that layer of fat anyway.)

5. After about 5 hours, when the internal temperature of the pork reaches 165 degrees, wrap it completely in foil. Continue cooking until the internal temperature of the pork is 195 degrees, another 2-3 hours.

6. Remove the pork from the grill and let it set at room temperature, covered, for one hour.

7. Place the pork on a large rimmed baking sheet. Remove and discard the thick layer of fat. Use your fingers or forks to shred the remaining meat. Serve.

chocolate chip bundt cake

Dave opens doors for me and buys me little surprises, but Sunday he really went all out when he offered to clean up the kitchen while I baked a cake. Then he indulged me when I brought the baked cake to him and exclaimed, “Smell this! Just like a chocolate chip cookie, right?!” over and over. And then, even though his favorite desserts are fruity and custardy and pretty much the opposite of chocolate chip bundt cake, the next day, we had this conversation over gmail chat:

David: i’m eating chocolate chip cake
me: it’s good, isn’t it?!
David: it’s good!
me: tell me some more about how awesome my cake is.
David: very moist
and delicious
me: thank you
just chocolately enough, right?
David: and the outside was powdery
me: it has a bit smaller ratio of chocolate to dough than choc chip cookies, but the few bites i’ve had have seemed good
David: and perfect balance of chocolateness
me: you’re so sweet.

Dave might have preferred Dorie Greenspan’s original fruit and nut version, posted on Peggy’s site, but the dough is so similar to chocolate chip cookie dough that I couldn’t resist adding 8 ounces of chocolate instead. I’m fairly certain I made the right choice. (I also increased the salt to 1 teaspoon.)

One year ago: Quick Classic Berry Tart
Two years ago: Tartest Lemon Tart
Three years ago: Florida Pie