kale salad with garlic vinaigrette

kale salad 5

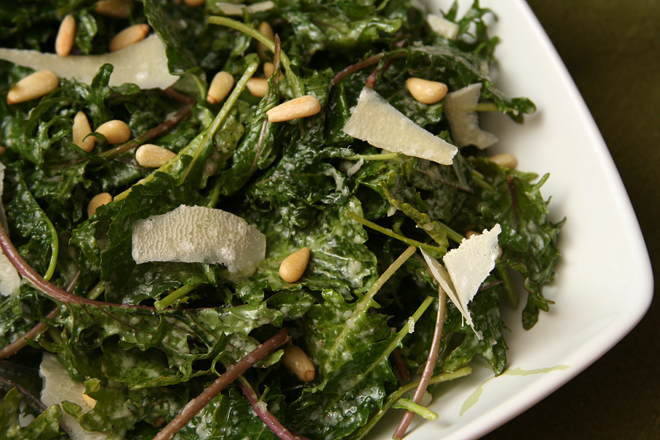
I made this for the first time a couple months ago, and I made the salmon salad for the first time just a couple weeks ago. If I had gotten around to telling you about this one before I told you about the other, I would have labeled this as my new favorite salad (although this other one is close, but that’s not fair because it has goat cheese in it). Now the Mediterranean salmon salad has stolen that title, but this kale salad is certainly my favorite side salad.

kale salad 1

I’m rarely a fan of side salads. Usually I think of them as nothing more than a distraction from what I really want, which is the carbs and sauce they often accompany.  I eat them, because vegetables are important, but I don’t get much enjoyment from them.

kale salad 2

Maybe if the average side salad involved generous amounts of garlic and parmesan cheese, I’d feel more generouos toward it.  Crunchy pine nuts don’t hurt either.  All of those strong flavors need something hearty to stand up to them, and kale is the answer.  I like to spend a few minutes massaging the dressing into the kale to soften the raw leaves.  I have to admit, I still usually serve this before the main course, and not alongside it, but it holds its own compared to the best of carbs and sauce.

 kale salad 4

One year ago: Slow-Cooker Spinach Mushroom Lasagna
Two years ago: Tacos al Pastor
Three years ago: Dried Fruit Compote
Four years ago: Sautéed Shredded Zucchini

Printer Friendly Recipe
Kale Salad with Garlic Vinaigrette (adapted from Confections of a Foodie Bride)

4 servings

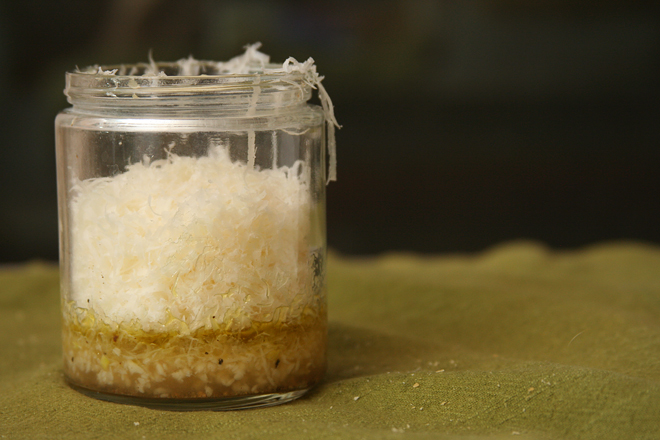
The amount of oil you add is somewhat a matter of personal taste. The amount listed will result in a balanced vinaigrette. However, I can’t stomach the thought of 2 tablespoons of oil per serving in a salad and I don’t mind tart dressings, so I use substantially less, just a couple of tablespoons total.

4 cloves garlic, minced or pressed through a garlic press
4 tablespoons lemon juice
1 tablespoon white wine vinegar
½ cup extra virgin olive oil
½ cup (1 ounce) grated parmesan
¼ teaspoon salt
pinch ground black pepper
2 bunches kale, cut into bite-sized pieces
½ cup pine nuts, toasted
parmesan, shaved (for garnish)

1. Add the garlic, lemon juice, white wine vinegar, salt, and black pepper to a bowl and whisk to combine. Let stand at least 15 minutes, or, for a stronger garlic flavor, cover and refrigerate the mixture overnight. Just before serving, slowly pour in the olive oil while whisking constantly. Stir in the grated parmesan.

2. Transfer the kale to a large bowl. Add about half of the dressing and toss to combine. Using your hands, massage the dressing into the kale by lightly squeezing and tossing the kale until it softens and begins to wilt. Taste, adding more dressing if necessary. Garnish with toasted pine nuts and shaved parmesan; serve.

kale salad 3

summer chopped salad with feta

summer chopped salad with feta 7

I wore out coleslaw. It was too convenient and easy and good and healthy, so I made it whenever we had pulled pork or burgers or barbecue. And that was fine for a while, for over a year, in fact, but now I’ve had enough. I needed something new to catch my fancy.

summer chopped salad with feta 1

I found it. This is my new favorite side salad for a number of reasons. For one thing, it passes the no-lettuce test; delicate lettuce-based salads seem so out of place next to a hearty burger. It goes without saying that a side salad should be healthy and easy, and this one is.

summer chopped salad with feta 3

And maybe most importantly, it’s adaptable. I’ve been making coleslaw nearly the exact same way for well over a year, but this salad can be made with different vegetables, different types of citrus juice, and different seasonings to match the meal you’re serving it with. The original recipe used lime juice and cumin for a southwestern vibe, but I wanted something more Mediterranean, so I went with lemon juice this time.  It went perfectly with spareribs.  Coleslaw has been relegated from my favorite summer side to just my favorite pulled pork topping.

summer chopped salad with feta 6

One year ago: Chocolate Chocolate Chunk Muffins
Two years ago: Tarte Noire
Three years ago: Seafood Lasagna
Four years ago: Salmon Clubs with Avocado Butter

Printer Friendly Recipe
Summer Chopped Salad with Feta (adapted from Smitten Kitchen)

Serves 8 as a side dish

I steamed the green beans for about 1 minute, then did not blanch them (dip them into ice water to stop the cooking). If you do plan to blanch your beans, cook them for another minute or two. My beans looks olive green instead of bright green in the photos because I took these pictures the day after I made the salad, and the citrus juice had darkened the beans.

16 ounces green beans, lightly cooked, chopped into ¼-inch pieces
2 cups (7 ounces) radishes, halved and thinly sliced
1 hothouse or 3 English cucumbers (5 ounces total), halved lengthwise and sliced
4 scallions, thinly sliced
1 cup (4 ounces) crumbled feta
¾ cup toasted sunflower seeds, salted or unsalted
¼ cup fresh lemon juice
½ teaspoon salt
freshly ground black pepper, to taste
2 tablespoons thinly sliced fresh mint leaves
2-4 tablespoons extra virgin olive oil

Mix everything except the olive oil.  Add the oil and more salt to taste.

summer chopped salad with feta 8

meyer lemon semifreddo

semifreddo 4

I traveled to Santa Fe last month for work, and while I didn’t love the day-long meetings all week, it was worth it to eat at Santa Fe restaurants and shop at Santa Fe grocery stores. I stopped at Whole Foods before I even checked in to my hotel, picking up some healthy snacks for the week and some sushi for dinner. I got pizza the next night (pizza – good pizza! – that I didn’t make myself!), but it was back to sushi the third night. The last day, after only six hours of meetings instead of the usual eight, I drove home, but not before making stops at both Whole Foods (where I got, you guessed it, more sushi to snack on during the drive home) and Trader Joe’s.

semifreddo 3

Whole Foods had what must have been the last Meyer lemons of the season, and I couldn’t resist buying a few, even though I already had a bag of organic regular lemons in my cart. I could not, however, decide what to make with them. Like the last time I bought Meyer lemons, well over four years ago, I wanted something that would showcase their flavor so I could figure out just how much different they are from regular lemons.

semifreddo 2

I diluted the flavor only slightly by mixing it with heavy cream, sugar, and egg yolks to make semifreddo. And if you’re paying attention while eating this dessert, the flavor has a little extra something, even beyond the sweeter orange hint of Meyer lemons. However, if you’re distracted by the light and airy texture that comes from freezing whipped heavy cream, I won’t blame you. And this indulgent dessert with a popular but elusive ingredient is all thanks to a week of meetings; traveling for work has its advantages.

semifreddo 5

One year ago: Barbecued Pulled Pork
Two years ago: Grilled Artichokes
Three years ago: Basic Lentil Soup
Four years ago: Asparagus and Arugula Salad with Cannellini Beans and Balsamic Vinegar

Printer Friendly Recipe
Meyer Lemon Semifreddo (from Bon Appétit via epicurious)

Serves 8 to 10

While the recipe indicates that you can use Meyer or regular lemons interchangeably, Meyer lemons are significantly less sour than regular lemons. I used Meyer, but if you use regular, you should probably increase the sugar.

I used a round pan instead of a loaf pan, but other than that, followed the recipe exactly.

½ cup sliced almonds, toasted
1¾ cups chilled heavy whipping cream
1¼ cups (8.75 ounces) plus 2 tablespoons sugar
7 large egg yolks
½ cup fresh Meyer lemon juice or regular lemon juice
1 tablespoon plus 2 teaspoons finely grated Meyer lemon peel or regular lemon peel
¼ teaspoon salt
4 cups mixed fresh berries (such as raspberries, blackberries, blueberries, and quartered hulled strawberries)

1. Line a 9-by-5-inch metal loaf pan with plastic wrap, leaving a generous overhang. Sprinkle almonds evenly over the bottom of the pan. Using an electric mixer, beat the whipping cream in a large bowl until soft peaks form. Refrigerate the whipped cream while making the custard.

2. Whisk 1¼ cups sugar, the egg yolks, lemon juice, lemon peel, and salt in a large metal bowl to blend. Set the bowl over a large saucepan of simmering water and whisk constantly until the yolk mixture is thick and fluffy and instant-read thermometer inserted into the mixture registers 170°F, about 4 minutes. Remove the bowl from over the simmering water. Using an electric mixer, beat the mixture until cool, thick, and doubled in volume, about 6 minutes. Fold in the chilled whipped cream. Transfer the mixture to the prepared loaf pan; smooth the top. Tap the loaf pan lightly on the work surface to remove air pockets. Fold the plastic wrap overhang over top to cover. Freeze the semifreddo until firm, at least 8 hours or overnight. (Semifreddo can be made 3 days ahead. Keep frozen.)

3. Gently mix the berries and remaining 2 tablespoons sugar in a large bowl. Set aside for 30 minutes.

4. Unfold the plastic wrap from the top of the semifreddo; invert onto a platter and remove the plastic wrap. Dip a heavy large knife into hot water; cut the semifreddo crosswise into 1-inch-thick slices. Transfer to plates; spoon the berries alongside and serve.

dolmades

dolmades 10

Someone please tell me to stop making recipes that involve individually filling and shaping portions after a full workday! Last week it was these dolmades, this week it was tortellini. (Tortellini, it turns out, are a lot more time-consuming to make than ravioli. A lot.) Evenings after work are not a good time to take on ambitious cooking projects.

dolmades 2

It didn’t help that this venture started out with a jar full of grape leaves stuffed so tightly they wouldn’t come out. All I could think of to do was rip out the middle leaves in a messy clump to loosen up the remainder, which wasn’t very satisfying. Then I discovered that grape leaves are not a shape that lends itself to easy rolling. And finally, at the end of it all, I realized that the early step of boiling the grape leaves before filling them was more important than I had counted on when I cut it short in my rush to get dinner on the table.

dolmades 3

And then I learned that it doesn’t matter how smoothly the dolmades come together, because the combination of grape leaves, rice, and a lemony sauce will always be a hit. Even if the grape leaves mostly unroll. And they’re just a little tough. Even if dinner is nearly an hour late. Or maybe they tasted so good because dinner was an hour late?

dolmades 4

One year ago: Cornmeal Shortbread Cookies
Two years ago: Chockablock Cookies
Three years ago: Brownies (comparison of 4 recipes)
Four years ago: Cheesecake Pops (Daring Bakers)

Printer Friendly Recipe
Dolmades (adapted from Elly Says Opa and Emeril Live)

Makes about 36

1 (8-ounce) jar grape leaves, or 36 medium-sized fresh leaves
1 tablespoon olive oil
1 onion, diced
3 cloves garlic, minced
½ cup pine nuts
1 cup long-grain rice
1 teaspoon salt
½ cup currants (or raisins)
⅔ cup broth + additional for cooking dolmades
1 lemon
2 tablespoons chopped parsley
Avgolemono sauce (recipe follows)

1. Bring a medium pot of water to a simmer. Remove the grape leaves from the jar and drop them in batches of 4 or 5 into the hot water. Leave them in the simmering water for 4-5 minutes, then spread them flat on a towel-lined work surface. Cut the stem from each grape leaf, as needed.

2. In a large skillet over medium- high heat, heat the olive oil. Add the onions and sauté until translucent, about 6 minutes. Add the garlic and pine nuts and sauté for 2 minutes. Add the rice, salt, currants, broth, and the juice of half the lemon. Simmer, stirring occasionally, until the liquid is absorbed. Stir in the parsley.

3. To assemble the dolmades, place 1 grape leaf on the work surface, dull side (or underside) of the leaf up. Place 1 to 2 teaspoons of rice filling near the stem end of the leaf. Fold the stem (bottom) end up over the filling, fold the sides toward the filling in the center, then roll up the leaf into a small cylindrical package, being careful not to fold too tightly, as the rice will expand during cooking.

4. Place the dolmades in a large Dutch oven or wide sauté pan, seam side down. Add the juice from the remaining lemon half, plus enough broth to just cover the dolmades. Rest a heavy plate or baking dish directly on top of the dolmades. Bring to a boil over high heat, lower the heat, and simmer for 30 minutes, or until the rice is tender. Serve with avgolemeno sauce.

Avgolemono Sauce (adapted from Elly Says Opa)

2 eggs
⅓ cup fresh lemon juice (about 2-3 lemons)
liquid from cooking dolmades

In a medium bowl, whisk the eggs with the lemon juice until combined. Slowly drizzle the hot dolmades cooking liquid into the egg/lemon mixture, whisking continuously to avoid scrambling the eggs.

dolmades 9

pear almond danishes and lemon ricotta danishes

danish 14

I went through a baking drought early this year that lasted a few weeks, maybe a month. I couldn’t explain it, but I just wasn’t interested in baking for the first time in years. I was kind of worried – how long would this last? When would my drive to bake come back?

danish 1

Oh it’s back. It crept back in, but it’s in full force now. The last few weeks, in particular, I’ve taken on some ambitious projects. It started with these danishes, made for a brunch potluck that was in the evening after work. The very next day, I stayed up until midnight flooding sugar cookies with royal icing. A week after that, I made two batches of fancy cupcakes for a bridal shower. I breathed a sigh of relief when that was over, but mixed up another batch of sugar cookie dough just one day later. I’ll decorate those sugar cookies this week, plus make a double batch of tiramisu for my friend’s rehearsal dinner on Friday.

danish 5

Baking projects that are for an event in the evening after work are particularly complicated, especially if the event is toward the end of the week instead of shortly after the weekend. It requires careful balancing of chilling time, lunch hours, and evening schedules. Of course it’s worth it when you’re sitting around with your friends, drinking bellinis and eating eggs Benedict and buttery, flaky danishes on Thursday evening after work. Not just worth it, but so enjoyable that I did it again a week later with cupcakes, and a week after that I’m sure it will be something else. My baking obsession is back.

danish 12

One year ago: Chocolate Pots de Creme
Two years ago: Toasted Coconut Custard Tart
Three years ago: Lemon Cream Cheese Bars
Four years ago: Raspberry Bars

Printer Friendly Recipe
Danishes (adapted from Martha Stewart’s Baking Handbook)

I made 18 danishes from this batch of dough, and they were about 3-inches on a side after baking. Bigger danishes are probably easier to work with; many of mine unfolded when the dough expanded during baking, particularly the square shape with the corners folding in.

½ cup warm milk
2 teaspoons instant yeast
10 ounces (about 2 cups) all-purpose flour
3 tablespoons sugar
1 teaspoon table salt
2 sticks butter, room temperature
1 large egg
1 batch of filling (recipes follow)
egg wash (1 egg mixed with ⅛ teaspoon salt and 1 teaspoon water)

1. In a small measuring cup, stir the yeast into the milk. In the bowl of a stand mixer fitted with the paddle attachment, combine the flour, sugar, and salt. Add 2 tablespoons of butter; mix until evenly combined. Pour in the yeast and milk; mix until the dough starts to look shaggy. Switch to the dough hook; add the egg and knead until the dough just starts to look smooth, 2-3 minutes. Wrap the dough in plastic wrap and refrigerate for at least 2 hours or overnight.

2. On a lightly floured surface, roll the dough out to a 12-inch by 8-inch rectangle, about ¼ inch thick. Distribute the softened butter over two-thirds of the dough, leaving a short end free of butter. Fold the non-buttered third over the middle, then fold the last third over the middle, like folding a letter. Pinch the edges to seal. Roll the dough out to a 12-by-8-inch rectangle again, then fold it in thirds again. Rewrap the dough in plastic wrap; chill 1 hour.

danish 3
(see here for an explanation of the creases on the dough)

3. After the dough has chilled, roll it out and fold it in thirds twice more, then chill another hour, and roll and fold twice more. Wrap tightly and refrigerate for at least four hours or overnight. (This is a good point to freeze the dough too; thaw in the refrigerator overnight.)

4. Roll the dough out to a 12-by-18-inch rectangle about ⅛-inch thick. If the dough becomes too elastic and springs back, cover it and place it in the refrigerator for at least ten minutes, then try rolling again. Be patient; the rolling and chilling could take up to an hour. Cut 12 to 18 squares (see note).

5. For pinwheels: Cut from each corner halfway to the center of each square. Dab about ¼ teaspoon of filling into the center of each square, then fold every other corner toward the center, pressing to seal. Top with one (for smaller danishes) to two (for the larger size) tablespoons of filling.

danish 8

For squares with folded corners: Spoon one (for smaller danishes) to two (for the larger size) tablespoons of filling into the center of each square. Fold each corner to the middle of the dough; press to seal.

danish 9

6. Transfer the danishes to a baking sheet lined with parchment paper or a silicone mat. Cover and either chill overnight or set aside to rise. Heat the oven to 400 degrees. When the danish dough is about doubled in height and is starting to look puffy, brush the danishes with the egg wash. Bake one baking sheet at a time until the danishes are golden brown, 20-25 minutes. Transfer the pan to a wire rack; let the danishes cool on the pan for a few minutes before transferring them to cooling racks to cool to room temperature. Serve within a day.

danish 10

Cheese Danish Filling

Makes enough for 1 batch of danishes

1 cup ricotta cheese
6 tablespoons (2.6 ounces) sugar
⅛ teaspoon salt
1 tablespoon lemon zest
1 large egg
2 teaspoons vanilla
2 tablespoons unsalted butter, melted and cooled

Combine all ingredients. Chill.

danish 11

Pear Almond Danish Filling (rewritten from Martha Stewart’s Baking Handbook)

Makes enough for 1 batch of danishes

⅔ cup slivered almonds, toasted and cooled completely
2 tablespoons flour
½ cup (3.5 ounces) sugar, plus 1 tablespoon
¼ teaspoon salt
2 tablespoons butter
1 large egg
2 pears, peeled, cored, diced finely
¼ cup lemon juice

1. In a food processor, grind the almonds, flour, ½ cup sugar, and salt; add the butter and egg; chill.

2. Heat the pears, lemon juice, and 1 tablespoon sugar in a medium nonstick skillet over medium heat, stirring occasionally, until the pears caramelize, 8-10 minutes. Chill.

danish 15

butterscotch peanut butter chocolate rice krispy treats

rice krispie treats 8

I did something very, very stupid with this recipe. It calls for 1½ bags of butterscotch chips. The thing is, I don’t like butterscotch chips very much, so I didn’t want half a bag leftover that I would feel obligated to keep around indefinitely, where it would take up valuable cabinet space. I only bought one bag, deciding to wing it (always trouble) for the remainder.

rice krispie treats 3

I started regretting this shortly after leaving the store. Because obviously I could have just dumped that half bag of chips into a batch of chocolate chip cookies and they would be hardly noticeable. Or, heaven forbid, I could just throw a handful of butterscotch chips away if I didn’t plan to use them.

rice krispie treats 12

Instead of making an extra trip back to the store, I forged ahead. Things looked bad from the beginning when I measured out my single bag of butterscotch chips and it was even less than I was expecting. I still forged ahead, adding in a couple tablespoons of butter and another couple tablespoons of corn syrup to make up for the fat and sugar I was missing from the extra chips. I knew I was in bad shape when I poured in the entire box of cereal, and it filled my pot to the brim. I thought about shoveling some of the cereal out before mixing it into the melted butterscotch and peanut butter mixture but stubbornly forged ahead instead.

rice krispie treats 7

No one is surprised that my rice krispy bars were a crumbly mess, are they? There simply wasn’t enough glue to hold together all that cereal. They tasted good, like that classic combination of peanut butter and chocolate, but, while I did manage to cut a few clean squares, they’re so delicate that they crumble as soon as they’re touched. Of course I ate them anyway, because they’re butterscotch peanut butter chocolate rice krispy bars. Crumbles aside, what’s not to love? But next time, I’ll follow the directions, half bag of extra chips be damned.

rice krispie treats 10

One year ago: Strawberry Buttercream
Two years ago: Bacon-Wrapped Stuffed Dates
Three years ago: Beer-Battered Fish
Four years ago: Julia Child’s French Bread

Printer Friendly Recipe
Butterscotch Peanut Butter Chocolate Rice Krispy Treats (slightly adapted from Cara’s Cravings)

About 32 tall bar cookies

3 cups (1½ to 2 11-ounce bags) butterscotch chips
1½ cups (13½ ounces) creamy peanut butter
salt
1 (12-ounce) box crisp rice cereal
4 cups (2 12-ounce bags) semi-sweet chocolate chips
8 tablespoons (1 stick) butter, cut into ½-inch cubes
1½ cups (6 ounces) confectioners’ sugar
¼ cup water

1. Spray a 9-by-13 inch pan with cooking spray.

2. In a large (at least 5-quart) pot over medium-low heat, melt the butterscotch chips with the peanut butter and ¼ teaspoon salt. When the mixture is smooth, which will take 8-10 minutes, add the cereal and stir to thoroughly coat the cereal with the peanut butter mixture.

3. Meanwhile, bring 1-inch of water to a simmer in a saucepan. Place the chocolate, water, 1/8 teaspoon salt, and butter in a heatproof bowl and set it over the simmering water. Stir occasionally until the chocolate is melted and smooth, 6-8 minutes. Stir in the powdered sugar.

4. Transfer half of the cereal mixture to the prepared pan; use a rubber spatula or greased hands to pat the mixture into an even layer, pressing lightly to compact. Spread the chocolate mixture evenly over the cereal in the pan. Top with the remaining cereal mixture. Cover lightly with plastic wrap and refrigerate until set, about 2 hours.

rice krispie treats 9

Normally I wouldn’t waste your time describing such a mistake, but this recipe was on my list of 2012 goals for February.

pasta with salmon in pesto cream sauce

salmon pesto pasta 3

I never know what to do about Valentine’s Day. On the one hand, I’m not interested in the traditional stuff; I don’t want gifts or chocolate or a heart-covered card with a canned message. I’ll never say no to flowers, although I don’t love the responsibility of keeping the cat from eating them. On the other hand, Valentine’s Day is hard to ignore, because the rest of the world is definitely into it. I’m not one to scoff at something because it’s mainstream; I’d rather join in on the fun.

salmon pesto pasta 1

I thought that, at the very least, I’d make a nice meal. But Valentine’s Day is on a Tuesday this year, so I couldn’t get too ambitious. Dave’s favorite meal, salmon pesto pasta, would have fit the bill perfectly. It hardly takes longer to cook than it takes pasta to boil, assuming that your pesto is already prepared.  For all that it’s so easy, the finished dish is deserving of being Dave’s all-time favorite dinner, with generous bites of salmon held to pasta by a sauce that’s creamy but not too heavy, since it’s made from evaporated milk instead of heavy cream.

salmon pesto pasta 2

But, we’ve been having salmon pesto pasta a lot lately, trying to use up last year’s surplus of pesto before this year’s basil starts growing. I decided it wasn’t special enough for Valentine’s Day, even my lazy attitude toward the holiday, so instead we’re having prosciutto-wrapped salmon, farro risotto, and roasted Brussels sprouts. Dave will be so disappointed, but it will be short-lived, because salmon pesto pasta is so easy that we can just have it next week for a non-holiday.

salmon pesto pasta 5

One year ago: Chocolate Oatmeal Drops
Two years ago: Jalapeno Baked Fish with Roasted Tomatoes and Potatoes
Three years ago: Pot Roast
Four years ago: Apple Galette

Printer Friendly Recipe
Pasta and Salmon with Pesto Cream Sauce

Serves 4

I usually make half of this recipe to serve two people, and the smaller 5-ounce can of evaporated milk is perfect.  I tried using more, so that the full recipe would use a whole 15-ounce can of evaporated milk, but all the dairy blunted the other flavors.

12 ounces pasta, preferably a short shape (rotini, penne, farfalle, orechiette)
salt
2 (6 to 8 ounce) salmon filets
10 ounces evaporated milk
½ lemon
½ cup pesto
parmesan, for serving

1. Adjust a rack to the upper position and heat the broiler. Line a baking sheet with foil.

2. Bring about 4 quarts of water to a boil over high heat. Once the water boils, add the pasta and 1 tablespoon of salt. Cook the pasta until it is slightly undercooked, about 1 minute less than the package indicates the pasta will be done. Drain.

3. Meanwhile, place the salmon, skin-side down, on the prepared baking sheet. Season it liberally with salt. Broil until the salmon is lightly browned on top and flakes easily with a fork, 6-10 minutes. Set aside to cool slightly.

4. Return the empty pasta-cooking pot to medium-high heat. Add the evaporated milk and ¼ teaspoon salt. Simmer, scraping the bottom of the pot often to prevent sticking, until the milk is reduced to about ⅓ cup, about 5 minutes. Add the pasta to the milk, and cook, stirring constantly, for about one more minute, until the pasta is al dente.

5. Use two spoons to break up the salmon into bite-sized pieces. Squeeze the lemon juice over the flaked salmon. Add the salmon and pesto to the pasta; stir gently to combine and serve immediately, topping with parmesan.

salmon pesto pasta 4

This is an update from a earlier blog entry. For a meal we love as much as this one, I thought a new entry was worthwhile.

black bean avocado brownies

black bean brownies 13

I have developed an extensive spreadsheet of calculations in an effort to address to issue of brownies that aren’t bad for you, and what I have discovered is that brownies are bad for you. The problem is the chocolate. Chocolate on its own doesn’t taste good, as you’re probably aware. It needs sugar to taste good. Fat is nice too. Sugar and fat aren’t good for you.

black bean brownies 4

Sure, the internet is rife with recipes for black bean brownies, in which beans replace the flour, cocoa powder is the only source of chocolate, and, in Cara’s recipe, avocado adds some fat, but the healthy kind. I made Cara’s recipe, exchanging 2 tablespoons of cocoa for 1 ounce of bittersweet chocolate to add oomph to the chocolateliness in a compromise between health and flavor that I thought was worthwhile. The brownies were very, very edible. They didn’t taste like beans or like avocado. They also didn’t taste much like chocolate.

black bean brownies 7

This is when I started calculating calories, trying to see how much chocolate I could add to black bean brownies before it defeats the purpose of making a healthier brownie. I started by looking at Cook’s Illustrated’s Lighter Brownies recipe, replacing the flour with beans and the butter with avocado. I also added some ground almonds, because the original brownies needed something dry to absorb some of the moisture and bulk up the batter.

black bean brownies 8

Once you add more chocolate and fatty nuts to the recipe, it has just as much fat as Cook’s Illustrated butter-containing light brownie recipe. It has twice the fat of Cara’s recipe – but half the fat of my favorite regular brownie recipe (for the same size square). It has about the same amount of fiber and protein as Cara’s recipe, and two or three times the protein of a regular brownie recipe. (Regular brownies don’t contain any fiber to speak of.)

black bean brownies 10

What these brownies have going for them is that they’re chock full of fiber, high in protein, gluten-free, and full of good fats. What they have working against them is that they still have a significant amount of refined sugar, and they have more fat and therefore more calories than other black bean brownie recipes. They also have more flavor, more chocolate flavor, that is; in fact, so much chocolate flavor that this won’t just satisfy a chocolate craving, but it’ll cause a craving – for black bean brownies.

black bean brownies 3
first batch (all other photos are of second batch)

One year ago: Great Grains Muffins
Two years ago: Butternut Squash Macaroni and Cheese
Three years ago: Tofu Croutons
Four years ago: Potstickers

Printer Friendly Recipe
Black Bean Avocado Brownies (adapted from Cara’s Cravings and Cook’s Illustrated’s Lighter Brownies)

12 medium squares

¼ cup almonds
½ cup (3.5 ounces) sugar
⅛ teaspoon table salt
1 (15-ounce black) beans, rinsed and drained
2 ounces avocado flesh (about ½ an avocado)
3 ounces semisweet chocolate, coarsely chopped
2 tablespoons Dutch-processed cocoa powder
1 tablespoon boiling water
1 tablespoon vanilla extract
½ teaspoon instant espresso powder
½ teaspoon baking powder
2 large eggs

1. Adjust an oven rack to the middle position and heat the oven to 350 degrees. Coat an 8-inch square baking pan with vegetable oil spray.

2. Process the almonds, sugar, and salt in a food processor until the almonds are finely ground, about 2 minutes. Add the beans and avocado; process until the beans are smoothly pureed, 4-5 minutes (some flecks of bean skins may remain).

3. Set a heatproof bowl over a saucepan containing one inch of simmering water. Add the chocolate; stir frequently until the chocolate is smooth, then remove from the heat. In a separate small bowl, whisk the cocoa, water, vanilla, and espresso powder together. Add the chocolate, cocoa mixture, and baking powder to the bean mixture in the food processor; pulse to combine. Add the eggs; process for 30 seconds, stopping twice to scrape the sides of the bowl.

4. Pour the batter into the prepared pan and smooth the top. Bake until a toothpick inserted into the center comes out clean, about 25 minutes. Cool completely on a wire rack, at least 1 hour. Store leftovers, tightly wrapped, in the refrigerator for up to 5 days.

black bean brownies 11

rice noodle salad with peanut dressing

rice noodle peanut butter salad 5

I was going through a protein rut recently, where I seemed to be cooking with beans more weeknights than not. We try not to eat meat on weekdays, we take hard-boiled eggs to work everyday as snacks, and cheese has too much fat. So what does that leave me? I’d completely forgotten about soy.

rice noodle peanut butter salad 1

Think of tofu as a sponge that soaks up flavor. True, on its own, it tastes like water and has a jello-like squishiness, but when you sauté it and soak it in sauce, it’s hardly discernible from chicken, except cheaper and easier to work with. Plus, it won’t dry out like boneless skinless chicken breasts.

rice noodle peanut butter salad 3

This sauce has plenty of flavor for the tofu to absorb. Ginger, garlic, soy sauce, sugar, rice vinegar, and sesame oil, all mixed into creamy peanut butter, make for one heck of a combination. There are plenty of vegetables to provide brightness and crunch.  This was so good we had it two weeks in a row – alternating with dinners involving beans, of course.

rice noodle peanut butter salad 4

One year ago: Pasta Puttanesca
Two years ago: Asian-Style Chicken Noodle Soup
Three years ago: Pasta with Broccoli, Sausage, and Roasted Red Peppers

Printer Friendly Recipe
Rice Noodle Salad with Peanut Dressing (adapted from Cate’s World Kitchen)

My noodles stuck together in one big clump, so I chopped them up after cooking. I know that’s against standard noodle procedure, but in the end, it worked perfectly.

Serves 4-6

Having made this a bunch more times, I’ve found that it’s even better with the juice of a lime squeezed into the sauce.

2 teaspoons olive oil
1 pound tofu
salt
8 ounces rice noodles (linguine shape)
½ inch fresh ginger, peeled and finely chopped
4 cloves garlic, chopped
½ cup creamy peanut butter
3 tablespoons soy sauce
2 teaspoons brown sugar
3 tablespoons rice vinegar
1 tablespoon sesame oil
¼ cup warm water
chili garlic sauce to taste (optional)
1 medium cucumber, sliced into half moons
1 red bell pepper, cut into matchsticks
2 green onions (green parts only), sliced
¼ cup chopped fresh cilantro

1. Heat the oil in a medium nonstick skillet over medium-high heat. Slice the tofu lengthwise into ½-inch thick slabs; pat dry on a dishtowel. Transfer the tofu to the oil and cook, without moving, for 4-6 minutes, until browned on the bottom. Flip the tofu and brown the second side. Remove the tofu from the skillet and cut into bite-sized cubes.

2. Bring a large pot of water to a boil. Add a large pinch of salt and the rice noodles; cook until tender. (Check the package instructions for exact cooking times.) Drain and rinse the pasta.

3. In a large bowl, whisk together the peanut butter, soy sauce, ginger, garlic, sugar, rice vinegar, sesame oil, water, and chili garlic sauce until smooth. Fold the tofu into the sauce, then add the remaining ingredients, reserving some of the green onions and cilantro for a garnish.

rice noodle peanut butter salad 6

kid’s thumbprints

kids thumbprints 7

I have now cooked all* of the recipes in Dorie Greenspan’s Baking: From my Home to Yours. Every week, for the last four years, I have baked whatever recipe someone else picked. I was late a few times but never missed a week. I also managed to make up all of the recipes that the group made before I joined a few months after it started.

kids thumbprints 1

It’s been challenging, I will tell you that. That’s a lot of baking, and it’s a lot of baking that has to be done by a deadline. It often included recipes that were complex, recipes that I knew I wouldn’t love, and in worse case scenarios, complex recipes that I knew I wouldn’t love.

kids thumbprints 2

But, there were far more recipes that I thought I knew I wouldn’t love only to be pleasantly surprised. There were lessons learned, friendships made, and so much confidence gained. Now I have a generous handful of favorite new recipes in my arsenal.

kids thumbprints 3

And what a huge goal to be reached – checking an entire* cookbook off the list. I don’t know what I’ll do now, as I’m not joining the spinoff group.  I might relearn how to choose my own dessert recipes.  I might get into those healthified desserts.  Maybe I won’t bake at all, although I suspect my coworkers, spoiled after months of weekly Dorie treats, would protest.  These cookies, rushed to work on my day off because I was enjoying them a little too much myself for breakfast, were the last in a long line of sweets that quickly disappeared from the office kitchen.  Tuesdays with Dorie is over, but I suspect the baking will continue.

kids thumbprints 6

This final recipe of Tuesdays with Dorie is posted on Dorie’s blog, along with her own reflections on the group. I was too lazy to deal with the egg white and chopped peanut coating but kept to the recipe otherwise.

*Okay, I haven’t made really all of the recipes. I skipped the two fresh fig recipes, and there’s a handful of garnishes and toppings in the last chapter that never came up as part of other recipes.

Final note: My favorite recipes from this book are marked with an asterisk in my blog page that lists posts associated with baking groups.

One year ago: Quintuple Chocolate Brownies
Two years ago: Pecan Pie
Three years ago: Tall and Creamy Cheesecake

kids thumbprints 5