antipasti salad

antipasto salad 6

It took me a few tries to get the office potluck right. In the meantime, I learned that goat cheese is a bad idea; the old cowboys think it sounds gross and won’t try it. Dips and spreads don’t work well because you have to dish both the spread and the item to be spread onto and guess at the ratio. Grabbable snacks are fine, but not necessary, because people aren’t hovering and grazing; they just fill a plate and find a seat at the crowded table in the conference room.

antipasto salad 1

Food in crockpots is always popular, but anything that requires a bowl is too much work for people; you need one hand for your plate and the other to scoop more food onto that plate, so a bowl overloads you. That still leaves a lot of good food though – meatballs, beans, pastas. I considered bringing macaroni and cheese in the crockpot, but after a look at the potluck’s sign-up sheet, decided that more carbs was probably unnecessary.

antipasto salad 3

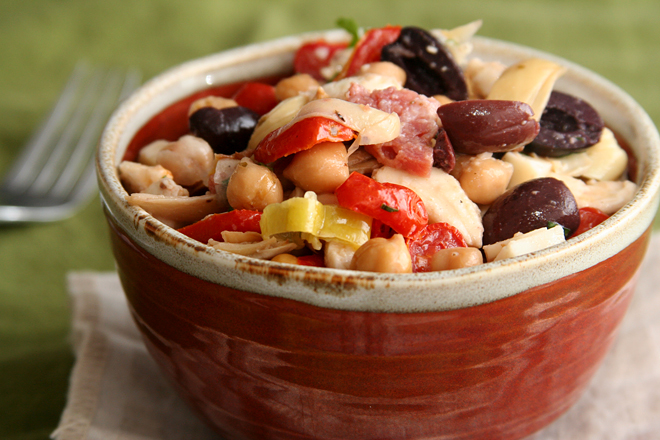
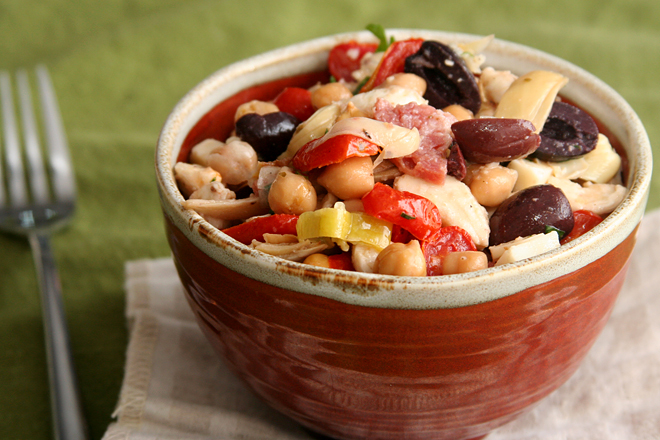
So then I started thinking that something more on the healthier side would be nice. A green salad doesn’t work though; I’m okay with my foods touching, but not grape jelly-chile meatball sauce and lettuce. Instead, I combined all of my favorite antipasti ingredients into one bowl, mixed it up, and let it sit overnight. In that time, the brine from the olives, seasoning in the salami, and herbs in the artichoke marinade seeped into the chickpeas and milky mozzarella.

antipasto salad 4

I couldn’t stop eating it when I made it. At the potluck, it didn’t get overshadowed by tasty choices like chile relleno casserole, green chile corn pudding, and green chile stew (green chile is how we do potlucks in New Mexico).  I don’t know if the picky old cowboys tried it, but several other people gave me compliments. My favorite was the leftovers though – I didn’t have to share and there were no distractions from the salad itself.

antipasto salad 5

Printer Friendly Recipe
Antipasti Salad

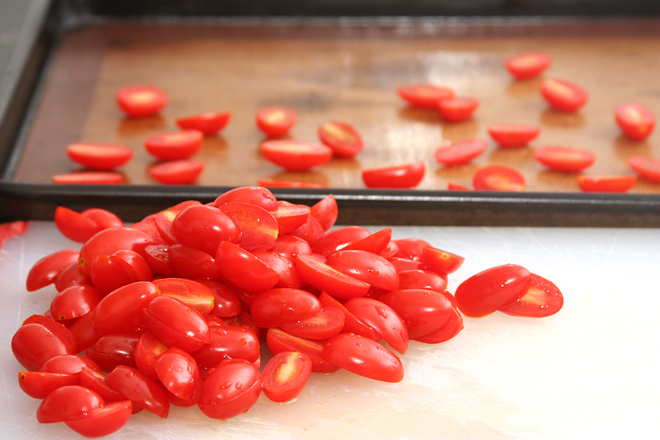
1 pint grape tomatoes, halved
1 clove garlic, unpeeled
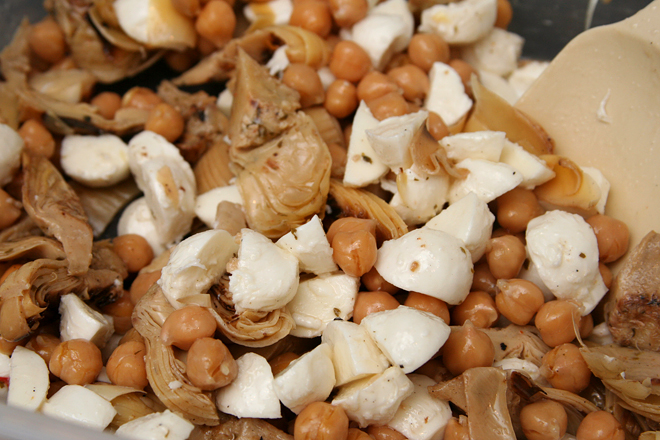
1 (15-ounce) can chickpeas, drained and rinsed
2 (6.27 ounce) jars marinated quartered artichoke hearts, preferably grilled, drained but not rinsed
1 cup kalamata olives, halved
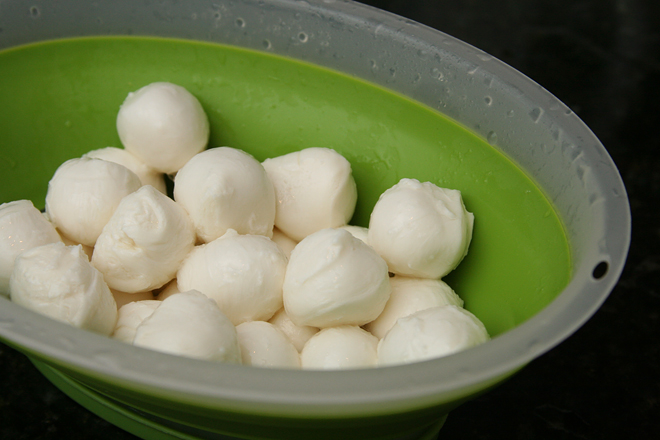
8 ounces fresh mozzarella, cubed
4 ounces sliced salami or mini pepperoni
½ small red onion, sliced thin
2 ounces parmesan, diced small
¼ cup minced parsley
¼ cup pepperoncini, sliced
1 tablespoon red wine vinegar
1 tablespoon extra-virgin olive oil

1. Heat the oven to 350 degrees. Arrange the tomatoes cut side up on a baking sheet; place the garlic on the baking sheet. Bake until the tomatoes are slightly shriveled and the garlic is soft, about 30 minutes. Cool to room temperature.

2. In a large serving bowl, mix the tomatoes and all of the remaining ingredients. Squeeze the garlic into the mixture; stir. Marinate at least 1 hour or cover and refrigerate for up to three days. Serve at room temperature.

antipasto salad 7

mulled wine cranberry sauce

mulled wine cranberry sauce 2

This, finally, is the cranberry sauce I’ve been looking for – the one that is worth making not just because making cranberry sauce is fun, but because this is better than anything you could buy. And it’s no more effort than any other cranberry sauce; the only difference between this and the most basic recipe is that wine is used to simmer the cranberries instead of water, and there are a handful of warm winter spices thrown in.

mulled wine cranberry sauce 4

With so much wine, you might think that the sauce ends up tasting like wine, but that isn’t the case. It tastes like something much more than the in-your-face tart and sweet of regular cranberry sauce, but it isn’t particularly boozy. It’s just deeper, more complex, with a little buzz on your tongue.

mulled wine cranberry sauce 5

Unfortunately, with half a bottle of wine stirred into one bag of cranberries, there’s no chance of claiming that all the alcohol cooks off, so this isn’t the best cranberry sauce for kids. That’s why my friend offered to bring a can of jellied cranberry sauce for her kids when I invited them over for a big turkey feast.

mulled wine cranberry sauce 6

When she forgot, we figured what the heck, what harm could a few tablespoons of winey cranberries do? Not much at all, it turns out, as her son took one spoonful of sauce, noted that there was wine in it, and pushed it aside in favor of the stuffing. So maybe it’s not for everyone, but it’s definitely my new favorite.

mulled wine cranberry sauce 7
(turkey cranberry green chile sandwich on a crescent roll)

Printer Friendly Recipe
Mulled Wine Cranberry Sauce (adapted from Bon Appetit via epicurious)

I pressed the sauce through a food mill right after simmering, because I like my cranberry sauce smooth.

zest from 1 orange
1½ cups red wine
½ cup (3.5 ounces) packed brown sugar
½ cup finely chopped crystallized ginger
½ teaspoon ground cinnamon
¼ teaspoon ground cloves
¼ teaspoon ground nutmeg
12 ounces fresh cranberries

Combine all of the ingredients in a medium saucepan. Bring to a boil over medium-high heat, stirring until the sugar dissolves. Reduce the heat to low and simmer uncovered until the berries burst and the mixture thickens, about 20 minutes. Transfer sauce to bowl; chill until cold. (Can be prepared 1 week ahead. Cover and keep refrigerated.)

mulled wine cranberry sauce 3

braised potatoes

braised potatoes 5

I don’t live in a world (okay, a town) where there are duck fat fries. People are always raving about them – except for the few who claim they’re not all that – but my opportunities to try duck fat anything have been limited. So I do what I usually do when I can’t find a restaurant to serve me something I want to try: I make it myself.

duck fat potatoes 3

Not that I set out to cook with duck fat; mostly I just stumbled onto a container of it at Whole Foods on my last visit to see my parents in Albuquerque. Also I didn’t exactly make fries, but close enough.

braised potatoes 1

On my first attempt to discover what makes potatoes cooked in duck fat so popular, I simply melted a half-inch or so of the fat in a nonstick pan, added the potatoes cut-side down, and let them cook until they were tender inside and nicely browned on the flat edges. They were just fine, but I didn’t see what the fuss was about.

braised potatoes 2

I was planning to give it another try one evening – after all, I had a container of duck fat with no other plans for it – when, a few hours before dinner, I read about Cook’s Illustrated’s braised new potato recipe in their latest issue. In this technique, the potatoes are cooked in a mixture of water, seasonings, and fat (the original recipe uses butter). The water tenderizes the potatoes, and when it evaporates, the potatoes brown in the fat.

braised potatoes 3

These are now a contender for my favorite potatoes ever. I still haven’t tried it with butter, which I’m sure is delicious, but the duck fat makes the kitchen smell like the best of Thanksgiving.  The inside of the potatoes are soft and creamy, and the flat edge is crisp and browned.  I see what all the fuss is about now.

braised potatoes 4

One year ago: California Roll Burgers
Two years ago: Lemon Bar (comparison of 3 recipes)
Three years ago: Grilled Artichokes
Four years ago: Fresh Strawberry Scones
Five years ago: Asparagus and Arugula Salad with Cannellini Beans and Balsamic Vinegar

Printer Friendly Recipe
Braised Red Potatoes with Lemon (from Cooks Illustrated)

Did I mention that they’re almost entirely hands-off?

1½ pounds small red potatoes, unpeeled, halved
2 cups water
3 tablespoons unsalted butter
3 garlic cloves, peeled
3 sprigs fresh thyme
¾ teaspoon salt
1 teaspoon lemon juice
¼ teaspoon pepper
2 tablespoons minced fresh chives

1. Arrange the potatoes in a single layer, cut-side down, in a 12-inch nonstick skillet. Add the water, butter, garlic, thyme, and salt and bring to a simmer over medium-high heat. Reduce the heat to medium, cover, and simmer until potatoes are just tender, about 15 minutes.

2. Remove the lid and use a slotted spoon to transfer the garlic to a cutting board; discard the thyme. Increase the heat to medium-high and vigorously simmer, swirling pan occasionally, until the water evaporates and the butter starts to sizzle, 15-20 minutes. When it’s cool enough to handle, mince the garlic to a paste.  Transfer the paste to a bowl and stir in the lemon juice and pepper.

3. Continue to cook the potatoes, swirling the pan frequently, until the butter browns and the cut sides of the potatoes turn spotty brown, 4 to 6 minutes longer. Off the heat, add the garlic mixture and chives and toss to thoroughly coat. Serve immediately.

braised potatoes 7

barbecue cowboy beans

cowboy beans 7

I feel like I should wait and do a comparison post with this recipe, because I have a friend who makes some seriously good cowboy beans. Hers are full of meat with a dominant sweet flavor. They’re always one of my favorite dishes on the potluck table.

cowboy beans 2

For my own version though, I wanted something lighter to serve as a side dish to barbecued ribs. When you’re spending hours cooking big slabs of meat, you don’t really need ground beef in your side dish. A few slices of bacon provide plenty of meaty depth, combined with sweet-bitter molasses and a slew of acidic ingredients like ketchup and beer.

cowboy beans 3

To be honest, I’m not sure what makes a pot of beans “cowboy” instead of just “baked.” A lot of recipes contain ground meat, but not all of them. This is the only one with spicy chiles. But honestly, I don’t much care. What matters most is that these are perfect along barbecued meat, and if I want a chile-less, meatier version, I can have that too.

cowboy beans 4

One year ago: Grilled Pita Breads
Two years ago: Whole Wheat Bagels
Three years ago: Amaretto Cheesecake
Four years ago: Blackberry Swirl Ice Cream

Printer Friendly Recipe
Barbecue Cowboy Beans (adapted from Something Edible)

Serves 6

If you don’t want to buy two kinds of beans, feel free to choose one or the other.

I didn’t use the liquid smoke because I didn’t have any, so I can’t attest to how it affects the beans. I doubt adding smoky flavor would be a bad thing though.

6 ounces (about 1 cup) dry pinto beans, rinsed and sorted
2 ounces (about ⅓ cup) dry kidney beans
salt
6 slices (about 6 ounces) bacon, chopped
½ medium onion, chopped
2 cloves garlic, minced
1 teaspoon allspice ground
½ teaspoon ground coriander
½ teaspoon ground black pepper
1 teaspoon dry mustard
¼ cup beer
1 (10-ounce) can diced tomatoes with chiles
¼ cup ketchup
¼ cup molasses
1 tablespoon cider vinegar
1 teaspoon hickory liquid smoke (optional)

1. Heat the oven to 300 degrees. Place the beans and 1 teaspoon salt in a 5-quart Dutch oven; add enough water to cover the beans by 1½ inches. Bring the water to a boil over medium-high heat, then cover the pot and transfer it to the oven. Cook for 75 minutes, until the beans are tender. Drain the beans. Increase the oven temperature to 400 degrees.

2. Add the bacon to the now-empty Dutch oven. Cook over medium heat until fat begins to render, 3-4 minutes. Add the onion and cook, stirring occasionally, until softened and translucent, 5-6 minutes. Add the garlic, allspice, coriander, black pepper, and mustard; cook, stirring constantly, until fragrant, about 1 minute. Add the beer and scrape the bottom of the pot to release the browned bits. Add the tomatoes and chiles with their juice, the ketchup, molasses, cider vinegar, liquid smoke (if using), and 1 teaspoon salt. Bring to a simmer over medium-high heat.

3. Cover and transfer the beans to the oven. Bake for 4 hours. Serve.

cowboy beans 5

summer chopped salad with feta

summer chopped salad with feta 7

I wore out coleslaw. It was too convenient and easy and good and healthy, so I made it whenever we had pulled pork or burgers or barbecue. And that was fine for a while, for over a year, in fact, but now I’ve had enough. I needed something new to catch my fancy.

summer chopped salad with feta 1

I found it. This is my new favorite side salad for a number of reasons. For one thing, it passes the no-lettuce test; delicate lettuce-based salads seem so out of place next to a hearty burger. It goes without saying that a side salad should be healthy and easy, and this one is.

summer chopped salad with feta 3

And maybe most importantly, it’s adaptable. I’ve been making coleslaw nearly the exact same way for well over a year, but this salad can be made with different vegetables, different types of citrus juice, and different seasonings to match the meal you’re serving it with. The original recipe used lime juice and cumin for a southwestern vibe, but I wanted something more Mediterranean, so I went with lemon juice this time.  It went perfectly with spareribs.  Coleslaw has been relegated from my favorite summer side to just my favorite pulled pork topping.

summer chopped salad with feta 6

One year ago: Chocolate Chocolate Chunk Muffins
Two years ago: Tarte Noire
Three years ago: Seafood Lasagna
Four years ago: Salmon Clubs with Avocado Butter

Printer Friendly Recipe
Summer Chopped Salad with Feta (adapted from Smitten Kitchen)

Serves 8 as a side dish

I steamed the green beans for about 1 minute, then did not blanch them (dip them into ice water to stop the cooking). If you do plan to blanch your beans, cook them for another minute or two. My beans looks olive green instead of bright green in the photos because I took these pictures the day after I made the salad, and the citrus juice had darkened the beans.

16 ounces green beans, lightly cooked, chopped into ¼-inch pieces
2 cups (7 ounces) radishes, halved and thinly sliced
1 hothouse or 3 English cucumbers (5 ounces total), halved lengthwise and sliced
4 scallions, thinly sliced
1 cup (4 ounces) crumbled feta
¾ cup toasted sunflower seeds, salted or unsalted
¼ cup fresh lemon juice
½ teaspoon salt
freshly ground black pepper, to taste
2 tablespoons thinly sliced fresh mint leaves
2-4 tablespoons extra virgin olive oil

Mix everything except the olive oil.  Add the oil and more salt to taste.

summer chopped salad with feta 8

black bean quinoa salad with tomatillo salsa

black bean quinoa 7

A few weeks ago, I was skiing, and I was having fun, but I felt stale. I felt like I was doing the same things I always do when I ski, back and forth across the slope, not too fast, just nice and comfortable. After a morning of this, I was getting impatient with myself – why are you so timid, I asked myself? Go faster, mix it up, challenge yourself, get out of that comfort zone. So I did, and I fell, and I twisted my knees, had to sit in the lodge and read a book the next day while my friends skied, and I couldn’t run or progress in my weightlifting routine for three weeks (and counting*).

black bean quinoa 1

My weeknight dinner routine has felt stale lately too. So many grain salads, so many beans. It seems like I always use quinoa the same way, in some sort of salad. And how many different ways can I possibly combine black beans, chiles, and avocadoes?

black bean quinoa 3

On the other hand, maybe I’m in this rut because it works – it’s healthy, it’s fast, and it’s good. Sometimes it’s better to stick with what works. Quinoa salads work. Black beans and cilantro works. And avocado works on everything. This was one of the best meals I’ve made lately. Mixing it up is overrated.

black bean quinoa 4

*Eventually, I decided that if resting wasn’t helping my knees heal, I might as well run. (Impeccable logic, right?) A couple runs in, my knees feel better than they have in weeks. Crossing my fingers to start weightlifting again this weekend!

black bean quinoa 6

One year ago: Chocolate Frosting (comparison of 3 recipes)
Two years ago: Dorie Greenspan’s Best Chocolate Chip Cookies
Three years ago: Devil’s Food White Out Cake
Four years ago: Cream Cheese Brownies

Printer Friendly Recipe
Black Bean Quinoa Salad with Tomatillo Salsa (adapted slightly from Cate’s World Kitchen)

Serves 3-4

I substituted about 4 ounces of roasted peeled Hatch green chiles for one of the jalapenos.

1 cup quinoa, rinsed
salt
4 tomatillos, papery skins removed
3 cloves garlic, unpeeled
2 jalapenos, stemmed and seeded
¾ cup cilantro, divided
juice of 1 lime
1 (15-ounce) can black beans, rinsed and drained
1 cup grape tomatoes, halved
1 avocado, diced

1. In a medium saucepan over high heat, bring 1 cup water, ¼ teaspoon salt, and the quinoa to a boil. Cover the pot, reduce the heat to low, and simmer for 15 minutes. After 15 minutes, remove the pot from the heat and let sit, still covered, for 10 minutes.

2. Meanwhile, adjust an oven rack to the upper-middle position and heat the broiler. Broil the tomatillos and garlic until the tomatillos are browned, 5-8 minutes. Peel the garlic; transfer it to a blender with the tomatillos, ½ teaspoon salt, jalapenos, and ½ cup cilantro. Puree.

3. Transfer the quinoa to a large bowl. Stir in the lime juice. Once the quinoa cools to slightly warmer than room temperature, add the beans, tomatoes, avocado, remaining ¼ cup cilantro, and salsa. Serve.

black bean quinoa 5

cranberry sauce with port and dried figs

port cranberries 3

Have you ever looked at the ingredients of canned jellied cranberries? They’re exactly the same as homemade cranberry sauce: cranberries, sugar, water. The first time I made homemade cranberry sauce, I eagerly took my first bite and then…huh. It tastes exactly like the canned kind. Don’t bother making cranberry sauce from scratch if it’s because you’re expecting it to taste better than it is from the can.

port cranberries 4

But there are other reasons to make it from scratch. The first is that it’s fun. Raw cranberries are neat, pucker-inducing and hard and dry. Then when you cook them, they pop. It only takes 15 minutes and can be done up to a week in advance, so why not spend a few minutes playing with your food?

The other reason is that you can play around with flavors, personalizing the sauce. Orange is the most common addition and after doing that for several years, I was ready for more experimentation. Sweet port wine and balsamic vinegar seemed like they would complement the tart cranberries perfectly.

port cranberries 1

Even with all of the extra flavors in this – port, balsamic vinegar, figs, rosemary, black pepper, cinnamon – it didn’t taste so different from the stuff in the can. It had a warmer tone to it, and I liked the crunch of the fig seeds. But everyone would have been just fine with the canned stuff too. And that’s okay, because the few minutes I spent making this cranberry sauce were well spent just for the fun of it.

port cranberries 2

Two years ago: African Pineapple Peanut Stew
Three years ago: Pumpkin Goat Cheese Ravioli

Printer Friendly Recipe
Cranberry Sauce with Port and Dried Figs (adapted from Bon Appétit via epicurious)

At first, I served this as you see it here, but for the leftovers, I put the sauce through a food mill to separate the skins, and I much prefer the smoother version.

1½ cups ruby Port
¼ cup balsamic vinegar
¼ cup (1.75 ounces) packed brown sugar
8 dried black Mission figs, stemmed, chopped
1 6-inch-long sprig fresh rosemary
1 3-inch cinnamon stick
¼ teaspoon ground black pepper
1 12-ounce bag fresh cranberries
¾ cup (5.25 ounces) granulated sugar

Combine the port, vinegar, brown sugar, figs, rosemary, cinnamon, and pepper in a medium saucepan. Bring to a boil over medium-high heat, stirring until the sugar dissolves. Reduce the heat to low and simmer 10 minutes. Discard the rosemary and cinnamon. Mix in the cranberries and granulated sugar. Cook over medium heat until the liquid is slightly reduced and the berries burst, stirring occasionally, about 6 minutes. Transfer the sauce to a bowl; chill until cold. (Cranberry sauce can be prepared 1 week ahead. Cover and keep refrigerated.)

roasted root vegetable stuffing

root vegetable stuffing 6

When I was creating my Thanksgiving menu last year, it occurred to me that most of the traditional Thanksgiving courses are based on carbs – stuffing, potatoes, rolls. The only traditional non-carb sides are the green bean casserole that nobody likes and the sugar-laden cranberries. I have nothing against carbs, and I know all about splurging for a holiday, but I actually like vegetables. Plus, if you include lower calorie food in the menu, you can eat more before filling up!

root vegetable stuffing 1

I would go so far as to almost call this healthy, although it depends on the cornbread you use. It’s mostly vegetables – vegetables whose natural sugars are intensified through roasting. The sweet earthy root vegetables meld perfectly with similarly flavored cornbread.

root vegetable stuffing 2

Beyond the parsnips and rutabaga, it’s a typical dressing recipe with eggs and broth binding the ingredients together before the mixture is baked until it’s crisp on top (but maybe not dry and burned like mine). The result is a dressing that’s almost too good to be topped with white wine gravy.

root vegetable stuffing 4

Two years ago: Glazed Lemon Cookies
Three years ago: Wheatmeal Shortbread Cookies

Printer Friendly Recipe
Cornbread Dressing with Roasted Root Vegetables (adapted from Bon Appétit via epicurious)

Serves 6

6 ounces shallots, peeled, halved if small, quartered if large
8 ounces carrots, sliced ¼-inch thick on the diagonal
8 ounces parsnips, sliced ¼-inch thick on diagonal
8 ounces rutabaga, cut into ½-inch cubes
salt and pepper
olive oil
4 large garlic cloves, unpeeled
1 tablespoon fresh thyme
1 tablespoon chopped fresh rosemary
2 teaspoons minced fresh sage
2 cups ½-inch cubes of cornbread
2 large eggs, lightly beaten
2 tablespoons unsalted butter, melted
1 cup low-salt chicken broth (or Golden Turkey Stock)

1. Preheat the oven to 425 degrees. Spread the shallots, carrots, parsnips, and rutabaga in a single layer on a rimmed baking sheet. Season with a generous sprinkling of salt and pepper and drizzle with just enough olive oil to coat. Roast for about 45 minutes, stirring every 15 minutes, until the vegetables are soft and browned around the edges. Add the garlic during last 15 minutes. Set the roasted garlic aside; transfer the other vegetables to a large bowl.

2. Spread the cornbread cubes over the now-empty baking sheet. Bake until dry, 10-15 minutes, stirring about halfway through the cooking time.

3. Spray a baking dish with nonstick spray. Mince the garlic; add it to the vegetables along with the herbs and cornbread cubes. In a medium bowl, whisk the eggs, then whisk in the broth and butter; pour the egg mixture over the vegetable mixture and gently fold to combine.

4. Transfer the mixture to the prepared baking dish. Cover the pan with foil; bake until heated through, about 30 minutes. Uncover and bake until browned and crisp, about 15 minutes longer.

root vegetable stuffing 5

carrot avocado salad

carrot avocado salad 3

The problem with just about every recipe that contains avocado is that there isn’t enough avocado. The only exception I can think of is guacamole, because it’s almost entirely avocado. My favorite way to eat avocado is on toast with a sprinkling of kosher salt.

carrot avocado salad 2

My usual way of eating it, however, is as an accent in which there’s just enough avocado so that most bites have a tiny portion. And all the bites without avocado are just sad.  And all the bites that do have avocado need more of it.

carrot avocado salad 1

And that is what I love about this salad – avocado is the main event, or at least it shares equal billing with the sweet caramelized carrots. It might sound like an unusual combination, but it works. The radishes add a nice touch as well, crisp and spicy. I’m pretty sure the only way I could like this salad more would be if I left out the carrots, pepper, cumin, olive oil, and radishes. And maybe added in some toast.

carrot avocado salad 4

One year ago: Spinach Artichoke Pizza
Two years ago: Tofu Mu Shu
Three years ago: Crockpot Pulled Pork

Printer Friendly Recipe
Roasted Carrot and Avocado Salad (adapted from Smitten Kitchen)

4 servings

I prefer to use a regular olive oil to roast the carrots and extra virgin olive oil in the dressing.

1 pound carrots, scrubbed or peeled and cut into two-inch segments
Coarse salt and freshly ground black pepper
½ teaspoon ground cumin
3 tablespoons olive oil, divided
3 tablespoons lemon juice
4 radishes, chopped small
1 avocado, pitted and sliced

1. Adjust a rack to the middle position and heat the oven to 400 degrees. On a large baking sheet, toss the carrots with ¼ teaspoon salt, ⅛ teaspoon pepper, cumin, and 2 tablespoons olive oil. Roast for about 20 to 30 minutes, until the carrots are tender and browned.

2. In a small bowl, whisk together the lemon juice and the remaining tablespoon olive oil. In a medium serving bowl, combine the carrots, avocado and radishes. Drizzle the vegetables with the dressing, adding more salt and pepper to taste. Serve immediately.

carrot avocado salad 5

basic coleslaw

Once upon a time, I thought I didn’t like coleslaw. A Cooks Illustrated recipe turned me around, but over time, I found aspects of it that I didn’t love. One is that is really does take about 4 hours of salting the cabbage for it to draw out enough water to avoid a watery dressing. Then you have to rinse the salt off so your slaw isn’t too salty, and then you have to dry the cabbage, because wasn’t the whole point of salting to remove water?

The dressing of that recipe is based on buttermilk, which is a great lowfat option, but is too thin to coat the cabbage strands well. Many slaw dressings are nothing more than flavored mayonnaise, and while I do love mayonnaise, I don’t like to spend so much of my calorie budget on salad. The dressing for my old favorite recipe also requires sour cream, which I never have.

The answer, like I’m finding it is to so many things, is Greek yogurt. It’s everything you want in a slaw dressing – thick, creamy and tangy. Oh, and full of protein instead of just fat. I like to use the same flavorings used in the Cooks Illustrated recipe – cider vinegar, parsley, minced onion, a wee bit of sugar. I also like to mix a spoonful of mayonnaise into the yogurt. It’s amazing how even a small proportion of mayonnaise can make the whole mixture taste like it’s full of the fattening stuff.

With a thicker dressing, it isn’t as necessary to draw water out of the cabbage. If I have time, I still often sprinkle the shredded cabbage with salt and set it aside, but I use only as much salt as I need to include in the salad anyway – so no tedious rinsing and drying is required. Without needing to plan four hours in advance, I can mix up a quick coleslaw while Dave heats the grill for brats. I’m not going to say that I like the coleslaw more than the sausage – but it’s close, and it’s a heck of a lot healthier too.

One year ago: Grilled Artichokes
Two years ago: Basic Lentil Soup
Three years ago: Snickery Squares

Printer Friendly Recipe
Basic Coleslaw (adapted from Cooks Illustrated)

You can see that I now take a very laid back approach to preparing slaw. This is what happens when I start making things for lunch on Saturday; I can’t be bothered with details when it’s 85 degrees and sunny out. Sometimes I combine the first few ingredients earlier in the morning and set them aside until later to lightly pickle to cabbage and onion, but sometimes I make the slaw start to finish right before serving. Either way works great.

Feel free to use any fat level of Greek yogurt.

½ cabbage, sliced thin
¼ cup minced red onion
¼ teaspoon table salt
1 teaspoon cider vinegar
½ teaspoon sugar
½ teaspoon Dijon mustard
1/8 teaspoon ground black pepper
1 carrot, shredded
2 tablespoons minced fresh parsley leaves
1 (7-ounce container) plain Greek yogurt
2 tablespoons mayonnaise

In a large bowl, stir together the cabbage, onion, salt, vinegar, and sugar. Set aside while you prepare the remaining ingredients. Add the rest of the ingredients and stir to combine.