Archives for October 2011

apple brandy hand pies

apple brandy hand pies 8

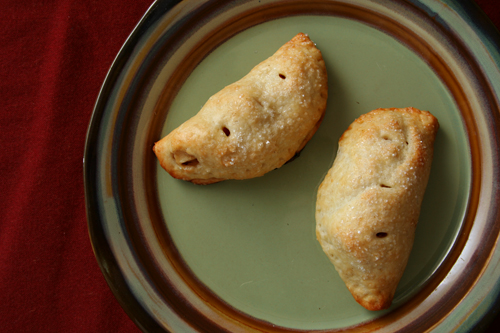
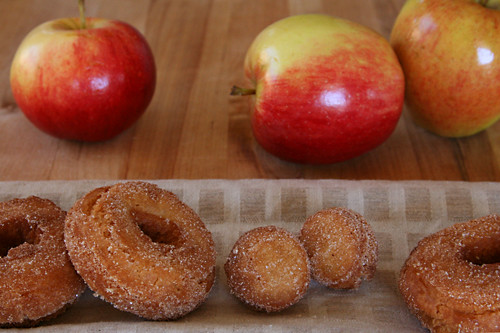
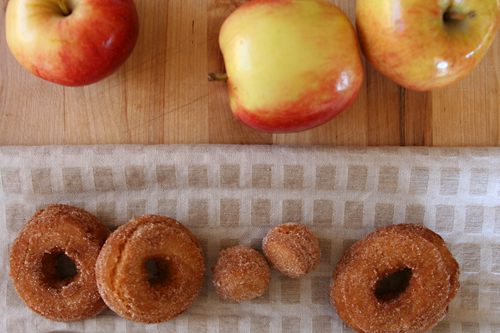
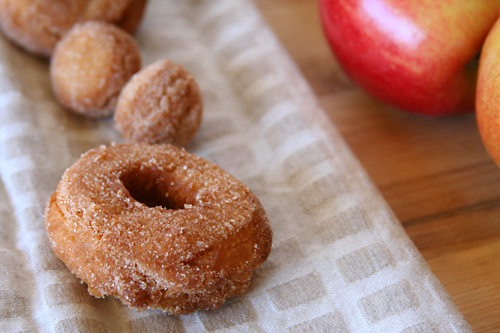
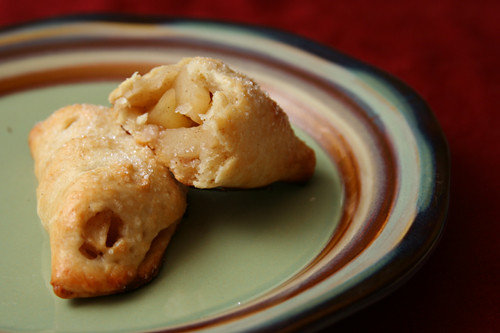
Adding ‘brandy’ to the title of this recipe is probably an exaggeration, because I suspect most of the brandy gets left behind in the sugary liquid given off by the apples. Plus, with two teaspoons of brandy in over a dozen hand pies, that’s approximately one drop per pie. On the other hand, how much more fun do apple brandy hand pies sound than apple hand pies? A lot more fun, that’s how much.

apple brandy hand pies 2

And these are fun. To eat, that is; to make, they’re a lot of nitpicky chilling steps. You measure the ingredients and chill them; make the dough and chill it; roll it out and chill it; cut circles and chill them; fill the hand pies and chill them.

apple brandy hand pies 3

It isn’t too bad though; you don’t have to actually do anything during those chilling steps, so it’s really just an issue of starting early. The reward at the end is crust so flaky it’s almost like puff pastry dough, not to mention a sweet and spicy apple filling – whether it’s actually spiked with brandy or not.

apple brandy hand pies 5

One year ago: Coconut Cream Tart/Pie
Two years ago: Sun-Dried Tomato Jam
Three years ago: Peter Reinhart’s Pizza

Printer Friendly Recipe
Apple Brandy Hand Pies (adapted from Smitten Kitchen and from Cooks Illustrated’s apple pie recipe in The New Best Recipe)

Makes about 14 pies

Dough:
1¼ cups (6 ounces) all-purpose flour
¼ teaspoon salt
½ tablespoon sugar
8 tablespoons (1 stick) unsalted butter, cut into pieces
¼ cup Greek yogurt or sour cream
2 teaspoons fresh lemon juice
¼ cup ice water

Filling:
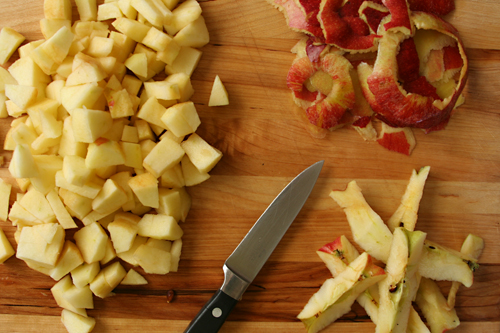
2 large apples, peeled, cored, diced into ¼-inch cubes
1 teaspoon lemon juice
1 teaspoon apple (or regular) brandy
¼ teaspoon lemon zest
¼ cups (1.75 ounces) sugar
2 teaspoons all-purpose flour
⅛ teaspoon salt
½ teaspoon cinnamon
⅛ teaspoon ground nutmeg
⅛ teaspoon ground allspice

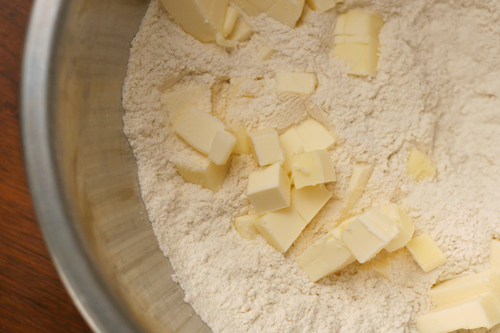
1. To make the pastry, in a bowl, combine the flour, sugar and salt. Place the butter in another bowl. Place both bowls in the freezer for 1 hour. Remove the bowls from the freezer and make a well in the center of the flour. Add the butter to the well and, using a pastry blender, cut it in until the mixture resembles coarse meal. Make another well in the center. In a small bowl, whisk together the sour cream, lemon juice and water and add half of this mixture to the well. With your fingertips, mix in the liquid until large lumps form. Remove the large lumps and repeat with the remaining liquid and flour-butter mixture. Pat the lumps into a ball; do not overwork the dough. Cover with plastic wrap and refrigerate for 1 hour. If preparing ahead of time, the dough can be stored at this point for up to one month in the freezer.

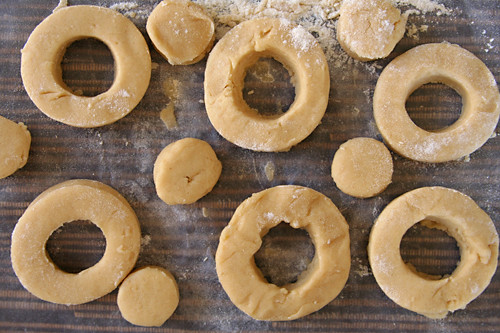
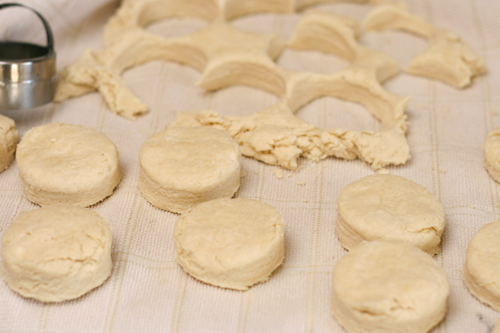
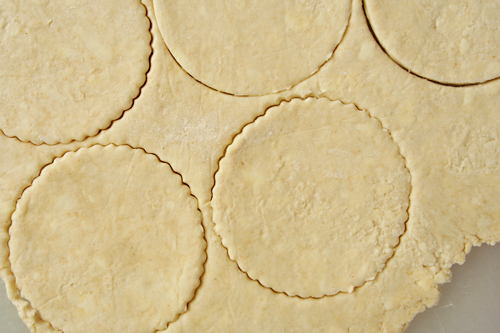
2. On a lightly floured work surface, roll out one half of the dough to ⅛-inch thickness. Using a 4-inch-round biscuit cutter, cut seven circles out of the rolled dough. Transfer the circles to a parchment-lined baking sheet, and place in the refrigerator to chill for about 30 minutes.

3. Toss the apples with the lemon juice and zest. In a medium bowl, mix the sugar, flour, salt and spices. Toss the dry ingredients with the apples.

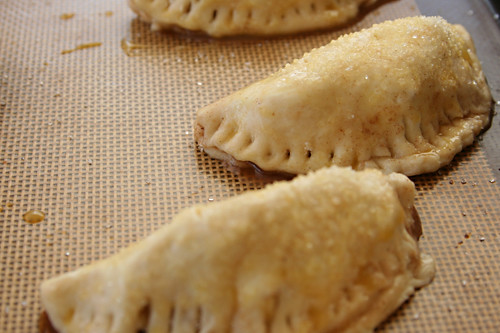
4. Remove the chilled dough from the refrigerator, and let stand at room temperature until just pliable, 2 to 3 minutes. Spoon about 1 tablespoon of filling onto one half of each circle of dough. Quickly brush cold water around the circumference of the dough, and fold it in half so the other side comes down over the filling, creating a semicircle. Seal the hand pie, and make a decorative edge by pressing the edges of the dough together with the back of a fork. Repeat the process with remaining dough and filling. Place the hand pies back on the parchment-lined baking sheet, and return to the refrigerator to chill for another 30 minutes.

5. Heat the oven to 375 degrees. Remove the chilled hand pies from the refrigerator, cut 3 small slits in each and lightly brush with the egg yolk wash. Sprinkle sanding sugar generously over the pies. Bake until the hand pies are golden brown and just slightly cracked, about 20 minutes. Remove the pies from the oven; let cool slightly before serving.

apple brandy hand pies 7

butternut squash risotto

butternut squash risotto 7

The first time I made this risotto, all the smoke from the chicken I was roasting set off the fire alarm in my apartment building. Everyone had to go stand outside in the cold (this is back when I lived somewhere where it actually got cold), but I didn’t want to leave the stove because I needed to stir my risotto! So Dave was the one who had to go confess to everyone that the alarm was my fault. He loved that.

butternut squash risotto 2

And I loved this risotto. It isn’t nearly as rich as the pumpkin risotto I made a couple years ago; that one has twice the cooking fat and a generous dollop of mascarpone. All that cheese mutes the flavor of the squash, and squash is what I want to highlight in a squash risotto.

butternut squash risotto 3

This recipe has a trick (it’s a Cooks Illustrated recipe; of course it has a trick) to eeking out all of the possible flavor from squash, and that’s to sauté to fibers and seeds, then use them as a base for the liquid used to cook the rice. It’s almost like making a squash broth, which is the perfect way to incorporate squash flavor into the entire risotto, not just in the chunks of squash distributed throughout the rice.

butternut squash risotto 4

The risotto was much better than that alarm-raising chicken. It involves some annoying steps with straining the broth and of course the tedious peeling and chopping of squash, but it isn’t anything as bad as explaining to your neighbors why they have to stand out in the cold on a Sunday night.

butternut squash risotto 6

One year ago: Pomegranate-Glazed Salmon
Two years ago: Brown Rice with Black Beans
Three years ago: Sushi Bowls

Printer Friendly Recipe
Butternut Squash Risotto (from Cooks Illustrated)

Serves 4 as a main course and 6 as a first course

2 tablespoons olive oil
1 medium butternut squash (about 2 pounds), peeled, seeded, and cut into ½-inch dice (about 3½ cups), seeds and fibers reserved
¾ teaspoon salt
¾ teaspoon pepper
4 cups low-sodium chicken broth
1 cup water
4 tablespoons unsalted butter
2 small onions, chopped very fine (about 1½ cups)
2 cloves garlic, minced
2 cups Arborio rice
1½ cups dry white wine
¾ cup (1½ ounces) finely grated Parmesan cheese
¼ teaspoon grated nutmeg
2 tablespoons minced fresh sage leaves

1. Heat the oil in a 12-inch skillet over medium-high heat until shimmering but not smoking. Add about 3½ cups of the squash in an even layer and cook without stirring until the squash is golden brown, 4-5 minutes; stir in ¼ teaspoon salt and ¼ teaspoon pepper. Continue to cook, stirring occasionally, until the squash is tender and browned, about five minutes longer. Transfer the squash to a small bowl and set aside.

2. Return the skillet to medium heat; add the reserved squash fibers and seeds and any leftover diced squash. Cook, stirring frequently to break up the fibers, until lightly browned, about 4 minutes. Transfer to a large saucepan and add the chicken broth and water; cover the saucepan and bring the mixture to a simmer over high heat, then reduce the heat to medium-low to maintain a bare simmer.

3. Melt 3 tablespoons of butter in the now-empty skillet over medium heat; when the foaming subsides, add the onions, garlic, remaining ½ teaspoon salt, and remaining ½ teaspoon pepper. Cook, stirring occasionally, until the onions are softened, 4 to 5 minutes. Add the rice to the skillet and cook, stirring frequently, until the grains are translucent around the edges, about 3 minutes. Add the wine and cook, stirring frequently, until fully absorbed, 4 to 5 minutes.

4. Meanwhile, strain the hot broth through a fine-mesh strainer set over a medium bowl, pressing on the solids to extract as much liquid as possible. Return the strained broth to the saucepan and discard the solids in the strainer; cover the saucepan and set over low heat to keep the broth hot.

5. When the wine is fully absorbed, add 3 cups of the hot broth and half of the reserved squash to the rice. Simmer, stirring every 3 to 4 minutes, until the liquid is absorbed and the bottom of the pan is almost dry, about 12 minutes.

6. Stir in about ½ cup of hot broth and cook, stirring constantly, until absorbed, about 2 minutes; repeat with additional broth 2 or 3 more times, until the rice is al dente. Off the heat, stir in the remaining tablespoon of butter, the Parmesan, sage, and nutmeg. Gently fold in the remaining cooked squash. If desired, add an additional ¼ cup of broth to loosen the texture of the risotto. Serve immediately.

butternut squash risotto 5

apple nut muffin cake

apple muffin cake 6

I wasn’t expecting great things from Pisa, although that wasn’t Pisa’s fault. I had a cold, because I learned the hard way that you have to eat the occasional fruit or vegetable, even on vacation. We had to get up early and rush to the train station, spend 2 hours on a train to get to Pisa, where we had 3 hours before we had to board another train to get to Rome, where I had a suspicion we’d get lost looking for the hotel. I knew it would be worth it to see the iconic Leaning Tower, but I wasn’t looking forward to the trains, the constant concern over my Kleenex supply, or the crowds I assumed surrounded the famous tower.

pisa

But I was wrong. Not about getting lost in Rome, which we did, and not about the need for Kleenex, which lasted for the next few days, but about Pisa having nothing to offer other than a poorly constructed tower and hordes of tourists. Instead, we took a relaxed walk down a lovely street full of bicyclists, shops, and cafes; peeked into a dark, quiet church that was perhaps my favorite of the trip; and detoured to a wonderful street market where, having learned our lesson, we bought some fruit to snack on while I ogled the squash blossoms, giant porcini mushrooms, crates of fresh figs, bins of artichokes, and baskets of uncured olives. Best of all, we found a farmacia that sold six-packs of Kleenex packets – a lifesaver for the 4-hour train ride ahead.

apple muffin cake 1

But that was Pisa and now I’m back in southeast New Mexico, where fresh figs are nowhere to be found, to say nothing of squash blossoms and fresh porcini mushrooms. (They do have Kleenex here, gladly.) So I skipped the fig cake chosen for Tuesdays with Dorie – but here’s the apple cake I missed while traveling.

apple muffin cake 3

I tried to pretty it up by adding streusel, but it melted into the cake and didn’t contribute much more than a delicious sugary crust. Not that the cake needed any help in the taste department, as it was already moist and sweet and pleasantly appley. Next time I’m in Pisa, I’ll pick up some fresh figs to make Dorie’s fig cake with; until then, apple muffin cake will have to do.

apple muffin cake 4

Katrina chose this for Tuesdays with Dorie a few weeks ago, and she has the recipe posted. If you want to add streusel to the top, try this one; the one I used didn’t work very well.  I doubled the salt, as usual, since I like my desserts saltier than Dorie.

One year ago: Apple Pie
Two years ago: Sweet Potato Biscuits
Three years ago: Chocolate Cupcakes

apple muffin cake 7

turkey ricotta meatloaf

turkey ricotta meatloaf 6

Of all the food we ate in Italy, probably the most interesting dishes were made by friends in their home, not ordered in a restaurant. One night, after a first course of spaghetti with tomato sauce, they served thin slices of pork loin (or possibly veal) with a sauce made from canned tuna (which I later found is a traditional Piedmontese dish called vitella tonnato). The next night, we ate trofie al pesto, which Wikipedia claims is the “most symbolic of Genoese meals”, fitting, considering that we were indeed in Genoa.

turkey ricotta meatloaf 1

But it was the main course that night that really impressed me. It was a sort of loaf, which I know doesn’t sound appetizing, but it was wrapped in pancetta, which does sound appetizing. It was light colored and didn’t have the coarse texture of most American meatloaves. I asked about the recipe several days later, but our friend didn’t know what his wife had put into it other than turkey and ricotta.

turkey ricotta meatloaf 3

Searches for turkey ricotta meatloaf didn’t turn up anything that looked similar. The closest I found was a beef meatloaf with ricotta, so I started there, changing the ground beef to ground turkey, skipping the chunks of mozzarella (but keeping some shredded, to increase tenderness), and eliminating the tomato sauce to more closely replicate the one I’d had in Italy.

turkey ricotta meatloaf 4

This meatloaf was not very similar to my friend’s meatloaf. But it was very good regardless, and other than cooking it in a smaller pan to concentrate instead of burn the juices, I wouldn’t do anything differently. Except maybe eat it with friends in Genoa while overlooking the Mediterranean, but that goes without saying.

turkey ricotta meatloaf 8

One year ago: Red Kidney Bean Curry (We had this for dinner twice last week.)
Two years ago: Roasted Butternut Squash Salad with Cider Vinaigrette
Three years ago: Mulled Cider

Printer Friendly Format
Turkey Ricotta Meatloaf (adapted from Lidia Bastianich’s Cooking from the Heart of Italy)

Serves 8

½ cup milk
1 cup stale bread cubes, crusts removed (from 2 slices sandwich bread)
2 pounds ground turkey
2 large eggs
10 ounces ricotta
4 ounces (1 cup) mozzarella, shredded
2 shallots, grated
1 ounce (½ cup) grated parmesan cheese
¼ cup minced parsley
pinch nutmeg
½ teaspoon salt
¼ teaspoon black pepper
8 ounces pancetta, thinly sliced

1. Adjust an oven rack to the middle position; heat the oven to 375 degrees.

2. In a large bowl, mix the milk and bread; set aside for 10 minutes, stirring occasionally. When the bread is saturated with milk, use a fork to mash the mixture until it’s smooth. Add the turkey, eggs, ricotta, mozzarella, shallots, parmesan, parsley, nutmeg, salt and pepper to the bowl with the bread. Use your hands to mix the ingredients until evenly combined.

3. In a 9 by 13-inch pan, shape the meat mixture into a cylindrical loaf shape about 12 inches long. Drape the pancetta slices over the loaf, tucking the slices under the bottom. Cover the pan with aluminum foil.

4. Bake, covered, for 30 minutes. Remove the foil; bake for an additional 45 minutes, until an instant-read thermometer reads at least 170 degrees when inserted into the middle of the loaf. Let the meatloaf rest 10 minutes before slicing and serving with the accompanying juices in the pan.

turkey ricotta meatloaf 7

ginger-jazzed brownies

ginger brownies 5

I wasn’t confident in the ginger / chocolate combo, so rather than make a full batch of potentially less-than-perfect brownies to share at work, I made a just a small portion of the recipe and kept them for myself. Granted, my coworkers will eventually eat nearly anything sugary that finds its way into our kitchen (the same day that I brought in dulce de leche cupcakes, someone put a basket of Twinkies out; the cupcakes went faster, but the Twinkies went), but I have my standards, you know.

ginger brownies 1

I needn’t have worried. The ginger flavor was so subtle as to be essentially invisible. I might have been disappointed by that, but I was so pleased to have a mini-batch of deep chocolately and meltingly tender brownies all to myself that I had no reason to complain.

ginger brownies 2

Clivia, who chose these for Tuesdays with Dorie, has the recipe posted. Except for making only a third of it, I followed it exactly. It resulted in a very good regular brownie. However, if you want your brownies to have any ginger kick, you’ll want to increase the ginger; I would double both the ground and fresh ginger.

One year ago: Caramel Pumpkin Pie
Two years ago: Allspice Crumb Muffins
Three years ago: Pumpkin Muffins

ginger brownies 6

apple cider doughnuts

cider donuts 5

It’s going to be 95 degrees here today, but I’m trying to force it to feel like fall anyway. It isn’t just the temperature; there are no trees here to change colors, the air is always dry and crisp, and the only place to buy pumpkins and apples is the grocery store. I often prefer living in the desert, even with months of over 100-degree days in the summer, but every fall, I miss upstate New York.

cider donuts 2

I especially miss the cider mill I lived near when I was there, which was almost a fall festival of its own, every day. I loved stopping there and choosing one each of six different apple types, which made the best apple pies I’d ever eaten. In the weeks before Halloween, they’d cover most of the lot with pumpkins, not to mention the barrels of squash of every variety. Inside, you could watch them pulp the apples into cider on one side of the building, and on the other, they were frying doughnuts. Brushing fallen sugar off of our shirts after biting into fresh donuts became a yearly tradition.

cider donuts 3

You can’t buy jugs of fresh cider here or the donuts made with it, but I can make my own doughnuts using pulpy storebought apple juice. By reducing the apple cider/juice until it’s syrupy, you can increase the apple flavor of the doughnuts without increasing the stickiness of the dough. Concentrating apple juice and frying apply donuts smells like fall, and, in a pinch, that will have to epitomize the season in the desert.

cider donuts 6

One year ago: Burritos
Two years ago: Green Chile Rellenos
Three years ago: Stuffed Mushrooms with Sun-Dried Tomatoes

Printer Friendly Recipe
Apple Cider Doughnuts (slightly adapted from The Hearth Restaurant via Smitten Kitchen)

Makes 18 doughnuts and 18 doughnut holes

Despite generally being anti-shortening, I tried it for frying this time. However, I wasn’t happy with it; it started smoking well before it reached proper frying temperature. The doughnuts also seemed to absorb more fat than usual.

1 cup apple cider
3½ cups (16.8 ounces) flour, plus additional for the work surface
2 teaspoons baking powder
1 teaspoon baking soda
½ teaspoon ground cinnamon
½ teaspoon salt
⅛ teaspoon ground nutmeg
4 tablespoons (½ stick) butter, at room temperature
1 cup (7 ounces) granulated sugar
2 large eggs
½ cup buttermilk
Vegetable oil or shortening for frying
Topping (optional): ½ cup granulated sugar + 2 teaspoons cinnamon

1. In a small saucepan over medium heat, bring the apple cider to a simmer. Reduce the heat and simmer, uncovered, until reduced to ¼ cup, about 20 minutes. Set aside to cool. Meanwhile, combine the flour, baking powder, baking soda, cinnamon, salt and nutmeg.

2. Using an electric mixer on medium speed (with the paddle attachment, if using a standing mixer), beat the butter and granulated sugar until smooth, 1-2 minutes. Add the eggs, one at a time; continue to beat until the eggs are completely incorporated. Reduce the speed to low and gradually add half of the reduced apple cider and buttermilk, then all of the dry ingredients, then the remaining liquid ingredients, mixing just until combined.

3. Flour two sheets of parchment or wax paper; turn the dough out onto one floured sheet and cover with the second sheet. Roll the dough out to a thickness of ½-inch. Transfer the dough to the freezer until it is slightly hardened, about 20 minutes.

4. Using a floured 3-inch or 3½-inch doughnut cutter (or a round cutter plus a 1-inch round cutter or backside of a piping tip), cut out rings of dough. Place the cut doughnuts and doughnut holes onto one sheet of floured wax paper. Re-roll the scraps of dough, incorporating as little flour as possible. Refrigerate the doughnuts for 20 to 30 minutes.

5. Add oil or shortening to a deep-sided pan to measure a depth of about 3 inches. Heat over medium heat until the oil reaches 350°F. Place a wire rack over a baking sheet.

6. Carefully add three doughnuts and three holes to the oil; fry until golden brown, about 60 seconds. Flip the doughnuts and fry until the other side is golden, 30 to 60 seconds. Drain on the rack for one minute. Dip the top of the warm doughnuts into the cinnamon sugar mixture (if using) and serve immediately.

cider donuts 7

smoked salmon mousse

salmon mousse 6

Having friends with kids when you don’t have kids is tricky. I appreciate being invited to their house for dinner, but I’m not sure how best to reciprocate, especially with people who don’t have family in the area to be built-in babysitters. One solution a friend and I came up with is to have dinner at her house, but split the cooking. That way, we all get to hang out, she doesn’t have to do all of the hostess work, I get to cook, and the kids can still go to bed at their normal time and place.

salmon mousse 2

The last time we did this, we decided to each make a few small dishes rather than one big meal. I had lots of ideas, but nearly all of them were based on carbs, like green chile fettuccine alfredo (which I did make), empanadas, crostini, and California rolls. I settled on cucumber slices to replace the bread in crostini, not to mention add some vegetables to the menu.

salmon mousse 3

Salty smoked salmon is perfect with watery cucumber. Piping stars on the slices is so pretty, and what’s more, the mousse is extremely easy to make – it’s nothing more than blending a few ingredients together in the food processor. With these little bites, I didn’t miss carbs one bit. In fact, the only people who didn’t like these were the kids.

salmon mousse 4

One year ago: Roasted Vegetable Bean Soup
Two years ago: Applesauce Snack Cake
Three years ago: Spinach Artichoke and Red Pepper Strata

Printer Friendly Recipe
Smoked Salmon Mousse (adapted from Annie’s Eats and allrecipes)

Makes about 25 appetizers

3 ounces smoked salmon
4 ounces cream cheese, softened
1 teaspoon lemon juice
1 teaspoon fresh minced dill
Black pepper

Place the smoked salmon in a blender or food processor; blend until smooth. Add the remaining ingredients and blend to desired consistency. To serve, pipe the mousse onto cucumbers slices or crackers, or serve as a dip.

salmon mousse 7

basic biscuits

flaky biscuits 2

I just got back from two weeks in Italy, which I spent eating: croissants for breakfast, baskets of bread for lunch and dinner (and not a whole grain in sight), wine with lunch and dinner, gelato at least once a day, and so on and so on and so on. And guess what? I came home exactly the same size I was when I left.

flaky biscuits 1

I wish I could use this as justification to throw all of my healthy eating ideals to the wind (I accidentally typed “wine” at first – I’m still in vacation mode) and just eat what I want to eat. And maybe I could, if I spent hours upon hours walking in my normal life, walking until my feet ached and then ached more, and then they kept aching hours after I’d stopped walking. Instead, I spend hours upon hours of my normal life sitting at a computer, both at work and at home, and that, my friends, is the difference.

flaky biscuits 5

Biscuits, and their buttery bready cousins croissants and scones, become a weekend treat. Usually I make biscuits to sandwich with eggs and ham for breakfast, but occasionally I serve them alongside crab cakes for dinner. But just occasionally. If only my normal life burned as many calories as my vacation life, I could – and would! – eat biscuits almost every day.

flaky biscuits 4

Jennifer chose these for Tuesdays with Dorie, and she has the recipe posted. I…made no changes? Maybe? I don’t know, I made these a while ago. It seems likely that I followed the recipe exactly, except I definitely used the cake flour option, because I love how light biscuits are when they’re made with cake flour.

One year ago: Fold-over Pear Torte
Two years ago: Split-Level Pudding
Three years ago: Lenox Almond Biscotti

flaky biscuits 3

chewy brownies

chewy brownies 3

I’m going to put this right out there: I didn’t absolutely love these brownies. The whole goal of this recipe is to mimic the chewiness of boxed brownies, and…eh. I don’t need that texture. I don’t mind it; I just won’t sacrifice flavor for it. Plus I think that the fudgy-cakey balance of my favorite brownie recipe is perfect.

chewy brownies 2

The problem, and it’s one that just keeps getting more frustrating, is the availability of ingredients in my small town. My favorite brownie recipe calls for unsweetened chocolate, and the only brand available within a hundred miles of where I live is Baker’s. I’ve noticed that the flavor of brownies baked with Baker’s chocolate is muted.

So, I needed a recipe that wasn’t based entirely on unsweetened chocolate. (I did have a few ounces leftover from my last trip to a big city.) This one uses a combination of unsweetened chocolate, cocoa, and bittersweet chocolate.

chewy brownies 1

The trick to getting that boxed brownie chew is substituting oil for some of the butter called for in most brownie recipes. These brownies, though, were intensely gooey. Not bad, by any means; my coworkers raved. But my coworkers have never had my favorite brownie recipe, which has a more intense chocolate flavor and isn’t so weighed down by oil. I guess I need to stock up on unsweetened chocolate next time I visit the big city.

chewy brownies 4

One year ago: Palmiers
Two years ago: Bran Muffins
Three years ago: Pain Ordinaire

Printer Friendly Recipe
Chewy Brownies (from Cooks Illustrated)

Makes 24 brownies

⅓ cup Dutch-processed cocoa
1½ teaspoons instant espresso (optional)
½ cup plus 2 tablespoons boiling water
2 ounces unsweetened chocolate, finely chopped
4 tablespoons (½ stick) unsalted butter, melted
½ cup plus 2 tablespoons vegetable oil
2 large eggs
2 large egg yolks
2 teaspoons vanilla extract
2½ cups (17.5 ounces) sugar
1¾ cups (8.75 ounces) all-purpose flour
¾ teaspoon salt
6 ounces bittersweet chocolate, cut into ½-inch pieces

1. Adjust an oven rack to the lowest position and heat the oven to 350 degrees. Line a 9×13-inch baking pan with foil, leaving about a one-inch overhang on all sides. Spray with nonstick cooking spray.

2. Whisk the cocoa, espresso powder, and boiling water together in large bowl until smooth. Add the unsweetened chocolate and whisk until the chocolate is melted. Whisk in the melted butter and oil. (The mixture may look curdled.) Add the eggs, yolks, and vanilla and continue to whisk until smooth and homogeneous. Whisk in the sugar until fully incorporated. Add the flour and salt and mix with a rubber spatula until combined. Fold in the bittersweet chocolate pieces.

3. Scrape the batter into the prepared pan and bake until a toothpick inserted halfway between the edge and the center comes out with just a few moist crumbs attached, 30 to 35 minutes. Transfer the pan to a wire rack and cool 1½ hours.

4. Using the foil overhang, lift the brownies from the pan. Return the brownies to a wire rack and let cool completely, about 1 hour. Cut into 2-inch squares and serve. The brownies can be stored in an airtight container at room temperature for up to 4 days.

chewy brownies 6

perfection pound cake

(The reason I’m talking about pound cake and not this week’s chosen recipe is because I’m off gallivanting around Italy and have been since before this month’s recipes were chosen.)

(Sorry to brag!)

perfection pound cake 4

I’m under no illusions that pound cake is easy despite its simple ingredients. In fact, it’s just the opposite – without any fancy flavors spicing things up, there’s no disguising an imperfect texture. After struggling with a traditional pound cake recipe that kept baking up too dense, I finally gave up and moved on to one in which the egg whites are whipped separately, which is the only leavener in the recipe. It guarantees a light texture without drying out the cake.

perfection pound cake 0

The majority of blog entries on Dorie’s recipe, which uses baking powder as the leavener, mention that it’s dry. I was tempted to tweak the ingredients to remedy any potential problems, but instead, I made the recipe exactly, following my best baking procedure – butter that’s soft but not too soft, all ingredients at room temperature, gradually adding each new ingredient, sifting the flour and gently folding it in rather than letting the mixer do the work (and potentially overmix the dough). But with ½ to ¾ cup more flour in this compared to my other recipes for the same amount of butter, and ¼ cup less sugar, I was worried that it was hopeless. If nothing else, I figured, pound cake is my absolute favorite thing to bake, so I wouldn’t be sad if it wasn’t perfect in the end.

perfection pound cake 2

And while it may not have been as moist as my favorite pound cake, it wasn’t dry. It was dense, but that isn’t necessarily a bad thing for a cake like this. And it tasted just like pound cake should – like sweet butter with a hint of caramel from the browned edges. In the end, I would call this a success.

perfection pound cake 6

One year ago: Double Apple Bundt
Two years ago: Chocolate-Crunched Caramel Tart
Three years ago: Caramel Peanut-Topped Brownie Cake

Printer Friendly Recipe
Perfection Pound Cake (from Dorie Greenspan’s Baking: From my Home to Yours)

I used cake flour, and I strongly recommend that you do as well. As I show at the end of this entry, cake flour makes a lighter, more tender pound cake. I did not put the loaf pan on sheet pans during baking, because that trick tends to result in under-risen cakes for me. This could have resulted in a shorter cooking time – I took the cake out of the oven at 60 minutes, when it was golden brown and a toothpick came out dry.

2 cups (9.6 ounces) all-purpose flour (or 2¼ cups (9 ounces) cake flour)
1 teaspoon baking powder
¼ teaspoon salt
16 tablespoons (2 sticks) unsalted butter, at room temperature
1 cup (7 ounces) sugar
4 large eggs, at room temperature
1 teaspoon pure vanilla extract

Getting Ready:
Center a rack in the oven and preheat the oven to 325 degrees F. Butter a 9×5-inch loaf pan or an 8½ by 4½-inch loaf pan. Put the pan on an insulated baking sheet or on two regular baking sheets stacked one on top of the other.

Whisk together the flour, baking powder, and salt.

Working with a stand mixer, preferably fitted with a paddle attachment, or with a hand mixer in a large bowl, beat the butter and sugar on high speed until pale and fluffy, a full 5 minutes. Scrape down the bowl and beater and reduce the mixer speed to medium. Add the eggs one at a time, beating for 1 to 2 minutes after each egg goes in. As you’re working, scrape down the bowl and beater often. Mix in the vanilla extract. Reduce the mixer speed to low and add the flour, mixing only until it is incorporated – don’t overmix. In fact, you might want to fold in the last of the flour, or even all of it, by hand with a rubber spatula. Scrape the batter into the buttered pan and smooth the top.

Put the cake into the oven to bake, and check on it after about 45 minutes. If it’s browning too quickly, cover it loosely with a foil tent. If you’re using a 9×5-inch pan, you’ll need to bake the cake for 70 to 75 minutes; the smaller pan needs about 90 minutes. The cake is properly baked when a thin knife inserted deep into the center comes out clean.

Remove the cake from the oven, transfer the pan to a rack and let rest for 30 minutes.

Run a blunt knife between the cake and the sides of the pan and turn the cake out, then turn it right side up on the rack and cool to room temperature.

Storing:
Wrapped well, the cake will keep for 5 to 7 days at room temperature (stale cake is great toasted) or up to 2 months in the freezer.

perfection pound cake 3