Archives for July 2012

honey ice cream

honey ice cream 4

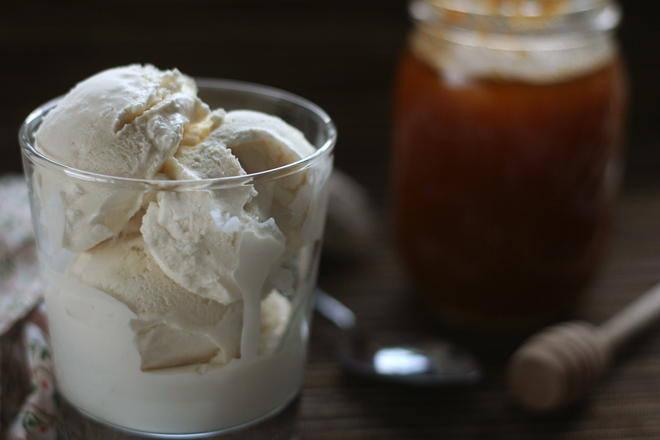
I’m a big fan of sweeteners that are more than just sweet. Sometimes granulated sugar is exactly what you want, when you’re sweetening something subtle, like a snickerdoodle where the sour flavor from cream of tartar is so important, or where you don’t want the sweetener to distract from the main event, like in almost anything chocolate. Other times, it’s fun to let the sweetener itself play the main role, and nothing does that better than honey. Except for maybe maple syrup.

honey ice cream 1

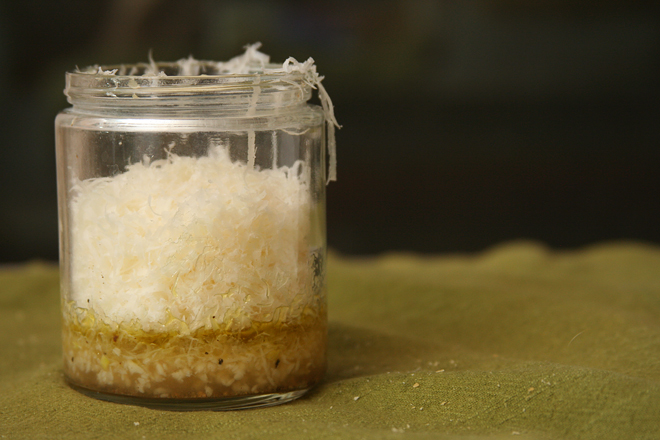
I’ve built up a bit of a honey collection over the last couple years, from craft fairs, the local natural food store, and my boss’s beekeeping hobby. While I would have loved to use the slightly smoky flavored mesquite honey my boss gave me, it’s still in the waxy honeycomb. Instead, I used up the last of an unlabeled jar I picked up last year at a honey tasting stand.

honey ice cream 2

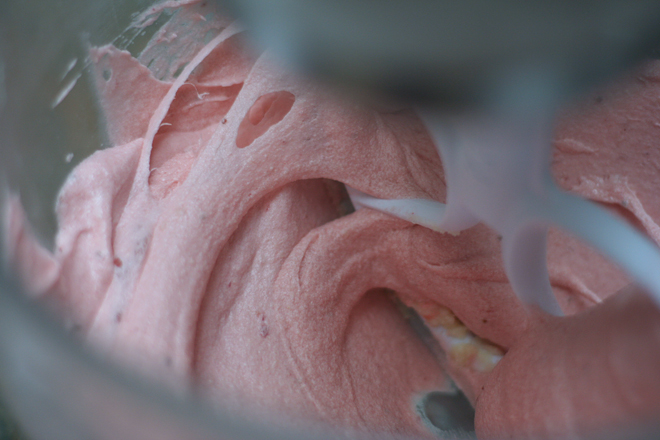
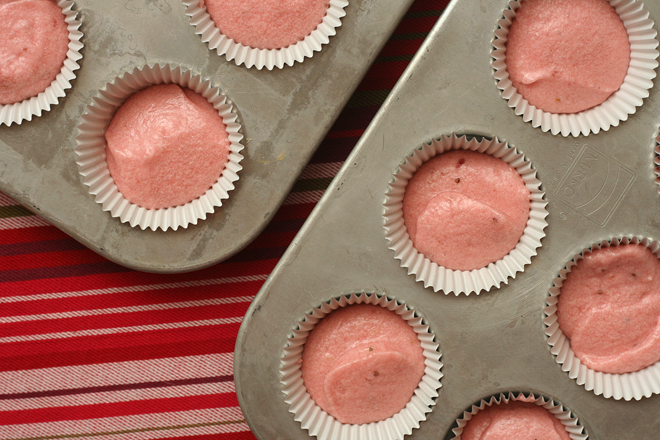
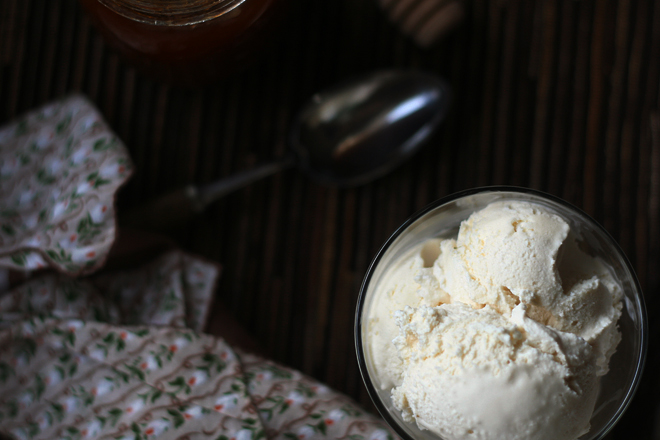
Molly said the half cup of honey for a quart of ice cream that the original recipe called for was overpowering, so I went with 6 tablespoons, and it was perfect. The honey flavor doesn’t slap you in the face, but it doesn’t hide either. It’s just the right balance of honey and cream. Next up: maple syrup ice cream.

honey ice cream 5

One year ago: Chocolate Sorbet
Two years ago: Lemon Curd Tart
Three years ago: Puff Pastry Dough
Four years ago: Soba Salad with Feta and Peas

Printer Friendly Recipe
Honey Ice Cream (adapted slightly from Alice Medrich’s Pure Dessert via Orangette)

Makes about 1 quart

I’m assuming that scalding the milk has a point, but I don’t know what it is.

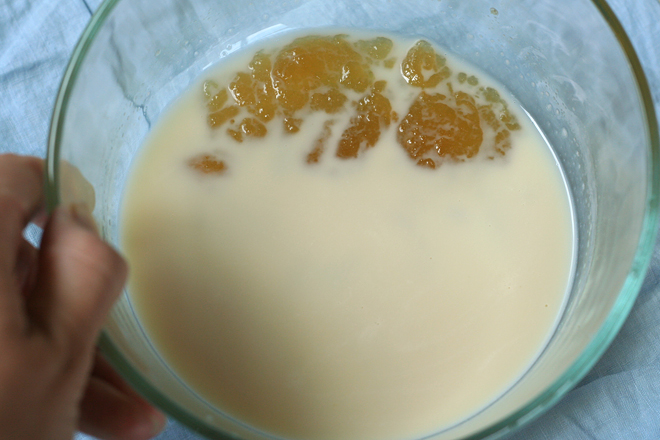
My honey was slightly crystallized, which may be why it took a while to dissolve into the milk, but with some vigorous whisking, it did eventually mix in evenly.

½ cup whole milk
6 tablespoons honey
⅛ teaspoon salt
2 cups heavy cream

1. In a small saucepan over medium heat, heat the milk until it begins to steam and bubbles form around the edge of the pot. Remove it from the heat and let it cool.

2. Whisk the honey and salt into the milk until dissolved. Add the cream. Cover and refrigerate to thoroughly chill, at least 2 hours or up to overnight.

3. Churn until it’s at least as thick as soft serve ice cream, 15 to 20 minutes. Transfer to a chilled container; freeze at least 2 hours before serving.

honey ice cream 7

paella

paella 8

I will always associate paella with the group of friends I hung out with in graduate school. We all enjoyed good food and good drinks, so whenever we got together, everyone would bring food and wine to share. One of my friends was from Spain, and he made paella at several of these get-togethers. Of course, it was fully authentic, cooked in a paella pan set on a tripod over an open flame. The smoked paprika, saffron, roasted red peppers, and rice came directly from Spain, picked up on his latest trip home to visit his parents. Sitting around the fire in my friends’ backyard, drinking good wine and eating paella is one of my most vivid food memories.

paella 1

I knew that cooking paella in a Dutch oven on the grill wouldn’t be the same, but I was hoping for just a twinge of that taste, that memory. That’s why I insisted on cooking it outside on the grill instead of using the much easier option of the stove and oven. Maybe it would pick up a hint of smokiness from the coals, but it was more than just the flavor I was after, it was that feeling.

paella 2

I got some of each. With the cast iron Dutch oven, the one Dave and I have taken camping for the last ten years, heated over coals on the grill, I got some of the fun of cooking outdoors. Dave sat outside with me with a glass of wine and let me babble on about different rice dishes in cultures around the world.

paella 3

The food was good, but I need some paella practice before it’ll be up to the standards of what I remember. The biggest mistake I made was preventing the formation of a soccarat, a layer of crusty bits on the bottom of the pan, which is one of the best parts of paella. Letting rice stick to the bottom of the pan goes against years of rice-cooking training, and I ended up adding too much liquid, making a wetter, saucier paella. I also think I’ll leave out the tomatoes next time. They were included in a number of the paella recipes I looked at, but it’s not a flavor I associate with paella.

paella 6

Overall, it was a successful meal, in that I had fun making it and it tasted good. But next time, I’ll use the lessons I learned, like not stirring the rice and leaving out the tomato, and my paella will be that much better. However, I doubt it’ll ever taste as good as one cooked over a fire in a paella pan while enjoying the company of good friends.

paella 10

One year ago: Bruschetta with Chickpea Puree
Two years ago: Grilled Potato and Vegetable Salad
Three years ago: Casatiello
Four years ago: Soba Salad with Feta and Peas

Printer Friendly Recipe
Paella (adapted from Cooks Illustrated, Alton Brown, the New York Times, Leite’s Culinaria, and About.com)

Most of my problems came from not following this method, adding more liquid and stirring more often because I was worried about the rice cooking unevenly. However, it should be noted that the recipe given here has not been perfected.

The recipe specifically refers to charcoal grilling methods, but I think it could be easily adapted to a gas grill.

4 cups water
8 ounces shrimp, peeled, shells reserved
1 onion, half sliced, half diced
2 garlic cloves, 1 sliced, 2 minced
1 small bay leaf
1 large thyme sprig
salt and pepper
1 pounds chicken legs and/or thighs, bone-in, skin-on
2 tablespoons olive oil
1 red pepper, diced
½ teaspoon smoked paprika
¼ teaspoon crumbled saffron
1 cup short-grain rice, preferably Bomba
7 ounces canned diced tomatoes with juice
2 tablespoons white wine
½ cup peas

1. In a medium-size pot over medium-high heat, bring the water, shrimp shells, sliced onion, sliced garlic, bay leaf, thyme sprig and 1 teaspoon salt to a boil. Reduce the heat to medium and simmer for about 30 minutes. Strain, discarding the solids. Return the broth to the saucepan, cover, and keep warm over low heat.

2. Combine the shrimp with 2 teaspoons olive oil, the minced garlic, ¼ teaspoon paprika, and a pinch of teaspoon salt. Mix well to coat with seasonings and let marinate at least 15 minutes or up to 1 hour.

3. Light about 2 quarts of charcoal briquettes; once the briquettes are lightly covered with gray ash, spread them over the bottom grate of the grill, then top with another 2 quarts of unlit coals.

4. Heat a 10-inch cast-iron skillet or Dutch oven directly over the coals. Add the shrimp and cook, without moving, until browned and pink on one side, 30 seconds to a minute. Flip the shrimp to brown the second side. Transfer to a plate.

5. Season the chicken generously with salt and ground black pepper. Add 1 tablespoon of olive oil to the hot skillet (or Dutch oven). Add the chicken, skin-side down, and cook with moving until the bottom is deeply browned, 3-4 minutes. Turn each piece of chicken to brown the other side. Transfer the browned chicken to a plate. (Because the chicken is mostly raw and the shrimp is cooked and will only be briefly reheated, don’t put them on the same plate.)

6. Add the diced onion, red pepper, and a pinch of salt to the skillet; sauté, stirring frequently, until softened and lightly browned, 8-10 minutes. Add the saffron and remaining ¼ teaspoon paprika and cook, stirring constantly, until fragrant, about a minute.

7. Add the rice, stirring well to coat with the onion mixture. Add the tomatoes, wine, half of the hot shrimp broth, ½ teaspoon salt, and the browned chicken. Bring to a brisk simmer, stirring once. Simmer, uncovered, until most of the broth has been absorbed, about 10 minutes.

8. Add the remaining broth and cook for an additional 10 minutes. Turn off the heat and arrange the peas and shrimp over the surface of the rice in one layer. Cover the pan with a clean dish cloth. Let the rice rest for 10 minutes before serving.

paella 9

strawberry champagne cupcakes

strawberry champagne cupcakes 5

I loved how these cupcakes came out, but still, I’m not so sure about this idea of baking with champagne. On the one hand, it certainly sounds fun and fancy, doesn’t it? On the other, it’s awfully hard to get the flavor of alcohol to come through after a dessert is baked, so adding something as pricey as champagne to cupcake batter is quite a splurge.

strawberry champagne cupcakes 1

Sure enough, I couldn’t taste the splash of champagne that I added to the cupcake batter. On the other hand, the full cup of champagne that I reduced to just 2 tablespoons and then added to the frosting, that flavor was very evident. It made the powdered sugar-based icing, which can often seem overwhelmingly sweet, tangy.

strawberry champagne cupcakes 2

Between the champagne cake, the champagne frosting, and the glass of champagne I drank to finish the bottle, my favorite was the pure bubbly liquid, but I couldn’t bring that to work for a coworker’s bridal shower. In that setting, the only way to include champagne is in dessert, which makes strawberry champagne cupcakes the perfect festive, not to mention delicious, way to celebrate, even if it is a splurge.

strawberry champagne cupcakes 4

One year ago: Tapioca Pudding (comparison of 3 recipes)
Two years ago: Stuffed Squash Flowers
Three years ago: Brioche Plum Tart
Four years ago: Pain a l’ancienne

Printer Friendly Recipe
Strawberry Champagne Cupcakes (adapted from Sky High’s strawberry cake and Cook’s Illustrated’s white cake recipes)

Makes about 36 mini cupcakes or 12 regular cupcakes

2 egg whites, at room temperature 6 tablespoons unsalted butter, at room temperature
½ cup (3 ounces by weight) strawberries, pureed
3 tablespoons champagne
½ teaspoon vanilla
1 drop red food coloring
1 cup + 2 tablespoons (4.5 ounces) cake flour
¾ cup (5.25 ounces) granulated sugar
1½ teaspoons baking powder
½ teaspoon table salt

1. Adjust a rack to the middle position and heat the oven to 350 degrees. Line muffin wells with paper cups. In a large measuring cup, beat the egg whites, strawberry puree, champagne, vanilla, and food coloring.

2. In the bowl of a stand mixer fitted with the paddle attachment (or a large mixing bowl if using a handheld mixer), whisk together the flour, sugar, baking powder, and salt. Add the butter; beat at slow speed until the mixture resembles coarse crumbs. With the mixer running, pour in the strawberry mixture and continue to beat on medium speed (or high speed if using a handheld mixer) for 2 minutes, stopping to scrape the bowl once or twice.

3. Divide the batter evenly between the prepared muffin cups.  Bake until a toothpick inserted into the center of a cupcake comes out dry, 11-14 minutes for mini cupcakes or 18-24 minutes for regular cupcakes.  Transfer the pan(s) to a wire rack to cool for about 5 minutes, then remove the cupcakes from the pan.  Let cool completely before frosting.

Champagne Buttercream (slightly adapted from Love and Olive Oil)

Makes enough to frost about 36 mini cupcakes or 12 regular cupcakes

A few comments on the original recipe note that their champagne reduction came out bitter, which seemed to be a result of using dry (brut) champagne. Stick to a sweeter champagne like demi-sec to avoid this.

1 cup demi-sec champagne
8 tablespoons (1 stick) unsalted butter, at room temperature
pinch salt
2½ to 3 cups (10-12 ounces) confectioners’ sugar

1. In a small saucepan over medium-high heat, bring the champagne to a simmer.  Reduce the heat to medium and simmer until the champagne is reduced to 2 tablespoons, 15-20 minutes.  Set aside to cool to room temperature.

2. In a stand mixer fitted with the whisk attachment (or a large bowl if using a handheld mixer), beat the butter and salt on medium speed until smooth.  Reduce the mixer speed to low and slowly add the sugar, then increase the mixer speed to high and beat until the mixture is light and fluffy, about 5 minutes.  Reduce the mixer speed to medium and slowly add the reduced champagne, mixing just until combined.

strawberry champagne cupcakes 6

kale salad with garlic vinaigrette

kale salad 5

I made this for the first time a couple months ago, and I made the salmon salad for the first time just a couple weeks ago. If I had gotten around to telling you about this one before I told you about the other, I would have labeled this as my new favorite salad (although this other one is close, but that’s not fair because it has goat cheese in it). Now the Mediterranean salmon salad has stolen that title, but this kale salad is certainly my favorite side salad.

kale salad 1

I’m rarely a fan of side salads. Usually I think of them as nothing more than a distraction from what I really want, which is the carbs and sauce they often accompany.  I eat them, because vegetables are important, but I don’t get much enjoyment from them.

kale salad 2

Maybe if the average side salad involved generous amounts of garlic and parmesan cheese, I’d feel more generouos toward it.  Crunchy pine nuts don’t hurt either.  All of those strong flavors need something hearty to stand up to them, and kale is the answer.  I like to spend a few minutes massaging the dressing into the kale to soften the raw leaves.  I have to admit, I still usually serve this before the main course, and not alongside it, but it holds its own compared to the best of carbs and sauce.

 kale salad 4

One year ago: Slow-Cooker Spinach Mushroom Lasagna
Two years ago: Tacos al Pastor
Three years ago: Dried Fruit Compote
Four years ago: Sautéed Shredded Zucchini

Printer Friendly Recipe
Kale Salad with Garlic Vinaigrette (adapted from Confections of a Foodie Bride)

4 servings

The amount of oil you add is somewhat a matter of personal taste. The amount listed will result in a balanced vinaigrette. However, I can’t stomach the thought of 2 tablespoons of oil per serving in a salad and I don’t mind tart dressings, so I use substantially less, just a couple of tablespoons total.

4 cloves garlic, minced or pressed through a garlic press
4 tablespoons lemon juice
1 tablespoon white wine vinegar
½ cup extra virgin olive oil
½ cup (1 ounce) grated parmesan
¼ teaspoon salt
pinch ground black pepper
2 bunches kale, cut into bite-sized pieces
½ cup pine nuts, toasted
parmesan, shaved (for garnish)

1. Add the garlic, lemon juice, white wine vinegar, salt, and black pepper to a bowl and whisk to combine. Let stand at least 15 minutes, or, for a stronger garlic flavor, cover and refrigerate the mixture overnight. Just before serving, slowly pour in the olive oil while whisking constantly. Stir in the grated parmesan.

2. Transfer the kale to a large bowl. Add about half of the dressing and toss to combine. Using your hands, massage the dressing into the kale by lightly squeezing and tossing the kale until it softens and begins to wilt. Taste, adding more dressing if necessary. Garnish with toasted pine nuts and shaved parmesan; serve.

kale salad 3

mediterranean salmon salad

mediterranean salmon salad 6

This salad ended up being something really special, one of those that I raved about all through dinner. But I can’t pinpoint exactly what made it stand out so much. I like all the ingredients, quite a bit actually, but I could say the same for a lot of salads that I like but don’t gush over like I did this one.

mediterranean salmon salad 1

It might have been the wild sockeye salmon my store has been stocking, or the fancy block of feta. You can rarely go wrong with artichoke hearts and quinoa. I was worried the bite of raw onion would be distracting, but it blended in perfectly, and the occasional briny kalamata olive was a treat (for me; not so much for Dave the olive-hater). I think I have a new favorite salad.

mediterranean salmon salad 3

One year ago: Peaches and Cream Scones
Two years ago: Mint Brownies
Three years ago: Crockpot Chicken Broth
Four years ago: Chicken with Forty Cloves of Garlic

Printer Friendly Recipe
Mediterranean Salmon Salad (adapted from Weekly Bite via Prevention RD)

Serves 4

Dressing:
3 tablespoons red wine vinegar
2 tablespoons extra virgin olive oil
1 teaspoon mustard
salt and pepper to taste

Salad:
1 cup uncooked quinoa, rinsed
salt
24 ounces (1½ pounds) salmon filet
oil
8 cups spring mix, lightly packed
½ cup kalamata olives, halved
1 small red onion, thinly sliced
1 (14-ounce) can marinated quartered artichoke hearts, drained
1 cup (4 ounces) crumbled feta

1. In a small bowl, whisk all of the dressing ingredients together.

2. Bring 1 1/4 water and 1/4 teaspoon salt to a boil in a medium saucepan. Add the quinoa, reduce the heat to low, and cover; cook for 15 minutes, then remove the pan from the heat and let set, still covered, for another 10 minutes. Add 2 tablespoons of the dressing, using a fork to fluff the quinoa and evenly distribute the dressing.

3. Adjust an oven rack to the top position, about 3 inches from the broiler. Line a baking sheet with aluminum foil. Transfer the salmon to the foil-lined pan; season with salt and either spray or brush with a light layer of oil. Broil until the salmon is lightly browned and opaque in the center, about 10 minutes. Remove from the oven and let rest for a few minutes, then use two spoons to flake the salmon flesh into bite-sized pieces, leaving the skin stuck to the foil. Toss the flaked salmon with 1 tablespoon of dressing.

4. Add the lettuce to a large bowl; pour the remaining dressing over it and toss to evenly distribute. Mix in the quinoa, salmon, olives, onion, artichokes, and feta. Serve immediately.

mediterranean salmon salad 4

bacon mushroom breakfast skillet

bacon mushroom skillet 5

I’m pretty sure there was a time, not even that long ago, when I would make complicated breakfasts every weekend morning. (Well, every weekend morning that I wasn’t baking scones straight from the freezer.) I vaguely remember asking myself, while surrounded by dirty dishes, why I did this to myself. But the next weekend I’d be back in the same place, always unable to resist a shiny new recipe.

bacon mushroom skillet 1

Probably I’ll swing around to that phase again, but for now, I’m loving simple breakfasts – things that only briefly keep me away from drinking coffee while mindlessly surfing the internet. Even these quick meals are a lot more complicated than the yogurt and frozen berries I spend five minutes blending together every morning before work, so they’re still a treat.

bacon mushroom skillet 3

In this case, it’s a simple matter of cooking bacon and mushrooms, topping them with eggs (poached, fried, your choice; I chose fried because it’s easier), mixing in some spinach just until it softens, and if you want to get fancy, you can add a slice of toast.  I love the earthiness of the mushrooms and spinach combined with bacon, and getting in a serving of vegetables for breakfast is a great way to start the day.  But what makes me the happiest is that I get all that in well under half an hour, so I can get on with the rest of my weekend, whether than means working out, relaxing in the backyard, or spending all day messing up the kitchen with other projects.

bacon mushroom skillet 6

One year ago: Thai Grilled Beef Salad
Two years ago: Basic Pancakes
Three years ago: Brioche
Four years ago: Salad with Herbed Baked Goat Cheese

Printer Friendly Recipe
Bacon Mushroom Breakfast Skillet (adapted from Tyler Florence Family Meal via Joy the Baker)

I did not wilt the spinach for the pictures, but I should have.

Serves 4

4 slices bacon, coarsely chopped
2 cup (8 ounces) cremini or button mushrooms, halved or quartered if large
1 cup oyster mushrooms, coarsely chopped
6 to 8 eggs
salt
ground black pepper
2 cups spinach leaves

1. In a medium skillet over medium heat, cook the bacon until crisp.  Using a slotted spoon, transfer the bacon to a paper towel-lined plate.

2. Pour off all but about 1 tablespoon of fat from the skillet.  Add the mushrooms, increase the heat to medium-high, and cook, stirring occasionally, until brown, 8-10 minutes.

3. Meanwhile, heat about 1 tablespoon of bacon fat to a large nonstick skillet over medium-low heat. Add the eggs (I crack them into small dishes first), season with salt and pepper, cover the pan, and cook until the whites are set and the yolks are soft (or however you like your eggs), about 5-7 minutes.

4. When the eggs are ready, add the spinach and the cooked bacon to the mushrooms. Cook, stirring constantly, until the bacon is warm and the spinach just wilts, about a minute.  Serve, with the eggs, immediately.

bacon mushroom skillet 4

strawberry white chocolate brownies

strawberry white chocolate brownies 9

I know white chocolate isn’t as sexy as its darker sibling, but I think it has its own charm. It’s not much beyond sweet and soft, which could be boring, but you can use those traits to the advantage of the treat you’re making with it. Mixed into a batter, it adds a little more interest than plain white sugar would, although I think you’d be hard-pressed to pick out the white chocolate flavor if you didn’t know it was there.

strawberry white chocolate brownies 5

That being said, while I expected these to turn out quite nice, they exceeded my expectations. I reduced the sugar from the original recipe, suspecting that the white chocolate would contribute plenty of sweetness, and that, combined with an extra dose of salt, resulted in the perfect balance. Bright, juicy strawberries added a welcome flavor and texture contrast. Forced to choose between these and my favorite dark chocolate brownies would be a tough call, but these tamer white chocolate brownies would stand a good chance.

strawberry white chocolate brownies 6

One year ago: Pizza Bianca with Goat Cheese and Greens
Two years ago: Garlic Mustard Glazed Skewers
Three years ago: Tribute to Katharine Hepburn Brownies
Four years ago: Vanilla Ice Cream

Printer Friendly Recipe
Strawberry White Chocolate Brownies (adapted from Love and Olive Oil)

Makes 16 squares

1 cup (4.8 ounces) all-purpose flour
¼ teaspoon baking powder
⅓ teaspoon salt
5 ounces white chocolate, chopped fine
5 tablespoons butter, cut into ½-inch cubes
½ cup (3.5 ounces) sugar
1 teaspoon vanilla
2 eggs
4 ounces strawberries, hulled and quartered

1. Adjust a rack to the middle position and heat the oven to 350 degrees. Line the bottom and sides of an 8×8 baking pan with parchment paper, leaving a slight overhang. In a medium bowl, whisk the flour, baking powder, and salt together.

2. Set a heatproof bowl over a saucepan containing one inch of simmering water. Add the chocolate and butter; stir frequently until the mixture is melted and smooth, then remove from the heat. Whisk in the sugar (the mixture will appear curdled), then add vanilla and the eggs one at a time, whisking constantly.

3. Switch to a rubber spatula and add the flour mixture, stirring until just combined. Gently fold in the strawberries. Pour the batter into the prepared pan, spreading it into an even layer.

4. Bake the brownies for 25 to 30 minutes, or until the top is lightly golden and a toothpick inserted near the center comes out clean. Transfer the pan to a wire rack; cool completely. Use the parchment paper to lift the bars out of the pan and cut into 2-inch squares. (The brownies can be stored in an airtight container in the refrigerator for up to 3 days.)

strawberry white chocolate brownies 8

summer chopped salad with feta

summer chopped salad with feta 7

I wore out coleslaw. It was too convenient and easy and good and healthy, so I made it whenever we had pulled pork or burgers or barbecue. And that was fine for a while, for over a year, in fact, but now I’ve had enough. I needed something new to catch my fancy.

summer chopped salad with feta 1

I found it. This is my new favorite side salad for a number of reasons. For one thing, it passes the no-lettuce test; delicate lettuce-based salads seem so out of place next to a hearty burger. It goes without saying that a side salad should be healthy and easy, and this one is.

summer chopped salad with feta 3

And maybe most importantly, it’s adaptable. I’ve been making coleslaw nearly the exact same way for well over a year, but this salad can be made with different vegetables, different types of citrus juice, and different seasonings to match the meal you’re serving it with. The original recipe used lime juice and cumin for a southwestern vibe, but I wanted something more Mediterranean, so I went with lemon juice this time.  It went perfectly with spareribs.  Coleslaw has been relegated from my favorite summer side to just my favorite pulled pork topping.

summer chopped salad with feta 6

One year ago: Chocolate Chocolate Chunk Muffins
Two years ago: Tarte Noire
Three years ago: Seafood Lasagna
Four years ago: Salmon Clubs with Avocado Butter

Printer Friendly Recipe
Summer Chopped Salad with Feta (adapted from Smitten Kitchen)

Serves 8 as a side dish

I steamed the green beans for about 1 minute, then did not blanch them (dip them into ice water to stop the cooking). If you do plan to blanch your beans, cook them for another minute or two. My beans looks olive green instead of bright green in the photos because I took these pictures the day after I made the salad, and the citrus juice had darkened the beans.

16 ounces green beans, lightly cooked, chopped into ¼-inch pieces
2 cups (7 ounces) radishes, halved and thinly sliced
1 hothouse or 3 English cucumbers (5 ounces total), halved lengthwise and sliced
4 scallions, thinly sliced
1 cup (4 ounces) crumbled feta
¾ cup toasted sunflower seeds, salted or unsalted
¼ cup fresh lemon juice
½ teaspoon salt
freshly ground black pepper, to taste
2 tablespoons thinly sliced fresh mint leaves
2-4 tablespoons extra virgin olive oil

Mix everything except the olive oil.  Add the oil and more salt to taste.

summer chopped salad with feta 8

radiation sugar cookies

radiation cookies 8

If I don’t often talk about what I do for a living, it’s because it’s hard to explain. I don’t have one of those jobs that you can name in one word and people will get at least some idea of how you spend your days, like being a teacher or nurse or accountant or engineer. My official title is either Scientist 2 or Difficult Waste Expert.

radiation symbol

If I say I work with nuclear waste, you might start to picture Homer Simpson’s job, but mostly I work in an office with spreadsheets. Our official task is to come up with ways to get radioactive waste (stuff mostly left over from the Cold War; not spent nuclear fuel) safely disposed of. There is a radioactive waste repository near my town, half a mile underground in a salt deposit, but I never have any reason to go out there.

radiation containment suit

Even so, my coworkers and I are trained on what the radiation symbol looks like, including the colors – yellow and magenta, at least until you run out of magenta icing, and then black is acceptable. Not even one of the thirty or so people in my office have been required to wear hazmat suits for our current positions, but the idea was too cute to pass up.

radiation cookies 10

I was worried my nuclear containment guys would end up looking like yellow astronaut teddy bears, but I think I got the point across. Other than one manager who thought they might be eskimos, my coworkers loved these. And after another long day looking at computers, trying to make tiny steps toward solving the country’s nuclear waste problem, a distraction in the form of cute cookies is something we could all use.

One year ago: Baked Eggs in Mushrooms with Zucchini Ragout
Two years ago: Vanilla Bean Cupcakes
Three years ago: Sourdough Bagels
Four years ago: Apple Cheddar Scones

migas

migas 9

I’ve been raving about migas since the first time I made them, several months ago. They’re such a perfect breakfast for me that I’ve had them almost every weekend since. Somewhere along the way, after I talked my brother into making them, he pointed out that they’re basically just scrambled eggs.

migas 1

Which is true, and in a way, sums up what it is I love about them – their simplicity. Scrambled eggs is not a complicated breakfast, so that must mean that migas are also not a complicated breakfast. And beyond that, it’s healthy and filling and flexible.

migas 3

The recipe I’ve given here is one of my favorite ways to make it, and the simplest way I like it. First, I bake lightly oiled corn tortillas until browned. I tried frying them once, but since baking results in crisp tortillas every bit as good as those that are fried, but is healthier, I’m sticking with that. However, it’s not uncommon that I’ll use the crumbs at the bottom of the tortilla chip bag either, when they’re too small to dip in salsa but there’s too many to throw away.

migas 5

The other ingredients I consider crucial to migas are chiles and cheese. I use roasted and peeled Hatch green chiles, but any chile you like would be fine. I suspect that while beans are a common side, adding them to the migas themselves isn’t traditional, but the sweetness they add to the dish is too good to skip.

migas 2

In addition to these standards, I’ve also added chorizo (shown here), spaghetti squash, and random unlabeled spicy tomato stuff I found in the freezer (probably meant for this dish, but who can be sure). It’s not a dish that requires precision or even consistency. Every single time I’ve made it, it’s been different, but it always been delicious – and easy.

migas 6

One year ago: Greek Yogurt Dill Dip
Two years ago: Roasted Red Pepper Pasta Salad
Three years ago: White Cake (comparison of 3 recipes)
Four years ago: Danish Braids (for the Daring Bakers)

Printer Friendly Format
Migas (adapted from Homesick Texan)

4 servings

When I add chorizo, I brown it before adding the cooking the onion, replacing the oil with the fat rendered from the sausage. When I’ve added pre-cooked leftover squash, I add it with the beans and tortillas.  I often add the salsa with the beans too, although the texture of the finished isn’t as firm as when it’s added as a garnish.

8 corn tortillas
8 eggs
salt
4 ounces chopped green chiles
1 tablespoon oil
1 onion, chopped
2 garlic cloves, minced
½ teaspoon ground cumin
1 (15-ounce) can black or pinto beans, drained and rinsed
2 ounces (½ cup) shredded cheddar, Monterey jack, or pepper jack
salsa
cilantro

1. Heat the oven to 425 degrees. Arrange an oven-safe cooling rack on a baking sheet. Light spray both sides of the tortillas with nonstick spray; lay them in a single layer on the cooling rack and bake, flipping once, for 12-16 minutes, until browned and crisp. Break into bite-sizes pieces.

2. In a medium bowl, beat the eggs, ¼ teaspoon salt, and green chiles with a whisk until large bubbles start to form around the edges of the bowl.

3. In a large nonstick skillet, heat the oil over medium heat. Add the onions and a pinch of salt; sauté, stirring occasionally, until just browned around the edges, 5-8 minutes. Pour in the egg mixture and cook without stirring for about a minute, then drag a spatula through the eggs a few times to lightly stir them. Let the eggs set for approximately 30 seconds, then stir again. Add the tortilla pieces, beans, and cheese. Cook and stir the eggs until set. Serve immediately, topping each portion with salsa and cilantro.

migas 7